javaConfig&springBoot入门
javaConfig&springBoot入门
1. javaConfig基础
1.1 为什么要学习javaConfig
因为:Springboot原理基于它的!!!(为学习springBoot打下基础)
1.2 Java 的 bean 配置(JavaConfig)出现历史
spring1.x:xml配置
spring2.x:注解配置(打注解,扫描注解)
spring3.x-4.x javaconfig&springboot
Spring5.x
2. JavaConfig操作
2.1 spring测试方式
方式一:new ClassPathXmlApplicationContext
/**

 * 方式一:直接new

 * @throws Exception

 */

@Test

public void test1() throws Exception {

    ApplicationContext context = new ClassPathXmlApplicationContext("applicationContext-xml.xml");

    String[] beanDefinitionNames = context.getBeanDefinitionNames();

    for (String beanDefinitionName : beanDefinitionNames) {

        System.out.println(beanDefinitionName);

    }

}
直接new
方式二:注入:Runwith ContextConfigration
/**

 * 方式二:注解方式 springtest注入

 * @author Lenovo

 */

@RunWith(SpringJUnit4ClassRunner.class)

@ContextConfiguration("classpath:applicationContext-xml.xml")

public class SpringTestTest {

    @Autowired

    private ApplicationContext applicationContext;

    @Test

    public void test2() throws Exception {

        for (String beanDefinitionName : applicationContext.getBeanDefinitionNames()) {

            System.out.println(beanDefinitionName);

        }

    }

}
注解方式
2.2 xml配置
<bean id="myDate" class="java.util.Date">
2.3 注解配置
1. 打注解
2. 扫描包
<context:component-scan base-package=”包的全限定名”/>
2.4 javaconfig配置
基本:
配置类:@Configration 代替了xml配置文件
@Bean 代替了<bean>
/**

 * @Configuration 加上此注解就相当于一个spring配置文件(applicationContext.xml)

 * @author Lenovo

 */

@Configuration

public class IocConfig {

    /**

     * @Bean 就相当于创建了一个bean

     * 等同于 <bean id="myBean" class="....MyBean"/>

     * @return

     */

    @Bean

    public MyBean myBean() {

        return new MyBean();

    }

}
基本的配置类
扫描包:
bean扫描(@ComponentScan/ComponentScans)
/**

 * 注解方式配置bean

 * 1.打注解

 * 2.扫描包

 *

 * @author Lenovo

 */

@Configuration

/**扫描父类包

    @ComponentScan("cn.itsource._05componentScan")

*/

/**扫描多个包的方式

@ComponentScans(value = {

        @ComponentScan("cn.itsource._05componentScan.controller"),

        @ComponentScan("cn.itsource._05componentScan.service")

})*/

//排除指定注解或者包含指定注解的bean

@ComponentScans(value = {

        /*@ComponentScan(value = "cn.itsource._05componentScan", excludeFilters = {

                //排除指定的注解

                @ComponentScan.Filter(type = FilterType.ANNOTATION, classes = {Controller.class})

        })*/

        //包含指定的注解

        @ComponentScan(value = "cn.itsource._05componentScan", includeFilters = {

                @ComponentScan.Filter(type = FilterType.ANNOTATION, classes = {Service.class})

        }, useDefaultFilters = false )//关闭默认全部扫描includeFilters才生效)

})

public class IocConfig {

}
ComponentScan扫描包
Bean详情:
//给value给bean取名如果没有设置默认就是方法名

@Bean(value = "myBean")

//singleton:单例  prototype:多例

@Scope(value = "singleton")

//懒加载(只对单例模式有用) 你用的时候才给你加载

@Lazy
bean详情
@Condition按条件注入:
1.条件类创建(实现Condition接口)
/**

 * windows操作系统才能获取bean

 * @author Lenovo

 */

public class WindowsCondition implements Condition {

    @Override

    public boolean matches(ConditionContext conditionContext, AnnotatedTypeMetadata annotatedTypeMetadata) {

        //获取类加载器

        ClassLoader classLoader = conditionContext.getClassLoader();

        //获取spring容器

        ConfigurableListableBeanFactory beanFactory = conditionContext.getBeanFactory();

        //获取注册器

        BeanDefinitionRegistry registry = conditionContext.getRegistry();

        //获取本机环境

        Environment environment = conditionContext.getEnvironment();

        String osName = environment.getProperty("os.name");

        System.out.println("Windows:" + osName);

        return osName.contains("Windows");

    }

}
2.@Condition添加到类或者方法上面
@Bean

@Conditional(value = WindowsCondition.class)

public MyBean myBeanWindows() {

    return new MyBean();

}
@Import导入bean:
创建bean的方式
方式1:@ComponentScan+注解(@Controller+@Service+@Repository+@Compont)-自己创建的bean
方式2:@Bean 别人的bean
方式3:@Import(快速向容器中注册一个bean)
1)@Import(要导入的组件),名称就是累的全限定名
2)ImportSelector:导入选择器,返回需要导入组件类的全限定名数组-springboot底层用的多
/**

 * 选择器,

 * @author Lenovo

 */

public class MyImportSelector implements ImportSelector {

    /**

     * 你要注册类全限定名数组

     * @param annotationMetadata

     * @return

     */

    @Override

    public String[] selectImports(AnnotationMetadata annotationMetadata) {

        //可以做逻辑判断

        return new String[]{"cn.itsource._08import_.PurpleColor", "cn.itsource._08import_.GrayColor"};

    }

}
importSelector选择器
3)ImportBeanDefinitionRegistrar:通过bean定义注册器手动项目spring中容器中注册
/**

 * 通过bean定义注册器手动项目spring中容器中注册

 * @author Lenovo

 */

public class MyImportBeanDefinitionRegistrar implements ImportBeanDefinitionRegistrar {

    @Override

    public void registerBeanDefinitions(AnnotationMetadata annotationMetadata,

                                        BeanDefinitionRegistry beanDefinitionRegistry) {

        beanDefinitionRegistry.registerBeanDefinition("redColor", new RootBeanDefinition(RedColor.class));

    }

}
ImportBeanDefinitionRegistar注册bean
@Import(value = {GreenColor.class, YellowColor.class, MyImportSelector.class, MyImportBeanDefinitionRegistrar.class})
方式4:FactoryBean的方式,返回的是getObject的类实例-和其他框架集成是用的多
public class PersonFactoryBean implements FactoryBean<Person> {

    @Override

    public Person getObject() throws Exception {

        return new Person();

    }

    @Override

    public Class<?> getObjectType() {

        return Person.class;

    }

    @Override

    public boolean isSingleton() {

        return true;

    }

}
factoryBean创建bean
3. springBoot入门
3.1 步骤
一 创建项目
parent
dependency
<parent>

    <groupId>org.springframework.boot</groupId>

    <artifactId>spring-boot-starter-parent</artifactId>

    <version>2.0.5.RELEASE</version>

  </parent>

<dependencies>

        <dependency>

            <groupId>org.springframework.boot</groupId>

            <artifactId>spring-boot-starter-web</artifactId>

        </dependency>

</dependencies>
二 创建springboot项目并且启动
1)任意类加上@SpringBootApplication
2)Main函数启动springboot的应用
@SpringBootApplication

public class App {

    public static void main(String[] args) {

        SpringApplication.run(App.class, args);

    }

}
三 写一个Contorller来测试
HelloConroller
@Controller

public class HelloController {

    @RequestMapping("/hello")

    @ResponseBody

    public String hello() {

        return "hello springBoot!";

    }

}
四 访问页面
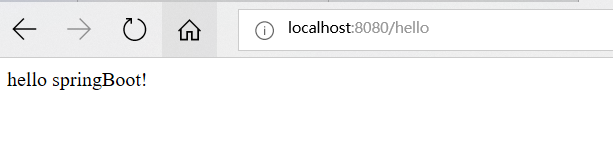
3.2 打包
1.导入插件
 <build>

        <plugins>

            <plugin>

                <groupId>org.springframework.boot</groupId>

                <artifactId>spring-boot-maven-plugin</artifactId>

                <configuration>

                    <mainClass>配置类全限定名</mainClass>

                </configuration>

                <executions>

                    <execution>

                        <goals>

                            <goal>repackage</goal>

                        </goals>

                    </execution>

                </executions>

            </plugin>

        </plugins>

</build>
2.打包
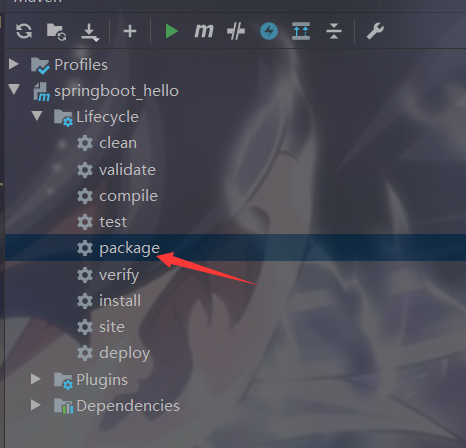
3. 运行
窗口运行:java -jar xxx.jar
后台运行: nohup java -jar XXX.jar & 只linux
javaConfig&springBoot入门的更多相关文章
- SpringBoot入门(三)——入口类解析
本文来自网易云社区 上一篇介绍了起步依赖,这篇我们先来看下SpringBoot项目是如何启动的. 入口类 再次观察工程的Maven配置文件,可以看到工程的默认打包方式是jar格式的. <pack ...
- SpringBoot入门教程(二)CentOS部署SpringBoot项目从0到1
在之前的博文<详解intellij idea搭建SpringBoot>介绍了idea搭建SpringBoot的详细过程, 并在<CentOS安装Tomcat>中介绍了Tomca ...
- SpringBoot入门基础
目录 SpringBoot入门 (一) HelloWorld. 2 一 什么是springboot 1 二 入门实例... 1 SpringBoot入门 (二) 属性文件读取... 16 一 自定义属 ...
- SpringBoot入门示例
SpringBoot入门Demo SpringBoot可以说是Spring的简化版.配置简单.使用方便.主要有以下几种特点: 创建独立的Spring应用程序 嵌入的Tomcat,无需部署WAR文件 简 ...
- Spring全家桶系列–[SpringBoot入门到跑路]
//本文作者:cuifuan Spring全家桶————[SpringBoot入门到跑路] 对于之前的Spring框架的使用,各种配置文件XML.properties一旦出错之后错误难寻,这也是为什么 ...
- springboot入门之一:环境搭建(续)
在上篇博客中从springboot的入门到运行一个springboot项目进行了简单讲述,详情请查看“springboot入门之一”.下面继续对springboot做讲述. 开发springboot测 ...
- 【Java】SpringBoot入门学习及基本使用
SpringBoot入门及基本使用 SpringBoot的介绍我就不多说了,核心的就是"约定大于配置",接下来直接上干货吧! 本文的实例: github-LPCloud,欢迎sta ...
- SpringBoot入门(五)——自定义配置
本文来自网易云社区 大部分比萨店也提供某种形式的自动配置.你可以点荤比萨.素比萨.香辣意大利比萨,或者是自动配置比萨中的极品--至尊比萨.在下单时,你并没有指定具体的辅料,你所点的比萨种类决定了所用的 ...
- SpringBoot入门(四)——自动配置
本文来自网易云社区 SpringBoot之所以能够快速构建项目,得益于它的2个新特性,一个是起步依赖前面已经介绍过,另外一个则是自动配置.起步依赖用于降低项目依赖的复杂度,自动配置负责减少人工配置的工 ...
随机推荐
- robotframework从列表中循环读取数据,传入关键字执行
场景预设:从列表内读取手机号,自动化执行微信加好友,直至选择完所有数据后,脚本停止执行 1.建一个备选数据表,表内列待添加的手机号数据 2.脚本的主要流程新加好友-输入手机号-添加好友-判断好友是否存 ...
- 移动端ui框架
https://blog.csdn.net/Robin_star_/article/details/81810197
- Python3基础之正则表达式
正则表达式 在线测试工具 http://tool.chinaz.com/regex/ 同一个位置上可以出现的字符的范围. 字符组 : [字符组] 在同一个位置可能出现的各种字符组成了一个字符组,在正则 ...
- mysql--->mysql的事务和锁
mysql 事务和锁 什么是事务?及其特性? 答:事务:是一系列的数据库操作,是数据库应用的基本逻辑单位. 或者这样理解: 事务就是被绑定在一起作为一个逻辑工作单元的SQL语句分组,如果任何一个语句操 ...
- springBoot 启动没有数据库配置报错
在没有配置数据库的时候, 直接启动springBoot 项目 会有报错 Description: Failed to configure a DataSource: 'url' attribute i ...
- string method 字符串常用方法讲解
st = 'hello ketty ##$ \*'print(st.count('t'))# 输出‘t’的个数print(st.capitalize()) #Hello ketty 将首字母大写pri ...
- [GPU高性能编程CUDA实战].(桑德斯).聂雪军等.扫描版-百度云分享
链接:https://pan.baidu.com/s/1NkkDiyRgmfmhm9d2g_GBKQ 提取码:3usj
- 如何优雅地打印一个Java对象?
你好呀,我是沉默王二,一个和黄家驹一样身高,和刘德华一样颜值的程序员.虽然已经写了十多年的 Java 代码,但仍然觉得自己是个菜鸟(请允许我惭愧一下). 在一个月黑风高的夜晚,我思前想后,觉得再也不能 ...
- 编译出适合自己的nginx
上面是解压后的nginx源码 auto目录 上面的cc目录用于编译,lib库 os目录对系统进行判断,其他所有文件都是辅助conf脚本执行 判定nginx支持哪些模块,当前操作系统有哪些特性. CHA ...
- Codeforces 1296F Berland Beauty
题目链接:http://codeforces.com/problemset/problem/1296/F 思路: 1————2————3————4————5————6 1->3 2 2-> ...