使用 postman 给 API 写测试
使用 postman 给 API 写测试
Intro
上次我们简单介绍了 使用 postman 测试 API,这次主要来写一些测试用例以检查请求的响应是否符合我们的预期以及如何使用脚本测试
使用 postman 内置的随机变量
postman 内置的有一些产生随机值的变量,在发送请求时随机生成,这样我们可以在请求中随机生成一些用户名,邮箱,公司名称等等,
支持的变量如下,官方文档:https://learning.getpostman.com/docs/postman/variables-and-environments/variables-list/
- {{$randomZipCode}}
- {{$randomCity}}
- {{$randomCityPrefix}}
- {{$randomCitySuffix}}
- {{$randomStreetName}}
- {{$randomStreetAddress}}
- {{$randomStreetSuffix}}
- {{$randomStreetPrefix}}
- {{$randomSecondaryAddress}}
- {{$randomCountry}}
- {{$randomCountryCode}}
- {{$randomState}}
- {{$randomStateAbbr}}
- {{$randomLatitude}}
- {{$randomLongitude}}
- {{$randomColor}}
- {{$randomDepartment}}
- {{$randomProductName}}
- {{$randomPrice}}
- {{$randomProductAdjective}}
- {{$randomProductMaterial}}
- {{$randomProduct}}
- {{$randomCompanyName}}
- {{$randomCompanySuffix}}
- {{$randomCatchPhrase}}
- {{$randomBs}}
- {{$randomCatchPhraseAdjective}}
- {{$randomCatchPhraseDescriptor}}
- {{$randomCatchPhraseNoun}}
- {{$randomBsAdjective}}
- {{$randomBsBuzz}}
- {{$randomBsNoun}}
- {{$randomDatabaseColumn}}
- {{$randomDatabaseType}}
- {{$randomDatabaseCollation}}
- {{$randomDatabaseEngine}}
- {{$randomDatePast}}
- {{$randomDateFuture}}
- {{$randomDateBetween}}
- {{$randomDateRecent}}
- {{$randomMonth}}
- {{$randomWeekday}}
- {{$randomBankAccount}}
- {{$randomBankAccountName}}
- {{$randomCreditCardMask}}
- {{$randomCurrencyAmount}}
- {{$randomTransactionType}}
- {{$randomCurrencyCode}}
- {{$randomCurrencyName}}
- {{$randomCurrencySymbol}}
- {{$randomBitcoin}}
- {{$randomBankAccountIban}}
- {{$randomBankAccountBic}}
- {{$randomAbbreviation}}
- {{$randomAdjective}}
- {{$randomNoun}}
- {{$randomVerb}}
- {{$randomIngverb}}
- {{$randomPhrase}}
- {{$randomImage}}
- {{$randomAvatarImage}}
- {{$randomImageUrl}}
- {{$randomAbstractImage}}
- {{$randomAnimalsImage}}
- {{$randomBusinessImage}}
- {{$randomCatsImage}}
- {{$randomCityImage}}
- {{$randomFoodImage}}
- {{$randomNightlifeImage}}
- {{$randomFashionImage}}
- {{$randomPeopleImage}}
- {{$randomNatureImage}}
- {{$randomSportsImage}}
- {{$randomTechnicsImage}}
- {{$randomTransportImage}}
- {{$randomImageDataUri}}
- {{$randomEmail}}
- {{$randomExampleEmail}}
- {{$randomUserName}}
- {{$randomProtocol}}
- {{$randomUrl}}
- {{$randomDomainName}}
- {{$randomDomainSuffix}}
- {{$randomDomainWord}}
- {{$randomIP}}
- {{$randomIPV6}}
- {{$randomUserAgent}}
- {{$randomHexColor}}
- {{$randomMACAddress}}
- {{$randomPassword}}
- {{$randomLoremWord}}
- {{$randomLoremWords}}
- {{$randomLoremSentence}}
- {{$randomLoremSlug}}
- {{$randomLoremSentences}}
- {{$randomLoremParagraph}}
- {{$randomLoremParagraphs}}
- {{$randomLoremText}}
- {{$randomLoremLines}}
- {{$randomFirstName}}
- {{$randomLastName}}
- {{$randomFullName}}
- {{$randomJobTitle}}
- {{$randomNamePrefix}}
- {{$randomNameSuffix}}
- {{$randomNameTitle}}
- {{$randomJobDescriptor}}
- {{$randomJobArea}}
- {{$randomJobType}}
- {{$randomPhoneNumber}}
- {{$randomPhoneNumberFormat}}
- {{$randomPhoneFormats}}
- {{$randomArrayElement}}
- {{$randomObjectElement}}
- {{$randomUUID}}
- {{$randomBoolean}}
- {{$randomWord}}
- {{$randomWords}}
- {{$randomLocale}}
- {{$randomAlphaNumeric}}
- {{$randomFileName}}
- {{$randomCommonFileName}}
- {{$randomMimeType}}
- {{$randomCommonFileType}}
- {{$randomCommonFileExt}}
- {{$randomFileType}}
- {{$randomFileExt}}
- {{$randomDirectoryPath}}
- {{$randomFilePath}}
- {{$randomSemver}}
还是比较偏英文化,对于中文可能并不太友好,下面来演示一个使用示例:
在请求中使用上面这些变量

监控发送的 HTTP 请求
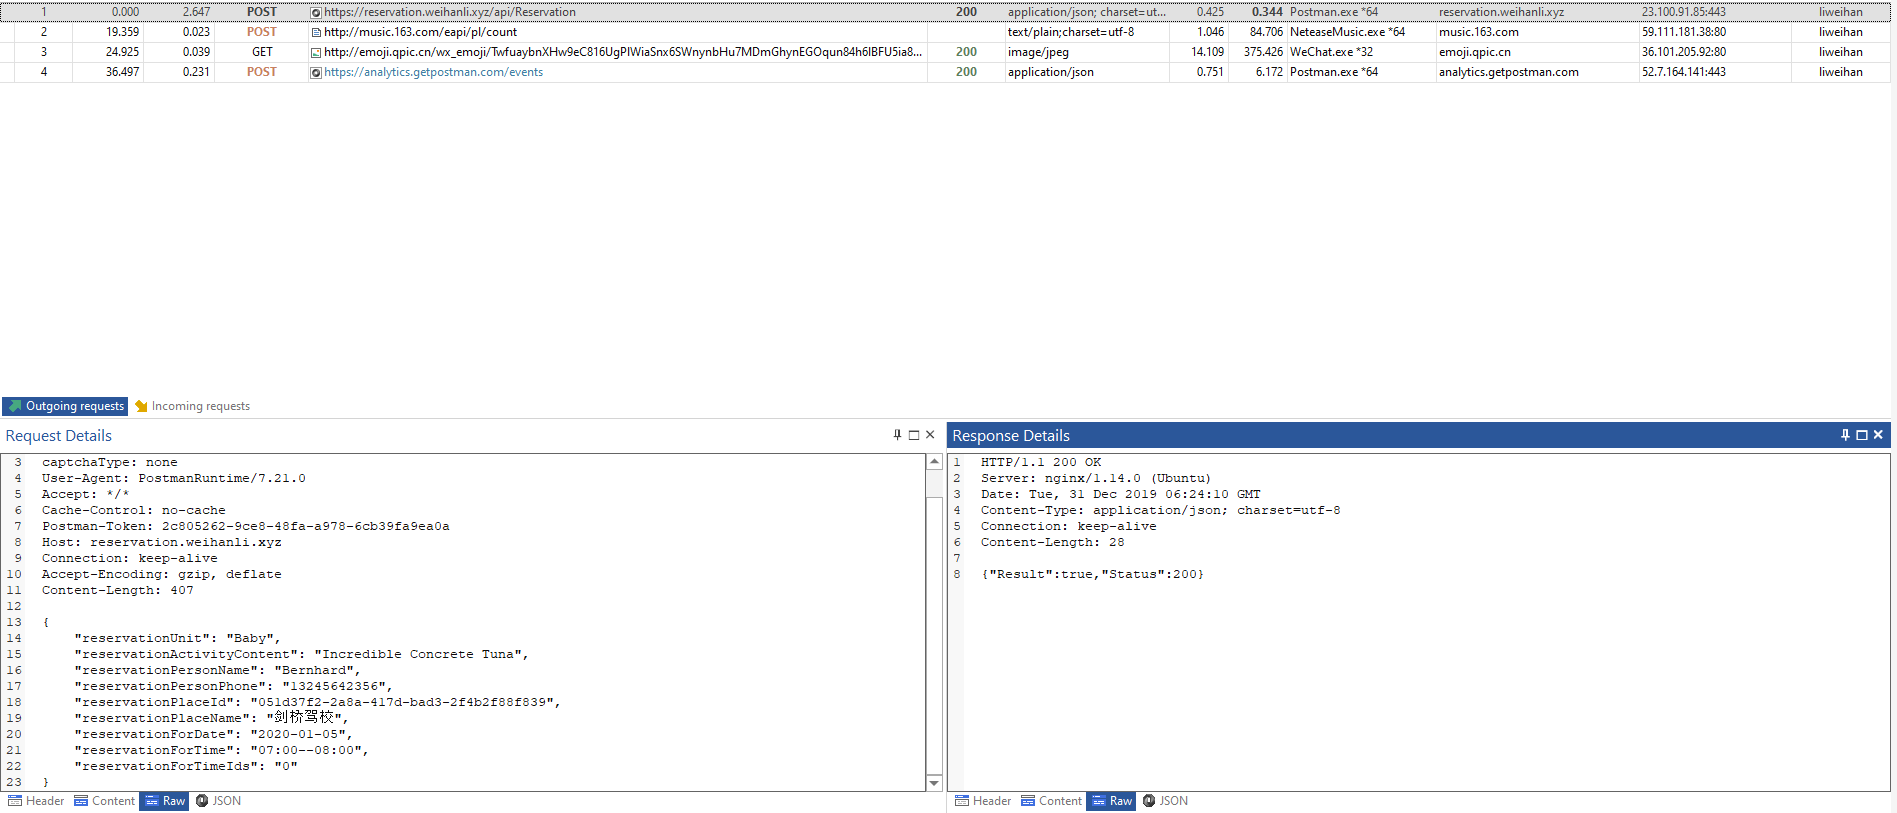
从上图中可以看到,我们使用到的随机变量在发送请求的时候是已经替换成具体的值的了
编写测试用例
Scripts 介绍
postman 有一套基于 nodejs 的运行时,我们可以写一些 scripts 来在请求发送之前做一些日志等,在得到响应之后测试响应是否与预期一致
postman 的 script 主要分成两类,一类是 Pre-Request Scripts,在发送请求之前执行,一类是 Tests,个人感觉可能叫 Post-Response Scripts 更好一些,因为我们不仅仅可以写测试,也可以记录日志,也可以设置变量等
上次我们说过了 postman 的测试推荐使用 Collection ,Collection 下可以分目录也可以直接就是 request,目录里也可以有具体的 api request,还可以有子目录
Collection/Folder/Request 都可以定义自己的 Pre-Request Scripts 和 Tests,这些 Scripts 执行顺序如下:

上一级的测试作用于子级所有的请求,也就是说我们可以在 Collection 的 Test Scripts 中定义一个测试用例,这会对这个 Collection 下的所有请求都有效,都会验证这个测试是否有效
如果想要实现测试用例的复用可以将类似的请求放在一个目录下针对目录写测试用例,这样这个目录下的请求都会有这个测试用例
如果只是想针对某一个请求的测试,可以针对 request 来写,只在对应 request 的 Test Scripts 中定义即可
Scripts 常用语法
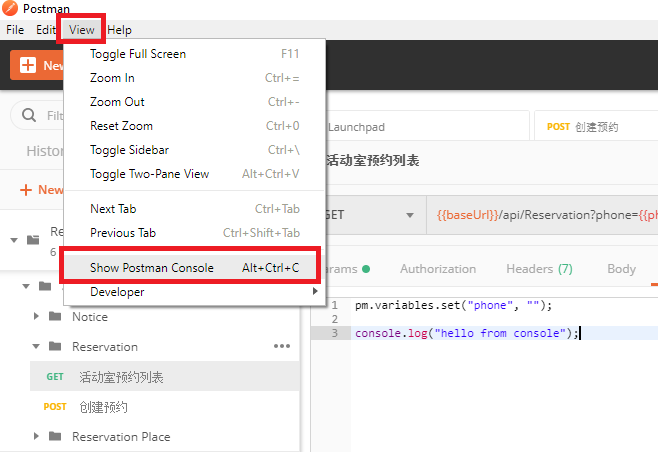
Postman Console
postman 是基于 nodejs 的,你可以直接使用 console.log 来记录一些日志,通过 postman console 来查看,在左上角的菜单 View 下有一个 Show Postman Console
我们在请求的 Pre-Scripts 里输出一条日志,然后发送请求
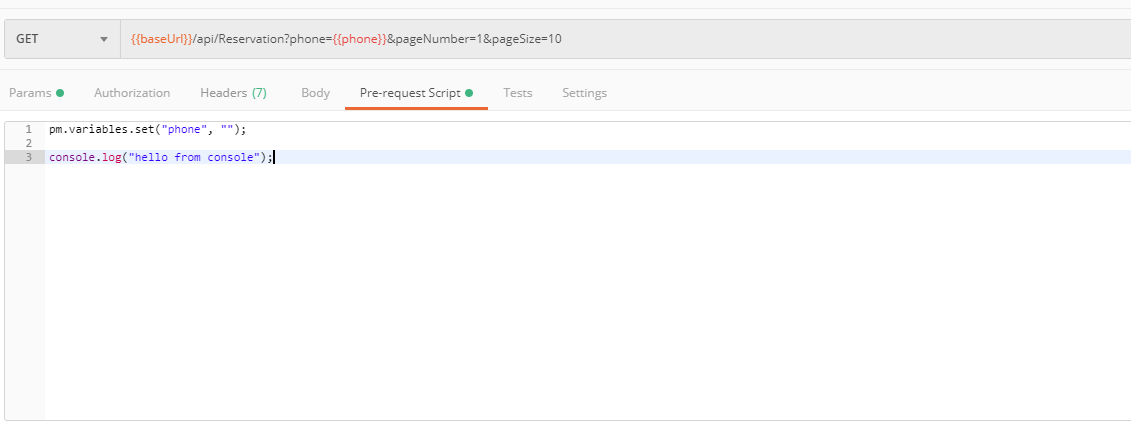
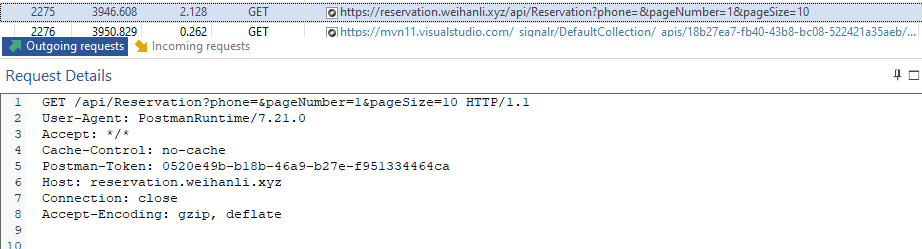
这里的 pm.variables.set("phone","") 是设置 phone 这一参数为空字符串,由下图可以看出,phone 这一变量在发送请求的时候会被替换成空字符串
查看 postman console
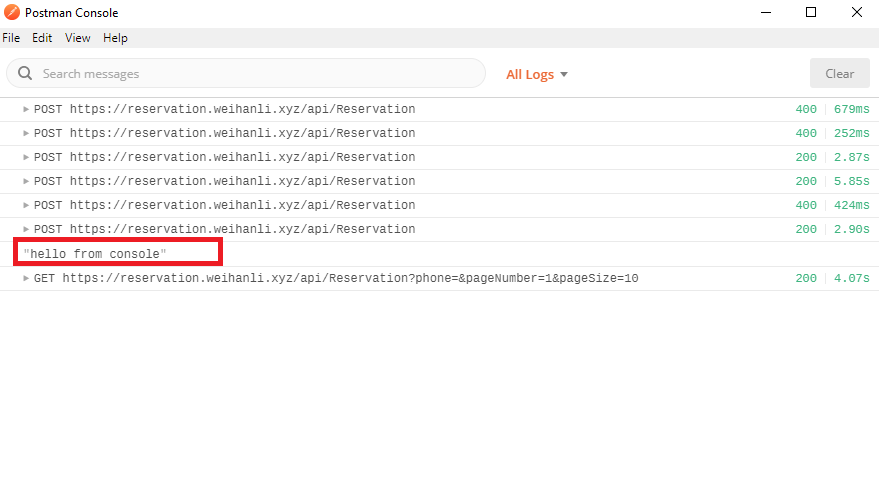
可以看到我们在上面输出的日志已经输出到 postman console 了
变量设置
postman 支持的变量分几个层级,
- global
- environment
- collection
- data(数据文件中的变量值)
- local
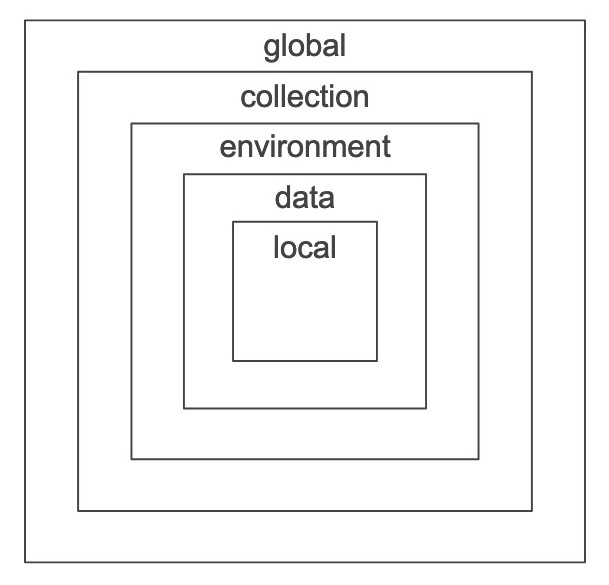
变量优化级:
上面的类型优先级从低到高,“就近原则”
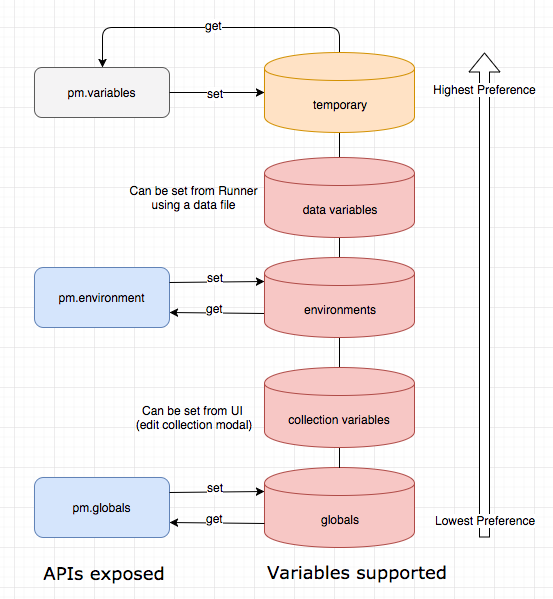
// Variables

// This function searches for the variable across globals and the active environment.

var value = pm.variables.get("variable_key"); // 这个方法会从上面所有的来源寻找对应的变量,就近原则,优先从最靠近自己的地方找

// Globals

// Set a global variable,设置一个全局变量

pm.globals.set("variable_key", "variable_value");

// Get a global variable,从全局变量中获取某个变量的值

pm.globals.get("variable_key");

// Clear a global variable,取消设置全局变量,移除变量

pm.globals.unset("variable_key");

// Environments

// Setting an environment variable, 设置一个环境变量(注,这是postman 中的 <Environment> 环境变量,不同于系统环境变量)

pm.environment.set("variable_key", "variable_value");

// 你也可以序列化一个对象或数组放在变量中

// Setting a nested object as an environment variable

// var array = [1, 2, 3, 4];

// pm.environment.set("array", JSON.stringify(array, null, 2));

// var obj = { a: [1, 2, 3, 4], b: { c: 'val' } };

// pm.environment.set("obj", JSON.stringify(obj));

// Getting an environment variable,从环境中获取某个变量

var value = pm.environment.get("variable_key");

// If the value is a stringified JSON:

// These statements should be wrapped in a try-catch block if the data is coming from an unknown source.

var array = JSON.parse(pm.environment.get("array"));

var obj = JSON.parse(pm.environment.get("obj"));

// // Clear an environment variable, 从环境中移除某一个变量

// pm.environment.unset("variable_key");

// Collection

// Setting an collection variable,设置一个 collection 变量

pm.collectionVariables.set("variable_key", "variableValue");

// Get a collection variable,从 collection 中获取一个变量

var val = pm.collectionVariables.get("variable_key");

// Clear a collection variable,从 collection 中移除一个变量

pm.collectionVariables.unset("variable_key");

// local

pm.variables.set("variable_key", "variable_value");

pm.variables.get("variable_key");
使用变量,如 username => {{username}},使用两层大括号来表示变量引用,比如上面的测试中的 phone
测试用例
postman 的测试用例也是分层级的,上面已经做了简单的介绍,postman 是基于 nodejs 的所以,在nodejs 里可以用的语法大多也都支持,比如 JSON.parse,这里主要介绍几种常用的方法:
// 检查 response 的 statusCode 是 200

pm.test("response is ok", function () {

    pm.response.to.have.status(200);

});

// 检查响应是 200,并且有 body,body 是一个 json

pm.test("response must be valid and has a json body", function () {

     // assert that the status code is 200

     pm.response.to.be.ok; // info, success, redirection, clientError,  serverError, are other variants

     // assert that the response has a valid JSON body

     pm.response.to.be.withBody;

     pm.response.to.be.json; // this assertion also checks if a body  exists, so the above check is not needed

});

// 定义一个超时时间,检查响应时间是否超时

let responseTimeout = parseInt(pm.variables.get("responseTimeout"));

if(responseTimeout > 0){

    pm.test(`Response time is less than ${responseTimeout}ms`, function () {

        pm.expect(pm.response.responseTime).to.be.below(responseTimeout);

    });

}

// Convert XML body to a JSON object,使用postman 内置的 xml2Json 将 xml 转换为 json 对象

var jsonObject = xml2Json(responseBody);

//Check for a JSON value

// 检查 json 对象中某一个值是否符合预期

pm.test("Your test name", function () {

    var jsonData = pm.response.json();

    pm.expect(jsonData.value).to.eql(100);

});

// 检查数组是否为空

pm.test("Check if array is empty", function () {

 expect([]).to.be.empty;

});

// 检查字符串是否为空

pm.test("Check if string is empty", function () {

 pm.expect('').to.be.empty;

});
运行测试:
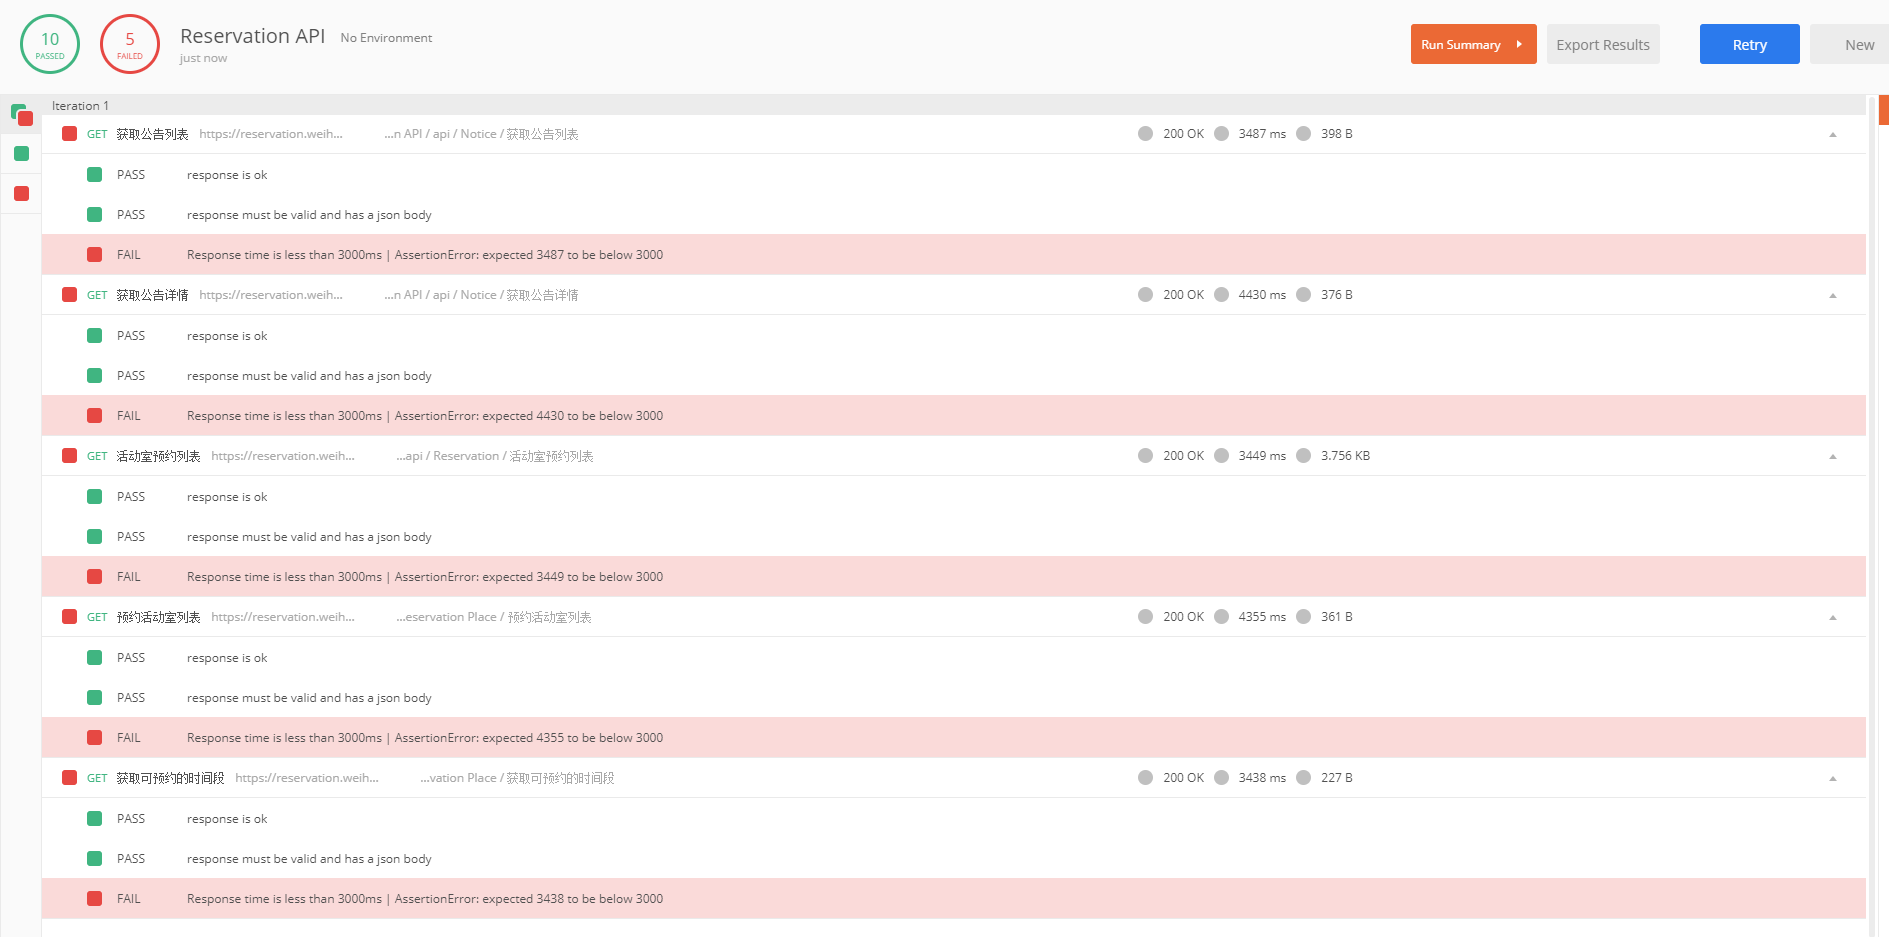
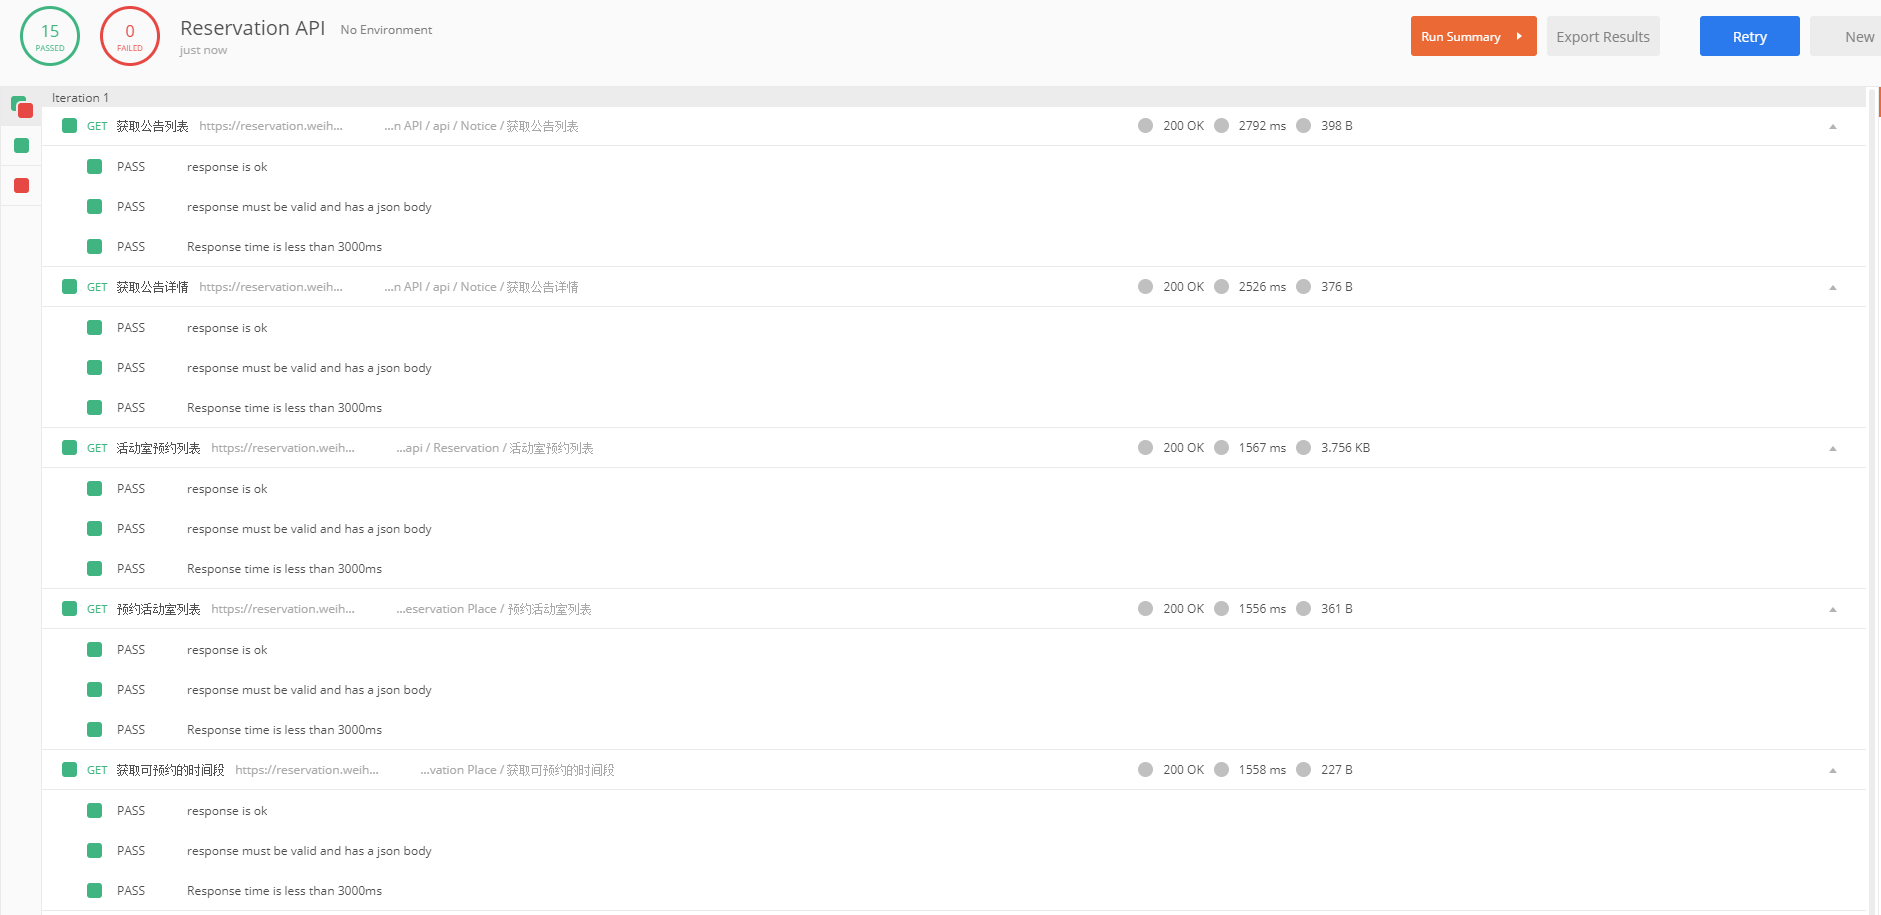
测试结果会显示出多个测试通过,多少失败的,哪些 assertion 失败,你也可以看到具体的响应信息
使用命令行测试
postman 提供了一个 npm 包 newman,我们可以直接命令行运行测试,也可以在自己的程序里集成 npm 包,在程序里运行
npm install -g newman
使用导出 Collection, 导出之后是一个 json 文件
newman run testCollection.json // 运行 testCollection 测试

newman run testCollection.json -d testData.json // -d 指定数据文件

newman run testCollection.json -d testData.json -r json // -d 指定数据文件,-r 指定 report 类型,默认是 `cli` 直接在命令行中输出测试结果

newman run testCollection.json -r cli,json // -d 指定数据文件,-r 指定 report 类型,默认是 `cli` 直接在命令行中输出测试结果,可以指定多个 reporter,json 会将运行结果保存到 json 文件中

// collection 路径不仅支持本地路径,也支持 url

newman run https://www.getpostman.com/collections/631643-f695cab7-6878-eb55-7943-ad88e1ccfd65-JsLv
示例:

在自己的程序中使用 newman 运行测试
const newman = require('newman'); // require newman in your project

// call newman.run to pass `options` object and wait for callback

newman.run({

    collection: require('./sample-collection.json'),

    reporters: 'cli'

}, function (err) {

	if (err) { throw err; }

    console.log('collection run complete!');

});
更多用法参考官方文档:https://github.com/postmanlabs/newman#using-newman-cli
Reference
- https://learning.getpostman.com/docs/postman/variables-and-environments/variables-list/
- https://learning.getpostman.com/docs/postman/scripts/intro-to-scripts/
- https://learning.getpostman.com/docs/postman/scripts/test-examples/
- https://github.com/postmanlabs/newman
使用 postman 给 API 写测试的更多相关文章
- 使用PostMan进行API自动化测试
最近在进行一个老项目的升级,第一步是先将node版本从4.x升级到8.x,担心升级会出现问题,所以需要将服务的接口进行验证:如果手动输入各种URL,人肉check,一个两个还行,整个服务..大几十个接 ...
- 基于postman的api自动化测试实践
测试的好处 每个人都同意测试很重要,但并不是所有人都会去做.每当你添加新的代码,测试可以保证你的api按照预期运行.通过postman,你可以为所有api编写和运行测试脚本. postman中的测试 ...
- 配置 influxDB 鉴权及 HTTP API 写数据的方法
本文简要描述如何为 InfluxDB 开启鉴权和配置用户管理权限(安装后默认不需要登录),以及开启鉴权后如何使用 HTTP API 写数据. 创建 InfluxDB 管理员账号创建 admin 帐号密 ...
- 自定义实现InputFormat、OutputFormat、输出到多个文件目录中去、hadoop1.x api写单词计数的例子、运行时接收命令行参数,代码例子
一:自定义实现InputFormat *数据源来自于内存 *1.InputFormat是用于处理各种数据源的,下面是实现InputFormat,数据源是来自于内存. *1.1 在程序的job.setI ...
- web api写api接口时返回
web api写api接口时默认返回的是把你的对象序列化后以XML形式返回,那么怎样才能让其返回为json呢,下面就介绍两种方法: 方法一:(改配置法) 找到Global.asax文件,在Applic ...
- 玩转Javascript 给JS写测试
给js写测试已经不是什么稀奇的事情了,最近项目里用了jasmine和JsTestDriver两种js测试框架.JsTestDriver易于与持续构建系统相集成并能够在多个浏览器上运行测试轻松实现TDD ...
- 无需编写代码,API业务流程测试,零代码实现
引言 除了测试单个接口,我们常常需要对多个有数据或者逻辑关联的接口进行业务流程测试,例如获取验证码-注册-登录.传统测试业务流程需要编写一系列测试代码,现在通过eoLinker全UI界面,无需编写任何 ...
- 使用 TypeScript & mocha & chai 写测试代码实战(17 个视频)
使用 TypeScript & mocha & chai 写测试代码实战(17 个视频) 使用 TypeScript & mocha & chai 写测试代码实战 #1 ...
- 基于语义感知SBST的API场景测试智能生成
摘要:面对庞大服务接口群,完备的接口测试覆盖和业务上下文场景测试看护才有可能保障产品服务的质量和可信.如果你想低成本实现产品和服务的测试高覆盖和高质量看护,这篇文章将为你提供你想要的. 本文分享自华为 ...
随机推荐
- Gym - 101617D_Jumping Haybales(BFS)
Sample Input 4 2 .### #... .#.. #.#. 3 1 .#. .#. .#. Sample Output 4 -1 题意:给一个n*n的图,每次最多能跳k个格子,只能向南( ...
- Java练习 SDUT-1255_小明A+B
小明A+B Time Limit: 1000 ms Memory Limit: 65536 KiB Problem Description 小明今年3岁了, 现在他已经能够认识100以内的非负整数, ...
- mysql查询包含逗号的数据,并逗号拆分为多行展现
在做系统开发的时候,有可能是由于之前的遗留问题,导致在数据入库的时候,将多个数据以逗号分隔的实行,存储在一条数据中,例如: ID VALUE 1 yang,zheng,song 2 zhao,qian ...
- thinkphp 清理runtime缓存的方法, 清理指定目录
https://blog.csdn.net/qq_22823581/article/details/79081497 hinkphp 清理runtime缓存的方法, 清理指定目录 function d ...
- 理解虚拟主机与VPS,云服务器CVM与云服务器ECS的区别
1.理解虚拟主机与VPS的区别:VPS与虚拟主机的区别 2.理解云服务器CVM与云服务器ECS的区别:云服务器CVM与云服务器ECS的区别 3.锐速安装一键包
- cp拷贝
1 cp 拷贝.复制 NAME cp - copy files and directories SYNOPSIS cp [OPTION]... [-T] SOURCE DEST -- c ...
- webpack学习(四)配置plugins
1 plugins是什么??? 如果学过vue和react肯定知道生命周期函数,而生命周期函数实际上就是当程序运行在某个时刻一定会发生的函数. plugins其实也是如此,我们在项目中配置相应的plu ...
- 【a403】遍历树问题
Time Limit: 1 second Memory Limit: 32 MB [问题描述] 我们都很熟悉二叉树的前序.中序.后序遍历,在数据结构中常提出这样的问题:已知一棵二叉树的前序和中序遍历, ...
- PC端页面如何调用QQ进行在线聊天?
pc端如何实现QQ在线咨询? html代码如下: <a href="tencent://message/?uin=1234567&Site=Sambow&Menu=ye ...
- Mac下SVN基本操作和常见错误
一.基本操作 1 从服务器上下载代码 svn checkout http://xxx.xxx.xxx/xxx 2 获取最新的代码 svn update 3 提交代码 svn commit -m ...