Android 手机卫士--导航界面3、4和功能列表界面跳转逻辑处理
刚刚花了一点时间,将导航界面3、4的布局和相应的跳转逻辑写了一下:
Setup3Activity代码如下:
/**

 * Created by wuyudong on 2016/10/10.

 */

public class Setup3Activity extends Activity{

    @Override

    protected void onCreate(Bundle savedInstanceState) {

        super.onCreate(savedInstanceState);

        setContentView(R.layout.activity_setup3);

    }

    public void nextPage(View view) {

        Intent intent = new Intent(getApplicationContext(), Setup4Activity.class);

        startActivity(intent);

        finish();

    }

    public void prePage(View view) {

        Intent intent = new Intent(getApplicationContext(), Setup2Activity.class);

        startActivity(intent);

        finish();

    }

}
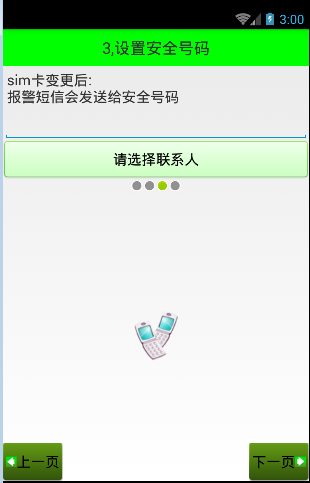
对应的布局文件activity_setup3.xml:
<?xml version="1.0" encoding="utf-8"?>

<LinearLayout xmlns:android="http://schemas.android.com/apk/res/android"

    android:layout_width="match_parent"

    android:layout_height="match_parent"

    android:orientation="vertical">

    <TextView

        style="@style/TitleStyle"

        android:text="3.设置安全号码" />

    <TextView

        android:layout_width="wrap_content"

        android:layout_height="wrap_content"

        android:textColor="#000"

        android:textSize="18sp"

        android:layout_margin="5dp"

        android:text="sim卡变更后\n就会发送报警短信安全号码" />

    <EditText

        android:layout_width="match_parent"

        android:layout_height="wrap_content"

        android:id="@+id/et_phone_number"

        android:hint="请输入电话号码"

        />

    <Button

        android:layout_width="match_parent"

        android:layout_height="wrap_content"

        android:id="@+id/bt_select_number"

        android:text="选择联系人"

        android:background="@drawable/selector_number_btn"

        />

    <!-- 让内部点的空间水平居中 -->

    <LinearLayout

        android:layout_width="match_parent"

        android:layout_height="wrap_content"

        android:gravity="center_horizontal">

        <ImageView

            android:layout_width="wrap_content"

            android:layout_height="wrap_content"

            android:background="@android:drawable/presence_invisible" />

        <ImageView

            android:layout_width="wrap_content"

            android:layout_height="wrap_content"

            android:background="@android:drawable/presence_invisible" />

        <ImageView

            android:layout_width="wrap_content"

            android:layout_height="wrap_content"

            android:background="@android:drawable/presence_online" />

        <ImageView

            android:layout_width="wrap_content"

            android:layout_height="wrap_content"

            android:background="@android:drawable/presence_invisible" />

    </LinearLayout>

    <RelativeLayout

        android:layout_width="match_parent"

        android:layout_height="match_parent">

        <!-- 图片选择器,在选中和未选中的过程中,切换展示图片 -->

        <Button style="@style/preBtn" />

        <Button style="@style/nextBtn" />

        <ImageView

            android:layout_width="wrap_content"

            android:layout_height="wrap_content"

            android:background="@drawable/phone"

            android:layout_centerVertical="true"

            android:layout_centerHorizontal="true" />

    </RelativeLayout>

</LinearLayout>
Setup4Activity代码如下:
/**

 * Created by wuyudong on 2016/10/10.

 */

public class Setup4Activity extends Activity{

    @Override

    protected void onCreate(Bundle savedInstanceState) {

        super.onCreate(savedInstanceState);

        setContentView(R.layout.activity_setup4);

    }

   public void nextPage(View view) {

        Intent intent = new Intent(getApplicationContext(), SetupOverActivity.class);

        startActivity(intent);

        finish();

        SpUtil.putBoolean(this, ConstantValue.SETUP_OVER, true);

    }

    public void prePage(View view) {

        Intent intent = new Intent(getApplicationContext(), Setup3Activity.class);

        startActivity(intent);

        finish();

    }

}
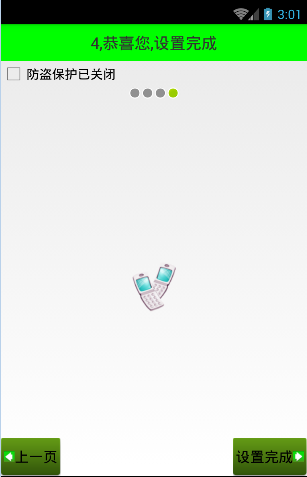
对应的布局文件activity_setup4.xml:
<?xml version="1.0" encoding="utf-8"?>

<LinearLayout xmlns:android="http://schemas.android.com/apk/res/android"

    android:layout_width="match_parent"

    android:layout_height="match_parent"

    android:orientation="vertical">

    <TextView

        style="@style/TitleStyle"

        android:text="4.恭喜您,设置完成" />

    <CheckBox

        android:layout_width="wrap_content"

        android:layout_height="wrap_content"

        android:text="防盗保护已关闭"

        />

    <!-- 让内部点的空间水平居中 -->

    <LinearLayout

        android:layout_width="match_parent"

        android:layout_height="wrap_content"

        android:gravity="center_horizontal">

        <ImageView

            android:layout_width="wrap_content"

            android:layout_height="wrap_content"

            android:background="@android:drawable/presence_invisible" />

        <ImageView

            android:layout_width="wrap_content"

            android:layout_height="wrap_content"

            android:background="@android:drawable/presence_invisible" />

        <ImageView

            android:layout_width="wrap_content"

            android:layout_height="wrap_content"

            android:background="@android:drawable/presence_invisible" />

        <ImageView

            android:layout_width="wrap_content"

            android:layout_height="wrap_content"

            android:background="@android:drawable/presence_online" />

    </LinearLayout>

    <RelativeLayout

        android:layout_width="match_parent"

        android:layout_height="match_parent">

        <ImageView

            android:layout_width="wrap_content"

            android:layout_height="wrap_content"

            android:layout_centerInParent="true"

            android:background="@drawable/phone" />

        <!-- 图片选择器,在选中和未选中的过程中,切换展示图片 -->

        <Button style="@style/preBtn" />

        <Button style="@style/nextBtn"

            android:text="设置完成"

            />

    </RelativeLayout>

</LinearLayout>
Android 手机卫士--导航界面3、4和功能列表界面跳转逻辑处理的更多相关文章
- Android 手机卫士--导航界面1的布局编写
本文地址:http://www.cnblogs.com/wuyudong/p/5943005.html,转载请注明出处. 本文实现导航界面1的布局的实现,效果如下图所示: 首先分析所使用的布局样式: ...
- Android 手机卫士--导航界面2
本文地址:http://www.cnblogs.com/wuyudong/p/5947504.html,转载请注明出处. 在之前的文章中,实现了导航界面1布局编写与相关的逻辑代码,如下图所示: 点击“ ...
- Android 手机卫士--导航界面4的业务逻辑
本文实现导航界面4的业务逻辑,导航界面4的界面如下: 本文地址:http://www.cnblogs.com/wuyudong/p/5952640.html,转载请注明出处. 相应的代码如下: pri ...
- Android 手机卫士--参照文档编写选择器
本文来实现<Android 手机卫士--导航界面1的布局编写>中的图片选择器部分的代码. 本文地址:http://www.cnblogs.com/wuyudong/p/5944356.ht ...
- Android 手机卫士--设置界面&功能列表界面跳转逻辑处理
在<Android 手机卫士--md5加密过程>中已经实现了加密类,这里接着实现手机防盗功能 本文地址:http://www.cnblogs.com/wuyudong/p/5941959. ...
- Android 手机卫士--确认密码对话框编写
本文接着实现“确认密码”功能,也即是用户以前设置过密码,现在只需要输入确认密码 本文地址:http://www.cnblogs.com/wuyudong/p/5940718.html,转载请注明出处. ...
- Android 手机卫士--签名文件说明&包名说明
在<Android 手机卫士--打包生成apk维护到服务器>一文中,实现了新版本的apk到服务器,当打开客户端apk的时候,发现有新版本,提示更新.还实现了利用xutils工具实现了从服务 ...
- Android 手机卫士--弹出对话框
在<Android 手机卫士--解析json与消息机制发送不同类型消息>一文中,消息机制发送不同类型的信息还没有完全实现,在出现异常的时候,应该弹出吐司提示异常,代码如下: private ...
- android手机卫士、3D指南针、动画精选、仿bilibli客户端、身份证银行卡识别等源码
Android精选源码 android身份证.银行卡号扫描源码 android仿bilibili客户端 android一款3D 指南针 源码 android手机卫士app源码 android提醒应用, ...
随机推荐
- C#迪杰斯特拉算法
C#迪杰斯特拉算法 网上有许多版本的,自己还是写一个理解点 Dijkstra.cs public class Dijkstra { private List<Node> _nodes; p ...
- Xamarin.Android之ActionBar与菜单
一.选项卡 如今很多应用都会使用碎片以便在同一个活动中能够显示多个不同的视图.在Android 3.0 以上的版本中,我们已经可以使用ActionBar提供的Tab来实现这种效果,而不需要我们自己去实 ...
- embedding mono实战笔录(一)
最近在给自己的服务器节点添加脚本功能,考虑到 执行性能.开发效率.调试效率.可维护性.严谨性 五大要素,最终选用C#作为脚本语言,并使用mono作为中间层,使其具备跨平台特性,以备具有在Windows ...
- AngularJS 第三天----作用域
作用域的概念及其功能 AngularJS使用作用域的概念来充当数据模型的作用,在视图和控制器之间起着桥梁的作用.由于双向绑定的数据特性,视图的修改会更新 $scope,同样对 $scope的修改也会重 ...
- .net垃圾回收机制编程调试试验
1. 什么是CLR GC? 它是一个基于引用跟踪和代的垃圾回收器. 从本质上,它为系统中所有活跃对象都实现了一种引用跟踪模式,如果一个对象没有任何引用指向它,那么这个对象就被认为是垃圾对象,并且可以被 ...
- 不要听吹牛逼什么前端MVVM框架就是好,其实都是一帮没学好分层设计的搞出来的,让你彻底看清前端MVVM的本质
最近前端圈子里面,发现大家都在热炒概念,什么knockout,angularJs,都被捧成神了,鄙人不才,最近心情也不好,特地写这篇文章来找骂 写代码的码农都知道,Java社区虽然不是一个提出分层思想 ...
- LeetCode-2AddTwoNumbers(C#)
# 题目 2. Add Two Numbers You are given two linked lists representing two non-negative numbers. The di ...
- Android开发学习之路-EventBus使用
EventBus是一个通过发布.订阅事件实现组件间消息传递的工具. 它存在的目的,就是为了优化组件之间传递消息的过程.传统组件之间传递消息的方法有使用广播,回调等,而这些方法使用都比较复杂. 工作原理 ...
- C# 深拷贝的具体代码的封装与调用
先封装下实现方法: public class DeepClone { public static object CopyObject(Object obj) { if (obj == null) { ...
- 关于SVG的viewBox
在SVG中,通过svg标记的 width和height可以规定这段SVG代码所表达的数据在绘制时所占用的空间大小 如下代码svg设置了宽度与高度,rect同样,所以结果自然是全屏 <svg wi ...