SSM框架入门——整合SSM并实现对数据的增删改查功能(Eclipse平台)
一、搭建框架环境
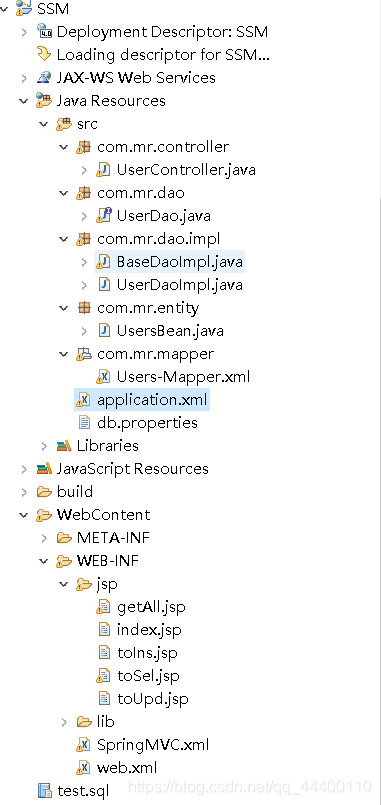
整个项目结构如下:

搭建SSM步骤如下:
(1)准备好三大框架的jar包,如图所示

(2)在Eclipse中创建一个web project ,并把这些jar包粘贴到lib文件夹中。
(3)在src文件夹下自己创建一个连接数据库的文件,命名为db.properties,如图1-2所示

接着在db.properties中配置一下信息:
1.登录数据库账号
2.登录数据库密码
3.数据库连接驱动
4.数据库链接地址
具体代码实例如下:
user=root
passWord=123456
driverClass=com.mysql.jdbc.Driver
url=jdbc:mysql://127.0.0.1:3306/test1
(4) 在src文件夹下自己创建一个Spring框架的配置文件,命名为application.xml,如图1-3所示

配置代码如下:
<?xml version="1.0" encoding="UTF-8"?>

<beans xmlns="http://www.springframework.org/schema/beans"

	   xmlns:xsi="http://www.w3.org/2001/XMLSchema-instance"

	   xmlns:context="http://www.springframework.org/schema/context"

	   xsi:schemaLocation="http://www.springframework.org/schema/beans

	   http://www.springframework.org/schema/beans/spring-beans-4.0.xsd

	   http://www.springframework.org/schema/context

	   http://www.springframework.org/schema/context/spring-context-4.0.xsd">

	   <!-- c3p0连接池 -->

	   <context:property-placeholder location="classpath:db.properties"/>

	   <!--所有带${}里面写的内容实在db.properties文件中起的名字。-->

	   <bean id="dataSource" class="com.mchange.v2.c3p0.ComboPooledDataSource">

			<property name="user" value="${user}"/>

			<property name="driverClass" value="${driverClass}"/>

			<property name="password" value="${passWord}"/>

			<property name="jdbcUrl" value="${url}"/>

	   </bean>

	   <!-- 配置SqlSessionFactory 用于加载mybatis框架,持久层的方法可以通过映射直接找到对应的Mapper文件里面的SQL语句-->

		<bean id="sqlSessionFactory" class="org.mybatis.spring.SqlSessionFactoryBean">

			<!---name="dataSource"固定对象名,ref是引用的作用,此句代表只想有一个id为“dataSource”的源-->

			<property name="dataSource" ref="dataSource"/>

		<!--mapperLocations属性使用一个资源位置的list,这个属性可以用来指定MyBatis的XML映射器文件的位置,会加载所指定路径下所有MyBatis的SQL映射文件-->

			<property name="mapperLocations">

				<list>

					<value>classpath:com/mr/mapper/*-Mapper.xml</value>

				</list>

			</property>

       <!--配置实体类包路径,其作用在于,以后在写入Mapper文件中时,如果参数或返回值是实体类对象,可以直接写实体类名字,不需要写全类名-->

			<property name="typeAliasesPackage" value="com.mr.entity"/>

		</bean>

			<!-- 自动配置dao层(dao层的Mapper可以直接通过spirng注入) -->

		<bean class="org.mybatis.spring.mapper.MapperScannerConfigurer">

			<property name="basePackage" value="com.mr.mapper"/>

			<property name="sqlSessionFactoryBeanName" value="sqlSessionFactory"/>

		</bean>

		<!-- 自动扫描bean ,把做了注解的类转为bean(使用这句话就可以用spring注解) -->

		<context:component-scan base-package="com.mr"/>

		<context:annotation-config />

		<!-- 事务配置 -->

		<bean id="transactionManager" class="org.springframework.jdbc.datasource.DataSourceTransactionManager">

			<property name="dataSource" ref="dataSource"/>

		</bean>

</beans>
二、创建实体类
数据库表结构如下:

SQL创建代码:
/*

Navicat MySQL Data Transfer

Source Server         : localhost

Source Server Version : 50513

Source Host           : localhost:3306

Source Database       : test

Target Server Type    : MYSQL

Target Server Version : 50513

File Encoding         : 65001

Date: 2018-11-16 09:28:49

*/

SET FOREIGN_KEY_CHECKS=0;

-- ----------------------------

-- Table structure for `tb_user`

-- ----------------------------

DROP TABLE IF EXISTS `tb_user`;

CREATE TABLE `tb_user` (

  `id` int(11) DEFAULT NULL,

  `username` varchar(50) DEFAULT NULL,

  `password` varchar(50) DEFAULT NULL,

  `sex` varchar(50) DEFAULT NULL,

  `question` varchar(50) DEFAULT NULL,

  `answer` varchar(50) DEFAULT NULL,

  `email` varchar(50) DEFAULT NULL

) ENGINE=InnoDB DEFAULT CHARSET=utf8;

-- ----------------------------

-- Records of tb_user

-- ----------------------------

INSERT INTO `tb_user` VALUES (null, '1', '1', '鐢�', '1', '1', '1');

-- ----------------------------

-- Table structure for `users`

-- ----------------------------

DROP TABLE IF EXISTS `users`;

CREATE TABLE `users` (

  `uId` int(11) NOT NULL AUTO_INCREMENT,

  `uName` varchar(255) DEFAULT NULL,

  `uAge` int(11) DEFAULT NULL,

  `uAddress` varchar(255) DEFAULT NULL,

  `uTel` varchar(255) DEFAULT NULL,

  PRIMARY KEY (`uId`)

) ENGINE=InnoDB DEFAULT CHARSET=utf8;

-- ----------------------------

-- Records of users

-- ----------------------------
根据这张表我们创建一个java实体类,并在里面声明私有属性和对应的公有方法。
package com.mr.entity;

import org.apache.ibatis.type.Alias;

import org.springframework.stereotype.Component;

@Alias("usersBean")

@Component

public class UsersBean {

	private int uId;

	private String uName;

	private int uAge;

	private String uAddress;

	private String uTel;

	public int getuId() {

		return uId;

	}

	public void setuId(int uId) {

		this.uId = uId;

	}

	public String getuName() {

		return uName;

	}

	public void setuName(String uName) {

		this.uName = uName;

	}

	public int getuAge() {

		return uAge;

	}

	public void setuAge(int uAge) {

		this.uAge = uAge;

	}

	public String getuAddress() {

		return uAddress;

	}

	public void setuAddress(String uAddress) {

		this.uAddress = uAddress;

	}

	public String getuTel() {

		return uTel;

	}

	public void setuTel(String uTel) {

		this.uTel = uTel;

	}

}
UsersBean类上方的注解就是对该类的映射,而且@Alias这个注解需要导入包,以后在Mapper文件中可以直接调用这个名字无需类名,因为在Spring的配置中已经完成相关配置。
三、编写持久层
开始写持久层前,要知道需要用到MyBatis的哪些对象或接口才能完成要完成的操作。
1.SqlSessionFactory
每个基于MyBatis的应用都是以一个SqlSessionFactory的实例为中心的,SQLSessionFactory的实例可以通过SqlSessionFactoryBuilder获得。而SqlSessionFactoryBuilder则可以从XML配置文件活一个预先定制的Configuration的实例构建出SqlSessionFactory的实例。
2.从SqlSessionFactory中获得SqlSession
既然有了SqlSessionFactory,就可以从中获得SqlSession的实例。SqlSession完全包含了面向数据库执行SQL命令的方法,可以通过SqlSession实例来直接执行已映射的SQL语句。
3.映射实例,让程序具体到哪个Mapper文件执行SQL代码
以上三点是每个daoImpl方法里都需要写的,根据面向对象的特点先把重复代码提取出来封装到一个类下,这样以后就不用写每个方法都创建这三个对象,因此,先创建一个BaseDaoImpl类用于封装这三个对象。
BaseDaoImpl.java:
package com.mr.dao.impl;

import java.io.IOException;

import java.io.Reader;

import org.apache.ibatis.io.Resources;

import org.apache.ibatis.session.SqlSession;

import org.apache.ibatis.session.SqlSessionFactory;

import org.apache.ibatis.session.SqlSessionFactoryBuilder;

import org.springframework.beans.factory.annotation.Autowired;

import org.springframework.stereotype.Repository;

@Repository

public class BaseDaoImpl<T> {

	//1.声明SqlSessionFactory

	@Autowired

	private SqlSessionFactory sqlSessionFactory;

	//2.声明SqlSession

	protected SqlSession sqlSession;

	//3.声明 mapper 属性

	private Class<T> mapper;

	//4.为mapper 创建get  set

	public T getMapper() {

		return sqlSessionFactory.openSession().getMapper(mapper);

	}

	public void setMapper(Class<T> mapper) {

		this.mapper = mapper;

	}

}
现在开始完成持久层代码:
首先要创建UsersDao接口以及UsersDaoImpl实现类,因为DaoImpl类里面要写具体地CURD(增删改查)方法,必然会用到上述提到的三个对象,现在这三个对象都封装到一个叫BaseDaoImpl的类中,所以在创建UsersDaoImpl类时,不但要实现UsersDao接口,还要继承BaseDaoImpl类并重写本类的构造方法,在构造方法中调用父类的构造方法,这样程序就可以获得Mapper对象。
UserDao.java:
package com.mr.dao;

import java.util.List;

import com.mr.entity.UsersBean;

import java.util.List;

import org.apache.ibatis.annotations.Insert;

import org.apache.ibatis.annotations.ResultType;

import org.apache.ibatis.annotations.Select;

public interface UserDao {

	//查询User表中所有数据的方法

	public List<UsersBean> getAllUser();

	//根据用户id 查询改用户所有信息

	public List<UsersBean> getUserById(int uId);

	//修改方法

	public void updUser(UsersBean usersBean);

	//删除方法

	public void delUser(int uId);

		//新增

	public  void insUser(UsersBean usersBean);

}
UsersDaoImpl.java:
package com.mr.dao.impl;

import java.util.List;

import org.springframework.stereotype.Repository;

import com.mr.dao.UserDao;

import com.mr.entity.UsersBean;

@Repository

public class UserDaoImpl extends BaseDaoImpl<UserDao> implements UserDao {

	//构造函数调用父类的构造方法

	public UserDaoImpl() {

		super();

		this.setMapper(UserDao.class);

	}

	//查询所有用户

	@Override

	public List<UsersBean> getAllUser() {

		// TODO Auto-generated method stub

		return this.getMapper().getAllUser();

	}

	//根据用户ID查询用户信息

	public List<UsersBean> getUserById(int id){

		return this.getMapper().getUserById(id);

	}

	//修改用户信息

	public void updUser(UsersBean usersBean) {

		this.getMapper().updUser(usersBean);

	}

	//删除用户

	@Override

	public void delUser(int uId) {

		// TODO Auto-generated method stub

		this.getMapper().delUser(uId);

	}

	//增加用户

	@Override

	public void insUser(UsersBean usersBean) {

		// TODO Auto-generated method stub

		this.getMapper().insUser(usersBean);

	}

}
上面代码中,通过调用父类的getMapper()可以直接让程序找到对应的映射文件,至于后面的getAllUser()的作用是用到Mapper文件中找到具体的SQL语句,接下来要写Mapper文件并在改映射文件中完成一条SQL语句。
首先创建一个XML文件并命名为*****-Mapper.xml,*号部分内容是可以自己修改的名字,最好和实体类同名。
Users-Mapper.xml:
<?xml version="1.0" encoding="UTF-8"?>

<!DOCTYPE mapper PUBLIC "-//mybatis.org//DTD Mapper 3.0//EN"

"http://mybatis.org/dtd/mybatis-3-mapper.dtd">

<mapper namespace="com.mr.dao.UserDao">

	<select id="getAllUser" resultType="usersBean">

		select * from users

	</select>

<!--resultType:输出结果类型;parameterType:输入参数类型  -->

	<select id="getUserById" resultType="usersBean" parameterType="int">

		select * from users where uId = #{uId}

	</select>

	<update id="updUser" parameterType="usersBean">

		update Users set uName=#{uName},uAge=#{uAge} where uId=#{uId}

	</update>

	<insert id="insUser">

	   insert into users(uId,uName,uAge) values(#{uId},#{uName},#{uAge})

	</insert>

	<delete id="delUser" parameterType="int">

		delete from users where uId=#{uId}

	</delete>

</mapper>
四、编写业务层
截止目前持久层、实体类都已经完成了,按规范接下来要实现业务层,先创建业务层接口,再创建业务层的实现类serviceImpl,并在实现类上面注解@service(“userService”),在业务层的注解括号里参数部分要特别声明一个名字,这个名字在后面Controller类里创建Service对象时需要根据这个名字来匹配。
业务层是把Dao层方法获取并返回给下一层,及Controller控制层。
由于本例我没有用到业务层,而是直接在控制层获取Dao层方法,所以嘞,业务层代码我就不贴啦。
五、配置SpringMVC
要想用SpringMVC来完成工作,首先需要创建它自己的配置文件,在项目结构中的WebContent\WEB-INF文件夹下创建一个xml,名字叫作SpringMVC.xml。
配置内容如下:
<?xml version="1.0" encoding="UTF-8"?>

<beans 	xmlns="http://www.springframework.org/schema/beans"

			xmlns:xsi="http://www.w3.org/2001/XMLSchema-instance"

			xmlns:context="http://www.springframework.org/schema/context"

			xmlns:mvc="http://www.springframework.org/schema/mvc"

			xsi:schemaLocation="http://www.springframework.org/schema/beans

			http://www.springframework.org/schema/beans/spring-beans-4.0.xsd

			http://www.springframework.org/schema/context

			http://www.springframework.org/schema/context/spring-context-4.0.xsd

			http://www.springframework.org/schema/mvc

			http://www.springframework.org/schema/mvc/spring-mvc-4.0.xsd">

	<!-- 配置视图解析器 -->

	<bean class="org.springframework.web.servlet.view.InternalResourceViewResolver">

		<property name="prefix" value="/WEB-INF/jsp/" />

		<property name="suffix" value=".jsp"/>

	</bean>

	<!-- 配置静态资源加载 -->

	<mvc:resources location="/WEB-INF/jsp" mapping="/jsp/**"/>

	<mvc:resources location="/WEB-INF/js" mapping="/js/**"/>

	<mvc:resources location="/WEB-INF/css" mapping="/css/**"/>

	<mvc:resources location="/WEB-INF/img" mapping="/img/**"/>

	<!-- 扫描控制器 -->

	<context:component-scan base-package="com.mr.controller"/>

	<!-- 配置指定的控制器-->

	<bean id="userController" class="com.mr.controller.UserController"/>

	<!-- 自动扫描组件 -->

	<mvc:annotation-driven />

	<mvc:default-servlet-handler/>

</beans>
六、实现控制层
现在SpringMVC的配置文件也已经完成,接下来完成Controller里面的内容,Controller的作用是接收前台的jsp页面请求,并返回相应结果。
UserController.java:
package com.mr.controller;

import java.lang.ProcessBuilder.Redirect;

import java.util.List;

import org.apache.ibatis.annotations.Param;

import org.springframework.beans.factory.annotation.Autowired;

import org.springframework.stereotype.Controller;

import org.springframework.web.bind.annotation.RequestMapping;

import org.springframework.web.servlet.ModelAndView;

import com.mr.dao.UserDao;

import com.mr.entity.UsersBean;

@Controller()

@RequestMapping("/userController")

public class UserController {

	@Autowired

	UserDao userDao;

	@RequestMapping("/getAllUser")

	public ModelAndView getAllUser() {

		//创建一个List集合用于接收Service层方法的返回值

		List<UsersBean> listUser = userDao.getAllUser();

		//创建一个ModelAndView对象 括号里面的参数是指定要跳转到哪个jsp页面

		ModelAndView mav = new ModelAndView("getAll");

		//通过addObject()方法 我们把要存的值存了进去。

		mav.addObject("listUser", listUser);

		//最后把ModelAndView对象返回出去

		return mav;

	}

	//用于在getAll.jsp中点击增加后跳转到toIns.jsp

	@RequestMapping("/insertUser")

	public String toIns() {

		return "toIns";

	}

	//用于在getAll.jsp中点击查找后跳转到toSel.jsp

	@RequestMapping("/selectUser")

	public String toSel() {

		return "toSel";

	}

	@RequestMapping("/getUserById")

	public ModelAndView getUserById(@Param("uId")Integer uId) {

		ModelAndView mav = new ModelAndView("toUpd");

		List<UsersBean> list = userDao.getUserById(uId);

		mav.addObject("list", list);

		return mav;

	}

	@RequestMapping("/updUser")

	public String toUpd(UsersBean usersBean){

		userDao.updUser(usersBean);

		return "forward:getAllUser";

	}

	@RequestMapping("/insUser")

	public String toIns(UsersBean usersBean) {

		userDao.insUser(usersBean);

		return "forward:getAllUser";

	}

	@RequestMapping("/delUser")

	public String delUser(@Param("uId")Integer uId) {

		userDao.delUser(uId);

		return "forward:getAllUser";

	}

}
代码说明:@RequestingMapping()注解是设定该控制器的请求路径,无论以后是从jsp页面发出的请求还是从其他控制器发出的请求都来写这个路径(UserController/getAllUser等)
ModelAndView类:该类的作用是业务处理器调用模型层处理完用户请求后,把结果数据存储在该类的model属性中,把要返回的视图信息存储在该类的view中,然后让该ModelAndView返回SpringMVC框架。框架通过调用配置文件中定义的视图解析器,对该对象进行解析,最后把结果数据显示在指定页面上。
七、配置web.xml
<?xml version="1.0" encoding="UTF-8"?>

<web-app xmlns:xsi="http://www.w3.org/2001/XMLSchema-instance"

xmlns="http://java.sun.com/xml/ns/javaee"

xsi:schemaLocation="http://java.sun.com/xml/ns/javaee

http://java.sun.com/xml/ns/javaee/web-app_4_0.xsd" version="4.0">

  <display-name>SSM</display-name>

  <welcome-file-list>

    <welcome-file>/WEB-INF/jsp/index.jsp</welcome-file>

  </welcome-file-list>

  <listener>

    <listener-class>

			org.springframework.web.context.ContextLoaderListener

		</listener-class>

  </listener>

  <context-param>

    <param-name>contextConfigLocation</param-name>

    <param-value>classpath:application.xml</param-value>

  </context-param>

  <servlet>

    <servlet-name>SpringMVC</servlet-name>

    <servlet-class>

			org.springframework.web.servlet.DispatcherServlet

		</servlet-class>

    <init-param>

      <param-name>contextConfigLocation</param-name>

      <param-value>/WEB-INF/SpringMVC.xml</param-value>

    </init-param>

  </servlet>

  <servlet-mapping>

    <servlet-name>SpringMVC</servlet-name>

    <url-pattern>/</url-pattern>

  </servlet-mapping>

  <filter>

    <filter-name>characterEncodingFilter</filter-name>

    <filter-class>org.springframework.web.filter.CharacterEncodingFilter</filter-class>

    <init-param>

      <param-name>encoding</param-name>

      <param-value>UTF-8</param-value>

    </init-param>

    <init-param>

      <param-name>forceEncoding</param-name>

      <param-value>true</param-value>

    </init-param>

  </filter>

  <filter-mapping>

    <filter-name>characterEncodingFilter</filter-name>

    <url-pattern>/*</url-pattern>

  </filter-mapping>

</web-app>
八、JSP页面展示
index.jsp:
<%@ page language="java" contentType="text/html; charset=UTF-8" pageEncoding="UTF-8"%>

<!DOCTYPE html PUBLIC "-//W3C//DTD HTML 4.01 Transitional//EN" "http://www.w3.org/TR/html4/loose.dtd">

<html>

<head>

<meta http-equiv="Content-Type" content="text/html; charset=UTF-8">

<title>Insert title here</title>

</head>

<body>

<input type="button" value="查询所有" onclick="toGetAll()"/>

</body>

<script type="text/javascript">

	function toGetAll(){

		location.href="userController/getAllUser";

	}

</script>

</html>
getAll.jsp:
<%@ page language="java" contentType="text/html; charset=UTF-8" pageEncoding="UTF-8"%>

<%@ taglib prefix="c" uri="http://java.sun.com/jsp/jstl/core" %>

<!DOCTYPE html PUBLIC "-//W3C//DTD HTML 4.01 Transitional//EN" "http://www.w3.org/TR/html4/loose.dtd">

<html>

<head>

<meta http-equiv="Content-Type" content="text/html; charset=UTF-8">

<title>Insert title here</title>

</head>

<body>

<table border="1">

	<tr>

		<td>

			序号

		</td>

		<td>

			姓名

		</td>

		<td>

           年龄

		</td>

		<td>

			操作

		</td>

	</tr>

	<c:forEach items="${listUser}" var ="list">

		<tr>

			<td>

				${list.uId }

			</td>

			<td>

				${list.uName }

			</td>

			<td>

				${list.uAge }

			</td>

			<td>

				<input type="button" value="修改" onclick="toUpd(${list.uId})"/>

			</td>

			<td>

			<input type="button" value="删除" onclick="toDel(${list.uId})"/>

			</td>

		</tr>

	</c:forEach>

</table>

<a href="insertUser">增加</a>

<a href="selectUser">查找</a>

</body>

</html>

<!-- 问号传参,若下列想传uName和uAge可以这么写:"getUserById?uId="+id+"&uName="+uName+"&uAge="+uAge;-->

<script>

	function toUpd(i){

		location.href="getUserById?uId="+i;

	}

</script>

<script>

	function toDel(id){

		location.href="delUser?uId="+id;

	}

</script>
代码说明:forEach标签下的items属性写要取的值对应的Key名字,后面的var属性可以理解成是临时起的变量名字,用来调用对象里的属性,这时浏览器页面即可正常显示数据。
toUpd.jsp:
<%@ page language="java" contentType="text/html; charset=utf-8"

    pageEncoding="utf-8"%>

<%@ taglib prefix="c" uri="http://java.sun.com/jsp/jstl/core" %>

<!DOCTYPE html PUBLIC "-//W3C//DTD HTML 4.01 Transitional//EN" "http://www.w3.org/TR/html4/loose.dtd">

<html>

<head>

<meta http-equiv="Content-Type" content="text/html; charset=utf-8">

<title>Insert title here</title>

</head>

<body>

	<form action="http://localhost:8089/SSM/userController/updUser" method="post">

		<c:forEach items="${list }" var="list">

		<table>

			<tr>

				<Td>

					序号:<input type="text" name="uId" value="${list.uId }" disabled="disabled"/>

						<input type="hidden" name="uId" value="${list.uId }"/>

				</Td>

			</tr>

			<tr>

				<td>

					姓名:<input type="text" name="uName" value="${list.uName }"/>

				</td>

			</tr>

			<tr>

				<Td>

					年龄:<input type="text" name="uAge" value="${list.uAge }"/>

				</Td>

			</tr>

			<tr>

				<td>

					<input type="submit" value="修改"/>

				</td>

			</tr>

		</table>

		</c:forEach>

	</form>

</body>

</html>
toIns.jsp:
<%@ page language="java" contentType="text/html; charset=utf-8"

    pageEncoding="utf-8"%>

<%@ taglib prefix="c" uri="http://java.sun.com/jsp/jstl/core" %>

<!DOCTYPE html PUBLIC "-//W3C//DTD HTML 4.01 Transitional//EN" "http://www.w3.org/TR/html4/loose.dtd">

<html>

<head>

<meta http-equiv="Content-Type" content="text/html; charset=utf-8">

<title>Insert title here</title>

</head>

<body>

	<form action="http://localhost:8089/SSM/userController/insUser" method="post">

		<table>

			<tr>

				<Td>

					序号:<input type="text" name="uId" />

				</Td>

			</tr>

			<tr>

				<td>

					姓名:<input type="text" name="uName"/>

				</td>

			</tr>

			<tr>

				<Td>

					年龄:<input type="text" name="uAge" />

				</Td>

			</tr>

			<tr>

				<td>

					<input type="submit" value="提交"/>

				</td>

			</tr>

		</table>

		</form>

</body>

</html>
toSel.jsp:
<%@ page language="java" contentType="text/html; charset=UTF-8"

    pageEncoding="UTF-8"%>

<!DOCTYPE html>

<html>

<head>

<meta charset="UTF-8">

<title>Insert title here</title>

</head>

<body>

<form action="http://localhost:8089/SSM/userController/getUserById" method="post">

<table>

			<tr>

				<Td>

请输入序号:<input type="text" name="uId" />

</Td>

<td><input type="submit" value="查找" />

</tr>

</form>

</body>

</html>
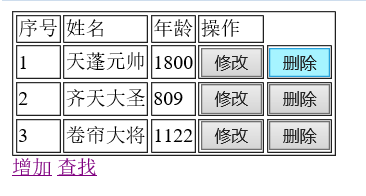
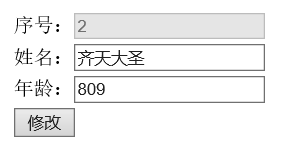
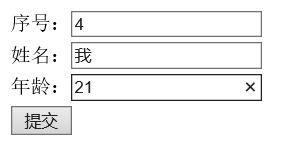
最后界面展示:
主界面:

查找修改界面:


增加界面:


参考文献:
1.Java Web从入门到精通 (第三版) ------明日科技著
2.Java EE基础使用教程(第三版)--------郑阿奇著
SSM框架入门——整合SSM并实现对数据的增删改查功能(Eclipse平台)的更多相关文章
- CoreData 从入门到精通(二) 数据的增删改查
在上篇博客中,讲了数据模型和 CoreData 栈的创建,那下一步就是对数据的操作了.和数据库一样,CoreData 里的操作也无非是增删改查.下面我们将逐步讲解在 CoreData 中进行增删改查的 ...
- IDEA搭建SSM实现登录、注册,数据增删改查功能
本博文的源代码:百度云盘/java/java实例/SSM实例/SSM实现登录注册,增删改查/IDEA搭建SSM实现登录,注册,增删改查功能.zip 搭建空的Maven项目 使用Intellij id ...
- springmvc+spring3+hibernate4框架简单整合,简单实现增删改查功能
转自:https://blog.csdn.net/thinkingcao/article/details/52472252 C 所用到的jar包 数据库表 数据库表就不用教大家了,一张表,很简 ...
- Django框架之第二篇--app注册、静态文件配置、form表单提交、pycharm连接数据库、django使用mysql数据库、表字段的增删改查、表数据的增删改查
本节知识点大致为:静态文件配置.form表单提交数据后端如何获取.request方法.pycharm连接数据库,django使用mysql数据库.表字段的增删改查.表数据的增删改查 一.创建app,创 ...
- Struts2+Spring+Hibernate实现员工管理增删改查功能(一)之ssh框架整合
前言 转载请标明出处:http://www.cnblogs.com/smfx1314/p/7795837.html 本项目是我写的一个练习,目的是回顾ssh框架的整合以及使用.项目介绍: ...
- ABP入门系列(6)——展现层实现增删改查
这一章节将通过完善Controller.View.ViewModel,来实现展现层的增删改查.最终实现效果如下图: 一.定义Controller ABP对ASP.NET MVC Controllers ...
- ABP入门系列(5)——展现层实现增删改查
ABP入门系列目录--学习Abp框架之实操演练 这一章节将通过完善Controller.View.ViewModel,来实现展现层的增删改查.最终实现效果如下图: 一.定义Controller ABP ...
- SpringMVC框架下数据的增删改查,数据类型转换,数据格式化,数据校验,错误输入的消息回显
在eclipse中javaEE环境下: 这儿并没有连接数据库,而是将数据存放在map集合中: 将各种架包导入lib下... web.xml文件配置为 <?xml version="1. ...
- node.js入门学习(四)--Demo图书的增删改查
需求:图书的增删改查,图书数据保存在data.json文件中. 1.Demo结构: 2.首先下载安装node.js,配置环境变量:参考博客 3.项目初始化 1)创建项目根目录node-hello,进入 ...
随机推荐
- Azure Web App (二)使用部署槽切换部署环境
一,引言 前天我们将到使用Azure的 Pass 服务 “Web App” 去部署我们的.NET Core Web项目,也同时有介绍到如何在VS中配置登陆中国区的Azure账号,今天接着讲,我们部署完 ...
- CodeChef Sum of distances(分治)
CodeChef Sum of distances(分治) 题目大意 有一排点,每个点 i 向 \(i + 1, i + 2, i + 3\) 分别连价值为 \(a_i,b_i,c_i\) 的有向边, ...
- Python Hacking Tools - Web Scraper
Preparation: Python Libray in the following programming: 1. Requests Document: https://2.python-requ ...
- Python Ethical Hacking - BACKDOORS(7)
Handling Errors: If the client or server crashes, the connection will be lost. Backdoor crashes if: ...
- express中是如何处理IP的?
express获取client_ip req.ip // 获取客户端ip req.ips // 获取请求经过的客户端与代理服务器的Ip列表 查看源码 定义获取ip的入口, // 源码 request. ...
- 微信小程序反编译~2020年
目录 摘要 介绍 安装反编译脚本 使用 获取wxapkg文件 反编译 结论 参考资料 摘要 安装wxappUnpacker小程序反编译工具并使用(2020.03) 关键词: 微信小程序反编译 wxss ...
- 高效C++:定制new和delete
内存的申请和释放,C++从语言级别提供了new和delete关键字,因此需要了解和熟悉其中的过程. 了解new-handler的行为 set_new_handler可以指定一个函数,当申请内存失败时调 ...
- JVM系列之:对象的锁状态和同步
目录 简介 java对象头 java中锁状态的变化 偏向锁biased locking 轻量级锁thin lock 重量级锁 三种锁状态的不同 简介 锁和同步是java多线程编程中非常常见的使用场景. ...
- shell 十三问
经典的Shell十三问 摘选整理自:http://bbs.chinaunix.net/thread-218853-1-1.htmlhttps://github.com/wzb56/13_questio ...
- vj map
/* * 换行好烦人呀! */ #include <iostream> #include <map> #include <string> using namespa ...
