WPF实现手势解锁
桌面程序的解锁方式一般是账号密码,互联网的可以使用扫码解锁,甚至人脸识别。但扫码需要网络,人脸识别又较复杂。所以就想把安卓常用的手势解锁移植到桌面程序上。
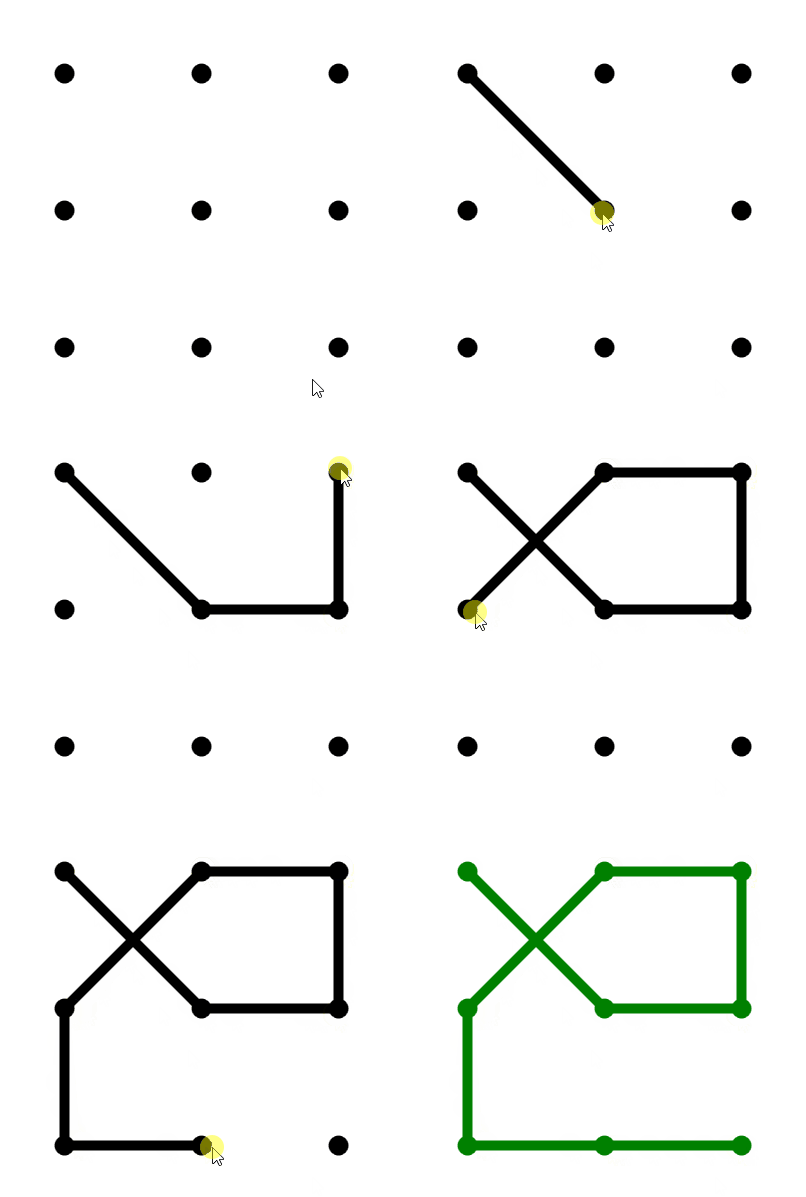
先来张效果图,有兴趣的往下看,没兴趣的打扰了。

WPF手势解锁使用鼠标点击事件,鼠标移动事件,鼠标弹起事件实现。自定义了三个属性(初始化颜色,选中颜色,选中点的集合),一个事件(绘制完成后触发的事件)。
实现的功能:
绘制过程中直线随鼠标移动的效果
绘制两个连接点的连线
绘制完成后可调用的事件
实现初始化颜色,选中颜色,选择连接点依赖属性
源码主要说明:
1.构造函数,完成事件注册


 /// <summary>

 /// 构造函数

 /// </summary>

 public ScreenUnlock()

 {

 InitializeComponent();

 Points = new List<int>();

 this.Loaded += ScreenUnlock_Loaded;

 this.MouseDown += ScreenUnlock_MouseDown;

 this.MouseUp += ScreenUnlock_MouseUp;

 this.MouseMove += ScreenUnlock_MouseMove;

 }
2.窗体加载事件
绘制九宫格,tag用动态类型保存了实际位置(Point)和序号(Loaction)


 /// <summary>

 /// Load事件,绘制九宫格

 /// </summary>

 /// <param name="sender"></param>

 /// <param name="e"></param>

 private void ScreenUnlock_Loaded(object sender, RoutedEventArgs e)

 {

 canvas.Children.Clear();

 //为了保证正方形

 var distance = Math.Min(this.ActualWidth ==  ? this.Width : this.ActualWidth, this.ActualHeight ==  ? this.Height : this.ActualHeight) / ;

 double left = (distance - PointSize) / ;

 for (var i = ; i < ; i++)

 {

 for (var j = ; j < ; j++)

 {

 var x = j * distance + left;

 var y = i * distance + left;

 Ellipse ellipse = new Ellipse()

 {

 Width = PointSize,

 Height = PointSize,

 Fill = Color,

 Tag = new

 {

 Point = new Point(x + PointSize / , y + PointSize / ),

 Location = i *  + j +

 }

 };

 ellipse.SetValue(Canvas.LeftProperty, x);

 ellipse.SetValue(Canvas.TopProperty, y);

 Canvas.SetLeft(ellipse, x);

 Canvas.SetTop(ellipse, y);

 canvas.Children.Add(ellipse);

 }

 }

 }
3.鼠标左键点击事件
3.1清空了除九宫格之外所有元素
3.2判断点击位置是否是圆点位置,如果不是则不处理,否则记录当前位置用于画线,一条是跟踪鼠标的线(currentLine),另一个是为了显示选中的圆点的连线,此处记录绘制线的第一个点(currentEllipse与后续经过的点的连线).


 private void ScreenUnlock_MouseDown(object sender, System.Windows.Input.MouseButtonEventArgs e)

 {

 if (e.LeftButton == System.Windows.Input.MouseButtonState.Pressed)

 {

 //每次点击都是重新绘制,清空除了九宫格的所有元素

 while (canvas.Children.Count > )

 canvas.Children.RemoveAt(canvas.Children.Count - );

 ellipseList.Clear();

 currentEllipse = null;

 Points.Clear();

 //再次点击时需要先把颜色修改为初始化颜色

 foreach (Shape item in canvas.Children)

 item.Fill = Color;

 //获取当前鼠标位置

 var point = e.GetPosition(this);

 //鼠标所在位置是否有圆点

 if (VisualTreeHelper.HitTest(this, point).VisualHit is Ellipse ellipse) //鼠标经过圆点

 {

 currentEllipse = ellipse;

 ellipseList.Add(ellipse);

 Points.Add((int)((dynamic)ellipse.Tag).Location);

 var p = (Point)((dynamic)currentEllipse.Tag).Point;

 currentLine = new Line()

 {

 Stroke = Color,

 StrokeThickness = PointSize / ,

 X1 = p.X,

 Y1 = p.Y,

 X2 = p.X,

 Y2 = p.Y

 };

 }

 }

 }
4.鼠标移动事件
4.1绘制跟随鼠标的线
4.2判断是否经过之前没经过的圆点,绘线过程中,一个点只能用一次。经过的点保存在ellipseList集合中。
4.3如果经过未曾经过的点,则与上个经过的点绘制直线,并且重新赋值当前点currentEllipse,重新定义跟随鼠标的线(currentLine)的起始点为该点。
4.4把点添加到Points集合中


 /// <summary>

 /// 鼠标移动

 /// </summary>

 /// <param name="sender"></param>

 /// <param name="e"></param>

 private void ScreenUnlock_MouseMove(object sender, System.Windows.Input.MouseEventArgs e)

 {

 //鼠标左键处于点击状态

 if (e.LeftButton == System.Windows.Input.MouseButtonState.Pressed)

 {

 //获取当前鼠标位置

 var point = e.GetPosition(this);

 ///当没有遇到圆点之前绘制跟随鼠标的线

 if (currentLine != null)

 {

 canvas.Children.Remove(currentLine);

 currentLine.X2 = point.X;

 currentLine.Y2 = point.Y;

 canvas.Children.Add(currentLine);

 }

 //线跟着移动

 if (VisualTreeHelper.HitTest(this, point).VisualHit is Ellipse ellipse && currentEllipse != null)

 {

 var p1 = (Point)((dynamic)currentEllipse.Tag).Point;

 var p = (Point)((dynamic)ellipse.Tag).Point;

 if (p1 != p) //鼠标经过圆点

 {

 //如果不包含该圆点,一个点只能用一次

 if (!ellipseList.Contains(ellipse))

 {

 //绘制当前点和上个点之间的连线

 var t = new Line()

 {

 Stroke = Color,

 StrokeThickness = PointSize / ,

 X1 = p1.X,

 Y1 = p1.Y,

 X2 = p.X,

 Y2 = p.Y

 };

 //修改当前点

 currentEllipse = ellipse;

 ellipseList.Add(ellipse);

 canvas.Children.Add(t);

 Points.Add((int)((dynamic)ellipse.Tag).Location);

 if (currentLine != null)

 {

 canvas.Children.Remove(currentLine);

 currentLine.X1 = p.X;

 currentLine.Y1 = p.Y;

 currentLine.X2 = p.X;

 currentLine.Y2 = p.Y;

 canvas.Children.Add(currentLine);

 }

 }

 }

 }

 }

 }
5.鼠标左键弹起事件
5.1鼠标弹起时,修改所有经过的点以及点之间的连线颜色。
5.2清空所有使用的临时的变量,currentEllipse,currentLine
5.3触发绘制后触发的事件(AfterDraw)


 /// <summary>

 /// 鼠标左键弹起

 /// </summary>

 /// <param name="sender"></param>

 /// <param name="e"></param>

 private void ScreenUnlock_MouseUp(object sender, System.Windows.Input.MouseButtonEventArgs e)

 {

 if (canvas.Children.Count > )

 foreach (Shape item in canvas.Children)

 if (item is Line)

 item.Stroke = SelectedColor;

 else if (item is Ellipse ellipse && ellipseList.Contains(ellipse))

 item.Fill = SelectedColor;

 currentEllipse = null;

 currentLine = null;

 canvas.Children.Remove(currentLine);

 RaiseEvent(new RoutedEventArgs(AfterDrawEvent));

 }
6.选中点和线的颜色,SelectedColor属性
设置该颜色时,需要同时修改选中的点和线的颜色。


 /// <summary>

 /// 选中的颜色

 /// </summary>

 public static readonly DependencyProperty SelectedColorProperty = DependencyProperty.Register("SelectedColor", typeof(SolidColorBrush), typeof(ScreenUnlock), new FrameworkPropertyMetadata(new SolidColorBrush(Colors.Green), new PropertyChangedCallback((s, e) =>

 {

 var t = s as ScreenUnlock;

 if (t.canvas.Children.Count > )

 for (int i = ; i < t.canvas.Children.Count; i++)

 {

 Shape item = t.canvas.Children[i] as Shape;

 if (item is Line)

 item.Stroke = e.NewValue as SolidColorBrush;

 else if (item is Ellipse ellipse)

 item.Fill = e.NewValue as SolidColorBrush;

 }

 })));

 /// <summary>

 /// 选中的颜色

 /// </summary>

 public SolidColorBrush SelectedColor

 {

 get { return GetValue(SelectedColorProperty) as SolidColorBrush; }

 set { SetValue(SelectedColorProperty, value); }

 }
7.绘制用的点的集合Points
绑定Points属性,后台就可以获取到绘制图案经历的点的集合。
8.其他代码
其他包含初始颜色,绘制完成以后触发的事件,以及使用到的变量。见源码。
9.利用该控件实现解锁
9.1绑定三个属性一个事件,分别是初始化颜色(Color),选中的颜色(SelectedColor),经过的点(Points)
9.2SelectedColor绑定方式
需要一个转换器(验证正确与否与颜色的转换),如果验证正确,则显示绿色,否则显示红色。
9.3如果连接的点太少时,则需进行提示,并且恢复原来的状态(即把选中的颜色设置为初始化的颜色)
参考:
https://www.cnblogs.com/ShenNan/p/5587009.html
源码:
没找到上传附件,附上码云地址。
https://gitee.com/yiyecao/temporary-components
WPF实现手势解锁的更多相关文章
- SJGestureUnlock快速集成手势解锁
前言:如果页面显示不完整或图片看不了还请移步:简书 SJGestureUnlock.h 常用自定义属性 @interface SJGestureUnlock : UIView @property (n ...
- Quartz2D复习(二) --- 手势解锁
这次支付宝手机客户端升级,把手势解锁那个功能去掉了,引起很多人的抱怨,觉得少了手势解锁的保护,个人信息容易泄漏了... 那么手势解锁功能是怎么是实现的呢,这里使用Quart2D来简单模拟一下, 先看下 ...
- HTML5实现屏幕手势解锁
HTML5实现屏幕手势解锁(转载) https://github.com/lvming6816077/H5lockHow to use? <script type="text/java ...
- iOS--开发之手势解锁
本文主要介绍通过手势识别实现手势解锁功能,这个方法被广泛用于手机解锁,密码验证,快捷支付等功能实现.事例效果如下所示. 首先,我们先分析功能的实现过程,首先我们需要先看大致的实现过程: 1.加载九宫格 ...
- 2016-1-10 手势解锁demo的实现
一:实现自定义view,在.h,.m文件中代码如下: #import <UIKit/UIKit.h> @class ZLLockView; @protocol ZLLockViewDele ...
- iOS绘制手势解锁密码
手势解锁这个功能其实已经用的越来越少了.但是郁闷不知道我公司为什么每次做一个app都要把手势解锁加上.....于是就自己研究了一下手势解锁页面的实现.. 要想实现这个页面,先说说需要掌握哪些: UIP ...
- [iOS UI进阶 - 5.0] 手势解锁Demo
A.需求 1.九宫格手势解锁 2.使用了绘图和手势事件 code source: https://github.com/hellovoidworld/GestureUnlockDemo B ...
- ReactNative手势解锁(react-native-ok-gesture-password)
在大前端的趋势之下,我也慢慢开始从事React Native相关的开发.但是奈何React Native生态相对于Android来说还是太小了.许多开源的库早早就已经不再维护.之前项目中需要用到手势解 ...
- iOS-高仿支付宝手势解锁(九宫格)
概述 高仿支付宝手势解锁, 通过手势枚举去实现手势密码相对应操作. 详细 代码下载:http://www.demodashi.com/demo/10706.html 基上篇[TouchID 指纹解锁] ...
随机推荐
- “随手记”开发记录day08
今天完成了关于统计页面中的关于每月支出和每月收入的页面
- C#LeetCode刷题之#125-验证回文串(Valid Palindrome)
问题 该文章的最新版本已迁移至个人博客[比特飞],单击链接 https://www.byteflying.com/archives/3899 访问. 给定一个字符串,验证它是否是回文串,只考虑字母和数 ...
- 获取客户端用户真实ip方法整理(jekyll迁移)
layout: post title: 获取客户端用户真实ip方法整理 date: 2019-08-22 author: xiepl1997 tags: springboot 由请求获取客户端ip地址 ...
- java如何实现发送邮箱
package cn.buy.util; import java.security.GeneralSecurityException; import java.util.Properties; imp ...
- kafka-clients 1.0 高阶API消费消息(未完)
消费消息的请求(按序) org/apache/kafka/common/requests/RequestHeader org/apache/kafka/common/requests/ApiVersi ...
- Solon详解(一)- 快速入门
一.Solon 最近号称小而美的的Solon框架,终于得空,搞了一把,发觉Solon确实好用,那Solon到底是什么,又是怎么好用呢? 什么是Solon? Solon参考过Spring boot 和 ...
- Spring Boot系列(一):Spring Boot快速开始
一.Spring Boot介绍 Spring Boot可以很容易的创建可直接运行的独立的基于Spring的应用程序. 功能特点: 创建独立的Spring应用程序: 直接嵌入Tomcat.Jetty等W ...
- 2w字 + 40张图带你参透并发编程!
并发历史 在计算机最早期的时候,没有操作系统,执行程序只需要一种方式,那就是从头到尾依次执行.任何资源都会为这个程序服务,在计算机使用某些资源时,其他资源就会空闲,就会存在 浪费资源 的情况. 这里说 ...
- 封装Vue Element的table表格组件
上周分享了几篇关于React组件封装方面的博文,这周就来分享几篇关于Vue组件封装方面的博文,也好让大家能更好地了解React和Vue在组件封装方面的区别. 在封装Vue组件时,我依旧会交叉使用函数式 ...
- SpringBoot--- SpringSecurity进行注销,权限控制
SpringBoot--- SpringSecurity进行注销,权限控制 环境 IDEA :2020.1 Maven:3.5.6 SpringBoot: 2.0.9 (与此前整合的版本2.3.3 不 ...
