cocos2d-x 模态对话框的实现
心情不好,恩。不扯淡了。直接讲。
==================================
在泰然看了一篇实现模态对话框的文章,写的还不错,然后在其基础上加了我简单加了一层灰色透明背景,这样子界面效果看起来会更友好一点。好吧,原谅我的无耻,原创转载什么的也不在意了,原文在这里,今天感觉有点累,恩,主要是大神不能带我飞了。非常是失落,好吧,不说废话了。
在游戏中,我们经常须要实现弹出一个模态对话框,比方说游戏暂停,退出提示对话框等
对话框特点例如以下:
1.可定制的,比方说背景图。标题,文本,按钮等,依据须要加入和设置
2.须要屏蔽对话框下层的触摸
3.为了友好的效果显示。把不可触摸的部分变为灰色
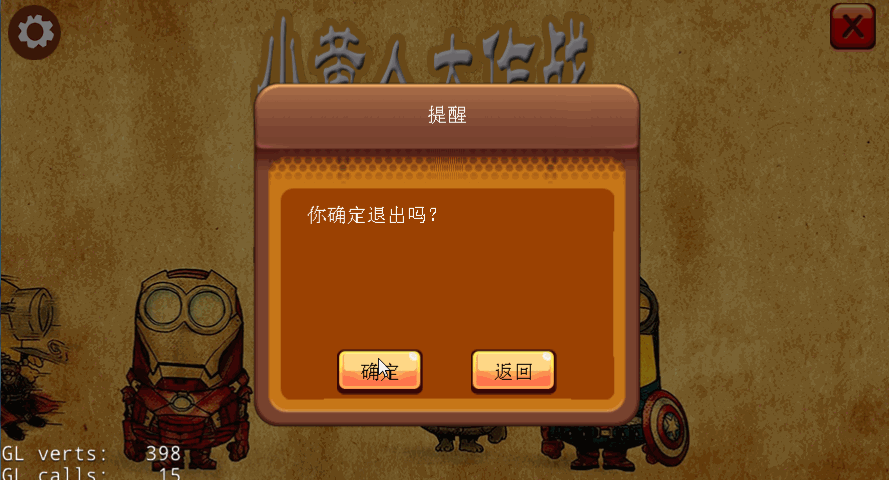
先来看一张效果图:
为了完毕这样一个效果。思路例如以下:
1.设计一个弹出对话框的类PopupLayer。继承于LayerColor,这样子我们就能够设置背景版透明,看起来好像把对话框下层的变灰暗了
        setColor(ccc3(0,0,0));

        setOpacity(128);
2.加入触摸事件。屏蔽下层触摸。也就是在Layer中设置不向下传递
        //add layer touch event

	auto listener = EventListenerTouchOneByOne::create();

	listener->setSwallowTouches(true);//不向下传递触摸

	listener->onTouchBegan = CC_CALLBACK_2(PopupLayer::onTouchBegan, this);

	listener->onTouchMoved = CC_CALLBACK_2(PopupLayer::onTouchMoved, this);

	listener->onTouchEnded = CC_CALLBACK_2(PopupLayer::onTouchEnded, this);

	auto dispatcher = Director::getInstance()->getEventDispatcher();

	dispatcher->addEventListenerWithSceneGraphPriority(listener, this);
3.PopupLayer类 实现 可定制对话框标题,按钮,文本。背景图片等
    //标题

    void setTitle(const char* title, int fontsize = 20);

    //文本

    void setContentText(const char* text, int fontsize = 20, int padding = 50, int paddintTop = 100);

    //设置button回调事件

    void setCallbackFunc(Ref* target, SEL_CallFuncN callfun);

     //加入button

    bool addButton(const char* normalImage, const char* selectedImage, const char* title, int tag = 0);
4.按钮回调函数实现也比較简单。首先设置外部的回调对象和回调函数
    Ref* m_callbackListener;    //回调对象

    SEL_CallFuncN m_callback;   //回调函数

    //设置按钮的回调函数

    void PopupLayer::setCallbackFunc(Ref* target, SEL_CallFuncN callfun){

    m_callbackListener = target;

    m_callback = callfun;

    }
然后在PopupLayer类中比方说我们加入一个菜单按钮
 // 创建图片菜单按钮

    auto item = MenuItemImage::create(

        normalImage,

        selectedImage,

        CC_CALLBACK_1(PopupLayer::buttonCallBack,this));

    item->setTag(tag);
设置button回调函数,然后由这个回调函数去调用外部的button监听函数,然后关闭对话框
//button回调函数

    void PopupLayer::buttonCallBack(Ref* pSender){

    Node* node = dynamic_cast<Node*>(pSender);

    CCLog("【====PopupLayer::buttonCallBack====】touch tag: %d", node->getTag());

    if (m_callback && m_callbackListener){

        (m_callbackListener->*m_callback)(node);

    }

    this->removeFromParent();}
5.然后使用方法也比較简单。假设须要对话框内容显示中文。能够參考:cocos2d-x
3.0 使用Sax解析xml文档(解决中文显示问题)这篇文章
    //弹出对话框

    pl = PopupLayer::create("BackGround.png",Size(400,350));

    pl->setTitle("title");

    pl->setContentText("Are you sure exit?", 20, 60, 250);

    pl->setCallbackFunc(this, callfuncN_selector(WelcomeScene::popButtonCallback));//设置按钮回调

    pl->addButton("pop_button.png", "pop_button.png", "yes", 0);

    pl->addButton("pop_button.png", "pop_button.png", "no", 1);

    this->addChild(pl);
外部回调函数实现。依据tag推断点了什么按钮
void WelcomeScene::popButtonCallback(Node *pNode){

    CCLog("【=====WelcomeScene::popButtonCallback======】button call back. tag: %d", pNode->getTag());

    //exit

    if(pNode->getTag() == 0){

        Director::getInstance()->end();

    }

}
恩。思路大概这样子,完整的对话框类例如以下,亲们能够复制直接使用
#pragma once

#include "cocos2d.h"

#include "cocos-ext.h"

using namespace cocos2d;

using namespace cocos2d::extension;

class PopupLayer : public LayerColor{

public:

	PopupLayer();

	~PopupLayer();

	virtual bool init();

	CREATE_FUNC(PopupLayer);

	static PopupLayer* create(const char* backgroundImage,Size dialogSize);

	//touch事件监听 屏蔽向下触摸

	bool onTouchBegan(Touch *touch, Event *event);

	void onTouchMoved(Touch *touch, Event *event);

	void onTouchEnded(Touch* touch, Event* event);

	//标题

	void setTitle(const char* title, int fontsize = 20);

	//文本

	void setContentText(const char* text, int fontsize = 20, int padding = 50, int paddintTop = 100);

	//设置button回调事件

	void setCallbackFunc(Ref* target, SEL_CallFuncN callfun);

	//加入button

	bool addButton(const char* normalImage, const char* selectedImage, const char* title, int tag = 0);

	virtual void onEnter();

	virtual void onExit();

	void backgroundFinish();

private:

	void buttonCallBack(Ref* pSender);

	// 文字内容两边的空白区

	int m_contentPadding;

	int m_contentPaddingTop;

	Size m_dialogContentSize;

	Ref* m_callbackListener;

	SEL_CallFuncN m_callback;

	//set and get

	CC_SYNTHESIZE_RETAIN(Menu*, m__pMenu, MenuButton);

	CC_SYNTHESIZE_RETAIN(Sprite*, m__sfBackGround, SpriteBackGround);

	CC_SYNTHESIZE_RETAIN(Scale9Sprite*, m__s9BackGround, Sprite9BackGround);

	CC_SYNTHESIZE_RETAIN(LabelTTF*, m__ltTitle, LabelTitle);

	CC_SYNTHESIZE_RETAIN(LabelTTF*, m__ltContentText, LabelContentText);

};
cpp文件实现例如以下:
#include "PopupLayer.h"

PopupLayer::PopupLayer():

	m__pMenu(NULL)

	, m_contentPadding(0)

	, m_contentPaddingTop(0)

	, m_callbackListener(NULL)

	, m_callback(NULL)

	, m__sfBackGround(NULL)

	, m__s9BackGround(NULL)

	, m__ltContentText(NULL)

	, m__ltTitle(NULL)

{

}

PopupLayer::~PopupLayer(){

	CC_SAFE_RELEASE(m__pMenu);

	CC_SAFE_RELEASE(m__sfBackGround);

	CC_SAFE_RELEASE(m__ltContentText);

	CC_SAFE_RELEASE(m__ltTitle);

	CC_SAFE_RELEASE(m__s9BackGround);

}

bool PopupLayer::init(){

	if(!LayerColor::init()){

		return false;

	}

	// 初始化须要的 Menu

	Menu* menu = Menu::create();

	menu->setPosition(CCPointZero);

	setMenuButton(menu);

	//add layer touch event

	auto listener = EventListenerTouchOneByOne::create();

	listener->setSwallowTouches(true);

	listener->onTouchBegan = CC_CALLBACK_2(PopupLayer::onTouchBegan, this);

	listener->onTouchMoved = CC_CALLBACK_2(PopupLayer::onTouchMoved, this);

	listener->onTouchEnded = CC_CALLBACK_2(PopupLayer::onTouchEnded, this);

	auto dispatcher = Director::getInstance()->getEventDispatcher();

	dispatcher->addEventListenerWithSceneGraphPriority(listener, this);

	setColor(ccc3(0,0,0));

	setOpacity(128);

	return true;

}

bool PopupLayer::onTouchBegan(Touch *touch, Event *event){

	return true;

}

void PopupLayer::onTouchMoved(Touch *touch, Event *event){

}

void PopupLayer::onTouchEnded(Touch* touch, Event* event){

}

PopupLayer* PopupLayer::create(const char* backgroundImage, Size dialogSize){

	PopupLayer* layer = PopupLayer::create();

//	layer->setSpriteBackGround(Sprite::create(backgroundImage));

	layer->setSprite9BackGround(Scale9Sprite::create(backgroundImage));

	layer->m_dialogContentSize = dialogSize;

	return layer;

}

void PopupLayer::setTitle(const char* title, int fontsize /* = 20 */){

	LabelTTF* label = LabelTTF::create(title,"",fontsize);

	setLabelTitle(label);

}

void PopupLayer::setContentText(const char *text, int fontsize, int padding, int paddingTop){

	LabelTTF* ltf = LabelTTF::create(text, "", fontsize);

	setLabelContentText(ltf);

	m_contentPadding = padding;

	m_contentPaddingTop = paddingTop;

}

void PopupLayer::setCallbackFunc(Ref* target, SEL_CallFuncN callfun){

	m_callbackListener = target;

	m_callback = callfun;

}

bool PopupLayer::addButton(const char* normalImage, const char* selectedImage, const char* title, int tag /* = 0 */){

	auto size = Director::getInstance()->getWinSize();

	auto center = Point(size.width / 2, size.height / 2);

	// 创建图片菜单按钮

	auto item = MenuItemImage::create(

		normalImage,

		selectedImage,

		CC_CALLBACK_1(PopupLayer::buttonCallBack,this));

	item->setTag(tag);

	item->setPosition(center);

	// 加入文字说明并设置位置

	Size itemSize = item->getContentSize();

	LabelTTF* ttf = LabelTTF::create(title, "", 20);

	ttf->setColor(Color3B(0, 0, 0));

	ttf->setPosition(Point(itemSize.width / 2, itemSize.height / 2));

	item->addChild(ttf);

	getMenuButton()->addChild(item);

	return true;

}

void PopupLayer::buttonCallBack(Ref* pSender){

	Node* node = dynamic_cast<Node*>(pSender);

	CCLog("【====PopupLayer::buttonCallBack====】touch tag: %d", node->getTag());

	if (m_callback && m_callbackListener){

		(m_callbackListener->*m_callback)(node);

	}

	this->removeFromParent();

}

void PopupLayer::onEnter(){

	LayerColor::onEnter();

	Size winSize = CCDirector::getInstance()->getWinSize();

	Point pCenter = Point(winSize.width / 2, winSize.height / 2);

//	Size contentSize ;

	// 设定好參数,在执行时载入

	//假设没有设置 ContentSize 。那么採取的方案是。窗体大小与传入图片一样大

// 	if (getContentSize().equals(this->getParent()->getContentSize())) {

// 		getSpriteBackGround()->setPosition(ccp(winSize.width / 2, winSize.height / 2));

// 		this->addChild(getSpriteBackGround(), 0, 0);

// 		contentSize = getSpriteBackGround()->getTexture()->getContentSize();

// 	} else {

// 		Scale9Sprite *background = getSprite9BackGround();

// 		background->setContentSize(getContentSize());

// 		background->setPosition(ccp(winSize.width / 2, winSize.height / 2));

// 		this->addChild(background, 0, 0);

// 		contentSize = getContentSize();

// 	}

	//加入背景图片

	Scale9Sprite *background = getSprite9BackGround();

	background->setContentSize(m_dialogContentSize);

	background->setPosition(Point(winSize.width / 2, winSize.height / 2));

	this->addChild(background,0,0);

	// 弹出效果

	Action* popupLayer = Sequence::create(

		ScaleTo::create(0.0, 0.0),

		ScaleTo::create(0.2, 1.05),

		ScaleTo::create(0.2, 0.95),

		ScaleTo::create(0.1, 1.0),

		CallFunc::create(CC_CALLBACK_0(PopupLayer::backgroundFinish,this)),

		NULL

		);

	background->runAction(popupLayer);

}

void PopupLayer::backgroundFinish(){

	Size winSize = CCDirector::getInstance()->getWinSize();

	Point pCenter = Point(winSize.width / 2, winSize.height / 2);

	// 加入按钮,并设置其位置

	this->addChild(getMenuButton());

	float btnWidth = m_dialogContentSize.width / (getMenuButton()->getChildrenCount() + 1);

	Vector<Node*> vector = getMenuButton()->getChildren();

	Ref* pObj = NULL;

	int i = 0;

	for(Node* pObj : vector){

		Node* node = dynamic_cast<Node*>(pObj);

		node->setPosition(Point( winSize.width / 2 - m_dialogContentSize.width / 2 + btnWidth * (i + 1), winSize.height / 2 - m_dialogContentSize.height / 3));

		i++;

	}

	// 显示对话框标题

	if (getLabelTitle()){

		getLabelTitle()->setPosition(ccpAdd(pCenter, ccp(0, m_dialogContentSize.height / 2 - 35.0f)));

		this->addChild(getLabelTitle());

	}

	// 显示文本内容

	if (getLabelContentText()){

		CCLabelTTF* ltf = getLabelContentText();

		ltf->setPosition(ccp(winSize.width / 2, winSize.height / 2));

		ltf->setDimensions(CCSizeMake(m_dialogContentSize.width - m_contentPadding * 2, m_dialogContentSize.height - m_contentPaddingTop));

		ltf->setHorizontalAlignment(kCCTextAlignmentLeft);

		this->addChild(ltf);

	}

}

void PopupLayer::onExit(){

	CCLog("popup on exit.");

	CCLayerColor::onExit();

}
cocos2d-x 模态对话框的实现的更多相关文章
- cocos2dx & cocostudio 实现模态对话框
用cocos2dx实现模态对话框 http://www.cnblogs.com/mrblue/(转自于) ui部分使用了cocoStudio,注意这里没有实现怎么屏蔽其他的输入事件,其他的文档已经太多 ...
- MFC编程 | 非模态对话框的定义
因为课程需要,会用到MFC编程,所以讲一些经验总结下,以便日后使用查询. // 非模态对话框的定义 // 通过单文档菜单调用一个非模态窗口 1.首先在工程里插入一个对话框(如:IDD_DLG_TEST ...
- bootstrap dialog 使用模态对话框
bootstrap3-dialog 使用模态对话框 <div class="modal fade"> <div class="modal-dialog& ...
- 【原创】WinForm 模态对话框
今天解决的一个问题,记录下,以备后用. 问题描述:WinForm程序有超时自动退出功能,但是有些模态对话框不关掉的话会退出失败,原因(猜测): 程序倒计时用的System.Windows.Forms. ...
- 关于easyUI的模态对话框
本文版权归博客园和作者吴双本人共同所有,转载和爬虫请注明原文地址.博客园蜗牛cnblogs.com/tdws 会用easyUI的模态对话框会是我们的开发更加简洁,只需下载这个插件,把需要的文件拖到项目 ...
- 自定义AlertView实现模态对话框
在Windows应用程序中,经常使用模态(Model)对话框来和用户进行简单的交互,比如登录框.在IOS应用程序中,有时我们也希望做同样的事情.但IOS的UI库中,没有模态对话框,最接近那个样子的应该 ...
- MFC编程入门之十二(对话框:非模态对话框的创建及显示)
上一节讲了模态对话框及其弹出过程,本节接着讲另一种对话框--非模态对话框的创建及显示. 非模态对话框显示后,程序其他窗口仍然能正常运行,可以响应用户输入,还可以相互切换.上一讲中创建的Tip模态对话框 ...
- MFC编程入门之十一(对话框:模态对话框及其弹出过程)
加法计算器对话框程序大家照着做一遍后,相信对基于对话框的程序有了些解了,有个好的开始对于以后的学习大有裨益.趁热打铁,这一节讲讲什么是对话框和非模态对话框,以及模态对话框怎样弹出. 一.模态对话框和非 ...
- MFC学习笔记(一)向模态对话框传递数据
声明构造函数为2个参数,具有默认参数的参数须放在后面. CDialogDimmer::CDialogDimmer(CString name,CWnd* pParent /*=NULL*/) : CDi ...
随机推荐
- http put post请求区别
1.RESTful API REST: Representational State Transfer url 对应服务器上的一种资源,e.g. 数据,图片等,所以url 中只含有名词,通过HTTP动 ...
- http 请求报文
1.报文 2.http请求方法 restful接口 post:创建 put:更新
- Web服务器讲解与JavaWeb应用部署(本机,以Tomcat为例)
转载请注明原文地址:http://www.cnblogs.com/ygj0930/p/6042290.html 在讨论Web系统发布之前,我们先来辨析两个概念:服务器.Web服务器. 通常,我们说的服 ...
- Yii2框架bootstrap样式理解
Yii2框架默认採用了bootstrap作为CSS风格,各种视图类组件都如此.之前一直採用默认风格,并在必要的时候加入或者改动一下class来达到目的.但在改版Yii1.1的orange项目时.发现之 ...
- QQ登录整合/oauth2.0认证-02-跳转到QQ互联页
---------------------------目录---------------------------------- QQ登录整合/oauth2.0认证-01-申请appkey和appid ...
- java计算时间差, 日期差小结
转自:https://blog.csdn.net/sy793314598/article/details/79544796 1.java 7中的日历类Calendar Calendar类使用其静态的g ...
- 【DeepLearning】Exercise:PCA and Whitening
Exercise:PCA and Whitening 习题链接:Exercise:PCA and Whitening pca_gen.m %%============================= ...
- mysqlsla快速入门
小强软件测试,因为不是天生丽质,所以必须天生励志. 性能.python自动化班长期招生,咨询QQ:2083503238 官网:http://xqtesting.sxl.cn QQ群:229390571 ...
- 业务、架构、技术,我们应该关注什么 Java和.Net的优势劣势简单看法 市场经济决定,商业之道即是软件之道,市场的需求决定着软件技术的发展 利益决定着选择应用新技术
业务.架构.技术,我们应该关注什么 一个企业存在的必然和前提就是获取企业生成的利润,怎么样合法合理取得利润呢,企业怎么样生存下去呢,很简单,为客户提供等值的产品与服务,客户支付你相应的报酬. 我们是从 ...
- php如何在某个时间上加一天?一小时? 时间加减(转)
<?php date_default_timezone_set('PRC'); //默认时区 echo "今天:",date("Y-m-d",time() ...