Linux 系统安装配置PHP服务(源码安装)
简介:
PHP(外文名:PHP: Hypertext Preprocessor,中文名:“超文本预处理器”)是一种通用开源脚本语言。语法吸收了C语言、Java和Perl的特点,利于学习,使用广泛,主要适用于Web开发领域。
标注:
配置nginx请参考此教程:
http://www.cnblogs.com/zoulongbin/p/6253568.html
配置mysql请参考此教程:
http://www.cnblogs.com/zoulongbin/p/6287167.html
配置网络yum源参考此教程:
http://www.cnblogs.com/zoulongbin/p/5773330.html
需要安装以下安装包:(使用网络yum源在线安装以下四个依赖包,本教程大部分使用下载的源码安装进行编译安装)
[root@ssticentos65 src]# yum -y install libcurl-devel (必须安装)
[root@ssticentos65 src]# yum -y install libXpm-devel (必须安装)
[root@ssticentos65 src]# yum -y install libxml2-devel (必须安装)
[root@ssticentos65 src]# yum -y install php-mbstring (自行选择安装)
提示:Linux软件编译安装都需要依赖两个安装包 gcc gcc-c++ make 可使用 yum -y install gcc gcc-c++ make 在线安装。
标注:下载的软件安装包统一存放路径在 /usr/local/src 目录下进行解压编译安装
1、 安装yasm
下载地址:http://www.tortall.net/projects/yasm/releases/
[root@ssticentos65 src]# cd yasm-1.3.0
[root@ssticentos65 yasm-1.3.0]# ./configure
[root@ssticentos65 yasm-1.3.0]# make
[root@ssticentos65 yasm-1.3.0]# make install
2、 安装libmcrypt
下载地址:https://sourceforge.net/projects/mcrypt/files/Libmcrypt/2.5.8/
[root@ssticentos65 src]# cd libmcrypt-2.5.8
[root@ssticentos65 libmcrypt-2.5.8]# ./configure
[root@ssticentos65 libmcrypt-2.5.8]# make
[root@ssticentos65 libmcrypt-2.5.8]# make install
3、 安装libvpx
下载地址: http://www.linuxfromscratch.org/blfs/view/svn/multimedia/libvpx.html
[root@ssticentos65 src]# cd libvpx-1.6.0
[root@ssticentos65 libvpx-1.6.0]#./configure --prefix=/usr/local/libvpx --enable-shared --enable-vp9
[root@ssticentos65 libvpx-1.6.0]# make
[root@ssticentos65 libvpx-1.6.0]# make install
4、 安装tiff
下载地址: http://download.osgeo.org/libtiff/
[root@ssticentos65 src]# cd tiff-4.0.6
[root@ssticentos65 tiff-4.0.6]#./configure --prefix=/usr/local/tiff --enable-shared
[root@ssticentos65 tiff-4.0.6]# make
[root@ssticentos65 tiff-4.0.6]# make install
5、 安装libpng
下载地址:http://www.libpng.org/pub/png/libpng.html
[root@ssticentos65 src]# cd libpng-1.6.28
[root@ssticentos65 libpng-1.6.28]#./configure --prefix=/usr/local/libpng --enable-shared
[root@ssticentos65 libpng-1.6.28]# make
[root@ssticentos65 libpng-1.6.28]# make install
6、 安装freetype
下载地址:http://ring.u-toyama.ac.jp/archives/graphics/freetype/freetype2/
[root@ssticentos65 src]# cd freetype-2.7.1
[root@ssticentos65 freetype-2.7.1]#./configure --prefix=/usr/local/freetype --enable-shared
[root@ssticentos65 freetype-2.7.1]# make
[root@ssticentos65 freetype-2.7.1]# make install
7、 安装jpeg
下载地址:http://www.ijg.org/files/
[root@ssticentos65 src]# cd jpeg-9a
[root@ssticentos65 jpeg-9a]#./configure --prefix=/usr/local/jpeg --enable-shared
[root@ssticentos65 jpeg-9a]# make
[root@ssticentos65 jpeg-9a]# make install
8、 安装libgd
下载地址:https://github.com/libgd/libgd/releases
[root@ssticentos65 src]# cd libgd-2.2.0
[root@ssticentos65 libgd-2.2.0]#./configure --prefix=/usr/local/libgd --enable-shared --with-jpeg=/usr/local/jpeg --with-png=/usr/local/libpng --with-freetype=/usr/local/freetype --with-fontconfig=/usr/local/freetype --with-xpm=/usr/ --with-tiff=/usr/local/tiff --with-webp=/usr/local/libwebp/
[root@ssticentos65 libgd-2.2.0]# make
[root@ssticentos65 libgd-2.2.0]# make install
9、 安装t1lib
下载地址:http://download.csdn.net/download/sunkaivg/9696064
[root@ssticentos65 src]# cd t1lib-5.1.2
[root@ssticentos65 t1lib-5.1.2]#./configure --prefix=/usr/local/t1lib --enable-shared
[root@ssticentos65 t1lib-5.1.2]# make without_doc
[root@ssticentos65 t1lib-5.1.2]# make install
10、 安装php
下载地址 :http://www.php.net/downloads.php
[root@ssticentos65 src]# ls
php-5.6.28 php-5.6.28.tar.gz
[root@ssticentos65 src]# pwd
/usr/local/src
[root@ssticentos65 src]# cd php-5.6.28
[root@ssticentos65 php-5.6.28]#./configure --prefix=/usr/local/php --with-config-file-path=/usr/local/php/etc --with-pdo-mysql=/usr/local/mysql --with-mysqli=/usr/local/mysql/bin/mysql_config --with-mysql-sock=/tmp/mysql.sock --with-pdo-mysql=/usr/local/mysql --with-gd --with-png-dir=/usr/local/libpng --with-jpeg-dir=/usr/local/jpeg --with-freetype-dir=/usr/local/freetype --with-xpm-dir=/usr/ --with-zlib-dir=/usr/local/zlib --with-iconv --enable-libxml --enable-xml --enable-bcmath --enable-shmop --enable-sysvsem --enable-inline-optimization --enable-opcache --enable-mbregex --enable-fpm --enable-mbstring --enable-ftp --enable-gd-native-ttf --with-openssl --enable-pcntl --enable-sockets --with-xmlrpc --enable-zip --enable-soap --without-pear --with-gettext --enable-session --with-mcrypt --with-curl --enable-ctype
[root@ssticentos65 php-5.6.28]# make
[root@ssticentos65 php-5.6.28]# make install
11、配置PHP
#显示php安装包存放路径
[root@ssticentos65 src]# pwd
/usr/local/src
[root@ssticentos65 src]# ls
php-5.6.28 php-5.6.28.tar.gz
[root@ssticentos65 src]# cd php-5.6.28
#复制php配置文件到安装目录
[root@ssticentos65 php-5.6.28]# cp php.ini-production /usr/local/php/etc/php.ini
#删除系统自带配置文件
[root@ssticentos65 php-5.6.28]# rm -rf /etc/php.ini
#添加软链接到 /etc目录
[root@ssticentos65 php-5.6.28]# ln -s /usr/local/php/etc/php.ini /etc/php.ini
[root@ssticentos65 php-5.6.28]# ls -l /etc/php.ini
lrwxrwxrwx 1 root root 26 Jan 6 02:22 /etc/php.ini -> /usr/local/php/etc/php.ini
#复制模板文件为php-fpm配置
[root@ssticentos65 php-5.6.28]# cp /usr/local/php/etc/php-fpm.conf.default /usr/local/php/etc/php-fpm.conf
#添加软件链接到 /etc目录
[root@ssticentos65 php-5.6.28]#ln -s /usr/local/php/etc/php-fpm.conf /etc/php-fpm.conf
#编辑php配置文件php-fpm.conf
[root@ssticentos65 php-5.6.28]# vim /usr/local/php/etc/php-fpm.conf
pid = run/php-fpm.pid //如果这个选项在配置文件存在就取消掉注释使用,如果不存在可以忽略,请勿手动添加,否则PHP启动会报错。
user = www
group = www
:wq! #保存并退出
12、设置php-fpm开机自启动
#复制php-fpm到启动目录
[root@ssticentos65 ~]# cp /usr/local/src/php-5.6.28/sapi/fpm/init.d.php-fpm /etc/init.d/php-fpm
[root@ssticentos65 ~]# ls -l /etc/init.d/php-fpm
-rw-r--r--. 1 root root 2354 Jan 6 02:37 /etc/init.d/php-fpm
#赋予php-fpm执行权限
[root@ssticentos65 ~]# chmod 755 /etc/init.d/php-fpm
[root@ssticentos65 ~]# ls -l /etc/init.d/php-fpm
-rwxr-xr-x. 1 root root 2354 Jan 6 02:37 /etc/init.d/php-fpm
#设置php-fpm开机启动
[root@ssticentos65 ~]# chkconfig php-fpm on
[root@ssticentos65 ~]# chkconfig --list php-fpm
php-fpm 0:off 1:off 2:on 3:on 4:on 5:on 6:off
#编辑php配置文件php.ini
[root@ssticentos65 ~]# vim /usr/local/php/etc/php.ini
找到:disable_functions =
修改成disable_functions= passthru,exec,system,chroot,scandir,chgrp,chown,shell_exec,proc_open,proc_get_status,ini_alter,ini_alter,ini_restore,dl,openlog,syslog,readlink,symlink,popepassthru,stream_socket_server,escapeshellcmd,dll,popen,disk_free_space,checkdnsrr,checkdnsrr,getservbyname,getservbyport,disk_total_space,posix_ctermid,posix_get_last_error,posix_getcwd,posix_getegid,posix_geteuid,posix_getgid,posix_getgrgid,posix_getgrnam,posix_getgroups,posix_getlogin,posix_getpgid,posix_getpgrp,posix_getpid,posix_getppid,posix_getpwnam,posix_getpwuid, posix_getrlimit,posix_getsid,posix_getuid,posix_isatty, posix_kill,posix_mkfifo,posix_setegid,posix_seteuid,posix_setgid, posix_setpgid,posix_setsid,posix_setuid,posix_strerror,posix_times,posix_ttyname,posix_uname
找到:date.timezone =
修改为:date.timezone = PRC #设置时区
找到:expose_php = On
修改为:expose_php = Off #禁止显示php版本的信息
找到:short_open_tag = Off
修改为:short_open_tag = On #支持php短标签
找到opcache.enable=0
修改为opcache.enable=1 #php支持opcode缓存
找到:opcache.enable_cli=1 #php支持opcode缓存
修改为:opcache.enable_cli=0
在最后一行添加:zend_extension=opcache.so #开启opcode缓存功能 (在文本按Shift+G就能跳到最后一行)
:wq! #保存并退出
13、配置nginx支持php
检查www用户和www用户组是否存在,不存在请手动创建
[root@ssticentos65 ~]# cat /etc/passwd | grep www
apache:x:48:48:Apache:/var/www:/sbin/nologin
www:x:501:3005::/home/www:/bin/bash
[root@ssticentos65 ~]# cat /etc/group | grep www
www:x:3005:
[root@ssticentos65 ~]# vim /usr/local/nginx/conf/nginx.conf
user www www;
#首行user去掉注释,修改Nginx运行组为www www;必须与/usr/local/php/etc/php-fpm.d/www.conf中的user,group配置相同,否则php运行出错
location / {
root html;
index index.html index.htm index.php; #添加index.php
}
location ~ \.php$ {
root html;
fastcgi_pass 127.0.0.1:9000;
fastcgi_index index.php;
fastcgi_param SCRIPT_FILENAME $document_root$fastcgi_script_name;
include fastcgi_params;
}
#取消FastCGI server部分location的注释,注意fastcgi_param行的参数,改为$document_root$fastcgi_script_name,或者使用绝对路径
:wq! #保存并退出
#启动nginx服务
[root@ssticentos65 ~]# /etc/init.d/nginx restart
#启动php服务
[root@ssticentos65 ~]# /etc/init.d/php-fpm start
14、测试php配置
#进入nginx默认网站根目录
[root@ssticentos65 ~]# cd /usr/local/nginx/html/
[root@ssticentos65 html]# ls
50x.html index.html
#删除默认测试页
[root@ssticentos65 html]# rm -rf /usr/local/nginx/html/*
[root@ssticentos65 html]# pwd
/usr/local/nginx/html
#新建index.php文件进行测试
[root@ssticentos65 html]# vim index.php
<?php
phpinfo();
?>
:wq! #保存并退出
#设置目录所有者为 www
[root@ssticentos65 html]# chown www.www /usr/local/nginx/html/ -R
#设置目录权限
[root@ssticentos65 html]# chmod 755 /usr/local/nginx/html/ -R
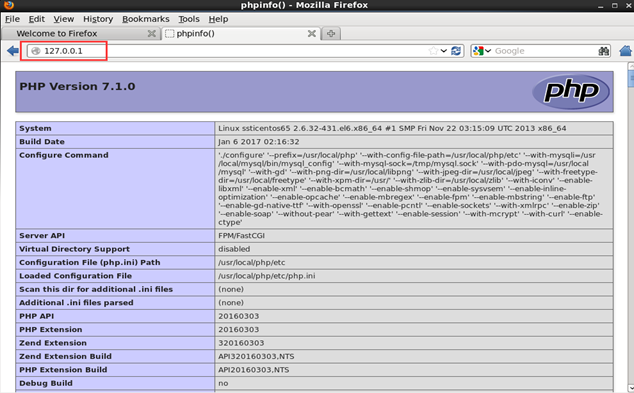
打开浏览器输入服务器IP地址,会看到下面的界面就是php安装成功
感谢此博客提供参考 http://www.osyunwei.com/archives/7891.html
Linux 系统安装配置PHP服务(源码安装)的更多相关文章
- linux 系统安装配置 zabbix服务(源码安装)
简介: zabbix是一个基于WEB界面的提供分布式系统监视以及网络监视功能的企业级的开源解决方案. zabbix能监视各种网络参数,保证服务器系统的安全运营:并提供灵活的通知机制以让系统管理员快速定 ...
- linux系统安装配置exim4(源码安装)
一.Exim4概述 Exim是一个MTA(Mail Transfer Agent,邮件传输代理)服务器软件,该软件基于GPL协议开发,是一款开源软件.该软件主要运行于类UNIX系统.通常该软件会与Do ...
- linux下MySQL 5.6源码安装
linux下MySQL 5.6源码安装 1.下载:当前mysql版本到了5.6.20 http://dev.mysql.com/downloads/mysql 选择Source Code 2.必要软件 ...
- linux应用之nginx的源码安装及配置(centos)
1.准备工作选首先安装这几个软件:GCC,PCRE(Perl Compatible Regular Expression),zlib,OpenSSL.Nginx是C写的,需要用GCC编译:Nginx的 ...
- centos下配置LNMP环境(源码安装)
准备工作,安装依赖库 yum -y install gcc automake autoconf libtool make gcc-c++ glibc libxslt-devel libjpeg lib ...
- 【程序包管理】Linux软件管理之src源码安装编译
在很多时候我们需要自定义软件的特性,这时就需要用到源码安装.那么,网上有很多编译源码的工具,那么,我们怎么知道别人使用的是什么工具呢.其实我也不知道(*^▽^*). 那么本篇博客主要是写C代码的源码安 ...
- linux下PostgreSQL数据库的源码安装
实验环境>>>>>>>>>>>>>>>>>>操作系统:CentOS release 6.3 ...
- linux应用之apache的源码安装(centos)
第一部分:前期准备 需要下载的东西 下载 Apache 源码包 下载地址: http://httpd.apache.org/download.cgi ...
- Apache网站服务源码安装与站点部署
简介: 在Internet 网络环境中,Web服务无疑是最为主流的应用系统,有了WEB站点,企业可以充分展示自己的产品,公司,宣传自己的企业形象,提供各种网上交流,业务平台等. Apache起源:源于 ...
随机推荐
- IIS6 301重定向和IIS7 301重定向
IIS6 301重定向 1.先在IIS里把网站正常发布,例如域名为(www.114390.com) 2.再硬盘上建一个空文件夹 3.再到IIS里建一个网站,例如域名为(114390.com),指向这个 ...
- SpringMVC中的 JSR 303 数据校验框架说明
JSR 303 是java为Bean数据合法性校验提供的标准框架,它已经包含在JavaEE 6.0中. JSR 303 通过在Bean属性上标注类似于@NotNull.@Max等标准的注解指定校验规则 ...
- vs code 快捷键的使用
vs code 快捷键的使用 shift + f12 快速查找函数的生成Ctrl+F12 查看单个函数的定义Shift+F12 查看所有函数的定义ctrl + ` 是打开运行的程序ctrl + Tab ...
- 组策略分发Adobe Reader 11教程
1, 实验环境 域控:Windows Server 2012 R2 客户端:Windows 7 Adobe Reader 版本:11.0.00 2, 获取分发 Adobe Reader 的许可协议 按 ...
- C#如何删除数组中的一个元素
C#如何删除数组中的一个元素,剩余的元素组成新数组,数组名不变double[] arr = new double[n];需要删除的是第m+1个数据arr[m]求新数组arr.(新数组arr包含n-1个 ...
- LeetCode: Best Time to Buy and Sell Stock 解题报告
Best Time to Buy and Sell Stock Say you have an array for which the ith element is the price of a gi ...
- C++类默认函数
问题,which is true??? 每个类都有一个无参构造函数 每个类都有一个拷贝构造函数 每个类可以有多个构造函数 每个类可以多个析构函数 默认构造函数 析构函数 拷贝构造函数 赋值 ...
- Python 入门网络爬虫之精华版
Python 入门网络爬虫之精华版 转载 宁哥的小站,总结的不错 Python学习网络爬虫主要分3个大的版块:抓取,分析,存储 另外,比较常用的爬虫框架Scrapy,这里最后也详细介绍一下. 首先列举 ...
- python 基础总结1
1.python简介特点: 是简单义学,有功能强大,高性能.面向对象,对动态输入的支持.解释性语言的本质,是大多数平台上理想的脚本语言. 简单,义学 免费, ...
- MYSQL优化9大法!
通常网站的性能瓶颈在数据库查询,如果你希望你的网站在一定阶段之内保持稳定,优化你的SQL和数据库是非常必要的一个优化环节.优化数据库是一个很大的话题,这里只是摘要一些比较关键的优化参考建议,并且需要具 ...