SpringBoot与数据层
1、JDBC
<dependency>

<groupId>org.springframework.boot</groupId>

<artifactId>spring‐boot‐starter‐jdbc</artifactId>

</dependency>

<dependency>

<groupId>mysql</groupId>

<artifactId>mysql‐connector‐java</artifactId>

<scope>runtime</scope>

</dependency>
spring:

datasource:

username: root

password: 123456

url: jdbc:mysql://192.168.15.22:3306/jdbc

driver‐class‐name: com.mysql.jdbc.Driver
效果:
默认是用org.apache.tomcat.jdbc.pool.DataSource作为数据源;
数据源的相关配置都在DataSourceProperties里面;
自动配置原理:
org.springframework.boot.autoconfigure.jdbc:
1、参考DataSourceConfiguration,根据配置创建数据源,默认使用Tomcat连接池;可以使用
spring.datasource.type指定自定义的数据源类型;
2、SpringBoot默认可以支持;
org.apache.tomcat.jdbc.pool.DataSource、HikariDataSource、BasicDataSource、
3、自定义数据源类型
/**

* Generic DataSource configuration.

*/

@ConditionalOnMissingBean(DataSource.class)

@ConditionalOnProperty(name = "spring.datasource.type")

static class Generic {

@Bean

public DataSource dataSource(DataSourceProperties properties) {

//使用DataSourceBuilder创建数据源,利用反射创建响应type的数据源,并且绑定相关属性

return properties.initializeDataSourceBuilder().build();

}

}
4、DataSourceInitializer:ApplicationListener;
作用:
1)、runSchemaScripts();运行建表语句;
2)、runDataScripts();运行插入数据的sql语句;
默认只需要将文件命名为:
schema‐*.sql、data‐*.sql

默认规则:schema.sql,schema‐all.sql;

可以使用

schema:

‐ classpath:department.sql

指定位置
5、操作数据库:自动配置了JdbcTemplate操作数据库
2、整合Druid数据源
导入druid数据源

@Configuration

public class DruidConfig {

@ConfigurationProperties(prefix = "spring.datasource")

@Bean

public DataSource druid(){

return new DruidDataSource();

}

//配置Druid的监控

//1、配置一个管理后台的Servlet

@Bean

public ServletRegistrationBean statViewServlet(){

ServletRegistrationBean bean = new ServletRegistrationBean(new StatViewServlet(),

"/druid/*");

Map<String,String> initParams = new HashMap<>();

initParams.put("loginUsername","admin");

initParams.put("loginPassword","123456");

initParams.put("allow","");//默认就是允许所有访问

initParams.put("deny","192.168.15.21");

bean.setInitParameters(initParams);

return bean;

}

//2、配置一个web监控的filter

@Bean

public FilterRegistrationBean webStatFilter(){

FilterRegistrationBean bean = new FilterRegistrationBean();

bean.setFilter(new WebStatFilter());

Map<String,String> initParams = new HashMap<>();

initParams.put("exclusions","*.js,*.css,/druid/*");

bean.setInitParameters(initParams);

bean.setUrlPatterns(Arrays.asList("/*"));

return bean;

}

}
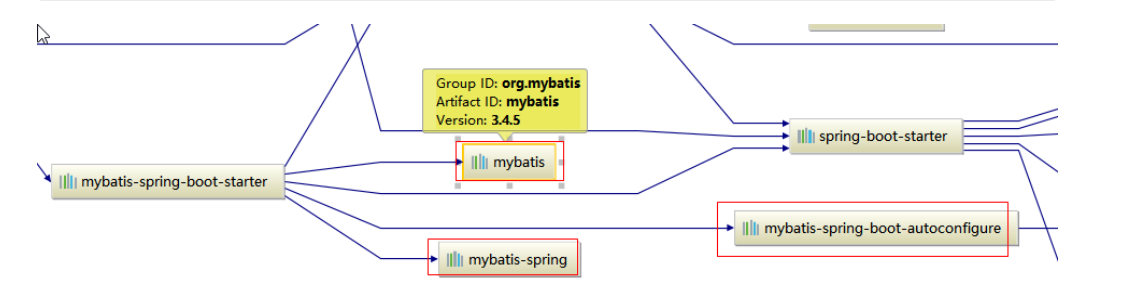
3、整合MyBatis
<dependency>

<groupId>org.mybatis.spring.boot</groupId>

<artifactId>mybatis‐spring‐boot‐starter</artifactId>

<version>1.3.1</version>

</dependency>
步骤:
1)、配置数据源相关属性(见上一节Druid)
2)、给数据库建表
3)、创建JavaBean
4)、注解版
//指定这是一个操作数据库的mapper

@Mapper

public interface DepartmentMapper {

@Select("select * from department where id=#{id}")

public Department getDeptById(Integer id);

@Delete("delete from department where id=#{id}")

public int deleteDeptById(Integer id);

@Options(useGeneratedKeys = true,keyProperty = "id")

@Insert("insert into department(departmentName) values(#{departmentName})")

public int insertDept(Department department);

@Update("update department set departmentName=#{departmentName} where id=#{id}")

public int updateDept(Department department);

}
问题:
自定义MyBatis的配置规则;给容器中添加一个ConfigurationCustomizer;
@org.springframework.context.annotation.Configuration

public class MyBatisConfig {

@Bean

public ConfigurationCustomizer configurationCustomizer(){

return new ConfigurationCustomizer(){

@Override

public void customize(Configuration configuration) {

configuration.setMapUnderscoreToCamelCase(true);

}

};

}

}
使用MapperScan批量扫描所有的Mapper接口;

@MapperScan(value = "com.atguigu.springboot.mapper")

@SpringBootApplication

public class SpringBoot06DataMybatisApplication {

public static void main(String[] args) {

SpringApplication.run(SpringBoot06DataMybatisApplication.class, args);

}

}
5)、配置文件版
mybatis:

config‐location: classpath:mybatis/mybatis‐config.xml 指定全局配置文件的位置

mapper‐locations: classpath:mybatis/mapper/*.xml 指定sql映射文件的位置
更多使用参照
http://www.mybatis.org/spring-boot-starter/mybatis-spring-boot-autoconfigure/
4、整合SpringData JPA
1)、SpringData简介
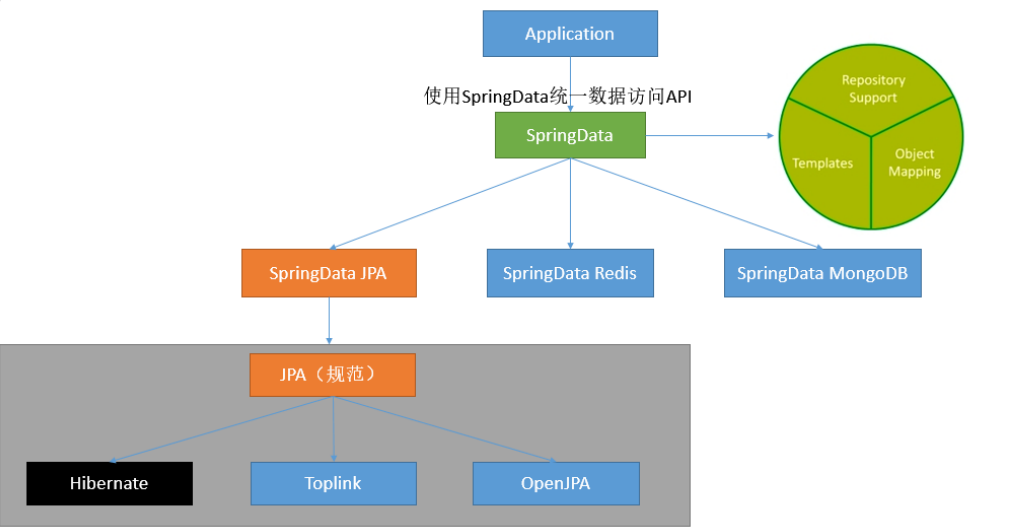
2)、整合SpringData JPA
JPA:ORM(Object Relational Mapping);
1)、编写一个实体类(bean)和数据表进行映射,并且配置好映射关系;
//使用JPA注解配置映射关系

@Entity //告诉JPA这是一个实体类(和数据表映射的类)

@Table(name = "tbl_user") //@Table来指定和哪个数据表对应;如果省略默认表名就是user;

public class User {

@Id //这是一个主键

@GeneratedValue(strategy = GenerationType.IDENTITY)//自增主键

private Integer id;

@Column(name = "last_name",length = 50) //这是和数据表对应的一个列

private String lastName;

@Column //省略默认列名就是属性名

private String email;
2)、编写一个Dao接口来操作实体类对应的数据表(Repository)
//继承JpaRepository来完成对数据库的操作

public interface UserRepository extends JpaRepository<User,Integer> {

}
3)、基本的配置JpaProperties
spring:

jpa:

hibernate:

# 更新或者创建数据表结构

ddl‐auto: update

# 控制台显示SQL

show‐sql: true
SpringBoot与数据层的更多相关文章
- Spring Boot 系列(九)数据层-集成Spring-data-jpa
实际开发中,不可避免地会对数据进行反复的增删改查操作,然而这部分工作是十分繁琐枯燥的.那么,随即而生的ORM框架就能很好的解决这个问题. 我们常用的ORM框架有:Hibernate.Mybatis.J ...
- Spring Boot 2.X(二):集成 MyBatis 数据层开发
MyBatis 简介 概述 MyBatis 是一款优秀的持久层框架,支持定制化 SQL.存储过程以及高级映射.它采用面向对象编程的方式对数据库进行 CRUD 的操作,使程序中对关系数据库的操作更方便简 ...
- SpringBoot之数据访问和事务-专题三
SpringBoot之数据访问和事务-专题三 四.数据访问 4.1.springboot整合使用JdbcTemplate 4.1.1 pom文件引入 <parent> <groupI ...
- 【开源】OSharp框架解说系列(5.2):EntityFramework数据层实现
OSharp是什么? OSharp是个快速开发框架,但不是一个大而全的包罗万象的框架,严格的说,OSharp中什么都没有实现.与其他大而全的框架最大的不同点,就是OSharp只做抽象封装,不做实现.依 ...
- 【开源】OSharp框架解说系列(5.1):EntityFramework数据层设计
OSharp是什么? OSharp是个快速开发框架,但不是一个大而全的包罗万象的框架,严格的说,OSharp中什么都没有实现.与其他大而全的框架最大的不同点,就是OSharp只做抽象封装,不做实现.依 ...
- 【类库】私房干货.Net数据层方法的封装
[类库]私房干货.Net数据层方法的封装 作者:白宁超 时间:2016年3月5日22:51:47 摘要:继上篇<Oracle手边常用70则脚本知识汇总>文章的发表,引起很多朋友关注.便促使 ...
- 23、ASP.NET MVC入门到精通——业务层和数据层父类及接口-T4模板
本系列目录:ASP.NET MVC4入门到精通系列目录汇总 在上一篇中,我们已经把项目的基本框架搭起来了,这一篇我们就来实现业务层和数据层的父接口及父类. 1.我们先来定义一个业务层父接口IBaseB ...
- 【转】Caffe初试(四)数据层及参数
要运行caffe,需要先创建一个模型(model),如比较常用的Lenet,Alex等,而一个模型由多个层(layer)构成,每一层又由许多参数组成.所有的参数都定义在caffe.proto这个文件中 ...
- C#在数据层过滤属性中的主键
C#使用泛型+反射做为数据层时,一个很都头疼的问题,如何让C#属性在程序里识别出哪个属性是主键,在拼接SQL时,不能把主键拼接到SQL语句里. 这个需要自定义一个属性.新建一个类文件,命名为Prosp ...
随机推荐
- Dapr 运用之集成 Asp.Net Core Grpc 调用篇
前置条件: <Dapr 运用> 改造 ProductService 以提供 gRPC 服务 从 NuGet 或程序包管理控制台安装 gRPC 服务必须的包 Grpc.AspNetCore ...
- liunx新装tomcat之后,tomcat不能识别新发布的项目
遇到的问题 在liunx新装tomcat之后,发布之前的项目,发现在tomcat不能识别新发布的项目,打成war包,还是直接把项目拷贝过去都不行. 环境:虚拟机:VMware 主机系统:win10 虚 ...
- vscode代码自动补全失效
前段时间,朋友说自己的vscode突然出现了代码不能自动补全的问题(主要是js,其他语言也可以参考) 症状表现为,刚打开vscode有自动补全,过了一会,突然就没了,反反复复 解决过程也是相当坎坷了 ...
- 构建 CDN 分发网络架构简析
构建 CDN 分发网络架构 CDN的基本目的:1.通过本地缓存实现网站的访问速度的提升 CDN的关键点:CNAME在域名解析:split智能分发,引流到最近缓存节点
- adb shell常用命令
一.文件操作相关命令 1.文件操作命令 子命令 参数 说明 cd 无 进入目录 cat [-beflnstuv] [-B bsize] [file...] 查看文件内容-n:显示行号-b:显示行号,但 ...
- Mysql被黑客入侵及安全措施总结
情况概述 今天登陆在腾讯云服务器上搭建的 MySQL 数据库,发现数据库被黑了,黑客提示十分明显. MySQL 中只剩下两个数据库,一个是information_schema,另一个是黑客创建的PLE ...
- java正则表达式大全(常用)
一.校验数字的表达式 数字:^[-]*$ n位的数字:^\d{n}$ 至少n位的数字:^\d{n,}$ m-n位的数字:^\d{m,n}$ 零和非零开头的数字:^(|[-][-]*)$ 非零开头的最多 ...
- 用 Keras 实现单词级的 one-hot 编码 & 使用散列技巧的单词级的 one-hot 编码
from keras.preprocessing.text import Tokenizer samples = ['The cat sat on the mat.', 'The dog ate my ...
- js实现常见排序算法
电脑配置 CPU:AMD X4 640 内存: 宏想 DDR3 1600MHz 8g 主板:华擎 980DE3/U3S3 R2.0 浏览器:chrome 79.0.3945.88(正式版本) (64 ...
- 自己封装Linux命令行万能解压命令
问题背景 Linux下经常需要解压文件,直接在命令行敲命令解压是最便捷的. 但问题在于,不同的压缩格式,需要用不同命令和不同参数,完全记不住啊. 解决方式 既然记不住,那就换一种思路,假如有一条命令能 ...