Android中后台的劳动者“服务”
前言
作为四大组件之一的Service,想必不少开发者都是了解的,那具体熟悉吗?是不是对Service中的每个知识点是否了解,它与Activity的关系又是什么样的,我们所理解的后台服务跟Service是否一样,那跟Thread有什么区别呢,带着这些问题,就可以写一篇文章来一一展开了。
目录
- Service是什么
- Service生命周期
- Service基本用法
- Service与Activity的关系
- Service与Thread的区别
- 小结
Service是什么
从官网中,我们可以看到这么一句:
Most confusion about the Service class actually revolves around what it is not:
- A Service is not a separate process. The Service object itself does not imply it is running in its own process; unless otherwise specified, it runs in the same process as the application it is part of.
- A Service is not a thread. It is not a means itself to do work off of the main thread (to avoid Application Not Responding errors).
Thus a Service itself is actually very simple, providing two main features:
- A facility for the application to tell the system about something it wants to be doing in the background (even when the user is not directly interacting with the application). This corresponds to calls to Context.startService(), which ask the system to schedule work for the service, to be run until the service or someone else explicitly stop it.
- A facility for an application to expose some of its functionality to other applications. This corresponds to calls to Context.bindService(), which allows a long-standing connection to be made to the service in order to interact with it.
简单来说,Service不是一个独立的进程,除非它被特殊指定,否则它也是我们应用程序的一部分,它需要依赖于创建服务时所在的应用程序。同时Service也不是一个线程,它其实是在主线程工作的,所以不能在Service中处理耗时的操作,不然就会出现ARN现象,如果要处理耗时的操作,可以新开一个子线程,单独处理。
更进一步讲,Service是 Android中实现程序后台运行的解决方案,它非常适合用于去执行那 些不需要和用户交互而且还要求长期运行的任务。服务的运行不依赖于任何用户界面,即使 当程序被切换到后台,或者用户打开了另外一个应用程序,服务仍然能够保持正常运行。
Service有两种启动方式,一种是通过startService()方式,一种是通过bindService()方式,那这两种具体有什么区别呢,我们可以看下它们的生命周期来看出端倪。
Service生命周期
看张图:
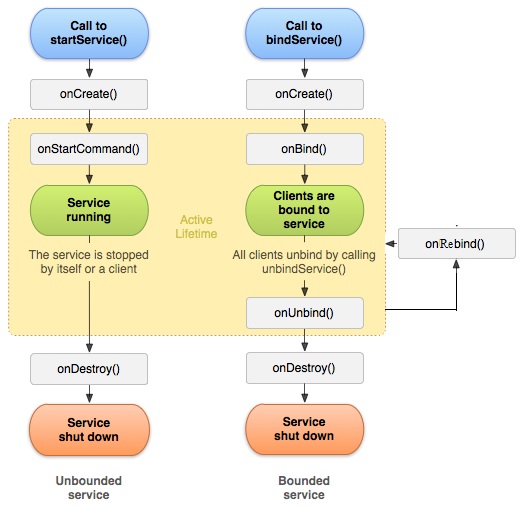
从图中我们可以看到两种不同的启动方式,分别是context.startService()和context.bindService()。
startService()启动的生命周期:
当我们第一次使用startService启动一个服务时,系统实例化一个Service实例,然后依次调用onCreate()和onStartCommand()方法,然后运行,需要注意的是,再次使用startService方法时,不会在创建一个新的服务对象了,但还是会再次执行onStartCommand()方法,如果我们想要停掉一个服务,可以用stopService方法,此时,onDestroy()方法就会被调用,不管前面使用了多少次的startService,stopService方法调用一次,就可停掉服务。
bindService()启动的生命周期:
当调用者首次使用bindService绑定一个服务时,系统会实例化一个Service实例,并一次调用其onCreate()方法和onBind()方法,然后调用者就可以和服务进行交互了,此后,如果再次使用bindService绑定服务,系统不会创建新的Service实例,也不会再调用onBind方法;如果我们需要解除与这个服务的绑定,可使用unbindService方法,此时onUnbind方法和onDestroy方法会被调用。
这两个启动方式的不同,导致生命周期也不同。startService与调用者没有必然的联系,即调用者结束了自己的生命周期,只要没有使用stopService方法停止这个服务,服务仍会运行。而bindService需要有个寄宿的对象,就相当于bind到某个宿主中去,谁绑定了,谁就要负责,负责它的生命周期,从开始到结束,如果宿主自己的生命周期结束了,bindService模式就要先把服务给销毁掉。
值得注意的一点是,如果调用者首先是先用startService方式启动服务,然后再用bindService方式绑定某个服务的话,一定要先用unbindService方式解绑,然后才用stopService方式销毁服务对象,不然的话,仅仅只是stopService是不够的,没解绑的对象还是在的,就容易造成内存泄露了。
Service基本用法
首先要定义个类,继承Service类,比如我们可以定义一个叫做MyService的类,具体如下:
public class MyService extends Service {

	private static final String TAG =  MyService.class.getSimpleName();

	private MyBinder mBinder = new MyBinder();

	@Override

	public void onCreate() {

		TLog.i(TAG,"onCreate()");

		super.onCreate();

	}

	@Override

	public void onDestroy() {

		TLog.i(TAG,"onDestroy()");

		super.onDestroy();

	}

	@Override

	public boolean onUnbind(Intent intent) {

		TLog.i(TAG,"onUnbind()");

		return super.onUnbind(intent);

	}

	@Override

	public int onStartCommand(Intent intent, int flags, int startId) {

		TLog.i(TAG,"onStartCommand()");

		return super.onStartCommand(intent, flags, startId);

	}

	@Nullable

	@Override

	public IBinder onBind(Intent intent) {

		TLog.i(TAG,"onBind()");

		return mBinder;

	}

	public class MyBinder extends Binder {

		public void startDownload() {

			Log.d("TAG", "startDownload()");

			// 执行具体的下载任务

		}

	}

}
然后写个界面来控制服务的启动和关闭
<?xml version="1.0" encoding="utf-8"?>

<LinearLayout xmlns:android="http://schemas.android.com/apk/res/android"

              android:orientation="vertical"

              android:layout_width="match_parent"

              android:layout_height="match_parent">

    <Button

        android:layout_width="wrap_content"

        android:layout_height="wrap_content"

        android:text="启动服务"

        android:id="@+id/recommend_btn_start"/>

    <Button

        android:layout_width="wrap_content"

        android:layout_height="wrap_content"

        android:text="停止服务"

        android:id="@+id/recommend_btn_stop"/>

    <Button

        android:layout_width="wrap_content"

        android:layout_height="wrap_content"

        android:text="绑定服务"

        android:id="@+id/recommend_btn_bind"/>

    <Button

        android:layout_width="wrap_content"

        android:layout_height="wrap_content"

        android:text="解绑服务"

        android:id="@+id/recommend_btn_unbind"/>

</LinearLayout>
相应的后台处理类,给按钮增加事件处理。
public class RecommendFragment extends BaseFragment implements OnTabReselectListener {

	@BindView(R.id.recommend_btn_start)

	Button mStart;

	@BindView(R.id.recommend_btn_stop)

	Button mStop;

	@BindView(R.id.recommend_btn_bind)

	Button mBind;

	@BindView(R.id.recommend_btn_unbind)

	Button mUnBind;

	private Unbinder unbinder;

	private MyService.MyBinder myBinder;

	private ServiceConnection connection = new ServiceConnection() {

		@Override

		public void onServiceDisconnected(ComponentName name) {

		}

		@Override

		public void onServiceConnected(ComponentName name, IBinder service) {

			myBinder = (MyService.MyBinder) service;

			myBinder.startDownload();

		}

	};

	@Override

	protected int getLayoutId() {

		return R.layout.fragment_recommend;

	}

	@Override

	protected void initView(View view, Bundle savedInstanceState) {

		unbinder = ButterKnife.bind(this,view);

		mStart.setOnClickListener(this);

		mStop.setOnClickListener(this);

		mBind.setOnClickListener(this);

		mUnBind.setOnClickListener(this);

	}

	@Override

	public void onClick(View v) {

		switch (v.getId()){

			case R.id.recommend_btn_start:

				Intent startIntent = new Intent(getHoldingActivity(), MyService.class);

				getHoldingActivity().startService(startIntent);

				break;

			case R.id.recommend_btn_stop:

				Intent stopIntent = new Intent(getHoldingActivity(), MyService.class);

				getHoldingActivity().stopService(stopIntent);

				break;

			case R.id.recommend_btn_bind:

				Intent bindIntent = new Intent(getHoldingActivity(), MyService.class);

				getHoldingActivity().bindService(bindIntent,connection, Context.BIND_ADJUST_WITH_ACTIVITY);

				break;

			case R.id.recommend_btn_unbind:

				getHoldingActivity().unbindService(connection);

				break;

		}

	}

	@Override

	public void onTabReselect() {

	}

	@Override

	public void onDestroyView() {

		super.onDestroyView();

		unbinder.unbind();

	}

}
我们首先用startService方式来启动服务
当点击启动服务时,日志打印如下:

当点击停止服务时,日志打印如下:

我们再用bindService方式来启动服务
此时我们可以看到一个ServiceConnection的一个实例,构成了Service与调用者的通信,在Activity里具体代码如下:
private ServiceConnection connection = new ServiceConnection() {

		@Override

		public void onServiceDisconnected(ComponentName name) {

		}

		@Override

		public void onServiceConnected(ComponentName name, IBinder service) {

			myBinder = (MyService.MyBinder) service;

			myBinder.startDownload();

		}

	};
然后在调用的时候开始启动绑定服务,使用这么一句:
getHoldingActivity().bindService(bindIntent,connection, Context.BIND_ADJUST_WITH_ACTIVITY);
当点击绑定服务时,日志打印如下:

当点击解绑服务时,日志打印如下:

Service与Activity的关系
其实Service与Activity都是属于四大组件之一,可能有几个关键区别是:
1,Activity是相当于应用程序的门面,用户看到最多的交互界面,可以点击滑动之类的,然而Service则是默默的后台运行,默默的服务着,可以说它是没有界面的Activity,也是有自己的生命周期。
2,Service与Activity都是属于UI线程中运行,都不能做耗时操作,如果需要耗时,比如网络请求,I/O读写之类的,都需要重新开个异步线程,然后进行回调更新UI内容。
3,如果Service中是用bindService方式的话,一般同一个Service对象可以被多个Activity对象使用,可以共享Service实例,所以在Activity对象销毁之前,先解绑Service对象。
4,在Service的onDestroy()方法里去清理掉那些不再使用的资源,防止在Service被销毁后还会有一些不再使用的对象仍占用着内存。
5,一个Service对象在被启动后,如果startService方法调用多次,返回的Service对象还是之前建立过的,不会启动一个新的对象,这跟Activity是有点不一样,Activity是有四种的标准模式。
Service与Thread的区别
说实话,Service与Thread这两个是没有什么关系的。因为我们知道Service是运行在UI线程中,那么当需要耗时操作的时候,就需要Thread帮助,不是说Service因为是在后台运行,就跟Thread等同了。Thread是用于开启一个子线程,在这里去执行一些耗时操作就不会阻塞主线程的运行。而Service我们最初理解的时候,总会觉得它是用来处理一些后台任务的,一些比较耗时的操作也可以放在这里运行,这就会让人产生混淆了。
Android的后台就是指,它的运行是完全不依赖UI的。即使Activity被销毁,或者程序被关闭,只要进程还在,Service就可以继续运行。比如说一些应用程序,始终需要与服务器之间始终保持着心跳连接,就可以使用Service来实现。
既然在Service里要创建一个子线程,那为什么不直接在Activity里创建呢?这是因为Activity很难对Thread进行控制,当Activity被销毁之后,就没有任何其它的办法可以再重新获取到之前创建的子线程的实例。而且在一个Activity中创建的子线程,另一个Activity无法对其进行操作。但是Service就不同了,所有的Activity都可以与Service进行关联,然后可以很方便地操作其中的方法,即使Activity被销毁了,之后只要重新与Service建立关联,就又能够获取到原有的Service中Binder的实例。因此,使用Service来处理后台任务,Activity就可以放心地finish,完全不需要担心无法对后台任务进行控制的情况。
小结
经过上面的讲诉,不知大家是否清楚点,可以说Service与Activity都是属于四大组件之一,只不过我们平时用的多都是Activity,Service用的比较少。这跟所开发的应用程序类型有关吧,比如常见的听歌应用,听书应用的,当我们锁屏的时候,一般都是在后台播放,此时Service就派上用场了,还有一种场景是远程Service的用法,进程之间的通信,多个APP共用一个Service进程对象,具体可以参考这篇文章: Android Service完全解析,关于服务你所需知道的一切(下)
阅读扩展
源于对掌握的Android开发基础点进行整理,罗列下已经总结的文章,从中可以看到技术积累的过程。
1,Android系统简介
2,ProGuard代码混淆
3,讲讲Handler+Looper+MessageQueue关系
4,Android图片加载库理解
5,谈谈Android运行时权限理解
6,EventBus初理解
7,Android 常见工具类
8,对于Fragment的一些理解
9,Android 四大组件之 " Activity "
10,Android 四大组件之" Service "
11,Android 四大组件之“ BroadcastReceiver "
12,Android 四大组件之" ContentProvider "
13,讲讲 Android 事件拦截机制
14,Android 动画的理解
15,Android 生命周期和启动模式
16,Android IPC 机制
17,View 的事件体系
18,View 的工作原理
19,理解 Window 和 WindowManager
20,Activity 启动过程分析
21,Service 启动过程分析
22,Android 性能优化
23,Android 消息机制
24,Android Bitmap相关
25,Android 线程和线程池
26,Android 中的 Drawable 和动画
27,RecylerView 中的装饰者模式
28,Android 触摸事件机制
29,Android 事件机制应用
30,Cordova 框架的一些理解
31,有关 Android 插件化思考
32,开发人员必备技能——单元测试
Android中后台的劳动者“服务”的更多相关文章
- Android中后台线程如何与UI线程交互
我想关于这个话题已经有很多前辈讨论过了.今天算是一次学习总结吧. 在android的设计思想中,为了确保用户顺滑的操作体验.一些耗时的任务不能够在UI线程中运行,像访问网络就属于这类任务.因此我们必须 ...
- 一个Demo学完Android中所有的服务(转)
说明:这个例子实现了Android中常见的许多服务,下面是实现的截图 接下来,以源代码的方式分析这个例子 1.MainActivity--主界面 这个类主要是实现用户所看到的这个Activity, ...
- 在Android开发中调用Rest web服务(转)
首先从维基百科上拷贝一点Rest的基本概念给大家看看,然后我们再开始详解在Android中如何调用Rest服务.表象化状态转变(英文:Representational State Transfer,简 ...
- Android中UI线程与后台线程交互设计的5种方法
我想关于这个话题已经有很多前辈讨论过了.今天算是一次学习总结吧. 在android的设计思想中,为了确保用户顺滑的操作体验.一 些耗时的任务不能够在UI线程中运行,像访问网络就属于这类任务.因此我们必 ...
- Android中UI线程与后台线程交互设计的6种方法
在android的设计思想中,为了确保用户顺滑的操作体验.一些耗时的任务不能够在UI线程中运行,像访问网络就属于这类任务.因此我们必须要重新开启 一个后台线程运行这些任务.然而,往往这些任务最终又会直 ...
- Android中的各种访问权限Permission含义
android.permission.EXPAND_STATUS_BAR 允许一个程序扩展收缩在状态栏,android开发网提示应该是一个类似Windows Mobile中的托盘程序 android. ...
- Android中的跨进程通信方法实例及特点分析(一):AIDL Service
转载请注明出处:http://blog.csdn.net/bettarwang/article/details/40947481 近期有一个需求就是往程序中增加大数据的採集点,可是由于我们的Andro ...
- Android中如何像 360 一样优雅的杀死后台服务而不启动
Android中,虽然有很多方法(API或者shell命令)杀死后台`service`,但是仍然有很多程序几秒内再次启动,导致无法真正的杀死.这里主要着重介绍如何像 360 一样杀死Android后台 ...
- Android中Service(服务)详解
http://blog.csdn.net/ryantang03/article/details/7770939 Android中Service(服务)详解 标签: serviceandroidappl ...
随机推荐
- Centos7 Docker 多主机 容器互连--基于OVS
来一张自己画的图,mark:2016年6月27日17:09:14 自己理解,如有错误 多谢指教. centos7, 部署OVS和docker.以及基于centos6.8的ssh images 命令. ...
- HTML 常用标签
一.基础标签 <!-- --> 定义注释 <!DOCTYPE> 定义文档类型 <style> 定义文档的样式信息 <meta> 定义关于HTML文 ...
- openCV C++ 代码笔记
代码片段1 cv_contourMask_step_tmp=cv_contourMask.clone(); cv::Mat maskImage; UIImageToMat(pathimg, maskI ...
- 在 Azure 上使用 Docker运行 Mono
Docker 是最近相当热门的一个名词,它是一个基于 Linux Container 的轻量化的虚拟技术,而微软也相当积极与 Docker 合作,在 Azure 上支持这个火热的技术,并且提供简单的方 ...
- c#开源消息队列中间件EQueue 教程
一.简介 EQueue是一个参照RocketMQ实现的开源消息队列中间件,兼容Mono,具体可以参看作者的文章<分享一个c#写的开源分布式消息队列equeue>.项目开源地址:https: ...
- ABP理论学习之OData集成(新增)
返回总目录 本篇目录 介绍 安装 创建控制器 例子 样例项目 介绍 OData在其官网的定义是: 允许以一种 简单且标准的方式创建和使用可查询的.可互操作的RESTful APIs. 在ABP中也可以 ...
- 关于新书《修炼之道:.NET开发要点精讲》的各种说明
索引 新书介绍 新书封面 新书目录 试读章节 原稿试读 网购地址 规格参数 反馈方式 一些感谢 附加说明 1.新书介绍 从2013年年底到2014年9月,历时将近10个月,这本书终于看到了“出版发行” ...
- IIS发布站点错误收集(持续更新)
本文主要收集IIS在发布站点过程中遇到的错误,并提供解决办法.并亲测可行.如果您也在使用IIS发布站点的过程中遇到了一些问题,欢迎留言提问. (1.) HTTP错误500.21-Internal Se ...
- 如何设计一门语言(十)——正则表达式与领域特定语言(DSL)
几个月前就一直有博友关心DSL的问题,于是我想一想,我在gac.codeplex.com里面也创建了一些DSL,于是今天就来说一说这个事情. 创建DSL恐怕是很多人第一次设计一门语言的经历,很少有人一 ...
- A Beginner's Guide to Paxos
Google Drive: A Beginner's Guide to Paxos The code ideas of Paxos protocol: 1) Optimistic concurrenc ...