Bert文本分类实践(二):魔改Bert,融合TextCNN的新思路
写在前面
文本分类是nlp中一个非常重要的任务,也是非常适合入坑nlp的第一个完整项目。虽然文本分类看似简单,但里面的门道好多好多,博主水平有限,只能将平时用到的方法和trick在此做个记录和分享,希望各位看官都能有所收获。并且尽可能提供给出简洁,清晰的代码实现。
本文采用的文本分类模型是基于Bert和TextCNN的方法进行魔改,在博主实际的有关文本分类的工作中取得了F1值超越Bert基础模型近4%的效果。大家可以用自己的数据尝试一下哦 - _ *
有关于Bert文本分类baseline版本请参考此处
第一部分
模型
Bert模型是Google在2018年10月发布的语言表示模型,一经问世在NLP领域横扫了11项任务的最优结果,可谓风头一时无二。有关于Bert中transformer的模型细节,推荐看这篇。在此不做赘述。
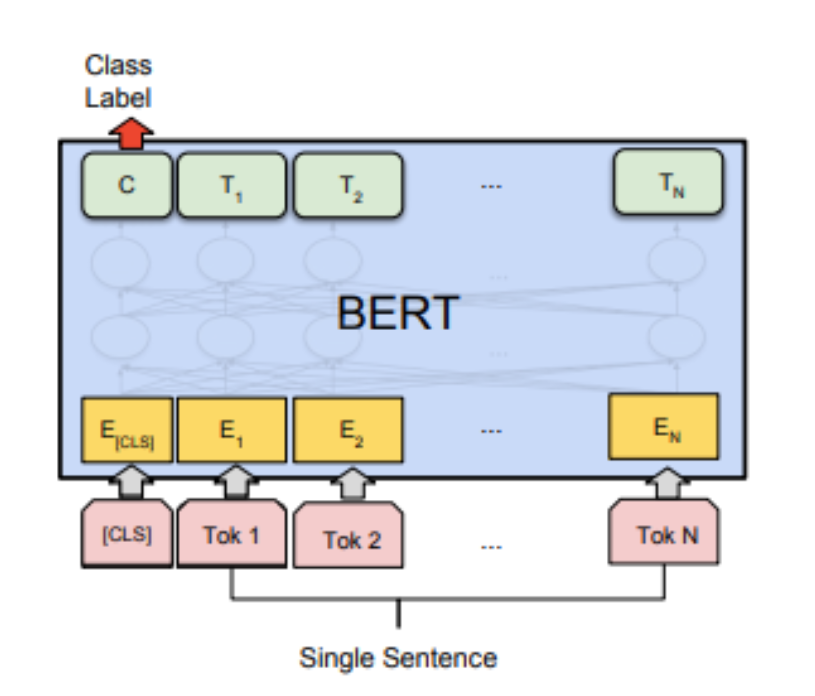
图一:bert分类模型结构
Bert文本分类模型常见做法为将bert最后一层输出的第一个token位置(CLS位置)当作句子的表示,后接全连接层进行分类。
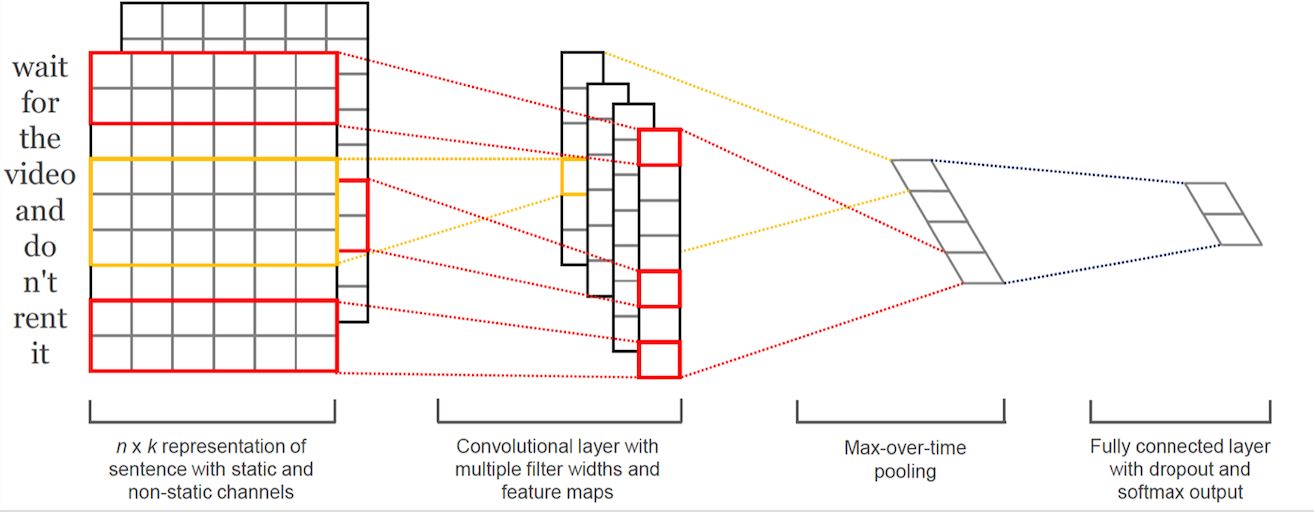
图二:TextCNN分类模型结构
在Bert问世前,TextCNN在文本分类模型中占据了举足轻重的位置,源于Cnn网络可以很有效的捕捉文本序列中的n-gram信息,而分类任务从本质上讲是捕捉n-gram排列组合特征,捕捉关键词,内容,还是句子的上层语义,在句子中均是以n-gram特征的形式存在的。博主在做完Bert和TextCNN的实验惊奇的发现,Bert往往可以对一些表述隐晦的句子进行更好的分类,TextCNN往往对关键词更加敏感。所以博主魔改了一下模型,将Bert与TextCNN的思想融合在一起。
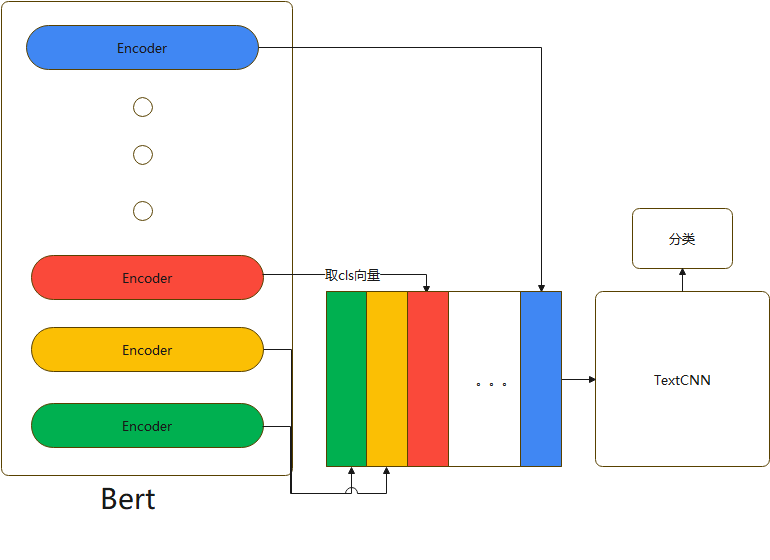 图三:本文魔改模型结构
Bert-Base除去第一层输入层,有12个encoder层,每个encode层的第一个token(CLS)向量都可以当作句子向量,我们可以抽象的理解为,encode层越浅,句子向量越能代表低级别语义信息,越深,代表更高级别语义信息。我们的目的是既想得到有关词的特征,又想得到语义特征,模型具体做法是将第1层到第12层的CLS向量,作为CNN的输入,分类。
话不多说我们直接看代码!
第二部分
pytorch代码实现
# -*- coding:utf-8 -*-
# bert融合textcnn思想的Bert+Blend-CNN
# model: Bert+Blend-CNN
# date: 2021.10.11 18:06:11
import os
import numpy as np
import pandas as pd
import torch
import torch.nn as nn
import torch.utils.data as Data
import torch.nn.functional as F
import torch.optim as optim
import transformers
from transformers import AutoModel, AutoTokenizer
import matplotlib.pyplot as plt
train_curve = []
device = torch.device('cuda' if torch.cuda.is_available() else 'cpu')
# # 定义一些参数,模型选择了最基础的bert中文模型
batch_size = 2
epoches = 100
model = "bert-base-chinese"
hidden_size = 768
n_class = 2
maxlen = 8
encode_layer=12
filter_sizes = [2, 2, 2]
num_filters = 3
# data,构造一些训练数据
sentences = ["我喜欢打篮球", "这个相机很好看", "今天玩的特别开心", "我不喜欢你", "太糟糕了", "真是件令人伤心的事情"]
labels = [1, 1, 1, 0, 0, 0] # 1积极, 0消极.
class MyDataset(Data.Dataset):
def __init__(self, sentences, labels=None, with_labels=True,):
self.tokenizer = AutoTokenizer.from_pretrained(model)
self.with_labels = with_labels
self.sentences = sentences
self.labels = labels
def __len__(self):
return len(sentences)
def __getitem__(self, index):
# Selecting sentence1 and sentence2 at the specified index in the data frame
sent = self.sentences[index]
# Tokenize the pair of sentences to get token ids, attention masks and token type ids
encoded_pair = self.tokenizer(sent,
padding='max_length', # Pad to max_length
truncation=True, # Truncate to max_length
max_length=maxlen,
return_tensors='pt') # Return torch.Tensor objects
token_ids = encoded_pair['input_ids'].squeeze(0) # tensor of token ids
attn_masks = encoded_pair['attention_mask'].squeeze(0) # binary tensor with "0" for padded values and "1" for the other values
token_type_ids = encoded_pair['token_type_ids'].squeeze(0) # binary tensor with "0" for the 1st sentence tokens & "1" for the 2nd sentence tokens
if self.with_labels: # True if the dataset has labels
label = self.labels[index]
return token_ids, attn_masks, token_type_ids, label
else:
return token_ids, attn_masks, token_type_ids
train = Data.DataLoader(dataset=MyDataset(sentences, labels), batch_size=batch_size, shuffle=True, num_workers=1)
class TextCNN(nn.Module):
def __init__(self):
super(TextCNN, self).__init__()
self.num_filter_total = num_filters * len(filter_sizes)
self.Weight = nn.Linear(self.num_filter_total, n_class, bias=False)
self.bias = nn.Parameter(torch.ones([n_class]))
self.filter_list = nn.ModuleList([
nn.Conv2d(1, num_filters, kernel_size=(size, hidden_size)) for size in filter_sizes
])
def forward(self, x):
# x: [bs, seq, hidden]
x = x.unsqueeze(1) # [bs, channel=1, seq, hidden]
pooled_outputs = []
for i, conv in enumerate(self.filter_list):
h = F.relu(conv(x)) # [bs, channel=1, seq-kernel_size+1, 1]
mp = nn.MaxPool2d(
kernel_size = (encode_layer-filter_sizes[i]+1, 1)
)
# mp: [bs, channel=3, w, h]
pooled = mp(h).permute(0, 3, 2, 1) # [bs, h=1, w=1, channel=3]
pooled_outputs.append(pooled)
h_pool = torch.cat(pooled_outputs, len(filter_sizes)) # [bs, h=1, w=1, channel=3 * 3]
h_pool_flat = torch.reshape(h_pool, [-1, self.num_filter_total])
output = self.Weight(h_pool_flat) + self.bias # [bs, n_class]
return output
# model
class Bert_Blend_CNN(nn.Module):
def __init__(self):
super(Bert_Blend_CNN, self).__init__()
self.bert = AutoModel.from_pretrained(model, output_hidden_states=True, return_dict=True)
self.linear = nn.Linear(hidden_size, n_class)
self.textcnn = TextCNN()
def forward(self, X):
input_ids, attention_mask, token_type_ids = X[0], X[1], X[2]
outputs = self.bert(input_ids=input_ids, attention_mask=attention_mask, token_type_ids=token_type_ids) # 返回一个output字典
# 取每一层encode出来的向量
# outputs.pooler_output: [bs, hidden_size]
hidden_states = outputs.hidden_states # 13*[bs, seq_len, hidden] 第一层是embedding层不需要
cls_embeddings = hidden_states[1][:, 0, :].unsqueeze(1) # [bs, 1, hidden]
# 将每一层的第一个token(cls向量)提取出来,拼在一起当作textcnn的输入
for i in range(2, 13):
cls_embeddings = torch.cat((cls_embeddings, hidden_states[i][:, 0, :].unsqueeze(1)), dim=1)
# cls_embeddings: [bs, encode_layer=12, hidden]
logits = self.textcnn(cls_embeddings)
return logits
bert_blend_cnn = Bert_Blend_CNN().to(device)
optimizer = optim.Adam(bert_blend_cnn.parameters(), lr=1e-3, weight_decay=1e-2)
loss_fn = nn.CrossEntropyLoss()
# train
sum_loss = 0
total_step = len(train)
for epoch in range(epoches):
for i, batch in enumerate(train):
optimizer.zero_grad()
batch = tuple(p.to(device) for p in batch)
pred = bert_blend_cnn([batch[0], batch[1], batch[2]])
loss = loss_fn(pred, batch[3])
sum_loss += loss.item()
loss.backward()
optimizer.step()
if epoch % 10 == 0:
print('[{}|{}] step:{}/{} loss:{:.4f}'.format(epoch+1, epoches, i+1, total_step, loss.item()))
train_curve.append(sum_loss)
sum_loss = 0
# test
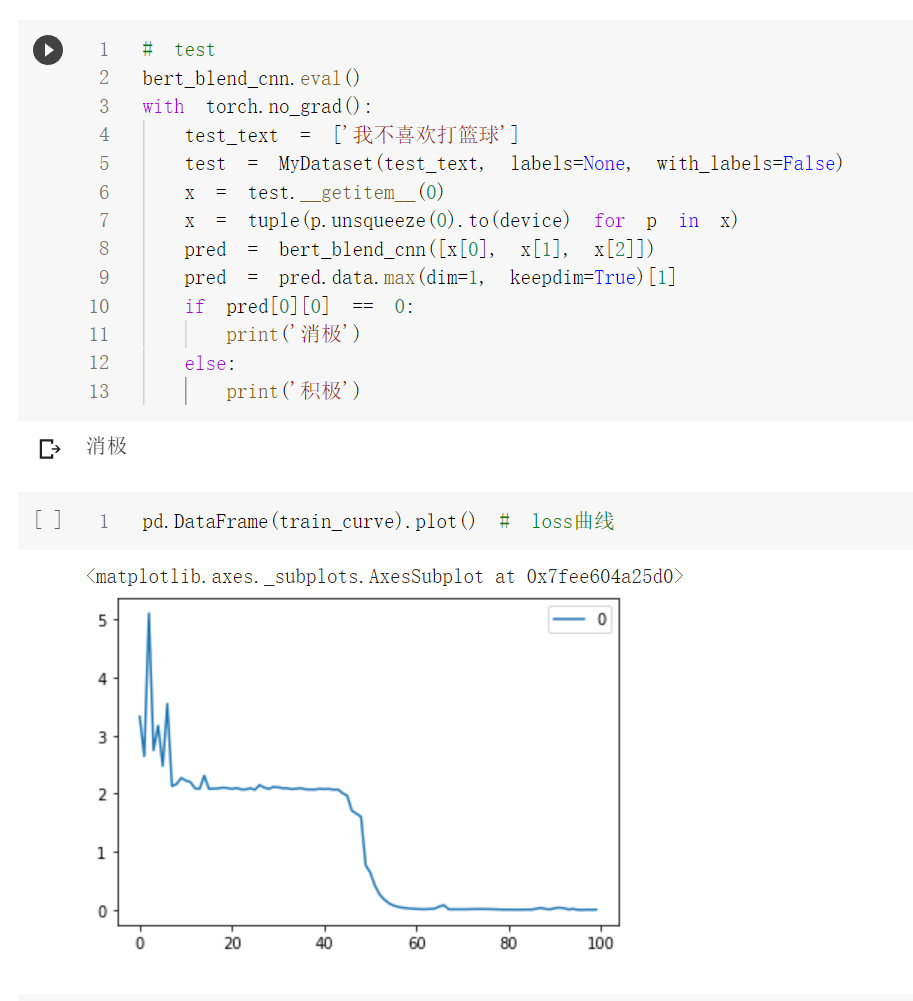
bert_blend_cnn.eval()
with torch.no_grad():
test_text = ['我不喜欢打篮球']
test = MyDataset(test_text, labels=None, with_labels=False)
x = test.__getitem__(0)
x = tuple(p.unsqueeze(0).to(device) for p in x)
pred = bert_blend_cnn([x[0], x[1], x[2]])
pred = pred.data.max(dim=1, keepdim=True)[1]
if pred[0][0] == 0:
print('消极')
else:
print('积极')
pd.DataFrame(train_curve).plot() # loss曲线
测试单条样本结果:
代码链接:
jupyter版本:https://github.com/PouringRain/blog_code/blob/main/nlp/Bert_Blend_CNN.ipynb
py版本:https://github.com/PouringRain/blog_code/blob/main/nlp/bert_blend_cnn.py
喜欢的话,给萌新的github仓库一颗小星星哦……^ _^
Bert文本分类实践(二):魔改Bert,融合TextCNN的新思路的更多相关文章
- Bert文本分类实践(一):实现一个简单的分类模型
写在前面 文本分类是nlp中一个非常重要的任务,也是非常适合入坑nlp的第一个完整项目.虽然文本分类看似简单,但里面的门道好多好多,作者水平有限,只能将平时用到的方法和trick在此做个记录和分享,希 ...
- Bert文本分类实践(三):处理样本不均衡和提升模型鲁棒性trick
目录 写在前面 缓解样本不均衡 模型层面解决样本不均衡 Focal Loss pytorch代码实现 数据层面解决样本不均衡 提升模型鲁棒性 对抗训练 对抗训练pytorch代码实现 知识蒸馏 防止模 ...
- 文本分类实战(十)—— BERT 预训练模型
1 大纲概述 文本分类这个系列将会有十篇左右,包括基于word2vec预训练的文本分类,与及基于最新的预训练模型(ELMo,BERT等)的文本分类.总共有以下系列: word2vec预训练词向量 te ...
- 文本分类(TFIDF/朴素贝叶斯分类器/TextRNN/TextCNN/TextRCNN/FastText/HAN)
目录 简介 TFIDF 朴素贝叶斯分类器 贝叶斯公式 贝叶斯决策论的理解 极大似然估计 朴素贝叶斯分类器 TextRNN TextCNN TextRCNN FastText HAN Highway N ...
- Pytorch——BERT 预训练模型及文本分类
BERT 预训练模型及文本分类 介绍 如果你关注自然语言处理技术的发展,那你一定听说过 BERT,它的诞生对自然语言处理领域具有着里程碑式的意义.本次试验将介绍 BERT 的模型结构,以及将其应用于文 ...
- 使用BERT预训练模型+微调进行文本分类
本文记录使用BERT预训练模型,修改最顶层softmax层,微调几个epoch,进行文本分类任务. BERT源码 首先BERT源码来自谷歌官方tensorflow版:https://github.co ...
- 基于Huggingface使用BERT进行文本分类的fine-tuning
随着BERT大火之后,很多BERT的变种,这里借用Huggingface工具来简单实现一个文本分类,从而进一步通过Huggingface来认识BERT的工程上的实现方法. 1.load data tr ...
- 文本分类实战(二)—— textCNN 模型
1 大纲概述 文本分类这个系列将会有十篇左右,包括基于word2vec预训练的文本分类,与及基于最新的预训练模型(ELMo,BERT等)的文本分类.总共有以下系列: word2vec预训练词向量 te ...
- 用深度学习(CNN RNN Attention)解决大规模文本分类问题 - 综述和实践
https://zhuanlan.zhihu.com/p/25928551 近来在同时做一个应用深度学习解决淘宝商品的类目预测问题的项目,恰好硕士毕业时论文题目便是文本分类问题,趁此机会总结下文本分类 ...
随机推荐
- 使用servlet中是否需要考虑线程问题
package day09; import java.io.IOException; import javax.servlet.ServletException; import javax.servl ...
- T-SQL——关于跨库连接查询
目录 0. 同一台服务器不同数据库 1. 使用跨库查询函数--OpenDataSource() 2. 使用链接服务器(Linking Server) 3. 使用OpenDataSource()函数和链 ...
- 目录-理解ASP.NET Core
<理解ASP.NET Core>基于.NET5进行整理,旨在帮助大家能够对ASP.NET Core框架有一个清晰的认识. 目录 [01] Startup [02] Middleware [ ...
- linux centos7 命令中的 2>&1 代表的意义
2021-09-01 1. 参数介绍 0 – stdin (standard input) 标准输入1 – stdout (standard output) 标准输出2 – stderr (stand ...
- MySQL数据库迁移之data目录
其实迁移数据库,一般用sql文件就行,把A服务器数据库的表结构和数据等等导出,然后导入到B服务器数据库, 但是这次数据文件过大,大约有40个G,使用命令行导入,效果不是很好,经常在执行过程中报错.卡死 ...
- shutdown 命令
# shutdown -h #停止系统服务并关机 -r #停止系统服务后重启 shutdown -h now #立即关机 shutdown -h 10:53 #到10:53关机,如果该时间小于当前时间 ...
- Kubernetes 持久化数据存储 StorageClass
文章链接 PV 和 PVC 模式要先创建好 PV,然后再定义好 PVC 进行一对一的绑定.那么如果遇到大集群,也一一的创建吗?这样来说维护成本很高,工作量大.这个时候就有了 Kubernetes 提供 ...
- CSS导航菜单(一级菜单)
index.html <div class="nav"> <ul> <li><a href="#">Java&l ...
- GIT:修改上一次提交的注释信息(git commit --amend)
git commit -m 注释信息 如果这时候注释信息输入错误,就可以输入以下指令更改 git commit --amend 键入" i "进入编辑模式 修改后键入ESC,:wq ...
- weblogic之XXE利用与分析
weblogic之XXE利用与分析 本篇文章漏洞环境使用p神的CVE-2018-2628 本机IP:192.168.202.1 被攻击主机IP:192.168.202.129 一. xxer工具 1. ...