render 函数渲染表格的当前数据列使用
render 函数渲染表格的当前数据列使用
实例1:
columns7: [
     // 实例1:代码段

      {

          title: '编号',

          align: 'center',

          width: 90,

          key: 'No',

          render: (h, params) => {

            return h('p', {

              style: 'color:#2D8CF0;font-size:14px;cursor: pointer;',

              on: {

                'click': () => {

                  this.GotoPage(params.row)

                }

              }

            }, params.row.No)

          }

        },
        // 实例2代码段: 未写成组件前

        {

          title: '个数',

          align: 'center',

          width: 100,

          key: 'popupArr',

          render: (h, params) => {

            let arrData = params.row.SumArr

            let rowData = []

            // 弹窗内容处理

            let popupCon = []

            if (params.row.popupArr.length){

              popupCon = [

                h('p', {}, `个数: ${params.row.popupArr.length}`),

                h('p', {}, [

                  h('span', {class: 'pop-span1'}, '金额'),

                  h('span', {class: 'pop-span3'}, '号码')

                ])

              ]

              params.row.popupArr.map(items => {

                let money = null

                money = h('p', {}, [

                  h('span', {class: 'pop-span1'}, `¥${this.numberComma(Number(items.Amount).toFixed(2))}`),

                  h('span', {class: 'pop-span2'}, `${items.Number}`)

                ])

                popupCon.push(money)

              })

            }

            // 外层内容

            arrData.map((item, index) => {

              // 单元格行的内容

             // on-popper-show 为监听事件,鼠标移上去请求接口拿数据展示在浮窗中

              let rowsC = null

              let tooltip = []

        // Tooltip

              tooltip[0] = h('Tooltip', {

                props: {placement: 'left', 'delay': 700, 'max-width': '600'},

                on: {

                  'on-popper-show': () => {

                    this.PopperShow(h, params)

                  }

                }

              }, [

                h('p', {style: 'min-width: 70px;'}, item.Count),

                h('div', {slot: 'content'}, popupCon)

              ])

              // 小单元格外层框

              if (index + 1 === arrData.length) {

                rowsC = h('p', {

                  style: 'padding:0 0 0 0;height:40px;line-height:40px;'

                }, tooltip)

              } else {

                rowsC = h('p', {

                  style: 'padding:0 0 0 0;height:40px;line-height:40px;border-bottom: 1px solid #E8EAEC;'

                }, tooltip)

              }

              rowData.push(rowsC)

            })

            return h('div', {class: 'countCol'}, rowData)

          }

        },

]

// 方法

methods: {

 PopperShow (h, params) {

   // 请求接口已封装

     this.$store.dispatch('GetInvoicedInfo', params.row.Id).then((res) => {

     if (res.Result) {

       this.$nextTick(() => {

          params.row.popupArr = res.Data

         this.$forceUpdate()

        })

       }

    })

  }

}
实例2:
render: Tooltip 动态获取浮窗数据的实例
以上代码我们可以优化下,将浮窗Tooltip写成公共组件的方式,在render中引入该模板组件:
columns7: [

        {

          title: '个数',

          align: 'center',

          width: 100,

          key: 'popupArr',

          render: (h, params) => {

            let arrData = params.row.SumArr

            let rowData = []// 外层内容

            arrData.map((item, index) => {

              // 单元格行的内容

             // on-popper-show 为监听事件,鼠标移上去请求接口拿数据展示在浮窗中

              let rowsC = null

              let tooltip = []

        // Tooltip
        // 小单元格外层框

              if (index + 1 === arrData.length) {

                rowsC = h('p', {

                  style: 'padding:0 0 0 0;height:40px;line-height:40px;'

                }, tooltip)

              } else {

                rowsC = h('p', {

                  style: 'padding:0 0 0 0;height:40px;line-height:40px;border-bottom: 1px solid #E8EAEC;'

                }, tooltip)

              }

              rowData.push(rowsC)

            })

            return h('div', {class: 'countCol'}, rowData)

          }

        },
 ]
InfoTooltip.vue
<template>

  <div class="InfoTooltip">

    <Tooltip :placement="placement" :delay="700" @on-popper-show="PopperShow" @on-popper-hide="PopperHide" max-width="600">

        <slot name="infoTooltip"></slot>    <!-- 该内容即 鼠标移上去的内容 -->

        <div class="demo-InfoList" slot="content">    <!-- 该div内的内容即为 浮窗的内容 -->

          <p>个数: {{InfoList.length}}</p>

          <p>

            <span class="pop-span1">金额</span>

            <span class="pop-span2">号码</span>

            <span class="pop-span3">状态</span>

          </p>

          <p v-for="(items, index) in InfoList" :key="index">

            <span class="pop-span1">¥{{numberComma(Number(items.Amount).toFixed(2))}}</span>

            <span class="pop-span2">{{items.Number}}</span>

            <span class="pop-span3">{{items.Status}}</span>

          </p>

        </div>

    </Tooltip>

  </div>

</template>

<script>

export default {

  name: 'InfoTooltip',

  components: {

  },

  data () {

    return {

      InfoList: []

    }

  },

  props: {

    rowId: String,

    dataNo: String,

    placement: {

      type: String,

      default: 'right-start'

    }

  },

  created () {

  },

  computed: {

  },

  methods: {

    GetPopupArrFn (arrData, dataNo) {

      let obj = {}

      arrData.map(function (item) {

        let timeKey = item.InvoDate.split(' ')[0]

        if (!obj[timeKey]) {

          obj[timeKey] = []

        }

        obj[timeKey].push(item)

      })

      return obj[dataNo]

    },

    PopperHide () {

    },

    PopperShow () {

      this.$store.dispatch('GetInvoicedInfo', this.rowId).then((res) => {

        if (res.Result) {

          this.$nextTick(() => {

            this.InfoList = this.GetPopupArrFn(res.Data, this.dataNo)

          })

        }

      })

    }

  }

}

</script>

<style scoped lang="less">

.demo-InfoList {

  display: inline-table;

  p {

    float: left;

    width: 100%;

    line-height: 22px;

  }

  .pop-span1 {

    width:120px;

    display:inline-block;

  }

  .pop-span2{

    width:200px;

    display:inline-block;

  }

  .pop-span3{

    width:80px;

    display:inline-block;

    text-align:center;

  }

}

</style>
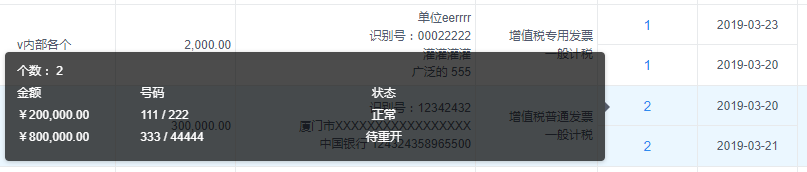
最后效果即如图:
鼠标移入小单元格时,动态请求浮窗内容
render 函数渲染表格的当前数据列使用的更多相关文章
- 使用render函数渲染组件
使用render函数渲染组件:https://www.jianshu.com/p/27ec4467a66b
- 在vue中结合render函数渲染指定的组件到容器中
1.demo 项目结构: index.html <!DOCTYPE html> <html> <head> <title>标题</title> ...
- iview,用render函数渲染
<Table border :columns="discountColumns" :data="discountData.rows"></Ta ...
- 使用Python的Flask框架,结合Highchart,动态渲染图表(Ajax 请求数据接口)
参考链接:https://www.highcharts.com.cn/docs/ajax 参考链接中的示例代码是使用php写的,这里改用python写. 需要注意的地方: 1.接口返回的数据格式,这个 ...
- render方法渲染组件和在webpack中导入vue
使用component注册的组件div容器里可以放多个,但是使用render的只能放一个 <div id="app"> <p>我可以放两个</p> ...
- iview table表中使用render函数props传值出现问题
使用iview中的table表格时避免不了使用render函数渲染自定义内容,或者渲染组件.但是在正常使用时出现了props传值无法识别, 按照官网介绍使用props如下: render: (h, p ...
- vue入门:(底层渲染实现render函数、实例生命周期)
vue实例渲染的底层实现 vue实例生命周期 一.vue实例渲染的底层实现 1.1实例挂载 在vue中实例挂载有两种方法:第一种在实例化vue时以el属性实现,第二种是通过vue.$mount()方法 ...
- 超全table功能Datatables使用的填坑之旅--1: 无法渲染表格数据: ajax调用了参数 : success
问题:Datatables: 无法渲染表格数据 原因:datatables的ajax 传了"success":function(){},导致无法渲染数据. ajax 删掉" ...
- oracle数据库查询日期sql语句(范例)、向已经建好的表格中添加一列属性并向该列添加数值、删除某一列的数据(一整列)
先列上我的数据库表格: c_date(Date格式) date_type(String格式) 2011-01-01 0 2012-03-07 ...
随机推荐
- 《Head First 设计模式》之工厂模式
工厂模式(Factory) 依赖倒置原则(Dependency Inversion Principle):依赖抽象,不要依赖具体类. 变量不可以持有具体类的引用.(如果使用new,就会持有具体类的引用 ...
- js中random的应用
1.生成一个随机数 var r = Math.random(); console.info(r); 结果生成一个0-1的随机数(返回0和1之间的伪随机数,可能为0,但总是小于1,[0,1)) 2.生成 ...
- tp3.2开启允许跨域
在入口文件<?PHP下加上 header('Access-Control-Allow-Origin:*');header("Access-Control-Allow-Headers: ...
- FLASK实现上传下载功能
#!-*-coding=utf-8-*- # from flask import Flask # # app = Flask(__name__) # # # @app.route('/') # def ...
- chrome中常用的快捷键
ctrl+n 新建窗口ctrl+shift+n 无痕模式新建窗口ctrl+t 打开新标签页ctrl+shift+t 打开最近关闭的标签页ctrl+tab 标签页之间切换ctrl+w/ctrl+F4 关 ...
- 关于tr:hover变色的问题
最近在给table里面的tr标签添加高亮背景色显示的时候,遇到一个坑,HTML结构如下: <tr> <td></td> <td></td> ...
- sauvola二值化算法研究
sauvola二值化算法研究 sauvola是一种考虑局部均值亮度的图像二值化方法, 以局部均值为基准在根据标准差做些微调.算法实现上一般用积分图方法 来实现.这个方法能很好的解决全局阈值方法的短 ...
- Android Studio修改app图标
1.将下载好的图片放到app\src\main\res\drawable目录下 2.在AndroidManifest.xml下加入一句 android:icon="@drawable/??? ...
- Redux学习笔记-基础知识
Redux概述 是什么:Redux是管理状态的容器,提供可预测的状态管理. 怎么做:Redux主要是用来管理组件或者应用的状态,本质上跟一个事件处理器差不多.通过分发action触发reduce来 ...
- 自学git心得-1
Github作为目前世界上最先进的分布式版本控制系统,是软工工作者管理工程代码的不二选择,笔者也是因时所需,自学了基本的git操作,在此回顾一下也作为分享. 推荐学习资源:https://www.li ...