Python之Scrapy爬虫框架安装及简单使用
题记:早已听闻python爬虫框架的大名。近些天学习了下其中的Scrapy爬虫框架,将自己理解的跟大家分享。有表述不当之处,望大神们斧正。
一、初窥Scrapy
Scrapy是一个为了爬取网站数据,提取结构性数据而编写的应用框架。 可以应用在包括数据挖掘,信息处理或存储历史数据等一系列的程序中。
其最初是为了 页面抓取 (更确切来说, 网络抓取 )所设计的, 也可以应用在获取API所返回的数据(例如 Amazon Associates Web Services ) 或者通用的网络爬虫。
本文档将通过介绍Scrapy背后的概念使您对其工作原理有所了解, 并确定Scrapy是否是您所需要的。
当您准备好开始您的项目后,您可以参考 入门教程 。
二、Scrapy安装介绍
Scrapy框架运行平台及相关辅助工具
- Python 2.7(Python最新版3.5,这里选择了2.7版本)
- Python Package: pip and setuptools. 现在 pip 依赖 setuptools ,如果未安装,则会自动安装setuptools 。
- lxml. 大多数Linux发行版自带了lxml。如果缺失,请查看http://lxml.de/installation.html
- OpenSSL. 除了Windows(请查看 平台安装指南)之外的系统都已经提供。
您可以使用pip来安装Scrapy(推荐使用pip来安装Python package).
pip install Scrapy
Windows下安装流程:
1、安装Python 2.7之后,您需要修改 PATH 环境变量,将Python的可执行程序及额外的脚本添加到系统路径中。将以下路径添加到 PATH 中:
C:\Python27\;C:\Python27\Scripts\;
除此之外,还可以用cmd命令来设置Path:
c:\python27\python.exe c:\python27\tools\scripts\win_add2path.py
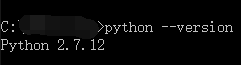
安装配置完成之后,可以执行命令python --version查看安装的python版本。(如图所示)
2、从 http://sourceforge.net/projects/pywin32/ 安装 pywin32
请确认下载符合您系统的版本(win32或者amd64)
从 https://pip.pypa.io/en/latest/installing.html 安装 pip
3、打开命令行窗口,确认 pip 被正确安装:
pip --version
4、到目前为止Python 2.7 及 pip 已经可以正确运行了。接下来安装Scrapy:
pip install Scrapy
至此windows下Scrapy安装已经结束。
三、Scrapy入门教程
1、在cmd中创建Scrapy项目工程。
scrapy startproject tutorial
H:\python\scrapyDemo>scrapy startproject tutorial

New Scrapy project 'tutorial', using template directory 'f:\\python27\\lib\\site-packages\\scrapy\\templates\\project', created in:

    H:\python\scrapyDemo\tutorial

You can start your first spider with:

    cd tutorial

    scrapy genspider example example.com
2、文件目录结构如下: 。
。
解析scrapy框架结构:
scrapy.cfg: 项目的配置文件。tutorial/: 该项目的python模块。之后您将在此加入代码。tutorial/items.py: 项目中的item文件。tutorial/pipelines.py: 项目中的pipelines文件。tutorial/settings.py: 项目的设置文件。tutorial/spiders/: 放置spider代码的目录。
3、编写简单的爬虫
1、在item.py中配置需采集页面的字段实例。
 # -*- coding: utf- -*-

 # Define here the models for your scraped items

 #

 # See documentation in:

 # http://doc.scrapy.org/en/latest/topics/items.html

 import scrapy

 from scrapy.item import Item, Field

 class TutorialItem(Item):

     title = Field()

     author = Field()

     releasedate = Field()
2、在tutorial/spiders/spider.py中书写要采集的网站以及分别采集各字段。
 # -*-coding:utf-8-*-

 import sys

 from scrapy.linkextractors.sgml import SgmlLinkExtractor

 from scrapy.spiders import CrawlSpider, Rule

 from tutorial.items import TutorialItem

 reload(sys)

 sys.setdefaultencoding("utf-8")

 class ListSpider(CrawlSpider):

     # 爬虫名称

     name = "tutorial"

     # 设置下载延时

     download_delay = 1

     # 允许域名

     allowed_domains = ["news.cnblogs.com"]

     # 开始URL

     start_urls = [

         "https://news.cnblogs.com"

     ]

     # 爬取规则,不带callback表示向该类url递归爬取

     rules = (

         Rule(SgmlLinkExtractor(allow=(r'https://news.cnblogs.com/n/page/\d',))),

         Rule(SgmlLinkExtractor(allow=(r'https://news.cnblogs.com/n/\d+',)), callback='parse_content'),

     )

     # 解析内容函数

     def parse_content(self, response):

         item = TutorialItem()

         # 当前URL

         title = response.selector.xpath('//div[@id="news_title"]')[0].extract().decode('utf-8')

         item['title'] = title

         author = response.selector.xpath('//div[@id="news_info"]/span/a/text()')[0].extract().decode('utf-8')

         item['author'] = author

         releasedate = response.selector.xpath('//div[@id="news_info"]/span[@class="time"]/text()')[0].extract().decode(

             'utf-8')

         item['releasedate'] = releasedate

         yield item
3、在tutorial/pipelines.py管道中保存数据。
 # -*- coding: utf-8 -*-

 # Define your item pipelines here

 #

 # Don't forget to add your pipeline to the ITEM_PIPELINES setting

 # See: http://doc.scrapy.org/en/latest/topics/item-pipeline.html

 import json

 import codecs

 class TutorialPipeline(object):

     def __init__(self):

         self.file = codecs.open('data.json', mode='wb', encoding='utf-8')#数据存储到data.json

     def process_item(self, item, spider):

         line = json.dumps(dict(item)) + "\n"

         self.file.write(line.decode("unicode_escape"))

         return item
4、tutorial/settings.py中配置执行环境。
 # -*- coding: utf-8 -*-

 BOT_NAME = 'tutorial'

 SPIDER_MODULES = ['tutorial.spiders']

 NEWSPIDER_MODULE = 'tutorial.spiders'

 # 禁止cookies,防止被ban

 COOKIES_ENABLED = False

 COOKIES_ENABLES = False

 # 设置Pipeline,此处实现数据写入文件

 ITEM_PIPELINES = {

     'tutorial.pipelines.TutorialPipeline': 300

 }

 # 设置爬虫爬取的最大深度

 DEPTH_LIMIT = 100
5、新建main文件执行爬虫代码。
 from scrapy import cmdline

 cmdline.execute("scrapy crawl tutorial".split())
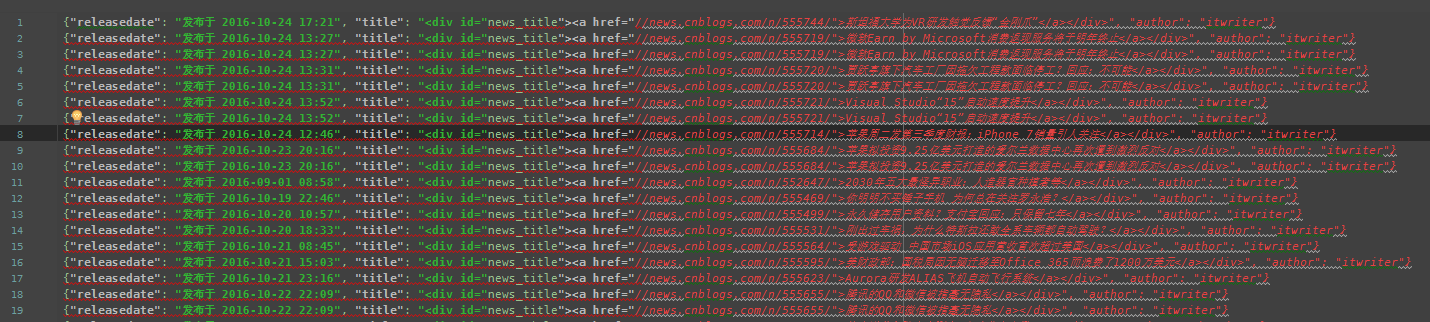
最终,执行main.py后在data.json文件中获取到采集结果的json数据。
Python之Scrapy爬虫框架安装及简单使用的更多相关文章
- windows下使用python的scrapy爬虫框架,爬取个人博客文章内容信息
scrapy作为流行的python爬虫框架,简单易用,这里简单介绍如何使用该爬虫框架爬取个人博客信息.关于python的安装和scrapy的安装配置请读者自行查阅相关资料,或者也可以关注我后续的内容. ...
- Python之Scrapy爬虫框架 入门实例(一)
一.开发环境 1.安装 scrapy 2.安装 python2.7 3.安装编辑器 PyCharm 二.创建scrapy项目pachong 1.在命令行输入命令:scrapy startproject ...
- 【python】Scrapy爬虫框架入门
说明: 本文主要学习Scrapy框架入门,介绍如何使用Scrapy框架爬取页面信息. 项目案例:爬取腾讯招聘页面 https://hr.tencent.com/position.php?&st ...
- Python使用Scrapy爬虫框架全站爬取图片并保存本地(妹子图)
大家可以在Github上clone全部源码. Github:https://github.com/williamzxl/Scrapy_CrawlMeiziTu Scrapy官方文档:http://sc ...
- 【网络爬虫】【python】网络爬虫(四):scrapy爬虫框架(架构、win/linux安装、文件结构)
scrapy框架的学习,目前个人觉得比较详尽的资料主要有两个: 1.官方教程文档.scrapy的github wiki: 2.一个很好的scrapy中文文档:http://scrapy-chs.rea ...
- Python爬虫教程-31-创建 Scrapy 爬虫框架项目
本篇是介绍在 Anaconda 环境下,创建 Scrapy 爬虫框架项目的步骤,且介绍比较详细 Python爬虫教程-31-创建 Scrapy 爬虫框架项目 首先说一下,本篇是在 Anaconda 环 ...
- python3.7.1安装Scrapy爬虫框架
python3.7.1安装Scrapy爬虫框架 环境:win7(64位), Python3.7.1(64位) 一.安装pyhthon 详见Python环境搭建:http://www.runoob.co ...
- 安装scrapy 爬虫框架
安装scrapy 爬虫框架 个人根据学习需要,在Windows搭建scrapy爬虫框架,搭建过程种遇到个别问题,共享出来作为记录. 1.安装python 2.7 1.1下载 下载地址 1.2配置环境变 ...
- Scrapy爬虫框架(实战篇)【Scrapy框架对接Splash抓取javaScript动态渲染页面】
(1).前言 动态页面:HTML文档中的部分是由客户端运行JS脚本生成的,即服务器生成部分HTML文档内容,其余的再由客户端生成 静态页面:整个HTML文档是在服务器端生成的,即服务器生成好了,再发送 ...
随机推荐
- 基于Metronic的Bootstrap开发框架总览
基于Metronic的Bootstrap开发框架经验总结(1)-框架总览及菜单模块的处理 最近一直很多事情,博客停下来好久没写了,整理下思路,把最近研究的基于Metronic的Bootstrap开发框 ...
- MySQL 第九天(核心优化三)
一.昨天内容回顾 索引设计依据 与数据表有关系的sql语句都统计出来 where order by or等等条件的字段适当做索引 原则: 频率高的sql语句 执行时间长的sql语句 业务逻辑重要的sq ...
- javascript数组的一些方法实例
1 concat
- SDH误码仪MP1570A的自动化
MP1570A是日本安立公司的用于SDH测试的误码仪. 1.MP1570A的自动化测试场景和原理 任意测试PC--(telnet)-->测试PC(Tcl Interrupt)-->SIG_ ...
- js的原型模式
以下内容来自<JavaScript高级程序设计>第三版 我们创建的每个函数都有一个prototype(原型)属性,这个属性是一个指针,指向一个对象,而这个对象的用途是包含可以由特定类型的所 ...
- thinkPHP--SQL连贯操作
一.连贯入门 连贯操作使用起来非常简单,比如查找到 id 为 1,2,3,4 中按照创建时间的倒序的前两 位. //连贯操作入门 $user = M('User'); var_dump($user-& ...
- RichEdit 追加 RTF
下面实现追加RTF 到 RichEdit 的功能其本质是:EM_STREAMIN 消息,详细查看 MSDN//--------------------------------------------- ...
- 怎样增强MyEclipse的代码自动提示功能
步骤/方法 1 一 般在Eclipse ,MyEclipse代码里面,打个foreach,switch等 这些,是无法得到代码提示的(不信自己试试),其他的就更不用说了,而在Microsoft Vis ...
- Gvim插件管理Vundle
之前关于gvim的博客中提到的很多插件安装比较繁琐,这一篇来介绍一下gvim管理插件的插件--vundle的安装以及使用,让givm的插件安装更加的简单 首先给出vundle的git地址 https: ...
- bootstrap制作搜索框及添加回车搜索事件
下面是开发中用bootstrap制作的一个搜索框,以及给搜索框添加回车搜索事件的一个小案例. bootstrap制作搜索框及添加回车搜索事件 下面是功能实现的代码: <!DOCTYPE html ...