ios之UITableViewController(二) tableView的编辑模式
tableView的编辑模式
表视图可以进入编辑模式,当进入编辑模式就可以进行删除、插入、移动单元等操作
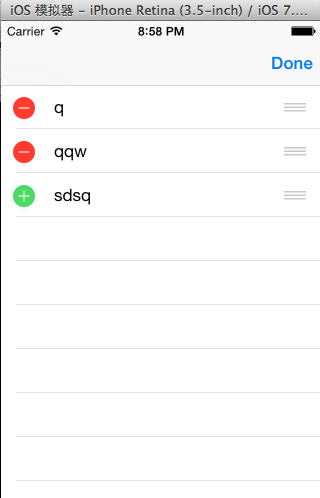
效果图:

让表视图进入编辑模式,进入编辑模式的方法有两种,一种是使用导航栏的edit
按钮,另一种是设置tableView的editing属性进入编辑模式。
最后通过实现UITableViewDataSource协议的方法实现单元格的删除、插入和移动
1,在viewDidLoad方法里面指定导航栏的右按钮为edit按钮
self.navigationItem.rightBarButtonItem =self.editButtonItem;
2,另一种进入编辑模式的方式是修改tableView的editing属性
该属性是一个BOOL类型,默认值是NO,这里给导航栏添加一个左按钮,通过点击左按钮修改editing属性的值
进入和退出编辑模式
- (void)editTableView:(UIBarButtonItem *)button
{
//修改editing属性的值,进入或退出编辑模式
[self.tableView setEditing:!self.tableView.editinganimated:YES];
if(self.tableView.editing){
button.title = @"完成";
}
else{
button.title = @"编辑";
}
}
实现删除和插入行
两方法一响应
方法一:那些行进入编辑模式
- (BOOL)tableView:(UITableView *)tableView canEditRowAtIndexPath:(NSIndexPath *)indexPath
{
return YES;
}
方法二:进入编辑模式的cell是删除还是增加
-(UITableViewCellEditingStyle)tableView:(UITableView *)tableView editingStyleForRowAtIndexPath:(NSIndexPath *)indexPath
{
return UITableViewCellEditingStyleDelete;
}
注意:这个方法里一般返回两种类型,还有一中默认类型
删除:UITableViewCellEditingStyleDelete
增加:UITableViewCellEditingStyleInsert
响应:点击当点击delete后执行的删除过程
-(void)tableView:(UITableView *)tableView commitEditingStyle:(UITableViewCellEditingStyle)editingStyle forRowAtIndexPath:(NSIndexPath *)indexPath
{
//删除数据源里的数据
[self.array removeObjectAtIndex:indexPath.row];
//再删除tableView中对应的行
[tableView deleteRowsAtIndexPaths:@[indexPath] withRowAnimation:UITableViewRowAnimationFade];
}
注意:先除数据源里的数据,删除tableView中对应的行
实现移动行
当tableView进入编辑模式之后,默认每一行都是可以移动,每一行尾部有一个图标
为三行灰色横线的按钮,就是表示该行可以移动
一方法一响应
方法一:那些cell可以移动
-(BOOL)tableView:(UITableView *)tableView
canMoveRowAtIndexPath:(NSIndexPath *)indexPath
{
return YES;
}
响应:移动的具体操作
- (void)tableView:(UITableView *)tableView
moveRowAtIndexPath:(NSIndexPath *)fromIndexPath
toIndexPath:(NSIndexPath *)toIndexPath
{
TRStudent *stu=self.array[fromIndexPath.row];
[self.array removeObjectAtIndex:fromIndexPath.row];
[self.array insertObject:stuatIndex:toIndexPath.row];
}
案例
AppDelegate.h
#import <UIKit/UIKit.h>
@interface AppDelegate : UIResponder <UIApplicationDelegate>
@property (strong, nonatomic) UIWindow *window;
@end
AppDelegate.m
#import "AppDelegate.h"
#import"TRStudent.h"
#import "TRTableViewController.h"
@implementation AppDelegate
- (BOOL)application:(UIApplication *)application didFinishLaunchingWithOptions:(NSDictionary *)launchOptions
{
self.window = [[UIWindow alloc] initWithFrame:[[UIScreen mainScreen] bounds]];
// Override point for customization after application launch.
self.window.backgroundColor = [UIColor whiteColor];
TRTableViewController *tr1=[[TRTableViewController alloc] initWithNibName:@"TRTableViewController" bundle:nil];
UINavigationController *navi=[[UINavigationController alloc] initWithRootViewController:tr1];
self.window.rootViewController=navi;
[self.window makeKeyAndVisible];
return YES;
}
@end
TRTableViewController.h
#import <UIKit/UIKit.h>
@interface TRTableViewController : UITableViewController
@property(nonatomic,strong) NSMutableArray *array;
@end
TRTableViewController.m
#import "TRTableViewController.h"
#import "TRStudent.h"
@interface TRTableViewController ()
@end
@implementation TRTableViewController
-(id)initWithNibName:(NSString *)nibNameOrNil bundle:(NSBundle *)nibBundleOrNil
{
return self=[super initWithNibName:nibNameOrNil bundle:nibBundleOrNil];
}
- (void)viewDidLoad
{
[super viewDidLoad];
self.array=[TRStudent getarray];
self.navigationItem.rightBarButtonItem=self.editButtonItem;
}
//有多少分区
- (NSInteger)numberOfSectionsInTableView:(UITableView *)tableView
{
return 1;
}
//有多少个cell单元
- (NSInteger)tableView:(UITableView *)tableView numberOfRowsInSection:(NSInteger)section
{
return self.array.count;
}
//cell单元
- (UITableViewCell *)tableView:(UITableView *)tableView cellForRowAtIndexPath:(NSIndexPath *)indexPath
{
UITableViewCell *cell = [tableView dequeueReusableCellWithIdentifier:@"cell"];
if(cell==nil)
{
cell=[[UITableViewCell alloc] initWithStyle:UITableViewCellStyleValue1 reuseIdentifier:@"cell"];
}
TRStudent *stu=self.array[indexPath.row];
cell.textLabel.text=stu.name;
return cell;
}
//那些行进入编辑模式,根据你的需求自行设置,我这里设置的全部
- (BOOL)tableView:(UITableView *)tableView canEditRowAtIndexPath:(NSIndexPath *)indexPath
{
return YES;
}
//进入编辑模式的cell是删除还是增加
//自行设置,我这里设置的是最后一个cell单元是增加,其他是删除
-(UITableViewCellEditingStyle)tableView:(UITableView *)tableView
editingStyleForRowAtIndexPath:(NSIndexPath *)indexPath
{
if(indexPath.row==self.array.count-1)
return UITableViewCellEditingStyleInsert;
return UITableViewCellEditingStyleDelete;
}
//点击当点击delete后执行的删除增加过程
- (void)tableView:(UITableView *)tableView commitEditingStyle:(UITableViewCellEditingStyle)editingStyle forRowAtIndexPath:(NSIndexPath *)indexPath
{
if (editingStyle == UITableViewCellEditingStyleDelete) {
[self.array removeObjectAtIndex:indexPath.row];
[tableView deleteRowsAtIndexPaths:@[indexPath] withRowAnimation:UITableViewRowAnimationFade];
} else if (editingStyle == UITableViewCellEditingStyleInsert) {
TRStudent *str2=[[TRStudent alloc] init];
str2.name=@"qwer";
str2.name=@"124456";
[self.array addObject:str2];
NSIndexPath *insetindexpath=[NSIndexPath indexPathForRow:self.array.count-1 inSection:0];
[tableView insertRowsAtIndexPaths:@[insetindexpath] withRowAnimation:UITableViewRowAnimationAutomatic];
}
}
//那些cell可移动
-(BOOL)tableView:(UITableView *)tableView
canMoveRowAtIndexPath:(NSIndexPath *)indexPath
{
return YES;
}
//移动
- (void)tableView:(UITableView *)tableView
moveRowAtIndexPath:(NSIndexPath *)fromIndexPath
toIndexPath:(NSIndexPath *)toIndexPath
{
TRStudent *stu=self.array[fromIndexPath.row];
[self.array removeObjectAtIndex:fromIndexPath.row];
[self.array insertObject:stuatIndex:toIndexPath.row];
}
@end
TRStudent.h
#import <Foundation/Foundation.h>
@interface TRStudent : NSObject
@property(nonatomic,strong) NSString *name;
@property(nonatomic,strong) NSString *phone;
+(NSMutableArray *)getarray;
@end
TRStudent.m
#import "TRStudent.h"
@implementation TRStudent
+(NSMutableArray *)getarray
{
TRStudent *stu1=[[TRStudent alloc] init];
stu1.name=@"q";
stu1.phone=@"12345";
TRStudent *stu2=[[TRStudent alloc] init];
stu2.name=@"qqw";
stu2.phone=@"12345";
TRStudent *stu3=[[TRStudent alloc] init];
stu3.name=@"sdsq";
stu3.phone=@"12345";
NSMutableArray *mut=[[NSMutableArray alloc] init];
[mut addObject:stu1];
[mut addObject:stu2];
[mut addObject:stu3];
return mut;
}
@end
ios之UITableViewController(二) tableView的编辑模式的更多相关文章
- iOS UIKit:TableView之编辑模式(3)
一般table view有编辑模式和正常模式,当table view进入编辑模式时,会在row的左边显示编辑和重排控件,如图 42所示的编辑模式时的控件布局:左边的editing control有表 ...
- 07-UIKit(tableview的编辑模式、accessoryView)
目录: 一.tableview的编辑模式-增删改查 二.不使用继承创建tableview 三.accessoryView辅助视图 回到顶部 一.tableview的编辑模式-增删改查 [1-conta ...
- IOS开发学习笔记032-UITableView 的编辑模式
UITableView 的三种编辑模式 1.删除 2.排序 3.添加 进入编辑模式,需要设置一个参数 - (IBAction)remove:(UIBarButtonItem *)sender { NS ...
- IOS第七天(6:UiTableView编辑模式, 拖动位置 ,滑动删除)
**********UiTableView编辑模式, 拖动位置 ,滑动删除 #import "HMViewController.h" @interface HMViewContro ...
- ios 继承UITableViewController,更改tableview样式
// 继承UITableViewController,更改tableview样式 - (instancetype)initWithStyle:(UITableViewStyle)style { ret ...
- iOS开发UI篇-tableView在编辑状态下的批量操作(多选)
先看下效果图 直接上代码 #import "MyController.h" @interface MyController () { UIButton *button; } @pr ...
- iOS 中UITableViewController 中tableView 会被状态栏覆盖的问题
解决办法在 生命周期函数viewDidAppear中设置即可 - (void)viewDidAppear:(BOOL)animated { self.tableView.frame = CGRectM ...
- IOS第13天(3,私人通讯录,登陆状态数据存储,数据缓存, cell的滑动删除,进入编辑模式,单个位置刷新 )
*****联系人的界面的优化 HMContactsTableViewController.m #import "HMContactsTableViewController.h" # ...
- UITableView编辑模式大全解
1.UITableView 的编辑模式 进入编辑模式 代码体现 // 设置 editing 属性 tableView?.editing = true // 这个设置的时候是有动画效果的 tableVi ...
随机推荐
- Codeforces Good Bye 2015 C. New Year and Domino 前缀和
C. New Year and Domino 题目连接: http://www.codeforces.com/contest/611/problem/C Description They say &q ...
- VK Cup 2012 Qualification Round 2 C. String Manipulation 1.0 字符串模拟
C. String Manipulation 1.0 Time Limit: 20 Sec Memory Limit: 256 MB 题目连接 codeforces.com/problemset/pr ...
- grumble.js
grumble.js是一个jQuery插件.它提供了气泡提示框功能. 我们可以自定义气泡框的角度,大小,内容,以及回调方法等. 用法很简单: $('#grumble1').grumble( { tex ...
- DLX舞蹈链 hdu5046
题意: 在N个城市选出K个城市,建飞机场(1 ≤ N ≤ 60,1 ≤ K ≤ N),N个城市给出坐标,选择这K个机场,使得从城市到距离自己最近的机场的 最大的距离 最小. 输出这个最小值. 思路: ...
- 好记心不如烂笔头之jQuery学习,第一章
jQuery对象和DOM对象的转换: 1.jquery对象是对象数组,于是乎: var $cr = $('#cr'); var cr = $cr[0]; 2.使用jquery的自带函数: var $c ...
- SSIS 64位环境访问Oracle11g
SSIS 为了要能够在64位的机器上面让SSIS存取Oracle,当然需要安装64位的Oracle Provider,但是遇到最大的问题在于SSIS在执行的时候分成两种组件,分别是DTExec.exe ...
- 分布式缓存技术redis学习(三)——redis高级应用(主从、事务与锁、持久化)
上文<详细讲解redis数据结构(内存模型)以及常用命令>介绍了redis的数据类型以及常用命令,本文我们来学习下redis的一些高级特性.目录如下: 安全性设置 设置客户端操作秘密 客户 ...
- ubuntu 设置IP,设置网关
1. 检验是否可以连通,就使用ping命令ping 网关 开始的时候总是现实unreachable 2. 设置IP sudo ifconfig eth0 133.133.133.190 netmask ...
- 分治法(一)(zt)
这篇文章将讨论: 1) 分治策略的思想和理论 2) 几个分治策略的例子:合并排序,快速排序,折半查找,二叉遍历树及其相关特性. 说明:这几个例子在前面都写过了,这里又拿出来,从算法设计的策略的角度把它 ...
- 第一个c++程序 helloworld
// helloworld.cpp : 定义控制台应用程序的入口点.// #include "stdafx.h"#include "iostream" int ...
