Tutorial: Create a Blinky ARM test project(创建一个闪灯的arm测试项目)
Background
If you are new to ARM development, it is recommended to follow this short tutorial and learn how to build a simple test executable program that will blink a LED.
Note: this tutorial was created with the GNU Tools for ARM Embedded Processors toolchain in mind. Only when using this toolchain the build is guaranteed to succeed. Using other toolchains might be possible, but small changes might be necessary in the source code and in the linker options.
Note2: this tutorial requires a recent version of the STM32F4 template, not older than 20150807.
Prerequisites
Before creating a new project, please be sure you checked all prerequisites described in the How to install GNU MCU Eclipse? page, especially the need to install the build tools if you use Windows as your development platform.
It is also recommended to set the workspace preferences and to install the desired CMSIS packs.
Note: the multi-LED template is currently available only for ST32F4, and only for C++, since it allows to easily instantiate multiple BlinkLed objects.
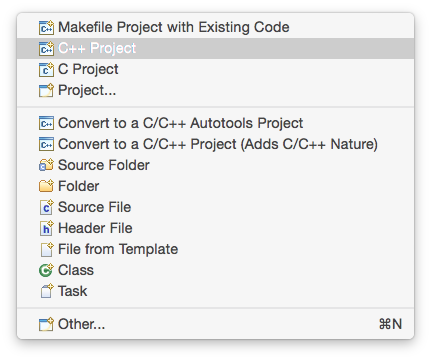
Create a new C++ project
To create a new project, go to Eclipse menu, File → New (or the button in the upper left corner), and select the C++ Project:
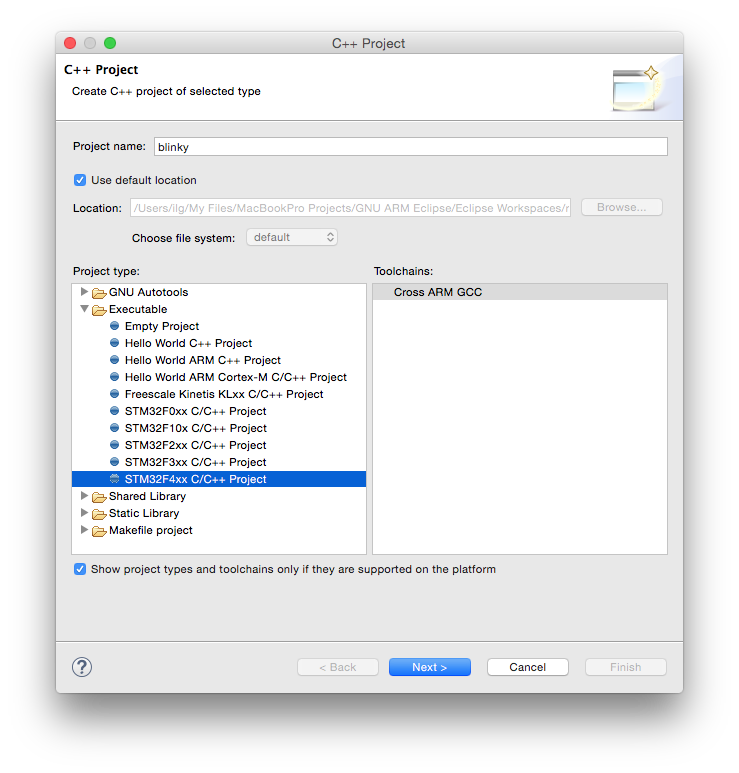
In the C++ Project window:
- in the Project name: field enter the name of the new project, for example blinky
- in the Project type: section expand the Executable type and select STM32F4xx C/C++ Project
- in the Toolchains: section select Cross ARM GCC
- click the Next > button
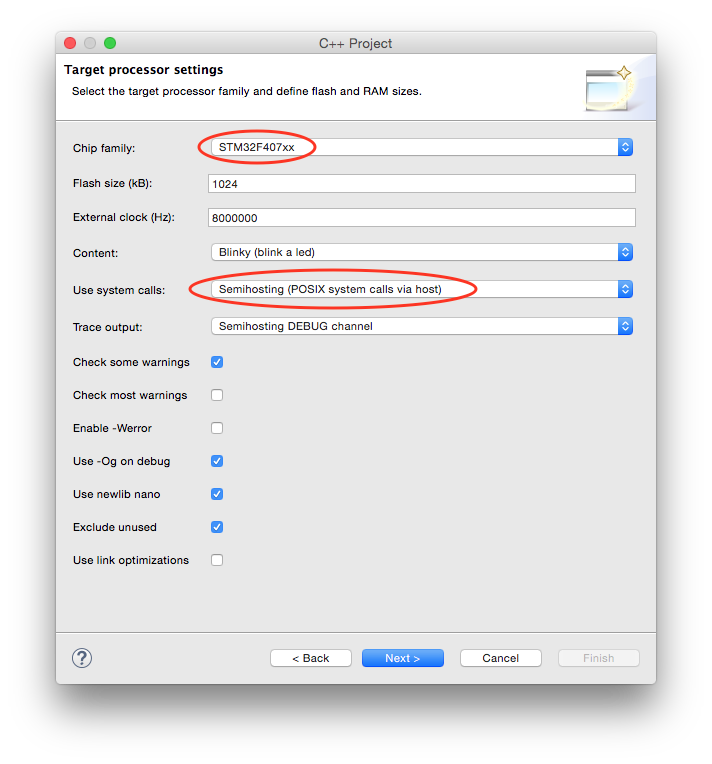
In the Target processor settings window be sure to:
- select the STM32F407xx chip family
- set the Flash size (kB) field to 1024 kB
- set the Clock (Hz): field to 8000000
- for a more complete example, change the Use system calls: fields to Semihosting (POSIX system calls via host)
- click the Next > button.
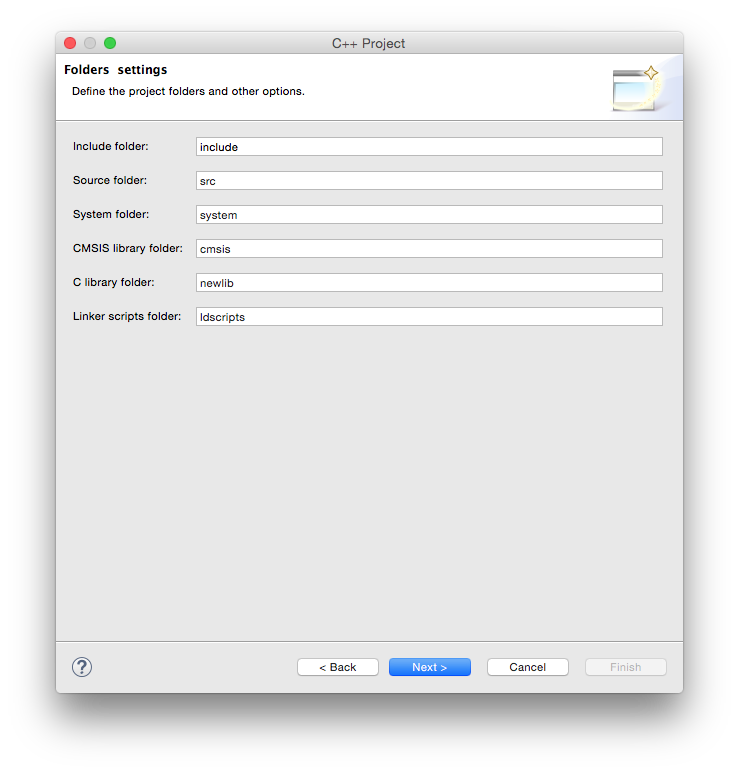
In the Folders page leave the suggested folders unchanged and click the Next > button.
In the Select Configurations page leave the suggested Debug/Release configurations checked and click the Next > button.

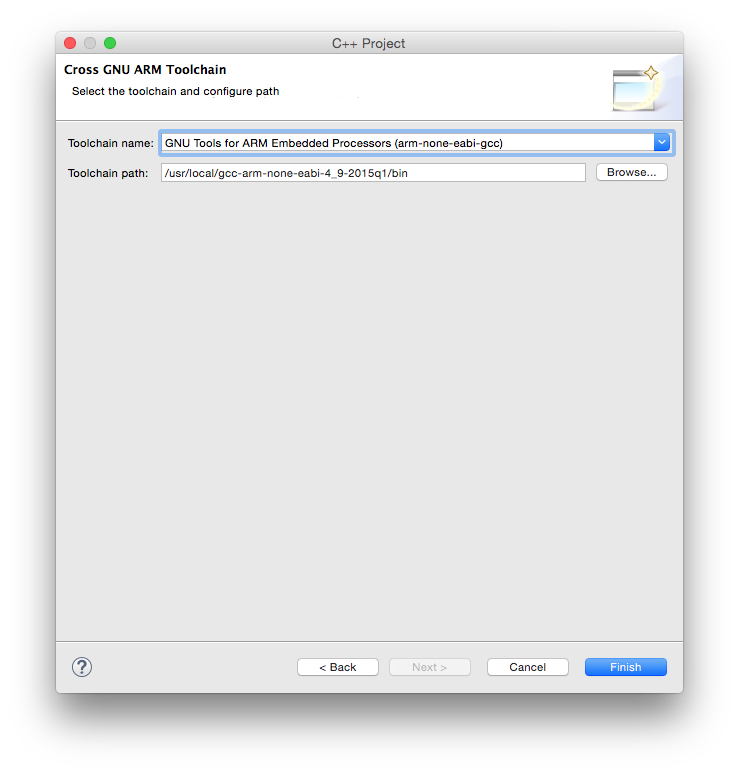
In the Cross GNU ARM Toolchain window:
- select the Toolchain name: GNU Tools for ARM Embedded Processors (mandatory)
- browse for the bin folder within the toolchain folder; don’t be afraid to use the absolute address, it is not stored in the project;
- click the Finish button
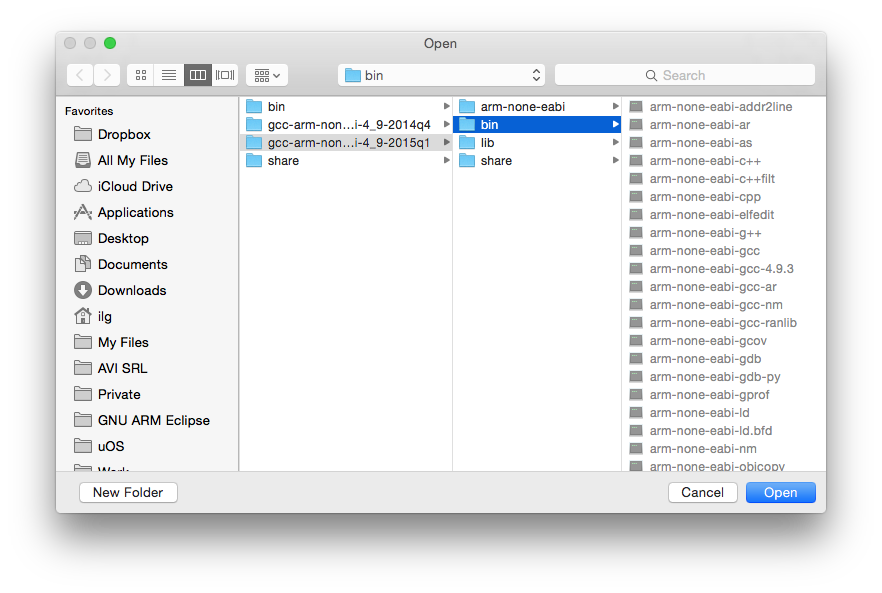
Note 1: when selecting the path, be sure you select the /bin folder where the programs with long, prefixed names are stored, and not the inner /bin folder where the short name programs may be available.
Note 2: DO NOT SKIP this step, it is mandatory to have a correct toolchain path defined in order for the build to complete correctly.
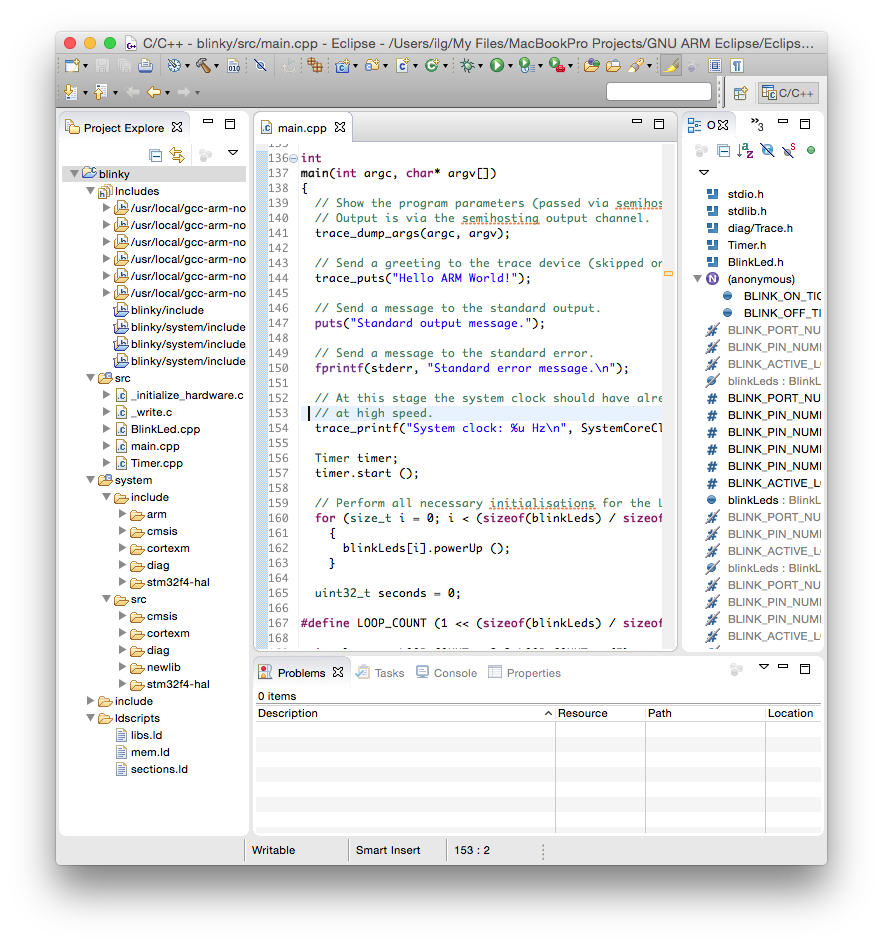
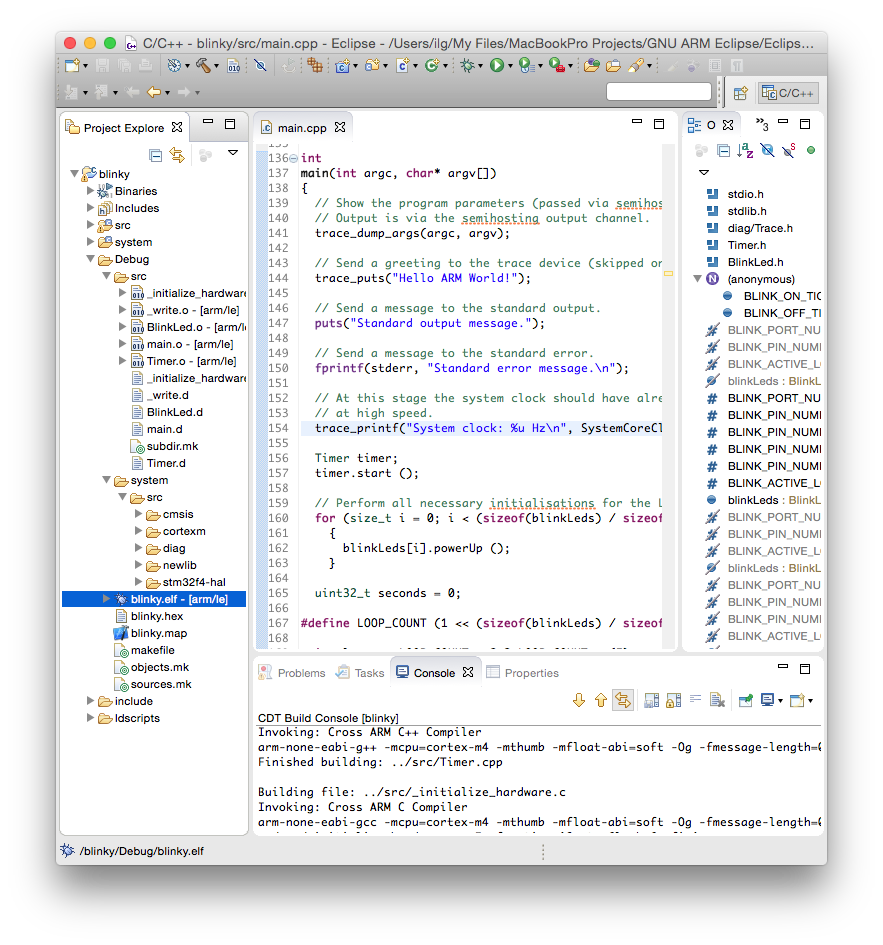
The result of the wizard is a simple project, with a main() function printing a greeting on the standard output.
Build the project
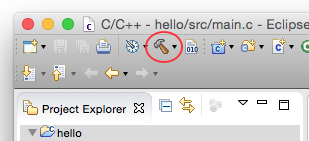
To start the build:
- select the new project in the Project Explorer section
- click the hammer icon
The build process should leave in the Console window a listing like this:
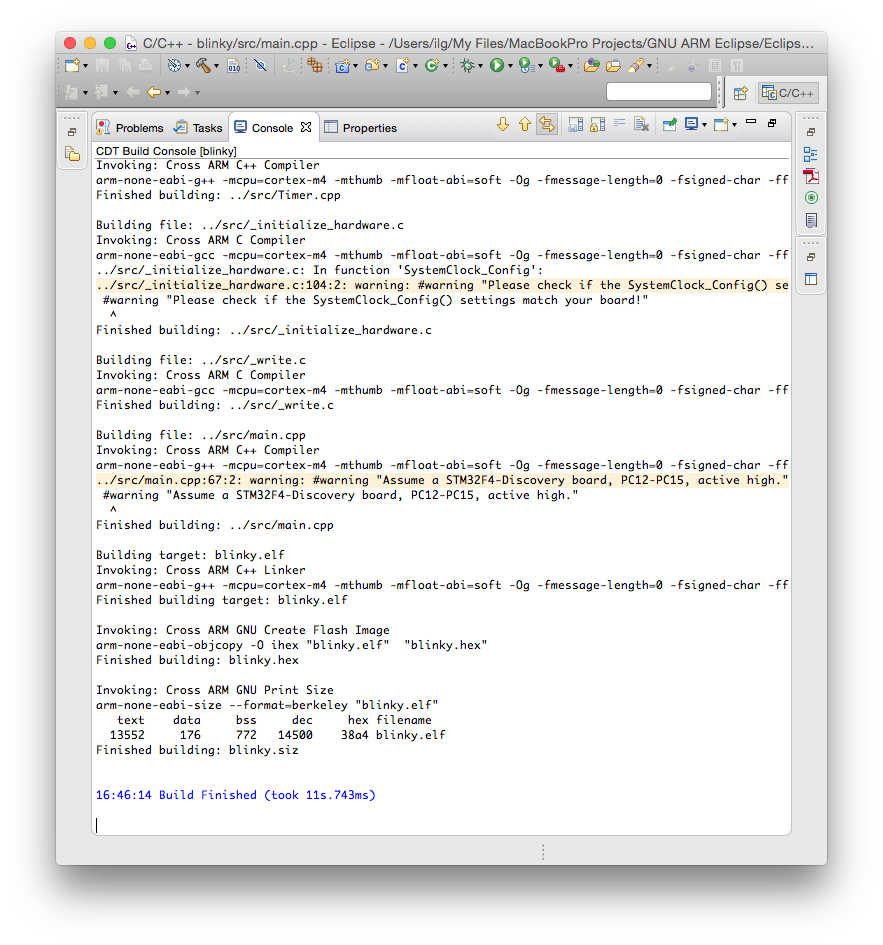
The files created by the build process are left in a folder named by the name of the configuration, for example Debug or Release.
As seen above, the Debug folder is populated with:
- all make files required for the build (makefile and various *.mk files, generated by CDT),
- the object files and dependency files generated during the build (main.o and main.d) and
- the final executable file, with all debug symbols, useful for a debug session (blinky.elf)
- the binary executable file, ready to be programmed in flash (blinky.hex)
- a program map, with all symbols and their associated addresses (blinky.map)
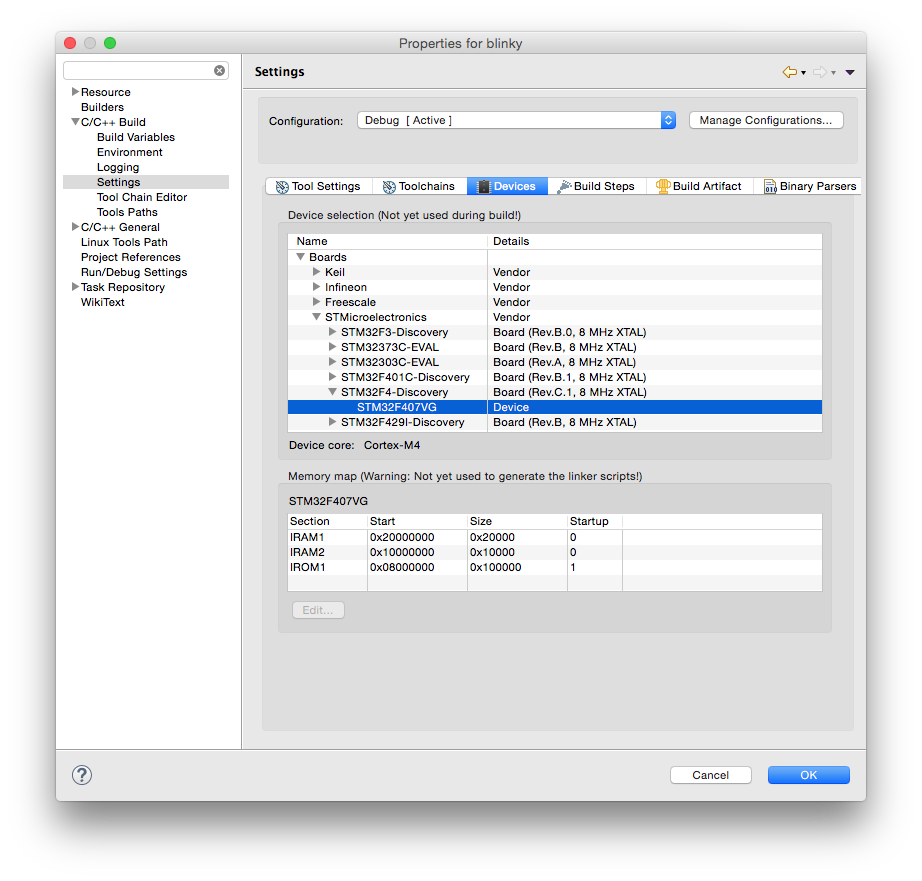
Assign a board and device to the project
Although optional, it is highly recommended to assign a board and a device to the project, using the packs definitions. If you did not do it before, install the STM32F4 package, as explained in the Packs Manager page.
To assign the board and device:
- select the project
- either with right click or via Project menu, enter Properties
- expand the C/C++ Build entry
- select the Settings entry
- select the Devices tab
- in the Boards section, expand STMicroelectronics
- expand STM32F4-Discovery
- select STM32F407VG
- click OK
Run the test with QEMU
The most convenient way to run this test is to use the QEMU Debugging plug-in. Actually, with the latest plug-ins, you can directly Run the application, you do not need to Debug it.
As for any debugging plug-in,
- select the blinky.elf file
- either with right click Run As… or in the Run menu, select Run Configurations
- doble click the GDB QEMU Debugging
- select the Debugger tab
- check if the Board name: and Device name: are correctly filled-in; without assigning the board and device to the project, these fields must be filled in manually;
- enable Extra verbose
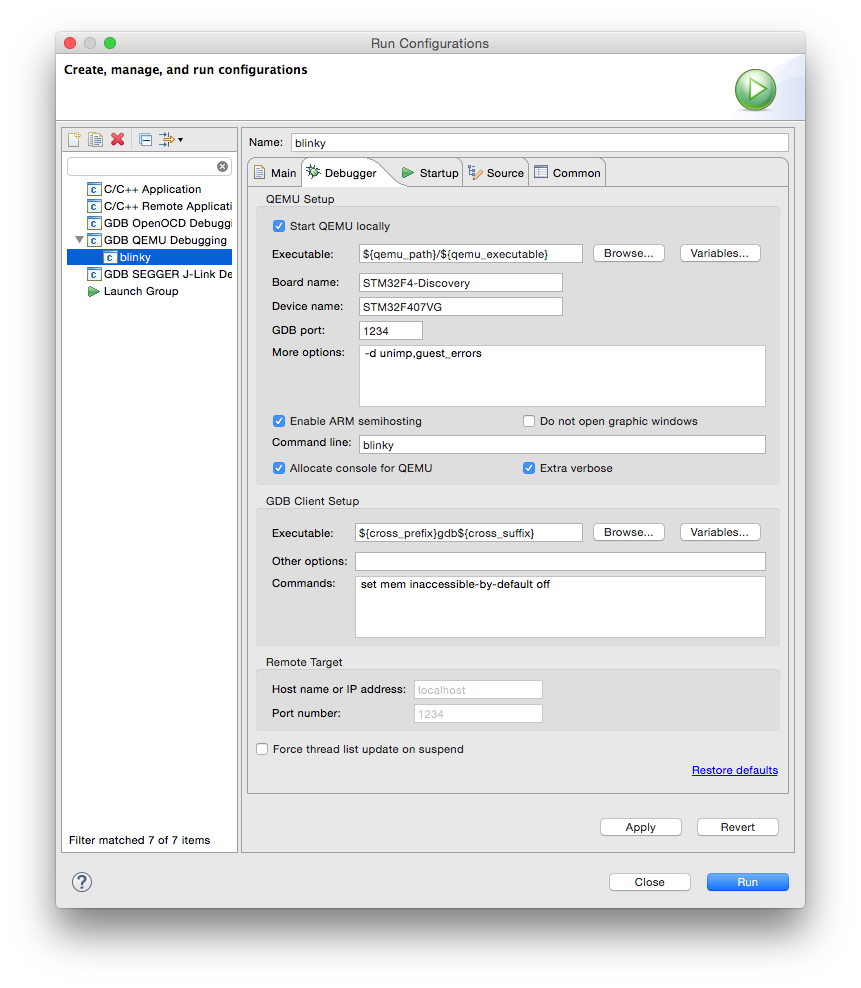
When done, click the Run button.
If you did not disable the graphic windows, an animated image of the board is shown, with the 4 LEDs blinking.

The QEMU process also displays some information in its console:

Semihosting
Contrary to usual POSIX environments, like GNU/Linux, embedded systems usually do not provide standard input/output devices. In the code generated by the template, the output of the printf() calls, including trace_printf(), is redirected to a special debugging channel implemented by most debuggers, using the semihosting protocol.
Next step
Once you checked the development environment to be functional, proceed with creating real projects using the STM32Fx templates, Freescale KLxx templates, or, if your target processor is not yet supported, using the Generic Cortex-M template.
Troubleshooting
The usual sources for build failures are:
- a wrong or missing toolchain path; go to the project Properties → C/C++ Build → Settings → the Toolchains tab and define the correct path;
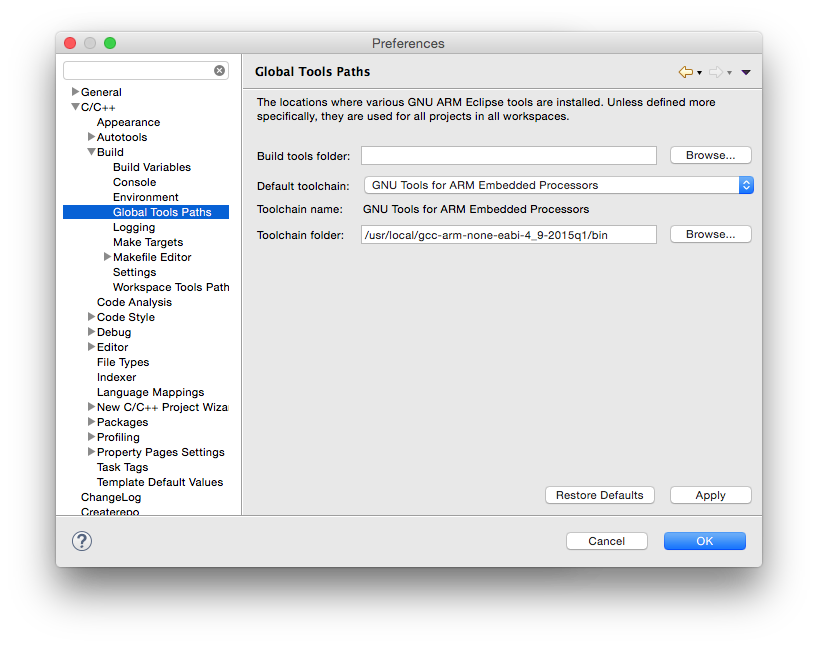
Set the toolchain path for all projects and workspaces.
- missing build tools (make & rm) on Windows; install the build tools;
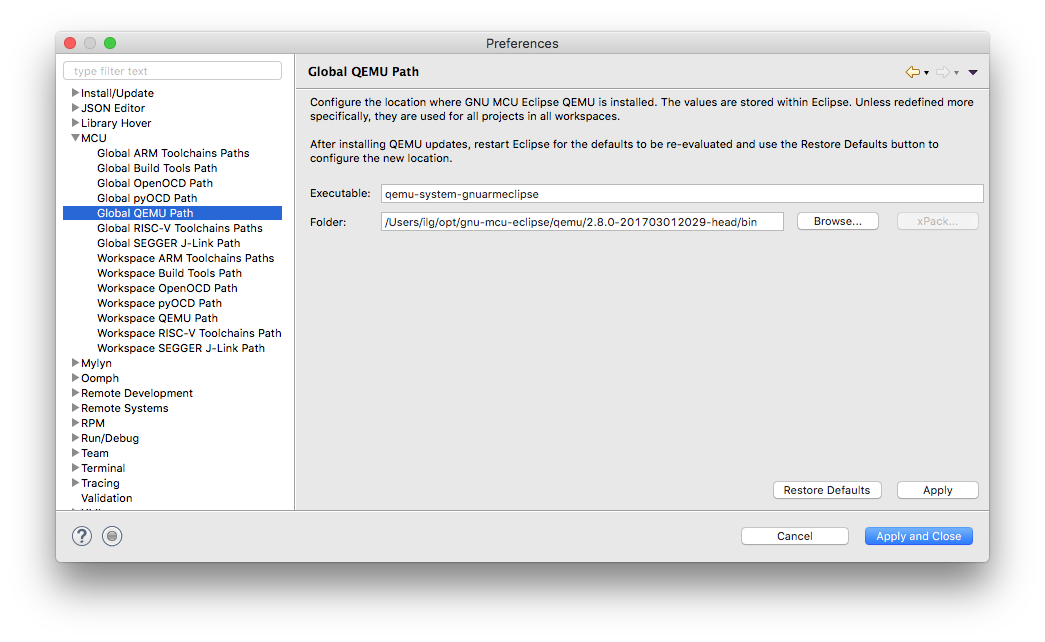
- a wrong or missing QEMU path; go to the project (Window →) Preferences → MCU → Global QEMU Path (or Workspace QEMU Path) and define the correct path;
Support
If something went wrong and you cannot build the project, please check the How to use, the FAQ and the Known issues pages. If you do not find the answer to your question, please read the Support page on how to record a support request in the Support tracker. Do not post comments on this page unless they are related to the text (the phrasing is not correct, you discovered typos, etc).
Last modified on Wed Apr 25 17:59:20 2018 UTC.
Tutorial: Create a Blinky ARM test project(创建一个闪灯的arm测试项目)的更多相关文章
- 用Eclipse 创建一个 简单的 Maven JavaWeb 项目
使用Maven 创建一个简单的 javaWeb 项目: 本篇属于 创建 JavaWeb 项目的第三篇: 建议阅读本篇之前 阅读 用 Eclipse 创建一个简单的web项目 ;本篇是这这篇文章的基础 ...
- 创建一个scrapy爬虫框架的项目
第一步:打开pycharm,选择"terminal",如图所示: 第二步:在命令中端输入创建scrapy项目的命令:scrapy startproject demo (demo指的 ...
- 创建一个支持ES6的Nodejs项目
文章来自于:https://www.codementor.io/iykyvic/writing-your-nodejs-apps-using-es6-6dh0edw2o 第一步:创建项目文件夹并初始化 ...
- 如何创建一个Asp .Net Web Api项目
1.点击文件=>新建=>项目 2.创建一个Asp .NET Web项目 3.选择Empty,然后选中下面的MVC和Web Api,也可以直接选择Web Api选项,注意将身份验证设置为无身 ...
- Object.create 以原对象为原型创建一个新对象
Object.create = function(o){ var Fun = function(){}; Fun.prototype = o; return new Fun(); } var peo ...
- 创建一个ArcGIS for Android 新项目并显示出本地的地图
1.准备工作:首先要配置好android的开发环境,然后在Eclipse中安装ArcGIS for Android的开发控件:在ArcCatalog中发布好本地的地图服务. 2.安装完ArcGIS f ...
- 前端技术之:如何创建一个NodeJs命令行交互项目
方法一:通过原生的NodeJs API,方法如下: #!/usr/bin/env node # test.js var argv = process.argv; console.log(argv) ...
- 创建一个简单的 Springboot web项目
1.点击Project 2.点击 Next 3.项目名 4.web 项目 4.确认 5.pom.xml <?xml version="1.0" encoding=" ...
- 手动创建一个Spring Boot 2.x项目
spring boot 2.1.9版本quick start参考文档地址:https://docs.spring.io/spring-boot/docs/2.1.9.RELEASE/reference ...
随机推荐
- 吴裕雄 Bootstrap 前端框架开发——Bootstrap 字体图标(Glyphicons):glyphicon glyphicon-minus
<!DOCTYPE html> <html> <head> <meta charset="utf-8"> <meta name ...
- JuJu团队11月26号工作汇报
JuJu团队11月26号工作汇报 JuJu Scrum 团队成员 今日工作 剩余任务 困难 于达 对原始文本进行预处理, 并转换成可被julia读入的格式 完成预处理并用julia读入. 读入后按 ...
- springboot - 在servlet中映射Errors 脱离spring mvc
应用不用Spring MVC, 采用ErrorPageRegistrar 接口能直接映射errors. 1.概览 2.java代码 1).MyAppServlet package com.ebc.se ...
- js排序专场
1,冒泡排序 function bubble(arr) { var len = arr.length - 1; for (let i = 0 ; i < len; i++) { var bool ...
- SignalR实现页面实时监控
1.页面截图
- crontab 实现Linux系统上定时任务的关键命令
附上原文链接 https://www.cnblogs.com/ftl1012/p/crontab.html 原文真是写得非常好,所谓他山之石可以攻玉~,我就不客气啦,哈哈
- Python 内置类型 dict, list,线程安全吗
近段时间发现一个 Python 连接数据库的连接是线程不安全的,结果惹得我哪哪儿都怀疑变量的多线程是否安全的问题,今天终于找到了正确答案,那就是 Python 内置类型 dict,list ,tupl ...
- js模式-观察者模式
// 主题,接收状态变化,触发每个观察者 class Subject { constructor() { this.state = 0 this.observers = [] } getState() ...
- hex、Base64
一.什么是Hex 将每一个字节表示的十六进制表示的内容,用字符串来显示. 二.作用 将不可见的,复杂的字节数组数据,转换为可显示的字符串数据 类似于Base64编码算法 区别:Base64将三个字节转 ...
- 使用Oracle VM VirtualBox创建虚拟机教程
使用Oracle VM VirtualBox创建虚拟机教程 ...