SpringBoot的@Enable*注解的使用介绍
@EnableAsync或@EnableConfigurationProperties背后的运行原理,是使用了@Import注解。
@Import({User.class,Role.class,MyConfiguration.class}),@Import里面可以存放数组类型的。
@Import用来导入一个或多个类(bean被spring容器托管)、或者配置类(配置类里面的Bean都会被spring容器托管)。
@Enable*其实就是使用了@Import,@Import其实就是导入了配置类。
1、以如何将配置文件里面的配置注入到bean中。之前贴过了,这里再贴一下,权当自己熟悉了。
- package com.bie.enable;
- import org.springframework.boot.context.properties.ConfigurationProperties;
- import org.springframework.stereotype.Component;
- /**
- *
- * @Description TODO
- * @author biehl
- * @Date 2018年12月31日 下午1:13:07
- *
- */
- @Component
- @ConfigurationProperties(prefix = "tomcat")
- public class TomcatProperties {
- private String hosts;
- private String ports;
- public String getHosts() {
- return hosts;
- }
- public void setHosts(String hosts) {
- this.hosts = hosts;
- }
- public String getPorts() {
- return ports;
- }
- public void setPorts(String ports) {
- this.ports = ports;
- }
- @Override
- public String toString() {
- return "TomcatProperties [hosts=" + hosts + ", ports=" + ports + "]";
- }
- }
然后在配置文件里面进行配置:
- tomcat.hosts=192.168.11.12
- tomcat.ports=
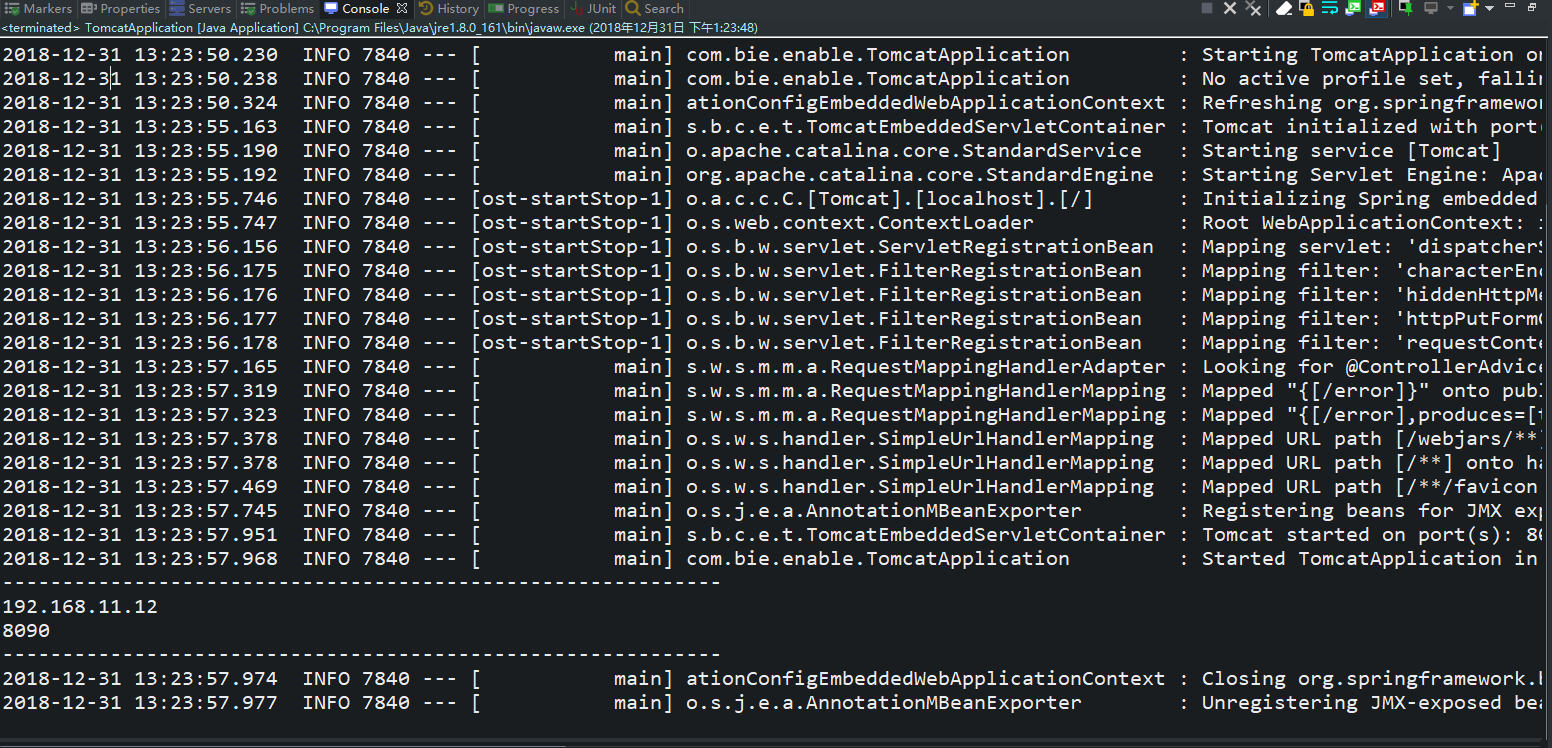
然后写一个主运行类来进行运行:
可以看到正常运行了。运行效果就不粘贴了。
- package com.bie.enable;
- import org.springframework.boot.SpringApplication;
- import org.springframework.boot.autoconfigure.SpringBootApplication;
- import org.springframework.context.ConfigurableApplicationContext;
- /**
- *
- * @Description TODO
- * @author biehl
- * @Date 2018年12月31日 下午1:15:27
- *
- */
- @SpringBootApplication
- public class TomcatApplication {
- public static void main(String[] args) {
- ConfigurableApplicationContext context = SpringApplication.run(TomcatApplication.class, args);
- System.out.println("------------------------------------------------------------");
- System.out.println(context.getEnvironment().getProperty("tomcat.hosts"));//从容器中获取到对象tomcat.hosts
- System.out.println(context.getEnvironment().getProperty("tomcat.ports"));//从容器中获取到对象tomcat.ports
- System.out.println("------------------------------------------------------------");
- context.close();
- }
- }
2、ctrl键和鼠标左键点开@SpringBootApplication注解,其实可以发现,注解里面主要使用了如此注解@EnableAutoConfiguration和@ComponentScan来实现的功能的。
注意1:@SpringBootConfiguration注解和Spring的@Configuration注解的作用是一样的。
注意2:@EnableConfigurationProperties注解是替代@EnableAutoConfiguration,发挥作用的是@EnableConfigurationProperties注解。

然后呢,你会发现,使用这两个注解和使用@SpringBootApplication注解的作用是一样的。
- package com.bie.enable;
- import org.springframework.boot.SpringApplication;
- import org.springframework.boot.autoconfigure.EnableAutoConfiguration;
- import org.springframework.boot.autoconfigure.SpringBootApplication;
- import org.springframework.context.ConfigurableApplicationContext;
- import org.springframework.context.annotation.ComponentScan;
- /**
- *
- * @Description TODO
- * @author biehl
- * @Date 2018年12月31日 下午1:15:27
- *
- */
- //@SpringBootApplication
- @EnableAutoConfiguration
- @ComponentScan
- public class TomcatApplication {
- public static void main(String[] args) {
- ConfigurableApplicationContext context = SpringApplication.run(TomcatApplication.class, args);
- System.out.println("------------------------------------------------------------");
- System.out.println(context.getEnvironment().getProperty("tomcat.hosts"));
- System.out.println(context.getEnvironment().getProperty("tomcat.ports"));
- System.out.println("------------------------------------------------------------");
- context.close();
- }
- }
运行效果如下所示:
上面说了发挥作用的@EnableConfigurationProperties,然而我测试的时候发现如下所示:
- . ____ _ __ _ _
- /\\ / ___'_ __ _ _(_)_ __ __ _ \ \ \ \
- ( ( )\___ | '_ | '_| | '_ \/ _` | \ \ \ \
- \\/ ___)| |_)| | | | | || (_| | ) ) ) )
- ' |____| .__|_| |_|_| |_\__, | / / / /
- =========|_|==============|___/=/_/_/_/
- :: Spring Boot :: (v1.5.10.RELEASE)
- -- ::18.515 INFO --- [ main] com.bie.enable.TomcatApplication : Starting TomcatApplication on DESKTOP-T450s with PID (E:\eclipeswork\guoban\spring-boot-hello\target\classes started by Aiyufei in E:\eclipeswork\guoban\spring-boot-hello)
- -- ::18.521 INFO --- [ main] com.bie.enable.TomcatApplication : No active profile set, falling back to default profiles: default
- -- ::18.600 INFO --- [ main] ationConfigEmbeddedWebApplicationContext : Refreshing org.springframework.boot.context.embedded.AnnotationConfigEmbeddedWebApplicationContext@101df177: startup date [Mon Dec :: CST ]; root of context hierarchy
- -- ::18.932 WARN --- [ main] ationConfigEmbeddedWebApplicationContext : Exception encountered during context initialization - cancelling refresh attempt: org.springframework.context.ApplicationContextException: Unable to start embedded container; nested exception is org.springframework.context.ApplicationContextException: Unable to start EmbeddedWebApplicationContext due to missing EmbeddedServletContainerFactory bean.
- -- ::19.423 ERROR --- [ main] o.s.boot.SpringApplication : Application startup failed
- org.springframework.context.ApplicationContextException: Unable to start embedded container; nested exception is org.springframework.context.ApplicationContextException: Unable to start EmbeddedWebApplicationContext due to missing EmbeddedServletContainerFactory bean.
- at org.springframework.boot.context.embedded.EmbeddedWebApplicationContext.onRefresh(EmbeddedWebApplicationContext.java:) ~[spring-boot-1.5..RELEASE.jar:1.5..RELEASE]
- at org.springframework.context.support.AbstractApplicationContext.refresh(AbstractApplicationContext.java:) ~[spring-context-4.3..RELEASE.jar:4.3..RELEASE]
- at org.springframework.boot.context.embedded.EmbeddedWebApplicationContext.refresh(EmbeddedWebApplicationContext.java:) ~[spring-boot-1.5..RELEASE.jar:1.5..RELEASE]
- at org.springframework.boot.SpringApplication.refresh(SpringApplication.java:) [spring-boot-1.5..RELEASE.jar:1.5..RELEASE]
- at org.springframework.boot.SpringApplication.refreshContext(SpringApplication.java:) [spring-boot-1.5..RELEASE.jar:1.5..RELEASE]
- at org.springframework.boot.SpringApplication.run(SpringApplication.java:) [spring-boot-1.5..RELEASE.jar:1.5..RELEASE]
- at org.springframework.boot.SpringApplication.run(SpringApplication.java:) [spring-boot-1.5..RELEASE.jar:1.5..RELEASE]
- at org.springframework.boot.SpringApplication.run(SpringApplication.java:) [spring-boot-1.5..RELEASE.jar:1.5..RELEASE]
- at com.bie.enable.TomcatApplication.main(TomcatApplication.java:) [classes/:na]
- Caused by: org.springframework.context.ApplicationContextException: Unable to start EmbeddedWebApplicationContext due to missing EmbeddedServletContainerFactory bean.
- at org.springframework.boot.context.embedded.EmbeddedWebApplicationContext.getEmbeddedServletContainerFactory(EmbeddedWebApplicationContext.java:) ~[spring-boot-1.5..RELEASE.jar:1.5..RELEASE]
- at org.springframework.boot.context.embedded.EmbeddedWebApplicationContext.createEmbeddedServletContainer(EmbeddedWebApplicationContext.java:) ~[spring-boot-1.5..RELEASE.jar:1.5..RELEASE]
- at org.springframework.boot.context.embedded.EmbeddedWebApplicationContext.onRefresh(EmbeddedWebApplicationContext.java:) ~[spring-boot-1.5..RELEASE.jar:1.5..RELEASE]
- ... common frames omitted
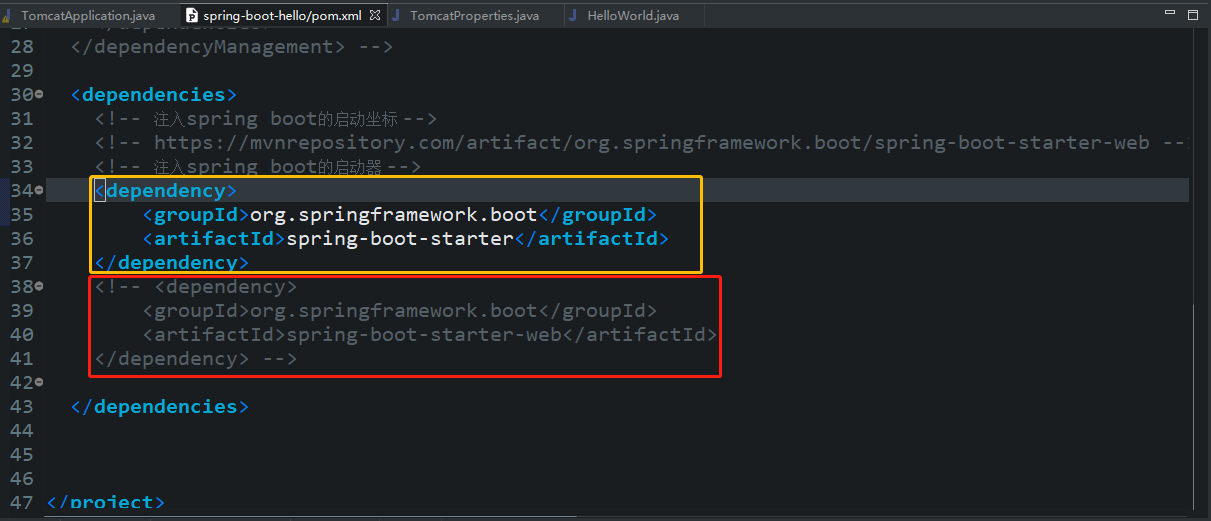
然而就百度呗,发现并没有很清晰说这个问题怎么解决的。
在https://stackoverflow.com/questions/37114076/exception-in-thread-main-org-springframework-context-applicationcontextexcepti发现了一段话,还挺有意思的。如是说,丢失注解,其实是依赖不对的问题,哈哈哈,然后看看自己的依赖。发现了问题所在。

我一开始是使用的<artifactId>spring-boot-starter-web</artifactId>,这种web的依赖,修改为了<artifactId>spring-boot-starter</artifactId>普通项目的依赖,这样使用@EnableConfigurationProperties注解是替代@EnableAutoConfiguration运行就没有问题了。
@EnableConfigurationProperties注解是用来启用一个特性的,这个特性就是,可以把配置文件注入到bean里面去。一般是要和@ConfigurationProperties一起使用。
2、SpringBoot中如何启用一个异步,看看SpringBoot如何对异步进行支持的。
- package com.bie.enable;
- import java.util.concurrent.TimeUnit;
- import org.springframework.scheduling.annotation.Async;
- import org.springframework.stereotype.Component;
- /**
- *
- * @Description TODO
- * @author biehl
- * @Date 2018年12月31日 下午2:08:52
- * 1、实现Runnable接口的类要实现run的方法
- */
- @Component //添加到容器中
- public class SyncRunnable implements Runnable {
- //@Async注解实现,异步执行
- @Async
- public void run() {
- try {
- for (int i = ; i < ; i++) {
- System.out.println("-------------------" + i);
- TimeUnit.SECONDS.sleep();
- }
- } catch (InterruptedException e) {
- e.printStackTrace();
- }
- }
- }
然后写主运行类,如下所示:
- package com.bie.enable;
- import org.springframework.boot.SpringApplication;
- import org.springframework.boot.autoconfigure.SpringBootApplication;
- import org.springframework.context.ConfigurableApplicationContext;
- import org.springframework.scheduling.annotation.EnableAsync;
- /**
- *
- * @Description TODO
- * @author biehl
- * @Date 2018年12月31日 下午2:11:52
- *
- */
- @SpringBootApplication
- @EnableAsync //启用异步注解
- public class SyncApplication {
- public static void main(String[] args) {
- ConfigurableApplicationContext context = SpringApplication.run(SyncApplication.class, args);
- SyncRunnable bean = context.getBean(SyncRunnable.class);
- System.out.println(bean);
- bean.run();
- System.out.println("-----------end-----------");
- //关闭
- context.close();
- }
- }
如果使用上面的会报错,如下所示:
- . ____ _ __ _ _
- /\\ / ___'_ __ _ _(_)_ __ __ _ \ \ \ \
- ( ( )\___ | '_ | '_| | '_ \/ _` | \ \ \ \
- \\/ ___)| |_)| | | | | || (_| | ) ) ) )
- ' |____| .__|_| |_|_| |_\__, | / / / /
- =========|_|==============|___/=/_/_/_/
- :: Spring Boot :: (v1.5.10.RELEASE)
- -- ::34.676 INFO --- [ main] com.bie.enable.SyncApplication : Starting SyncApplication on DESKTOP-T450s with PID (E:\eclipeswork\guoban\spring-boot-hello\target\classes started by Aiyufei in E:\eclipeswork\guoban\spring-boot-hello)
- -- ::34.682 INFO --- [ main] com.bie.enable.SyncApplication : No active profile set, falling back to default profiles: default
- -- ::34.991 INFO --- [ main] s.c.a.AnnotationConfigApplicationContext : Refreshing org.springframework.context.annotation.AnnotationConfigApplicationContext@103f852: startup date [Mon Dec :: CST ]; root of context hierarchy
- -- ::38.523 INFO --- [ main] o.s.j.e.a.AnnotationMBeanExporter : Registering beans for JMX exposure on startup
- -- ::38.623 INFO --- [ main] com.bie.enable.SyncApplication : Started SyncApplication in 5.1 seconds (JVM running for 5.898)
- Exception in thread "main" org.springframework.beans.factory.NoSuchBeanDefinitionException: No qualifying bean of type 'com.bie.enable.SyncRunnable' available
- at org.springframework.beans.factory.support.DefaultListableBeanFactory.getBean(DefaultListableBeanFactory.java:)
- at org.springframework.beans.factory.support.DefaultListableBeanFactory.getBean(DefaultListableBeanFactory.java:)
- at org.springframework.context.support.AbstractApplicationContext.getBean(AbstractApplicationContext.java:)
- at com.bie.enable.SyncApplication.main(SyncApplication.java:)
- -- ::38.663 INFO --- [ Thread-] s.c.a.AnnotationConfigApplicationContext : Closing org.springframework.context.annotation.AnnotationConfigApplicationContext@103f852: startup date [Mon Dec :: CST ]; root of context hierarchy
- -- ::38.670 INFO --- [ Thread-] o.s.j.e.a.AnnotationMBeanExporter : Unregistering JMX-exposed beans on shutdown
百度了一下,参考链接:https://www.cnblogs.com/javJoker/p/7281688.html
修改为了如下所示,参考链接的问题,确实也问住我了,需要深思一下吧。
@EnableAsync //启用异步注解,一般是和@Async一起使用。来实现异步的功能。
- package com.bie.enable;
- import org.springframework.boot.SpringApplication;
- import org.springframework.boot.autoconfigure.SpringBootApplication;
- import org.springframework.context.ConfigurableApplicationContext;
- import org.springframework.scheduling.annotation.EnableAsync;
- /**
- *
- * @Description TODO
- * @author biehl
- * @Date 2018年12月31日 下午2:11:52
- *
- */
- @SpringBootApplication
- @EnableAsync //启用异步注解
- public class SyncApplication {
- public static void main(String[] args) {
- ConfigurableApplicationContext context = SpringApplication.run(SyncApplication.class, args);
- Runnable bean = context.getBean(Runnable.class);
- System.out.println(bean);
- bean.run();
- System.out.println("-----------end-----------");
- //关闭
- context.close();
- }
- }
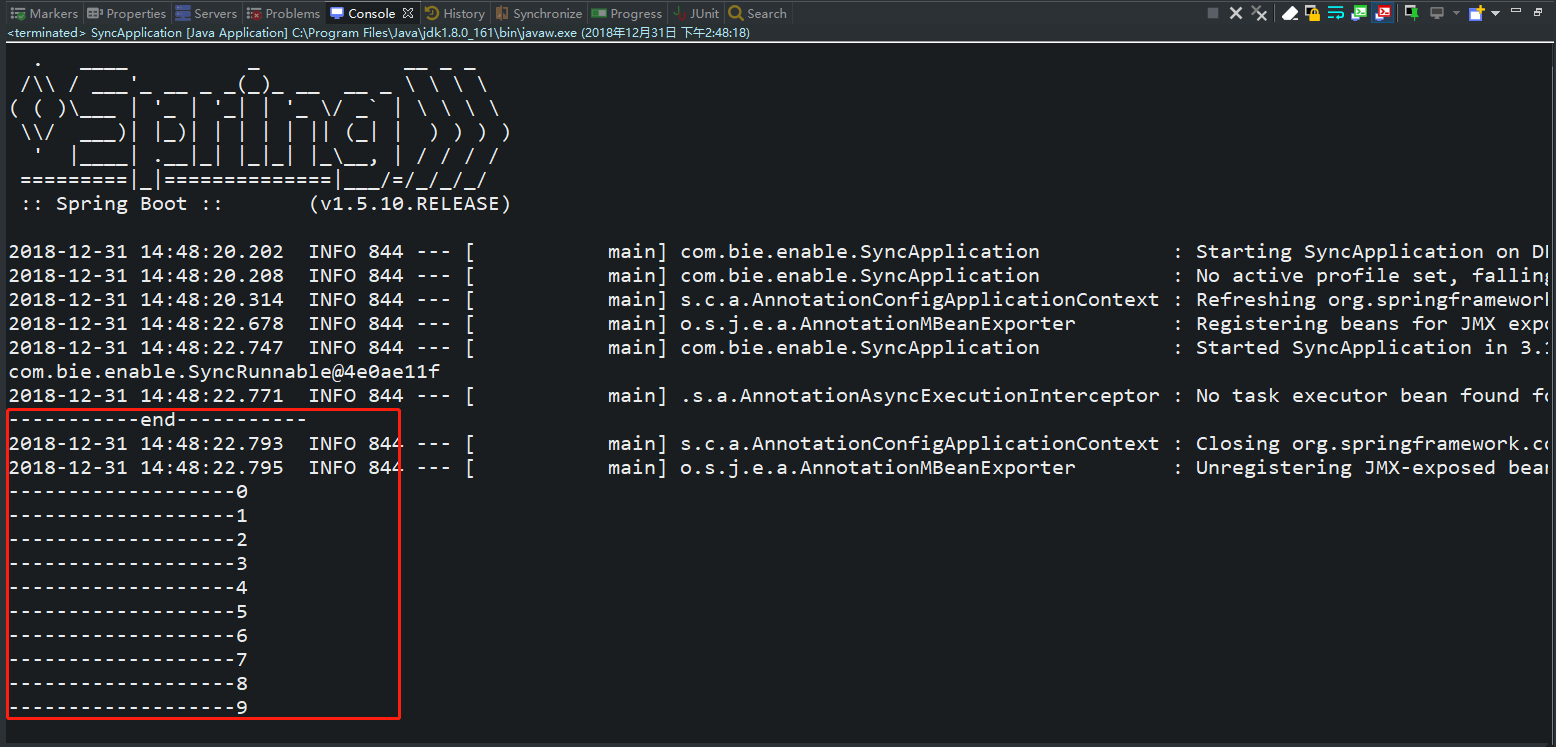
运行结果如下所示:
待续......
SpringBoot的@Enable*注解的使用介绍的更多相关文章
- Springboot中enable注解
这句话可以作为理解springboot自动注入的原理的钥匙:ImportSelector接口的selectImports返回的数组(类的全类名)都会被纳入到spring容器中. 至于spring怎么根 ...
- Spring Boot @Enable*注解源码解析及自定义@Enable*
Spring Boot 一个重要的特点就是自动配置,约定大于配置,几乎所有组件使用其本身约定好的默认配置就可以使用,大大减轻配置的麻烦.其实现自动配置一个方式就是使用@Enable*注解,见其名知 ...
- SpringBoot 中常用注解@PathVaribale/@RequestParam/@GetMapping介绍
SpringBoot 中常用注解@PathVaribale/@RequestParam/@GetMapping介绍 本篇博文将介绍几种如何处理url中的参数的注解@PathVaribale/@Requ ...
- SpringBoot 中常用注解@Controller/@RestController/@RequestMapping介绍
原文 SpringBoot 中常用注解 @Controller/@RestController/@RequestMapping介绍 @Controller 处理http请求 @Controller / ...
- SpringBoot中神奇的@Enable*注解?
在SpringBoot开发过程,我们经常会遇到@Enable开始的好多注解,比如@EnableEurekaServer.@EnableAsync.@EnableScheduling等,今天我们就来分析 ...
- 自定义Spring-Boot @Enable注解
Spring-Boot中有很多Enable开头的注解,通过添加注解来开启一项功能,如 其原理是什么?如何开发自己的Enable注解? 1.原理 以@EnableScheduling为例,查看其源码,发 ...
- SpringBoot 中常用注解
本篇博文将介绍几种SpringBoot 中常用注解 其中,各注解的作用为: @PathVaribale 获取url中的数据 @RequestParam 获取请求参数的值 @GetMapping 组合注 ...
- Spring 3.1新特性之二:@Enable*注解的源码,spring源码分析之定时任务Scheduled注解
分析SpringBoot的自动化配置原理的时候,可以观察下这些@Enable*注解的源码,可以发现所有的注解都有一个@Import注解.@Import注解是用来导入配置类的,这也就是说这些自动开启的实 ...
- SpringBoot 中常用注解@Controller/@RestController/@RequestMapping的区别
SpringBoot中常用注解@Controller/@RestController/@RequestMapping的区别 @Controller 处理http请求 @Controller //@Re ...
随机推荐
- nuxt npm run dev 报错Solution to the "Error: listen EADDRINUSE 127.0.0.1:8080"
Solution to the "Error: listen EADDRINUSE 127.0.0.1:8080" Hello, Just sharing a solution t ...
- ASP.NET and ADO.NET
1.ASP.NET ASP.NET是一个使用HTML.Css.JacaScript 和服务器脚本创建网页和网站的开发框架 ASP.NET支持 WebPages.MVC.WebForms三种开发模式 ...
- 浅谈JS中逗号运算符的用法
阅读本文的前提是,你能区分什么是表达式,什么是语句.还有明确运算符和运算数都是些啥东西.所谓的表达式就是一个JavaScript的"短语",JavaScript的解释器可以计算它, ...
- 《STL源码剖析》----2.23 value_type()和__type_traits<>如何实现
在2.13小节destory()第二版本接受两个迭代器找出元素类型,代码如下 其中value_type()判断出类型,__type_traits判断是否存在trivial destructor 在3. ...
- 2019 年 3 月 iOS程序员面试心得总结,请大家多多指教!
序言: 今年2月中下旬因为个人原因,换了一份工作,3月初期间面试了有3,4家,基本都是D轮或者刚刚上市的公司,也有上榜的BAT,也从他们的面试笔试中看到了自己的一些不足,于是就想写出来和大家分享一下, ...
- js重点--this关键字
推荐博客:https://www.cnblogs.com/huaxili/p/5407559.html this是JavaScript的一个关键字,表示的不是对象本身,而是指被调用的上文. 主要用于以 ...
- [译]Ocelot - Caching
原文 Ocelot支持基本的缓存,目前Ocelot的缓存是通过CacheManager project实现的. 下面的示例展示了如何启用缓存: s.AddOcelot() .AddCacheManag ...
- Spring rabbitMq 中 correlationId或CorrelationIdString 消费者获取为null的问题
问题 在用Spring boot 的 spring-boot-starter-amqp 快速启动 rabbitMq 是遇到了个坑 消费者端获取不到:correlationId或Correlatio ...
- Java IO与网络编程笔记
<!doctype html>Java IO&NIO figure:first-child { margin-top: -20px; } #write ol, #write ul ...
- maven配置及IDEA配置maven环境
一. maven的下载及配置 1. maven下载地址 可以在网址:https://maven.apache.org/download.cgi下载最新版本的maven 2. maven文件解压缩 解压 ...