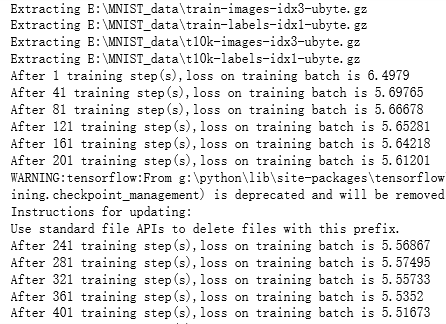
吴裕雄 python 神经网络TensorFlow实现LeNet模型处理手写数字识别MNIST数据集
import tensorflow as tf

tf.reset_default_graph()

# 配置神经网络的参数

INPUT_NODE = 784

OUTPUT_NODE = 10

IMAGE_SIZE = 28

NUM_CHANNELS = 1

NUM_LABELS = 10

# 第一层卷积层的尺寸和深度

CONV1_DEEP = 32

CONV1_SIZE = 5

# 第二层卷积层的尺寸和深度

CONV2_DEEP = 64

CONV2_SIZE = 5

# 全连接层的节点个数

FC_SIZE = 512

# 定义卷积神经网络的前向传播过程。这里添加了一个新的参数train,用于区分训练过程和测试过程

# 在这个程序中将用到dropout方法,dropout方法可以进一步提升模型可靠性并防止过拟合

# dropout过程只在训练时使用

def inference(input_tensor, train, regularizer):

    # 声明第一层卷积层的变量并实现前向传播过程。

    # 通过使用不同的命名空间来隔离不同层的变量,这可以让每一层中的变量命名

    # 只需要考虑当前层的作用,而不需要担心重命名的问题。和标准LeNet-5模型不大一样,

    # 这里定义的卷积层输入为28*28*1的原始MNIST图片像素,因为卷积层中使用了全0填充

    # 所以输出为28*28*32的矩阵

    with tf.variable_scope('layer1-conv1'):

        conv1_weights = tf.get_variable("weight",

                                        [CONV1_SIZE, CONV1_SIZE, NUM_CHANNELS, CONV1_DEEP],

                                        initializer=tf.truncated_normal_initializer(stddev=0.1)

                                        )

        conv1_biases = tf.get_variable("bias", [CONV1_DEEP], initializer=tf.constant_initializer(0.0))

        # 使用边长为5,深度为32的过滤器,过滤器移动的步长为1,且使用全0填充

        conv1 = tf.nn.conv2d(input_tensor, conv1_weights, strides=[1, 1, 1, 1], padding='SAME')

        relu1 = tf.nn.relu(tf.nn.bias_add(conv1, conv1_biases))

    # 实现第二城池化层的前向传播过程。这里选用最大池化层,池化层过滤器的边长为2,

    # 使用全0填充且移动的步长为2.这一层的输入是上一层的输出,也就是28*28*32

    # 的矩阵。输出为14*14*32的矩阵

    with tf.name_scope('layer2-pool1'):

        pool1 = tf.nn.max_pool(relu1, ksize=[1, 2, 2, 1], strides=[1, 2, 2, 1], padding='SAME')

    # 声明第三层卷积层的变量并实现前向传播过程。这一层输入为14*14*32的矩阵

    # 输出为14*14*64的矩阵

    with tf.variable_scope('layer3-conv2'):

        conv2_weights = tf.get_variable("weight", [CONV2_SIZE, CONV2_SIZE, CONV1_DEEP, CONV2_DEEP],

                                        initializer=tf.truncated_normal_initializer(stddev=0.1))

        conv2_biases = tf.get_variable("bias", [CONV2_DEEP], initializer=tf.constant_initializer(0.0))

        # 使用边长为5,深度为64的过滤器,过滤器移动的步长为1,且使用全0填充

        conv2 = tf.nn.conv2d(pool1, conv2_weights, strides=[1, 1, 1, 1], padding='SAME')

        relu2 = tf.nn.relu(tf.nn.bias_add(conv2, conv2_biases))

    # 实现第四层池化层的前向传播过程。这一层和第二层的结构是一样的。这一层的输入为

    # 14*14*64的矩阵,输出为7*7*64的矩阵

    with tf.name_scope('layer4-pool2'):

        pool2 = tf.nn.max_pool(relu2, ksize=[1, 2, 2, 1], strides=[1, 2, 2, 1], padding='SAME')

    # 将第四层池化层的输出转化为第五层全连接层的输入格式,第四层的输出为7*7*64的矩阵

    # 然而第五层全连接层需要的输入格式为向量,所以在这里需要将这个7*7*64的矩阵拉直成一个向量

    # pool2.get_shape函数可以得到第四层输出矩阵的维度而不需要手工计算

    # 注意因为每一层神经网络的输入输出都为一个batch的矩阵,所以这里得到的维度也包含了一个batch中数据的个数

    pool_shape = pool2.get_shape().as_list()

    # 计算将矩阵拉直成向量之后的长度,这个长度就是矩阵长宽及深度的乘积。注意在这里pool_shape[0]为一个batch中数据的个数

    nodes = pool_shape[1] * pool_shape[2] * pool_shape[3]

    # 通过tf.reshape函数将第四层的输出变成一个batch向量

    reshaped = tf.reshape(pool2, [pool_shape[0], nodes])

    # 声明第五层全连接的变量并实现前向传播过程。这一层的输入是拉直之后的一组向量

    # 向量长度为3136,输出是一组长度为512的向量。

    # 引入了dropout的概念,dropout在训练时会随机将部分节点的输出改为0

    # dropout可以避免过拟合问题,从而使得模型在测试数据上的效果更好

    # dropout一般只在全连接层而不是卷积层或者池化层使用

    with tf.variable_scope('layer5-fc1'):

        fc1_weights = tf.get_variable("weight", [nodes, FC_SIZE],

                                      initializer=tf.truncated_normal_initializer(stddev=0.1))

        # 只用全连接层的权重需要加入正则化

        if regularizer != None:

            tf.add_to_collection('losses', regularizer(fc1_weights))

        fc1_biases = tf.get_variable("bias", [FC_SIZE], initializer=tf.constant_initializer(0.1))

        fc1 = tf.nn.relu(tf.matmul(reshaped, fc1_weights) + fc1_biases)

        if train:

            fc1 = tf.nn.dropout(fc1, 0.5)

    # 声明第六层的变量并实现前向传播过程。这一层的输入为一组长度为512的向量

    # 输出为一组长度为10的向量。这一层的输出通过Softmax之后就得到了最后的分类结果

    with tf.variable_scope('layer6-fc2'):

        fc2_weights = tf.get_variable("weight", [FC_SIZE, NUM_LABELS],

                                      initializer=tf.truncated_normal_initializer(stddev=0.1))

        if regularizer != None:

            tf.add_to_collection('losses', regularizer(fc2_weights))

        fc2_biases = tf.get_variable("bias", [NUM_LABELS], initializer=tf.constant_initializer(0.1))

        logit = tf.matmul(fc1, fc2_weights) + fc2_biases

    return logit

import os

import numpy as np

from tensorflow.examples.tutorials.mnist import input_data

# 配置神经网络的参数

BATCH_SIZE = 100

LEARNING_RATE_BASE = 0.8

LEARNING_RATE_DECAY = 0.99

REGULARAZTION_RATE = 0.0001

TRAINING_STEPS = 20000

MOVING_AVERAGE_DECAY = 0.99

# 模型保存的路径和文件名

MODEL_SAVE_PATH = "E:\\MNIST_data\\"

MODEL_NAME = "model1.ckpt"

def train(mnist):

    # 定义输入输出placeholder

    x = tf.placeholder(tf.float32, [BATCH_SIZE,# 第一维表示一个batch中样例的个数

                                    IMAGE_SIZE,

                                    IMAGE_SIZE,  # 第二维和第三维表示图片的尺寸

                                    NUM_CHANNELS],  # 第四维表示图片的深度,对于RGB格式的图片,深度为5

                       name='x-input')

    y_ = tf.placeholder(tf.float32, [None, OUTPUT_NODE], name='y-input')

    regularizer = tf.contrib.layers.l2_regularizer(REGULARAZTION_RATE)

    # 直接使用inference中定义的前向传播过程

    y = inference(x, True, regularizer)

    global_step = tf.Variable(0, trainable=False)

    # 定义损失函数、学习率、滑动平均操作以及训练过程

    variable_averages = tf.train.ExponentialMovingAverage(MOVING_AVERAGE_DECAY, global_step)

    variable_averages_op = variable_averages.apply(tf.trainable_variables())

    cross_entropy = tf.nn.sparse_softmax_cross_entropy_with_logits(logits=y, labels=tf.argmax(y_, 1))

    cross_entropy_mean = tf.reduce_mean(cross_entropy)

    loss = cross_entropy_mean + tf.add_n(tf.get_collection('losses'))

    learning_rate = tf.train.exponential_decay(LEARNING_RATE_BASE, global_step, mnist.train.num_examples / BATCH_SIZE,

                                               LEARNING_RATE_DECAY)

    train_step = tf.train.GradientDescentOptimizer(learning_rate).minimize(loss, global_step=global_step);

    with tf.control_dependencies([train_step, variable_averages_op]):

        train_op = tf.no_op(name='train')

    # 初始化Tensorflow持久化类

    saver = tf.train.Saver()

    with tf.Session() as sess:

        tf.global_variables_initializer().run()

        # 在训练过程中不再测试模型在验证数据上的表现,验证和测试的过程将会有一个独立的程序来完成

        for i in range(TRAINING_STEPS):

            xs, ys = mnist.train.next_batch(BATCH_SIZE)

            reshaped_xs = np.reshape(xs, (BATCH_SIZE,

                                          IMAGE_SIZE,

                                          IMAGE_SIZE,

                                          NUM_CHANNELS))

            _, loss_value, step = sess.run([train_op, loss, global_step], feed_dict={x: reshaped_xs, y_: ys})

            # 每40轮保存一次模型

            if i % 40 == 0:

                # 输出当前训练情况。这里只输出了模型在当前训练batch上的损失函数大小

                # 通过损失函数的大小可以大概了解训练的情况。在验证数据集上的正确率信息

                # 会有一个单独的程序来生成

                print("After %d training step(s),loss on training batch is %g" % (step, loss_value))

                # 保存当前的模型。注意这里给出了global_step参数,这样可以让每个被保存模型的文件末尾加上训练的轮数

                # 比如"model1.ckpt-41"表示训练41轮之后得到的模型

                saver.save(sess, os.path.join(MODEL_SAVE_PATH, MODEL_NAME), global_step=global_step)

def main(argv=None):

    mnist = input_data.read_data_sets("E:\\MNIST_data", one_hot=True)

    train(mnist)

main()

# if __name__ == '__main__':

#     main()

吴裕雄 python 神经网络TensorFlow实现LeNet模型处理手写数字识别MNIST数据集的更多相关文章
- 吴裕雄 python 神经网络——TensorFlow实现AlexNet模型处理手写数字识别MNIST数据集
import tensorflow as tf # 输入数据 from tensorflow.examples.tutorials.mnist import input_data mnist = in ...
- 吴裕雄 python 神经网络——TensorFlow实现回归模型训练预测MNIST手写数据集
import tensorflow as tf from tensorflow.examples.tutorials.mnist import input_data mnist = input_dat ...
- 吴裕雄 PYTHON 神经网络——TENSORFLOW 滑动平均模型
import tensorflow as tf v1 = tf.Variable(0, dtype=tf.float32) step = tf.Variable(0, trainable=False) ...
- 吴裕雄 python 神经网络——TensorFlow 实现LeNet-5模型处理MNIST手写数据集
import os import numpy as np import tensorflow as tf from tensorflow.examples.tutorials.mnist import ...
- TensorFlow 之 手写数字识别MNIST
官方文档: MNIST For ML Beginners - https://www.tensorflow.org/get_started/mnist/beginners Deep MNIST for ...
- 吴裕雄 python 神经网络——TensorFlow训练神经网络:全模型
import tensorflow as tf from tensorflow.examples.tutorials.mnist import input_data INPUT_NODE = 784 ...
- 吴裕雄 python 神经网络——TensorFlow 循环神经网络处理MNIST手写数字数据集
#加载TF并导入数据集 import tensorflow as tf from tensorflow.contrib import rnn from tensorflow.examples.tuto ...
- 吴裕雄 python 神经网络——TensorFlow 使用卷积神经网络训练和预测MNIST手写数据集
import tensorflow as tf import numpy as np from tensorflow.examples.tutorials.mnist import input_dat ...
- 吴裕雄 python 神经网络——TensorFlow 训练过程的可视化 TensorBoard的应用
#训练过程的可视化 ,TensorBoard的应用 #导入模块并下载数据集 import tensorflow as tf from tensorflow.examples.tutorials.mni ...
随机推荐
- 《NVM-Express-1_4-2019.06.10-Ratified》学习笔记(8.20)-- ANA
8.20 非对称namespace访问报告 8.20.1 非对称namespace访问报告概况 非对称Namespace访问(ANA)在如下场景下产生,基于访问这个namespace的controll ...
- Centos7 安装VNC实现远程桌面
1.设置root用户方法: 1.# 复制一个服务设置的模板,命令如下: cp /lib/systemd/system/vncserver@.service /etc/systemd/system/vn ...
- socket 简单实现HTTP服务器
# -*- coding: utf-8 -*- # @Time : 2019-07-17 1:39 # @File : 网络socket实现http服务器.py # @Software: PyChar ...
- JS高级---函数作为返回值使用
函数作为返回值使用 function f1() { console.log("f1函数开始"); return function () { console.log("函数 ...
- JS高级---函数的几个成员
函数的几个成员 函数中有一个name属性----->函数的名字, name属性是只读的, 不能修改 函数中有一个arguments属性--->实参的个数 函数中有一个length属性--- ...
- Linux下run文件的直接运行
比如realplay.run 安装方法如下 chmod +x realplay.run ./realplay.run 然后他就会执行安装了,在过程中可能会要求你输入yes或no 安装完后就可以用了 , ...
- spring(三):BeanDefiniton
- sql根据字符将一行拆成多行
SELECT B.value FROM ( SELECT [value] = CONVERT(xml,'<root><v>' + REPLACE('A,C,D', ',', ' ...
- 1.5 面试问题整理:cl
1.自我介绍2.介绍测试的项目> 期望答案:让你介绍项目,目的是想知道你参与过该项目后,对该项目的认识程度和认识层次,从而判断你在项目中到底起多大作用. 即:测试的流程.用例设计的方法.在项目中 ...
- wget 显示网页内容到控制台
wget -q -O - http://www.microsoft.com
