React Router学习
React Router教程
本教程引用马伦老师的的教程
React项目的可用的路由库是React-Router,当然这也是官方支持的。它也分为:
- react-router 核心组件
- react-router-dom 应用于浏览器端的路由库(单独使用包含了react-router的核心部分)
- react-router-native 应用于native端的路由
以下教程我们都以Web端为主,所以所有的教程内容都是默认关于
react-router-dom的介绍。
进行网站(将会运行在浏览器环境中)构建,我们应当安装react-router-dom。react-router-dom暴露出react-router中暴露的对象与方法,因此你只需要安装并引用react-router-dom即可。
官方文档地址: https://reacttraining.com/react-router/web/guides/philosophy
Installation | 安装
安装:
yarn add react-router-dom

# 或者,不使用 yarn

npm install react-router-dom
路由的基本概念
现在的React Router版本中已不需要路由配置,现在一切皆组件。
ReactRouter中提供了以下三大组件:
- Router是所有路由组件共用的底层接口组件,它是路由规则制定的最外层的容器。
- Route路由规则匹配,并显示当前的规则对应的组件。
- Link路由跳转的组件
当然每个组件下又会有几种不同的子类组件实现。比如: Router组件就针对不同功能和平台对应用:
<BrowserRouter>浏览器的路由组件<HashRouter>URL格式为Hash路由组件<MemoryRouter>内存路由组件<NativeRouter>Native的路由组件<StaticRouter>地址不改变的静态路由组件
三大组件使用的关系:
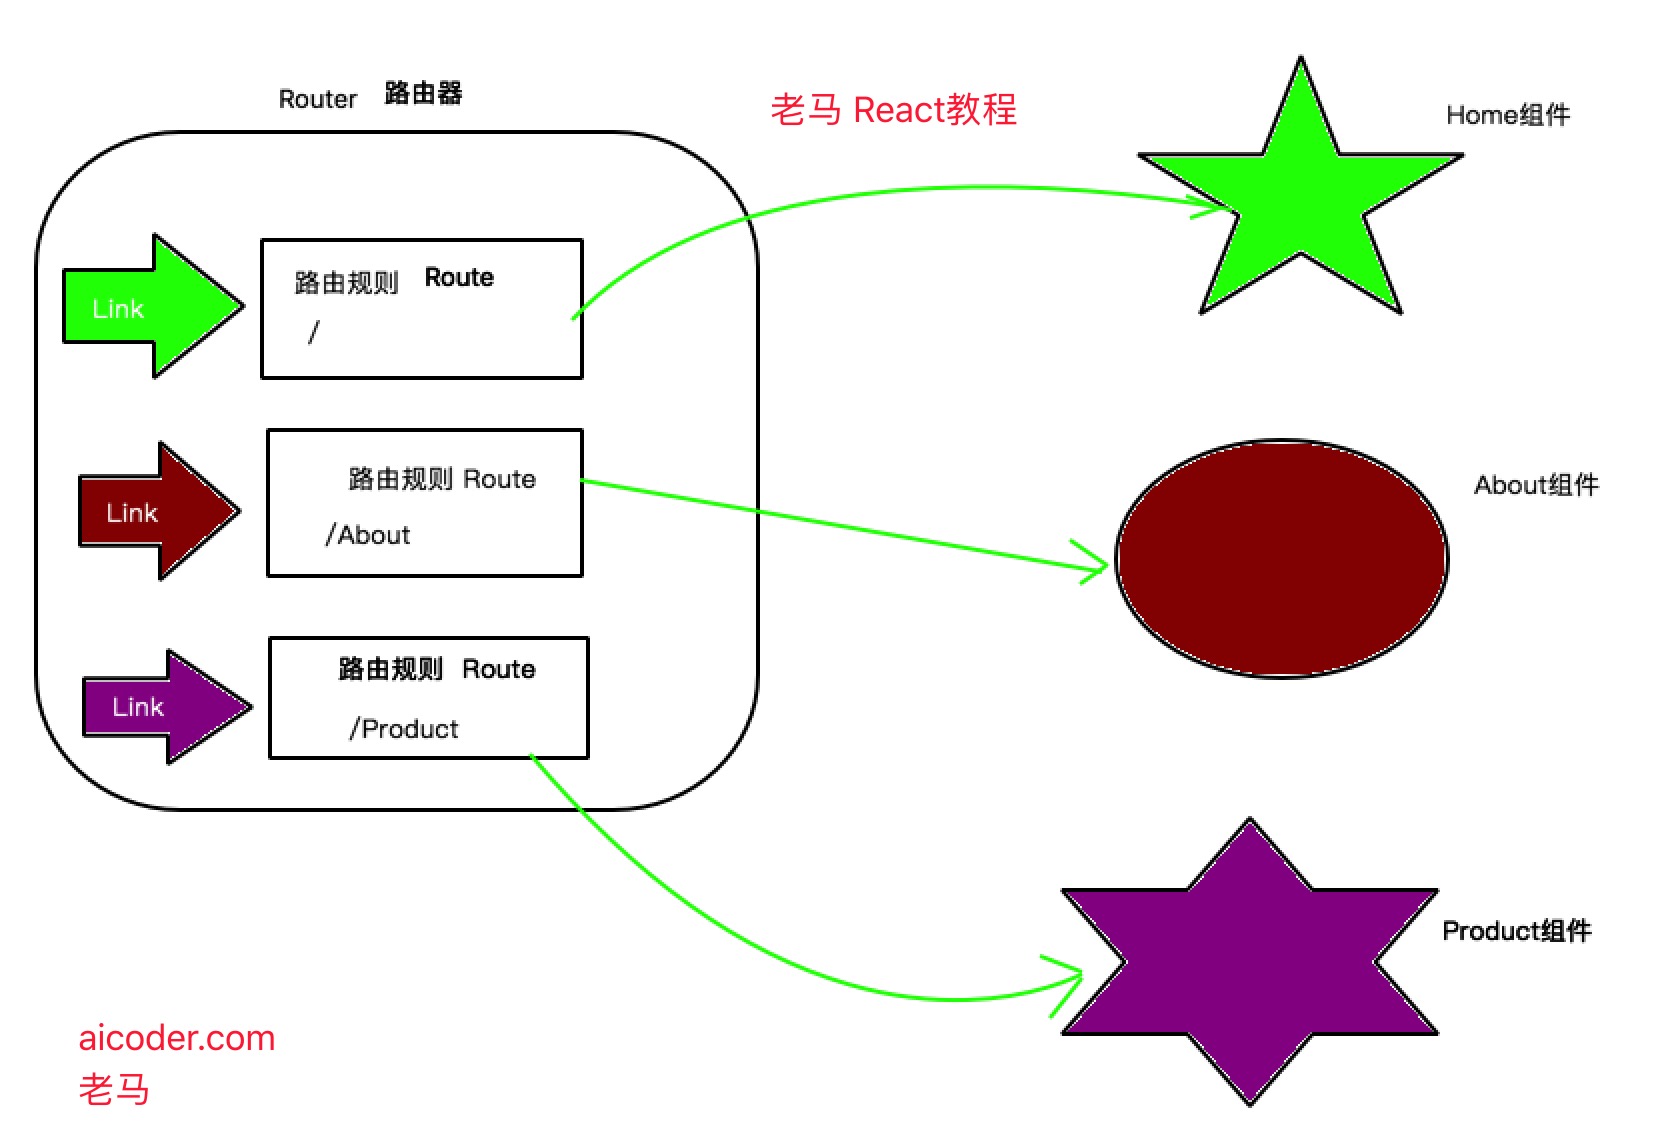
如果说我们的应用程序是一座小城的话,那么Route就是一座座带有门牌号的建筑物,而Link就代表了到某个建筑物的路线。有了路线和目的地,那么就缺一位老司机了,没错Router就是这个老司机。
第一个Demo
现在你可以复制任意的示例代码,并粘贴到 src/App.js。如下:
import React, { Component } from 'react';

import { HashRouter as Router, Link, Route } from 'react-router-dom';

import './App.css';

const Home = () => (

  <div>

    <h2>Home</h2>

  </div>

)

const About = () => (

  <div>

    <h2>About</h2>

  </div>

)

const Product = () => (

  <div>

    <h2>Product</h2>

  </div>

)

class App extends Component {

  render() {

    return (

      <Router>

        <div className="App">

          <Link to="/">Home</Link>

          <Link to="/About">About</Link>

          <Link to="/Product">Product</Link>

          <hr/>

          <Route path="/" exact component={Home}></Route>

          <Route path="/about" component={About}></Route>

          <Route path="/product" component={Product}></Route>

        </div>

      </Router>

    );

  }

}

export default App;
Router组件
BrowserRouter组件
BrowserRouter主要使用在浏览器中,也就是WEB应用中。它利用HTML5 的history API来同步URL和UI的变化。当我们点击了程序中的一个链接之后,BrowserRouter就会找出与这个URL匹配的Route,并将他们对应的组件渲染出来。 BrowserRouter是用来管理我们的组件的,那么它当然要被放在最顶级的位置,而我们的应用程序的组件就作为它的一个子组件而存在。
import * as React from 'react';

import * as ReactDOM from 'react-dom';

import { BrowserRouter } from 'react-router-dom';

ReactDOM.render(

    <BrowserRouter>

        <App/>

    </BrowserRouter>,

    document.body);
BrowserRouter组件提供了四个属性。
basename: 字符串类型,路由器的默认根路径forceRefresh: 布尔类型,在导航的过程中整个页面是否刷新getUserConfirmation: 函数类型,当导航需要确认时执行的函数。默认是:window.confirmkeyLength: 数字类型location.key的长度。默认是 6
basename 属性
当前位置的基准 URL。如果你的页面部署在服务器的二级(子)目录,你需要将 basename 设置到此子目录。正确的 URL 格式是前面有一个前导斜杠,但不能有尾部斜杠。
例如:有时候我们的应用只是整个系统中的一个模块,应用中的URL总是以 http://localhost/admin/ 开头。这种情况下我们总不能每次定义Link和Route的时候都带上admin吧?react-router已经考虑到了这种情况,所以为我们提供了一个basename属性。为BrowserRouter设置了basename之后,Link中就可以省略掉admin了,而最后渲染出来的URL又会自动带上admin。
<BrowserRouter basename="/admin"/>

    ...

    <Link to="/home"/> // 被渲染为 <a href="/admin/home">

    ...

</BrowserRouter>
getUserConfirmation: func
当导航需要确认时执行的函数。默认使用 window.confirm。
// 使用默认的确认函数

const getConfirmation = (message, callback) => {

  const allowTransition = window.confirm(message)

  callback(allowTransition)

}

<BrowserRouter getUserConfirmation={getConfirmation}/>
forceRefresh: bool
当设置为 true 时,在导航的过程中整个页面将会刷新。 只有当浏览器不支持 HTML5 的 history API 时,才设置为 true。
const supportsHistory = 'pushState' in window.history

<BrowserRouter forceRefresh={!supportsHistory}/>
keyLength: number
location.key 的长度。默认是 6。
<BrowserRouter keyLength={12}/>
children: node
渲染单一子组件(元素)。
HashRouter
HashRouter 使用 URL 的 hash (例如:window.location.hash) 来保持 UI 和 URL 的同步。
注意: 使用 hash 的方式记录导航历史不支持
location.key和location.state。在以前的版本中,我们为这种行为提供了 shim,但是仍有一些问题我们无法解。任何依赖此行为的代码或插件都将无法正常使用。由于该技术仅用于支持传统的浏览器,因此在用于浏览器时可以使用<BrowserHistory>代替。
跟BrowserRouter类似,它也有:basename、getUserConfirmation、children属性,而且是一样的。
hashType: string
window.location.hash 使用的 hash 类型。有如下几种:
"slash"- 后面跟一个斜杠,例如#/和#/sunshine/lollipops"noslash"- 后面没有斜杠,例如#和#sunshine/lollipops"hashbang"- Google 风格的 "ajax crawlable",例如#!/和#!/sunshine/lollipops
默认为 "slash"。
MemoryRouter
主要用在ReactNative这种非浏览器的环境中,因此直接将URL的history保存在了内存中。 StaticRouter 主要用于服务端渲染。
Link组件
Link就像是一个个的路牌,为我们指明组件的位置。Link使用声明式的方式为应用程序提供导航功能,定义的Link最终会被渲染成一个a标签。Link使用to这个属性来指明目标组件的路径,可以直接使用一个字符串,也可以传入一个对象。
import { Link } from 'react-router-dom'

// 字符串参数

<Link to="/query">查询</Link>

// 对象参数

<Link to={{

  pathname: '/query',

  search: '?key=name',

  hash: '#hash',

  state: { fromDashboard: true }

}}>查询</Link>
属性: to
需要跳转到的路径(pathname)或地址(location)。
属性:replace: bool
当设置为 true 时,点击链接后将使用新地址替换掉访问历史记录里面的原地址。
当设置为 false 时,点击链接后将在原有访问历史记录的基础上添加一个新的纪录。
默认为 false。
<Link to="/courses" replace />
NavLink组件
NavLink是一个特殊版本的Link,可以使用activeClassName来设置Link被选中时被附加的class,使用activeStyle来配置被选中时应用的样式。此外,还有一个exact属性,此属性要求location完全匹配才会附加class和style。这里说的匹配是指地址栏中的URl和这个Link的to指定的location相匹配。
// 选中后被添加class selected

<NavLink to={'/'} exact activeClassName='selected'>Home</NavLink>

// 选中后被附加样式 color:red

<NavLink to={'/gallery'} activeStyle={{color:red}}>Gallery</NavLink>
activeClassName默认值为active
属性
- to 可以是字符串或者对象,同Link组件
- exact 布尔类型,完全匹配时才会被附件class和style
- activeStyle Object类型
- activeClassName 字符串类型
- strict: bool类型,当值为
true时,在确定位置是否与当前 URL 匹配时,将考虑位置pathname后的斜线。
Route组件
Route应该是react-route中最重要的组件了,它的作用是当location与Route的path匹配时渲染Route中的Component。如果有多个Route匹配,那么这些Route的Component都会被渲染。
与Link类似,Route也有一个exact属性,作用也是要求location与Route的path绝对匹配。
// 当location形如 http://location/时,Home就会被渲染。

// 因为 "/" 会匹配所有的URL,所以这里设置一个exact来强制绝对匹配。

<Route exact path="/" component={Home}/>

<Route path="/about" component={About}/>
Route的三种渲染方式
- component: 这是最常用也最容易理解的方式,给什么就渲染什么。
- render: render的类型是function,Route会渲染这个function的返回值。因此它的作用就是附加一些额外的逻辑。
<Route path="/home" render={() => {

    console.log('额外的逻辑');

    return (<div>Home</div>);

    }/>
- children: 这是最特殊的渲染方式。
一、它同render类似,是一个function。不同的地方在于它会被传入一个match参数来告诉你这个Route的path和location匹配上没有。
二、第二个特殊的地方在于,即使path没有匹配上,我们也可以将它渲染出来。秘诀就在于前面一点提到的match参数。我们可以根据这个参数来决定在匹配的时候渲染什么,不匹配的时候又渲染什么。
// 在匹配时,容器的calss是light,<Home />会被渲染

// 在不匹配时,容器的calss是dark,<About />会被渲染

<Route path='/home' children={({ match }) => (

    <div className={match ? 'light' : 'dark'}>

      {match ? <Home/>:<About>}

    </div>

  )}/>
所有路由中指定的组件将被传入以下三个 props 。
- match.
- location.
- history.
这里主要说下match.params.透过这个属性,我们可以拿到从location中解析出来的参数。当然,如果想要接收参数,我们的Route的path也要使用特殊的写法。
如下示例,三个Link是一个文章列表中三个链接,分别指向三篇id不同的文章。而Route用于渲染文章详情页。注意path='/p/:id' ,location中的对应的段会被解析为id=1 这样的键值。最终这个键值会作为param的键值存在。Route中的组件可以使用this.props.match.params.id来获取,示例中使用了结构赋值。
<Link to='/p/1' />

<Link to='/p/2' />

<Link to='/p/3' />

......

<Route path='/p/:id' render={(match)=<h3>当前文章ID:{match.params.id}</h3>)} />
location
Location 是指你当前的位置,下一步打算去的位置,或是你之前所在的位置,形式大概就像这样:
{

  key: 'ac3df4', // 在使用 hashHistory 时,没有 key

  pathname: '/somewhere'

  search: '?some=search-string',

  hash: '#howdy',

  state: {

    [userDefined]: true

  }

}
你使用以下几种方式来获取 location 对象:
- 在 Route component 中,以
this.props.location的方式获取, - 在 Route render 中,以
({ location }) => ()的方式获取, - 在 Route children 中,以
({ location }) => ()的方式获取, - 在 withRouter 中,以
this.props.location的方式获取。
你也可以在 history.location 中获取 location 对象,但是别那么写,因为 history 是可变的。更多信息请参见 history 文档。
location 对象不会发生改变,因此你可以在生命周期的钩子函数中使用 location 对象来查看当前页面的位置是否发生改变,这种技巧在获取远程数据以及使用动画时非常有用。
componentWillReceiveProps(nextProps) {

  if (nextProps.location !== this.props.location) {

    // 已经跳转了!

  }

}
通常情况下,你只需要给一个字符串当做 location ,但是,当你需要添加一些 location 的状态时,你可以对象的形式使用 location 。并且当你需要多个 UI ,而这些 UI 取决于历史时,例如弹出框(modal),使用location 对象会有很大帮助。
// 通常你只需要这样使用 location

<Link to="/somewhere"/>

// 但是你同样可以这么用

const location = {

  pathname: '/somewhere'

  state: { fromDashboard: true }

}

<Link to={location}/>

<Redirect to={location}/>

history.push(location)

history.replace(location)
最后,你可以把 location 传入一下组件:
- [Route]
- [Switch]
这样做可以让组件不使用路由状态(router state)中的真实 location,因为我们有时候需要组件去渲染一个其他的 location 而不是本身所处的真实 location,比如使用动画或是等待跳转时。
history
本文档中的「history」以及「history对象」请参照 history 包中的内容。 History 是 React Router 的两大重要依赖之一(除去 React 本身),在不同的 Javascript 环境中,history 以多种形式实现了对于 session 历史的管理。
我们会经常使用以下术语:
- 「browser history」 - history 在 DOM 上的实现,经常使用于支持 HTML5 history API 的浏览器端。
- 「hash history」 - history 在 DOM 上的实现,经常使用于旧版本浏览器端。
- 「memory history」 - 一种存储于内存的 history 实现,经常用于测试或是非 DOM 环境(例如 React Native)。
history 对象通常会具有以下属性和方法:
length-( number 类型)指的是 history 堆栈的数量。action-( string 类型)指的是当前的动作(action),例如PUSH,REPLACE以及POP。location-( object类型)是指当前的位置(location),location 会具有如下属性:pathname-( string 类型)URL路径。search-( string 类型)URL中的查询字符串(query string)。hash-( string 类型)URL的 hash 分段。state-( string 类型)是指 location 中的状态,例如在push(path, state)时,state会描述什么时候 location 被放置到堆栈中等信息。这个 state 只会出现在 browser history 和 memory history 的环境里。
push(path, [state])-( function 类型)在 hisotry 堆栈顶加入一个新的条目。replace(path, [state])-( function 类型)替换在 history 堆栈中的当前条目。go(n)-( function 类型)将 history 对战中的指针向前移动n。goBack()-( function 类型)等同于go(-1)。goForward()-( function 类型)等同于go(1)。block(prompt)-( function 类型)阻止跳转,(请参照 history 文档)
match
match 对象包含了 <Route path> 如何与URL匹配的信息。match 对象包含以下属性:
params-( object 类型)即路径参数,通过解析URL中动态的部分获得的键值对。isExact- 当为true时,整个URL都需要匹配。path-( string 类型)用来做匹配的路径格式。在需要嵌套<Route>的时候用到。url-( string 类型)URL匹配的部分,在需要嵌套<Link>的时候会用到。
你可以在以下地方获取 match 对象:
- 在 Route component 中,以
this.props.match方式。 - 在 Route render中,以
({ match }) => ()方式。 - 在 Route children中,以
({ match }) => ()方式
Redirect组件
当这个组件被渲染是,location会被重写为Redirect的to指定的新location。它的一个用途是登录重定向,比如在用户点了登录并验证通过之后,将页面跳转到个人主页。
<Redirect to="/new"/>
Switch组件
渲染匹配地址(location)的第一个 <Route>或者<Redirect>
这与只使用一堆<Route>有什么不同?
<Switch>的独特之处是独它仅仅渲染一个路由。相反地,每一个包含匹配地址(location)的<Route>都会被渲染。思考下面的代码:
<Route path="/about" component={About}/>

<Route path="/:user" component={User}/>

<Route component={NoMatch}/>
如果现在的URL是 /about ,那么 <About>, <User>, 还有 <NoMatch> 都会被渲染,因为它们都与路径(path)匹配。这种设计,允许我们以多种方式将多个 <Route> 组合到我们的应用程序中,例如侧栏(sidebars),面包屑(breadcrumbs),bootstrap tabs等等。 然而,偶尔我们只想选择一个<Route> 来渲染。如果我们现在处于 /about,我们也不希望匹配 /:user (或者显示我们的 "404" 页面 )。以下是使用 Switch 的方法来实现:
import { Switch, Route } from 'react-router'<Switch>
<Route exact path="/" component={Home}/>
<Route path="/about" component={About}/>
<Route path="/:user" component={User}/>
<Route component={NoMatch}/>
</Switch>
现在,如果我们处于 /about, <Switch> 将开始寻找匹配的 <Route>。 <Route path="/about"/> 将被匹配, <Switch> 将停止寻找匹配并渲染<About>。 同样,如果我们处于 /michael , <User> 将被渲染。
这对于过渡动画也是起作用的,因为匹配的 <Route> 在与前一个相同的位置被渲染。
<Fade>

  <Switch>

    {/* there will only ever be one child here */}

    {/* 这里只会有一个子节点 */}

    <Route/>

    <Route/>

  </Switch>

</Fade>

<Fade>

  <Route/>

  <Route/>

  {/* there will always be two children here,

      one might render null though, making transitions

      a bit more cumbersome to work out */}

   {/* 这里总是有两个子节点,

      一个可能会渲染为null, 使计算过渡增加了一点麻烦 */}

</Fade>
Prompt组件
当用户离开当前页的时候做出提示. 当你的应用处在特定状态, 此状态不希望用户离开时(例如填写表格到一半), 你应该使用<Prompt>。
import { Prompt } from 'react-router'

<Prompt

  when={formIsHalfFilledOut}

  message="你确定要离开吗?"

/>
message: string
当用户尝试导航离开时,提示用户的消息。
<Prompt message="你确定要离开吗?"/>
message: func
会与用户试图前往下一个地址(location) 和 action 一起被调用。
函返回一个字符串用作向用户提示,或者返回true用作允许过渡。
<Prompt message={location => (

  `你确定你要前往 ${location.pathname} 吗?`

)}/>
when: bool
你可以随时渲染<Prompt>,而不是有条件地在警戒后面渲染它。
- 当
when={true}时,经过用户允许后导航 - 当
when={false}时,允许不用经过用户允许直接导航
<Prompt when={formIsHalfFilledOut} message="确定吗?"/>
路由配置
import React from "react";

import { BrowserRouter as Router, Route, Link } from "react-router-dom";

// Some folks find value in a centralized route config.

// A route config is just data. React is great at mapping

// data into components, and <Route> is a component.

////////////////////////////////////////////////////////////

// first our route components

const Main = () => <h2>Main</h2>;

const Sandwiches = () => <h2>Sandwiches</h2>;

const Tacos = ({ routes }) => (

  <div>

    <h2>Tacos</h2>

    <ul>

      <li>

        <Link to="/tacos/bus">Bus</Link>

      </li>

      <li>

        <Link to="/tacos/cart">Cart</Link>

      </li>

    </ul>

    {routes.map((route, i) => <RouteWithSubRoutes key={i} {...route} />)}

  </div>

);

const Bus = () => <h3>Bus</h3>;

const Cart = () => <h3>Cart</h3>;

////////////////////////////////////////////////////////////

// then our route config

const routes = [

  {

    path: "/sandwiches",

    component: Sandwiches

  },

  {

    path: "/tacos",

    component: Tacos,

    routes: [

      {

        path: "/tacos/bus",

        component: Bus

      },

      {

        path: "/tacos/cart",

        component: Cart

      }

    ]

  }

];

// wrap <Route> and use this everywhere instead, then when

// sub routes are added to any route it'll work

const RouteWithSubRoutes = route => (

  <Route

    path={route.path}

    render={props => (

      // pass the sub-routes down to keep nesting

      <route.component {...props} routes={route.routes} />

    )}

  />

);

const RouteConfigExample = () => (

  <Router>

    <div>

      <ul>

        <li>

          <Link to="/tacos">Tacos</Link>

        </li>

        <li>

          <Link to="/sandwiches">Sandwiches</Link>

        </li>

      </ul>

      {routes.map((route, i) => <RouteWithSubRoutes key={i} {...route} />)}

    </div>

  </Router>

);

export default RouteConfigExample;
React Router学习的更多相关文章
- React Router学习笔记(转自阮一峰老师博客)
React Router是一个路由库,通过管理URL来实现组件切换和状态转变. 1.安装和使用 $ npm install -S react-router 在使用时,作为React组件导入 impor ...
- React Router V4.0学习笔记
最近在学习React Router,但是网站的教程多半还是3.X版本之前的,所以我只能在GitHub上找到React Router的官方文档在读.后来总结了一下,包括学习经验以及V3.X与V4.X的差 ...
- 初步学习React Router 4.0
React Router 4.0 是react官方推荐的路由库.4是已经正式发布的最新版本. 初始化项目启动之后: npm run eject 弹出配置文件.自定义配置webpack 查看下pac ...
- React Redux学习笔记
React Router React Router 使用教程 Redux中间件middleware [译]深入浅出Redux中间件 Redux学习之一:何为middleware? ES6 ES6新特性 ...
- React Router 4.x 开发,这些雷区我们都帮你踩过了
前言 在前端框架层出不穷的今天,React 以其虚拟 DOM .组件化开发思想等特性迅速占据了主流位置,成为前端开发工程师热衷的 Javascript 库.作为 React 体系中的重要组成部分:Re ...
- React Router API文档
React Router API文档 一.<BrowserRouter> 使用HTML5历史记录API(pushState,replaceState和popstate事件)的<Rou ...
- 【优质】React的学习资源
React的学习资源 github 地址: https://github.com/LeuisKen/react-collection https://github.com/reactnativecn/ ...
- [Web 前端] 你不知道的 React Router 4
cp from https://segmentfault.com/a/1190000010718620 几个月前,React Router 4 发布,我能清晰地感觉到来自 Twitter 大家对新版本 ...
- [Web 前端] React Router v4 入坑指南
cp from : https://www.jianshu.com/p/6a45e2dfc9d9 万恶的根源 距离React Router v4 正式发布也已经过去三个月了,这周把一个React的架子 ...
随机推荐
- PyQt5--InputDiaglog
# -*- coding:utf-8 -*- ''' Created on Sep 14, 2018 @author: SaShuangYiBing Comment: ''' import sys f ...
- JDK 环境变量 Windows配置
安装完成JDK后需要配置环境变量,下面是环境变量的配置方法 1.配置环境变量: 对于Java程序开发而言,主要会使用JDK的两个命令:javac.exe.java.exe.路径:C:\Java\jdk ...
- 10.Solr4.10.3数据导入(DIH全量增量同步Mysql数据)
转载请出自出处:http://www.cnblogs.com/hd3013779515/ 1.创建MySQL数据 create database solr; use solr; DROP TABLE ...
- react native环境搭建(含错误处理)
1. Python 2 注意,不要选择3.0及以上的,还不成熟 安装过程中一直 next就可以了,但是注意下图,勾选添加到系统环境变量 安装完之后cmd输入 python 查看是否安装成功. 补充 ...
- vue2.0学习笔记之路由(二)路由嵌套+动画
<!DOCTYPE html> <html lang="en"> <head> <meta charset="UTF-8&quo ...
- Shallwe学长的模拟赛
NOIP Simulated Test 这个名字一听就很高端. T1:sGCD:http://uoj.ac/problem/48 题意概述:给定一个长度为$n$的序列,求$sgcd(a_1,a_i)$ ...
- Django使用静态文件
除了由服务器生成的HTML文件外,网页应用一般需要提供其它必要的文件 —— 比如图片文件.JavaScript脚本和CSS样式表 —— 来为用户呈现出一个完整的网站. 在Django中,我们将这些文件 ...
- 字典树Trie树
摘自大佬博客 https://www.cnblogs.com/TheRoadToTheGold/p/6290732.html 给出n个单词和m个询问1.查询某个前缀是否出现过2.查询某个单词是否出现过 ...
- 十二生肖swift1.2
2015年八月的最后一个星期,暑假就快落幕,说起来觉得这个暑假挺后悔没去实习,就在项目组里这边打打酱油,这里做点修改,不过自学了一些mapnik,还有nodejs和django的基础开发,其实还是很喜 ...
- FFmpeg编程学习笔记二:音频重採样
ffmpeg实现音频重採样的核心函数swr_convert功能很强大,但是ffmpeg文档对它的凝视太过简单.在应用中往往会出这样那样的问题,事实上在读取数据->重採样->编码数据的循环中 ...