javascript模拟flash头像裁切上传
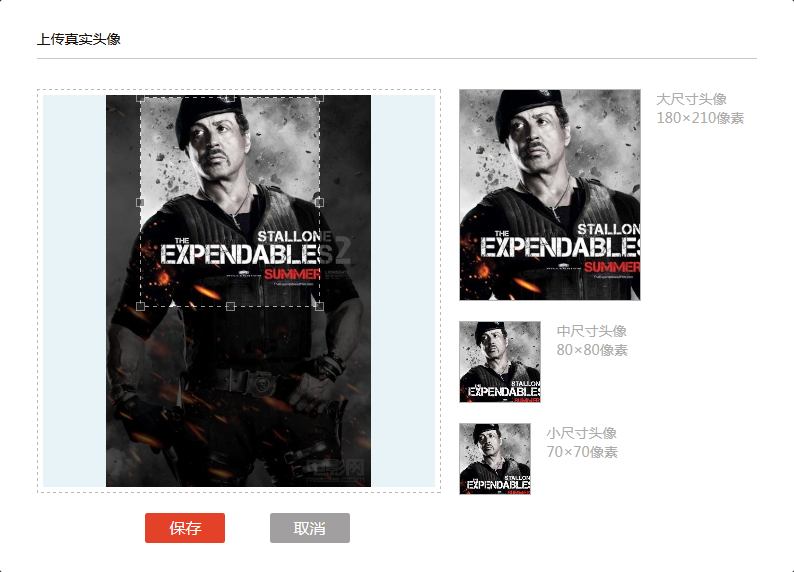
是的,jq已经有类似的插件了,或者干脆用flash算了,为什么我还要自己写?因为造(wo)轮(bu)子(hui)也(flash)是一个学习的过程,轮子不会造,将来怎么造飞机?先来一张最终效果图:
一、大概思路
用js来做这个效果,先得将图片A上传到服务器,关于异步上传的插件有很多,不用插件也可以参考本人上一篇博客用纯js的方式上传,上传之后显示到页面里,由于上传的图片尺寸各不相同,要完整地显示图片,就要将上传后的图片用css控制按比例缩放显示,然后通过矩形选框选择需要的部分,用js获取矩形选框的左上角坐标,加上选框的宽高按比例计算后传给后台,后台程序根据所传参数来裁切得到图片B后返回到前台并将上传的原图A删除,节省空间。
二、分析
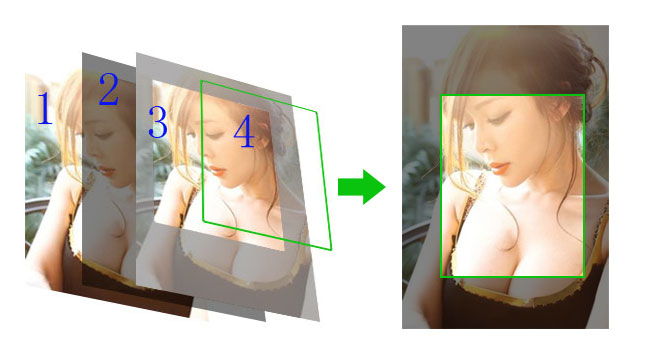
将效果图分为左右两部分,先看左边,由一张图片加一个矩形选区组成,图片和选区之间有一层半透明的遮罩,但是这样的话会连选区部分一块遮住,就没有上面这种框选出来的效果了,事实上结构是这样的:由下往上分别是1图片层,2遮罩层,3选区层(一个div,绝对定位),4图片层(绝对定位)。第1层和第4层的图片是一样的,大小及left、top值也一样,给第3层选区层加个overflow:hidden,就呈现出了上面的效果,虚线边框及拖拽的8个点后文会讲到。下图比较直观地说明的它们的层级关系,第3层灰色部分为overflow:hidden隐藏的部分:
做完图发现左右两边框的位置不一样,但重在说明原理。接下来,选区部分可以拖动,用到拖拽原理:鼠标按下,记录var disx=event.clientX,var disy=event.clientY,拖动,计算当前event.clientX与disx的差值为x,当前event.clientY与disy的差值为y,设置第4层图片的left值为图片当前offsetLeft+disx,top值为offsetTop+disy。如选区往左移动10px,由于第4层只能在第1层范围内移动,那么刚好第4层的left值等于负的第3层的left值,top值同理。拖拽原理图:

选区大小是可以按比例改变的,这就需要用到选区周围的8个点,如下图可以分为4个部分:
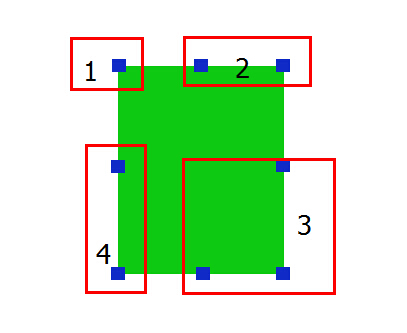
每个部分里的点触发的事件是一样的,4个部分触发的事件都是改变选区大小,不一样的地方在于第1部分会同时改变选区的left和top值,第2和第4部分分别只改变的是选区的top、left值,第3部分不会改变选区的left和top值。4个部分原理都一样,拿第1部分说事,点击第1部分的点往左上角拖动,选区变大的同时设置其left和top值(会减小),而left减小的值刚好等于选区增大的值,这个值的计算方法同拖拽原理。拖拽过程中需要限制范围,不能超出整个图片的范围。
选中需要截取的部分后,获取当前选区(第4层)的左上角的坐标,即第4层的offsetLeft、offsetTop值,再获取选区的宽高,这4个值不能直接往后台传,因为此时的图片可能是被缩放过的,而后台是根据原图尺寸来截取的,那么需要在图片上传完之后获取图片原始宽高,与页面中图片显示宽高得出一个比例,将这4个值乘以这个比例得出的值才是后台需要的。
至于选区的边框,做得简单点可以直接设置border:1px dashed #fff,更好的方法是放四个position:absolute的div,分别固定在选区的上下左右,上下宽100%,高1px,左右宽1px,高100%,背景设为一个波浪纹的gif图片 ,repeat,出来的效果很是惊艳!
右边部分3张图片仅仅是展示用,显示的内容是左边选区选中的部分,而选区的大小是可以改变的,所以右边的图片大小及位置是随着选区的变化而变化。选择图片上传后,选区有个默认宽高,右边3个框宽高是固定的,根据选区宽与右边三个框的宽分别相除得出的比例可以算出右边三个框内的图片应该显示的尺寸,显示原理同左边,相比左边只是少了第1、2层。
这种方式的优点是纯js,兼容性也好,另外还可以做个特性检测,支持HTML5的浏览器可以直接在前端切割图片,缺点是裁切之前要选将图片上传。源码晚点贴上来。
三、源码
<!DOCTYPE html>

<html>

<head>

    <title></title>

    <script src="js/jquery.min.js"></script>

    <style>

    *{margin: 0;padding: 0}

    </style>

</head>

<body>

<style>

.uploadHead{max-width: 800px;}

.clearfix{clear: both;overflow: hidden;position: relative;zoom: 1;}

.l{float: left;}.r{float: right;}

.uploadHead h3{color: #19110a; text-decoration: none; border-bottom: #BFC9CB 1px solid; padding: 10px 0;margin-bottom: 30px;}

.preview{width: 400px; height: 400px;padding: 1px; border: #B8B8B8 1px dashed;margin-right: 18px; position: relative;}

.canvas{background-color: #E8F3F7;width:392px; height: 392px; margin: 4px; text-align: center; position: relative; overflow: hidden;}

.canvas .mask{width: 100%;height: 100%; background: #000; opacity: 0.7; filter:alpha(opacity=70); position: absolute;}

.photoBox p{width: 100px; padding-left: 16px; float: left; color: #aeacab;}

.photoBox .size{width: 100%;}

.p_180,.p_80,.p_70{position: relative;border: #B5B5B5 1px solid;overflow: hidden;}

.p_180 img,.p_80 img,.p_70 img{position: absolute; left: 0;top: 0;}

.p_180{width: 180px; height: 210px; margin-bottom: 20px;}

.p_80{width: 80px; height: 80px; margin-bottom: 20px;}

.p_70{width: 70px; height: 70px;}

.cutImg{text-align: center;margin-top: 10px;}

.cutImg input{width: 80px; height: 30px; border: none;margin: 10px 20px; font-size: 16px; color: #fff; cursor: pointer; border-radius: 2px;}

.cutImg .save{background-color: #e34128;}

.cutImg .cancel{background-color: #a19f9f;}

.checkImg{width: 192px; height: 192px;position: absolute; left: 50%; top: 50%; margin:-96px 0 0 -96px;z-index: 9; display: none;}

.checkImg p{color: #898989; font-size: 14px; text-align: center;}

.checkImg .checkLocalImg{width: 132px; height: 42px;margin:50px 30px 20px; background: url(img/checkImg.png) center; font-size: 14px; color: #fff; cursor: pointer;}

.imgBox{position: relative;margin: 0 auto;display: none1; overflow: hidden; }

.cutImgBox{ width: 180px; height: 210px;  position: absolute; z-index: 2; }

.cutImgBox img{ position: absolute; left: 0px; top:0px;}

.imgCon{position: relative;width: 100%;height: 100%;overflow: hidden;cursor: pointer; z-index: 1;}

.imgCon .lineBg{background:#fff url(img/jcrop.gif) center repeat; opacity: 0.6; filter:alpha(opacity:60); position: absolute; z-index: 3;}

.imgCon .tandb{width: 100%;height: 1px;}

.imgCon .landr{height: 100%;width: 1px;}

.imgCon .right{right: 0;}

.imgCon .bottom{bottom: 0;}

.cSize{width: 100%; height: 100%; position: absolute;left: 0;top: 0; cursor: move; z-index: 8;}

.cSize .btn{width: 7px; height: 7px; border: #eee 1px solid; background-color: #333; opacity: 0.5;filter:alpha(opacity:50); position: absolute;}

.cSize .lt{left: -4px; top: -4px;cursor: nw-resize;}

.cSize .tc{left:50%; margin-left: -4px;top:-4px;cursor: n-resize;}

.cSize .rt{right: -4px; top:-4px;cursor: ne-resize;}

.cSize .rc{right: -4px; top:50%;margin-top: -4px;cursor: e-resize;}

.cSize .rb{right: -4px; bottom: -4px;cursor: se-resize;}

.cSize .bc{bottom: -4px; left: 50%;margin-left: -4px;cursor: n-resize;}

.cSize .lb{left: -4px; bottom: -4px;cursor: sw-resize;}

.cSize .lc{left: -4px;top:50%;margin-top: -4px;cursor: e-resize;}

.width_392{max-width: 392px; max-height: 392px; z-index: 1;}

.fileInput{width: 100%; height: 50px;top: 50px;font-size: 100px; position: absolute; opacity: 0; filter:alpha(opacity=0); cursor: pointer;}

.ie8Drag{width: 100%; height: 100%; position: absolute;left: 0;top: 0; z-index: 99; background-color: #000; opacity: 0; filter:alpha(opacity=0);}

</style>

<!-- 头像上传 By 王美建 2014-10-9 10:45:02 -->

<script type="text/javascript" >

//图片裁切对象

function CutImg(){

    this.init();

};

CutImg.prototype.init=function(opt){

    var that=this;

    this.con=$('.cutImgBox')[0];this.img=$('.cutImgBox img:last')[0];

    this.imgBox=$('#imgBox');this.defaultWidth=180;this.defaultHeight=210;

    this.scalex=this.defaultWidth/this.defaultHeight;this.scaley=this.defaultHeight/this.defaultWidth;

    that.drag().setSize().cSize().cPosition();;

}

// 拖拽

CutImg.prototype.drag=function(){

    var that=this;

    this.con.onmousedown=function(e){

        var e=e||window.event,target=e.target||e.srcElement;

        if($(target).hasClass('btn')) return;

        var disx=e.clientX-that.con.offsetLeft,disy=e.clientY-that.con.offsetTop;

        document.onmousemove=function(ev){

            var ev=ev||event,L,T;

            L=ev.clientX-disx;

            T=ev.clientY-disy;

            if(L<0){

                L=0;

            }else if(L>that.con.parentNode.offsetWidth-that.con.offsetWidth){

                L=that.con.parentNode.offsetWidth-that.con.offsetWidth;

            };

            if(T<0){

                T=0;

            }else if(T>that.con.parentNode.offsetHeight-that.con.offsetHeight){

                T=that.con.parentNode.offsetHeight-that.con.offsetHeight;

            };

            that.con.style.left=L+'px';

            that.con.style.top=T+'px';

            that.img.style.left=-that.con.offsetLeft+'px';

            that.img.style.top=-that.con.offsetTop+'px';

            that.cPosition();

        }

        document.onmouseup=function(){

            document.onmousemove=null;

            document.onmouseup=null;

        }

        return false;

    }

    return this;

};

// 改变图片尺寸

CutImg.prototype.setSize=function(){

    var that=this.con;

    $('.p_180 img').css('width',that.parentNode.offsetWidth*180/that.offsetWidth);

    $('.p_80 img').css('width',that.parentNode.offsetWidth*80/that.offsetWidth);

    $('.p_70 img').css('width',that.parentNode.offsetWidth*70/that.offsetWidth);

    return this;

};

// 改变图片位置

CutImg.prototype.cPosition=function(){

    this.setPosition( $('.p_180'),180,210 );

    this.setPosition( $('.p_80'),80,80 );

    this.setPosition( $('.p_70'),70,70 );

    return this;

};

// 设置三幅图片显示位置

CutImg.prototype.setPosition=function(obj,w,h){

    var that=this.con;

    obj.find('img').css({

        'left':-w*that.offsetLeft/that.offsetWidth,

        'top':-h*that.offsetTop/that.offsetHeight

    });

    return this;

};

// 保存截取后的头像

CutImg.prototype.saveImg=function() {

    var x=0,y=0,w=180,h=210,that=this,cutObj=$('.cutImgBox')[0];

    w=parseInt( this.oldW*cutObj.offsetWidth/that.imgBox.width() );

    h=parseInt( w*that.scaley );

    x=parseInt(cutObj.offsetLeft/(that.imgBox.width()-that.con.offsetWidth)*(this.oldW-w));

    y=parseInt(cutObj.offsetTop/(that.imgBox.height()-that.con.offsetHeight)*(this.oldH-h));

    x=x?x=x:x=0;y=y?y=y:y=0; //x/y可能为NaN

    //x,y,w,h分别为后端需要的坐标及宽高

}

// 改变选区大小

CutImg.prototype.cSize=function(){

    var that=this.con,This=this;

    var thatImg=this.img;

    $('.cSize .btn').each(function() {

        var obj=this;

        obj.onmousedown=function(e) {

            var e=e||window.event;

            var disx=e.clientX,disy=e.clientY;

            var disw=that.offsetWidth,dish=that.offsetHeight,disl=that.offsetLeft,dist=that.offsetTop;

            document.onmousemove=function(ev) {

                var ev=ev||window.event,dirx=ev.clientX-disx,diry=ev.clientY-disy;

                var minW=6,minH=7,L,T;

                //点击第1部分改变选取尺寸

                if( $(obj).hasClass('t1') ){

                    L=disl+dirx;T=dish-(disw-dirx)*This.scaley+dist;

                    if( L<0||T<0 ||disw-dirx<minW||(disw-dirx)*This.scaley<minH) return;

                    $(that).css({

                        'left':L,

                        'top':T,

                        'width':disw-dirx,

                        'height':(disw-dirx)*This.scaley

                    })

                    $(thatImg).css({

                        'left':-L,

                        'top':-that.offsetTop

                    })

                }

                //点击第2部分改变选取尺寸

                if( $(obj).hasClass('t2') ){

                    if( dist+diry<0||(dish-diry)*This.scalex<minW||dish-diry<minH||(dish-diry)*This.scalex+that.offsetLeft>that.parentNode.offsetWidth )return;

                    $(that).css({

                        'top':dist+diry,

                        'width':(dish-diry)*This.scalex,

                        'height':dish-diry

                    })

                    $(thatImg).css({

                        'top':-that.offsetTop

                    })

                }

                //点击第3部分改变选取尺寸

                if( $(obj).hasClass('t3') ){

                    if( disw+dirx+that.offsetLeft>that.parentNode.offsetWidth||(disw+dirx)*This.scaley+that.offsetTop>that.parentNode.offsetHeight||disw+dirx<minW||(disw+dirx)*This.scaley<minH ) return;

                    $(that).css({

                        'width':disw+dirx,

                        'height':(disw+dirx)*This.scaley

                    })

                }

                //点击第4部分改变选取尺寸

                if( $(obj).hasClass('t4') ){

                    if( disl+dirx<0||(disw-dirx)*This.scaley+that.offsetTop>that.parentNode.offsetHeight||disw-dirx<minW||(disw-dirx)*This.scaley<minH ) return;

                    $(that).css({

                        'left':disl+dirx,

                        'width':disw-dirx,

                        'height':(disw-dirx)*This.scaley

                    })

                    $(thatImg).css({

                        'left':-that.offsetLeft

                    })

                }

                This.setSize().cPosition();

                return false;

            };

            document.onmouseup=function(e) {

                document.onmousemove=null;

                document.onmouseup=null;

            }

            return;

        };

    });

};

$(function(){

    var oCutImg=new CutImg();

})

</script>

<div class="e_box uploadHead" id="uploadHead">

    <h3>上传真实头像</h3>

    <div class="e_con">

        <div class="previewBox l">

            <div class="preview">

                <div class="checkImg" id="checkImg">

                    <input type="file" id="headImgInput" name="img" accept="image/jpg,image/jpeg,image/png" dir="rtl" title="选择本地照片" class="fileInput" />

                     <input type="button" value="选择本地照片" class="checkLocalImg" />

                     <p>支持JPG/JPEG/PNG格式</p>

                 </div>

                <div class="canvas">

                    <div class="imgBox" id="imgBox">

                        <div class="cutImgBox">

                            <div class="imgCon">

                                <div class="lineBg tandb"></div>

                                <div class="lineBg tandb bottom"></div>

                                <div class="lineBg landr"></div>

                                <div class="lineBg landr right"></div>

                                <img class="width_392 staPhoto" src="img/1.png" />

                                <div class="ie8Drag"></div>

                            </div>

                            <div class="cSize">

                                <div class="btn lt t1"></div><div class="btn tc t2"></div>

                                <div class="btn rt t2"></div><div class="btn rc t3"></div>

                                <div class="btn rb t3"></div><div class="btn bc t3"></div>

                                <div class="btn lb t4"></div><div class="btn lc t4"></div>

                            </div>

                        </div>

                        <div id="mask" class="mask"></div>

                        <img class="width_392 staPhoto" src="img/1.png" />

                    </div>

                </div>

            </div>

            <div class="cutImg">

                <input type="button" class="save" value="保存" >

                <input type="button" class="cancel" id="cancelUp" value="取消" >

            </div>

        </div>

        <div class="photoBox l">

            <div class="size">

                <div class="p_180 l"><img class="staPhoto" src="img/1.png" /></div><p>大尺寸头像 180×210像素</p>

            </div>

            <div class="size clearfix">

                <div class="p_80 l"><img class="staPhoto" src="img/1.png" /></div><p>中尺寸头像 80×80像素</p>

            </div>

            <div class="size">

                <div class="p_70 l"><img class="staPhoto" src="img/1.png" /></div><p>小尺寸头像 70×70像素</p>

            </div>

        </div>

    </div>

</div>

</body>

</html>
javascript模拟flash头像裁切上传的更多相关文章
- 头像截图上传三种方式之一(一个简单易用的flash插件)(asp.net版本)
flash中有版权声明,不适合商业开发.这是官网地址:http://www.hdfu.net/ 本文参考了http://blog.csdn.net/yafei450225664/article/det ...
- 第三百九十节,Django+Xadmin打造上线标准的在线教育平台—Django+cropper插件头像裁剪上传
第三百九十节,Django+Xadmin打造上线标准的在线教育平台—Django+cropper插件头像裁剪上传 实现原理 前台用cropper插件,将用户上传头像时裁剪图片的坐标和图片,传到逻辑处理 ...
- springMVC 头像裁剪上传并等比压
第一次写头像裁剪上传,原本想着直接本地预览裁剪再上传,可是时间有限,jquery.jcrop貌似并没有对 假设是ie下图片预览效果是滤镜做的 做出对应处理,也没有时间去改;仅仅好将就一下先把图片上传 ...
- day25—JavaScript实现文件拖拽上传案例实践
转行学开发,代码100天——2018-04-10 今天记录一个利用JavaScript实现文件拖拽上传到浏览器,后天将文件打开的小案例. 基本功能:1点击添加文件 2 文件拖拽添加 html: < ...
- Java模拟表单POST上传文件
JAVA模拟表单POST上传文件 import java.awt.image.BufferedImage;import java.awt.image.ColorModel;import java.io ...
- 5.21学习总结——android开发实现用户头像的上传
最近在做个人头像的上传,具体是能调用摄像头和从相册进行选择.本篇文章参考的我的同学的博客,大家有兴趣可以去原作者那里去看看: Hi(.・∀・)ノ (cnblogs.com) 1.使用glide进行图片 ...
- thinkphp + 美图秀秀api 实现图片裁切上传,带数据库
思路: 1.数据库 创建test2 创建表img,字段id,url,addtime 2.前台页: 1>我用的是bootstrap 引入必要的js,css 2>引入美图秀秀的js 3.后台: ...
- html5,js插件实现手机端实现头像剪切上传
思路:先打开相册,选取图片,在剪切图片,转化为base64格式,然后上传到七牛存储,返回url,再传给后端,整个流程就是这样.用的是angular框架,图像插件用到imagecropper.js,废话 ...
- jfinal头像裁剪上传服务器
前端页面完整代码,复制可用,记得导入库文件 <!DOCTYPE html> <html lang="en"> <head> <title& ...
随机推荐
- Luogu 2762 太空飞行计划 / Libre 6001 「网络流 24 题」太空飞行计划 (网络流,最大流)
Luogu 2762 太空飞行计划 / Libre 6001 「网络流 24 题」太空飞行计划 (网络流,最大流) Description W 教授正在为国家航天中心计划一系列的太空飞行.每次太空飞行 ...
- @RequestParam注解一般用法
原文链接:https://www.cnblogs.com/likaileek/p/7218252.html SpringMVC注解@RequestParam全面解析 在此之前,写项目一直用的是@R ...
- First non-repeating character in a stream
First non-repeating character in a stream Given an input stream of n characters consisting only of s ...
- HTML5 快速学习一
关注HTML5有一段时间了,一直没系统的去学习过. 对于HTML5的理解,之前停留在一些新的标签,一些api可以完成部分js完成的事情,仅此而已. 前段时间HTML5定稿了,看了一些这方面的报道,进行 ...
- 比特币全节点(bitcoind) eth 全节点
运行全节点的用途: 1.挖矿 2.钱包 运行全节点,可以做关于btc的任何事情,例如创建钱包地址.管理钱包地址.发送交易.查询全网的交易信息等等 选个节点钱包:bitcoind 1.配置文件: ...
- 工具类 | window批处理杀死指定端口进程
window批处理杀死指定端口进程,注意保存时使用ansi格式,运行输入端口即可 @echo off setlocal enabledelayedexpansion set /p port=请输入端口 ...
- Excel VBA保护工作表
'设定可编辑区域 ActiveSheet.Protection.AllowEditRanges.Add Title:="区域1", Range:=Range("E5:H1 ...
- html5 canvas简单的直线路径
<!DOCTYPE html PUBLIC "-//W3C//DTD XHTML 1.0 Transitional//EN" "http://www.w3.org/ ...
- Anaconda+django写出第一个web app(七)
今天来实现如何在页面弹出一些信息,比如注册成功后弹出注册成功的信息.这一点可以通过materialize里的Toasts来实现. django自带的messages可以告诉我们是否注册成功,以及注册失 ...
- nested exception is com.svorx.core.dao.PersistenceException
在quartz定时执行任务的时候,hibernate报错,在只读事务中进行了update语句: [ERROR] 2018/08/03 10:35:00,827 org.quartz.core.JobR ...