ansible学习
声明:本博客内容是根据惨绿少年内容实践随笔,地址:http://www.cnblogs.com/clsn/p/7743792.html#comment_form
1、ansible介绍
Ansible 是一个简单的自动化运维管理工具,基于Python开发,集合了众多运维工具(puppet、cfengine、chef、func、fabric)的优点,实现了批量系统配置、批量程序部署、批量运行命令等功能。可以用来自动化部署应用、配置、编排 task(持续 交付、无宕机更新等),采用 paramiko 协议库(fabric 也使用这个),通过 SSH 或者 ZeroMQ 等连 接主机。
Ansible是基于模块工作的,本身没有批量部署的能力。真正具有批量部署的是ansible所运行的模块,ansible只是提供一种框架。Ansible的强大在于丰富的模块,目前已经存在的模块有750+,所有的功能是由ansible核心来调度,基于模块来完成和工作的。
2、ansible安装
2.1安装epel源
yum -y install epel-release
2.2安装 ansible
2.3测试是否安装成功
[root@localhost opt]# ansible --version
ansible 2.4.2.0
config file = /etc/ansible/ansible.cfg
configured module search path = [u'/root/.ansible/plugins/modules', u'/usr/share/ansible/plugins/modules']
ansible python module location = /usr/lib/python2.7/site-packages/ansible
executable location = /usr/bin/ansible
python version = 2.7.5 (default, Nov 20 2015, 02:00:19) [GCC 4.8.5 20150623 (Red Hat 4.8.5-4)]
[root@localhost opt]#
3、ansible配置
3.1ansible总配置文件
配置文件路径为:/etc/ansible/ansible.cfg
部分配置文件说明:
[defaults]
#inventory = /etc/ansible/hosts #定义inventory
#forks = 5 #默认开启的并发数
#sudo_user = root #默认sudo用户
#ask_sudo_pass = True #是否需要sudo密码
#ask_pass = True #是否需要密码
#host_key_checking = False #首次连接是否需要检查key认证
3.2主机配置文件
配置文件路径:/etc/ansible/hosts
[testhost]
192.168.126.129
192.168.126.130
4、配置ansible免密登录
ansible管理其他的服务器实现自动化等操作,需要进行免密认证
在A机器上:
ssh-keygen生成密钥对文件
[root@localhost ~]# ssh-keygen (默认是-t rsa)
Generating public/private rsa key pair.
Enter file in which to save the key (/root/.ssh/id_rsa): // 这里直接按回车即可
Enter passphrase (empty for no passphrase): //这里需要设置密钥的密码,如果直接回车则表示密码为空
Enter same passphrase again: // 再次输入密码; 这里也可以输入 ssh-keygen -t rsa -P '' ,这样可以免去输入三次回车,-P ''表示密码为空
Your identification has been saved in /root/.ssh/id_rsa.
Your public key has been saved in /root/.ssh/id_rsa.pub.
The key fingerprint is:
复制代码
这样就生成了一对密钥在/root/.ssh/ 目录下,公钥是id_rsa.pub, 私钥是id_rsa. 然后
cat .ssh/id_rsa.pub
打开公钥文件,把公钥文件复制到B机器的/root/.ssh/authorized_keys文件下
mkdir /root/.ssh
chmod 700 /root/.ssh
vi /root/.ssh/authorized_keys
然后就可以实现A机器密钥登录B机器了
5、ansible常用模块
5.1ping模块测试连通性
[root@localhost opt]# ansible all -m ping
192.168.126.129 | SUCCESS => {
"changed": false,
"ping": "pong"
}
192.168.126.130 | SUCCESS => {
"changed": false,
"ping": "pong"
}
5.2command 模块
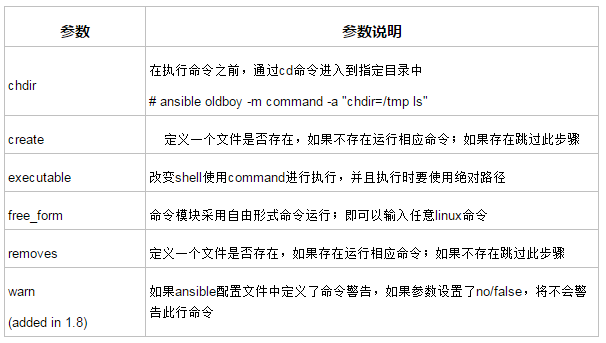
chdir参数的使用:
[root@localhost opt]# ansible all -m command -a "chdir=/mnt/test ls"
192.168.126.129 | SUCCESS | rc=0 >>
111
keepalived-1.3.5.tar.gz
rpms
rpms.zip
tomcat-dev-8.0.32-v1.x86_64.rpm
192.168.126.130 | SUCCESS | rc=0 >>
111
keepalived-1.3.5.tar.gz
rpms
rpms.zip
tomcat-dev-8.0.32-v1.x86_64.rpm
creates 文件是否存在,不存在就执行命令
[root@localhost opt]# ansible all -m command -a "creates=/mnt/test1 date"
192.168.126.129 | SUCCESS | rc=0 >>
2018年 02月 05日 星期一 23:40:50 CST
192.168.126.130 | SUCCESS | rc=0 >>
2018年 02月 05日 星期一 15:47:35 CST
removes 文件是否存在,不存在就不执行命令
[root@localhost opt]# ansible all -m command -a "removes=/mnt/test1 date"
192.168.126.129 | SUCCESS | rc=0 >>
skipped, since /mnt/test1 does not exist
192.168.126.130 | SUCCESS | rc=0 >>
skipped, since /mnt/test1 does not exist
5.3 shell模块,万能模块
执行linux命令时可以用
远程节点执行命令
说明: shell 模块在远程执行脚本时,远程主机上一定要有相应的脚本
[root@localhost opt]# ansible all -m shell -a "/bin/sh /opt/test.sh"
192.168.126.130 | SUCCESS | rc=0 >>
hello world
192.168.126.129 | SUCCESS | rc=0 >>
hello world
5.4script模块,执行脚本模块
在本地执行脚本时,将脚本中的内容传输到远程节点上运行
[root@localhost opt]# ansible all -m script -a "/opt/test.sh"
192.168.126.129 | SUCCESS => {
"changed": true,
"rc": 0,
"stderr": "Shared connection to 192.168.126.129 closed.\r\n",
"stdout": "hello world\r\n",
"stdout_lines": [
"hello world"
]
}
192.168.126.130 | SUCCESS => {
"changed": true,
"rc": 0,
"stderr": "Shared connection to 192.168.126.130 closed.\r\n",
"stdout": "hello world\r\n",
"stdout_lines": [
"hello world"
]
}
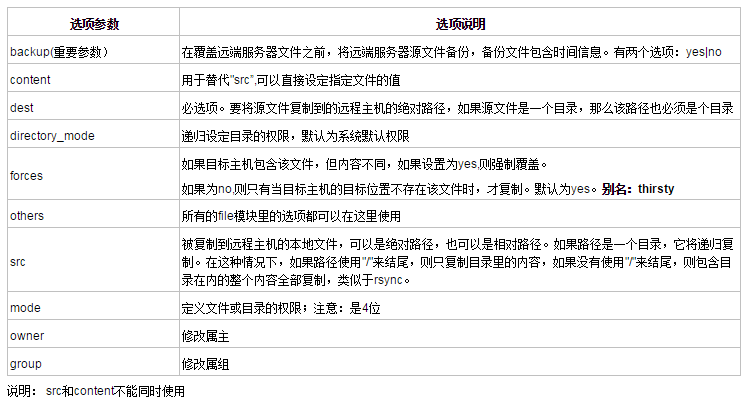
5.5copy模块,把本地文件复制到远程
[root@localhost opt]# ansible all -m copy -a 'src=/opt/test.conf dest=/opt/ owner=root group=root backup=yes'
192.168.126.129 | SUCCESS => {
"changed": false,
"checksum": "da39a3ee5e6b4b0d3255bfef95601890afd80709",
"gid": 0,
"group": "root",
"mode": "0644",
"owner": "root",
"path": "/opt/test.conf",
"secontext": "system_u:object_r:usr_t:s0",
"size": 0,
"state": "file",
"uid": 0
}
192.168.126.130 | SUCCESS => {
"changed": false,
"checksum": "da39a3ee5e6b4b0d3255bfef95601890afd80709",
"gid": 0,
"group": "root",
"mode": "0644",
"owner": "root",
"path": "/opt/test.conf",
"secontext": "system_u:object_r:usr_t:s0",
"size": 0,
"state": "file",
"uid": 0
}
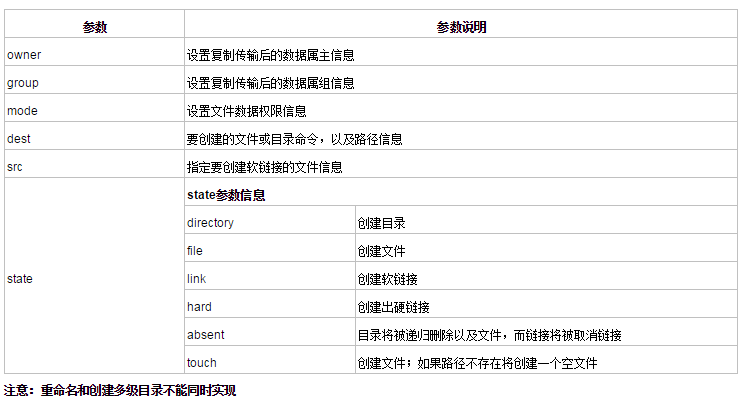
5.6 file模块,设置文件属性
file文件参数说明:
5.6.1 创建目录
[root@localhost opt]# ansible all -m file -a "dest=/opt/heruiguo state=directory"
192.168.126.129 | SUCCESS => {
"changed": true,
"gid": 0,
"group": "root",
"mode": "0755",
"owner": "root",
"path": "/opt/heruiguo",
"secontext": "unconfined_u:object_r:usr_t:s0",
"size": 6,
"state": "directory",
"uid": 0
}
192.168.126.130 | SUCCESS => {
"changed": true,
"gid": 0,
"group": "root",
"mode": "0755",
"owner": "root",
"path": "/opt/heruiguo",
"secontext": "unconfined_u:object_r:usr_t:s0",
"size": 4096,
"state": "directory",
"uid": 0
}
5.6.2创建文件
[root@localhost opt]# ansible all -m file -a "dest=/opt/heruiguo.conf state=touch"
192.168.126.129 | SUCCESS => {
"changed": true,
"dest": "/opt/heruiguo.conf",
"gid": 0,
"group": "root",
"mode": "0644",
"owner": "root",
"secontext": "unconfined_u:object_r:usr_t:s0",
"size": 0,
"state": "file",
"uid": 0
}
192.168.126.130 | SUCCESS => {
"changed": true,
"dest": "/opt/heruiguo.conf",
"gid": 0,
"group": "root",
"mode": "0644",
"owner": "root",
"secontext": "unconfined_u:object_r:usr_t:s0",
"size": 0,
"state": "file",
"uid": 0
}
5.6.3创建软连接
[root@localhost opt]# ansible all -m file -a "src=/opt/heruiguo.conf dest=/home/111 state=link"
192.168.126.129 | SUCCESS => {
"changed": true,
"dest": "/home/111",
"gid": 0,
"group": "root",
"mode": "0777",
"owner": "root",
"secontext": "unconfined_u:object_r:home_root_t:s0",
"size": 18,
"src": "/opt/heruiguo.conf",
"state": "link",
"uid": 0
}
192.168.126.130 | SUCCESS => {
"changed": true,
"dest": "/home/111",
"gid": 0,
"group": "root",
"mode": "0777",
"owner": "root",
"secontext": "unconfined_u:object_r:home_root_t:s0",
"size": 18,
"src": "/opt/heruiguo.conf",
"state": "link",
"uid": 0
}
[root@localhost opt]# cd /home/
[root@localhost home]#
[root@localhost home]# ll
总用量 4
lrwxrwxrwx. 1 root root 18 2月 5 17:01 111 -> /opt/heruiguo.conf
drwx------. 5 pmoopr pmoopr 4096 2月 5 13:20 pmoopr
5.6.4 删除目录
[root@localhost opt]# ansible all -m file -a "dest=/opt/heruiguo.conf state=absent"
192.168.126.130 | SUCCESS => {
"changed": true,
"path": "/opt/heruiguo.conf",
"state": "absent"
}
192.168.126.129 | SUCCESS => {
"changed": true,
"path": "/opt/heruiguo.conf",
"state": "absent"
}
5.7 fetch模块,拉取文件
参数说明:

从远程拉取文件放到本地
[root@localhost opt]# ansible all -m fetch -a "dest=/opt/ src=/opt/test.conf"
192.168.126.129 | SUCCESS => {
"changed": true,
"checksum": "da39a3ee5e6b4b0d3255bfef95601890afd80709",
"dest": "/opt/192.168.126.129/opt/test.conf",
"md5sum": "d41d8cd98f00b204e9800998ecf8427e",
"remote_checksum": "da39a3ee5e6b4b0d3255bfef95601890afd80709",
"remote_md5sum": null
}
192.168.126.130 | SUCCESS => {
"changed": true,
"checksum": "da39a3ee5e6b4b0d3255bfef95601890afd80709",
"dest": "/opt/192.168.126.130/opt/test.conf",
"md5sum": "d41d8cd98f00b204e9800998ecf8427e",
"remote_checksum": "da39a3ee5e6b4b0d3255bfef95601890afd80709",
"remote_md5sum": null
}
flat 参数,拉去的时候不创建目录(同名文件会覆盖)
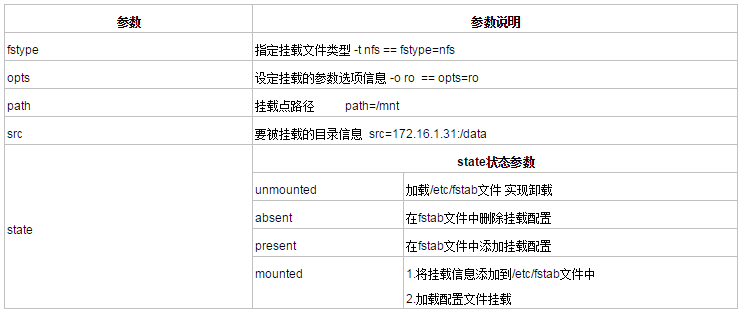
5.8 mount模块,挂载点模块
参数说明:
挂载:
ansible 192.168.126.129 -m mount -a "fstype=xfs opts=rw path=/mnt/ src=192.168.126.129:/data/ state=mounted"
卸载:
ansible 192.168.126.129 -m mount -a "fstype=xfs opts=rw path=/mnt/ src=192.168.126.129:/data/ state=unmounted"
5.8 cron模块,定时任务模块
参数说明:
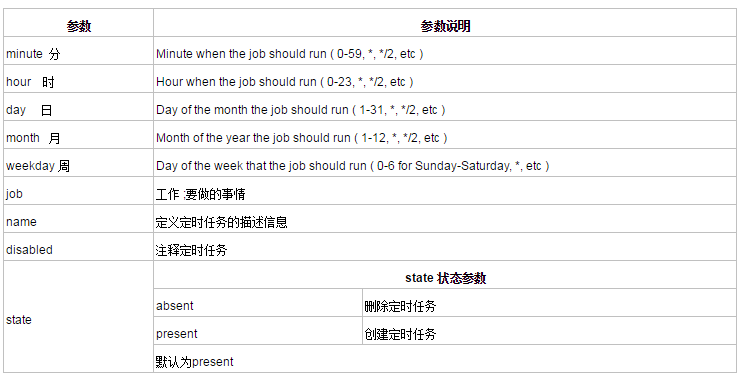
添加定时任务
ansible test -m cron -a "minute=0 hour=0 job='/bin/sh  /server/scripts/hostname.sh &>/dev/null' name=oldboy01"

删除定时任务
ansible oldboy -m cron -a "minute=00 hour=00 job='/bin/sh /server/scripts/hostname.sh &>/dev/null' name=oldboy01 state=absent"
ansible学习的更多相关文章
- ansible 学习与实践
title: ansible 学习与实践 date: 2016-05-06 16:17:28 tags: --- ansible 学习与实践 一 介绍 ansible是新出现的运维工具是基于Pytho ...
- ansible学习笔记一
ansible学习笔记一 参考博客: ansible学习 - 51CTO博客 一.安装 1 .下载epel源 wget -O /etc/yum.repos.d/epel.repo http://mir ...
- Ansible学习实战手记-你想要知道的可能都在这里了
最近接触了ansible工具,查找了一些资料,也做了一些总结.希望能给刚接触的新手带来一些帮助. 此总结有实际例子,大部分也是从实践中用到才逐一总结的. 当然可能肯定一定会存在一些错误和纰漏,还望大家 ...
- Ansible学习记录一:Linux下部署
0.Ansible介绍 Ansible 是一个简单的自动化运维管理工具,可以用来自动化部署应用.配置.编排 task(持续交付.无宕机更新等),采用 paramiko 协议库(fabric 也使用这个 ...
- Ansible 学习笔记
最近因为需要管理很多台机器,而这些机器又需要频繁重新安装,实在受不了Puppet需要在每个客户机上都安装一遍,于是转头开始学些Ansible.根据这段时间的使用,这个确实是神器,唯一的感觉就是相见恨晚 ...
- 自动化运维工具ansible学习+使用ansible批量推送公钥到远程主机
目录: 一.ansible简介 1.1.ansible是什么 1.2.ansible如何工作 1.3.ansible优缺点 1.4.ansible安装方式 1.5.ansible文件简单介绍 1.6. ...
- ansible学习笔记三:playbook和roles
参考博客: Ansible 系列之 Playbooks 剧本 -飞走不可(博客园) linux运维学习之ansible的playbook及roles的使用 - 51CTO博客 nginx 基于uwsg ...
- ansible 学习记录
Ansible 的重新学习记录 这里我的Ansible的宿主机是centos 7.2系统,这里我通过yum 安装Ansible 1.配置epel源 sudo yum -y install epel-r ...
- Ansible学习 Playbooks_1
Playbooks是Ansible中执行较复杂任务的一种的方式,Playbook由1个或多个play组成,语法格式是YAML,下面以一个简单的任务为例,开始我们的Playbook学习: 任务描述: 1 ...
- Ansible学习分享(基本)
背景:Teamleader提到一款好用的自动化配置管理工具,于是前去学习实践,有了下面分享. 纲要 一.Ansible简介 二.Ansible准备 2.1 Ansible安装 2.2 设置SSH公钥验 ...
随机推荐
- 【洛谷】NOIP2018原创模拟赛DAY1解题报告
点此进入比赛 T1:小凯的数字 题意:给定q个l,r,求l(l+1)(l+2)...(r-1)r模9的结果 很显然,这是道考验数(运)学(气)的题目 结论:输出\((l+r)*(r-l+1)\over ...
- 修改docker镜像和容器的存放路径
默认情况下,镜像和容器存放的路径是/var/lib/docker. 要修改这个设置很简单,把指定的目录软链到这个目录,或者将一个单独的分区挂载到这个目录,或者直接修改docker启动参数. 查看使用帮 ...
- 解析word公式的解决方案(office插入和wps插入不同的解决方案)
这几天在公司的项目有个需求就是数学公式的导入,而对于word来说,插入的公式xml格式,需要转换为mathML,借用插件MathJax来进行展示,而对于wps插入的公式来说,获取到的是一个wmf图片, ...
- 深入理解JS this,作用域
深入理解JS this 阮一峰博客链接http://www.ruanyifeng.com/blog/2010/04/using_this_keyword_in_javascript.html this ...
- django xadmin 安装和使用
官方文档: http://xadmin.readthedocs.io/en/docs-chinese/ 版本:django1.9 pip安装部署 pip install xadmin settings ...
- JavaScript实现ajax发送表单数据
知识点: 1.重置表单数据 2.获取表单数据(纯JavaScript) 3.设置表单数据(纯JavaScript) 4.ajax发送数据到客户端 (1)设置请求头,自己组合数据 (2)实例化表单对象, ...
- 使用 git 托管代码
1. 下载安装好 git 客户端 2. 找一个家代码托管平台 我用 coding.net,注册个账号,建一个空项目 然后打开安装好的 git bash 客户端,使用 git clone 命令克隆下远程 ...
- 从ACM会议分析我国计算机科学近十年发展情况
从ACM会议分析我国计算机科学近十年发展情况 来源:<中国计算机学会通讯>2015年第10期<专栏> 作者:陈 钢 2006年,承蒙李国杰院士推荐,<中国计算机学会通讯& ...
- argunlar 1.0.1 【数据绑定】
<!DOCTYPE html><html lang="en" ng-app><head> <meta charset="U ...
- C++的Enum hack
从一个例子开始吧 class Game { private: static const int GameTurn = 10; int scores[GameTurn]; }; 对于支持类内初始化的C+ ...