购物商城学习--第二讲(maven工程介绍)
接下来第二讲介绍整体工程如何使用maven搭建的。
使用maven管理工程的好处:
- jar包的管理;
- 工程之间的依赖管理;
- 自动打包
maven常见打包方式:jar、war和pom三种。jar工程,是pom工程的子工程,由pom工程来管理;war工程,是web工程放到web服务器下运行的工程;pom工程一般都是父工程,用于管理jar包版本,maven插件版本和统一的依赖管理,是一个聚合工程。
商城的maven目录结构如下图所示:

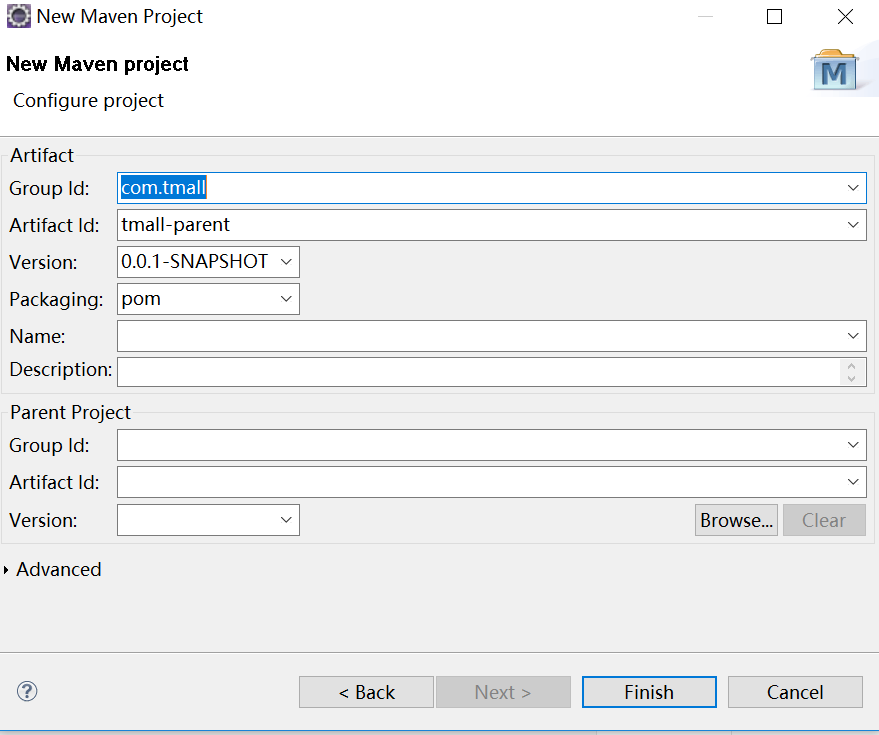
首先创建tmall-parent聚合工程,在eclipse中新建maven工程,如下图所示,注意标识出来的方框需要勾选:

在点击下一步之后,弹出以下界面,输出对于土办法group id和artifact id,打包方式选择pom,如下图所示:
点击finish完成,则生成如下maven聚合工程:

在tmall-parent工程中只统一管理jar包版本,不实际依赖工程,注意此处为dependencyManagement节点,只管理版本。对应pom文件如下图所示:
<project xmlns="http://maven.apache.org/POM/4.0.0" xmlns:xsi="http://www.w3.org/2001/XMLSchema-instance"

    xsi:schemaLocation="http://maven.apache.org/POM/4.0.0 http://maven.apache.org/xsd/maven-4.0.0.xsd">

  <modelVersion>4.0.0</modelVersion>

  <groupId>com.tmall</groupId>

  <artifactId>tmall-parent</artifactId>

  <version>0.0.1-SNAPSHOT</version>

  <packaging>pom</packaging>

  <!-- 集中定义依赖版本号 -->

  <properties>

        <junit.version>4.12</junit.version>

        <spring.version>4.2.4.RELEASE</spring.version>

        <mybatis.version>3.2.8</mybatis.version>

        <mybatis.spring.version>1.2.2</mybatis.spring.version>

        <mybatis.paginator.version>1.2.15</mybatis.paginator.version>

        <mysql.version>5.1.32</mysql.version>

        <slf4j.version>1.6.4</slf4j.version>

        <jackson.version>2.4.2</jackson.version>

        <druid.version>1.0.9</druid.version>

        <httpclient.version>4.3.5</httpclient.version>

        <jstl.version>1.2</jstl.version>

        <servlet-api.version>2.5</servlet-api.version>

        <jsp-api.version>2.0</jsp-api.version>

        <joda-time.version>2.5</joda-time.version>

        <commons-lang3.version>3.3.2</commons-lang3.version>

        <commons-io.version>1.3.2</commons-io.version>

        <commons-net.version>3.3</commons-net.version>

        <pagehelper.version>5.1.6</pagehelper.version>

        <jsqlparser.version>0.9.1</jsqlparser.version>

        <commons-fileupload.version>1.3.1</commons-fileupload.version>

        <jedis.version>2.7.2</jedis.version>

        <solrj.version>4.10.3</solrj.version>

        <dubbo.version>2.5.3</dubbo.version>

        <zookeeper.version>3.4.7</zookeeper.version>

        <zkclient.version>0.1</zkclient.version>

        <activemq.version>5.11.2</activemq.version>

        <freemarker.version>2.3.23</freemarker.version>

        <quartz.version>2.2.2</quartz.version>

    </properties>

    <dependencyManagement>

        <dependencies>

            <!-- 时间操作组件 -->

            <dependency>

                <groupId>joda-time</groupId>

                <artifactId>joda-time</artifactId>

                <version>${joda-time.version}</version>

            </dependency>

            <!-- Apache工具组件 -->

            <dependency>

                <groupId>org.apache.commons</groupId>

                <artifactId>commons-lang3</artifactId>

                <version>${commons-lang3.version}</version>

            </dependency>

            <dependency>

                <groupId>org.apache.commons</groupId>

                <artifactId>commons-io</artifactId>

                <version>${commons-io.version}</version>

            </dependency>

            <dependency>

                <groupId>commons-net</groupId>

                <artifactId>commons-net</artifactId>

                <version>${commons-net.version}</version>

            </dependency>

            <!-- Jackson Json处理工具包 -->

            <dependency>

                <groupId>com.fasterxml.jackson.core</groupId>

                <artifactId>jackson-databind</artifactId>

                <version>${jackson.version}</version>

            </dependency>

            <!-- httpclient -->

            <dependency>

                <groupId>org.apache.httpcomponents</groupId>

                <artifactId>httpclient</artifactId>

                <version>${httpclient.version}</version>

            </dependency>

            <!-- quartz任务调度框架 -->

            <dependency>

                <groupId>org.quartz-scheduler</groupId>

                <artifactId>quartz</artifactId>

                <version>${quartz.version}</version>

            </dependency>

            <!-- 单元测试 -->

            <dependency>

                <groupId>junit</groupId>

                <artifactId>junit</artifactId>

                <version>${junit.version}</version>

                <scope>test</scope>

            </dependency>

            <!-- 日志处理 -->

            <dependency>

                <groupId>org.slf4j</groupId>

                <artifactId>slf4j-log4j12</artifactId>

                <version>${slf4j.version}</version>

            </dependency>

            <!-- Mybatis -->

            <dependency>

                <groupId>org.mybatis</groupId>

                <artifactId>mybatis</artifactId>

                <version>${mybatis.version}</version>

            </dependency>

            <dependency>

                <groupId>org.mybatis</groupId>

                <artifactId>mybatis-spring</artifactId>

                <version>${mybatis.spring.version}</version>

            </dependency>

            <dependency>

                <groupId>com.github.miemiedev</groupId>

                <artifactId>mybatis-paginator</artifactId>

                <version>${mybatis.paginator.version}</version>

            </dependency>

            <dependency>

                <groupId>com.github.pagehelper</groupId>

                <artifactId>pagehelper</artifactId>

                <version>${pagehelper.version}</version>

            </dependency>

            <!-- MySql -->

            <dependency>

                <groupId>mysql</groupId>

                <artifactId>mysql-connector-java</artifactId>

                <version>${mysql.version}</version>

            </dependency>

            <!-- 连接池 -->

            <dependency>

                <groupId>com.alibaba</groupId>

                <artifactId>druid</artifactId>

                <version>${druid.version}</version>

            </dependency>

            <!-- Spring -->

            <dependency>

                <groupId>org.springframework</groupId>

                <artifactId>spring-context</artifactId>

                <version>${spring.version}</version>

            </dependency>

            <dependency>

                <groupId>org.springframework</groupId>

                <artifactId>spring-beans</artifactId>

                <version>${spring.version}</version>

            </dependency>

            <dependency>

                <groupId>org.springframework</groupId>

                <artifactId>spring-webmvc</artifactId>

                <version>${spring.version}</version>

            </dependency>

            <dependency>

                <groupId>org.springframework</groupId>

                <artifactId>spring-jdbc</artifactId>

                <version>${spring.version}</version>

            </dependency>

            <dependency>

                <groupId>org.springframework</groupId>

                <artifactId>spring-aspects</artifactId>

                <version>${spring.version}</version>

            </dependency>

            <dependency>

                <groupId>org.springframework</groupId>

                <artifactId>spring-jms</artifactId>

                <version>${spring.version}</version>

            </dependency>

            <dependency>

                <groupId>org.springframework</groupId>

                <artifactId>spring-context-support</artifactId>

                <version>${spring.version}</version>

            </dependency>

            <!-- JSP相关 -->

            <dependency>

                <groupId>jstl</groupId>

                <artifactId>jstl</artifactId>

                <version>${jstl.version}</version>

            </dependency>

            <dependency>

                <groupId>javax.servlet</groupId>

                <artifactId>servlet-api</artifactId>

                <version>${servlet-api.version}</version>

                <scope>provided</scope>

            </dependency>

            <dependency>

                <groupId>javax.servlet</groupId>

                <artifactId>jsp-api</artifactId>

                <version>${jsp-api.version}</version>

                <scope>provided</scope>

            </dependency>

            <!-- 文件上传组件 -->

            <dependency>

                <groupId>commons-fileupload</groupId>

                <artifactId>commons-fileupload</artifactId>

                <version>${commons-fileupload.version}</version>

            </dependency>

            <!-- Redis客户端 -->

            <dependency>

                <groupId>redis.clients</groupId>

                <artifactId>jedis</artifactId>

                <version>${jedis.version}</version>

            </dependency>

            <!-- solr客户端 -->

            <dependency>

                <groupId>org.apache.solr</groupId>

                <artifactId>solr-solrj</artifactId>

                <version>${solrj.version}</version>

            </dependency>

            <!-- dubbo相关 -->

            <dependency>

                <groupId>com.alibaba</groupId>

                <artifactId>dubbo</artifactId>

                <version>${dubbo.version}</version>

            </dependency>

            <dependency>

                <groupId>org.apache.zookeeper</groupId>

                <artifactId>zookeeper</artifactId>

                <version>${zookeeper.version}</version>

            </dependency>

            <dependency>

                <groupId>com.github.sgroschupf</groupId>

                <artifactId>zkclient</artifactId>

                <version>${zkclient.version}</version>

            </dependency>

            <dependency>

                <groupId>org.apache.activemq</groupId>

                <artifactId>activemq-all</artifactId>

                <version>${activemq.version}</version>

            </dependency>

            <dependency>

                <groupId>org.freemarker</groupId>

                <artifactId>freemarker</artifactId>

                <version>${freemarker.version}</version>

            </dependency>

        </dependencies>

    </dependencyManagement>

    <build>

        <finalName>${project.artifactId}</finalName>

        <plugins>

            <!-- 资源文件拷贝插件 -->

            <plugin>

                <groupId>org.apache.maven.plugins</groupId>

                <artifactId>maven-resources-plugin</artifactId>

                <version>2.7</version>

                <configuration>

                    <encoding>UTF-8</encoding>

                </configuration>

            </plugin>

            <!-- java编译插件 -->

            <plugin>

                <groupId>org.apache.maven.plugins</groupId>

                <artifactId>maven-compiler-plugin</artifactId>

                <version>3.6.0</version>

                <configuration>

                    <source>1.8</source>

                    <target>1.8</target>

                    <encoding>UTF-8</encoding>

                </configuration>

            </plugin>

        </plugins>

        <pluginManagement>

            <plugins>

                <!-- 配置Tomcat插件 -->

                <plugin>

                    <groupId>org.apache.tomcat.maven</groupId>

                    <artifactId>tomcat7-maven-plugin</artifactId>

                    <version>2.2</version>

                </plugin>

            </plugins>

        </pluginManagement>

    </build>

</project>
创建完tmall-parent工程之后,接下来创建tmall-common工程,注意创建时是创建maven工程,而不是maven模块,模块是子工程,与父工程具有依赖关系。针对maven project和maven module的区别可以参见https://blog.csdn.net/J080624/article/details/81067587。如果是创建maven工程,tmall-common工程需要依赖tmall-parent中的jar包版本关系,在层级上与tmall-parent是同一层级的,创建如下所示:
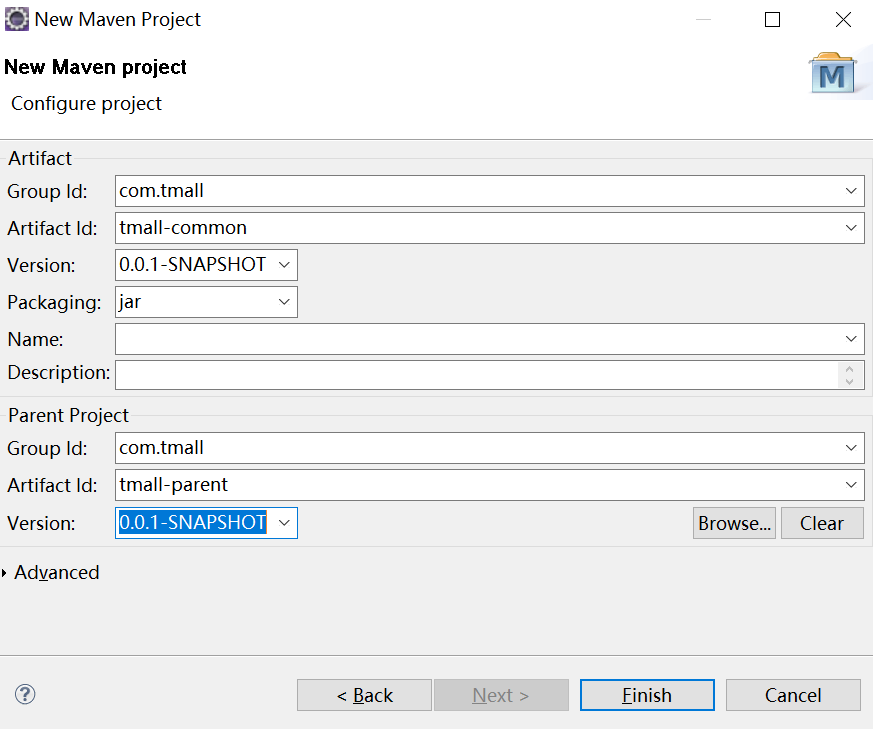
对应tmall-common工程的pom文件如下所示:
<project xmlns="http://maven.apache.org/POM/4.0.0" xmlns:xsi="http://www.w3.org/2001/XMLSchema-instance" xsi:schemaLocation="http://maven.apache.org/POM/4.0.0 http://maven.apache.org/xsd/maven-4.0.0.xsd">

  <modelVersion>4.0.0</modelVersion>

  <parent>

    <groupId>com.tmall</groupId>

    <artifactId>tmall-parent</artifactId>

    <version>0.0.1-SNAPSHOT</version>

  </parent>

  <artifactId>tmall-common</artifactId>

  <dependencies>

          <!-- 时间操作组件 -->

        <dependency>

            <groupId>joda-time</groupId>

            <artifactId>joda-time</artifactId>

        </dependency>

        <!-- Apache工具组件 -->

        <dependency>

            <groupId>org.apache.commons</groupId>

            <artifactId>commons-lang3</artifactId>

        </dependency>

        <dependency>

            <groupId>org.apache.commons</groupId>

            <artifactId>commons-io</artifactId>

        </dependency>

        <dependency>

            <groupId>commons-net</groupId>

            <artifactId>commons-net</artifactId>

        </dependency>

        <!-- Jackson Json处理工具包 -->

        <dependency>

            <groupId>com.fasterxml.jackson.core</groupId>

            <artifactId>jackson-databind</artifactId>

        </dependency>

        <!-- httpclient -->

        <dependency>

            <groupId>org.apache.httpcomponents</groupId>

            <artifactId>httpclient</artifactId>

        </dependency>

        <!-- quartz任务调度框架 -->

        <dependency>

            <groupId>org.quartz-scheduler</groupId>

            <artifactId>quartz</artifactId>

        </dependency>

        <!-- 单元测试 -->

        <dependency>

            <groupId>junit</groupId>

            <artifactId>junit</artifactId>

            <scope>test</scope>

        </dependency>

        <!-- 日志处理 -->

        <dependency>

            <groupId>org.slf4j</groupId>

            <artifactId>slf4j-log4j12</artifactId>

        </dependency>

  </dependencies>

</project>
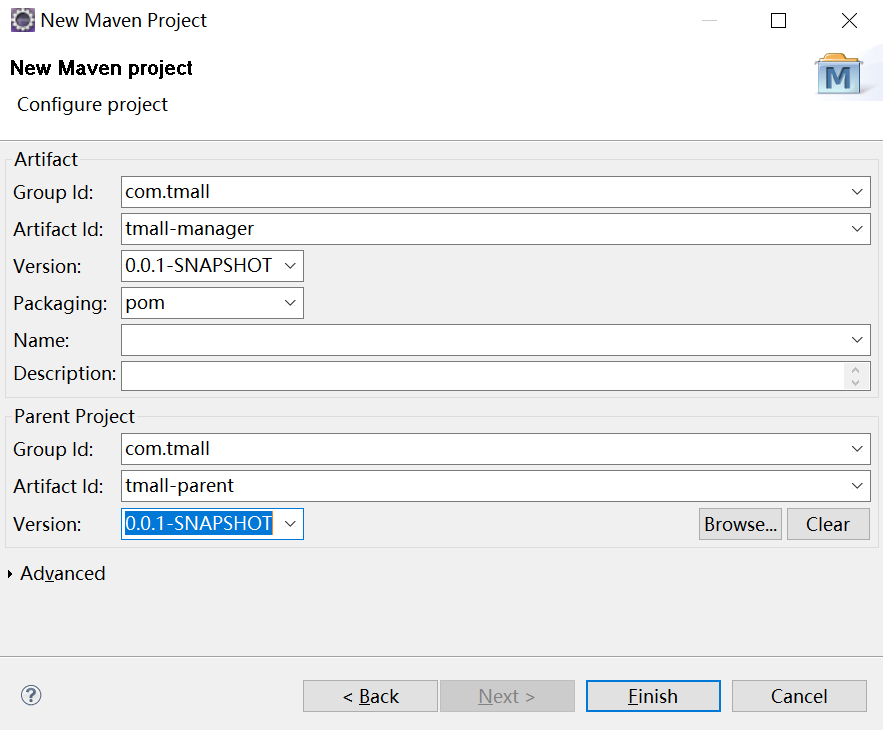
接下来创建tmall-manager工程,这是个聚合工程,依赖tmall-parent工程。
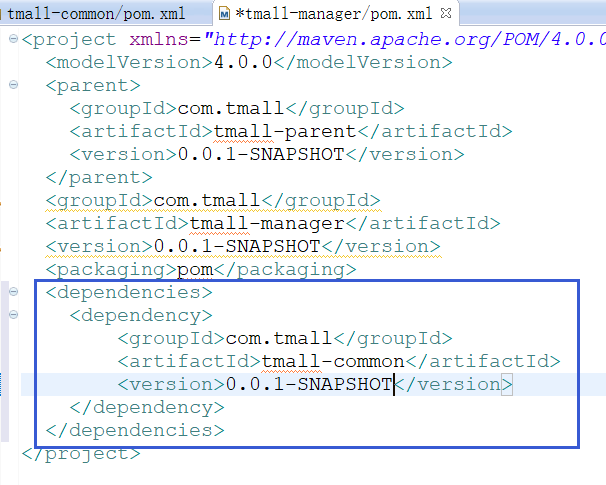
在pom.xml文件中添加对tmall-common工程的依赖关系,如下图所示:
然后添加当前manager工程的四个聚合模块,dao、pojo、interface和service。首先添加dao模块,在taotao-manager工程上右键,在右键菜单New-->Other,创建maven module,如下图所示:

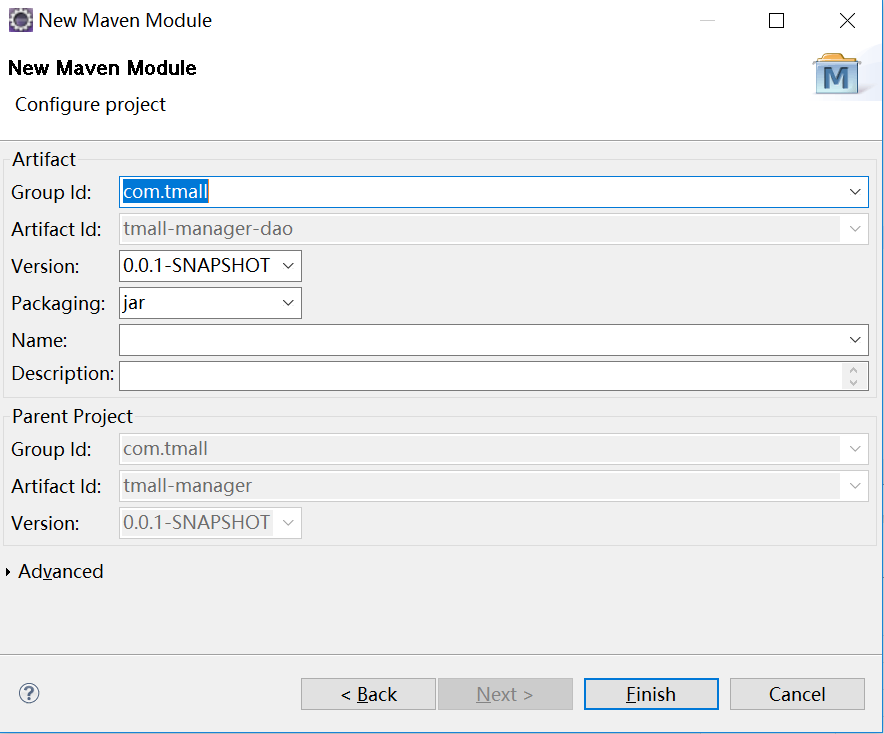
点击“finish”按钮即可完成jar包打包方式的创建,接下来创建pojo,类似过程,不再介绍。
打开tmall-dao工程的pom文件,添加对tmall-pojo工程、mybatis、mysql、分页以及数据池的支持,修改文件如下所示:
<project xmlns="http://maven.apache.org/POM/4.0.0" xmlns:xsi="http://www.w3.org/2001/XMLSchema-instance" xsi:schemaLocation="http://maven.apache.org/POM/4.0.0 http://maven.apache.org/xsd/maven-4.0.0.xsd">

  <modelVersion>4.0.0</modelVersion>

  <parent>

    <groupId>com.tmall</groupId>

    <artifactId>tmall-manager</artifactId>

    <version>0.0.1-SNAPSHOT</version>

  </parent>

  <artifactId>tmall-manager-dao</artifactId>

  <dependencies>

      <dependency>

          <groupId>com.tmall</groupId>

        <artifactId>tmall-manager-pojo</artifactId>

        <version>0.0.1-SNAPSHOT</version>

      </dependency>

      <!-- Mybatis -->

    <dependency>

        <groupId>org.mybatis</groupId>

        <artifactId>mybatis</artifactId>

    </dependency>

    <dependency>

        <groupId>org.mybatis</groupId>

        <artifactId>mybatis-spring</artifactId>

    </dependency>

    <dependency>

        <groupId>com.github.miemiedev</groupId>

        <artifactId>mybatis-paginator</artifactId>

    </dependency>

    <dependency>

        <groupId>com.github.pagehelper</groupId>

        <artifactId>pagehelper</artifactId>

    </dependency>

    <!-- MySql -->

    <dependency>

        <groupId>mysql</groupId>

        <artifactId>mysql-connector-java</artifactId>

    </dependency>

    <!-- 连接池 -->

    <dependency>

        <groupId>com.alibaba</groupId>

        <artifactId>druid</artifactId>

    </dependency>

  </dependencies>

</project>
接下来创建tmall-interface模块,与tmall-dao类似,接口工程添加对pojo的依赖,pom文件如下图所示:
<project xmlns="http://maven.apache.org/POM/4.0.0" xmlns:xsi="http://www.w3.org/2001/XMLSchema-instance" xsi:schemaLocation="http://maven.apache.org/POM/4.0.0 http://maven.apache.org/xsd/maven-4.0.0.xsd">

  <modelVersion>4.0.0</modelVersion>

  <parent>

    <groupId>com.tmall</groupId>

    <artifactId>tmall-manager</artifactId>

    <version>0.0.1-SNAPSHOT</version>

  </parent>

  <artifactId>tmall-manager-interface</artifactId>

  <dependencies>

      <dependency>

          <groupId>com.tmall</groupId>

          <artifactId>tmall-pojo</artifactId>

          <version>0.0.1-SNAPSHOT</version>

      </dependency>

  </dependencies>

</project>
接着创建tmall-service模块,打包方式为war包,创建maven工程如下所示:

因为tmall-service模块是以war包方式需要部署到web服务器上,确认下是否含有web.xml文件,如果没有需要在tmall-service模块下创建,如下图所示:
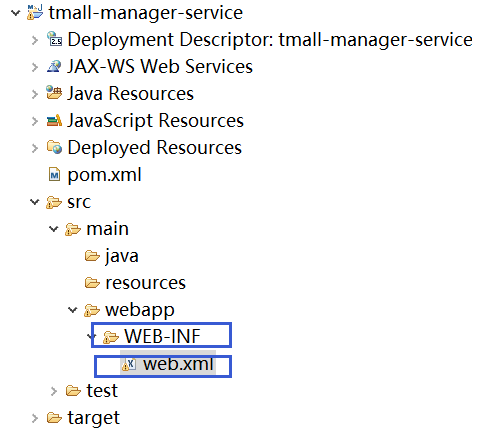
web.xml文件内容如下所示:
<?xml version="1.0" encoding="UTF-8"?>

<web-app version="2.5"

 id="WebApp_ID"

 xmlns="http://java.sun.com/xml/ns/javaee"

 xmlns:xsi="http://www.w3.org/2001/XMLSchema-instance"

 xsi:schemaLocation="http://java.sun.com/xml/ns/javaee

 http://java.sun.com/xml/ns/javaee/web-app_2_5.xsd">

 <display-name>taotao-manager</display-name>

 <welcome-file-list>

     <welcome-file>index.jsp</welcome-file>

 </welcome-file-list>

</web-app>
tmall-service模块需要添加对dao层的依赖,以及spring相关组件的依赖,修改pom.xml文件,如下所示:
<project xmlns="http://maven.apache.org/POM/4.0.0"

    xmlns:xsi="http://www.w3.org/2001/XMLSchema-instance"

    xsi:schemaLocation="http://maven.apache.org/POM/4.0.0

    http://maven.apache.org/xsd/maven-4.0.0.xsd">

  <modelVersion>4.0.0</modelVersion>

  <parent>

    <groupId>com.tmall</groupId>

    <artifactId>tmall-manager</artifactId>

    <version>0.0.1-SNAPSHOT</version>

  </parent>

  <artifactId>tmall-manager-service</artifactId>

  <packaging>war</packaging>

  <dependencies>

      <dependency>

          <groupId>com.tmall</groupId>

        <artifactId>tmall-manager-dao</artifactId>

        <version>0.0.1-SNAPSHOT</version>

      </dependency>

      <!-- Spring -->

    <dependency>

        <groupId>org.springframework</groupId>

        <artifactId>spring-context</artifactId>

    </dependency>

    <dependency>

        <groupId>org.springframework</groupId>

        <artifactId>spring-beans</artifactId>

    </dependency>

    <dependency>

        <groupId>org.springframework</groupId>

        <artifactId>spring-webmvc</artifactId>

    </dependency>

    <dependency>

        <groupId>org.springframework</groupId>

        <artifactId>spring-jdbc</artifactId>

    </dependency>

    <dependency>

        <groupId>org.springframework</groupId>

        <artifactId>spring-aspects</artifactId>

    </dependency>

    <dependency>

        <groupId>org.springframework</groupId>

        <artifactId>spring-jms</artifactId>

    </dependency>

    <dependency>

        <groupId>org.springframework</groupId>

        <artifactId>spring-context-support</artifactId>

    </dependency>

  </dependencies>

</project>
创建完tmall-manager工程,接下来创建tmall-manager-web表现层工程,如下图所示:

创建对应web.xml文件,如tmall-manager-service模块所示。web工程的pom文件添加对common工程以及jsp、spring相关模块的依赖。如下所示:
<project xmlns="http://maven.apache.org/POM/4.0.0" xmlns:xsi="http://www.w3.org/2001/XMLSchema-instance" xsi:schemaLocation="http://maven.apache.org/POM/4.0.0 http://maven.apache.org/xsd/maven-4.0.0.xsd">

  <modelVersion>4.0.0</modelVersion>

  <parent>

    <groupId>com.tmall</groupId>

    <artifactId>tmall-parent</artifactId>

    <version>0.0.1-SNAPSHOT</version>

  </parent>

  <artifactId>tmall-manager-web</artifactId>

  <packaging>war</packaging>

  <dependencies>

    <!-- 依赖taotao-common -->

    <dependency>

        <groupId>com.tmall</groupId>

        <artifactId>tmall-common</artifactId>

        <version>0.0.1-SNAPSHOT</version>

    </dependency>

      <!-- Spring -->

    <dependency>

        <groupId>org.springframework</groupId>

        <artifactId>spring-context</artifactId>

    </dependency>

    <dependency>

        <groupId>org.springframework</groupId>

        <artifactId>spring-beans</artifactId>

    </dependency>

    <dependency>

        <groupId>org.springframework</groupId>

        <artifactId>spring-webmvc</artifactId>

    </dependency>

    <dependency>

        <groupId>org.springframework</groupId>

        <artifactId>spring-jdbc</artifactId>

    </dependency>

    <dependency>

        <groupId>org.springframework</groupId>

        <artifactId>spring-aspects</artifactId>

    </dependency>

    <dependency>

        <groupId>org.springframework</groupId>

        <artifactId>spring-jms</artifactId>

    </dependency>

    <dependency>

        <groupId>org.springframework</groupId>

        <artifactId>spring-context-support</artifactId>

    </dependency>

    <!-- JSP相关 -->

    <dependency>

        <groupId>jstl</groupId>

        <artifactId>jstl</artifactId>

    </dependency>

    <dependency>

        <groupId>javax.servlet</groupId>

        <artifactId>servlet-api</artifactId>

        <scope>provided</scope>

    </dependency>

    <dependency>

        <groupId>javax.servlet</groupId>

        <artifactId>jsp-api</artifactId>

        <scope>provided</scope>

    </dependency>

  </dependencies>

</project>
到此,所有maven相关项目搭建已经完成。
购物商城学习--第二讲(maven工程介绍)的更多相关文章
- python学习第二讲,pythonIDE介绍以及配置使用
目录 python学习第二讲,pythonIDE介绍以及配置使用 一丶集成开发环境IDE简介,以及配置 1.简介 2.PyCharm 介绍 3.pycharm 的安装 二丶IDE 开发Python,以 ...
- 购物商城学习--第三讲(tomcat插件启动web工程)
此处提到的tomcat插件即maven工程集成的tomcat插件,可以在添加maven的tomcat插件之后,在本地通过脚本或者命令行方式运行web工程,tomcat插件启动只需要修改一个端口即可,非 ...
- 第二讲:WCF介绍(2)
代码 https://yunpan.cn/cPns5DkGnRGNs 密码:3913 在上一讲中我们说到 在代码 当中 完成了 服务的寄宿. 这里我们说下 在实际的开发 当中 我们一般不会去 ...
- CI(CodeIgniter)学习第二讲
一.CI的文件结构: 了解CI的文件结构可以帮助我们快速的对CI框架有一个整体的认识,就好像我们去了一个陌生的城市一样,对你来讲周围的一切都是陌生和未知的,要想快速的了解这座城市,你可以买一张这座城市 ...
- android学习-第二讲(修改项目名称和图标,log,过滤器)
一.在app/src/main/res下有 AndroidManifest.xml打开,打开后如下图1 二.日志工具log log.v() log.d() log.i() log.w() lo ...
- 001淘淘商城项目:项目的Maven工程搭建
开始一个新的项目,特此记录,资料全部来源于传智播客,感谢. 我们要做一个类似电商的项目.用maven做管理. maven里面主要分为三种工程: 1:pom工程:用在父级工程,聚合工程中 2:war工程 ...
- Maven详解(三)------ Maven工程目录介绍
上一章我们配置并安装好了 Maven,那么这一章我们介绍如何用eclipse创建一个 Maven 工程,然后介绍 Maven 工程的目录结构. 1.eclipse 创建 Maven 工程 第一步:Fi ...
- spring 学习(一):使用 intellijIDEA 创建 maven 工程进行 Spring ioc 测试
spring学习(一):使用 intellijIDEA 创建 maven 工程进行 Spring ioc 测试 ioc 概念 控制反转(Inversion of Control,缩写为IOC),是面向 ...
- Java并发包下锁学习第二篇Java并发基础框架-队列同步器介绍
Java并发包下锁学习第二篇队列同步器 还记得在第一篇文章中,讲到的locks包下的类结果图吗?如下图: 从图中,我们可以看到AbstractQueuedSynchronizer这个类很重要(在本 ...
随机推荐
- [Python 从入门到放弃] 1. 列表的基本操作
''' 列表 Create By 阅后即焚 On 2018.1.29 ''' 1. 列表的定义 列表看起来好像其它编程语言中的数组,但列表具备更加强大的功能,它是Python完备的集合对象,现在,你可 ...
- 工厂模式——java设计模式
工厂模式 目录 何为工厂模式 工厂方法与抽象工厂 如何在Java EE中通过@Producers与@Inject注解实现工厂模式 如何创建自定义注解以及通过@Qualifier消除具体实现之间的歧义 ...
- redis学习(七)redis主从复制
redis主从复制 1.redis主从复制的作用 redis的定位是一个高可用的数据服务器,可是在实际生产环境下,单机的redis服务器是无法满足真正意义上的高可用性的. 第一,单机的redis服务器 ...
- PowerBuilder编程新思维2:嵌入(Thread多线程)
PowerBuilder编程新思维2:嵌入(Thread多线程) 在PB中使用多线程,在网上有大量的文章介绍.不过深入研究并试着给出更易用的模型的,目前还只有"路人甲cw"的一篇& ...
- Vue下拉刷新组件
Examples examples Installation npm install vue-pull-to --save Use Setup <template> <div> ...
- Docker配置阿里云加速地址
首先需要注册一个阿里云账号,只要注册账号就可以,不用充钱购买任何阿里云服务! 打开阿里云网站https://cr.console.aliyun.com,登陆自己的阿里云账号. 然后只需要在服务器配置d ...
- 虚方法virtual详解(转载)
从C#的程序编译的角度来看,它和其它一般的函数有什么区别呢?一般函数在编译时就静态地编译到了执行文件中,其相对地址在程序运行期间是不发生变化的,也就是写死了的!而虚函数在编译期间是不被静态编译的,它的 ...
- [日常] Go语言圣经--Map习题
练习 4.8: 修改charcount程序,使用unicode.IsLetter等相关的函数,统计字母.数字等Unicode中不同的字符类别. 练习 4.9: 编写一个程序wordfreq程序,报告输 ...
- IDEA中的git更新项目
1.先pull 2.在add 3. 最后
- volatile关键值
happens-before原则 我们编写的程序都要经过优化后(编译器和处理器会对我们的程序进行优化以提高运行效率)才会被运行,优化分为很多种,其中有一种优化叫做重排序,重排序需要遵守happens- ...