[iOS] UICollectionView实现图片水平滚动
最新更新: 简单封装了一下代码,参考新文章:UICollectionView实现图片水平滚动
先简单看一下效果:
新博客:http://wossoneri.github.io
准备数据
首先先加入一些资源文件:
先建立一个xcassets文件,放入图片:

再建立一个plist文件,写入与图片对应的内容:
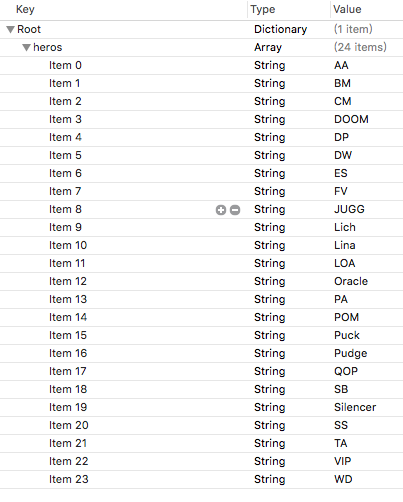
在ViewController中读取plist到词典中:
@property (nonatomic, strong) NSArray *itemTitles;

NSString *path = [[NSBundle mainBundle] pathForResource:@"titles" ofType:@"plist"];

NSDictionary *rootDictionary = [[NSDictionary alloc] initWithContentsOfFile:path];

self.itemTitles = [rootDictionary objectForKey:@"heros"];
可以打log输出,可以看到plist的内容已经读取出来,后面就可以用_itemTitle作为数据源了。
添加UICollectionView初步显示图片
每个CollectionView都有一个对应的布局layout,对于默认的的UICollectionViewFlowLayout,效果是类似Android的GridView的布局。如果要自定义CollectionView的样式,就要对这个layout进行修改。
建立自己的HorizontalFlowLayout,继承自UICollectionViewFlowLayout,然后在初始化方法里将滚动方向设置为水平:
- (instancetype) init {

    if (self = [super init]) {

        self.scrollDirection = UICollectionViewScrollDirectionHorizontal;

    }

    return self;

}
接下来定制我们的cell的显示样式,建立DotaCell,继承自UICollectionViewCell。由于我们要实现的是图片和文字的上下布局,所以增加两个属性:
@interface DotaCell : UICollectionViewCell

@property (nonatomic, strong) UIImageView *image;

@property (nonatomic, strong) UILabel *name;

@end
然后设置图片与文字上下对齐布局,这里我使用pod导入Masonry库来写自动布局:
- (instancetype)initWithFrame:(CGRect)frame {

    self = [super initWithFrame:frame];

    if (self) {

        [self initialize];

    }

    return self;

}

- (void)initialize {

    self.layer.doubleSided = NO;

    self.image = [[UIImageView alloc] init];

    self.image.backgroundColor = [UIColor clearColor];

    self.image.contentMode = UIViewContentModeCenter;

    self.image.autoresizingMask = UIViewAutoresizingFlexibleWidth | UIViewAutoresizingFlexibleHeight;

    self.name = [[UILabel alloc] init];

    self.name.font = [UIFont fontWithName:@"Helvetica Neue" size:20];

    self.name.textAlignment = NSTextAlignmentCenter;

    [self.contentView addSubview:self.image];

    [self.contentView addSubview:self.name];

    [_image mas_makeConstraints:^(MASConstraintMaker *make) {

        make.left.right.equalTo(self.contentView);

        make.top.equalTo(self.contentView).offset(30);

        make.bottom.equalTo(_name.mas_top).offset(-10);

    }];

    [_name mas_makeConstraints:^(MASConstraintMaker *make) {

        make.left.right.equalTo(self.contentView);

        make.top.equalTo(_image.mas_bottom).offset(10);

        make.bottom.equalTo(self.contentView).offset(-20);

    }];

}
写好layout和cell后就可以用这两个类来初始化我们的collectionView了:
//add in view did load

    self.layout = [[HorizontalFlowLayout alloc] init];

    CGRect rct = self.view.bounds;

    rct.size.height = 150;

    rct.origin.y = [[UIScreen mainScreen] bounds].size.height / 2.0 - rct.size.height;

    self.collectionView = [[UICollectionView alloc] initWithFrame:rct collectionViewLayout:_layout];

    self.collectionView.autoresizingMask = UIViewAutoresizingFlexibleWidth | UIViewAutoresizingFlexibleHeight;

    self.collectionView.showsHorizontalScrollIndicator = NO;

    self.collectionView.decelerationRate = UIScrollViewDecelerationRateNormal;

    [self.collectionView registerClass:[DotaCell class] forCellWithReuseIdentifier:NSStringFromClass([DotaCell class])];

    [self.collectionView setBackgroundColor:[UIColor clearColor]];

    [self.collectionView setDelegate:self];

    [self.collectionView setDataSource:self];

    [self.view addSubview:_collectionView];
添加UICollectionViewDataSource的代理方法,使其显示数据。
- (NSInteger)collectionView:(UICollectionView *)collectionView numberOfItemsInSection:(NSInteger)section {

    return [self.itemTitles count];

}

- (UICollectionViewCell *)collectionView:(UICollectionView *)collectionView cellForItemAtIndexPath:(NSIndexPath *)indexPath {

    DotaCell *cell = [collectionView dequeueReusableCellWithReuseIdentifier:NSStringFromClass([DotaCell class]) forIndexPath:indexPath];

    cell.image.image = [UIImage imageNamed:[self.itemTitles objectAtIndex:indexPath.row]];

    cell.name.text = [self.itemTitles objectAtIndex:indexPath.row];

    return cell;

}
这样程序就有了我们想要的初步效果:
图片水平排放
但...效果的确很差!
下面要做的就是逐步完善效果,首先我们要让两排图像变成一排去展示。那要怎么去做?首先,我们在初始化collectionView的地方设置了高度为150,所以图片就挤在这个150的高度里尽可能的压缩显示。由于collectionView的尺寸已经设定,那么就剩cell的尺寸可以控制了。实现CollectionViewFlowLayoutDelegate的代理方法sizeForItemAtIndexPath:
- (CGSize)collectionView:(nonnull UICollectionView *)collectionView layout:(nonnull UICollectionViewLayout *)collectionViewLayout sizeForItemAtIndexPath:(nonnull NSIndexPath *)indexPath {

    return CGSizeMake(64, collectionView.bounds.size.height);

}
这里宽度64是图片的尺寸,高度设置填满
collectionView的高度是为了防止上图中两行图片挤压的情况,所以直接让一个cell的高度占满整个容器。
这时候的效果好了很多,已经有点样子了:
顶端图片滑到中间
但这离我们最终的效果还差很远,接下来我需要实现让第一张图片和最后一张图片都能滑到屏幕中点的位置,这应该是很常见的效果,实现起来也很简单。首先我们的一排cell都默认为顶端与collectionView的两端对齐的,collectionView的左右两端与viewController.view也是对齐的,所以显示的效果是,两端的图片都与屏幕对齐。知道这个关系就好办了,直接设置collectionView与其父view的内间距即可。
依旧是实现flowLayout的代理方法:
//Asks the delegate for the margins to apply to content in the specified section.安排初始位置

//使前后项都能居中显示

- (UIEdgeInsets)collectionView:(nonnull UICollectionView *)collectionView layout:(nonnull UICollectionViewLayout *)collectionViewLayout insetForSectionAtIndex:(NSInteger)section {

    NSInteger itemCount = [self collectionView:collectionView numberOfItemsInSection:section];

    NSIndexPath *firstIndexPath = [NSIndexPath indexPathForItem:0 inSection:section];

    CGSize firstSize = [self collectionView:collectionView layout:collectionViewLayout sizeForItemAtIndexPath:firstIndexPath];

    NSIndexPath *lastIndexPath = [NSIndexPath indexPathForItem:itemCount - 1 inSection:section];

    CGSize lastSize = [self collectionView:collectionView layout:collectionViewLayout sizeForItemAtIndexPath:lastIndexPath];

    return UIEdgeInsetsMake(0, (collectionView.bounds.size.width - firstSize.width) / 2,

                            0, (collectionView.bounds.size.width - lastSize.width) / 2);

}
效果如图:

居中图片放大显示
接下来添加一个我们需要的特效,就是中间的图片放大显示,其余的缩小并且增加一层半透明效果。
在FlowLayout中有一个名为layoutAttributesForElementsInRect的方法,功能如其名,就是设置范围内元素的layout属性。对于这个效果,首先需要设置放大的比例,其次要根据图片大小和间距来设定一个合适的触发放大的区域宽度,当图滑入这个区域就进行缩放。
static CGFloat const ActiveDistance = 80;

static CGFloat const ScaleFactor = 0.2;

//这里设置放大范围

- (NSArray *)layoutAttributesForElementsInRect:(CGRect)rect

{

    NSArray *array = [super layoutAttributesForElementsInRect:rect];

    CGRect visibleRect = (CGRect){self.collectionView.contentOffset, self.collectionView.bounds.size};

    for (UICollectionViewLayoutAttributes *attributes in array) {

        //如果cell在屏幕上则进行缩放

        if (CGRectIntersectsRect(attributes.frame, rect)) {

            attributes.alpha = 0.5;

            CGFloat distance = CGRectGetMidX(visibleRect) - attributes.center.x;//距离中点的距离

            CGFloat normalizedDistance = distance / ActiveDistance;

            if (ABS(distance) < ActiveDistance) {

                CGFloat zoom = 1 + ScaleFactor * (1 - ABS(normalizedDistance)); //放大渐变

                attributes.transform3D = CATransform3DMakeScale(zoom, zoom, 1.0);

                attributes.zIndex = 1;

                attributes.alpha = 1.0;

            }

        }

    }

    return array;

}
效果如下:
滑动校正
这时候几乎完成了,但还差点东西,就是让其在滚动停止的时候,离屏幕中间最近的cell自动矫正位置到中间。还是在FlowLayout添加该方法,具体说明我都写到注释里了:
//scroll 停止对中间位置进行偏移量校正

- (CGPoint)targetContentOffsetForProposedContentOffset:(CGPoint)proposedContentOffset withScrollingVelocity:(CGPoint)velocity {

    CGFloat offsetAdjustment = MAXFLOAT;

    ////  |-------[-------]-------|

    ////  |滑动偏移|可视区域 |剩余区域|

    //是整个collectionView在滑动偏移后的当前可见区域的中点

    CGFloat centerX = proposedContentOffset.x + (CGRectGetWidth(self.collectionView.bounds) / 2.0);

    //    CGFloat centerX = self.collectionView.center.x; //这个中点始终是屏幕中点

    //所以这里对collectionView的具体尺寸不太理解,输出的是屏幕大小,但实际上宽度肯定超出屏幕的

    CGRect targetRect = CGRectMake(proposedContentOffset.x, 0.0, self.collectionView.bounds.size.width, self.collectionView.bounds.size.height);

    NSArray *array = [super layoutAttributesForElementsInRect:targetRect];

    for (UICollectionViewLayoutAttributes *layoutAttr in array) {

        CGFloat itemCenterX = layoutAttr.center.x;

        if (ABS(itemCenterX - centerX) < ABS(offsetAdjustment)) { // 找出最小的offset 也就是最中间的item 偏移量

            offsetAdjustment = itemCenterX - centerX;

        }

    }

    return CGPointMake(proposedContentOffset.x + offsetAdjustment, proposedContentOffset.y);

}
增加图片点击效果
最后 添加一个点击cell 将其滚动到中间
在viewcontroller添加CollectionViewDelegate的代理方法
- (void)collectionView:(UICollectionView *)collectionView didSelectItemAtIndexPath:(NSIndexPath *)indexPath {

    [self.collectionView selectItemAtIndexPath:indexPath animated:YES scrollPosition:UICollectionViewScrollPositionNone];

    //滚动到中间

    [self.collectionView scrollToItemAtIndexPath:indexPath atScrollPosition:UICollectionViewScrollPositionCenteredHorizontally animated:YES];

}
封装成控件
当我们把效果实现之后,就可以考虑将代码优化一下,合到一个类里,减少书写常量,增加接口,封装成一个控件去使用。比如可以设定文字的显示与隐藏接口,再比如增加适应各种尺寸的图片等等。这个代码就不放了,毕竟不难,有问题给我留言好了。
[iOS] UICollectionView实现图片水平滚动的更多相关文章
- 【demo练习三】:图片水平滚动、点击按钮变更图片动画
要求:四张图片水平滚动,每隔5秒进行一次循环,点击按钮随机变更图片. XAML前台代码: <Window x:Class="图片滚动.MainWindow" xmlns=&q ...
- [iOS] WSHorizontalPickerView 图片水平滚动封装
之前这篇文章传送门本来是记录自己练手的demo的,后来很多人来问我要代码.今天就抽时间封装了一下,没有考虑太多情况,等我有空再去仔细考虑吧. 代码在:Github 用法很简单,创建对象,设置数据源,记 ...
- JS特效——图片水平滚动
具体源码如下: <!doctype html> <html lang="en"> <head> <meta http-equiv=&quo ...
- Android_ViewPager_实现多个图片水平滚动
1.示意图 2.实现分析 (1).xml配置 <!-- 配置container和pager的clipChildren=false, 并且指定margi ...
- Android ViewPager实现多个图片水平滚动
1.示意图 2.实现分析 (1).xml配置 <!-- 配置container和pager的clipChildren=false, 并且指定margi ...
- iOS开发之多图片无缝滚动组件封装与使用
经常有园友会问"博主,有没有图片无限滚动的Demo呀?", 正儿八经的图片滚动的Demo我这儿还真没有,今天呢就封装一个可以在项目中直接使用的图片轮播.没看过其他iOS图片无限轮播 ...
- IOS UIScrollView + UIButton 实现segemet页面和顶部标签页水平滚动效果
很长一段时间没有写博客了,最近在学习iOS开发,看了不少的代码,自己用UIScrollView和UIButton实现了水平滚动的效果,有点类似于今日头条的主界面框架,效果如下: 代码如下: MyScr ...
- ASP.NET中使用JavaScript实现图片自动水平滚动效果
参照网上的资料,在ASP.NET中使用JavaScript实现图片自动水平滚动效果. 1.页面前台代码: <%@ Page Language="C#" AutoEventWi ...
- 使用Recyclerview实现图片水平自动循环滚动
简介: 本篇博客主要介绍的是如何使用RecyclerView实现图片水平方向自动循环(跑马灯效果) 效果图: 思路: 1.准备m张图片 1.使用Recyclerview实现,返回无数个(实际Inter ...
随机推荐
- github绑定自己的域名
1.进入需要绑定域名的项目里面,然后新建一个文件CNAME,没有后缀的. 2.在文件里面输入你的域名,然后保存.github这边就完成了. 3.然后去你购买域名的网站,进入控制台,找到域名,然后域名解 ...
- redis集群环境的搭建和错误分析
redis集群环境的搭建和错误分析 redis集群时,出现的几个异常问题 09 redis集群的搭建 以及遇到的问题
- 编译开源C或者C++项目最好像执行如下命令,否则可能会有这种奇葩问题
find ./ -type f | xargs sed -i 's/\r$//' find ./ -name "*.sh" | xargs chmod +x find ./ -ty ...
- php还原16进制特殊字符
特殊字符的16进制表:https://websitebuilders.com/tools/html-codes/ascii/ 可以通过 hexdec() 和 chr()方法来进行转换, 例子: < ...
- JavaScript对象Object
<script> var obj = new Object(); var obj2 = {}; obj2.firstName = "wang"; obj2.lastNa ...
- CustomSqlSessionFactoryBean
import java.io.File; import java.net.JarURLConnection; import java.net.URL; import java.util.ArrayLi ...
- Linux 普通用户启动nginx
众所周知,apache的80端口为系统保留端口,如果通过其他非root用户启动,会报错如下: ()Permission denied: make_sock: could not bind to add ...
- C# 枚举器和迭代器
一.枚举器(enumerator)和可枚举类型(enumeration) 我们都知道foreach语句可以用来遍历数组中的元素,但你有没有想过为什么它可以被foreach处理呢? 这是因为数组可以按需 ...
- new image的使用
在看别人的程序,用到了new image()这种方法,然而怎么看也不是很明白: 于是就上网搜,然而却没有一个人能够解开我心中的疑惑,因为没有一个人的程序是完整的, 即使我知道怎么用,但是我看不到效果就 ...
- Silverlight 在ie8 下 报2152 错误
前几天改别人的一个silverlight程序,在项目属性上 选中了 “通过使用应用程序库缓存减小XAP 大小”,编译无错,发布无错误. 放服务器上测试: 站点绑定域名,使用ie9.ie10 都没有问题 ...