springboot+cfx实现webservice功能
一、开发服务端
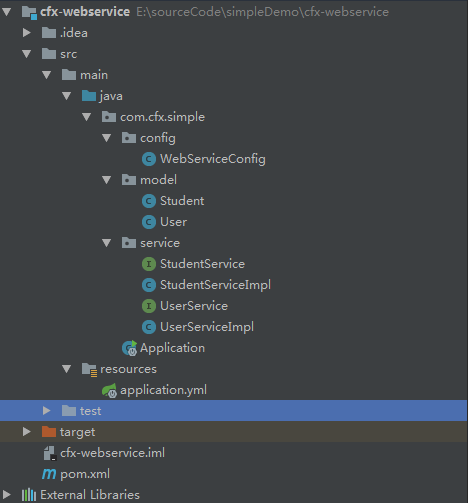
1、新建工程 cfx-webservice ,最终的完整工程如下:

pom.xml如下:
<?xml version="1.0" encoding="UTF-8"?>

<project xmlns="http://maven.apache.org/POM/4.0.0"

         xmlns:xsi="http://www.w3.org/2001/XMLSchema-instance"

         xsi:schemaLocation="http://maven.apache.org/POM/4.0.0 http://maven.apache.org/xsd/maven-4.0.0.xsd">

    <modelVersion>4.0.0</modelVersion>

    <groupId>com.cfx.simple.service</groupId>

    <artifactId>cfx-webservice</artifactId>

    <version>1.0-SNAPSHOT</version>

    <parent>

        <groupId>org.springframework.boot</groupId>

        <artifactId>spring-boot-starter-parent</artifactId>

        <version>1.4.1.RELEASE</version>

    </parent>

    <dependencies>

        <dependency>

            <groupId>org.springframework.boot</groupId>

            <artifactId>spring-boot-starter-web</artifactId>

        </dependency>

        <dependency>

            <groupId>org.apache.cxf</groupId>

            <artifactId>cxf-spring-boot-starter-jaxws</artifactId>

            <version>3.1.12</version>

        </dependency>

    </dependencies>

</project>
红色部分的依赖是开发webservice的依赖包,其他的只是springboot需要的基本包
1、实体类(Student和User)
public class Student {

    private String stuName;

    private Integer stuAge;

    public Student(String stuName, Integer stuAge) {

        this.stuName = stuName;

        this.stuAge = stuAge;

    }

    public String getStuName() {

        return stuName;

    }

    public void setStuName(String stuName) {

        this.stuName = stuName;

    }

    public Integer getStuAge() {

        return stuAge;

    }

    public void setStuAge(Integer stuAge) {

        this.stuAge = stuAge;

    }

}
public class User {

    private String name;

    private String sex;

    public User(String name, String sex) {

        this.name = name;

        this.sex = sex;

    }

    public String getName() {

        return name;

    }

    public void setName(String name) {

        this.name = name;

    }

    public String getSex() {

        return sex;

    }

    public void setSex(String sex) {

        this.sex = sex;

    }

}
2、WebService的接口和实现类(一个是返回用户信息的WebService,一个是返回学生信息的WebService)
1)学生的
package com.cfx.simple.service;

import com.cfx.simple.model.Student;

import javax.jws.WebMethod;

import javax.jws.WebService;

import java.util.List;

/**

 * @author Administrator

 * @date 2019/01/30

 */

@WebService(targetNamespace = "http://service.simple.cfx.com")//  命名空间,写一个有意义的http地址就行,并不是网上所说的要写成包名倒序,只不过写成包名倒序易读而已

public interface StudentService {

    @WebMethod

    List<Student> getStudentList();

}
package com.cfx.simple.service;

import com.cfx.simple.model.Student;

import org.springframework.stereotype.Component;

import javax.jws.WebService;

import java.util.Arrays;

import java.util.List;

/**

 * @author Administrator

 * @date 2019/01/30

 */

@WebService(serviceName = "StudentService",

        targetNamespace = "http://service.simple.cfx.com",

        endpointInterface = "com.cfx.simple.service.StudentService")

@Component

public class StudentServiceImpl implements StudentService {

    @Override

    public List<Student> getStudentList() {

        Student stu1 = new Student("学生1",25);

        Student stu2 = new Student("学生2",30);

        return Arrays.asList(stu1,stu2);

    }

}
2)用户的
package com.cfx.simple.service;

import com.cfx.simple.model.User;

import javax.jws.WebMethod;

import javax.jws.WebParam;

import javax.jws.WebService;

import java.util.List;

/**

 * @author Administrator

 * @date 2019/01/30

 */

@WebService(targetNamespace = "http://service.simple.cfx.com")// 命名空间,写一个有意义的http地址就行,并不是网上所说的要写成包名倒序,只不过写成包名倒序易读而已

public interface UserService {

    @WebMethod

    List<User> getUserList(@WebParam(name = "userName") String userName);

}
package com.cfx.simple.service;

import com.cfx.simple.model.User;

import org.springframework.stereotype.Component;

import javax.jws.WebService;

import java.util.Arrays;

import java.util.List;

/**

 * @author Administrator

 * @date 2019/01/30

 */

@WebService(serviceName = "UserService",

        targetNamespace = "http://service.simple.cfx.com",

        endpointInterface = "com.cfx.simple.service.UserService")

@Component

public class UserServiceImpl implements UserService {

    @Override

    public List<User> getUserList(String userName) {

        System.out.println("输入参数:" + userName);

        User user1 = new User("张三", "男");

        User user2 = new User("李四", "男");

        return Arrays.asList(user1,user2);

    }

}
3、发布WebService的配置类
package com.cfx.simple.config;

import com.cfx.simple.service.StudentService;

import com.cfx.simple.service.UserService;

import org.apache.cxf.Bus;

import org.apache.cxf.jaxws.EndpointImpl;

import org.springframework.beans.factory.annotation.Autowired;

import org.springframework.context.annotation.Bean;

import org.springframework.context.annotation.Configuration;

import javax.xml.ws.Endpoint;

/**

 * @author Administrator

 * @date 2019/01/30

 */

@Configuration

public class WebServiceConfig {

    @Autowired

    private Bus bus;

    @Autowired

    private UserService userService;

    @Autowired

    private StudentService studentService;

    @Bean

    public Endpoint endpointUserService() {

        EndpointImpl endpoint = new EndpointImpl(bus,userService);

        endpoint.publish("/UserService");//接口发布在 /UserService 目录下

        return endpoint;

    }

    @Bean

    public Endpoint endpointStudentService() {

        EndpointImpl endpoint = new EndpointImpl(bus,studentService);

        endpoint.publish("/StudentService");//接口发布在 /StudentService 目录下

        return endpoint;

    }

}
4、springboot启动类
package com.cfx.simple;

import org.springframework.boot.SpringApplication;

import org.springframework.boot.autoconfigure.SpringBootApplication;

/**

 * @author Administrator

 * @date 2019/01/30

 */

@SpringBootApplication

public class Application {

    public static void main(String[] args) throws Exception {

        SpringApplication.run(Application.class, args);

    }

}
5、application.yml
server:

  port: 8084

  context-path: /
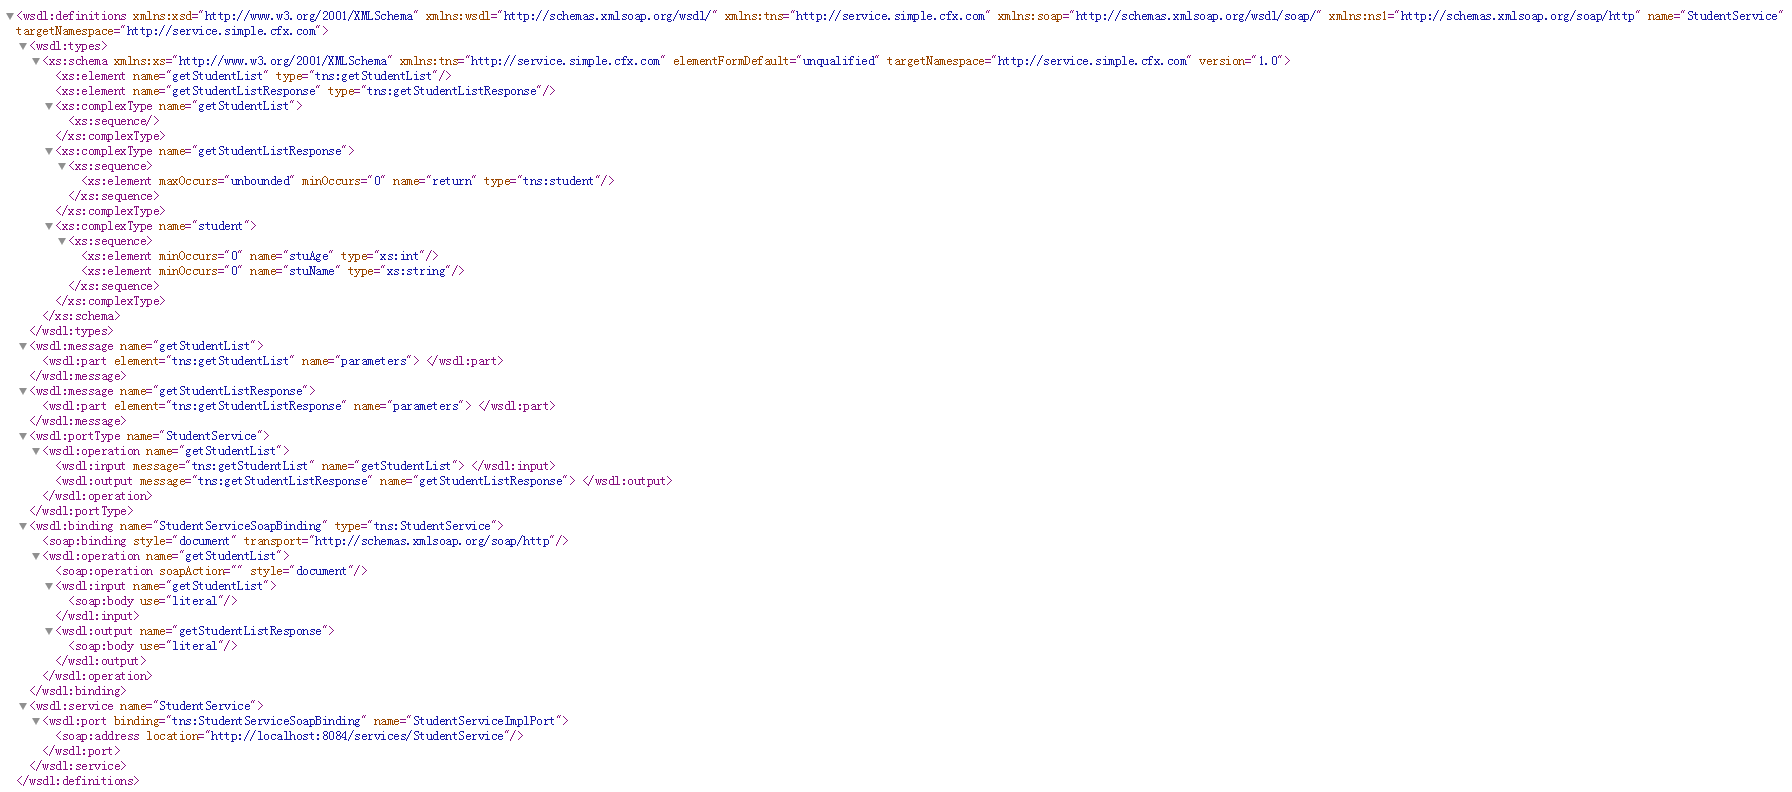
启动程序,浏览器输入:http://localhost:8084/services

点击WSDL

二、开发客户端进行测试
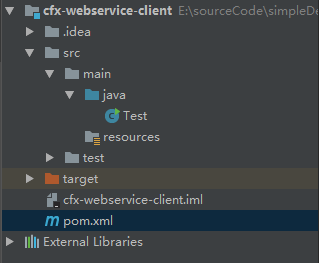
1、新建cfx-webservice-client

pom.xml如下:
<?xml version="1.0" encoding="UTF-8"?>

<project xmlns="http://maven.apache.org/POM/4.0.0"

         xmlns:xsi="http://www.w3.org/2001/XMLSchema-instance"

         xsi:schemaLocation="http://maven.apache.org/POM/4.0.0 http://maven.apache.org/xsd/maven-4.0.0.xsd">

    <modelVersion>4.0.0</modelVersion>

    <groupId>cfx.webservice.client</groupId>

    <artifactId>cfx-webservice-client</artifactId>

    <version>1.0-SNAPSHOT</version>

    <dependencies>

        <!--调用webserivce的依赖-->

        <dependency>

            <groupId>org.apache.cxf</groupId>

            <artifactId>cxf-spring-boot-starter-jaxws</artifactId>

            <version>3.1.12</version>

        </dependency>

        <!--用于将对象转换成json-->

        <dependency>

            <groupId>net.sf.json-lib</groupId>

            <artifactId>json-lib</artifactId>

            <version>2.4</version>

            <classifier>jdk15</classifier>

        </dependency>

    </dependencies>

</project>
2、编写测试类
import net.sf.json.JSONObject;

import org.apache.cxf.endpoint.Client;

import org.apache.cxf.jaxws.endpoint.dynamic.JaxWsDynamicClientFactory;

import java.util.ArrayList;

/**

 * @author Administrator

 * @date 2019/01/30

 */

public class Test {

    public static void main(String[] args){

        //在一个方法中连续调用多次WebService接口,每次调用前需要重置上下文

        ClassLoader cl = Thread.currentThread().getContextClassLoader();

        JaxWsDynamicClientFactory dcf = JaxWsDynamicClientFactory.newInstance();

        System.out.println("学生的信息如下:================");

        printStudentList(dcf);

        //在调用第二个webservice前,需要重置上下文

        Thread.currentThread().setContextClassLoader(cl);

        System.out.println("用户的信息如下:================");

        printUserList(dcf);

    }

    private static void printUserList(JaxWsDynamicClientFactory dcf){

        Client client = dcf.createClient("http://localhost:8084/services/UserService?wsdl");

        // 需要密码的情况需要加上用户名和密码

        // client.getOutInterceptors().add(new ClientLoginInterceptor(USER_NAME, PASS_WORD));

        Object[] objects = new Object[0];

        try {

            // invoke("方法名",参数1,参数2,参数3....);

            objects = client.invoke("getUserList", "张三");

            if(objects.length>0){

                ArrayList<Object> objectList = (ArrayList)objects[0];

                for (Object o:objectList){

                    JSONObject jsonObject = JSONObject.fromObject(o);

                    System.out.println("userName:"+jsonObject.getString("name")+",sex:"+jsonObject.getString("sex"));

                }

            }

        } catch (java.lang.Exception e) {

            e.printStackTrace();

        }

    }

    private static void printStudentList(JaxWsDynamicClientFactory dcf){

        Client client = dcf.createClient("http://localhost:8084/services/StudentService?wsdl");

        // 需要密码的情况需要加上用户名和密码

        // client.getOutInterceptors().add(new ClientLoginInterceptor(USER_NAME, PASS_WORD));

        Object[] objects = new Object[0];

        try {

            // invoke("方法名",参数1,参数2,参数3....);

            objects = client.invoke("getStudentList","");

            if(objects.length>0){

                ArrayList<Object> objectList = (ArrayList)objects[0];

                for (Object o:objectList){

                    JSONObject jsonObject = JSONObject.fromObject(o);

                    System.out.println("stuName:"+jsonObject.getString("stuName")+",stuAge:"+jsonObject.getString("stuAge"));

                }

            }

        } catch (java.lang.Exception e) {

            e.printStackTrace();

        }

    }

}
学生的信息如下:================

stuName:学生1,stuAge:25

stuName:学生2,stuAge:30

用户的信息如下:================

userName:张三,sex:男

userName:李四,sex:男
上面的红色代码不能去掉,去掉后,第一个webservice调用正常,第二个会报以下错误:

springboot+cfx实现webservice功能的更多相关文章
- 通过CFX发布WebService(一)
发布WebService的方法很多.如XFire,CFX等.现在首先介绍下怎样通过CFX来发部一个WebService. (1) 首先,是从Apache官方网站获取CFX的Java包.其地址是:htt ...
- 基于cfx的webservice调用
一.简单的(结合Spring) 1. 新建一个web 项目,加入cfx所需要jar 2. 编写要发布的Web Service接口和实现类所需要jar 接口类 HelloWorld : import ...
- springboot+CXF开发webservice对外提供接口(转)
文章来源:http://www.leftso.com/blog/144.html 1.项目要对外提供接口,用webservcie的方式实现 2.添加的jar包 maven: <dependenc ...
- CFX构建webservice实例,与Spring整合.
项目结构图: 步骤一: 添加maven包依赖 <project xmlns="http://maven.apache.org/POM/4.0.0" xmlns:xsi=&qu ...
- 初始cfx开发webservice, 简单实例应用
项目结构图: 步骤一: 添加maven 依赖包 <project xmlns="http://maven.apache.org/POM/4.0.0" xmlns:xsi=&q ...
- SpringBoot 框架整合webservice
spring boot集成web service框架 题记: 本篇博客讲的spring boot如何集成 spring web service,如果您想用Apache CXF集成,那么可能不适合您.为 ...
- SpringBoot的注解注入功能移植到.Net平台(开源)
*:first-child { margin-top: 0 !important; } .markdown-body>*:last-child { margin-bottom: 0 !impor ...
- SpringBoot简单实现登录功能
登陆 开发期间模板引擎页面修改以后,要实时生效 1).禁用模板引擎的缓存 # 禁用缓存 spring.thymeleaf.cache=false 2).页面修改完成以后ctrl+f9:重新编译: 登陆 ...
- SpringBoot邮件推送功能
鞠躬,道歉 抱歉,迟到了近一年的更新,这一年挺忙的,发生了很多事情,就厚脸皮拖更了,抱歉. 现在状态回来了,打算分享下近期学到的东西,这一年期间学到的东西可能会随意更新,其实也就是玩了下C# + un ...
随机推荐
- PHP调用外部程序的方法
很多情况下需要php调用其他程序如shell命令.shell脚本.可执行程序等等,此时需要使用到诸如exec/system/popen/proc_open等函数,每种函数有各自适合使用的场景以及需要注 ...
- 【python】入门指南1
基础的数据结构:int, float, string 注意:python入门系列的文章的示例均使用python3来完成. #!/bin/python a = 1 b = 1.0 c = 'string ...
- MVC 的那点小事
两年未见 一切从头再来.我猜到了故事的开头,找工作一如我想象的那般艰难,但是结果却比我预期的要好很多. 第一次开始用MVC 框架,比我想象的要简单的多,就像同事跟我说的,这只是个框架. 言归正传,前两 ...
- c#、.net、asp.net、asp 、ado.net、.net framework的区别
c#:一种编程语言 .net:一种运行环境 asp.net:基于.netFramework框架下的一种开发技术(相对与asp而言,引入了服务器控件,前后台可分,编译型的编程框架) asp:也是.net ...
- 44-java断点调式dubug
转自:https://www.cnblogs.com/mq0036/p/3780538.html Eclipse 的单步调试 1.设置断点在程序里面放置一个断点,也就是双击需要放置断点的程序左边的栏目 ...
- python:在for遍历list时使用remove出现的问题以及解析(转)
原文地址:http://blog.csdn.net/circle2015/article/details/64444300最近面试时,面试官在纸上写了几行代码,说是很简单的问题,我看后直接懵逼...如 ...
- Windows Server 2008 MetaFile设置占用内存限制
最近遇到Windows Server 2008服务器内存持续飙升,48G内存用了99%,查看任务管理器的进程,也没发现具体哪个进程用的内存比较大? 于是,在网上找了了一个查看内存的工具RamMap,具 ...
- Hadoop(三) HADOOP常用命令参数介绍
-help 功能:输出这个命令参数手册 -ls 功能:显示目录信息 示例: hadoop fs -ls hdfs://hadoop-server01:9000/ 备注 ...
- 适合新手小白的UI学习路线完整版
UI设计是很多年轻人活着想转行学习的人的新职业目标,越来越多的人看到UI设计良好的就业发展前景,纷纷投入到UI设计的大军中来,想学习UI设计,很多小白并不知道从何开始学起,用什么样的方法去学习,所以今 ...
- 解决CentOS7-python-pip安装失败
Pip介绍 pip 是一个安装和管理 Python 包的工具,python安装包的工具有easy_install, setuptools, pip,distribute.使用这些工具都能下载并安装dj ...
