python的数字图像处理学习(3)
高级滤波:
 from skimage import data,color,data_dir

 import matplotlib.pyplot as plt

 from skimage.morphology import disk

 import skimage.filters.rank as sfr

 img =color.rgb2gray(data.camera())

 auto =sfr.autolevel(img, disk(5))  #半径为5的圆形滤波器

 plt.figure('filters',figsize=(8,8))

 plt.subplot(121)

 plt.imshow(img,plt.cm.gray)

 plt.subplot(122)

 plt.imshow(auto,plt.cm.gray)

 data_dir
高级滤波.....
 from skimage import data,color

 import matplotlib.pyplot as plt

 from skimage.morphology import disk

 import skimage.filters.rank as sfr

 img =color.rgb2gray(data.camera())

 auto =sfr.bottomhat(img, disk(5))  #半径为5的圆形滤波器

 auto1 =sfr.tophat(img, disk(5))  #半径为5的圆形滤波器

 plt.figure('filters',figsize=(12,12))

 plt.subplot(131)

 plt.imshow(img,plt.cm.gray)

 plt.subplot(132)

 plt.imshow(auto,plt.cm.gray)

 plt.subplot(133)

 plt.imshow(auto1,plt.cm.gray)
提取轮廓....
 import numpy as np

 import matplotlib.pyplot as plt

 from skimage import measure,draw,data,filters

 #生成二值测试图像

 img=data.page()

 thresh = filters.threshold_isodata(img)

 img1 = (img <= thresh)*1.0   #根据阈值进行分割

 #检测所有图形的轮廓

 img2 = img1[:,:]

 contours = measure.find_contours(img1, 0.5)

 #绘制轮廓

 fig, (ax0,ax1,ax2) = plt.subplots(1,3,figsize=(15,15))

 ax0.imshow(img,plt.cm.gray)

 ax1.imshow(img1,plt.cm.gray)

 ax2.imshow(img2,plt.cm.gray)    #enumerate索引序列

 for n, contour in enumerate(contours):

     ax2.plot(contour[:, 1], contour[:, 0], linewidth=1)

 plt.show()
提取轮廓..............
 import matplotlib.pyplot as plt

 from skimage import measure,data,color

 img=color.rgb2gray(data.horse())

 contours = measure.find_contours(img, 0.5)

 fig, axes = plt.subplots(1,2,figsize=(8,8))

 ax0, ax1= axes.ravel()

 ax0.imshow(img,plt.cm.gray)

 rows,cols=img.shape

 ax1.axis([0,rows,cols,0])

 for n, contour in enumerate(contours):

     ax1.plot(contour[:, 1], contour[:, 0], linewidth=1)

 ax1.axis('image')

 plt.show()
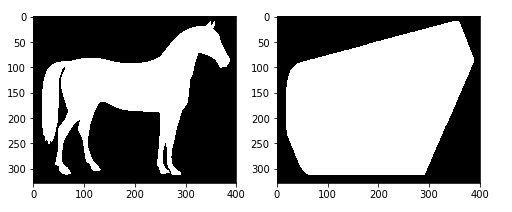
凸包............
import matplotlib.pyplot as plt

from skimage import data,color,morphology

img=color.rgb2gray(data.horse())

img=(img<0.5)*1

chull = morphology.convex_hull_image(img)

fig, axes = plt.subplots(1,2,figsize=(8,8))

ax0, ax1= axes.ravel()

ax0.imshow(img,plt.cm.gray)

ax1.imshow(chull,plt.cm.gray)
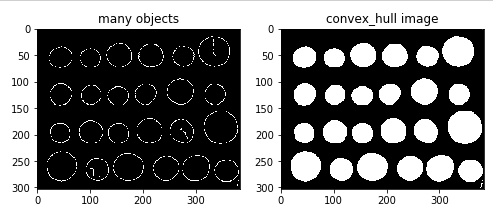
多个凸包.....................................................................................
 import matplotlib.pyplot as plt

 from skimage import data,color,morphology,feature

 img=color.rgb2gray(data.coins())

 edgs=feature.canny(img, sigma=3, low_threshold=10, high_threshold=50)

 chull = morphology.convex_hull_object(edgs)

 #绘制轮廓

 fig, axes = plt.subplots(1,2,figsize=(8,8))

 ax0, ax1= axes.ravel()

 ax0.imshow(edgs,plt.cm.gray)

 ax0.set_title('many objects')

 ax1.imshow(chull,plt.cm.gray)

 ax1.set_title('convex_hull image')

 plt.show()
看不懂也写不下去了...
python的数字图像处理学习(3)的更多相关文章
- python的数字图像处理学习(2)
图像的重定义大小,图像的缩扩,图像的旋转: from skimage import transform,data import matplotlib.pyplot as plt img = data. ...
- python的数字图像处理学习(1)
导入原有的测试图片,测试图片路径,和一些方法,显示出测试图像,测试图像路径. from skimage import io,data,data_dir img_rgb=data.chelsea() i ...
- 【笔记】基于Python的数字图像处理
[博客导航] [Python相关] 前言 基于Python的数字图像处理,离不开相关处理的第三方库函数.搜索网络资源,列出如下资源链接. Python图像处理库到底用哪家 python计算机视觉编程— ...
- 数字图像处理学习笔记之一 DIP绪论与MATLAB基础
写在前面的话 数字图像处理系列的学习笔记是作者结合上海大学计算机学院<数字图像处理>课程的学习所做的笔记,使用参考书籍为<冈萨雷斯数字图像处理(第二版)(MATLAB版)>,同 ...
- MATLAB数字图像处理学习笔记
我们都知道一幅图片就相当于一个二维数组,可以用一个矩阵来表示,而MATLAB可以说就是为矩阵运算而生的,所以学习图像处理,学习MATLAB势在必行! 一. MATLAB基础知识 1. 读取图像 %im ...
- 初始----python数字图像处理--:环境安装与配置
一提到数字图像处理编程,可能大多数人就会想到matlab,但matlab也有自身的缺点: 1.不开源,价格贵 2.软件容量大.一般3G以上,高版本甚至达5G以上. 3.只能做研究,不易转化成软件. 因 ...
- 数字图像处理(一)之灰度转换和卷积python实现
使用Python实现数字图像处理中如下功能: 彩色图像转成灰度图像 实现图像的相关&卷积操作 实现图像的高斯核卷积 使用的库和python版本如下: imageio:2.9.0 用于读取磁盘中 ...
- python数字图像处理(17):边缘与轮廓
在前面的python数字图像处理(10):图像简单滤波 中,我们已经讲解了很多算子用来检测边缘,其中用得最多的canny算子边缘检测. 本篇我们讲解一些其它方法来检测轮廓. 1.查找轮廓(find_c ...
- python数字图像处理(1):环境安装与配置
一提到数字图像处理编程,可能大多数人就会想到matlab,但matlab也有自身的缺点: 1.不开源,价格贵 2.软件容量大.一般3G以上,高版本甚至达5G以上. 3.只能做研究,不易转化成软件. 因 ...
随机推荐
- Java Web开发和Python Web开发之间的区别
今天的文章讨论了Java Web开发和Python Web开发之间的区别.我不鼓励我们在这里从Java Web迁移到Python Web开发.我只是想谈谈我的感受.它不一定适合所有情况,仅供我们参考. ...
- 贪吃蛇Controller Java实现(二)
package cn.tcc.snake.Controller; import java.awt.Point;import java.awt.event.KeyAdapter;import java. ...
- 微信小程序——过滤器的模拟
>> 编写wxs文件——filter.wxs //1. 价格格式化 function getPriceFormat(value) { return parseFloat(isNaN(val ...
- Java-排序算法-冒泡排序
一.冒泡排序的原理 冒泡排序,就是从第一个元素开始,通过两两交换,使小的先冒出来,然后再走第二轮使次小的冒出来,直到最后一轮最大的冒出来,排序完成 二.冒泡排序的伪代码实现: bubblesort(A ...
- f5 SNAT
request过程: 1.真实源地址(3.3.3.3)将数据包发给f5虚拟的vs地址(1.1.1.5:80): 2.f5将真实源地址(3.3.3.3)转换成SNAT地址(1.1.1.100),并将vs ...
- 将之前的Power idea公司的数据按照下图所示的格式在屏幕上显示出来。
之前的文章 示例代码如下 assume cs:codesg ;将整个data段看作是一个数组,长度一共为 ;21*4+21*4+2*21=168+42=210字节 data segment db ' ...
- POI依据类型设置导出格式
//设置Bigdecimal数据导出时以数值形式输出 CellStyle decimalStyle = workbook.createCellStyle(); DataFormat decimalDf ...
- go语言path包和filepath包的学习与使用
path包的使用 package main; import ( "fmt" "path" ) //go语言path包的学习 func main() { //返回 ...
- MVC之CodeFirst
1.建立MVC项目>NuGet安装EF 2.建立模型: public class Blog { [Key] [DatabaseGenerated(DatabaseGeneratedOption. ...
- Query to find the eligible indexes for rebuilding
Query to find the eligible indexes for rebuilding The following script can be used to determine whic ...