Linux密钥认证
网站集群批量管理-秘钥认证
一、概述
管理更加轻松:两个节点,通过秘钥形式进行访问,不需要输入密码,单向
应用场景:
一些服务在使用前要求做秘钥认证
手动写批量管理脚本
名字:秘钥认证,免密码登录,双机互信
二、原理
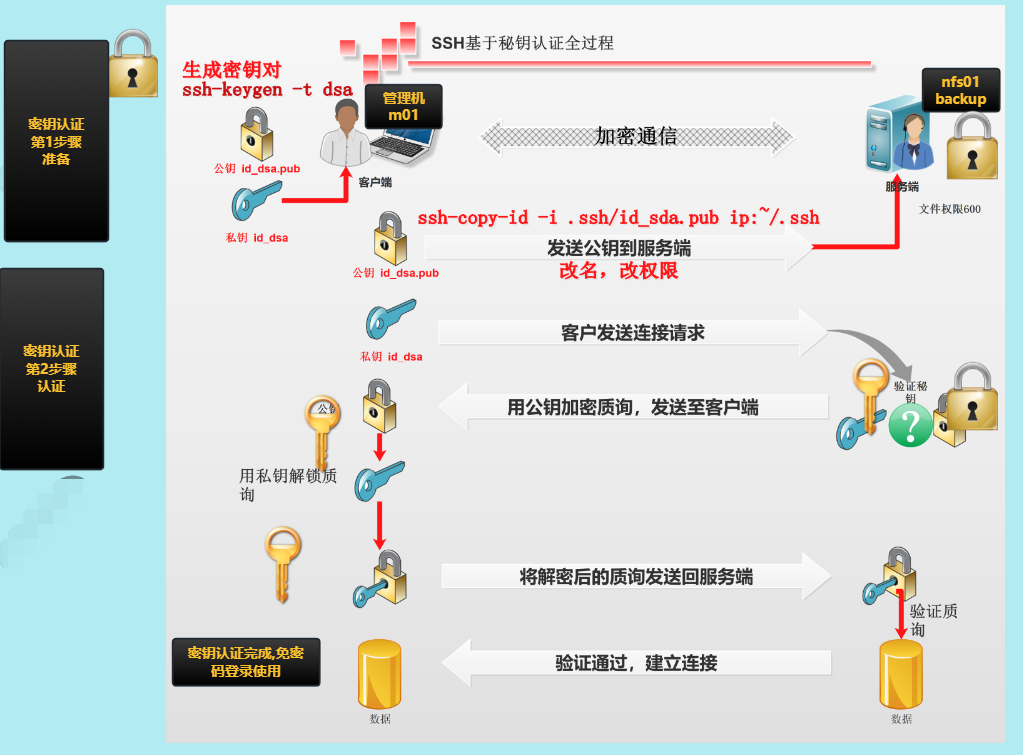
秘钥对:
公钥:public key 一般以.pub结尾
私钥:private key 没有特殊的结尾
[root@m01 ~]# ll .ssh

total 12

-rw------- 1 root root 1679 Feb  1 10:11 id_rsa        #私钥

-rw-r--r-- 1 root root  390 Feb  1 10:11 id_rsa.pub    #公钥

-rw-r--r-- 1 root root  686 Feb  1 11:11 known_hosts   #存放连接时是否需要输入yes or no
三、极速上手指南
| 角色 | 主机名 | 内网ip | 公网ip |
|---|---|---|---|
| 管理机 | m01 | 172.16.1.61 | 10.0.0.61 |
| 被管理机 | nfs | 172.16.1.31 | 10.0.0.31 |
| 被管理机 | web01 | 172.16.1.7 | 10.0.0.7 |
| 被管理机 | backup | 172.16.1.41 | 10.0.0.41 |
1.基本检查
#检查管理机与被管理机是否联通

#ping

[root@m01 ~]# ping 172.16.1.7

PING 172.16.1.7 (172.16.1.7) 56(84) bytes of data.

64 bytes from 172.16.1.7: icmp_seq=1 ttl=64 time=0.300 ms

64 bytes from 172.16.1.7: icmp_seq=2 ttl=64 time=0.184 ms

^C

--- 172.16.1.7 ping statistics ---

2 packets transmitted, 2 received, 0% packet loss, time 1000ms

rtt min/avg/max/mdev = 0.184/0.242/0.300/0.058 ms

#22端口,sshd服务开启或客户访问

[root@m01 ~]# nmap -p22 172.16.1.31 172.16.1.7 172.16.1.41

Starting Nmap 6.40 ( http://nmap.org ) at 2023-02-01 15:14 CST

Nmap scan report for nfs01 (172.16.1.31)

Host is up (0.00015s latency).

PORT   STATE SERVICE

22/tcp open  ssh

MAC Address: 00:0C:29:87:19:20 (VMware)

Nmap scan report for web01 (172.16.1.7)

Host is up (0.00020s latency).

PORT   STATE SERVICE

22/tcp open  ssh

MAC Address: 00:0C:29:2A:09:7D (VMware)

Nmap scan report for backup (172.16.1.41)

Host is up (0.00018s latency).

PORT   STATE SERVICE

22/tcp open  ssh

MAC Address: 00:0C:29:DB:3F:AB (VMware)

Nmap done: 3 IP addresses (3 hosts up) scanned in 0.66 seconds
2.创建秘钥对
[root@m01 ~]# ssh-keygen -t rsa

Generating public/private rsa key pair.

Enter file in which to save the key (/root/.ssh/id_rsa):

Created directory '/root/.ssh'.

Enter passphrase (empty for no passphrase):

Enter same passphrase again:

Your identification has been saved in /root/.ssh/id_rsa.

Your public key has been saved in /root/.ssh/id_rsa.pub.

The key fingerprint is:

SHA256:qBDXHAdOru29Wu3F7A/EphYrA+xc3HMOtgsJJltoAB0 root@m01

The key's randomart image is:

+---[RSA 2048]----+

|..E.  +..        |

| ..  * o         |

|  o . =          |

|   + = o . .     |

|  . = O S * =    |

|   o X = + #     |

|    o + B * *    |

|       . B + .   |

|      ... o ...  |

+----[SHA256]-----+

#注意创建的时候,可以不加t

#-t 指定加密的类型

#默认通过rsa方法对数据进行加密
3.分发公钥
[root@m01 ~]# ssh-copy-id -i .ssh/id_rsa.pub 172.16.1.41

/usr/bin/ssh-copy-id: INFO: Source of key(s) to be installed: ".ssh/id_rsa.pub"

The authenticity of host '172.16.1.41 (172.16.1.41)' can't be established.

ECDSA key fingerprint is SHA256:fVjvhVF2qU+PCOqsrVTrbxa/aNB4dzNmGRJTw1iIZ1s.

ECDSA key fingerprint is MD5:0f:00:32:1c:41:31:af:a2:f5:e8:64:40:2c:cf:98:98.

Are you sure you want to continue connecting (yes/no)? yes

/usr/bin/ssh-copy-id: INFO: attempting to log in with the new key(s), to filter out any that are already installed

/usr/bin/ssh-copy-id: INFO: 1 key(s) remain to be installed -- if you are prompted now it is to install the new keys

root@172.16.1.41's password:

Number of key(s) added: 1

Now try logging into the machine, with:   "ssh '172.16.1.41'"

and check to make sure that only the key(s) you wanted were added.
4.连接测试
[root@m01 ~]# ssh 172.16.1.41 hostname

backup
温馨提示:
ssh-copy-id 公钥被存放在对方服务器的用户家目录下面
名字变为了:authorized_keys
[root@backup ~]# ll .ssh

total 8

-rw------- 1 root root 390 Feb  1 15:16 authorized_keys
如果管理机的秘钥重新生成,又重新发送,那么authorized_keys中的秘钥就会变成2个
[root@nfs ~]# cat .ssh/authorized_keys

ssh-rsa AAAAB3NzaC1yc2EAAAADAQABAAABAQDEak/lEI0Aoy8MJhsYaALPAOCtmAV6l9YTZ/t9jJX+vMpC2EUuKzOuii0LwLgQ0ovqWAERJLaFpSlIHZg9jio7vLwsm8KiBtfiWVihG6NDkj8Y2LAUrNUbMFYHpO4z+jlJNbeo+0rJIAKsAoFPGMjYjmm2/oZZRz8YsHrpHsJpidXCW161v7Cn5tfJTOSEixeKoCbFKQBCcb36hHT9sqLFK9S2/PiPJZi4N8FiBcBxz4DIq9dIPgj6BCG99YqBIRtIg6dB1WdDsqKXrdDxDwmSYNWfxBKkII0DncxSM8cX8+YtAis5gRubxvsOGIpZ5LjKnpQgGWQUwNu0FaIe9AhT root@m01

ssh-rsa AAAAB3NzaC1yc2EAAAADAQABAAABAQCvqqbNj++CGwQROG+1kKB6uxcK54le6Pz8K+SFoq5GKspmt2pjMupzsvM0okEMhJhMRH8e/tZlfMRNOa82mF3FkKhWCBAsK+YAY5oHUzEnS7M+7V6L6JSyi8No2RG/xxC51zWiJgExAFAXTrJCcmN8npeKyGwcBHaKpDtqb3sigm6mty05rQmjKd52BBjTbu19jen9D+FxhbJHHU00uBWq0b9XrpvTqN5mp1qbIreB/U5YZg1j4skEmqtG1WzjEe6Q/oxkQbBnubZ17C7kvTt9xSre6TnLaPPb2sFDCb/6V983wxCQrkuYjTcfRkgzPZtjN/xQk+lfmFiKTdZAU8dv root@m01
四、自动化创建与分发密钥
步骤:
- 创建秘钥对
- 分发公钥的时候:yes/no (yes后会把信息保存到.ssh/known_hosts)
- 分发公钥的时候:输入密码
1.自动化创建密钥
[root@m01 ~]# ssh-keygen -f ~/.ssh/id_rsa -P ''

Generating public/private rsa key pair.

Created directory '/root/.ssh'.

Your identification has been saved in /root/.ssh/id_rsa.

Your public key has been saved in /root/.ssh/id_rsa.pub.

The key fingerprint is:

SHA256:UebPlzDbK0NcyDAuNoDMR0aa5jUNcwx63bF5ftW/9R4 root@m01

The key's randomart image is:

+---[RSA 2048]----+

|   o +Oo. *      |

|    +=.B.* B .  .|

|    =.+ B * * . o|

|   o o o + * * o.|

|    .   S   B = o|

|           . o .+|

|            o .E.|

|             o ..|

|                .|

+----[SHA256]-----+

-f 用于指定私钥的位置

-P 密钥短语,设置为空。就是输完ssh-keygen,需要敲的两下回车
2.自动化分发公钥(解决yes/no问题)
第1次远程的提示 yes/no,主机密钥信息检查,输入yes后存放到~/.ssh/known_hosts
解决思路:临时取消即可,连接的时候不检查主机信息
-o StrictHostKeyChecking=no 临时不检查主机信息.
#不加-o参数时

[root@m01 ~]# ssh-copy-id -i .ssh/id_rsa.pub 10.0.0.31

/usr/bin/ssh-copy-id: INFO: Source of key(s) to be installed: ".ssh/id_rsa.pub"

The authenticity of host '10.0.0.31 (10.0.0.31)' can't be established.

ECDSA key fingerprint is SHA256:fVjvhVF2qU+PCOqsrVTrbxa/aNB4dzNmGRJTw1iIZ1s.

ECDSA key fingerprint is MD5:0f:00:32:1c:41:31:af:a2:f5:e8:64:40:2c:cf:98:98.

Are you sure you want to continue connecting (yes/no)? ^C

#加上-o参数时

[root@m01 ~]# ssh-copy-id -oStrictHostKeyChecking=no -i .ssh/id_rsa.pub 10.0.0.31

/usr/bin/ssh-copy-id: INFO: Source of key(s) to be installed: ".ssh/id_rsa.pub"

/usr/bin/ssh-copy-id: INFO: attempting to log in with the new key(s), to filter out any that are already installed

/usr/bin/ssh-copy-id: INFO: 1 key(s) remain to be installed -- if you are prompted now it is to install the new keys

root@10.0.0.31's password:

Number of key(s) added: 1

Now try logging into the machine, with:   "ssh -o 'StrictHostKeyChecking=no' '10.0.0.31'"

and check to make sure that only the key(s) you wanted were added.
3.自动化分发公钥(解决密码问题)
#安装sshpass

[root@m01 ~]# yum -y install sshpass

#基本使用

#-p指定密码

#需要回车输入密码

[root@m01 ~]# ssh 172.16.1.7 hostname

root@172.16.1.7's password:

web01

#使用sshpass不需要输入密码

[root@m01 ~]# sshpass -p1 ssh 172.16.1.7 hostname

web01

#使用sshpass 与ssh-copy-id分发公钥

[root@m01 ~]# sshpass -p1 ssh-copy-id 172.16.1.7

/usr/bin/ssh-copy-id: INFO: Source of key(s) to be installed: "/root/.ssh/id_rsa.pub"

/usr/bin/ssh-copy-id: INFO: attempting to log in with the new key(s), to filter out any that are already installed

/usr/bin/ssh-copy-id: INFO: 1 key(s) remain to be installed -- if you are prompted now it is to install the new keys

Number of key(s) added: 1

Now try logging into the machine, with:   "ssh '172.16.1.7'"

and check to make sure that only the key(s) you wanted were added.

[root@m01 ~]# ssh 172.16.1.7 hostname

web01
温馨提示:
sshpass 与 ssh-copy-id 的时候,如果第一次连接的时候,提示yes/no,sshpass就失效了
解决方法:
[root@m01 ~]# sshpass -p1 ssh-copy-id -i ~/.ssh/id_rsa.pub -oStrictHostKeyChecking=no  10.0.0.41

/usr/bin/ssh-copy-id: INFO: Source of key(s) to be installed: "/root/.ssh/id_rsa.pub"

/usr/bin/ssh-copy-id: INFO: attempting to log in with the new key(s), to filter out any that are already installed

/usr/bin/ssh-copy-id: INFO: 1 key(s) remain to be installed -- if you are prompted now it is to install the new keys

Number of key(s) added: 1

Now try logging into the machine, with:   "ssh -o 'StrictHostKeyChecking=no' '10.0.0.41'"

and check to make sure that only the key(s) you wanted were added.
补充:
sshpass 适用于ssh相关的命令提供密码:ssh,scp,ssh-copy-id
expect 是一门语言,用于实现非交互式判断,认证相关操作
五、自动化创建与分发脚本
#自动化分发脚本

#!/bin/bash

#author: wh

#desc: 一键创建秘钥对 分发秘钥对

#1.vars

pass=1

ips="172.16.1.7 172.16.1.31 172.16.1.41 172.16.1.8"

. /etc/init.d/functions

#2.创建秘钥对

if [ -f ~/.ssh/id_rsa ] ;then

   echo "已经创建过秘钥对"

else

   echo "正在创建秘钥对...."

   ssh-keygen -t rsa  -f  ~/.ssh/id_rsa   -P ''  &>/dev/null

   if [ $? -eq 0 ];then

       action "密钥创建成功" /bin/true

   else

       action "密钥创建失败" /bin/false

   fi

fi

#3.通过循环发送公钥

for ip  in  $ips

do

   sshpass -p${pass} ssh-copy-id -i ~/.ssh/id_rsa.pub -oStrictHostKeyChecking=no  $ip &>/dev/null

   if [ $? -eq 0 ];then

       action "$ip 公钥分发 成功" /bin/true

   else

       action "$ip 公钥分发 失败" /bin/false

   fi

done

[root@m01 ~]# sh fenfa.sh

正在创建秘钥对....

密钥创建成功                                               [  OK  ]

172.16.1.7 公钥分发 成功                                   [  OK  ]

172.16.1.31 公钥分发 成功                                  [  OK  ]

172.16.1.41 公钥分发 成功                                  [  OK  ]

172.16.1.8 公钥分发 失败                                   [FAILED]

#自动化检查脚本

[root@m01 ~]# cat check.sh

#!/bin/bash

# author: wh

# desc: 批量在所有机器上执行命令

for   ip  in  172.16.1.7 172.16.1.31 172.16.1.41 172.16.1.8

do

    ssh  $ip   hostname

done

[root@m01 ~]# sh check.sh

web01

nfs

backup

ssh: connect to host 172.16.1.8 port 22: No route to host
Linux密钥认证的更多相关文章
- Linux密钥认证错误解决
问题描述: Xshell用key认证登录,提示所选的用户密钥未在远程主机上注册 问题解决: 查看日志/var/log/secure,基本上都是用户根目录的权限问题 根据日志提示: Authentica ...
- 使用XShell工具密钥认证登录Linux系统
如果你是一名Linux运维,那么Linux服务器的系统安全问题,可能是你要考虑的,而系统登录方式有两种,密码和密钥.哪一种更加安全呢? 无疑是后者! 这里我为大家分享用Xshell利器使用密钥的方式登 ...
- Linux之SSH密钥认证
1.SSH协议的认识 SSH 为 Secure Shell 的缩写,由 IETF 的网络小组(Network Working Group)所制定:SSH 为建立在应用层基础上的安全协议.SSH 是目前 ...
- 使用密钥认证机制远程登录Linux
密钥认证机制 创建存放key的文件 1)创建目录 /root/.ssh 并设置权限 [root@localhost ~]# mkdir /root/.ssh mkdir 命令用来创建目录,以后会详细介 ...
- Linux学习总结(三)之 putty,xshell远程连接及密钥认证篇
一:putty 下载 1:认准两个地方 a. Download putty b. chiark greenend 2:下载32位的zip包,这是一个工具包合集,不单是一个终端工具 二:putty设置 ...
- 如何在 Linux 中配置基于密钥认证的 SSH
什么是基于 SSH 密钥的认证? 众所周知,Secure Shell,又称 SSH,是允许你通过无安全网络(例如 Internet)和远程系统之间安全访问/通信的加密网络协议.无论何时使用 SSH 在 ...
- putty,xshell以及密钥认证:linux学习第二篇
1. Putty下载 官网:https://www.chiark.greenend.org 下载putty的zip包 2. Putty使用 2000为可查看的文件行数,建议设置为2000 ...
- Linux之sshkey密钥认证实战
在实际的生产环境中,经常会用到sshkey密钥认证实行数据分发数据等操作,还可以批量操作内网服务器,实行免密认证进行推送分发数据. 1.环境查看 分发服务器 节点服务器 2.服务器添加系统账号 3.生 ...
- 安全终端模拟工具Xshell 5使用密钥认证登录配置详细教程
▲版权声明:本文为博主原创文章,未经博主允许不得转载. Xshell支持SSH1 / SSH2协议,密码和DSA / RSA公钥用户认证方式等各种安全功能,并对各种加密算法进行加密.使用内置的Xshe ...
- 使用Putty和Xshell远程登录之密钥认证
本次实验主要使用目前使用最多的Putty和Xshell工具进行实验 关于SSH密钥认证原理,请参考链接:http://www.cnblogs.com/ImJerryChan/p/6661815.htm ...
随机推荐
- 自动化运维?看看Python怎样完成自动任务调度⛵
作者:韩信子@ShowMeAI Python3◉技能提升系列:https://www.showmeai.tech/tutorials/56 本文地址:https://www.showmeai.tech ...
- ios手机键盘拉起之后页面不会回退的问题
在input输入框输入内容之后,点击完成,键盘下去了,可是页面没有回退回去,也就是页面会空出浏览器高度那一块,这个问题发现于ios手机中的微信浏览器.解决方案如下 <input type=&qu ...
- 【Java并发006】使用层面:Lock锁机制全解析
一.前言 二.synchronized局限性 + Lock锁机制的引入 2.1 synchronized局限性 第一,使用synchronized,其他线程只能等待直到持有锁的线程执行完释放锁(syn ...
- 【CDH数仓】Day02:业务数仓搭建、Kerberos安全认证+Sentry权限管理、集群性能测试及资源管理、邮件报警、数据备份、节点添加删除、CDH的卸载
五.业务数仓搭建 1.业务数据生成 建库建表gmall 需求:生成日期2019年2月10日数据.订单1000个.用户200个.商品sku300个.删除原始数据. CALL init_data('201 ...
- Kubernetes-基于容器云构建devops平台
1.基于kubernetes devops的整体方案 本文以Kubernetes为基础,为基于java语言研发团队提供一套完整的devops解决方案.在此方案中,开发人员基于eclipse集成开发环境 ...
- Qt栅格布局、ScrollArea和用户选择界面
用户选择界面 就我们在实际开发的时候可能需要面对这样一个界面 做个demo试试看 其实我们可以分解一下这个界面 就是除了控制相关的内容,最主要的就是这个界面之上,有一个个动态的输入的控件,上面都是学生 ...
- Mac系统下word论文参考文献更新域
写论文的时候可能会遇到后续要增加文献的情况 在参考文献增加后会发现文章中的交叉引用的序号并没有更新 下面分享两种情况的处理方法 一.更新全部域 首先确认自己的打印️项是选中的 2. 打开word偏好 ...
- What's new in Dubbo 3.1.4 and 3.2.0-beta.3
在 12 月 22 日,Dubbo 3.1.4 和 3.2.0-beta.3 正式通过投票发布.本文将介绍发布的变化一览. Dubbo 3.1.4 版本是目前 Dubbo 3 的最新稳定版本,我们建议 ...
- 正则爬取豆瓣Top250数据存储到CSV文件(6行代码)
利用正则爬取豆瓣TOP250电影信息 电影名字 电影年份 电影评分 评论人数 import requests import csv import re # 不算导包的话正式代码6行 存储到csv文件 ...
- ubuntu系统wireshark源码编译与安装
官网:https://www.wireshark.org/ 官方文档:Wireshark · Documentation 一 介绍 wireshark[1]是一款抓包工具.wireshark的GUI( ...