TensorFlow车辆检测
1、先在UIUC Image Database for Car Detection下载训练数据集。
下载地址:http://cogcomp.org/Data/Car/
下载解压之后文件目录如图所示,这里我们所需的是TrainImages这个文件夹和TestImages文件夹。

2、输入是一幅40*100*1的灰度图片,采用的是CNN网络,经过多次卷积和池化之后得到1*1*1的结果,各层参数如下所示。
我的文件目录组织结构:

    -CarDetect

          --CarDetect.py

          --datas

              ---CarData

          --models
input : [None, 40, 100, 1]

conv-pool1 :

    f : 5*5

    strides : 1

    nc : 6

    padding : VALID

    maxpool : 2

conv-pool2:

    f : 5*5

    strides : 1

    nc : 16

    padding : VALID

    maxpool : 2

conv3:

    f : 5*5

    strides : 1

    nc : 32

    padding : VALID

conv4:

    f : 3*18

    strides : 1

    nc : 64

    padding : VALID

conv5:

    f : 1*1

    strides : 1

    nc : 1

    padding : VALID

output : [None, 1, 1, 1]
import tensorflow as tf
import numpy as np
import matplotlib.pyplot as plt #定义加载数据的函数,注意训练数据的存储位置
def load_carDats():
import cv2
import os
file_path = './datas/CarData/TrainImages/'
files = os.listdir(file_path)
samples = []
for file_name in files:
data = cv2.imread(file_path + file_name, 0).reshape(-1) / 255
label = 0 if file_name.split('-')[0] == 'neg' else 1
samples.append((data, label))
return samples
#加载数据
datas = load_carDats()
#随机打乱数据
np.random.shuffle(datas)
#划分数据,xs、ys 用来训练网络,x_test、y_test 用来测试网络训练效果
xs = [i[0] for i in datas[:1000]]
ys = np.reshape([i[1] for i in datas[:1000]], newshape=(-1,1))
x_test = [i[0] for i in datas[1000:]]
y_test = np.reshape([i[1] for i in datas[1000:]], newshape=(-1,1)) #----------------定义网络中频繁使用的函数,将其重构-----------------#
#权重变量
def weight_variables(shape):
weights = tf.truncated_normal(shape, stddev=0.1, dtype=tf.float32)
return tf.Variable(weights) #偏置变量
def biase_variables(shape):
biases = tf.constant(value=1.0, shape=shape)
return tf.Variable(biases) #卷积
def conv2d(x, W):
'''计算卷积,x为输入层(shape=[-1,width,height,channel]),
W为f*f的共享权重矩阵shape=[f,f,in_layers_num, out_layers_num],
水平和垂直方向上的步长都为1'''
return tf.nn.conv2d(x, W, strides=[1,1,1,1], padding="VALID") #最大值池化
def max_pooling(x):
'''计算最大值混合,x为输入层(一般是卷积结果)shape=[-1,width,height,channels]
ksize为混合pooling的核大小2*2,水平和垂直方向上的步长都为2'''
return tf.nn.max_pool(x, ksize=[1,2,2,1], strides=[1,2,2,1], padding="VALID") #---------------------网络前向传播部分------------------#
def deepnn(x, keep_prop):
'''定义深层卷积网络,包含了两个卷积-混合层和三个卷积层'''
#step1:将原始一维得得数据转换成2维, 第一个表示样本数,第二三个是行列,最后一个是通道数
# x = tf.reshape(x, shape=[-1, 40, 100, 1])
#step2:定义第一的卷积-混合层
with tf.name_scope("conv-pooling1"):
W_conv1 = weight_variables([5,5,1,6])
b_conv1 = biase_variables([6])
ret_conv1 = tf.nn.relu(conv2d(x,W_conv1) + b_conv1) #计算卷积,并使用修正单元对卷积结果进一步处理
ret_pooling1 = max_pooling(ret_conv1) #执行混合操作 #step3:定义第二个卷积-混合层
with tf.name_scope("conv-pooling2"):
W_conv2 = weight_variables([5,5,6,16])
b_conv2 = biase_variables([16])
ret_conv2 = tf.nn.relu(conv2d(ret_pooling1, W_conv2) + b_conv2)
ret_pooling2 = max_pooling(ret_conv2) #step4:定义第三个卷积层
with tf.name_scope("conv-pooling3"):
W_conv3 = weight_variables([5,5,16,32])
b_conv3 = biase_variables([32])
ret_conv3 = tf.nn.relu(conv2d(ret_pooling2, W_conv3) + b_conv3) #step5:定义第四个卷积层
with tf.name_scope("conv4"):
W_conv4 = weight_variables([3,18,32,64])
b_conv4 = biase_variables([64])
ret_conv4 = tf.nn.relu(conv2d(ret_conv3, W_conv4) + b_conv4) #step6:定义第五个卷积层
with tf.name_scope("conv5"):
W_conv5 = weight_variables([1,1,64,1])
b_conv5 = biase_variables([1])
ret_conv5 = conv2d(ret_conv4, W_conv5) + b_conv5 return ret_conv5 #---------------------训练网络前的准备-----------------------#
#申明输入数据和标签的占位符
x = tf.placeholder(dtype=tf.float32, shape=[None,None, None, 1], name="x-input")
labels = tf.placeholder(dtype=tf.float32, shape=[None, 1], name="y-output") #申明弃权的占位符
keep_prop = tf.placeholder(dtype=tf.float32, name="kprob") #创建分类模型
ret = deepnn(x, keep_prop)
#此时的返回值是 -1*1*1*1的, 为了得到方便运算的结果,这里将reshape
y = tf.reshape(ret, shape=[-1,1]) #定义损失函数
with tf.name_scope("loss_function"):
loss = tf.nn.sigmoid_cross_entropy_with_logits(logits=y, labels=labels)
cost = tf.reduce_mean(loss)
#定义训练模型(优化模型)
with tf.name_scope("optimizor"):
train = tf.train.AdamOptimizer(0.0005).minimize(cost) #定义验证模型精度的方法
with tf.name_scope("accuracy"):
y_hat = tf.nn.sigmoid(y)
accuracy_rate = tf.abs(y_hat - labels) < 0.5
accuracy_rate = tf.cast(accuracy_rate, dtype=tf.float32)
accuracy = tf.reduce_mean(accuracy_rate) #--------------开始训练网络,并将训练结果保存到文件中---------------#
saver = tf.train.Saver()
sess = tf.Session()
sess.run(tf.global_variables_initializer()) #初始化变量 for i in range(10):
skip = 10
for k in range(0,1000,skip):
x_train = np.reshape(xs[k:k+skip], newshape=(-1, 40, 100, 1))
sess.run(train, feed_dict={x:x_train, labels:ys[k:k+skip], keep_prop:0.5}) # 训练模型
# if (i+1) % 10 == 0:
train_accuracy = sess.run(accuracy, feed_dict = {x: np.reshape(xs, (-1,40,100,1)), labels: ys, keep_prop:1.0})
print('step %d, train accuracy %g' % (i, train_accuracy))
saver.save(sess, "./models/carDetect_model.ckpt", global_step=i) 这是我的训练结果:
step 0, train accuracy 0.859
step 1, train accuracy 0.934
step 2, train accuracy 0.965
step 3, train accuracy 0.971
step 4, train accuracy 0.985
step 5, train accuracy 0.991
step 6, train accuracy 0.995
step 7, train accuracy 0.994
step 8, train accuracy 0.995
step 9, train accuracy 0.997 #--------------------------开始在新图片中检测-------------------#
import cv2
#导入图片
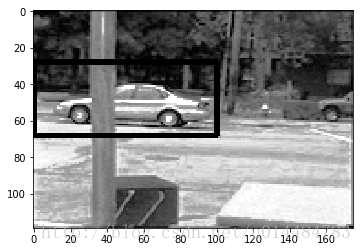
pic = cv2.imread("../../datas/CarData/TestImages/test-100.pgm", 0)
size = pic.shape img = np.reshape(pic, (-1,size[0], size[1], 1))
#利用上面训练好的网络,开始在新的图片中检测
result = sess.run(ret, feed_dict={x:img}) #将检测结果显示
pt1 = np.array([result.argmax()//result.shape[2], result.argmax()%result.shape[2]]) * 4
pt2 = pt1 + np.array([40, 100]) pic_2 = cv2.rectangle(pic, (pt1[1], pt1[0]), (pt2[1], pt2[0]), 0, 2) plt.imshow(pic_2, "gray")
plt.show()
3、结果
源码获取方式,关注公总号RaoRao1994,查看往期精彩-所有文章,即可获取资源下载链接

更多资源获取,请关注公总号RaoRao1994
TensorFlow车辆检测的更多相关文章
- 学习笔记TF052:卷积网络,神经网络发展,AlexNet的TensorFlow实现
卷积神经网络(convolutional neural network,CNN),权值共享(weight sharing)网络结构降低模型复杂度,减少权值数量,是语音分析.图像识别热点.无须人工特征提 ...
- Linux服务器配置GPU版本的pytorch Torchvision TensorFlow
最近在Linux服务器上配置项目,项目需要使用GPU版本的pytorch和TensorFlow,而且该项目内会同时使用TensorFlow的GPU和CPU. 在服务器上装环境,如果重新开始,就需要下载 ...
- 盘它!基于CANN的辅助驾驶AI实战案例,轻松搞定车辆检测和车距计算!
摘要:基于昇腾AI异构计算架构CANN(Compute Architecture for Neural Networks)的简易版辅助驾驶AI应用,具备车辆检测.车距计算等基本功能,作为辅助驾驶入门级 ...
- 基于OpenCV的车辆检测与追踪的实现
最近老师布置了一个作业,是做一个基于视频的车辆检测与追踪,用了大概两周的时间做了一个简单的,效果不是很理想,但抑制不住想把自己的一些认识写下来,这里就把一些网络上的博客整理一下分享给大家,希望帮助到大 ...
- Tensorflow 官方版教程中文版
2015年11月9日,Google发布人工智能系统TensorFlow并宣布开源,同日,极客学院组织在线TensorFlow中文文档翻译.一个月后,30章文档全部翻译校对完成,上线并提供电子书下载,该 ...
- tensorflow学习笔记二:入门基础
TensorFlow用张量这种数据结构来表示所有的数据.用一阶张量来表示向量,如:v = [1.2, 2.3, 3.5] ,如二阶张量表示矩阵,如:m = [[1, 2, 3], [4, 5, 6], ...
- 用Tensorflow让神经网络自动创造音乐
#————————————————————————本文禁止转载,禁止用于各类讲座及ppt中,违者必究————————————————————————# 前几天看到一个有意思的分享,大意是讲如何用Ten ...
- tensorflow 一些好的blog链接和tensorflow gpu版本安装
pading :SAME,VALID 区别 http://blog.csdn.net/mao_xiao_feng/article/details/53444333 tensorflow实现的各种算法 ...
- tensorflow中的基本概念
本文是在阅读官方文档后的一些个人理解. 官方文档地址:https://www.tensorflow.org/versions/r0.12/get_started/basic_usage.html#ba ...
随机推荐
- List转Datable(需区分对象充当List成员和数组充当List成员两种情况)
对象充当List成员时: /// <summary> /// 将泛类型集合List类转换成DataTable /// </summary> /// <param name ...
- CreateMutex实现只能打开一个客户端
#include "stdafx.h" #include <Windows.h> #include <iostream> using namespace s ...
- 10-28SQLserver基础--数据库管理器(基础操作)
C#基础--数据库(用来存储大量的数据) 操作数据库文件唯一途径 SQL server,结构化查询语言简称SQL. Analysis services:分析挖掘数据 Reporting service ...
- DAY13-前端之jQuery
jQuery jQuery介绍 jQuery是一个轻量级的.兼容多浏览器的JavaScript库. jQuery使用户能够更方便地处理HTML Document.Events.实现动画效果.方便地进行 ...
- DAY10-MYSQL库操作
一 系统数据库 information_schema: 虚拟库,不占用磁盘空间,存储的是数据库启动后的一些参数,如用户表信息.列信息.权限信息.字符信息等performance_schema: MyS ...
- [poj1509]Glass Beads(最小表示法)
题目大意:求循环同构的字符串的最小字典序. 解题关键:最小表示法模板题. #include<cstdio> #include<cstring> #include<algo ...
- 利用powerdesigner创建表模型后导出sql语句方法,以及报错 Generation aborted due to errors detected during the verification of the model.的解决办法
今天用powerdesigner建了表模型,下面先说一下导出sql语句的步骤. 1.选项 2. 然后就报错了,下面说解决办法,很简单. 你没看错,把模型检查的√去掉就行了~~ 导出表名不带双引号的设置 ...
- Codeforces #499 Div2 E (1010C) Border
一直第9个样例WA,发现事情没有这么简单的时候只剩20分钟了...... 看了一些大神提交的代码,发现还能这么玩..... 这个题目可以转化成这个问题:给一堆[0,m)之间的数,可以随意组合成新的数( ...
- ROS探索总结(四)——简单的机器人仿真
前边我们已经介绍了ROS的基本情况,以及新手入门ROS的初级教程,现在就要真正的使用ROS进入机器人世界了.接下来我们涉及到的很多例程都是<ROS by Example>这本书的内容,我是 ...
- 面试题:hibernate 第二天 快照 session oid 有用
## Hibernate第二天 ## ### 回顾与反馈 ### Hibernate第一天 1)一种思想 : ORM OM(数据库表与实体类之间的映射) RM 2)一个项目 : CRM 客户关系管理系 ...