Netty学习笔记(二)——netty组件及其用法
1、Netty是 一个异步事件驱动的网络应用程序框架,用于快速开发可维护的高性能协议服务器和客户端。

原生NIO存在的问题
1) NIO的类库和API繁杂,使用麻烦:需要熟练掌握Selector、ServerSocketChannel、SocketChannel、ByteBuffer等。
2)需要具备其他的额外技能:要熟悉Java 多线程编程,因为NIO编程涉及到Reactor 模式,你必须对多线程和网络编程非常熟悉,才能编写出高质量的NIO程序。
3)开发工作量和难度都非常大:例如客户端面临断连重连、网络闪断、半包读写、失败缓存、网络拥塞和异常流的处理等等。
4) JDKNIO 的Bug:例如臭名昭著的Epoll Bug,它会导致Selector 空轮询,最终导致CPU 100%。直到JDK 1.7
Netty 的优点
Netty对JDK自带的NIO的API进行了封装,解决了,上述问题。
1) 设计优雅:适用于各种传输类型的统- - API阻塞和非阻塞Socket; 基于灵活且可扩展的事件模型,可以清晰地分离关注点:高度可定制的线程模型-单线程,- -个或多个线程池.
2)使用 方便:详细记录的Javadoc, 用户指南和示例;没有其他依赖项,JDK5 (Netty3.x) 或6 (Netty4.x)就足够了。
3)高性能、 吞吐量更高:延迟更低;减少资源消耗;最小化不必要的内存复制。
4) 安全:完整的SSL/TLS 和StartTLS 支持。
2、线程模型:
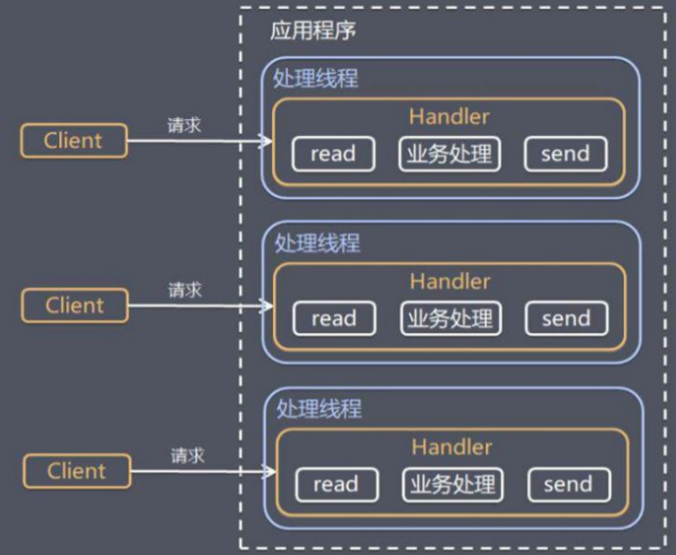
传统阻塞I/O 服务模型
模型特点:1.阻塞io模式获取数据 2每个连接都需要独立的线程去处理业务。
优缺点:
优点:编程简单
缺点:1) 当并发数很大,就会创建大量的线程,占用很大系统资源
2)连接创建后, 如果当前线程暂时没有数据可读,该线程会阻塞在read操作,造成线程资源浪费
Reactor模式
模型特点:
1)基于I/O 复用模型:多个连接共用一个阻塞对象,应用程序只需要在一个阻塞对象等待,无需阻塞等待所有连
接。当某个连接有新的数据可以处理时,操作系统通知应用程序,线程从阻塞状态返回,开始进行业务处理
Reactor对应的叫法:1.反应器模式2.分发者模式(Dispatcher) 3.通知者模式(notifier)
2)基于线程池复用线程资源:不必再为每个连接创建线程,将连接完成后的业务处理任务分配给线程进行处理,
一个线程可以处理多个连接的业务。

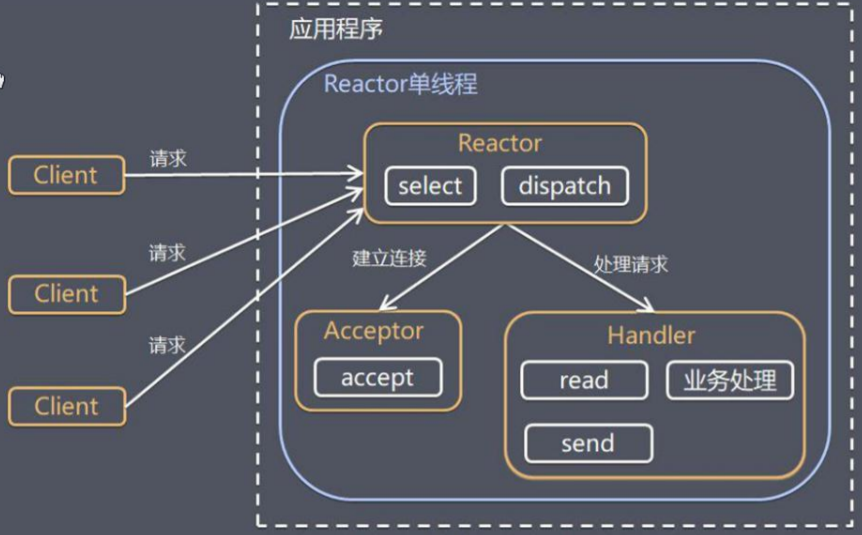
1》:单Reactor 单线程;在学习笔记(一)中的群聊天程序就是该种模式。
方案流程:
1) Select 是前面I/O 复用模型介绍的标准网络编程API,可以实现应用程序通过一个阻塞对象监听多路连接请求
2)Reactor对象通过Select监控客户端请求事件,收到事件后通过Dispatch进行分发
3)如果是建立连接请求事件,则由Acceptor 通过Accept处理连接请求,然后创建一个Handler 对象处理连接完成后的后续业务处理
4)如果不是建立连接事件, 则Reactor 会分发调用连接对应的Handler 来响应
5)Handler会完成Read-→业务处理-+Send的完整业务流程
优缺点:
1) 优点:模型简单,没有多线程、进程通信、竞争的问题,全部都在-一个线程中完成
2)缺点: 性能问题,只有-一个线程,无法完全发挥多核CPU的性能。Handler 在处理某个连接上的业务时,整个进程无法处理其他连接事件,很容易导致性能瓶颈
3)缺点: 可靠性问题,线程意外终止,或者进入死循环,会导致整个系统通信模块不可用,不能接收和处理外部消息,造成节点故障
4)使用场景: 客户端的数量有限,业务处理非常快速,比如Redis 在业务处理的时间复杂度0(1) 的情况
2》:单Reactor 多线程;
方案流程:
1) Reactor对象通过select 监控客户端请求事件,收到事件后,通过dispatch进行分发
2)如 果建立连接请求,则右Acceptor通过accept处理连接请求,然后创建一个Handler对象处理完成连接后的各种事件
3)如果不 是连接请求,则由reactor分发调用连接对应的handler来处理
4) handler 只负责响应事件,不做具体的业务处理,通过read读取数据后,会分发给后面的worker线程池的某个线程处理业务
5) worker 线程池会分配独立线程完成真正的业务,并将结果返回给handler
6) handler 收到响应后,通过send将结果返回给client
优缺点:
1)优点:可以充分的利用多核cpu的处理能力
2)缺点:多线程数据共享和访问比较复杂,reactor处理所有的事件的监听和响应,在单线程运行,在高并发场景容易出现性能瓶颈.

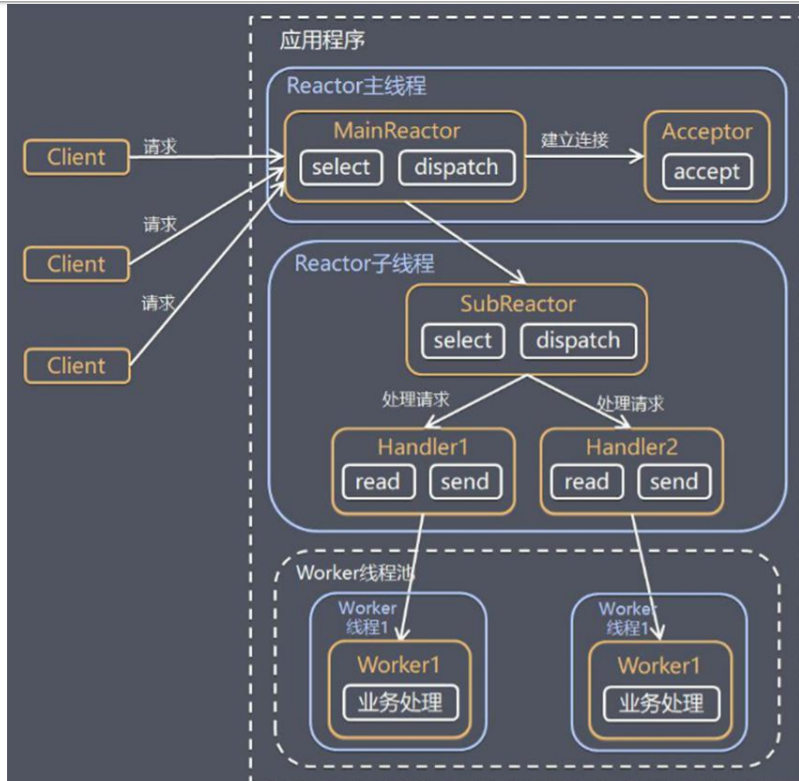
3》:主从Reactor 多线程
方案流程:
1) Reactor主线程MainReactor 对象通过select 监听连接事件,收到事件后,通过Acceptor 处理连接事件
2)当 Acceptor 处理连接 事件后,MainReactor 将连接分配给SubReactor
3)subreactor将连接加入到连接队列进行监听,并创建handler进行各种事件处理
4)当有 新事件发生时,subreactor 就会调用对应的handler处理
5) handler通过read 读取数据,分发给后面的worker 线程处理
6) worker 线程池分配独立的worker线程进行业务处理,并返回结果
7) handler 收到响应的结果后,再通过send将结果返回给client
8) Reactor 主线程可以对应多个Reactor子线程,即MainRecator可以关联多个SubReactor
优缺点:
1)优点:父线程与子线程的数据交互简单职责明确,父线程只需要接收新连接,子线程完成后续的业务处理。
2)优点: 父线程与子线程的数据交互简单,Reactor 主线程只需要把新连接传给子线程,子线程无需返回数据。
3)缺点: 编程复杂度较高
4)结合实例: 这种模型在许多项目中广泛使用,包括Nginx 主从Reactor 多进程模型,Memcached主从多线程,Netty主从多线程模型的支持
线程模型理解:
1) 单Reactor 单线程,前台接待员和服务员是同一个人,全程为顾客服.
2)单 Reactor 多线程,1个前台接待员,多个服务员,接待员只负责接待
3) 主从Reactor 多线程,多个前台接待员,多个服务生
Rector模型优点:
1)响应快,不必为单个同步时间所阻塞,虽然Reactor本身依然是同步的
2)可以最大程度的避免复杂的多线程及同步问题,并且避免了多线程/进程的切换开销
3)扩 展性好,可以方便的通过增加Reactor 实例个数来充分利用CPU资源
4)复用性好, Reactor 模型本身与具体事件处理逻辑无关,具有很高的复用性
3、Netty 线程模式(Netty主要基于主从Reactor 多线程模型做了一定的改进,其中主从Reactor 多线程模型有多个Reactor)
方案流程:
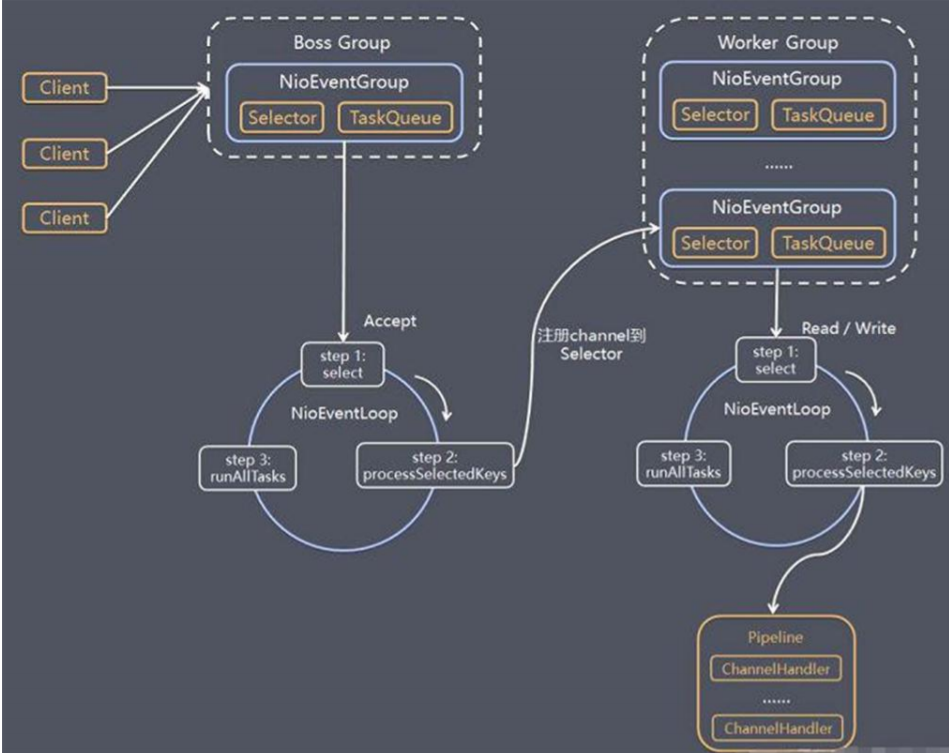
1) Netty 抽象出两组线程池BossGroup 专门负责接收客户端的连接, WorkerGroup专门负责网络的读写
2) BossGroup 和WorkerGroup 类型都是NioEventLoopGroup
3) NioEventLoopGroup 相当于-一个事件循环组,这个组中含有多个事件循环,每一个事件循环是NioEventLoop
4) NioEventLoop表示-一个不断循环的执行处理任务的线程, 每个NioEventLoop 都有-一个selector, 用于监听绑定在其上的socket的网络通讯
5) NioEventI oopGroup可以有多个线程,即可以含有多个NioEventLoop
6)每个 Boss NioEventLoop循环执行的步骤有3步
●轮询 accept事件
- 处理accept事件,与client建立连接,生成 NioScocketChannel,并将其注册到某个worker NIOEventLoop.上的selector
●处理任务队列的任务 ,即runAllTasks
7)每个Worker NIOEventLoop循环执行的步骤
处理任务队列的任务,即 runAllTasks
8)每个Worker NIOEventLoop处理 业务时,会使用pipeline(管道),pipeline 中包含了channel ,即通过pipeline
demo:服务端
- package nettyNio;
- import io.netty.bootstrap.Bootstrap;
- import io.netty.bootstrap.ServerBootstrap;
- import io.netty.channel.ChannelFuture;
- import io.netty.channel.ChannelInitializer;
- import io.netty.channel.ChannelOption;
- import io.netty.channel.EventLoopGroup;
- import io.netty.channel.nio.NioEventLoopGroup;
- import io.netty.channel.socket.SocketChannel;
- import io.netty.channel.socket.nio.NioServerSocketChannel;
- public class NettyNioServer {
- public static void main(String[] args) throws Exception {
- /**
- *创建两个线程组bossGroup和workGroup,bossGroup负责处理请求连接,workGroup负责数据的处理
- *两个都是无线循环
- *调用可构造方法,默认的字线程数NioEventLoopGroup是实际cpu核数*2
- */
- EventLoopGroup bossGroup = new NioEventLoopGroup(1);
- EventLoopGroup workGroup = new NioEventLoopGroup();
- try{
- //创建启动器
- ServerBootstrap bootstrap = new ServerBootstrap();
- bootstrap.group(bossGroup,workGroup)//设置两个线程组
- .channel(NioServerSocketChannel.class)//使用NioServerSocketChannel作为服务器的通道实现
- .option(ChannelOption.SO_BACKLOG,128)//设置线程队列得到的连接数
- .childOption(ChannelOption.SO_KEEPALIVE,true)//设置保持活动的连接状态
- .childHandler(new ChannelInitializer<SocketChannel>() {//创建一个通道测试对象
- //给pipeline设置处理器
- @Override
- protected void initChannel(SocketChannel ch) throws Exception {
- ch.pipeline().addLast(new NettyHandelServer());//调用处理器
- }
- });
- //启动服务器并绑定端口,绑定端口并同步,创建一个ChannelFuture对象
- ChannelFuture channelFuture = bootstrap.bind(7777).sync();
- System.out.println("服务器启动");
- //对关闭通道进行监听
- channelFuture.channel().closeFuture().sync();
- }catch (Exception e){
- e.printStackTrace();
- }finally {
- bossGroup.shutdownGracefully();
- workGroup.shutdownGracefully();
- }
- }
- }
服务端handler:NettyHandelServer
- package nettyNio;
- import io.netty.buffer.ByteBuf;
- import io.netty.buffer.Unpooled;
- import io.netty.channel.Channel;
- import io.netty.channel.ChannelHandlerContext;
- import io.netty.channel.ChannelInboundHandlerAdapter;
- import io.netty.channel.ChannelPipeline;
- import io.netty.util.CharsetUtil;
- public class NettyHandelServer extends ChannelInboundHandlerAdapter {
- /**
- * @param ctx 上下文对象,含有管道pipeline,通道channel,地址
- * @param msg 就是客户端发送的数据默认Object
- * @throws Exception
- */
- @Override
- public void channelRead(ChannelHandlerContext ctx, Object msg) throws Exception {
- System.out.println("ctx。。。"+ctx);
- System.out.println("当前线程"+Thread.currentThread().getName());
- Channel channel = ctx.channel();
- ChannelPipeline pipeline = ctx.pipeline();
- ByteBuf byteBuf = (ByteBuf)msg;
- System.out.println("读取的客户端数据。。。"+byteBuf.toString(CharsetUtil.UTF_8));
- System.out.println("客户端地址。。。"+channel.remoteAddress());
- }
- /**
- * 读取数据完毕
- * @param ctx
- * @throws Exception
- */
- @Override
- public void channelReadComplete(ChannelHandlerContext ctx) throws Exception {
- //把数据写入缓存并刷新
- ctx.writeAndFlush(Unpooled.copiedBuffer("hello",CharsetUtil.UTF_8));
- }
- /**
- * 处理异常一般是关闭通道
- * @param ctx
- * @param cause
- * @throws Exception
- */
- @Override
- public void exceptionCaught(ChannelHandlerContext ctx, Throwable cause) throws Exception {
- ctx.close();
- }
- }
ctx对象:该对象可以得到handel和pipeline

channel:
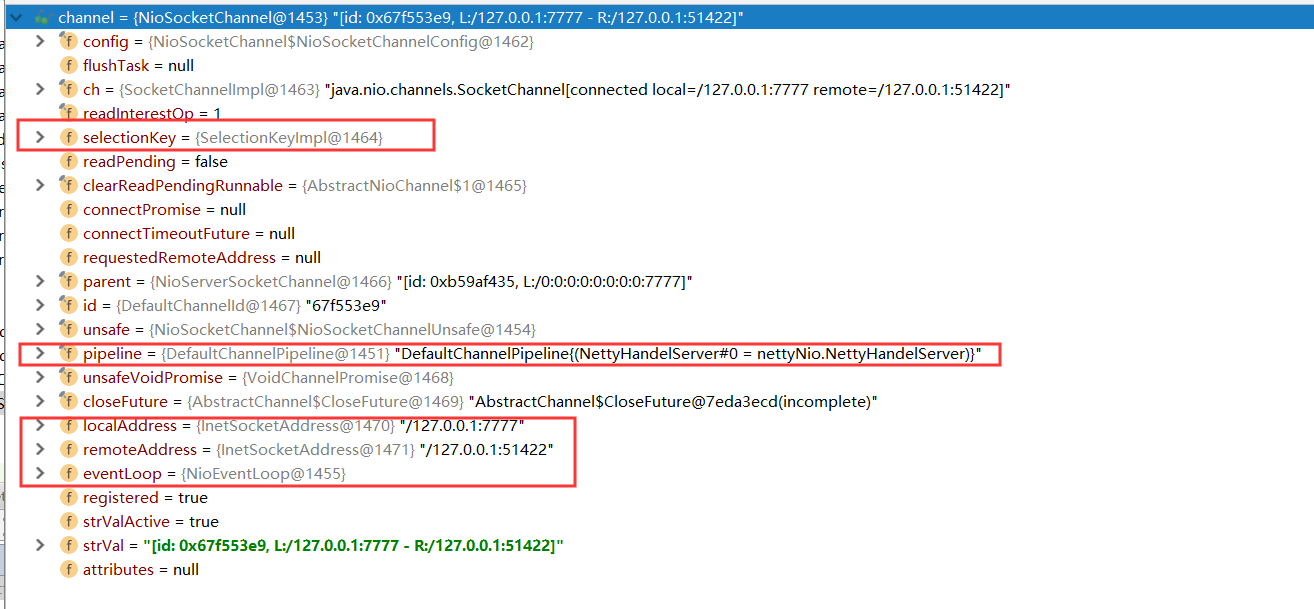
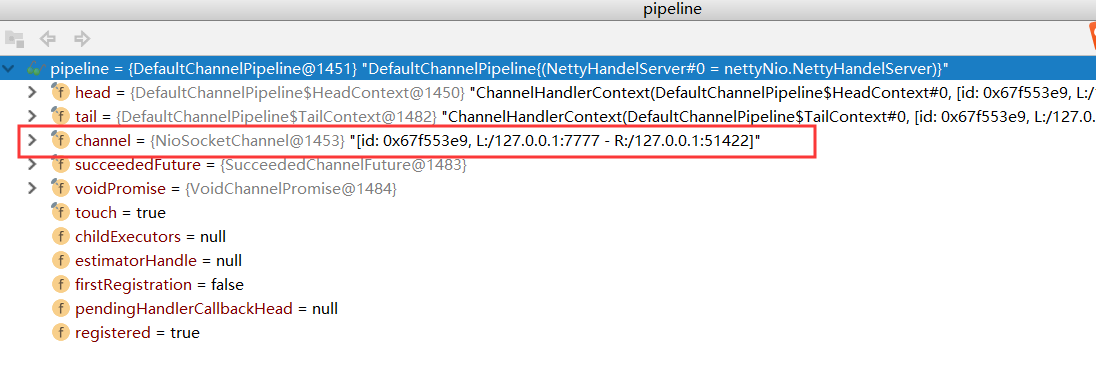
pipeline:
客户端:
- package nettyNio;
- import io.netty.bootstrap.Bootstrap;
- import io.netty.channel.ChannelFuture;
- import io.netty.channel.ChannelInitializer;
- import io.netty.channel.ChannelOption;
- import io.netty.channel.EventLoopGroup;
- import io.netty.channel.nio.NioEventLoopGroup;
- import io.netty.channel.socket.SocketChannel;
- import io.netty.channel.socket.nio.NioSocketChannel;
- public class NettyNioClient {
- public static void main(String[] args) {
- //创建group
- EventLoopGroup group = new NioEventLoopGroup();
- try{
- //创建客户端启动对象,这里不是ServerBootStrap
- Bootstrap bootstrap = new Bootstrap();
- //设置相关参数
- bootstrap.group(group)//
- .channel(NioSocketChannel.class)//设置客户端的实现类
- .handler(new ChannelInitializer<SocketChannel>() {
- @Override
- protected void initChannel(SocketChannel ch) throws Exception {
- ch.pipeline().addLast(new NettyHandelClient());
- }
- });
- System.out.println("客户端启动");
- //连接服务器
- ChannelFuture channelFuture = bootstrap.connect("127.0.0.1", 7777).sync();
- //给关闭通道监听
- channelFuture.channel().closeFuture().sync();
- }catch (Exception e){
- e.printStackTrace();
- }finally {
- group.shutdownGracefully();
- }
- }
- }
客户端handler:NettyHandelClient
- package nettyNio;
- import io.netty.buffer.ByteBuf;
- import io.netty.buffer.Unpooled;
- import io.netty.channel.ChannelHandlerContext;
- import io.netty.channel.ChannelInboundHandlerAdapter;
- import io.netty.util.CharsetUtil;
- public class NettyHandelClient extends ChannelInboundHandlerAdapter{
- /**
- * 当通道有读取事件就会触发
- * @param ctx
- * @throws Exception
- */
- @Override
- public void channelActive(ChannelHandlerContext ctx) throws Exception {
- System.out.println("client....ctx ...."+ctx);
- //向客户端发送数据
- ctx.writeAndFlush(Unpooled.copiedBuffer("hello, server ", CharsetUtil.UTF_8));
- }
- /**
- * 读取服务端发送的信息
- * @param ctx
- * @param msg
- * @throws Exception
- */
- @Override
- public void channelRead(ChannelHandlerContext ctx, Object msg) throws Exception {
- ByteBuf byteBuf = (ByteBuf) msg;
- System.out.println("从服务端获取的数据..."+byteBuf.toString(CharsetUtil.UTF_8));
- System.out.println("服务端的地址"+ctx.channel().remoteAddress());
- }
- @Override
- public void exceptionCaught(ChannelHandlerContext ctx, Throwable cause) throws Exception {
- ctx.close();
- }
- }
5、任务队列:
1)用户程序自定义的普通任务
2)用户自定 义定时任务
3) 非当前Reactor 线程调用Channel 的各种方法
demo:在上面的demo中,我们服务端的handel读取数据时,我们使用任务来做。
用户自定义的普通任务:
- ctx.channel().eventLoop().execute(new Runnable() {
- @Override
- public void run() {
- try{
- Thread.sleep(5000);
- ctx.writeAndFlush(Unpooled.copiedBuffer("hello 任务1",CharsetUtil.UTF_8));
- System.out.println("当前任务队列。。"+ctx.channel().hashCode());
- }catch (Exception e){
- e.printStackTrace();
- }
- }
- });
提交到定时任务:
- ctx.channel().eventLoop().schedule(new Runnable() {
- @Override
- public void run() {
- try{
- Thread.sleep(10000);
- ctx.writeAndFlush(Unpooled.copiedBuffer("hello 任务2",CharsetUtil.UTF_8));
- System.out.println("当前任务队列。。"+ctx.channel().hashCode());
- }catch (Exception e){
- e.printStackTrace();
- }
- }
- },5, TimeUnit.SECONDS);
小结:
1) Netty 抽象出两组线程池,BossGroup 专门负责接收客户端连接,WorkerGroup 专门负责网络读写操作。
2) NioEventLoop 表示一个 不断循环执行处理任务的线程,每个NioEventLoop 都有一个selector, 用于监听绑定在其_上的socket网络通道。
3) NioEventLoop 内部采用串行化设计,从消息的读取->解码->处理->编码~>发送,始终由I0线程NioEventLoop负责
NioEventLoopGroup 下 包含多个NioEventLoop
1>每个NioEventLoop 中包含有- -一个Selector, - 一个taskQueue
2>每个NioEventLoop 的Selector 上可以注册监听多个NioChannel
3>每个NioChannel只会绑定在唯- - 的NioEventLoop 上
4>每个NioChannel 都绑定有-一个自己的ChannelPipeline
6、异步模型:
1)异步的概念和同步相对。当一个异步过程调用发出后,调用者不能立刻得到结果。实际处理这个调用的组件在
完成后,通过状态、通知和回调来通知调用者。
2) Netty 中的I/O操作是异步的,包括Bind、 Write、 Connect 等操作会简单的返回一个ChannelFuture。
3)调用 者并不能立刻获得结果,而是通过Future-Listener 机制,用户可以方便的主动获取或者通过通知机制获得I0操作结果
4) Netty 的异步模型是建立在future 和callback 的之上的。callback 就是回调。重点说Future, 它的核心思想是:假设一个方法fun,
计算过程可能非常耗时,等待fun 返回显然不合适。那么可以在调用fun 的时候,立马返回一个Future,
后续可以通过Future 去监控方法fun 的处理过程(即: Future-Listener 机制)
Futher:
1)表示异步的执行结果,可以通过它提供的方法来检测执行是否完成,比如检索计算等等.
马返回一个Future, 后续可以通过Future 去监控方法fun 的处理过程(即: Future-Listener 机制)
2) ChannelFuture 是-一个接口: public interface ChannelFuture extends Future <Void>
我们可以添加监听器,当监听的事件发生时,就会通知到监听器.
在上面的demo中,我们在服务器启动的时候来去检测服务器是否启动成功
- //启动服务器并绑定端口,绑定端口并同步,创建一个ChannelFuture对象
- ChannelFuture channelFuture = bootstrap.bind(7777).sync();
- //加监听器
- channelFuture.addListener((future)->{
- if(channelFuture.isSuccess()){
- System.out.println("服务器启动成功");
- }else{
- System.out.println("服务器启动失败");
- }
- });
futher-listener机制:
1)当Future对象刚刚创建时,处于非完成状态,调用者可以通过返回的ChannelFuture来获取操作执行的状态,
注册监听函数来执行完成后的操作。
2)常见有如下操作
1》通过isDone方法来判断当前操作是否完成;
2》通过isSuccess方法来判断已完成的当前操作是否成功;
3》通过getCause方法来获取已完成的当前操作失败的原因;
4》通过isCancelled方法来判断已完成的当前操作是否被取消;
5》通过addListener 方法来注册监听器,当操作已完成(isDone 方法返回完成),将会通知指定的监听器;如果Future对象已完成,则通知指定的监听器
Http服务:
demo:服务端
- public class NettyHttpServer {
- public static void main(String[] args) throws InterruptedException {
- EventLoopGroup bossGroup = new NioEventLoopGroup(1);
- EventLoopGroup workGroup = new NioEventLoopGroup();
- try{
- ServerBootstrap serverBootstrap = new ServerBootstrap();
- serverBootstrap.group(bossGroup,workGroup).channel(NioServerSocketChannel.class).childHandler(new MyHttpIniliza());
- ChannelFuture channelFuture = serverBootstrap.bind(5577).sync();
- channelFuture.addListener(new ChannelFutureListener() {
- @Override
- public void operationComplete(ChannelFuture future) throws Exception {
- if(future.isSuccess()){
- System.out.println("服务器启动成功");
- }else{
- System.out.println("服务器1启动失败");
- }
- }
- });
- channelFuture.channel().closeFuture().sync();
- }finally {
- bossGroup.shutdownGracefully();
- workGroup.shutdownGracefully();
- }
- }
- }
- public class MyHttpIniliza extends ChannelInitializer<SocketChannel> {
- @Override
- protected void initChannel(SocketChannel ch) throws Exception {
- //得到管道
- ChannelPipeline pipeline = ch.pipeline();
- //加入一个netty提供的httpServerCodec codec =>[coder - decoder]
- //HttpServerCodec说明
- //1. HttpServerCodec是netty提供的处理http的编-解码器
- pipeline.addLast("HttpServerCodec",new HttpServerCodec());
- //增加自定义handler
- pipeline.addLast(new MyhttpHandler());
- }
- }
- public class MyhttpHandler extends SimpleChannelInboundHandler<HttpObject> {
- /**
- * 读取客户端数据
- * @param ctx
- * @param msg
- * @throws Exception
- */
- @Override
- protected void channelRead0(ChannelHandlerContext ctx, HttpObject msg) throws Exception {
- //判断是否是HttpRequest请求
- if(msg instanceof HttpRequest){
- //获取到msg
- HttpRequest httpRequest = (HttpRequest) msg;
- System.out.println(ctx.channel().remoteAddress());
- /* //过滤内容
- String uri = httpRequest.uri();
- Uri uri1 = new Uri(uri);
- if("".equals(uri1.getPath())){
- //不响应
- System.out.println("该信息不处理。。。");
- return;
- }*/
- //回应浏览器信息
- ByteBuf content = Unpooled.copiedBuffer("hello,浏览器", CharsetUtil.UTF_8);
- //构建http响应信息,httpResponse
- FullHttpResponse httpResponse = new DefaultFullHttpResponse(HttpVersion.HTTP_1_1,HttpResponseStatus.OK, content);
- httpResponse.headers().set(HttpHeaderNames.CONTENT_TYPE,"text/plain");
- httpResponse.headers().set(HttpHeaderNames.CONTENT_LENGTH,content.readableBytes());
- //将构建号的HttpResponse返回
- ctx.writeAndFlush(httpResponse);
- }
- }
- }
7、Netty核心组件:
1 、Bootstrap、 ServerBootstrap
Bootstrap 意思是引导,- -个Netty 应用通常由- 一个Bootstrap 开始,主要作用是配置整个Netty 程序,
串联各个组件,Netty 中Bootstrap 类是客户端程序的启动引导类,ServerBootstrap 是服务端启动引导类
- public ServerBootstrap group(EventI oopGroup parentGroup, EventL oopGroup childGroup),该方法用于服务器端,用来设置两个EventLoop
- public B group(EventLoopGroup group),该方法用于客户端,用来设置- - 个EventLoop
- public B channe(Class<? extends C> channelClass),该方法用来设置- -个服务器端的通道实现
- public <T> B option(ChannelOption<T> option, T value),用来给ServerChannel 添加配置
- public <T> ServerBootstrap childOption(ChannelOption<T> childOption, T value),用来给接收到的通道添加配置
- public ServerBootstrap childHandler(ChannelHandler childHandler),该方法用来设置业务处理类(自定义的handler)
- public ChannelFuture bind(int inetPort),该方法用于服务器端,用来设置占用的端口号
- public ChannelFuture connect(String inetHost, int inetPort),该方法用于客户端,用来连接服务器端
2、Future、 ChannelFuture
Netty中所有的I0操作都是异步的,不能立刻得知消息是否被正确处理。但是可以过--会等它执行完成或
者直接注册一个监听,具体的实现就是通过Future 和ChannelFutures,他们可以注册一个监听, 当操作执行成功
或失败时监听会自动触发注册的监听事件
常见的方法有
- Channel channel),返回当前正在进行I0操作的通道
- ChannelFuture sync(),等待异步操作执行完毕
3、Channel
1) Netty 网络通信的组件,能够用于执行网络I/O 操作。
2)通过Channel可获得当前网络连接的通道的状态
3)通过Channel可获得网络连接的配置参数( 例如接收缓冲区大小)
4) Channel 提供异步的网络I/O 操作(如建立连接,读写,绑定端口),异步调用意味着任何I/O 调用都将立即返.
回,并且不保证在调用结束时所请求的I/O 操作已完成
5)调用立即返回一个ChannelFuture 实例,通过注册监听器到ChannelFuture.上, 可以I/O操作成功、失败或取消时回调通知调用方
6)支持关联I/O操作与对应的处理程序
7)不同协议、 不同的阻塞类型的连接都有不同的Channel 类型与之对应,常用的Channel 类型:
- NioSocketChannel,异步的客户端TCP Socket连接。
- NioServerSocketChannel,异步的服务器端TCP Socket连接。
- NioDatagramChannel,异步的UDP连接。
- NioSctpChannel,异步的客户端Sctp 连接。
- NioSctpServerChannel,异步的Sctp 服务器端连接,这些通道涵盖了UDP和TCP网络I0以及文件I0。
4、Selector
1) Netty 基于Selector 对象实现I/O 多路复用,通过Selector 一个线程可以监听多个连接的Channel 事件。
2)当向-一个Selector中注册Channel后,Selector内部的机制就可以自动不断地查询(Select)这些注册的
Channel是否有已就绪的I/O 事件(例如可读,可写,网络连接完成等),这样程序就可以很简单地使用一个
线程高效地管理多个Channel
5、ChannelHandler 及其实现类
1) ChannelHandler 是-一个接口,处理I/O 事件或拦截I/0 操作,并将其转发到其ChannelPipeline( 业务处理链)中的下一个处理程序。
2) ChannelHandler 本身并没有提供很多方法,因为这个接口有许多的方法需要实现,方便使用期间,可以继承它的子类
3) ChannelHandler 及其实现类一览图(后)
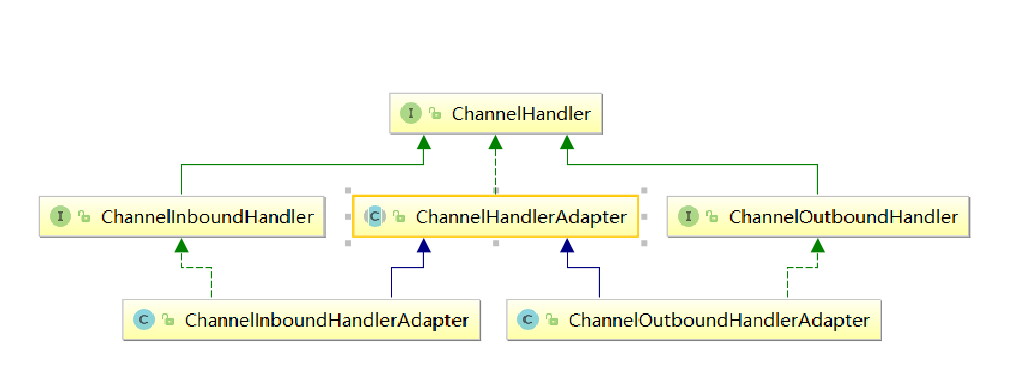
- ChannellinboundHandler 用于处理入站1/0事件。
- ChannelOutboundHandler 用于处理出站I/0操作。
//适配器- ChannellnboundHandlerAdapter用于处理入站I/O事件。
- ChannelOutboundHandlerAdapter用于处理出站I/0操作。
- ChannelDuplexHandler 用于处理入站和出站事件。
4)我们经常需要自定义 -一个Handler 类去继承ChannelInboundHandlerAdapter, 然后通过重写相应方法实现业务逻辑,我们接下来看看一-般都需要重写哪些方法
- public class ChannelInboundHandlerAdapter extends ChannelHandlerAdapter implements ChannelInboundHandler {
- //通道从他的事件循环中注册
- @Override
- public void channelRegistered(ChannelHandlerContext ctx) throws Exception {
- ctx.fireChannelRegistered();
- }
- //通道从它的事件循环注销
- @Override
- public void channelUnregistered(ChannelHandlerContext ctx) throws Exception {
- ctx.fireChannelUnregistered();
- }
- //通道就绪
- @Override
- public void channelActive(ChannelHandlerContext ctx) throws Exception {
- ctx.fireChannelActive();
- }
- //没有就绪
- @Override
- public void channelInactive(ChannelHandlerContext ctx) throws Exception {
- ctx.fireChannelInactive();
- }
- //读取数据
- @Override
- public void channelRead(ChannelHandlerContext ctx, Object msg) throws Exception {
- ctx.fireChannelRead(msg);
- }
- //数据读完之后
- @Override
- public void channelReadComplete(ChannelHandlerContext ctx) throws Exception {
- ctx.fireChannelReadComplete();
- }
- //用户事件触发
- @Override
- public void userEventTriggered(ChannelHandlerContext ctx, Object evt) throws Exception {
- ctx.fireUserEventTriggered(evt);
- }
- //通道可写状态改变
- @Override
- public void channelWritabilityChanged(ChannelHandlerContext ctx) throws Exception {
- ctx.fireChannelWritabilityChanged();
- }
- //异常捕捉
- @Override
- public void exceptionCaught(ChannelHandlerContext ctx, Throwable cause)
- throws Exception {
- ctx.fireExceptionCaught(cause);
- }
- }
6、 Pipeline 和ChannelPipeline
ChannelPipeline是-一个重点:
l) ChannelPipeline 是一个Handler 的集合,它负责处理和拦截inbound 或者outbound 的事件和操作,相当于
一个贯穿 Netty的链。(也可以这样理解: ChannelPipeline 是保存ChannelHandlerContext 的List, 用于处理或拦截Channel的入站事件和出站操作)
2) ChannelPipeline 实现了一种高级形式的拦截过滤器模式,使用户可以完全控制事件的处理方式,以及Channel中各个的ChannelHandler 如何相互交互
3) 在Netty 中每个Channel 都有且仅有一 -个ChannelPipeline 与之对应,它们的组成关系如下
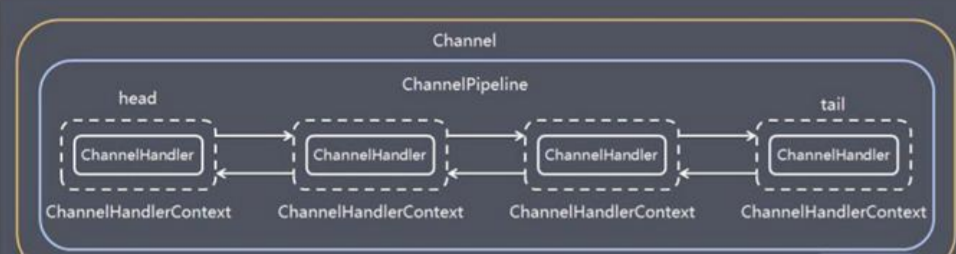
-一个Channel包含了一个ChannelPipeline,而ChannelPipeline中又维护了一个 由ChannelHandlerContex组成的双向链表,并且每个ChannelHandlerContext中又关联着-一个 ChannelHandler;
入站事件和出站事件在-一个双向链表中,入站事件会从链表head往后传递到最后一个入站的handler,出站事件会从链表tail往前传递到最前一一个出站的handler,两种类型的handler互不干扰
我们来·debug来看看在ChannelPipeine是不是一个链表结果?链表的储存对象?
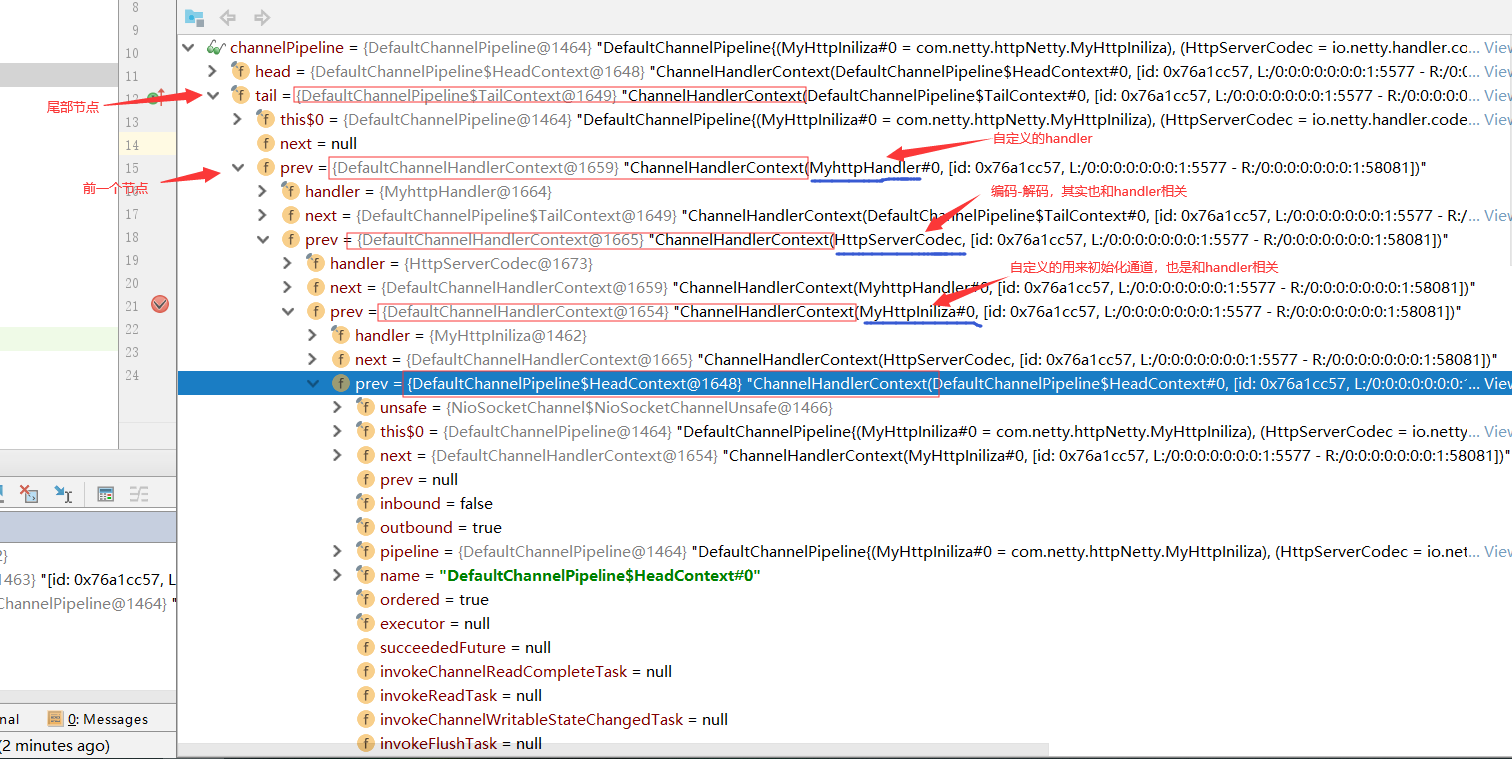
- HttpServerCodec它继承了CombinedChannelDuplexHandler,所以是和handler相关的
- public final class HttpServerCodec extends CombinedChannelDuplexHandler<HttpRequestDecoder, HttpResponseEncoder>
- implements HttpServerUpgradeHandler.SourceCodec {
- 自定义的MyHttpIniliza 继承了ChannelInitializer,ChannelInitializer继承了ChannelInboundHandlerAdapter ,
- ChannelInboundHandlerAdapter实现了ChannelInboundHandler,所以是和handler相关的
- public class MyHttpIniliza extends ChannelInitializer<SocketChannel> {
- @Sharable
- public abstract class ChannelInitializer<C extends Channel> extends ChannelInboundHandlerAdapter {
- public class ChannelInboundHandlerAdapter extends ChannelHandlerAdapter implements ChannelInboundHandler {
4)常用方法
- ChannelPipeline addFirst(ChanelHander.. handlers), 把-个业务处理类( handler)添加到链中的第一个位置
- ChannelPipeline addL ast(ChannelHandler.. handlers),把- 个业务处理类( handler)添加到链中的最后一个位置
7、ChannelHandlerContext
1) 保存Channel 相关的所有上下文信息,同时关联 一个ChannelHandler对象
2)即ChannelHandlerContext中包含一个具体的事件处理器ChannelHandler,同时
ChannelHandlerContext中也绑定了对应的pipeline 和Channel 的信息,方便对ChannelHandler进行调用.
3)常用方法
- ChannelFuture close(),关闭通道
- ChannelOutboundInvoker flush(),刷新
- ChanelFuture writeAndFlush(Object msg),将数据写到ChannelPipeline中当前
- ChannelHandler的下-一个ChannelHandler开始处理( 出站)
8、ChannelOption
1) Netty 在创建Channel 实例后,一 般都需要设置ChannelOption 参数。
2) ChannelOption 参数如下:
- ChannelOption.SO_BACKLOG:对应TCP/IP协议listen函数中的backlog参数,用来初始化服务器可连接队列大小。服
- 务端处理客户端连接请求是顺序处理的,所以同一时间只能处理一个客户端连接。多个客户端来的时候,
- 服务端将不能处理的客户端连接请求放在队列中等待处理,backlog 参数指定了队列的大小。
- ChannelOption.SO_KEEPALIVE: 一直保持连接活动状态
9、EventLoopGroup 和其实现类NioEventI oopGroup
1) EventLoopGroup 是- -组EventLoop 的抽象, Netty为了更好的利用多核CPU资源,- -般会有多个EventLoop同时工作,每个EventLoop 维护着一一个Selector 实例。
2)EventLoopGroup提供next 接口,可以从组里面按照- - 定规则获取其中-一个EventLoop 来处理任务。在Netty服务器端编程中,
我们一般都需要提供两个EventLoopGroup ,例如: BossEventLoopGroup 和WorkerEventL oopGroup。
3)通常--个服务端口即-一个ServerSocketChannel对应一个Selector和--个EventIoop线程。BossEventLoop负责
接收客户端的连接并将SocketChannel 交给WorkerEvent[ oopGroup来进行I0处理,如下图所示
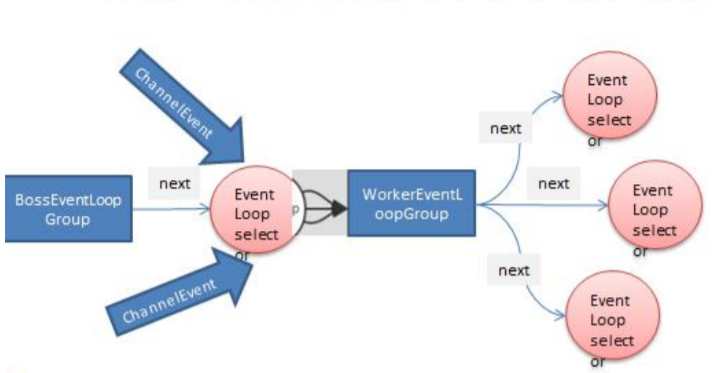
1》BossEventLoopGroup通常是一个 单线程的EventLoop, EventLoop 维护着一个注册了ServerSocketChannel的Selector实例BossEventLoop不断轮询Selector将连接事件分离出来
2》通常是OP_ ACCEPT事件,然后将接收到的SocketChannel交给WorkerEventLoopGroup
3》WorkerEventLoopGroup会由next选择其中一个EventLoop来将这个SocketChannel注册到其维护的Selector并对其后续的I0事件进行处理
相关方法:
- public NioEventI oopGroup(),构造方法
- public Future<?> shutdownGracefully(),断开连接,关闭线程
10、Unpooled类
1) Netty 提供一个专门用来操作缓冲区(即Netty的数据容器)的工具类
2)常用 方法如下所示
//通过给定的数据和字符编码返回一个ByteBuf 对象(类似于NIO中的ByteBuffer但有区别)
public static ByteBuf copiedBuffer(CharSequence string, Charset charset)
demo:来说明ByteBuf相关方法:
- public class NttyBuf {
- public static void main(String[] args) {
- /* //1.创建对象,该对象包含一个数组arr,是一个byte[10]
- //2.在netty的buffer中,不需要使用flip进行反转,底层维护了readerindex 和writerIndex
- //3.通过readerindex 和writerIndex和capacity, 将 buffer分成三个区域
- // 0--readerindex已经读取的区域 , readerindex--writerIndex,可读的区域 ,writerIndex - capacity,可写的区域
- ByteBuf buffer = Unpooled.buffer(10);*/
- //还可以通过Unpooled.copiedBuffer,指定字节编码
- ByteBuf byteBuf = Unpooled.copiedBuffer("hello,world", CharsetUtil.UTF_8);
- if (byteBuf.hasArray()) {
- //得到字节数组
- byte[] array = byteBuf.array();
- System.out.println("得到的数据:"+new String(array,CharsetUtil.UTF_8));
- //字节偏移
- int i = byteBuf.arrayOffset();
- System.out.println("字节偏移》》"+i);
- //获取当前readerIndex
- int readerIndex = byteBuf.readerIndex();
- System.out.println("获取当前readerIndex》》"+readerIndex);
- //获取当前readerIndex,不会+1
- int readerIndex2 = byteBuf.readerIndex();
- System.out.println("获取当前readerIndex2》》"+readerIndex2);
- //获取当前的writerIndex
- int writerIndex = byteBuf.writerIndex();
- System.out.println("获取当前的writerIndex》》"+writerIndex);
- //得到当前可读取的容量
- int capacity = byteBuf.capacity();
- System.out.println("得到当前可读取的容量》》"+capacity);
- //读取字节,并且readerIndex+1
- System.out.println("读取字节,并且readerIndex+1》》"+byteBuf.readByte());
- //字节偏移
- int i2 = byteBuf.arrayOffset();
- System.out.println("字节偏移2》》"+i2);
- //获取当前readerIndex
- int readerIndex3 = byteBuf.readerIndex();
- System.out.println("获取当前readerIndex2》》"+readerIndex3);
- //获取readIndex = 1的字节,不会readerIndex+1
- System.out.println("获取readIndex = 1的字节,不会readerIndex+1》》"+byteBuf.getByte(1));
- int capacity2 = byteBuf.capacity();
- System.out.println("得到当前可读取的容量2》》"+capacity2);
- //可读取的字节数
- int readableBytes = byteBuf.readableBytes();
- System.out.println("可读取的字节数》》"+readableBytes);
- //获取readerIndex为3,长度为7,按照utf-8的格式读取字节
- System.out.println("获取readerIndex为3,长度为7,按照utf-8的格式读取字节》》"+byteBuf.getCharSequence(3,7,CharsetUtil.UTF_8));
- }
- }
- }
结果:
- 得到的数据:hello,world
- 字节偏移》》0
- 获取当前readerIndex》》0
- 获取当前readerIndex2》》0
- 获取当前的writerIndex》》11
- 得到当前可读取的容量》》33
- 读取字节,并且readerIndex+1》》104
- 字节偏移2》》0
- 获取当前readerIndex2》》1
- 获取readIndex = 1的字节,不会readerIndex+1》》101
- 得到当前可读取的容量2》》33
- 可读取的字节数》》10
- 获取readerIndex为3,长度为7,按照utf-8的格式读取字节》》lo,worl
Netty群聊程序:
服务端:
- public class NettyGroupChatServer {
- //端口
- private int port;
- /**
- * 初始化
- * @param port
- */
- public NettyGroupChatServer(int port){
- this.port = port;
- }
- /**
- * 启动服务器
- */
- public void run() {
- EventLoopGroup bossGroup = new NioEventLoopGroup(1);
- EventLoopGroup workGroup = new NioEventLoopGroup();
- ServerBootstrap serverBootstrap = new ServerBootstrap();
- serverBootstrap.group(bossGroup,workGroup)
- .channel(NioServerSocketChannel.class)
- .option(ChannelOption.SO_BACKLOG,128)
- .childOption(ChannelOption.SO_KEEPALIVE,true)
- .childHandler(new ChannelInitializer<SocketChannel>() {
- @Override
- protected void initChannel(SocketChannel ch) throws Exception {
- ChannelPipeline pipeline = ch.pipeline();
- pipeline.addLast("stringEncoder",new StringEncoder());
- pipeline.addLast("stringDecoder",new StringDecoder());
- pipeline.addLast(new MyNettyServerHander());
- }
- });
- try {
- ChannelFuture channelFuture = serverBootstrap.bind(port).sync();
- channelFuture.addListener((sc)->{
- if(sc.isSuccess()){
- System.out.println("netty服务器启动成功");
- }else{
- System.out.println("netty服务器启动失败");
- }
- });
- channelFuture.channel().closeFuture().sync();
- } catch (InterruptedException e) {
- e.printStackTrace();
- }finally {
- bossGroup.shutdownGracefully();
- workGroup.shutdownGracefully();
- }
- }
- public static void main(String[] args) {
- new NettyGroupChatServer(7777).run();
- }
- }
服务端handler:MyNettyServerHander
- public class MyNettyServerHander extends SimpleChannelInboundHandler<String>{
- private static ChannelGroup channelGroup = new DefaultChannelGroup(GlobalEventExecutor.INSTANCE);
- /**
- * 连接建立
- * @param ctx
- * @throws Exception
- */
- @Override
- public void handlerAdded(ChannelHandlerContext ctx) throws Exception {
- Channel channel = ctx.channel();
- channelGroup.writeAndFlush("客户端"+channel.remoteAddress()+"加入聊天\n");
- channelGroup.add(channel);
- }
- /**
- * 失去连接
- * @param ctx
- * @throws Exception
- */
- @Override
- public void handlerRemoved(ChannelHandlerContext ctx) throws Exception {
- Channel channel = ctx.channel();
- channelGroup.writeAndFlush("客户端"+channel.remoteAddress()+"离开了\n");
- }
- /**
- * 通道就绪状态 表示上线
- * @param ctx
- * @throws Exception
- */
- @Override
- public void channelActive(ChannelHandlerContext ctx) throws Exception {
- ChannelPipeline channelPipeline = ctx.pipeline();
- System.out.println("客户端"+channelPipeline.channel().remoteAddress()+"上线了\n");
- }
- /**
- * 通道没有就绪,表示离线
- * @param ctx
- * @throws Exception
- */
- @Override
- public void channelInactive(ChannelHandlerContext ctx) throws Exception {
- ChannelPipeline channelPipeline = ctx.pipeline();
- System.out.println("客户端"+channelPipeline.channel().remoteAddress()+"离线了\n");
- }
- /**
- * 读取数据
- * @param ctx
- * @param msg
- * @throws Exception
- */
- @Override
- protected void channelRead0(ChannelHandlerContext ctx, String msg) throws Exception {
- Channel channel = ctx.channel();
- channelGroup.forEach(channel1 -> {
- if(channel1 == channel){
- channel.writeAndFlush("客户端"+channel1.remoteAddress()+"(自己)说:"+msg);
- }else {
- channel1.writeAndFlush("客户端"+channel1.remoteAddress()+"说:"+msg);
- }
- });
- }
- /**
- * 捕捉异常
- * @param ctx
- * @param cause
- * @throws Exception
- */
- @Override
- public void exceptionCaught(ChannelHandlerContext ctx, Throwable cause) throws Exception {
- System.out.println("出现异常。。。。");
- }
- }
客户端:
- import java.util.Scanner;
- public class NettyGroupChatClient {
- private String host;
- private int port;
- public NettyGroupChatClient(String host,int port){
- this.host = host;
- this.port = port;
- }
- public void run(){
- EventLoopGroup group = new NioEventLoopGroup();
- Bootstrap bootstrap = new Bootstrap();
- bootstrap.group(group)
- .channel(NioSocketChannel.class)
- .handler(new ChannelInitializer<SocketChannel>() {
- @Override
- protected void initChannel(SocketChannel ch) throws Exception {
- ChannelPipeline channelPipeline = ch.pipeline();
- channelPipeline.addLast("decoder",new StringDecoder());
- channelPipeline.addLast("encoder",new StringEncoder());
- channelPipeline.addLast(new MyNettyClentHanlder());
- }
- });
- try {
- ChannelFuture channelFuture = bootstrap.connect(host,port).sync();
- Channel channel = channelFuture.channel();
- Scanner scanner = new Scanner(System.in);
- while (scanner.hasNextLine()){
- String line = scanner.nextLine();
- channel.writeAndFlush(line+"\n");
- }
- } catch (InterruptedException e) {
- e.printStackTrace();
- }finally {
- group.shutdownGracefully();
- }
- }
- public static void main(String[] args) {
- new NettyGroupChatClient("127.0.0.1",7777).run();
- }
- }
客户端handler:MyNettyClentHanlder
- public class MyNettyClentHanlder extends SimpleChannelInboundHandler<String> {
- @Override
- protected void channelRead0(ChannelHandlerContext ctx, String msg) throws Exception {
- System.out.println(msg.trim());
- }
- }
8、心跳检测:用来检测客户端的状态
demo:
- public class NettyHeartBeat {
- public static void main(String[] args) {
- EventLoopGroup bossGroup = new NioEventLoopGroup(1);
- EventLoopGroup workGroup = new NioEventLoopGroup();
- ServerBootstrap serverBootstrap = new ServerBootstrap();
- serverBootstrap.group(bossGroup,workGroup)
- .channel(NioServerSocketChannel.class)
- .childOption(ChannelOption.SO_BACKLOG,128)
- .option(ChannelOption.SO_KEEPALIVE,true)
//指定日志等级- .handler(new LoggingHandler(LogEevel.INFO))
- .childHandler(new ChannelInitializer<SocketChannel>() {
- @Override
- protected void initChannel(SocketChannel ch) throws Exception {
- ChannelPipeline channelPipeline = ch.pipeline();
- /**
- * 加入-一个netty提供IdleStateHandler说明.
- * 1. IdleStateHandler是netty提供的处理空闲状态的处理器
- * 2. long readerIdleTime:表示多长时间没有读,就会发送-一个心跳检测包检测是否连接
- * 3. long writerIdleTime:表示多长时间没有写,就会发送- -个心跳检测包检测是否连接
- * 4. long alldleTimne:表示多长时间没有读写,就会发送一个心跳检测包检测是否连接
- *
- * triggers an {@link IdleStateEvent} when a {@link Channel} has not performed
- * * read, write, or both operation for a while.
- * 当IdleStateEvent 触发后,就会传递给管道的下一个handler去处理
- * 通过调用(触发)下一个handler的userEventTiggered(所以我们需要在自定义的handler中重写该方法) ,
- * 在该方法中去处理IdleStateEvent(空闲,写空闲,读写空闲)
- */
- channelPipeline.addLast(new IdleStateHandler(3,5,7, TimeUnit.SECONDS));
//给空闲检测加上自定义的handler- channelPipeline.addLast(new MyheartbeatHandler());
- }
- });
- try {
- ChannelFuture channelFuture = serverBootstrap.bind(7777).sync();
- channelFuture.addListener((ch)->{
- if(ch.isSuccess()){
- System.out.println("服务器启动成功");
- }else{
- System.out.println("服务器启动失败");
- }
- });
- channelFuture.channel().closeFuture().sync();
- } catch (InterruptedException e) {
- e.printStackTrace();
- }finally {
- bossGroup.shutdownGracefully();
- workGroup.shutdownGracefully();
- }
- }
- }
- //指定日志等级
.handler(new LoggingHandler(LogEevel.INFO))- channelPipeline.addLast(new IdleStateHandler(3,5,7, TimeUnit.SECONDS));
/**
* 加入-一个netty提供IdleStateHandler说明.
* 1. IdleStateHandler是netty提供的处理空闲状态的处理器
* 2. long readerIdleTime:表示多长时间没有读,就会发送-一个心跳检测包检测是否连接
* 3. long writerIdleTime:表示多长时间没有写,就会发送- -个心跳检测包检测是否连接
* 4. long alldleTimne:表示多长时间没有读写,就会发送一个心跳检测包检测是否连接
*
* triggers an {@link IdleStateEvent} when a {@link Channel} has not performed
* * read, write, or both operation for a while.
* 当IdleStateEvent 触发后,就会传递给管道的下一个handler去处理
* 通过调用(触发)下一个handler的userEventTiggered(所以我们需要在自定义的handler中重写该方法) ,
* 在该方法中去处理IdleStateEvent(空闲,写空闲,读写空闲)
*/
自定义handler:MyheartbeatHandler
- public class MyheartbeatHandler extends ChannelInboundHandlerAdapter {
- /**
- *
- * @param ctx 上下文
- * @param evt 触发的事件
- * @throws Exception
- */
- @Override
- public void userEventTriggered(ChannelHandlerContext ctx, Object evt) throws Exception {
- //先判断是否是IdleStateEvent事件
- if(evt instanceof IdleStateEvent){
- IdleStateEvent idleStateEvent = (IdleStateEvent)evt;
- String eventType = "";
- switch (idleStateEvent.state()){
- case READER_IDLE:
- eventType = "读空闲";
- break;
- case WRITER_IDLE:
- eventType = "写空闲";
- break;
- case ALL_IDLE:
- eventType = "读写都空闲";
- break;
- }
- System.out.println("连接状态。。。"+eventType);
- }
- }
- }
- idleStateEvent.state():返回一个枚举状态:
- public enum IdleState {
- /**
- * No data was received for a while.
- */
- READER_IDLE,
- /**
- * No data was sent for a while.
- */
- WRITER_IDLE,
- /**
- * No data was either received or sent for a while.
- */
- ALL_IDLE
- }
9、编码器和handler调用机制:
1》netty的组件设计:Netty的主要组件有Channel、EventLoop、ChannelFuture、ChannelHandler、ChannelPipe等
2》ChannelHandler充当了处理入站和出站数据的应用程序逻辑的容器。例如,实现ChannelInboundHandler接口(或ChannelInboundHandlerAdapter),
你就可以接收入站事件和数据,这些数据会被业务逻辑处理。当要给客户端发送响应时,也可以从ChannelInboundHandler冲刷数据。
业务逻辑通常写在一个或者多个ChannelInboundHandler中。ChannelOutboundHandler原理一样,只不过它是用来处理出站数据的
3》ChannelPipeline提供了ChannelHandler链的容器。以客户端应用程序为例,如果事件的运动方向是从客户端到服务端的,
那么我们称这些事件为出站的,即客户端发送给服务端的数据会通过pipeline中的一系列ChannelOutboundHandler,并被这些Handler处理,反之则称为入站的。

例如上面图,如果一个入站的事件,首选它会经过第一个handler的处理,再传给链中的下一个handler处理。
编码器:
1》当Netty发送或者接受一个消息的时候,就将会发生一次数据转换。入站消息会被解码:从字节转换为另一种格式(比如java对象);如果是出站消息,它会被编码成字节。
2》Netty提供一系列实用的编解码器,他们都实现了ChannelInboundHadnler或者ChannelOutboundHandler接口。在这些类中,
channelRead方法已经被重写了。以入站为例,对于每个从入站Channel读取的消息,这个方法会被调用。随后,它将调用由解码
器所提供的decode()方法进行解码,并将已经解码的字节转发给ChannelPipeline中的下一个ChannelInboundHandler。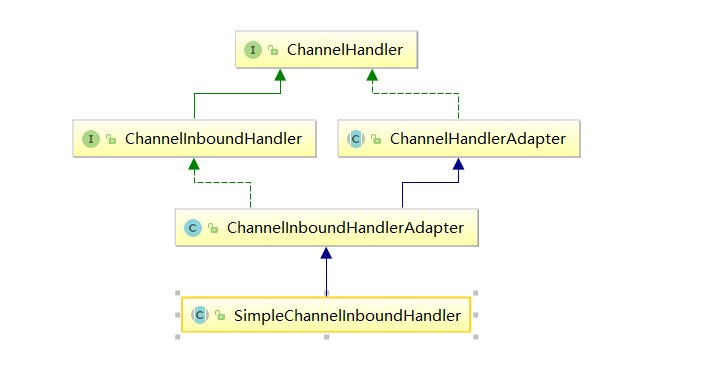
我们通常会使用继承SimpleChannelInboundHandler的handler类来处理事件
demo:客户端发送long -> 服务器和服务端发送long -> 客户端
服务端分为四部分:主启动类,initializer初始化器,解码器和编码器,自定义handler。
主启动类:和上面的案例写的内容基本一致
- public class MyDecoderServer {
- public static void main(String[] args) {
- EventLoopGroup bossGroup = new NioEventLoopGroup(1);
- EventLoopGroup workGroup = new NioEventLoopGroup();
- ServerBootstrap serverBootstrap = new ServerBootstrap();
- serverBootstrap.group(bossGroup,workGroup)
- .channel(NioServerSocketChannel.class)
- .option(ChannelOption.SO_BACKLOG,128)
- .childOption(ChannelOption.SO_KEEPALIVE,true)
- .handler(new LoggingHandler(LogLevel.INFO))//加日志
- .childHandler(new MyDecoderServerInitializer());
- try {
- ChannelFuture channelFuture = serverBootstrap.bind(8899).sync();
- channelFuture.addListener((sc)->{//加监听器
- if (sc.isSuccess()) {
- System.out.println("服务器启动成功");
- }else {
- System.out.println("服务端启动失败");
- }
- });
- channelFuture.channel().closeFuture().sync();
- } catch (InterruptedException e) {
- e.printStackTrace();
- }finally {
- bossGroup.shutdownGracefully();
- workGroup.shutdownGracefully();
- }
- }
- }
initializer初始化器:
- public class MyDecoderServerInitializer extends ChannelInitializer<SocketChannel> {
- @Override
- protected void initChannel(SocketChannel ch) throws Exception {
- ChannelPipeline channelPipeline = ch.pipeline();
//加入解码器,用来处理来自客户端的信息- channelPipeline.addLast(new MyToLongDecoder());
//加入编码器,用来处理发往客户端的信息- channelPipeline.addLast(new MyToLongEncoder());
//自定义的handler,用来处理器业务- channelPipeline.addLast(new MyDecoderServerHandler());
- }
- }
解码器和编码器:继承ByteToMessageDecoder,编码器中的Long型表示要将Long型的数据进行编码。
- public class MyToLongDecoder extends ByteToMessageDecoder{
- /**
- *
- * @param ctx 上下文对象
- * @param in 入站的ByteBuf数据
- * @param out list集合,将解码后的数据传给下一个handler
- * @throws Exception
- */
- @Override
- protected void decode(ChannelHandlerContext ctx, ByteBuf in, List out) throws Exception {
- System.out.println("MyToLongDecoder 。。。被调用");
- //读取long型数据,每次读取8个
- if(in.readableBytes() >= 8){
//将数据传给下一个handler- out.add(in.readLong());
- }
- }
- }
- public class MyToLongEncoder extends MessageToByteEncoder<Long> {
- @Override
- protected void encode(ChannelHandlerContext ctx, Long msg, ByteBuf out) throws Exception {
- System.out.println("MyToLongEncoder 。。。encode被调用");
- System.out.println("msg:"+msg);
- out.writeLong(msg);
- }
- }
自定义的handler:
- public class MyDecoderServerHandler extends SimpleChannelInboundHandler<Long> {
- @Override
- protected void channelRead0(ChannelHandlerContext ctx, Long msg) throws Exception {
- System.out.println("获取到客户端的数据");
- System.out.println("MyDecoderServerHandler 。。。被调用");
- System.out.println("从客户端获取的数据"+ctx.channel().remoteAddress()+":"+msg);
- }
- @Override
- public void channelReadComplete(ChannelHandlerContext ctx) throws Exception {
- System.out.println("————————————————————");
- System.out.println("给客户端发送数据。。。。");
- ctx.writeAndFlush(10000L);
- }
- @Override
- public void exceptionCaught(ChannelHandlerContext ctx, Throwable cause) throws Exception {
- System.out.println(cause.getMessage());
- ctx.close();
- }
- }
客户端也是分为四部分:主启动类,initializer初始化器,解码器和编码器,自定义handler。
主启动类:
- public class MyDecoderClient {
- public static void main(String[] args) {
- EventLoopGroup group = new NioEventLoopGroup();
- Bootstrap bootstrap = new Bootstrap();
- bootstrap.group(group)
- .channel(NioSocketChannel.class)
- .handler(new LoggingHandler(LogLevel.INFO))
- .handler(new MyDecoderClientInitializer());
- try {
- ChannelFuture channelFuture = bootstrap.connect("127.0.0.1", 8899).sync();
- channelFuture.addListener((sc)->{
- if (sc.isSuccess()) {
- System.out.println("客户端启动成功");
- }else{
- System.out.println("客户端启动失败");
- }
- });
- channelFuture.channel().closeFuture().sync();
- } catch (InterruptedException e) {
- e.printStackTrace();
- }finally {
- group.shutdownGracefully();
- }
- }
- }
initializer初始化器:
- public class MyDecoderClientInitializer extends ChannelInitializer<SocketChannel> {
- @Override
- protected void initChannel(SocketChannel ch) throws Exception {
- ChannelPipeline pipeline = ch.pipeline();
- //加入编码器,对出站的数据进行编码
- pipeline.addLast(new MyToLongEncoder() );
- //加入解码器,对入站的数据进行编码
- pipeline.addLast(new MyToLongDecoder());
- //加入自定义handler,处理业务
- pipeline.addLast(new MyDecoderClientHandler());
- }
- }
解码器和编码器上面已经有。
自定义的handler:
- public class MyDecoderClientHandler extends SimpleChannelInboundHandler<Long> {
- @Override
- protected void channelRead0(ChannelHandlerContext ctx, Long msg) throws Exception {
- System.out.println("————————————————————————————");
- System.out.println("MyDecoderClientHandler ....被调用");
- System.out.println("从服务端获取的数据"+ctx.channel().remoteAddress()+":"+msg);
- }
- @Override
- public void channelActive(ChannelHandlerContext ctx) throws Exception {
- System.out.println("ChannelHandlerContext 。。。channelActive 向服务端发送数据");
- ctx.writeAndFlush(1234567L);
- }
- }
在上面我们讲过编码和解码器其实都是一种handler,从这个demo中可以看到客户端向服务端发送消息过程中,handler的调用过程,
客户端发送消息——服务端
MyDecoderClientHandler ————》MyToLongEncoder ————》MyToLongDecoder ————》MyDecoderServerHandler
在netty中还提供了其他的编解码器:
ReplayingDecoder:ReplayingDecoder扩展了ByteToMessageDecoder类,使用这个类,我们不必调用readableBytes()方法。参数S指定了用户状态管理的类型,其中Void代表不需要状态管理
- LineBasedFrameDecoder:这个类在Netty内部也有使用,它使用行尾控制字符(\n或者\r\n)作为分隔符来解析数据。
- DelimiterBasedFrameDecoder:使用自定义的特殊字符作为消息的分隔符。
- HttpObjectDecoder:一个HTTP数据的解码器
- LengthFieldBasedFrameDecoder:通过指定长度来标识整包消息,这样就可以自动的处理黏包和半包消息。
- 10、TCP粘包和拆包
基本解释:TCP是面向连接的,面向流的,提供高可靠性服务。收发两端(客户端和服务器端)都要有一一成对的socket,
因此,发送端为了将多个发给接收端的包,更有效的发给对方,使用了优化方法(Nagle算法),
将多次间隔较小且数据量小的数据,合并成一个大的数据块,然后进行封包。这样做虽然提高了效率,
但是接收端就难于分辨出完整的数据包了,因为面向流的通信是无消息保护边界的,由于服务
由于服务端无法准确的接受客户端传来信息的长度,所以会出现粘包和拆包问题。- 示意图:
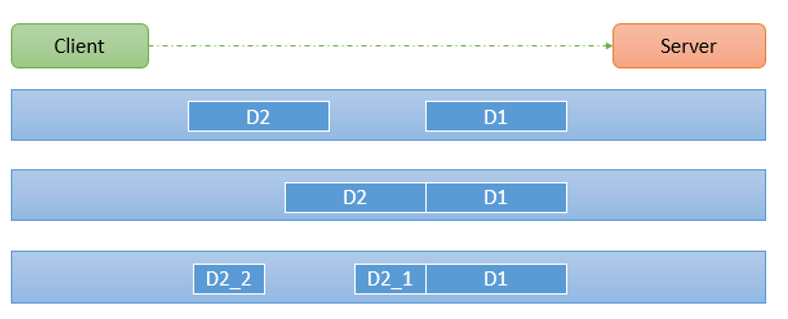
第一种正常接受,第二种粘包,第三D2拆包。
demo:粘包和拆包现象:
服务端:主启动类
- public class MyTcpServer {
- public static void main(String[] args) {
- EventLoopGroup bossGroup = new NioEventLoopGroup(1);
- EventLoopGroup workGroup = new NioEventLoopGroup();
- ServerBootstrap serverBootstrap = new ServerBootstrap();
- serverBootstrap.group(bossGroup,workGroup)
- .channel(NioServerSocketChannel.class)
- .option(ChannelOption.SO_BACKLOG,128)
- .childOption(ChannelOption.SO_KEEPALIVE,true)
- .handler(new LoggingHandler(LogLevel.INFO))
- .childHandler(new MyTcpInitializer());
- try {
- ChannelFuture channelFuture = serverBootstrap.bind(9990).sync();
- channelFuture.addListener((sc)->{
- if(sc.isSuccess()){
- System.out.println("服务器启动成功");
- }else{
- System.out.println("服务器启动失败");
- }
- });
- channelFuture.channel().closeFuture().sync();
- } catch (InterruptedException e) {
- e.printStackTrace();
- }finally {
- bossGroup.shutdownGracefully();
- workGroup.shutdownGracefully();
- }
- }
- }
MyTcpServer
initialzer初始化器:
- public class MyTcpInitializer extends ChannelInitializer<SocketChannel> {
- @Override
- protected void initChannel(SocketChannel ch) throws Exception {
- ChannelPipeline pipeline = ch.pipeline();
- pipeline.addLast(new MyTcpServerHandler());
- }
- }
MyTcpInitializer
自定义handler:
- public class MyTcpServerHandler extends SimpleChannelInboundHandler<ByteBuf> {
- private int count = 0;
- @Override
- protected void channelRead0(ChannelHandlerContext ctx, ByteBuf msg) throws Exception {
- byte[] bytes = new byte[msg.readableBytes()];
- msg.readBytes(bytes);
- System.out.println("————————————————————————");
- System.out.println("客户端获取到的数据: "+new String(bytes,CharsetUtil.UTF_8));
- System.out.println("获取的次数:"+(++this.count));
- ByteBuf resonseByteBuf = Unpooled.copiedBuffer(UUID.randomUUID().toString(), CharsetUtil.UTF_8);
- ctx.writeAndFlush(resonseByteBuf);
- }
- }
客户端:主启动类
- public class MyTcpClient {
- public static void main(String[] args) {
- EventLoopGroup group = new NioEventLoopGroup();
- Bootstrap bootstrap = new Bootstrap();
- bootstrap.group(group)
- .channel(NioSocketChannel.class)
- .handler(new MyTcpClientInitializer());
- try {
- ChannelFuture channelFuture = bootstrap.connect("127.0.0.1", 9990).sync();
- channelFuture.addListener((sc)->{
- if (sc.isSuccess()) {
- System.out.println("客户端启动成功");
- }else{
- System.out.println("客户端启动失败");
- }
- });
- channelFuture.channel().closeFuture().sync();
- } catch (InterruptedException e) {
- e.printStackTrace();
- }finally {
- group.shutdownGracefully();
- }
- }
- }
MyTcpClient
initialzer初始化器:
- public class MyTcpClientInitializer extends ChannelInitializer<SocketChannel> {
- @Override
- protected void initChannel(SocketChannel ch) throws Exception {
- ChannelPipeline pipeline = ch.pipeline();
- pipeline.addLast(new MyTcpClientHandler());
- }
- }
MyTcpClientInitializer
自定义handler:
- public class MyTcpClientHandler extends SimpleChannelInboundHandler<ByteBuf> {
- private int count = 0;
- @Override
- protected void channelRead0(ChannelHandlerContext ctx, ByteBuf msg) throws Exception {
- byte[] buffer = new byte[msg.readableBytes()];
- msg.readBytes(buffer);
- System.out.println("——————————————————————————");
- System.out.println("客户端收到服务端的信息:"+new String(buffer,CharsetUtil.UTF_8));
- System.out.println("客户端收到服务端的信息"+(++this.count));
- }
- @Override
- public void channelActive(ChannelHandlerContext ctx) throws Exception {
- for (int i = 0; i < 10 ; i++) {
- System.out.println("——————————————————————");
- String content = "hello,world"+i;
- ByteBuf byteBuf = Unpooled.copiedBuffer(content, CharsetUtil.UTF_8);
- ctx.writeAndFlush(byteBuf);
- System.out.println("发送数据次数:"+(++this.count));
- }
- }
- }
- 打印结果:测试三次,可以看出出现了粘包现象。
- ————————————————————————
- 客户端获取到的数据: hello,world0hello,world1hello,world2hello,world3hello,world4hello,world5hello,world6hello,world7hello,world8hello,world9
- 获取的次数:1
- ————————————————————————
- 客户端获取到的数据: hello,world0
- 获取的次数:1
- ————————————————————————
- 客户端获取到的数据: hello,world1
- 获取的次数:2
- ————————————————————————
- 客户端获取到的数据: hello,world2
- 获取的次数:3
- ————————————————————————
- 客户端获取到的数据: hello,world3hello,world4
- 获取的次数:4
- ————————————————————————
- 客户端获取到的数据: hello,world5hello,world6
- 获取的次数:5
- ————————————————————————
- 客户端获取到的数据: hello,world7hello,world8
- 获取的次数:6
- ————————————————————————
- 客户端获取到的数据: hello,world9
- 获取的次数:7
- ————————————————————————
- 客户端获取到的数据: hello,world0
- 获取的次数:1
- ————————————————————————
- 客户端获取到的数据: hello,world1
- 获取的次数:2
- ————————————————————————
- 客户端获取到的数据: hello,world2
- 获取的次数:3
- ————————————————————————
- 客户端获取到的数据: hello,world3hello,world4hello,world5hello,world6hello,world7hello,world8hello,world9
- 获取的次数:4
解决方案:
使用自定义协议 + 编解码器 来解决
关键就是要解决 服务器端每次读取数据长度的问题, 这个问题解决,就不会出现服务器多读或少读数据的问题,从而避免的TCP 粘包、拆包 。
demo:这次我们将发送的信息包装类发送
服务端:主启动类
- public class MyProtocolTcpServer {
- public static void main(String[] args) {
- EventLoopGroup bossGroup = new NioEventLoopGroup(1);
- EventLoopGroup workGroup = new NioEventLoopGroup();
- ServerBootstrap serverBootstrap = new ServerBootstrap();
- serverBootstrap.group(bossGroup,workGroup)
- .channel(NioServerSocketChannel.class)
- .option(ChannelOption.SO_BACKLOG,128)
- .childOption(ChannelOption.SO_KEEPALIVE,true)
- .handler(new LoggingHandler(LogLevel.INFO))
- .childHandler(new MyProtocolTcpServerInitializer());
- try {
- ChannelFuture channelFuture = serverBootstrap.bind(6699).sync();
- channelFuture.addListener((sc)->{
- if (sc.isSuccess()) {
- System.out.println("服务器启动成功");
- }else{
- System.out.println("服务器启动失败");
- }
- });
- channelFuture.channel().closeFuture().sync();
- } catch (InterruptedException e) {
- e.printStackTrace();
- }finally {
- bossGroup.shutdownGracefully();
- workGroup.shutdownGracefully();
- }
- }
- }
MyProtocolTcpServer
initialzer初始化器:
- public class MyProtocolTcpServerInitializer extends ChannelInitializer<SocketChannel> {
- @Override
- protected void initChannel(SocketChannel ch) throws Exception {
- ChannelPipeline pipeline = ch.pipeline();
- pipeline.addLast(new MyProtocolTcpDecoder());
- pipeline.addLast(new MyProtocolTcpServerHandler());
- }
- }
MyProtocolTcpServerInitializer
- 自定义的handler:MyProtocolTcpServerHandler
- public class MyProtocolTcpServerHandler extends SimpleChannelInboundHandler<ProtocolTcpMessage> {
- private int count = 0;
- @Override
- protected void channelRead0(ChannelHandlerContext ctx, ProtocolTcpMessage msg) throws Exception {
- System.out.println("获取到客户端信息:");
- System.out.println("长度:"+msg.getLength()+",内容:"+new String(msg.getContent(), CharsetUtil.UTF_8));
- System.out.println("第"+(++this.count)+"调用");
- }
- @Override
- public void exceptionCaught(ChannelHandlerContext ctx, Throwable cause) throws Exception {
- System.out.println("异常信息:"+cause.getMessage());
- ctx.close();
- }
- }
编解码器:MyProtocolTcpDecoder和MyProtocolTcpEncoder
- public class MyProtocolTcpDecoder extends ByteToMessageDecoder{
- @Override
- protected void decode(ChannelHandlerContext ctx, ByteBuf in, List<Object> out) throws Exception {
- System.out.println("——————————————————————————————————");
- System.out.println("MyProtocolTcpDecoder...decode 被调用");
- int len = in.readInt();
- byte[] content = new byte[len];
- in.readBytes(content);
//将读取的字节数据转为消息对象- ProtocolTcpMessage protocolTcpMessage = new ProtocolTcpMessage();
- protocolTcpMessage.setLength(len);
- protocolTcpMessage.setContent(content);
- out.add(protocolTcpMessage);
- }
- }
- public class MyProtocolTcpEncoder extends MessageToByteEncoder<ProtocolTcpMessage> {
- @Override
- protected void encode(ChannelHandlerContext ctx, ProtocolTcpMessage msg, ByteBuf out) throws Exception {
//接受消息对象,然后装换成字节- System.out.println("MyProtocolTcpEncoder。。。encode 被调用");
- out.writeInt(msg.getLength());
- out.writeBytes(msg.getContent());
- }
- }
消息类:ProtocolTcpMessage
- public class ProtocolTcpMessage {
- private int length;
- private byte[] content;
- public int getLength() {
- return length;
- }
- public void setLength(int length) {
- this.length = length;
- }
- public byte[] getContent() {
- return content;
- }
- public void setContent(byte[] content) {
- this.content = content;
- }
- }
客户端:主启动类
- public class MyProtocolTcpClient {
- public static void main(String[] args) {
- EventLoopGroup group = new NioEventLoopGroup();
- Bootstrap bootstrap = new Bootstrap();
- bootstrap.group(group)
- .channel(NioSocketChannel.class)
- .handler(new MyProtocolTcpClientInitializer());
- try {
- ChannelFuture channelFuture = bootstrap.connect("127.0.0.1", 6699).sync();
- channelFuture.addListener((sc)->{
- if (sc.isSuccess()) {
- System.out.println("客户端启动成功");
- }else {
- System.out.println("客户端启动失败");
- }
- });
- channelFuture.channel().closeFuture().sync();
- } catch (InterruptedException e) {
- e.printStackTrace();
- }finally {
- group.shutdownGracefully();
- }
- }
- }
MyProtocolTcpClient
initialzer初始化器:
- public class MyProtocolTcpClientInitializer extends ChannelInitializer<SocketChannel> {
- @Override
- protected void initChannel(SocketChannel ch) throws Exception {
- ChannelPipeline pipeline = ch.pipeline();
- pipeline.addLast(new MyProtocolTcpEncoder());
- pipeline.addLast(new MyProtocolTcpClientHandler());
- }
- }
MyProtocolTcpClientInitializer
- 自定义的handler:
- public class MyProtocolTcpClientHandler extends SimpleChannelInboundHandler<ProtocolTcpMessage> {
- @Override
- protected void channelRead0(ChannelHandlerContext ctx, ProtocolTcpMessage msg) throws Exception {
- }
- @Override
- public void channelActive(ChannelHandlerContext ctx) throws Exception {
- for (int i = 0; i < 10; i++) {
//将消息封装成消息对象ProtocolTcpMessage- String content = "hello world";
- ProtocolTcpMessage protocolTcpMessage = new ProtocolTcpMessage();
- protocolTcpMessage.setLength(content.getBytes(CharsetUtil.UTF_8).length);
- protocolTcpMessage.setContent(content.getBytes(CharsetUtil.UTF_8));
- ctx.writeAndFlush(protocolTcpMessage);
- }
- }
- @Override
- public void exceptionCaught(ChannelHandlerContext ctx, Throwable cause) throws Exception {
- System.out.println("异常信息"+cause.getMessage());
- ctx.close();
- }
- }
待更。。。
Netty学习笔记(二)——netty组件及其用法的更多相关文章
- Netty学习笔记(二) 实现服务端和客户端
在Netty学习笔记(一) 实现DISCARD服务中,我们使用Netty和Python实现了简单的丢弃DISCARD服务,这篇,我们使用Netty实现服务端和客户端交互的需求. 前置工作 开发环境 J ...
- netty权威指南学习笔记二——netty入门应用
经过了前面的NIO基础知识准备,我们已经对NIO有了较大了解,现在就进入netty的实际应用中来看看吧.重点体会整个过程. 按照权威指南写程序的过程中,发现一些问题:当我们在定义handler继承Ch ...
- Netty学习笔记(二)
只是代码,建议配合http://ifeve.com/netty5-user-guide/此网站观看 package com.demo.netty; import org.junit.Before;im ...
- Netty学习笔记(三)——netty源码剖析
1.Netty启动源码剖析 启动类: public class NettyNioServer { public static void main(String[] args) throws Excep ...
- [C语言学习笔记二] extern 函数的用法
extern 用来定义一个或多个变量.其后跟数据类型名和初始值.例如: extern int a =10 它与 int,long long int,double,char的本质区别,在于 extern ...
- Netty 学习笔记(1)通信原理
前言 本文主要从 select 和 epoll 系统调用入手,来打开 Netty 的大门,从认识 Netty 的基础原理 —— I/O 多路复用模型开始. Netty 的通信原理 Netty 底层 ...
- Netty学习笔记-入门版
目录 Netty学习笔记 前言 什么是Netty IO基础 概念说明 IO简单介绍 用户空间与内核空间 进程(Process) 线程(thread) 程序和进程 进程切换 进程阻塞 文件描述符 文件句 ...
- Netty 学习(二):服务端与客户端通信
Netty 学习(二):服务端与客户端通信 作者: Grey 原文地址: 博客园:Netty 学习(二):服务端与客户端通信 CSDN:Netty 学习(二):服务端与客户端通信 说明 Netty 中 ...
- python3.4学习笔记(二十) python strip()函数 去空格\n\r\t函数的用法
python3.4学习笔记(二十) python strip()函数 去空格\n\r\t函数的用法 在Python中字符串处理函数里有三个去空格(包括'\n', '\r', '\t', ' ')的函数 ...
随机推荐
- learning java 获取键盘输入
通过Scanner类,获取键盘的输入 var sc = new Scanner(System.in); // while (sc.hasNext()){ // System.out.println(& ...
- CSP 2019 退役记
声明:博主不会时空穿越,也没有造成恐慌,不应禁赛三年 Day0 上午:打板子 Polya定理; exkmp; exbsgs; 乘法逆元; 矩阵快速幂; 扫描线; ST表; excrt; Dirichl ...
- Comet OJ - Contest #7
传送门 \(A\) 咕咕咕 int main(){ for(scanf("%d",&T);T;--T){ scanf("%d%d",&l,&am ...
- Pycharm使用常见问题
Pycharm下载 下载链接:https://www.jetbrains.com/pycharm/download/ 分为专业版和社区版,社区版也能满足学习需求 Pycharm专业版激活 使用前请将& ...
- 比Excel还简单的SQL语句查询
大家好,我是jacky朱元禄,很高兴继续跟大家分享<MySQL数据分析实战>系列课程,前面的课程jacky分享了数据层面增删改查中的增删改,下面的课程我们要说增删改查的这个查,jacky说 ...
- 树莓派安装配置Nginx+PHP7+MariaDB
原文地址:http://blog.sina.com.cn/s/blog_150f554f50102yhra.html 一.安装 Nginx 和 PHP7 1.安装Nginx sudo apt inst ...
- ListView中的Item不能点击的解决方法
有时,为了实现某种功能,在Android程序中会考虑在ListView的每一个Item中添加一个Button(或ImageButton等). 但是,这样会出现一个问题: 当同时设置了Button的on ...
- 深入理解JVM虚拟机3:垃圾回收器详解
JVM GC基本原理与GC算法 Java的内存分配与回收全部由JVM垃圾回收进程自动完成.与C语言不同,Java开发者不需要自己编写代码实现垃圾回收.这是Java深受大家欢迎的众多特性之一,能够帮助程 ...
- 基于Spring框架怎么构建游戏玩法服务
说明:本篇阐述的问题,是基于前面的游戏服务器架构设计的. 问题 众所周知,Spring最擅长的领域是无状态服务的构建,而游戏(尤其是玩法部分)是有状态的.以棋牌游戏为例,玩法服务里面大概涉及以下两类对 ...
- 解决用root用户及密码可以直接登陆某LINUX系统,但是用ssh登陆,系统却总是提示密码不对
引用 vi /etc/ssh/sshd_config 将PermitRootLogin项改为yes service sshd restart 重启sshd服务即可