FasterRunner (httptunner+django)搭建以及小功能补充
配置
下载地址
https://github.com/httprunner/FasterRunner

后端配置
https://www.jianshu.com/p/e26ccc21ddf2

前端配置
https://www.cnblogs.com/luopan/p/10250485.html

mac下安装RabbitMq
https://www.cnblogs.com/yihuihui/p/9095130.html

入口
http://localhost:8080/fastrunner/login
问题:
1. pycharm 创建的虚拟环境不能pip
https://www.jianshu.com/p/e46e36addf8d
2. pymysql/mysqlclient caching_sha2_password,
https://blog.csdn.net/weekdawn/article/details/81039382
django 1.8.2 mysql 加密方式 caching_sha2_password
django 2.0.3 mysql 加密方式 mysql_native_password
部分功能配置及补充
定时任务
1. setting.py
djcelery.setup_loader()

CELERY_ENABLE_UTC = True

CELERY_TIMEZONE = 'Asia/Shanghai'

# BROKER_URL = 'amqp://username:password@IP:5672//'

BROKER_URL = 'amqp://guest:guest@127.0.0.1:5672//'

CELERYBEAT_SCHEDULER = 'djcelery.schedulers.DatabaseScheduler'

CELERY_RESULT_BACKEND = 'djcelery.backends.database:DatabaseBackend'

CELERY_ACCEPT_CONTENT = ['application/json']

CELERY_TASK_SERIALIZER = 'json'

CELERY_RESULT_SERIALIZER = 'json'

CELERY_TASK_RESULT_EXPIRES = 7200

CELERYD_CONCURRENCY = 1 if DEBUG else 5

CELERYD_MAX_TASKS_PER_CHILD = 40
2.定时服务
cd /home/conan/conan-ta/FasterRunner/

nohup python3 manage.py celery beat -l info >> /Users/zd/Documents/FasterRunner/logs/beat.log 2>&1 &

cd /home/conan/conan-ta/FasterRunner/

celery multi start w1 -A FasterRunner -l info --logfile=/Users/zd/Documents/FasterRunner/logs/worker.log 2>&1 &
3.调试定时任务
更改定时相关逻辑时,需要关掉并重新启动celery beat,celery multi 才会生效,打印出来的调试信息在logs/worker.log下查看。
举例:定时任务,增加发送邮件的标题:
fastrunner/utils/task.py

fastrunner/task.py


发送邮件
setting.py
# 发邮件

EMAIL_BACKEND = 'django.core.mail.backends.smtp.EmailBackend'

EMAIL_SEND_USERNAME = 'no-reply@fenbi.com'  # 定时任务报告发送邮箱,支持163,qq,sina,企业qq邮箱等,注意需要开通smtp服务

EMAIL_SEND_PASSWORD = ''     # 邮箱密码

EMAIL_PORT = 25

EMAIL_USE_TLS = True
fastrunner/utils/email.py
import smtplib
from email.mime.text import MIMEText
from email.header import Header
from FasterRunner.settings import EMAIL_SEND_USERNAME, EMAIL_SEND_PASSWORD def send_email_reports(receiver,save_summary,Cc=None,title=None):
receiver = receiver.rstrip(';')
all_receivers = receiver.split(';')
if '@sina.com' in EMAIL_SEND_USERNAME:
smtpserver = 'smtp.sina.com'
elif '@163.com' in EMAIL_SEND_USERNAME:
smtpserver = 'smtp.163.com'
else:
smtpserver = 'smtp.exmail.qq.com' if title:
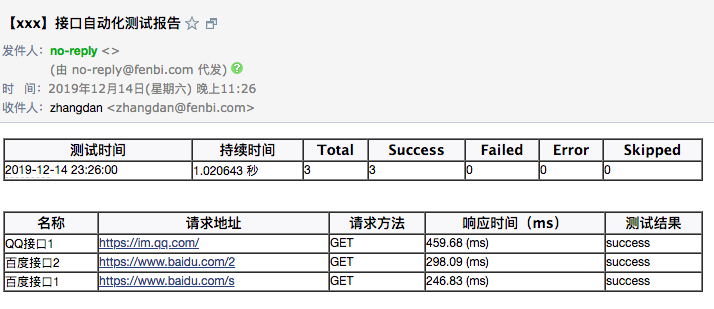
subject = "【%s】接口自动化测试报告"%title
else:
subject = "接口自动化测试报告"
smtp = smtplib.SMTP_SSL(smtpserver, 465)
smtp.login(EMAIL_SEND_USERNAME, EMAIL_SEND_PASSWORD)
msg = MIMEText(save_summary, "html", "utf-8")
msg["Subject"] = Header(subject, "utf-8")
msg['From'] = Header('no-reply', 'utf-8')
msg['To'] = receiver
# 处理抄送
if Cc:
Cc = Cc.rstrip(';')
msg['Cc'] = Cc
all_receivers = receiver + ';' + Cc
all_receivers = all_receivers.split(';') smtp.sendmail(EMAIL_SEND_USERNAME, all_receivers, msg.as_string())
fastrunner/tasks.py
 from fastrunner.utils.emails import send_email_reports

 import time

 @shared_task

 def schedule_debug_suite(*args, **kwargs):

     """定时任务

     """

     print("定时任务start.....")

     project = kwargs["project"]

     receiver = kwargs["receiver"]

     Cc = kwargs["copy"]

     title = kwargs["name"]

     print("receiver****:%s"%receiver)

     print("args****:%s"%args)

     print("kwargs****:%s"%kwargs)

     print("定时任务end.....")

     receiver = receiver.strip()

     Cc = Cc.strip()

     suite = []

     test_sets = []

     config_list = []

     for pk in args:

         try:

             name = models.Case.objects.get(id=pk).name

             suite.append({

                 "name": name,

                 "id": pk

             })

         except ObjectDoesNotExist:

             pass

     for content in suite:

         test_list = models.CaseStep.objects. \

             filter(case__id=content["id"]).order_by("step").values("body")

         testcase_list = []

         config = None

         for content in test_list:

             body = eval(content["body"])

             if "base_url" in body["request"].keys():

                 config = eval(models.Config.objects.get(name=body["name"], project__id=project).body)

                 continue

             testcase_list.append(body)

         config_list.append(config)

         test_sets.append(testcase_list)

     summary = debug_suite(test_sets, project, suite, config_list, save=False)

     save_summary("", summary, project, type=3)

     # 整理数据

     testTime = summary['time']['start_at']

     testTime = time.strftime('%Y-%m-%d %H:%M:%S', time.localtime(testTime))

     durTime = str(summary['time']['duration'])[:8]

     totalApi = summary['stat']['testsRun']

     successApi = summary['stat']['successes']

     FailApi = summary['stat']['failures']

     errorApi = summary['stat']['errors']

     skipApi = summary['stat']['skipped']

     htmll = """

     <table border="1" cellpadding="0" cellspacing="0" width="700px">

         <tr style="background-color: #f8f8fa">

             <th>测试时间</th>

             <th>持续时间</th>

             <th>Total</th>

             <th>Success</th>

             <th>Failed</th>

             <th>Error</th>

             <th>Skipped</th>

         </tr>

         <tr>

             <td>%s</td>

             <td>%s 秒</td>

             <td>%s</td>

             <td>%s</td>

             <td>%s</td>

             <td>%s</td>

             <td>%s</td>

         </tr>

     </table>

     <div style="height: 30px"></div>

     <table border="1" cellpadding="0" cellspacing="0" width="700px">

         <tr style="background-color: #f8f8fa">

             <th>名称</th>

             <th>请求地址</th>

             <th>请求方法</th>

             <th>响应时间(ms)</th>

             <th>测试结果</th>

         </tr>

     """ % (

         testTime, durTime, totalApi, successApi, FailApi, errorApi, skipApi

     )

     # 名称/请求地址/请求方法/响应时间/测试结果

     for i in summary['details']:  # [{},{}]

         detail = i['records']  # 列表

         for d in detail:

             name = d['name']

             uurl = d['meta_data']['request']['url']

             method = d['meta_data']['request']['method']

             responseTime = d['meta_data']['response']['response_time_ms']

             iresult = d['status']

             htmll += """

             <tr>

             <td>%s</td>

             <td>%s</td>

             <td>%s</td>

             <td>%s (ms)</td>

             <td>%s</td>

          </tr>

             """ % (name, uurl, method, responseTime, iresult)

     htmll = htmll + '</table>'

     if Cc:

         send_email_reports(receiver, htmll, Cc=Cc,title=title)

     else:

         send_email_reports(receiver, htmll,title=title)
启动/关闭 shell
start.sh
#!/bin/bash

#启动 FasterWeb

echo -e "启动 FasterWeb"

cd /home/conan/conan-ta/FasterWeb/

nohup npm run build >> /home/shared/log/npm.log 2>&1 &

# 启动 FasterRunner

echo -e "启动 FasterRunner"

cd /home/conan/conan-ta/FasterRunner/

nohup python3 manage.py runserver 0.0.0.0:9000 >> /home/shared/log/django.log 2>&1 &

# 使用默认的celery.py启动

echo -e "启动celery beat"

cd /home/conan/conan-ta/FasterRunner/

nohup python3 manage.py celery beat -l info >> /Users/zd/Documents/FasterRunner/logs/beat.log 2>&1 &

# 使用默认的celery.py启动

echo -e "启动 celery work"

cd /home/conan/conan-ta/FasterRunner/

celery multi start w1 -A FasterRunner -l info --logfile=/Users/zd/Documents/FasterRunner/logs/worker.log 2>&1 &
stop.sh
#!/bin/bash

# kill django pid

echo -e "shutting down django pid"

pids=$(ps aux | grep "python" | grep "runserver" | awk '{print $2}')

for pid in $pids

do

        kill -9 $pid

done

# kill celery beat pid

echo -e "shutting down celery beat pid"

pids=$(ps aux | grep "celery" | grep "FasterRunner" | awk '{print $2}')

for pid in $pids

do

        kill -9 $pid

done
FasterRunner (httptunner+django)搭建以及小功能补充的更多相关文章
- 用MVC5+EF6+WebApi 做一个小功能(三) 项目搭建
一般一个项目开始之前都会有启动会,需求交底等等,其中会有一个环节,大讲特讲项目的意义,然后取一个高大上的项目名字,咱这是一个小功能谈不上项目,但是名字不能太小气了.好吧,就叫Trump吧.没有任何含义 ...
- Django开发简单采集用户浏览器信息的小功能
Django开发简单采集用户浏览器信息的小功能 Centos环境准备 yum install –y python-pip export http_proxy=http://10.11.0.148:80 ...
- Django搭建博客网站(三)
Django搭建博客网站(三) 第三篇主要记录view层的逻辑和template. Django搭建博客网站(一) Django搭建博客网站(二) 结构 网站结构决定我要实现什么view. 我主要要用 ...
- Django-中间件-csrf扩展请求伪造拦截中间件-Django Auth模块使用-效仿 django 中间件配置实现功能插拔式效果-09
目录 昨日补充:将自己写的 login_auth 装饰装在 CBV 上 django 中间件 django 请求生命周期 ***** 默认中间件及其大概方法组成 中间件的执行顺序 自定义中间件探究不同 ...
- 从0到1搭建移动App功能自动化测试平台(2):操作iOS应用的控件
转自:http://debugtalk.com/post/build-app-automated-test-platform-from-0-to-1-Appium-interrogate-iOS-UI ...
- Django搭建简易博客
Django简易博客,主要实现了以下功能 连接数据库 创建超级用户与后台管理 利用django-admin-bootstrap美化界面 template,view与动态URL 多说评论功能 Markd ...
- Django搭建及源码分析(三)---+uWSGI+nginx
每个框架或者应用都是为了解决某些问题才出现旦生的,没有一个事物是可以解决所有问题的.如果觉得某个框架或者应用使用很不方便,那么很有可能就是你没有将其使用到正确的地方,没有按开发者的设计初衷来使用它,当 ...
- EBS OAF开发中的Java 实体对象(Entity Object)验证功能补充
EBS OAF开发中的Java 实体对象(Entity Object)验证功能补充 (版权声明,本人原创或者翻译的文章如需转载,如转载用于个人学习,请注明出处:否则请与本人联系,违者必究) EO理论上 ...
- Django 源码小剖: 初探 WSGI
Django 源码小剖: 初探 WSGI python 作为一种脚本语言, 已经逐渐大量用于 web 后台开发中, 而基于 python 的 web 应用程序框架也越来越多, Bottle, Djan ...
随机推荐
- UPDATE SELECT OUTPUT
-- 定义临时表变量,用于 output into 使用 DECLARE @VarOrderStatus table ( OrderNo nvarchar(50) NULL) -- update 表U ...
- 为 Exchange 2010 用户添加联系人头像
一.修改AD架构 为了给联系人添加头像,实际是让联系人头像缩略图能够显示在全局地址列表 GAL 中,需要让其在全局编录(GC)中进行复制,默认情况下,对象的“thumbnailphoto”属性值不会在 ...
- Git速成学习第四课:解决冲突
Git速成学习笔记整理于廖雪峰老师的官网网站:https://www.liaoxuefeng.com/ 我们继续练习,准备新的feature1分支. $ git checkout -b feature ...
- 最新 易车java校招面经 (含整理过的面试题大全)
从6月到10月,经过4个月努力和坚持,自己有幸拿到了网易雷火.京东.去哪儿.易车等10家互联网公司的校招Offer,因为某些自身原因最终选择了易车.6.7月主要是做系统复习.项目复盘.LeetCode ...
- java中类加载的全过程及内存图分析
类加载机制: jvm把class文件加载到内存,并对数据进行校验.解析和初始化,最终形成jvm可以直接使用的java类型的过程. (1)加载 将class文件字节码内容加载到内存中,并将这些静态数据转 ...
- windows上OpenSSH服务安装及启动
一.windows安装OpenSSH 1,下载openSSH windows版 GitHub下载链接 我安装的是64位版本 OpenSSH-Win64.zip 2,解压到C:\Program File ...
- [CF132C] Logo Turtle
[CF132C] Logo Turtle , Luogu A turtle moves following by logos.(length is \(N\)) \(F\) means "m ...
- Java没有引用传递机制,C#有。
Java没有引用传递机制,C#有: public class Obj { private Integer myValue; public Integer getMyValue() { return m ...
- Mybatis 批量操作以及多参数操作遇到的坑
查考地址:https://blog.csdn.net/shengtianbanzi_/article/details/80147134 待整理中......
- Spring4学习回顾之路09-基于注解的方式配置bean
一:基于注解配置Bean 首先介绍下组件扫描(component scanning): Spring能够从classpath下自动扫描,侦测和实例化具有特定注解的组件. 包括: -@Component ...