SpringMVC_第一个程序
一、基本代码的完成
补充
1、在myeclipse中 WEB-INF下放的资源和WebRoot下的资源区别:
WEB-INF下放到资源是不能通过浏览器直接访问的,是比较安全的,只能是后台服务端程序进行跳转的时候跳转过去,所以不能重定向到WEB-INF.
2、在使用EL表达式的jsp页面
- <%@page isELIgnored="false" %>
3、SpringMVC最全约束
- <?xml version="1.0" encoding="UTF-8"?>
- <beans xmlns="http://www.springframework.org/schema/beans"
- xmlns:xsi="http://www.w3.org/2001/XMLSchema-instance"
- xmlns:context="http://www.springframework.org/schema/context"
- xmlns:aop="http://www.springframework.org/schema/aop"
- xmlns:tx="http://www.springframework.org/schema/tx"
- xmlns:mvc="http://www.springframework.org/schema/mvc"
- xsi:schemaLocation="http://www.springframework.org/schema/beans
- http://www.springframework.org/schema/beans/spring-beans.xsd
- http://www.springframework.org/schema/context
- http://www.springframework.org/schema/context/spring-context.xsd
- http://www.springframework.org/schema/aop
- http://www.springframework.org/schema/aop/spring-aop.xsd
- http://www.springframework.org/schema/tx
- http://www.springframework.org/schema/tx/spring-tx.xsd
- http://www.springframework.org/schema/mvc
- http://www.springframework.org/schema/mvc/spring-mvc.xsd">
- </beans>
- public class MyController implements Controller {
- public ModelAndView handleRequest(HttpServletRequest request,
- HttpServletResponse response) throws Exception {
- // TODO Auto-generated method stub
- ModelAndView mv= new ModelAndView();
- mv.addObject("message","hello SpringMVC World!");
- mv.setViewName("/WEB-INF/welcome.jsp");
- return mv;
- }
- }
MyController
注册处理器
- <?xml version="1.0" encoding="UTF-8"?>
- <beans xmlns="http://www.springframework.org/schema/beans"
- xmlns:xsi="http://www.w3.org/2001/XMLSchema-instance"
- xmlns:context="http://www.springframework.org/schema/context"
- xmlns:aop="http://www.springframework.org/schema/aop"
- xmlns:tx="http://www.springframework.org/schema/tx"
- xmlns:mvc="http://www.springframework.org/schema/mvc"
- xsi:schemaLocation="http://www.springframework.org/schema/beans
- http://www.springframework.org/schema/beans/spring-beans.xsd
- http://www.springframework.org/schema/context
- http://www.springframework.org/schema/context/spring-context.xsd
- http://www.springframework.org/schema/aop
- http://www.springframework.org/schema/aop/spring-aop.xsd
- http://www.springframework.org/schema/tx
- http://www.springframework.org/schema/tx/spring-tx.xsd
- http://www.springframework.org/schema/mvc
- http://www.springframework.org/schema/mvc/spring-mvc.xsd">
- <!-- 注册处理器 -->
- <bean id="/my.do" class="com.jmu.handlers.MyController"></bean>
- </beans>
springmvc.xml

二、注册中央调度器
在web.xml中
- <!-- 注册中央调度器 -->
- <servlet>
- <servlet-name>reyco</servlet-name>
- <servlet-class>org.springframework.web.servlet.DispatcherServlet</servlet-class>
- </servlet>
- <servlet-mapping>
- <servlet-name>reyco</servlet-name>
- <url-pattern>*.do</url-pattern>
- </servlet-mapping>
三、指定SpringMVC配置文件
添加修改
- <servlet>
- <servlet-name>reyco</servlet-name>
- <servlet-class>org.springframework.web.servlet.DispatcherServlet</servlet-class>
<init-param>- <param-name>contextConfigLocation</param-name>
- <param-value>classpath:springMVC.xml</param-value>
- </init-param>
- </servlet>
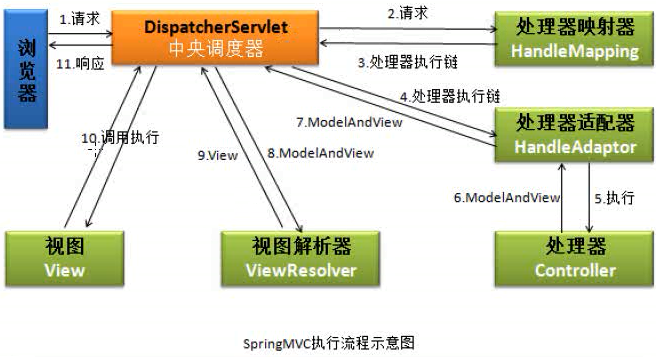
四、springMVC执行流程
五、使用servletloadOnStartup
目的:在Tomcat启动时直接创建当前Servlet
在web.xml中添加
- <load-on-startup>1</load-on-startup>
即添加修改
- !-- 注册中央调度器 -->
- <servlet>
- <servlet-name>springMVC</servlet-name>
- <servlet-class>org.springframework.web.servlet.DispatcherServlet</servlet-class>
- <!-- 指定springMVC配置文件的位置及文件名 -->
- <init-param>
- <param-name>contextConfigLocation</param-name>
- <param-value>classpath:springMVC.xml</param-value>
- </init-param>
- <load-on-startup>1</load-on-startup>
- </servlet>
- <servlet-mapping>
- <servlet-name>springMVC</servlet-name>
- <url-pattern>*.do</url-pattern>
- </servlet-mapping>
五、使用视图解析器
修改MyController
- mv.setViewName("welcome");//welcome为逻辑视图
welcome逻辑视图名通过内部资源适配器InternalResourceViewResolver转换成物理视图
修改springmvc.xml
- <!-- 注册视图解析器 -->
- <bean class="org.springframework.web.servlet.view.InternalResourceViewResolver">
- <property name="prefix" value="/WEB-INF/jsp/"></property>
- <property name="suffix" value=".jsp"></property>
- </bean>
六、整理
- public class MyController implements Controller {
- public ModelAndView handleRequest(HttpServletRequest request,
- HttpServletResponse response) throws Exception {
- // TODO Auto-generated method stub
- ModelAndView mv= new ModelAndView();
- mv.addObject("message","hello SpringMVC World!");
- mv.setViewName("welcome");//welcome为逻辑视图
- return mv;
- }
- }
MyController
- <?xml version="1.0" encoding="UTF-8"?>
- <beans xmlns="http://www.springframework.org/schema/beans"
- xmlns:xsi="http://www.w3.org/2001/XMLSchema-instance"
- xmlns:context="http://www.springframework.org/schema/context"
- xmlns:aop="http://www.springframework.org/schema/aop"
- xmlns:tx="http://www.springframework.org/schema/tx"
- xmlns:mvc="http://www.springframework.org/schema/mvc"
- xsi:schemaLocation="http://www.springframework.org/schema/beans
- http://www.springframework.org/schema/beans/spring-beans.xsd
- http://www.springframework.org/schema/context
- http://www.springframework.org/schema/context/spring-context.xsd
- http://www.springframework.org/schema/aop
- http://www.springframework.org/schema/aop/spring-aop.xsd
- http://www.springframework.org/schema/tx
- http://www.springframework.org/schema/tx/spring-tx.xsd
- http://www.springframework.org/schema/mvc
- http://www.springframework.org/schema/mvc/spring-mvc.xsd">
- <!-- 注册视图解析器 -->
- <bean class="org.springframework.web.servlet.view.InternalResourceViewResolver">
- <property name="prefix" value="/WEB-INF/jsp/"></property>
- <property name="suffix" value=".jsp"></property>
- </bean>
- <!-- 注册处理器 -->
- <bean id="/my.do" class="com.jmu.handlers.MyController"></bean>
- </beans>
springmvc.xml
- <?xml version="1.0" encoding="UTF-8"?>
- <web-app xmlns:xsi="http://www.w3.org/2001/XMLSchema-instance"
- xmlns="http://java.sun.com/xml/ns/javaee"
- xsi:schemaLocation="http://java.sun.com/xml/ns/javaee http://java.sun.com/xml/ns/javaee/web-app_2_5.xsd"
- id="WebApp_ID" version="2.5">
- <display-name>01-springmvc-primary</display-name>
- <!-- 注册中央调度器 -->
- <servlet>
- <servlet-name>springMVC</servlet-name>
- <servlet-class>org.springframework.web.servlet.DispatcherServlet</servlet-class>
- <!-- 指定springMVC配置文件的位置及文件名 -->
- <init-param>
- <param-name>contextConfigLocation</param-name>
- <param-value>classpath:springmvc.xml</param-value>
- </init-param>
- <load-on-startup>1</load-on-startup>
- </servlet>
- <servlet-mapping>
- <servlet-name>springMVC</servlet-name>
- <url-pattern>*.do</url-pattern>
- </servlet-mapping>
- <welcome-file-list>
- <welcome-file>index.jsp</welcome-file>
- </welcome-file-list>
- </web-app>
web.xml
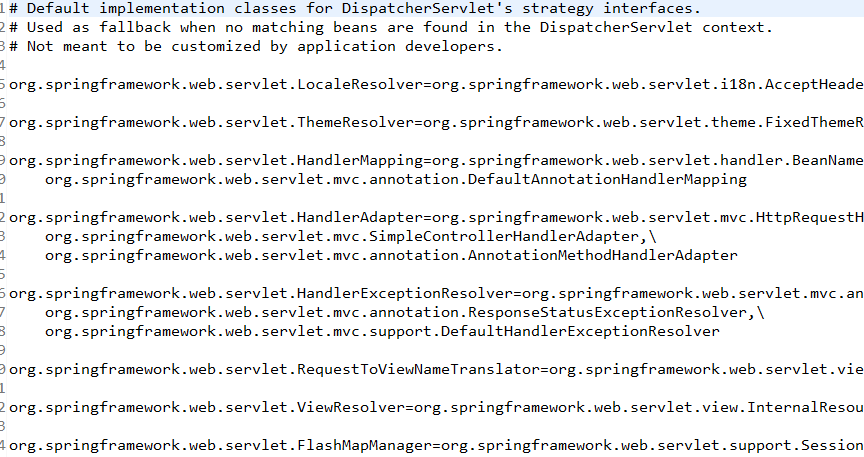
七、DispatcherServlet默认配置

SpringMVC_第一个程序的更多相关文章
- Android开发-之第一个程序:HelloWorld!
小编觉得不管学习什么编程的时候,第一个程序都是要求打印输出一个"HelloWorld!",那就从最简单的HelloWorld开始吧!哈哈~~~~ 一.创建一个Android工程 1 ...
- [Fluent NHibernate]第一个程序
目录 写在前面 Fluent Nhibernate简介 基本配置 总结 写在前面 在耗时两月,NHibernate系列出炉这篇文章中,很多园友说了Fluent Nhibernate的东东,也激起我的兴 ...
- rails再体验(第一个程序)
掌握redmine plugin开发的目标在2016年未实现,2017年继续. 选择<Ruby on Rails Tutorial>教程,windows安装railsinstaller,该 ...
- OpenGL学习笔记1——第一个程序
学习的参考书基本是按照GL编程指南,如果有消息机制概念,对于GLUT的理解是很自然的.下面就按照自己写的第一个程序详细解释一下GL,还是比较容易上手的. 程序实现的功能是,根据当前随即种子摇出来的结果 ...
- Android 第一个程序 及 环境搭配
一. JDK配置 1.找到jdk安装路径 2.配置环境变量(建议配置在系统变量里面) 1).配置JAVA_HOME变量 2).配置 CLASSPATH 环境变量 CLASSPATH=.;%JAVA_H ...
- unix 网路编程(卷一)第一个程序编译过程
unix卷一去年暑假买的到现在才开始看无比惭愧,而且惭愧第一个程序就断断续续弄了几天,要好好写程序了,马上要找工作了,下面介绍下把本书第一个程序跑起来的过程: 搜各种博客 我用系统的是ubuntu 1 ...
- Hadoop学习历程(三、第一个程序)
根据之前的操作,我们已经可以正常的启动Hadoop了,关于真正的集群我会在之后进行说明.现在我们来看一下第一个程序吧 1. 在eclipse上建立一个java项目 2. 将 /usr/hadoop/s ...
- Python2.7.3 学习——第一个程序 Hello Python World
Hello World 每学一门语言开始的第一程序都是Hello World ,当然了Python也不例外,下面开始我们的Python第一个程序编写: 1,命令行: (1)打开终端,输入python, ...
- 【 D3.js 入门系列 — 1 】 第一个程序 HelloWorld
记得以前刚上大一学 C 语言的时候,写的第一个程序就是在控制台上输出 HelloWorld .当时很纳闷,为什么要输出这个.老师解释说所有学编程入门的第一个程序都是在屏幕上输出 HelloWorld, ...
随机推荐
- BZOJ 2724: [Violet 6]蒲公英 [分块 区间众数]
传送门 题面太美不忍不放 分块分块 这种题的一个特点是只有查询,通常需要预处理:加入修改的话需要暴力重构预处理 预处理$f[i][j]$为第i块到第j块的众数,显然$f[i][j]=max{f[i][ ...
- Codeforces Round #403 (Div. 2, based on Technocup 2017 Finals)
Codeforces Round #403 (Div. 2, based on Technocup 2017 Finals) 说一点东西: 昨天晚上$9:05$开始太不好了,我在学校学校$9:40$放 ...
- BZOJ 3262: 陌上花开 [CDQ分治 三维偏序]
Description 有n朵花,每朵花有三个属性:花形(s).颜色(c).气味(m),又三个整数表示.现要对每朵花评级,一朵花的级别是它拥有的美丽能超过的花的数量.定义一朵花A比另一朵花B要美丽,当 ...
- 基于爬取百合网的数据,用matplotlib生成图表
爬取百合网的数据链接:http://www.cnblogs.com/YuWeiXiF/p/8439552.html 总共爬了22779条数据.第一次接触matplotlib库,以下代码参考了matpl ...
- 事务与隔离级别------《Designing Data-Intensive Applications》读书笔记10
和数据库打交道的程序员绕不开的话题就是:事务,作为一个简化访问数据库的应用程序的编程模型.通过使用事务,应用程序可以忽略某些潜在的错误场景和并发问题,由数据库负责处理它们.而并非每个应用程序都需要事务 ...
- yum 安装 nfs,rpcbind 出现错误 libc.so.6(GLIBC_2.14)(64bit) is needed by
错误信息: Running rpm_check_debugERROR with rpm_check_debug vs depsolve:libc.so.6(GLIBC_2.14)(64bit) is ...
- Linux常用命令手册
Linux常用命令手册 NO 分类 PS1 命令名 用法及参数 功能注解 对应章节 1 文件管理 # ls ls -a 列出当前目录下的所有文件,包括以.头的隐含文件 文件管理 # ls ls ...
- Docker Centos7 下建立 Docker 桥接网络
为什么要让docker桥接物理网络? docker默认提供了一个隔离的内网环境,启动时会建立一个docker0的虚拟网卡,每个容器都是连接到docker0网卡上的.而docker0的ip段为172.1 ...
- C# decimal 去掉小数点后的无效0
c#去掉小数点后的无效0 decimal d = 0.0500m; d.ToString("0.##")就出来了 也可以这样 string.Format("{0:0.## ...
- javascript selenium全套教程发布
为什么有这个系列 目前javascript生态非常丰富,越来越多的人开始用js去做前端的ui测试了.而selenium是web ui测试的标准解决方案,所以一套js的selenium教程是很有必要的. ...