ansible+packer+terraform在aws上布署web服务器
各工具所扮演的角色
ansible:
配合packer生成安装有apache的基础镜像
packer:
生成amazon AMI
terraform:
以packer生成的镜像为基础,布署web服务器
下面我要放各种配置文件上来了,先来个目录树,省的凌乱。。。
packer/
├── bastion.json
├── playbook.yml
└── roles
    └── httpd
        └── tasks
            └── main.yml
bastion.json(这个是packer要用到的文件)
[root@ip-172-31-42-166 packer]# cat bastion.json
{
  "variables": {
    "aws_access_key": "",
    "aws_secret_key": "",
    "aws_region": "us-west-2"
  },
  "provisioners": [
    {
      "type": "ansible",
      "playbook_file": "./playbook.yml",
      "ansible_env_vars": [
        "ANSIBLE_HOST_KEY_CHECKING=False",
        "ANSIBLE_SSH_ARGS='-o ForwardAgent=yes -o ControlMaster=auto -o ControlPersist=60s'",
        "ANSIBLE_NOCOLOR=True"
      ]

    }
  ],
  "builders": [{
    "type": "amazon-ebs",
    "access_key": "{{user `aws_access_key`}}",
    "secret_key": "{{user `aws_secret_key`}}",
    "region": "{{user `aws_region` }}",
    "source_ami": "ami-0031f978",
    "instance_type": "t2.micro",
    "ssh_username": "root",
    "ami_name": "packer-bastion {{timestamp | clean_ami_name}}"
  }]
}
下面是ansible的playbook
[root@ip-172-31-42-166 packer]# cat playbook.yml
---
- hosts: all
  remote_user: sysop
  become: yes
  vars:
    AWS_ACCESS_KEY_ID: '{{ AWS_ACCESS_KEY_ID }}'
    AWS_SECRET_ACCESS_KEY: '{{ AWS_SECRET_ACCESS_KEY }}'
    filename: '{{ filename }}'
    rolename: '{{ rolename }}'
    project: '{{ project }}'
    release: '{{ release }}'
    envname: '{{ envname }}'
    processList: '{{ processList}}'
  roles:
  - httpd
[root@ip-172-31-42-166 packer]# ls
bastion.json  playbook.yml  roles
[root@ip-172-31-42-166 packer]# cat playbook.yml
---
- hosts: all
  remote_user: sysop
  become: yes
  vars:
    AWS_ACCESS_KEY_ID: '{{ AWS_ACCESS_KEY_ID }}'
    AWS_SECRET_ACCESS_KEY: '{{ AWS_SECRET_ACCESS_KEY }}'
    filename: '{{ filename }}'
    rolename: '{{ rolename }}'
    project: '{{ project }}'
    release: '{{ release }}'
    envname: '{{ envname }}'
    processList: '{{ processList}}'
  roles:
  - httpd
下面是http的roles文件
[root@ip-172-31-42-166 packer]# cat roles/httpd/tasks/main.yml
- name: install the latest version of Apache
  yum:
    name: httpd
    state: latest
好了配置文件就这么多。
生成amazon AMI
cd packer/
packer build bastion.json
来看看aws的控制台,ami已经生成了

下面基于terraform来启动web server
先把配置文件放上,注意看注释
[root@ip-172-31-42-166 data]# cat terraform_workspace/main.tf
provider "aws" {
  region = "us-west-2"
}

resource "aws_instance" "example" {
  ami           = "ami-9842dbe0"
  instance_type = "t2.micro"
  vpc_security_group_ids = ["${aws_security_group.instance.id}"] #在这里我们引用了下面创建的安全组,没有顺序关系,terraform会自动生成顺序和依赖,使用terraform graph可以查看。

  user_data = <<-EOF
              #!/bin/bash
              /etc/init.d/httpd start
              chkconfig httpd on
              EOF

  tags {
    Name = "apache"
  }
}

resource "aws_security_group" "instance" {
  name = "terraform-example-instance"     #在这个resource里我们新建了安全组,需要在上面引用,否则无效

  ingress {
    from_port   = 80           #web线上服务器一般不开80端口,打开小于1024的端口要使用root权限,这是不安全的,一般都是前线的负载均衡器开80,然后映射到后面的高端口上。
    to_port     = 80
    protocol    = "tcp"
    cidr_blocks = ["0.0.0.0/0"]
  }
}
我们来访问一下试试:
curl http://<EC2_INSTANCE_PUBLIC_IP>:80
#成功了,显示了好大一堆,不放上来了
布署可配置的web服务器
什么是可配置的呢?我感脚就是引入变量。。。。。
所以上面的配置文件也可以写成这样式的:
[root@ip-172-31-42-166 terraform_workspace]# cat main.tf
provider "aws" {
  region = "us-west-2"
}

variable "server_port" {
  description = "define a variable server_port"
  default = 80
}

resource "aws_instance" "example" {
  ami           = "ami-9842dbe0"
  instance_type = "t2.micro"
  vpc_security_group_ids = ["${aws_security_group.instance.id}"]

  user_data = <<-EOF
              #!/bin/bash
              /etc/init.d/httpd start
              chkconfig httpd on
              EOF

  tags {
    Name = "apache"
  }
}

resource "aws_security_group" "instance" {
  name = "terraform-example-instance"

  ingress {
    from_port   = "${var.server_port}"
    to_port     = "${var.server_port}"
    protocol    = "tcp"
    cidr_blocks = ["0.0.0.0/0"]
  }
}
当然这变量还可以是一个列表,像这样:
variable "list_example" {
  description = "An example of a list in Terraform"
  type        = "list"
  default     = [1, 2, 3]
}
或者是一组映射,像这样:
variable "map_example" {
  description = "An example of a map in Terraform"
  type        = "map"

  default = {
    key1 = "value1"
    key2 = "value2"
    key3 = "value3"
  }
}
布署web服务器集群
在aws中,auto scaling group可以控制服务器的启停,实现集群操作
要创建asg的第一步就是创建启动配置,长这样的:
resource "aws_launch_configuration" "example" {
  image_id        = "ami-9842dbe0"
  instance_type   = "t2.micro"
  security_groups = ["${aws_security_group.instance.id}"]

  user_data = <<-EOF
              #!/bin/bash
              /etc/init.d/httpd start
              chkconfig httpd on
              EOF

  lifecycle {
    create_before_destroy = true   #在干掉一个机器之前,先启动一个机器 ,注意这里设置为true了,在安全组里也得设置成true,因为他们相互依赖的。
  }
}
所以安全组长这样子:
resource "aws_security_group" "instance" {
  name = "terraform-example-instance"

  ingress {
    from_port   = "${var.server_port}"
    to_port     = "${var.server_port}"
    protocol    = "tcp"
    cidr_blocks = ["0.0.0.0/0"]
  }
  lifecycle {
    create_before_destroy = true
  }
}
好了,下面就可以写安全组的source了:
resource "aws_autoscaling_group" "example" {
  launch_configuration = "${aws_launch_configuration.example.id}"

  # The same availability zone as our instances
  availability_zones = ["${split(",", var.availability_zones)}"]

  min_size = 2
  max_size = 3

  tag {
    key                 = "Name"
    value               = "terraform-asg-example"
    propagate_at_launch = true
  }
}
组合在一起,上个完整的配置文件:
provider "aws" {
  region = "us-west-2"
}

variable "server_port" {
  description = "define a variable server_port"
  default = 80
}

variable "availability_zones" {
  default     = "us-west-2a,us-west-2b,us-west-2c"
  description = "List of availability zones, use AWS CLI to find your "
}

resource "aws_instance" "example" {
  ami           = "ami-9842dbe0"
  instance_type = "t2.micro"
  vpc_security_group_ids = ["${aws_security_group.instance.id}"]

  user_data = <<-EOF
              #!/bin/bash
              /etc/init.d/httpd start
              chkconfig httpd on
              EOF

  tags {
    Name = "apache"
  }
}

resource "aws_security_group" "instance" {
  name = "terraform-example-instance"

  ingress {
    from_port   = "${var.server_port}"
    to_port     = "${var.server_port}"
    protocol    = "tcp"
    cidr_blocks = ["0.0.0.0/0"]
  }
  lifecycle {
    create_before_destroy = true
  }
}

resource "aws_launch_configuration" "example" {
  image_id        = "ami-9842dbe0"
  instance_type   = "t2.micro"
  security_groups = ["${aws_security_group.instance.id}"]

  user_data = <<-EOF
              #!/bin/bash
              /etc/init.d/httpd start
              chkconfig httpd on
              EOF

  lifecycle {
    create_before_destroy = true
  }
}

resource "aws_autoscaling_group" "example" {
  launch_configuration = "${aws_launch_configuration.example.id}"
  #availability_zones = ["${data.aws_availability_zones.all.names}"]
  availability_zones = ["${split(",", var.availability_zones)}"]

  min_size = 2
  max_size = 3

  tag {
    key                 = "Name"
    value               = "terraform-asg-example"
    propagate_at_launch = true
  }
}
在aws控制台上可以看到,新启动了两台机器。
现在我们已经有多台webserver在工作了,我们加个负载均衡器上去玩一下麻:
布署负载均衡器
关于负载均衡器,使用aws_elb resource进行配置:
resource "aws_elb" "example" {
  name               = "terraform-asg-example"
  availability_zones = ["${data.aws_availability_zones.all.names}"]
  security_groups    = ["${aws_security_group.elb.id}"]

  listener {
    lb_port           = 80
    lb_protocol       = "http"
    instance_port     = "${var.server_port}"
    instance_protocol = "http"
  }

  health_check {
    healthy_threshold   = 2
    unhealthy_threshold = 2
    timeout             = 3
    interval            = 30
    target              = "HTTP:${var.server_port}/"
  }
}
还要配置相应的安全组:
resource "aws_security_group" "elb" {
  name = "terraform-example-elb"

  ingress {
    from_port   = 80
    to_port     = 80
    protocol    = "tcp"
    cidr_blocks = ["0.0.0.0/0"]
  }

  egress {
    from_port   = 0
    to_port     = 0
    protocol    = "-1"
    cidr_blocks = ["0.0.0.0/0"]
  }
}
下面来个整体的配置文件吧,如果一个看着乱,可以拆分成多个:
provider "aws" {
  region = "us-west-2"
}

variable "server_port" {
  description = "define a variable server_port"
  default = 80
}

variable "availability_zones" {
  default     = "us-west-2a,us-west-2b,us-west-2c"
  description = "List of availability zones, use AWS CLI to find your "
}

resource "aws_instance" "example" {
  ami           = "ami-9842dbe0"
  instance_type = "t2.micro"
  vpc_security_group_ids = ["${aws_security_group.instance.id}"]

  user_data = <<-EOF
              #!/bin/bash
              /etc/init.d/httpd start
              chkconfig httpd on
              EOF

  tags {
    Name = "apache"
  }
}

resource "aws_security_group" "instance" {
  name = "terraform-example-instance"

  ingress {
    from_port   = "${var.server_port}"
    to_port     = "${var.server_port}"
    protocol    = "tcp"
    cidr_blocks = ["0.0.0.0/0"]
  }
  lifecycle {
    create_before_destroy = true
  }
}

resource "aws_security_group" "elb" {
  name = "terraform-example-elb"

  ingress {
    from_port   = 80
    to_port     = 80
    protocol    = "tcp"
    cidr_blocks = ["0.0.0.0/0"]
  }

  egress {
    from_port   = 0
    to_port     = 0
    protocol    = "-1"
    cidr_blocks = ["0.0.0.0/0"]
  }
}

resource "aws_launch_configuration" "example" {
  image_id        = "ami-9842dbe0"
  instance_type   = "t2.micro"
  security_groups = ["${aws_security_group.instance.id}"]

  user_data = <<-EOF
              #!/bin/bash
              /etc/init.d/httpd start
              chkconfig httpd on
              EOF

  lifecycle {
    create_before_destroy = true
  }
}

resource "aws_autoscaling_group" "example" {
  launch_configuration = "${aws_launch_configuration.example.id}"
  availability_zones = ["${split(",", var.availability_zones)}"]

  load_balancers    = ["${aws_elb.example.name}"]
  health_check_type = "ELB"

  min_size = 2
  max_size = 3

  tag {
    key                 = "Name"
    value               = "terraform-asg-example"
    propagate_at_launch = true
  }
}

resource "aws_elb" "example" {
  name               = "terraform-asg-example"
  availability_zones = ["${split(",", var.availability_zones)}"]
  security_groups    = ["${aws_security_group.elb.id}"]

  listener {
    lb_port           = 80
    lb_protocol       = "http"
    instance_port     = "${var.server_port}"
    instance_protocol = "http"
  }

  health_check {
    healthy_threshold   = 2
    unhealthy_threshold = 2
    timeout             = 3
    interval            = 30
    target              = "HTTP:${var.server_port}/"
  }
}

output "elb_dns_name" {
  value = "${aws_elb.example.dns_name}"
}
[root@ip-172-31-42-166 terraform_workspace]# ls
main.tf  main.tf.bak  terraform.tfstate  terraform.tfstate.backup
[root@ip-172-31-42-166 terraform_workspace]# cat main.tf
provider "aws" {
  region = "us-west-2"
}

variable "server_port" {
  description = "define a variable server_port"
  default = 80
}

variable "availability_zones" {
  default     = "us-west-2a,us-west-2b,us-west-2c"
  description = "List of availability zones, use AWS CLI to find your "
}

resource "aws_instance" "example" {
  ami           = "ami-9842dbe0"
  instance_type = "t2.micro"
  vpc_security_group_ids = ["${aws_security_group.instance.id}"]

  user_data = <<-EOF
              #!/bin/bash
              /etc/init.d/httpd start
              chkconfig httpd on
              EOF

  tags {
    Name = "apache"
  }
}

resource "aws_security_group" "instance" {
  name = "terraform-example-instance"

  ingress {
    from_port   = "${var.server_port}"
    to_port     = "${var.server_port}"
    protocol    = "tcp"
    cidr_blocks = ["0.0.0.0/0"]
  }
  lifecycle {
    create_before_destroy = true
  }
}

resource "aws_security_group" "elb" {
  name = "terraform-example-elb"

  ingress {
    from_port   = 80
    to_port     = 80
    protocol    = "tcp"
    cidr_blocks = ["0.0.0.0/0"]
  }

  egress {
    from_port   = 0
    to_port     = 0
    protocol    = "-1"
    cidr_blocks = ["0.0.0.0/0"]
  }
}

resource "aws_launch_configuration" "example" {
  image_id        = "ami-9842dbe0"
  instance_type   = "t2.micro"
  security_groups = ["${aws_security_group.instance.id}"]

  user_data = <<-EOF
              #!/bin/bash
              /etc/init.d/httpd start
              chkconfig httpd on
              EOF

  lifecycle {
    create_before_destroy = true
  }
}

resource "aws_autoscaling_group" "example" {
  launch_configuration = "${aws_launch_configuration.example.id}"
  availability_zones = ["${split(",", var.availability_zones)}"]

  load_balancers    = ["${aws_elb.example.name}"]
  health_check_type = "ELB"

  min_size = 2
  max_size = 3

  tag {
    key                 = "Name"
    value               = "terraform-asg-example"
    propagate_at_launch = true
  }
}

resource "aws_elb" "example" {
  name               = "terraform-asg-example"
  availability_zones = ["${split(",", var.availability_zones)}"]
  security_groups    = ["${aws_security_group.elb.id}"]

  listener {
    lb_port           = 80
    lb_protocol       = "http"
    instance_port     = "${var.server_port}"
    instance_protocol = "http"
  }

  health_check {
    healthy_threshold   = 2
    unhealthy_threshold = 2
    timeout             = 3
    interval            = 30
    target              = "HTTP:${var.server_port}/"
  }
}

output "elb_dns_name" {
  value = "${aws_elb.example.dns_name}"
}
注意:
配置完成的时候出了点问题,elb使用http方式检测webserver状态错误,但是tcp方式是可能,看下图;
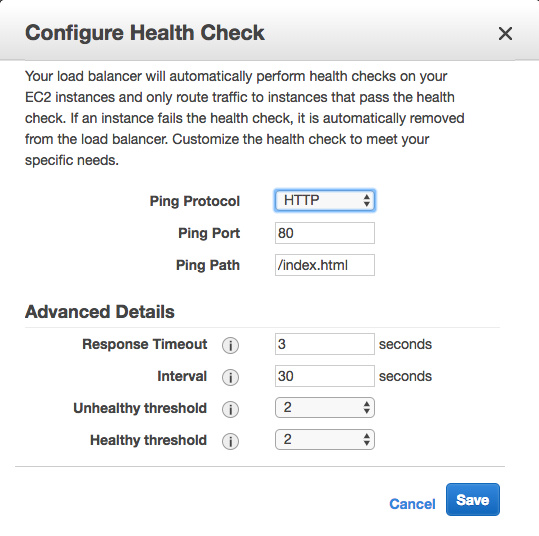
它默认去找/index.html文件了,但是我装的apache路径默认不是这个,所以检测一定是失败的。
为了节省资源,我们可以把aws刚才创建的资源都干掉,只要留着配置文件随时可以烣复:
terraform destroy
that`all thank you~
ansible+packer+terraform在aws上布署web服务器的更多相关文章
- 在公网上布署Web Api的时候,不能调用,返回404
在internet上布署web API做的站点时,发现不能调用web api的任何action, 返回404. 经过很多的努力,也找不到原因,环境是win server 2008, IIS 75. n ...
- 通过Jenkins在IIS上布署站点
当需要在多台服务器的IIS上布署站点时,如果纯粹靠人工手动完成此任务的话,过于低效,而借助Jenkins之类的自动化工具,则可以极大提升工作效率. 以下便是Jenkins Pipeline所使用的脚本 ...
- Windows server 2008 布署FTP服务器实例(适用于阿里云)!
Windows server 2008 布署FTP服务器实例(适用于阿里云). 1.打开管理.配置-用户-新建用户,如:ftp_user,并设置password.选择永只是期和password不能更改 ...
- 在 Azure VM 上安装 LEMP Web 服务器
本文逐步讲解如何在 Azure 中的 Ubuntu VM 上部署 NGINX Web 服务器.MySQL 和 PHP(LEMP 堆栈). LEMP 堆栈可以替代常用的 LAMP 堆栈,可安装在 Azu ...
- 在 Azure VM 上安装 LAMP Web 服务器
本文逐步讲解如何在 Azure 中的 Ubuntu VM 上部署 Apache Web 服务器.MySQL 和 PHP(LAMP 堆栈). 如果想要部署 NGINX Web 服务器,请参阅 LEMP ...
- Jexus是一款Linux平台上的高性能WEB服务器和负载均衡网关
什么是Jexus Jexus是一款Linux平台上的高性能WEB服务器和负载均衡网关,以支持ASP.NET.ASP.NET CORE.PHP为特色,同时具备反向代理.入侵检测等重要功能.可以这样说,J ...
- 如何在Ubuntu 16.04上安装Apache Web服务器
转载自:https://www.howtoing.com/how-to-install-the-apache-web-server-on-ubuntu-16-04 介绍 Apache HTTP服务器是 ...
- 如何在Ubuntu 18.04上安装Apache Web服务器
一. apt库安装 1.在终端输入更新检查命令,sudo apt-get update 2. 在更新完成后(如果不想检查更新,也可直接输入此步)输入:sudo apt-get install apac ...
- NodeJs+http+fs+request+cheerio 采集,保存数据,并在网页上展示(构建web服务器)
目的: 数据采集 写入本地文件备份 构建web服务器 将文件读取到网页中进行展示 目录结构: package.json文件中的内容与上一篇一样:NodeJs+Request+Cheerio 采集数据 ...
随机推荐
- ~psd面试 求最长回文序列 DP求解
链接:https://www.nowcoder.com/acm/contest/90/D来源:牛客网 掌握未来命运的女神 psd 师兄在拿了朝田诗乃的 buff 后决定去实习. 埃森哲公司注册成立于爱 ...
- 【Bootstrap】优秀小插件收集
Bootstrap中不乏很多优秀的小插件来让界面更加漂亮.比如之前做过笔记的bootstrap-fileinput,select2,datetimepicker等都是属于这一系列的.这些相对而言比较大 ...
- 【Python】 命名空间与LEGB规则
命名空间与LEGB规则 之前隐隐约约提到过一些关于Python赋值语句的特殊性的问题,这个问题的根源就在于Python中的变量的命名空间机制和之前熟悉的C也好java也好都不太一样. ■ 命名空间 所 ...
- 浅析Python多线程
学习Python多线程的资料很多,吐槽Python多线程的博客也不少.本文主要介绍Python多线程实际应用,且假设读者已经了解多线程的基本概念.如果读者对进程线程概念不甚了解,可参见知名博主 阮一峰 ...
- [BZOJ 1190][HNOI2007]梦幻岛宝珠
1190: [HNOI2007]梦幻岛宝珠 Time Limit: 10 Sec Memory Limit: 162 MBSubmit: 1057 Solved: 611[Submit][Stat ...
- Docker深入浅出系列教程——Docker简介
我是架构师张飞洪,钻进浩瀚代码,十年有余,人不堪其累,吾不改其乐.如果你和我的看法不一样,请关注我的头条号,我们一起奇闻共赏,疑义相析. 本节属于入门简介,从三个小方面进行简单介绍Docker. Do ...
- C语言博客作业--函数
一.PTA实验作业 题目1 (6-7) (1).本题PTA提交列表 (2)设计思路 设计第一个函数判断是否完数int factorsum( int number ) 定义sum.i:sum初始化归0, ...
- 视图和URL配置
视图和URL配置 实验简介 上一章里我们介绍了如何创建一个Django项目并启动Django的开发服务器.本章你将学到用Django创建动态网页的基本知识. 同时,也教会大家怎么在本地机器上建立一个独 ...
- 【iOS】OC-Quartz2D简单使用
什么是Quartz2D Quartz 2D是一个二维绘图引擎,同时支持iOS和Mac系统 作用 ? 1 2 3 4 5 6 7 8 9 <code>Quartz 2D能完成的工作 绘制图形 ...
- HTTP协议以及HTTP2.0/1.1/1.0区别
HTTP协议以及HTTP2.0/1.1/1.0区别 一.简介 摘自百度百科: 超文本传输协议(HTTP,HyperText Transfer Protocol)是互联网上应用最为广泛的一种网络协议.所 ...