创建 个人 pod
创建一个自己的 pod 大致需要以下步骤
- 创建git repository
- 编辑.podspec
- 创建LICENSE(许可证/授权)文件
- 标记 tag
- 验证
- 注册CocoaPods
- 发布
- 搜索验证
1.代码提交到github平台
在 git 平台创建自己的 repository,例如 ‘AGNetworking’
git init AGNetworking
项目创建之后,添加 README.md 文件
2.编辑.podspec
然后cd到项目的目录,执行命令,也可以使用vim创建,只要创建就可以了
// 注 AGNetworking 是框架的名称,也是 pod 用来搜索的名称

$ pod spec create AGNetworking
创建好后打开,内容如下
Pod::Spec.new do |s|

    s.name         = "AGNetworking"

    s.version      = "0.0.1"

    s.summary      = "A delightful networking framework."

    s.homepage     = "https://github.com/JumpJumpSparrow/AGNetworking.git"

    s.license      = { :type => "MIT", :file => "LICENSE" }

    s.author       = { "cunfa" => "cunfamiao@163.com" }

    s.source       = { :git => "https://github.com/JumpJumpSparrow/AGNetworking.git", :tag => s.version }

    s.source_files  = "AGNetworking/AGNetworking/AGNetworking/AGNetworking.h"

    s.requires_arc = true

end
接下来讲解一下每行代码的含义
s.name:名称,pod search 搜索的关键词,注意这里一定要和 .podspec 的名称一样,否则报错
s.version:版本号
s.ios.deployment_target:支持的pod最低版本
s.summary: 简介
s.homepage:项目主页地址
s.license:许可证
s.author:作者
s.social_media_url:社交网址,这里我写的微博默认是Twitter,如果你写Twitter的话,你的podspec发布成功后会@你
s.source:项目的地址
s.source_files:需要包含的源文件
s.resources: 资源文件
s.requires_arc: 是否支持ARC
s.dependency:依赖库,不能依赖未发布的库
s.dependency:依赖库,如有多个可以这样写
例如
s.dependency = 'AFNetworking'
s.license= { :type => "MIT", :file => "LICENSE" }
这里建议大家这样写,如果写别的会报警告,导致后面一直提交失败
- source_files:写法及含义
建议大家写第一种或者第二种
"AGNetworking/*"

"AGNetworking/*.{h,m}"
“*” 表示匹配所有文件
“*.{h,m}” 表示匹配所有以.h和.m结尾的文件
“**” 表示匹配所有子目录
s.source 常见写法
s.source = { :git => "https://github.com/JumpJumpSparrow/AGNetworking.git", :commit => "68defea" }

s.source = { :git => "https://github.com/JumpJumpSparrow/AGNetworking.git", :tag => 1.0.0 }

s.source = { :git => "https://github.com/JumpJumpSparrow/AGNetworking.git", :tag => s.version }
- commit => "68defea" 表示将这个Pod版本与Git仓库中某个commit绑定
- tag => 1.0.0 表示将这个Pod版本与Git仓库中某个版本的comit绑定
- tag => s.version 表示将这个Pod版本与Git仓库中相同版本的comit绑定
3.创建LICENSE(许可证/授权)文件,此文件必须要有
只需要把前面的版权改一下就行了,后面的都一样
创建一个文件名字命名为LICENSE,内容为:
Copyright (c) 2011-2016 AGNetworking Software Foundation (https://github.com/JumpJumpSparrow/AGNetworking.git)

Permission is hereby granted, free of charge, to any person obtaining a copy

of this software and associated documentation files (the "Software"), to deal

in the Software without restriction, including without limitation the rights

to use, copy, modify, merge, publish, distribute, sublicense, and/or sell

copies of the Software, and to permit persons to whom the Software is

furnished to do so, subject to the following conditions:

The above copyright notice and this permission notice shall be included in

all copies or substantial portions of the Software.

THE SOFTWARE IS PROVIDED "AS IS", WITHOUT WARRANTY OF ANY KIND, EXPRESS OR

IMPLIED, INCLUDING BUT NOT LIMITED TO THE WARRANTIES OF MERCHANTABILITY,

FITNESS FOR A PARTICULAR PURPOSE AND NONINFRINGEMENT. IN NO EVENT SHALL THE

AUTHORS OR COPYRIGHT HOLDERS BE LIABLE FOR ANY CLAIM, DAMAGES OR OTHER

LIABILITY, WHETHER IN AN ACTION OF CONTRACT, TORT OR OTHERWISE, ARISING FROM,

OUT OF OR IN CONNECTION WITH THE SOFTWARE OR THE USE OR OTHER DEALINGS IN

THE SOFTWARE.
将包含配置好的 .podspec, LICENSE 的项目提交 Git
4.打tag
因为cocoapods是依赖tag版本的,所以必须打tag,
以后再次更新只需要把你的项目打一个tag
然后修改.podspec文件中的版本接着提交到cocoapods官方就可以了,提交命令请看下面
- 执行命令
//为git打tag, 第一次需要在前面加一个v

git tag "v0.0.1"

//将tag推送到远程仓库

git push --tags
给 repository 打tag,cd 到 项目的目录下
git tag 0.0.1 -m '备注消息'
然后把打好的 tag push 到 远端 仓库
git push origin --tags
然后在git上就能看到 打的tag了

5.验证.podspec文件
- 到此检查一下你工程下面的文件, 你的项目, .podspec文件, LICENSE文件
验证会先测试本地 .podspec 文件是否存在语法错误.
然后执行命令
// --verbose 如果验证失败会报错误信息

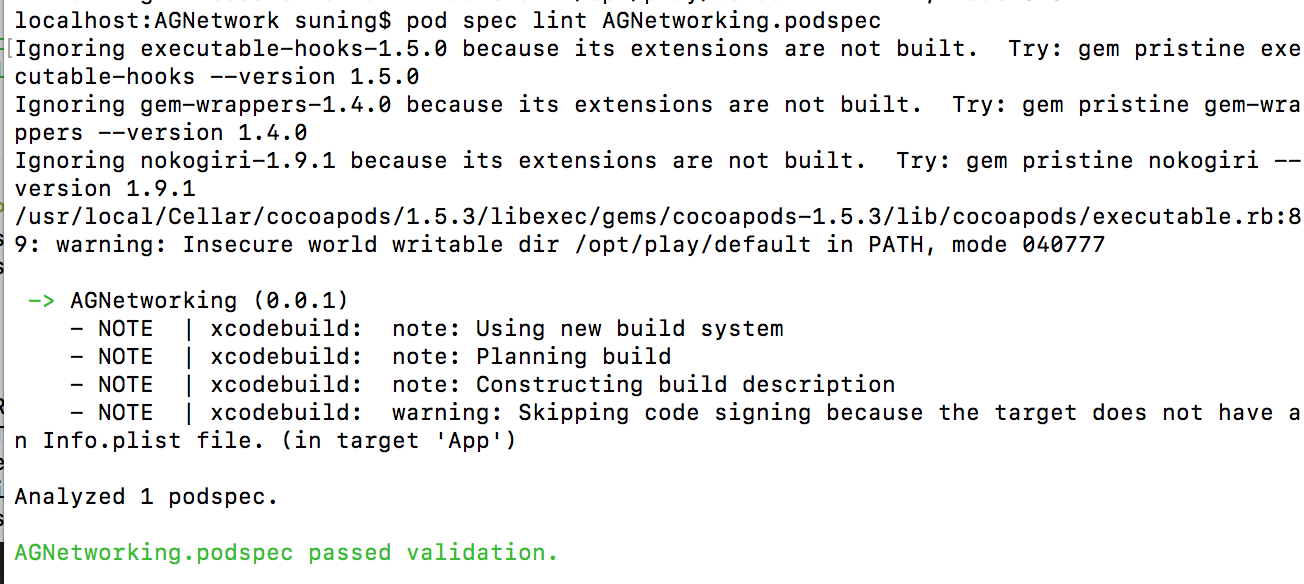
pod spec lint AGNetworking.podspec
验证过程中:
-> AGNetworking
验证成功后:
AGNetworking.podspec passed validation.

验证失败:
[!] The spec did not pass validation, due to 1 error.
这个过程会出现很多错误,这里不一一列举,大家按照错误信息自行修改,不过一般不会出现错误,只要你按照步骤做,基本上是没有问题的
清除缓存
pod cache clean --all 清除缓存
6.注册Trunk
trunk需要CocoaPods 0.33版本以上,用pod --version
命令查看版本,
- 如果版本低,需要升级:
sudo gen install cocoapods

pod setup
- 已经注册过的不需要注册,怎么看自己有没有注册
pod trunk me
- 我的注册信息
-Name:     coderYJ

  - Email:    xxxxxxx

  - Since:    August 12th, 04:37

  - Pods:

    - AGNetworking

  - Sessions:

    - August 12th, 04:37 -           Unverified. IP: 113.111.64.45

    Description: macbook pro

    - August 12th, 04:39 - December 18th, 21:11. IP: 113.111.64.45

    Description: macbook pro
- 注册
// 加上--verbose可以输出详细debug信息,方便出错时查看。

pod trunk register cunfamiao@163.com "JumpJumpSparrow" --verbose
注册完成之后会给你的邮箱发个邮件,进入邮箱邮件里面有个链接,需要点击确认一下
7.发布 pod
发布时会验证 Pod 的有效性
pod trunk push AGNetworking.podspec

发布成功后的信息,终端中的信息
localhost:AGNetwork suning$ pod trunk push AGNetworking.podspec
Ignoring executable-hooks-1.5.0 because its extensions are not built. Try: gem pristine executable-hooks --version 1.5.0
Ignoring gem-wrappers-1.4.0 because its extensions are not built. Try: gem pristine gem-wrappers --version 1.4.0
Ignoring nokogiri-1.9.1 because its extensions are not built. Try: gem pristine nokogiri --version 1.9.1
/usr/local/Cellar/cocoapods/1.5.3/libexec/gems/cocoapods-1.5.3/lib/cocoapods/executable.rb:89: warning: Insecure world writable dir /opt/play/default in PATH, mode 040777
Updating spec repo `master`
CocoaPods 1.7.0.beta.2 is available.
To update use: `gem install cocoapods --pre`
[!] This is a test version we'd love you to try.
For more information, see https://blog.cocoapods.org and the CHANGELOG for this version at https://github.com/CocoaPods/CocoaPods/releases/tag/1.7.0.beta.2
Validating podspec
-> AGNetworking (0.0.1)
- NOTE | xcodebuild: note: Using new build system
- NOTE | xcodebuild: note: Planning build
- NOTE | xcodebuild: note: Constructing build description
- NOTE | xcodebuild: warning: Skipping code signing because the target does not have an Info.plist file. (in target 'App')
Updating spec repo `master`
CocoaPods 1.7.0.beta.2 is available.
To update use: `gem install cocoapods --pre`
[!] This is a test version we'd love you to try.
For more information, see https://blog.cocoapods.org and the CHANGELOG for this version at https://github.com/CocoaPods/CocoaPods/releases/tag/1.7.0.beta.2
--------------------------------------------------------------------------------
创建 个人 pod的更多相关文章
- Docker Kubernetes 创建管理 Pod
Docker Kubernetes 容器扩容与缩容 环境: 系统:Centos 7.4 x64 Docker版本:18.09.0 Kubernetes版本:v1.8 管理节点:192.168.1.79 ...
- kubenetes创建一个pod应用
Pod是可以创建和管理Kubernetes计算的最小可部署单元.一个Pod代表着集群中运行的一个进程.每个pod都有一个唯一的ip. 一个pod类似一个豌豆荚,包含一个或多个容器(通常是docker) ...
- 3.创建一个pod应用
创建一个应用:k8s增删查改: pod创建:kubectl run nginx-deploy --image=nginx:1.14-alpine --port=80 --replicas=1 [roo ...
- 如何创建私有pod三方库
1.先登录github或者开源中国码云,创建远程仓库,用来存放库文件代码 仓库创建完成,得到远程仓库地址,并保存备用 2.创建本地代码库 打开终端,cd到你想创建的文件夹下,使用命令:pod lib ...
- kube-batch 创建的pod 一直是Pending
官网的例子 apiVersion: batch/v1 kind: Job metadata: name: qj-1 spec: backoffLimit: 6 completions: 6 paral ...
- 创建podSpec,使用pod管理第三方库
提要: podfile文件会先读取.podspec文件,根据.podspec文件的指向来下载第三方库到项目中. 本文先通过一.二.三项,这三个步骤讲解了如何建立一个.podspec文件在本地.coco ...
- [CocoaPods]使用Pod Lib创建
入门 我们将使用pod lib create引导过程来创建整个pod .那么让我们从初始命令开始: pod lib create MyLibrary 注意:要使用您自己的pod-template,您可 ...
- Kubernetes中pod创建流程
转自:https://blog.csdn.net/yan234280533/article/details/72567261 Pod是Kubernetes中最基本的部署调度单元,可以包含contain ...
- kubectl 创建 Pod 背后到底发生了什么?
原文链接:kubectl 创建 Pod 背后到底发生了什么? 想象一下,如果我想将 nginx 部署到 Kubernetes 集群,我可能会在终端中输入类似这样的命令: $ kubectl run - ...
随机推荐
- Vuejs入门级简单实例
Vue作为2016年最火的框架之一,以其轻量.易学等特点深受大家的喜爱.今天简单介绍一下Vue的使用. 首先,需要在官网下载vuejs,或者直接用cdn库.以下实例使用Vue实现数据绑定与判断循环: ...
- js点击事件在苹果端失效的问题
在安卓机上,我们随意定义点击事件也能够在找到点击的元素,但是在苹果端上就是不行,怎么点击都没有效果.这是因为在苹果机上window禁止了手指误点功能,必须解除这一功能,或者给点击事件指引某个元素上绑定 ...
- redux-devtools的使用
1.浏览器里安装redux-devtools 2.在项目的入口文件里 找到 createStore函数调用的地方,给它加第二个参数 window.__REDUX_DEVTOOLS_EXTENSION ...
- 图片(imageView)
图片(imageView): 常用属性: android:scaleType(图片显示的格式) android:src(图片源,一般使用的资源) android:scaleType属性的常用取值 0. ...
- Springmvc和Mybatis中常用的注解
使用注解来构造IoC容器 用注解来向Spring容器注册Bean.需要在applicationContext.xml中注册<context:component-scan base-package ...
- SVN合并时报错:合并跟踪不允许丢失子树Merge tracking not allowed with missing subtrees; try restoring these items
使用的是TortoiseSVN; Merge tracking not allowed with missing subtrees; try restoring these items 下面会有跟着几 ...
- socket概念 套接字
理解socket soxket因为TCP是面向流的,你发的信息如果很多很快,TCP这样就会形成黏包 Socket是应用层与TCP/IP协议族通信的中间软件抽象层,它是一组接口.在设计模式中,Socke ...
- xise官方网站|XISE官网|xise最新版下载|超级XISE WBMS管理V12.0版本官方网站|
诠释: 1. 破解VIP登陆限制 2.去后门 (自查) 下载地址 :https://pan.baidu.com/s/1eR2rUOM 查毒地址:http://a.virscan.org/a3983f3 ...
- [BZOJ 3992][SDOI2015]序列统计
3992: [SDOI2015]序列统计 Time Limit: 30 Sec Memory Limit: 128 MBSubmit: 2275 Solved: 1090[Submit][Stat ...
- Python 执行命令行操作。
os.system os.popen() commands.getstatusoutput(cmd) (status, output) = commands.getstatusoutput('cat ...
