DEPLOYING NATIVE UWP (UNIVERSAL WINDOWS PLATFORM) APPS FOR JAVA DEVELOPERS & PUBLISHING THEM TO THE MICROSOFT STORE
UWP Apps may distributed in 2 different ways:
In the Windows App Store. (This should be used for deployment of any production app).
Outside of the Windows App Store via sideloading directly onto a device. This should only be used for development.
Deploying Outside of the Windows App Store (Sideloading)
UWP apps may be deployed directly to Windows 10 desktop and mobile devices without any need to involve the Windows Store. This process is only realistic, though, for testing and debugging your app during development because it requires you to enable "Development" mode on the device. In addition, installation is a little bit more complicated than simply downloading an app over the internet. The process for deploying to Windows 10 desktop devices is different than the process for mobile devices. These are described in the following sections.
Side-loading to Windows 10 Mobile Devices
Enabling Developer Mode on Device
Before you can side-load apps onto your phone, you’ll need to set up your phone for development.
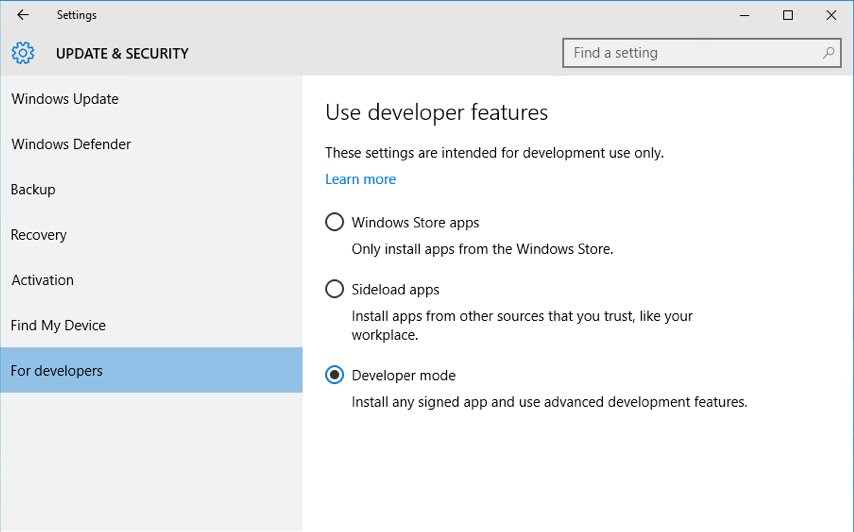
In "Settings", select "Update & Security" > "For developers"

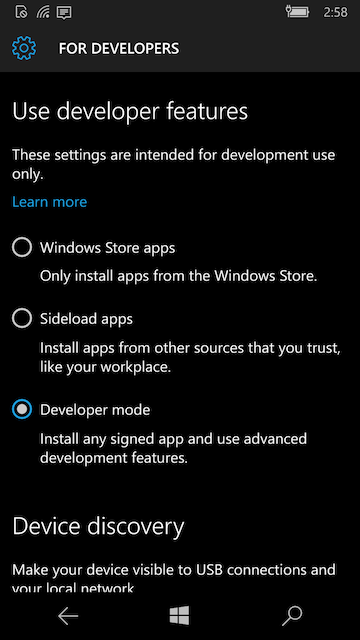
Select "Developer mode"
Under "Device Discovery", make sure that the "Make your device visible to USB connections and your local network" is set to "On".
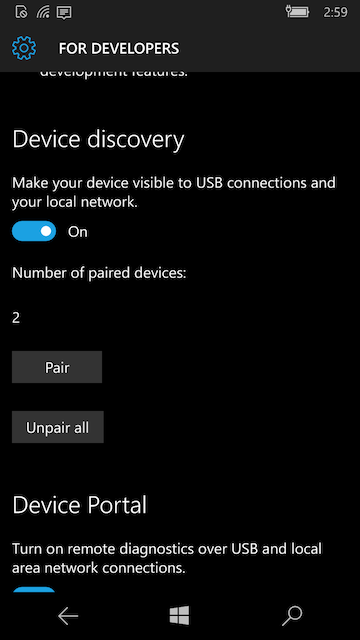
Make sure that "Device Portal" is set to "On"
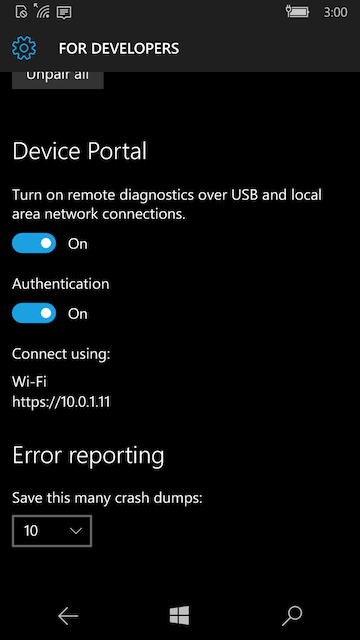
When you switch "Device Portal" to "On" it should show you an address that you can access the Phone at via wifi. (E.g. https://10.0.1.11). Remember this address, you’re going to use it to install all of your apps onto the device.
This will be a local address within your local network. It won’t be available to the outside world.
At this point, your phone should be ready to receive "Side-loaded" apps. This was a one-time setup, so you shouldn’t have to do it again, until you set up another device.
Building App for UWP
Now that your device is set up for development, you can proceed to build your app.
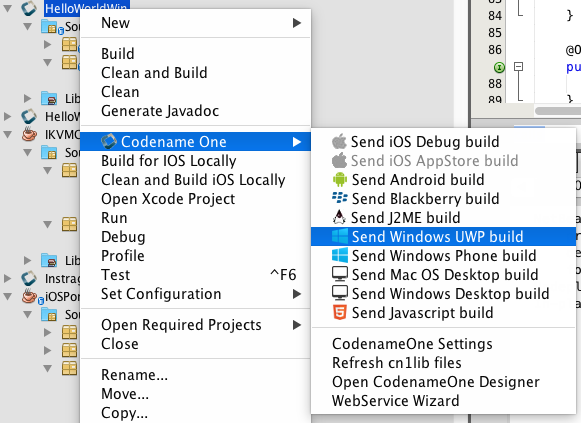
Select the "Mobile Debug Build" option in the UWP Codename One Settings.
Select the "Send Windows UWP Build" option in the Codename One menu of your IDE. This will initiate the build on the Codename One build server.
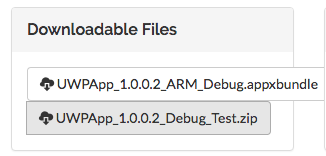
Log into the Codename One dashboard to watch the build progress. When it is complete, you’ll be able to download the ".appxbundle" file to your desktop.
You cannot simply download the .appxbundle file directly to your Windows Phone 10 mobile device and install it. It will indeed allow you to download it, and will give you an option to install it, but the install will silently fail.
Installing App On Device
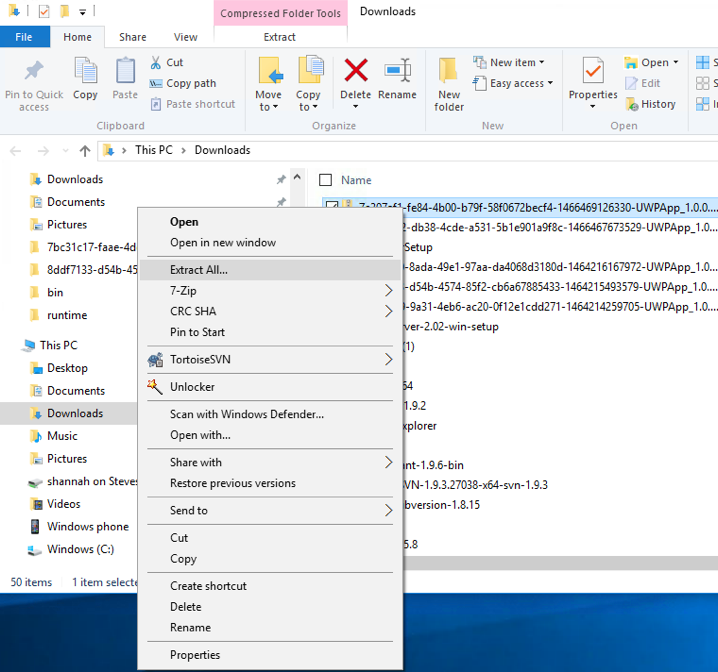
Point your computer’s web browser to the address for your mobile device. (This is the address listed when you turned on the "Device Portal" in the "Enabling Developer Mode on Device" section above. This will open the App Manager page.
Click on the "Apps" item in the left menu.
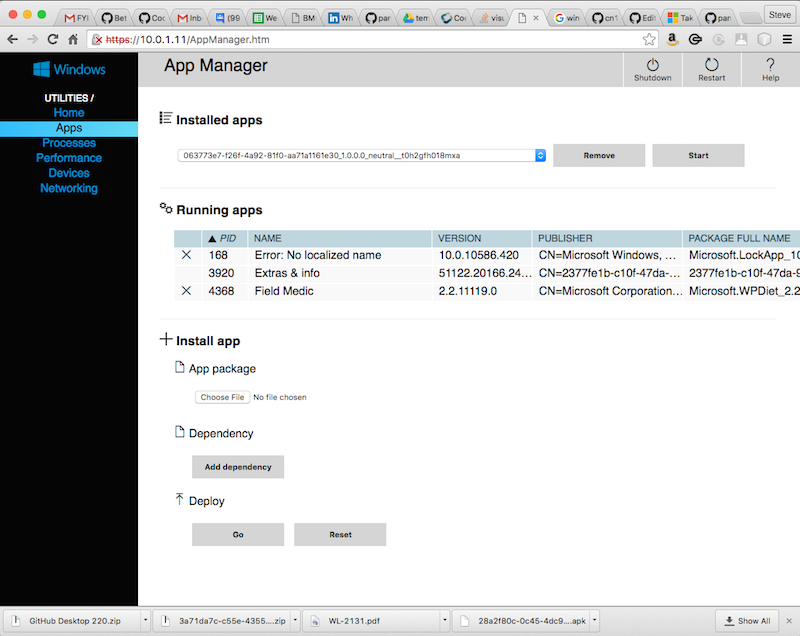
If this is the first time installing a UWP (debug) app on your device, you will need to install the dependencies. You can find the dependencies for mobile/ARM apps here. You’ll need to install both
Microsoft.NET.CoreRuntime.1.0.appxandMicrosoft.VCLibs.ARM.Debug.14.00.appx. If this is not the first time installing a UWP app, you can skip to the next step.Under the "Install App" section, click the "Choose File" button and navigate through the file chooser to select the "Microsoft.NET.CoreRuntime.1.0.appx" file. Then click "Go".
Do the same for the "Microsoft.VCLibs.ARM.Debug.14.00.appx" file.
Under the "Install App" section, click the "Choose File" button and navigate through the file chooser to select the .appxbundle file for your app.
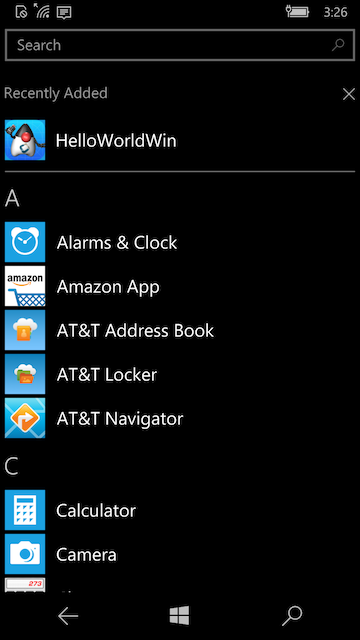
Once you have the appxbundle selected, you should press "Go" under the "Deploy" subheading. This will install the app and, if all went well, your app will appear in the "Recently Added" section in the apps list of the phone.
Side-loading to Windows 10 Desktop Devices
Enabling Developer Mode on PC
The easiest way to be able to run your development apps on a Windows 10 PC is to enable developer mode. This will allow you to install any app even if it is just "self-signed".
To enable developer mode, open "Settings", then select "Updates an Security". Under the "For Developers" menu item, select "Developer Mode" as shown below:
Building the App
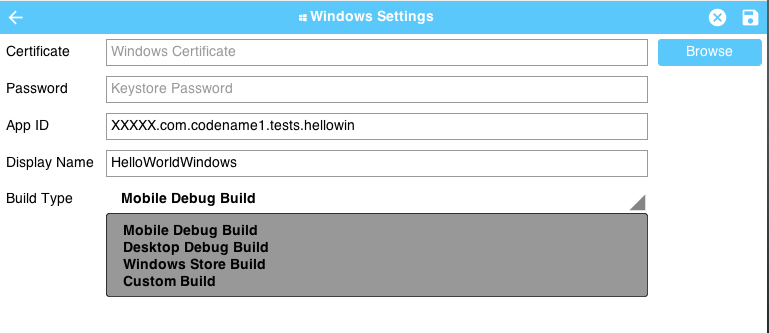
Before building the app, you’ll need to ensure that the build target is set to "Debug Desktop" in the Codename One Settings panel for Windows apps.
Steps:
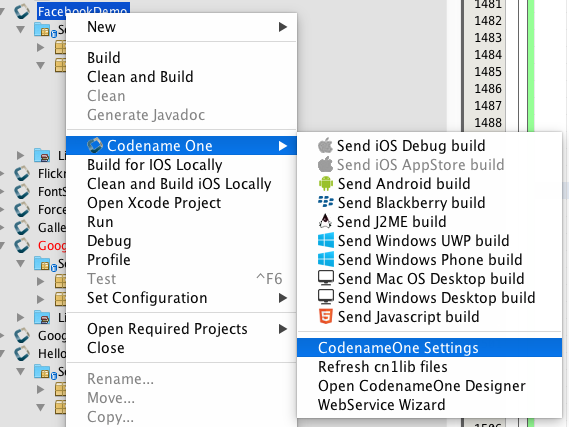
Open Codename One Settings (steps vary by IDE). On Netbeans you will find "Codename One Settings" by right clicking your project’s node in the project explorer, and look in the "Codename One" submenu:
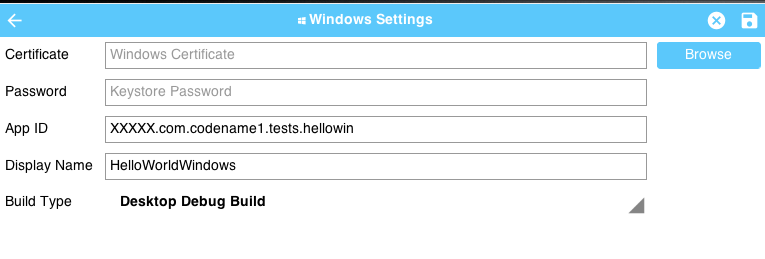
Click on "Windows Settings":
Under "Build Type", make sure that "Desktop Debug Build" is selected, as shown below:
Save the changes by clicking the "Disk" icon in the upper right:

Now you can proceed to send the build to the build server.
Select the "Send Windows UWP Build" option in the Codename One menu of your IDE. This will initiate the build on the Codename One build server.
Log into the Codename One dashboard to watch the build progress. When it is complete, you’ll be able to download the ".zip" file to the Windows 10 PC on which you wish to install the app.
Installing the App
Start by extracting the .zip file. (Navigate to the folder where the zip was downloaded, right click it, and select "Extract all" as shown below:
After extraction, open the resulting directory. You should see contents similar to the following:

Downloading Dependencies
If this is your first time installing a UWP app on this PC, you may need to add the dependencies before you can install. You can download the dependencies here. Extract "Dependencies.zip" and copy the resulting "Dependencies" directory into the app install directory. Your app install directory should now look like:

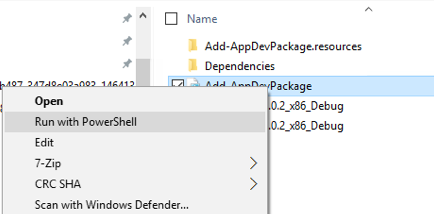
Running the Powershell Script
We are finally at the point where we can run the installer.
Right-click on the "Add-AppDevPackage" icon, and select "Run in Powershell", as shown:
You may be prompted that you need to change the execution policy, in Powershell:
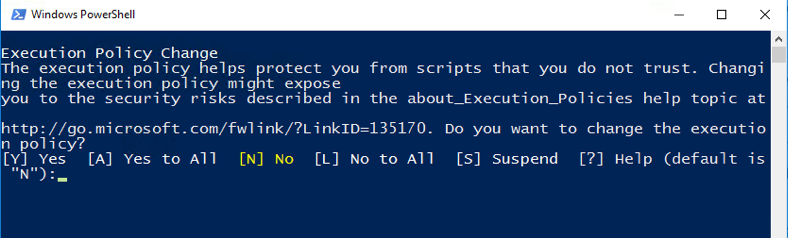
Enter "Y" at the prompt to allow this.
If all goes well, you should see a message saying that the app as successfully installed.
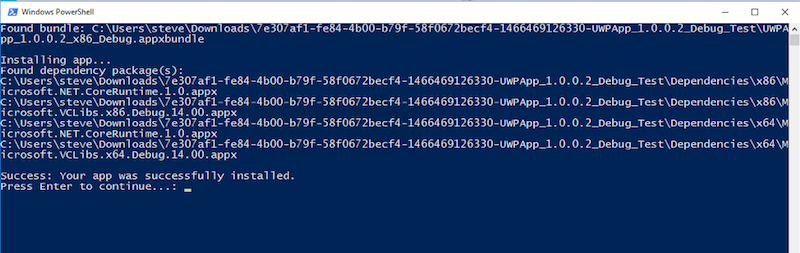
And if you look in your "Windows Menu" under "All Apps", you should see your app listed there:
Building for the Windows Store
If you want to be able to distribute your app to the public, the Windows Store is your best channel. Building for the Windows store involves roughly 3 steps:
Reserve a name for your app in the Windows Store
Build your app using the "Windows Store Upload" build type.
Upload the resulting .appxupload file to the Windows store.
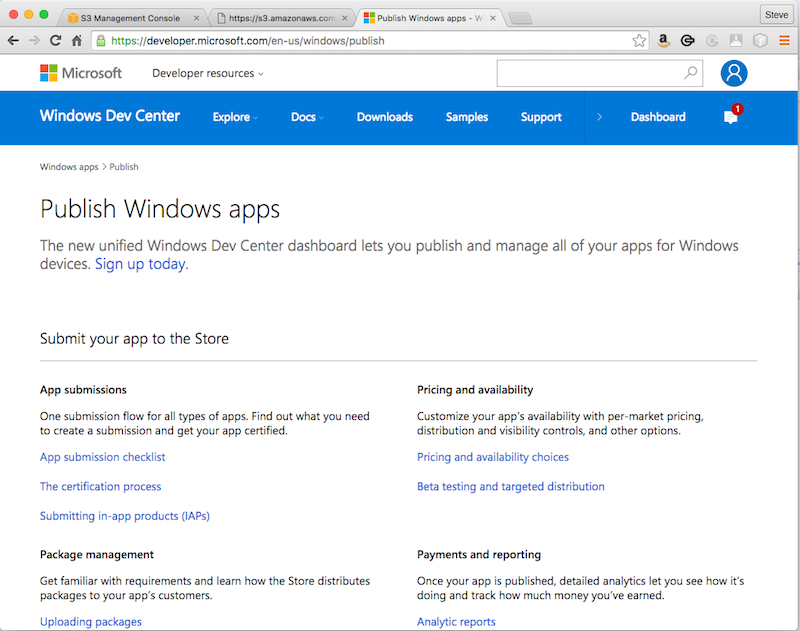
Let’s go through these steps in more detail. Start here.
If you don’t already have an account, sign up for one. Then log in. Once logged in, you can click the "Dashboard" link on the toolbar.
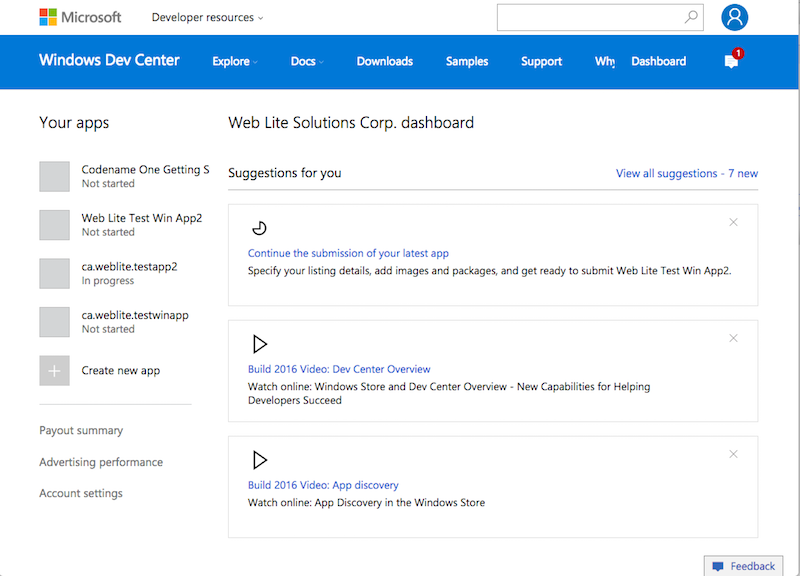
Under the "Your apps" section (on the left in the above screenshot), click the "Create new app" button.
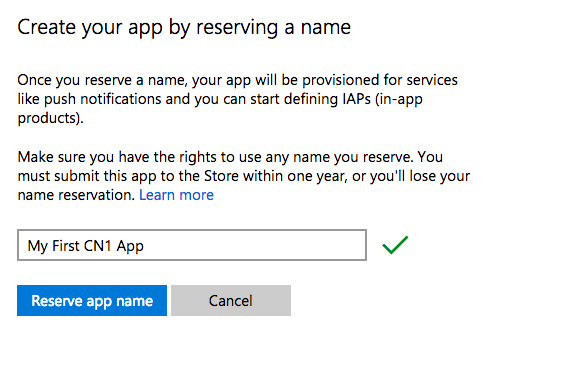
Enter a name for your app, and click "Reserve app name".
If the name was available, it should take you to the app overview page for your new app. There’s quite a few options there to play with, but we’re not going to worry about any of them for now. All we need to know is:
Your App’s ID
Your App’s Publisher ID
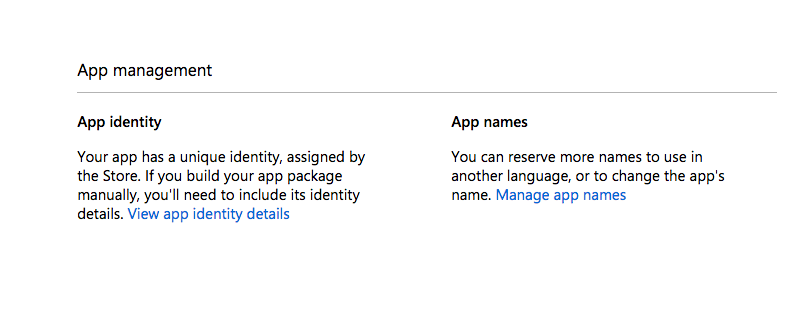
You can get this information by scrolling down to the bottom of the "App overview" page and clicking the "View app identity details" under the "App Management" > "App identity" section:
You’ll see a page with the information we need shown below:
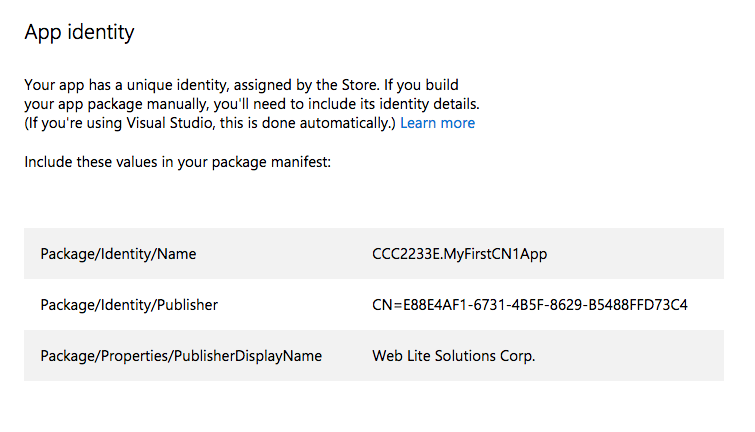
The next step is to copy this information into your Codename One project.
Open up the Codename One Settings for your project and go to the "Windows Settings" section.
Copy and paste the "Package/Identity/Name" and "Package/Properties/PublisherDisplayName" values from the windows store into the "App ID" and "Publisher Display Name" fields respectively.
| It is important that your App ID and Publisher Display Name match exactly what you have in the store, or your app will fail at the validation stage when you try to upload your app to the store. |
Next, click on the "Generate" button next to the Certificate field.
This will open a dialog titled "Certificate Generator". Paste the value from the "Package/Identity/Publisher" listed in the Windows Store into the Publisher ID field as shown below:
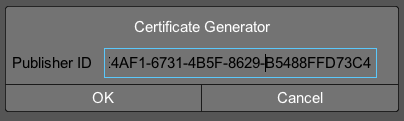
Then click OK. This will generate a .pfx file inside your project folder.
The "Display Name" must also match that app name in the store.
Finally, make sure that "Windows Store Upload" is selected in the "Build Type" field. For the example above, my settings form looks like the following screenshot when I am done.
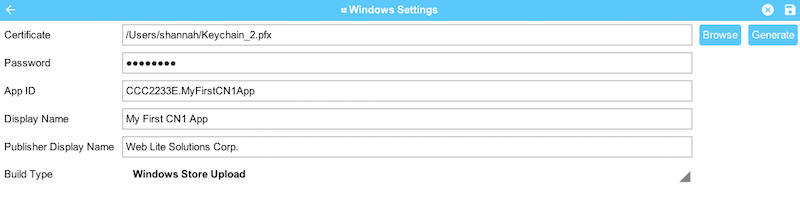
When you are done, hit the "Save" icon in the upper right corner of the window to save your changes.
Finally, select "Codename One" > "Send Windows UWP Build" in your IDE’s project explorer.
This will produce an .appxupload file that you can upload to the Windows Store.
See the Microsoft’s documentation on uploading app packages for more information on the remaining steps.
Debugging UWP Apps
On most platforms, there is a device log that records errors, exceptions, and messages written to STDOUT. UWP, unfortunately, doesn’t seem to provide this. If you are running on Windows Phone 10, there doesn’t seem to be any device log at all. There is a separate program called "Field Medic" that you can use to do some logging, but it doesn’t capture application errors or STDOUT messages.
The best way to debug apps on device is to enable crash protection in your app. This can be enabled by adding the following to your app’s init() method:
Log.bindCrashProtection(true);With crash protection enabled, you’ll receive an email whenever an exception is thrown that isn’t caught in your application code. The email will include the stack trace of the error along with any output you had previously provided using the com.codename1.io.Log class (e.g. Log.p() and Log.e()).
| A Pro account (or higher) is required to receive crash protection emails. |
No Line Numbers in Stack Traces
One major annoyance of UWP is that it doesn’t provide line numbers in its stack traces. Here is what you can expect to see in a stack trace:
[EDT] 0:0:7,683 - Results null

[EDT] 0:0:7,799 - Exception: java.lang.NullPointerException - null

   at com.codename1.ui.Display.invokeAndBlock(Runnable r, Boolean dropEvents)[EDT] 0:0:7,815 - Exception in AppName version 1.1

[EDT] 0:0:7,830 - OS win

[EDT] 0:0:7,836 - Error java.lang.NullPointerException

[EDT] 0:0:7,836 - Current Form null

[EDT] 0:0:7,836 - Exception: java.lang.NullPointerException - null

at System.Environment.GetStackTrace(Exception e, Boolean needFileInfo)

   at System.Environment.get_StackTrace()

   at UWPApp.IKVMReflectionHelper.getCurrentStackTrace()

   at java.lang.ThrowableHelper.getCurrentStackTrace()

   at java.lang.Throwable..ctor()

   at java.lang.Exception..ctor()

   at java.lang.RuntimeException..ctor()

   at java.lang.NullPointerException..ctor()

   at java.lang.Throwable.__mapImpl(Exception )

   at IKVM.Internal.ExceptionHelper.MapException[T](Exception x, Boolean remap, Boolean unused)

   at IKVM.Runtime.ByteCodeHelper.MapException[T](Exception x, MapFlags mode)

   at com.codename1.ui.Display.invokeAndBlock(Runnable r, Boolean dropEvents)

   at com.codename1.ui.Display.invokeAndBlock(Runnable r)

   at com.codename1.impl.SilverlightImplementation.editString(Component n1, Int32 n2, Int32 n3, String n4, Int32 n5)

   at com.codename1.impl.CodenameOneImplementation.editStringImpl(Component cmp, Int32 maxSize, Int32 constraint, String text, Int32 initiatingKeycode)

   at com.codename1.ui.Display.editString(Component cmp, Int32 maxSize, Int32 constraint, String text, Int32 initiatingKeycode)

   at com.codename1.ui.Display.editString(Component cmp, Int32 maxSize, Int32 constraint, String text)

   at com.codename1.ui.TextArea.editString()

   at com.codename1.ui.TextArea.pointerReleased(Int32 x, Int32 y)

   at com.codename1.ui.TextField.pointerReleased(Int32 x, Int32 y)

   at com.codename1.ui.Form.pointerReleased(Int32 x, Int32 y)

   at com.codename1.ui.Component.pointerReleased(Int32[] x, Int32[] y)

   at com.codename1.ui.Display.handleEvent(Int32 offset)

   at com.codename1.ui.Display.edtLoopImpl()

   at com.codename1.ui.Display.mainEDTLoop()

   at com.codename1.ui.RunnableWrapper.run()

   at com.codename1.impl.CodenameOneThread.run()

   at java.lang.Thread.threadProc2()

   at java.lang.Thread.threadProc()

   at java.lang.Thread.1.Invoke()

   at com.codename1.impl.NativeThreadImpl.<>c__DisplayClass6_0.<init>b__0()

   at System.Threading.Tasks.Task.InnerInvoke()

   at System.Threading.Tasks.Task.Execute()

   at System.Threading.Tasks.Task.ExecutionContextCallback(Object obj)

   at System.Threading.ExecutionContext.Run(ExecutionContext executionContext, ContextCallback callback, Object state)

   at System.Threading.Tasks.Task.ExecuteWithThreadLocal(Task& currentTaskSlot)

   at System.Threading.Tasks.Task.ExecuteEntry(Boolean bPreventDoubleExecution)

   at System.Threading.Tasks.ThreadPoolTaskScheduler.LongRunningThreadWork(Object obj)

   at System.Threading.ThreadHelper.ThreadStart_Context(Object state)

   at System.Threading.ExecutionContext.Run(ExecutionContext executionContext, ContextCallback callback, Object state)

   at System.Threading.ThreadHelper.ThreadStart(Object obj)

Originating from:

Message=Object reference not set to an instance of an object.

   at com.propertycross.codename1.PropertyCross.1.run()

   at com.codename1.ui.Display.processSerialCalls()

   at com.codename1.ui.Display.edtLoopImpl()

   at com.codename1.ui.Display.invokeAndBlock(Runnable r, Boolean dropEvents)
It will show you the call stack with the names of the methods. But it won’t show you the line numbers. If the stack trace isn’t specific enough, you can add Log.p() statements in various positions in my code to help narrow down the source of the exception.
Customizing the Status Bar
On mobile, the status bar (the bar across the top of the screen with the time, battery level etc…) is updated each time a form is shown. The foreground color, background color, and background opacity are set using the unselected style of the form being shown.
You can override these colors application-wide using the following display properties:
windows.StatusBar.ForegroundColor- A string representation of an integer RGB color.windows.StatusBar.BackgroundColor- A string representation of an integer RGB color.windows.StatusBar.BackgroundTransparency- A string representation of 0-255 integer.
e.g.
Display d = Display.getInstance();

d.setProperty("windows.StatusBar.ForegroundColor", String.valueOf(0xff0000));  // red

d.setProperty("windows.StatusBar.BackgroundColor", String.valueOf(0xffffff));  // white

d.setProperty("windows.StatusBar.BackgroundOpacity", String.valueOf(255));  // fully opaque
Associating App with File Types
It is possible to associate your application with file types on UWP using the standard Codename One "AppArg" method in conjunction with the windows.extensions build hint. Any content you place in the windows.extensions build hint will be embedded inside the <Extensions/> section of the Package.appxmanifest file. Then if the app is opened as a result of the user opening a file of the specified type, then the path to that file will be made available to the app via Display.getProperty("AppArg").
Example windows.extensions Value:
The following value would associate the app with the file extension ".alsdk". This example is taken from this MSDN document.
<uap:Extension Category="windows.fileTypeAssociation">

  <uap:FileTypeAssociation Name="alsdk">

    <uap:Logo>images\icon.png</uap:Logo>

    <uap:SupportedFileTypes>

      <uap:FileType>.alsdk</uap:FileType>

    </uap:SupportedFileTypes>

  </uap:FileTypeAssociation>

</uap:Extension>
To register your app to be able to handle PDFs, you would add:
<uap:Extension Category="windows.fileTypeAssociation">

    <uap:FileTypeAssociation Name="pdf">

        <uap:Logo>images\icon.png</uap:Logo>

        <uap:SupportedFileTypes>

            <uap:FileType ContentType="application/pdf">.pdf</uap:FileType>

        </uap:SupportedFileTypes>

    </uap:FileTypeAssociation>

</uap:Extension>
For more information about using the "AppArg" property, see this blog post which describes its usage on iOS and Android for intercepting URL types.
DEPLOYING NATIVE UWP (UNIVERSAL WINDOWS PLATFORM) APPS FOR JAVA DEVELOPERS & PUBLISHING THEM TO THE MICROSOFT STORE的更多相关文章
- 操作系统-Windows:UWP(Universal Windows Platform)
ylbtech-操作系统-Windows:UWP(Universal Windows Platform) 1.返回顶部 1. UWP即Windows 10中的Universal Windows Pla ...
- 将Win8.1/WP8.1应用迁移到Universal Windows Platform
在上一篇在VS2015 RC打开CTP中创建的工程,我们介绍了怎么在RC中打开CTP中创建的Universal 工程,这一篇我们来讲下怎么将Windows 8.1/WP8.1的应用迁移到Univers ...
- Win10 Migrate apps to the Universal Windows Platform (UWP)
https://msdn.microsoft.com/en-us/library/mt148501.aspx
- 如何将GridViewEX升级到UWP(Universal Windows Platform)平台
引言 上一篇文章中,我们主要讲解了如何在保证GridView控件的用户体验基础上,扩展GridView生成GridViewEx控件,增加动态添加新分组功能等,本文在上文的基础上,介绍如何在Window ...
- 使用 .NET 平台,如何玩转 Universal Windows 应用?
2015年7月30日 本文作者是 Managed Languages 团队项目经理 Lucian Wischik. 不久前,Visual Studio 2015上新增 Windows 10 应用的开发 ...
- 详解 UWP (通用 Windows 平台) 中的两种 HttpClient API
UWP (通用 Windows 平台) 应用开发者在构建通过 HTTP 与 Web 服务或服务器断点交互的应用时,有多种 API 可以选择.要在一个托管 UWP 应用中实现 HTTP 客户端角色,最常 ...
- MVA Universal Windows Apps系列学习笔记1
昨天晚上看了微软的Build 2015大会第一天第一场演讲,时间还挺长,足足3个小时,不过也挺震撼的.里面提到了windows 10.Microsoft edge浏览器.Azure云平台.Office ...
- Developing Universal Windows Apps 开发UWA应用 问答
开始是一些欢迎,就不翻译 Question: Is the code already there? Answer: There is some code on that codeplex site, ...
- Windows 下的高 DPI 应用开发(UWP / WPF / Windows Forms / Win32)
本文将介绍 Windows 系统中高 DPI 开发的基础知识.由于涉及到坐标转换,这种转换经常发生在计算的不知不觉中:所以无论你使用哪种 Windows 下的 UI 框架进行开发,你都需要了解这些内容 ...
随机推荐
- [redis] redis配置文件redis.conf的详细说明
# Redis 配置文件 # 当配置中需要配置内存大小时,可以使用 1k, 5GB, 4M 等类似的格式,其转换方式如下(不区分大小写) # # 1k => bytes # 1kb => ...
- BZOJ 2021 Usaco2010 Jan Cheese Towers 动态规划
题目大意:全然背包.假设最顶端的物品重量≥k,那么以下的全部物品的重量变为原来的45 考虑一些物品装进背包,显然我要把全部重量大于≥k的物品中重量最小的那个放在最顶端.才干保证总重量最小 那么我们给物 ...
- 【u127】台阶问题
Time Limit: 1 second Memory Limit: 128 MB [问题描述] 有N级的台阶,你一开始在底部,每次可以向上迈最多K级台阶(最少1级),问到达第N级台阶有多少种不同方式 ...
- 【codeforces 785B】Anton and Classes
[题目链接]:http://codeforces.com/contest/785/problem/B [题意] 给你两个时间各自能够在哪些时间段去完成; 让你选择两个时间段来完成这两件事情; 要求两段 ...
- Xamarin.Forms开发APP
Xamarin.Forms+Prism(1)—— 开发准备 准备: 1.VS2017(推荐)或VS2015: 2.JDK 1.8以上: 3.Xamarin.Forms 最新版: 4.Prism 扩展, ...
- 一次解决React+TypeScript+Webpack 别名(alias)找不到问题的过程「转载」
链接 引言 在组件开发中,业务功能和基础组件一般分开放,比如在我们的项目中,components为基础组件, container为业务组件,但是在container中调用components中的组件时 ...
- numpy 维度与轴的问题
0. 多维数组的显示问题 >> X = np.reshape(np.arange(24), (2, 3, 4)) # 也即 2 行 3 列的 4 个平面(plane) >> X ...
- Leetcode 226 Invert Binary Tree 二叉树
交换左右叶子节点 /** * Definition for a binary tree node. * struct TreeNode { * int val; * TreeNode *left; * ...
- 数学概念的提出(一) —— 熵的定义式 H(x)=-log2(p(x))
h(x)=−log2p(x) 考虑一个离散型随机变量 x,当我们观测到该变量的一个特定值,问此时我们通过该值获得的关于该变量的信息量是多少? 信息量可视为"意外的程度"(degre ...
- matlab 微积分
符号变量,symbolic variable 1. 高阶导数 高阶导数的计算,当然可以用手工的方式,但显然这种机械重复的推导,更适用于计算机的计算方式: f(x)=sinxx2+4x+3⇒d4fdx4 ...