python爬虫(4)——scrapy框架
安装
urllib库更适合写爬虫文件,scrapy更适合做爬虫项目。
步骤:
- 先更改pip源,国外的太慢了,参考:https://www.jb51.net/article/159167.htm
- 升级pip:python -m pip install --upgrade pip
- pip install wheel
- pip install lxml
- pip install Twisted
- pip install scrapy
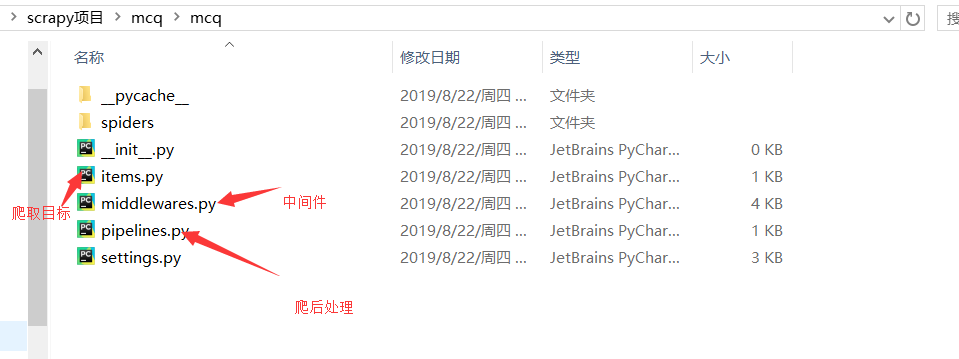
常用命令
核心目录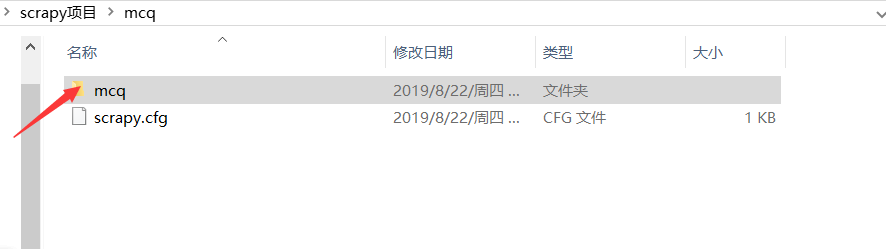
- 新建项目:scrapy startproject mcq
- 运行独立的爬虫文件(不是项目):比如
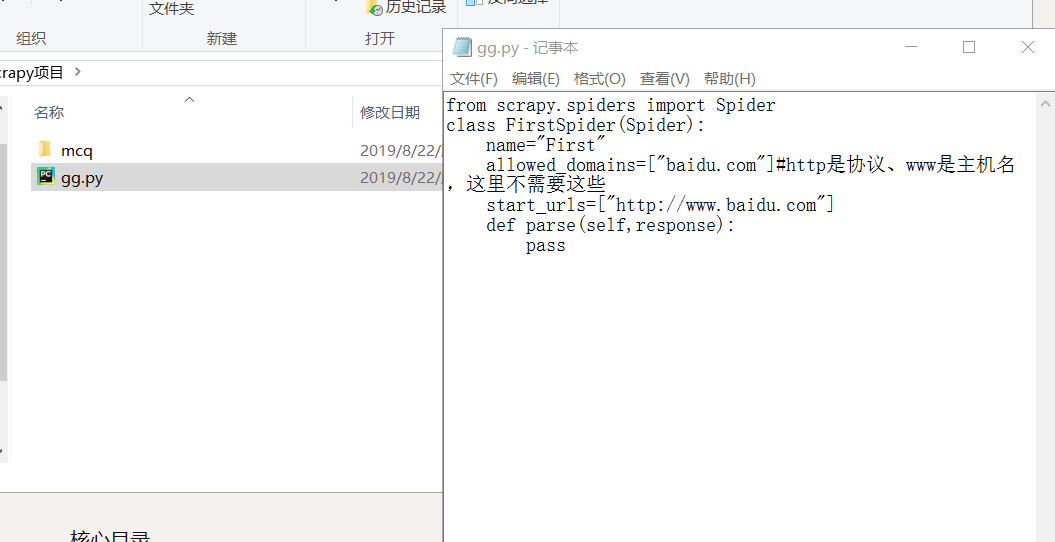
然后输入命令scrapy runspider gg.py
获取设置信息:cd到项目,比如scrapy settings --get BOT_NAME
交互式爬取:scrapy shell http://www.baidu.com,可以使用python代码
scrapy版本信息:scrapy version
爬取并且在浏览器显示:scrapy view http://news.1152.com,将网页下载到本地打开
测试本地硬件性能:scrapy bench ,每分钟可以爬取多少页面
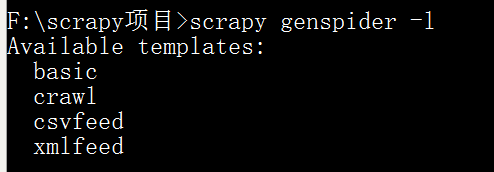
依据模板创建爬虫文件:scrapy genspider -l ,有以下模板
选择basic,scrapy genspider -t basic haha baidu.com (注意:这里填可爬取的域名,域名是不以www、edu……开头的)


测试爬虫文件是否合规:scrapy check haha
运行爬虫项目下的文件:scrapy crawl haha
不显示中间的日志信息:scrapy crawl haha --nolog查看当前项目下可用的爬虫文件:scrapy list
指定某个爬虫文件获取url:
F:\scrapy项目\mcq>scrapy parse --spider=haha http://www.baidu.com
XPath表达式
XPath与正则简单对比:
- XPath表达式效率会高一点
- 正则表达式功能强一点
- 一般来说,优先选择XPath,但是XPath解决不了的问题我们就选正则去解决
/:逐层提取
text()提取标签下面的文本
如要提取标题:/html/head/title/text()
//标签名:提取所有名为……的标签
如提取所有的div标签://div
//标签名[@属性='属性值']:提取属性为……的标签
@属性表示取某个属性值
使用scrapy做当当网商品爬虫
新建爬虫项目:F:\scrapy项目>scrapy startproject dangdang
F:\scrapy项目>cd dangdang
F:\scrapy项目\dangdang>scrapy genspider -t basic dd dangdang.com

修改items.py:
# -*- coding: utf-8 -*-

# Define here the models for your scraped items

#

# See documentation in:

# https://docs.scrapy.org/en/latest/topics/items.html

import scrapy

class DangdangItem(scrapy.Item):

    # define the fields for your item here like:

    # name = scrapy.Field()

    title=scrapy.Field() #商品标题

    link=scrapy.Field() #商品链接

    comment=scrapy.Field() #商品评论
我们翻一下页,分析两个链接:
http://category.dangdang.com/pg2-cid4008154.html
http://category.dangdang.com/pg3-cid4008154.html
可以找到初始链接:http://category.dangdang.com/pg1-cid4008154.html
分析页面源码,可以从name="itemlist-title" 下手,因为这个正好有48个结果,即一页商品的数量。
ctrl+f 条评论,可以发现正好有48条记录。
dd.py:
# -*- coding: utf-8 -*-

import scrapy

from dangdang.items import DangdangItem

from scrapy.http import Request

class DdSpider(scrapy.Spider):

    name = 'dd'

    allowed_domains = ['dangdang.com']

    start_urls = ['http://category.dangdang.com/pg1-cid4008154.html']

    def parse(self, response):

        item=DangdangItem()

        item["title"]=response.xpath("//a[@name='itemlist-title']/@title").extract()

        item["link"]=response.xpath("//a[@name='itemlist-title']/@href").extract()

        item["comment"]=response.xpath("//a[@name='itemlist-review']/text()").extract()

        # print(item["title"])

        yield item

        for i in range(2,11): #爬取2~10页

            url='http://category.dangdang.com/pg'+str(i)+'-cid4008154.html'

            yield Request(url, callback=self.parse)
对于dd里的Request:
url: 就是需要请求,并进行下一步处理的url
callback: 指定该请求返回的Response,由那个函数来处理。
先把settings.py的robots改为False:
settings.py:
# -*- coding: utf-8 -*-

# Scrapy settings for dangdang project

#

# For simplicity, this file contains only settings considered important or

# commonly used. You can find more settings consulting the documentation:

#

#     https://docs.scrapy.org/en/latest/topics/settings.html

#     https://docs.scrapy.org/en/latest/topics/downloader-middleware.html

#     https://docs.scrapy.org/en/latest/topics/spider-middleware.html

BOT_NAME = 'dangdang'

SPIDER_MODULES = ['dangdang.spiders']

NEWSPIDER_MODULE = 'dangdang.spiders'

# Crawl responsibly by identifying yourself (and your website) on the user-agent

#USER_AGENT = 'dangdang (+http://www.yourdomain.com)'

# Obey robots.txt rules

ROBOTSTXT_OBEY = False

# Configure maximum concurrent requests performed by Scrapy (default: 16)

#CONCURRENT_REQUESTS = 32

# Configure a delay for requests for the same website (default: 0)

# See https://docs.scrapy.org/en/latest/topics/settings.html#download-delay

# See also autothrottle settings and docs

#DOWNLOAD_DELAY = 3

# The download delay setting will honor only one of:

#CONCURRENT_REQUESTS_PER_DOMAIN = 16

#CONCURRENT_REQUESTS_PER_IP = 16

# Disable cookies (enabled by default)

#COOKIES_ENABLED = False

# Disable Telnet Console (enabled by default)

#TELNETCONSOLE_ENABLED = False

# Override the default request headers:

#DEFAULT_REQUEST_HEADERS = {

#   'Accept': 'text/html,application/xhtml+xml,application/xml;q=0.9,*/*;q=0.8',

#   'Accept-Language': 'en',

#}

# Enable or disable spider middlewares

# See https://docs.scrapy.org/en/latest/topics/spider-middleware.html

#SPIDER_MIDDLEWARES = {

#    'dangdang.middlewares.DangdangSpiderMiddleware': 543,

#}

# Enable or disable downloader middlewares

# See https://docs.scrapy.org/en/latest/topics/downloader-middleware.html

#DOWNLOADER_MIDDLEWARES = {

#    'dangdang.middlewares.DangdangDownloaderMiddleware': 543,

#}

# Enable or disable extensions

# See https://docs.scrapy.org/en/latest/topics/extensions.html

#EXTENSIONS = {

#    'scrapy.extensions.telnet.TelnetConsole': None,

#}

# Configure item pipelines

# See https://docs.scrapy.org/en/latest/topics/item-pipeline.html

ITEM_PIPELINES = {

   'dangdang.pipelines.DangdangPipeline': 300,

}

# Enable and configure the AutoThrottle extension (disabled by default)

# See https://docs.scrapy.org/en/latest/topics/autothrottle.html

#AUTOTHROTTLE_ENABLED = True

# The initial download delay

#AUTOTHROTTLE_START_DELAY = 5

# The maximum download delay to be set in case of high latencies

#AUTOTHROTTLE_MAX_DELAY = 60

# The average number of requests Scrapy should be sending in parallel to

# each remote server

#AUTOTHROTTLE_TARGET_CONCURRENCY = 1.0

# Enable showing throttling stats for every response received:

#AUTOTHROTTLE_DEBUG = False

# Enable and configure HTTP caching (disabled by default)

# See https://docs.scrapy.org/en/latest/topics/downloader-middleware.html#httpcache-middleware-settings

#HTTPCACHE_ENABLED = True

#HTTPCACHE_EXPIRATION_SECS = 0

#HTTPCACHE_DIR = 'httpcache'

#HTTPCACHE_IGNORE_HTTP_CODES = []

#HTTPCACHE_STORAGE = 'scrapy.extensions.httpcache.FilesystemCacheStorage'
运行:F:\scrapy项目\dangdang>scrapy crawl dd --nolog
去settings.py将pipeline开启:
pipelines.py:
# -*- coding: utf-8 -*-

import pymysql

# Define your item pipelines here

#

# Don't forget to add your pipeline to the ITEM_PIPELINES setting

# See: https://docs.scrapy.org/en/latest/topics/item-pipeline.html

class DangdangPipeline(object):

    def process_item(self, item, spider):

        conn=pymysql.connect(host='127.0.0.1',user="root",passwd="123456",db="dangdang")

        cursor = conn.cursor()

        for i in range(len(item["title"])):

            title=item["title"][i]

            link=item["link"][i]

            comment=item["comment"][i]

            # print(title+":"+link+":"+comment)

            sql="insert into goods(title,link,comment) values('%s','%s','%s')"%(title,link,comment)

            # print(sql)

            try:

                cursor.execute(sql)

                conn.commit()

            except Exception as e:

                print(e)

        conn.close()

        return item
登录mysql,创建一个数据库:mysql> create database dangdang;
mysql> use dangdang
mysql> create table goods(id int(32) auto_increment primary key,title varchar(100),link varchar(100) unique,comment varchar(100));
最后运行 scrapy crawl dd --nolog

每页48条,48*10=480,爬取成功!
完整项目源代码参考我的github
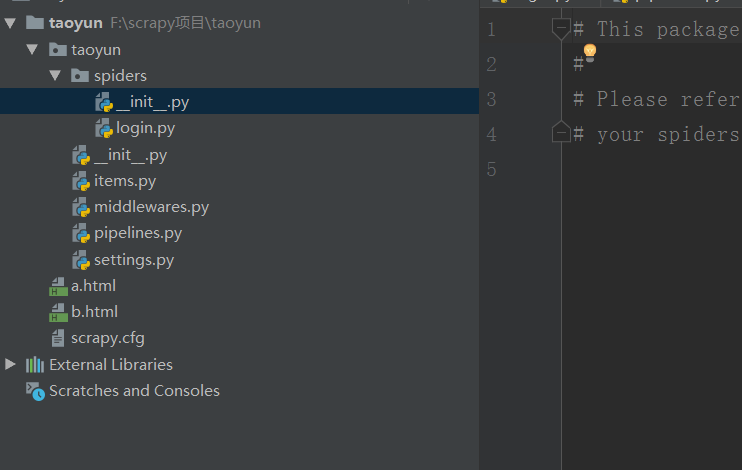
scrapy模拟登陆实战
以这个网站为例http://edu.iqianyue.com/,我们不爬取内容,只模拟登陆,所以不需要写item.py
点击登陆,用fiddler查看真正的登陆网址:http://edu.iqianyue.com/index_user_login

修改login.py:
# -*- coding: utf-8 -*-

import scrapy

from scrapy.http import FormRequest, Request

class LoginSpider(scrapy.Spider):

    name = 'login'

    allowed_domains = ['iqianyue.com']

    start_urls = ['http://iqianyue.com/']

    header={"User-Agent":"Mozilla/5.0 (Windows NT 10.0; Win64; x64; rv:68.0) Gecko/20100101 Firefox/68.0"}

    #编写start_request()方法,第一次会默认调取该方法中的请求

    def start_requests(self):

        #首先爬一次登录页,然后进入回调函数parse()

        return [Request("http://edu.iqianyue.com/index_user_login",meta={"cookiejar":1},callback=self.parse)]

    def parse(self, response):

        #设置要传递的post信息,此时没有验证码字段

        data={

            "number":"swineherd",

            "passwd":"123",

        }

        print("登录中……")

        #通过ForRequest.from_response()进行登录

        return FormRequest.from_response(response,

                                          #设置cookie信息

                                          meta={"cookiejar":response.meta["cookiejar"]},

                                          #设置headers信息模拟成浏览器

                                          headers=self.header,

                                          #设置post表单中的数据

                                          formdata=data,

                                          #设置回调函数

                                          callback=self.next,

                                          )

    def next(self,response):

        data=response.body

        fp=open("a.html","wb")

        fp.write(data)

        fp.close()

        print(response.xpath("/html/head/title/text()").extract())

        #登录后访问

        yield Request("http://edu.iqianyue.com/index_user_index",callback=self.next2,meta={"cookiejar":1})

    def next2(self,response):

        data=response.body

        fp=open("b.html","wb")

        fp.write(data)

        fp.close()

        print(response.xpath("/html/head/title/text()").extract())
scrapy新闻爬虫实战
目标:爬取百度新闻首页所有新闻
F:>cd scrapy项目
F:\scrapy项目>scrapy startproject baidunews
F:\scrapy项目>cd baidunews
F:\scrapy项目\baidunews>scrapy genspider -t basic n1 baidu.com
抓包分析
找到json文件:
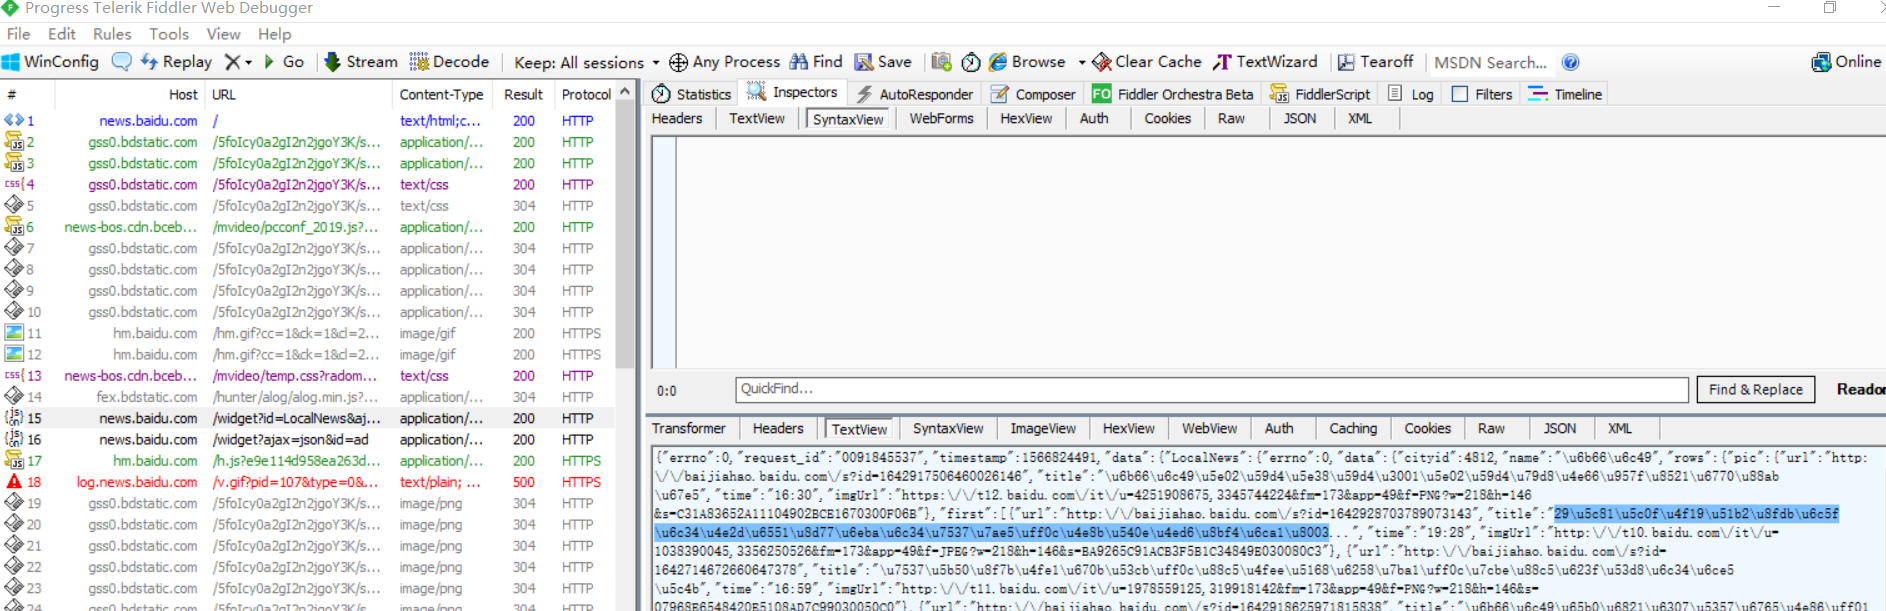
idle查看一下
首页ctrl+f:
在首页往下拖触发所有新闻,在fiddler中找到存储url、title等等的js文件(并不是每一个js文件都有用)
发现不止js文件有新闻信息,还有别的,要细心在fiddler找!
http://news.baidu.com/widget?id=LocalNews&ajax=json&t=1566824493194
http://news.baidu.com/widget?id=civilnews&t=1566824634139
http://news.baidu.com/widget?id=InternationalNews&t=1566824931323
http://news.baidu.com/widget?id=EnterNews&t=1566824931341
http://news.baidu.com/widget?id=SportNews&t=1566824931358
http://news.baidu.com/widget?id=FinanceNews&t=1566824931376
http://news.baidu.com/widget?id=TechNews&t=1566824931407
http://news.baidu.com/widget?id=MilitaryNews&t=1566824931439
http://news.baidu.com/widget?id=InternetNews&t=1566824931456
http://news.baidu.com/widget?id=DiscoveryNews&t=1566824931473
http://news.baidu.com/widget?id=LadyNews&t=1566824931490
http://news.baidu.com/widget?id=HealthNews&t=1566824931506
http://news.baidu.com/widget?id=PicWall&t=1566824931522
我们可以发现真正影响新闻信息的是widget?后面的id值
写个脚本把id提取出来: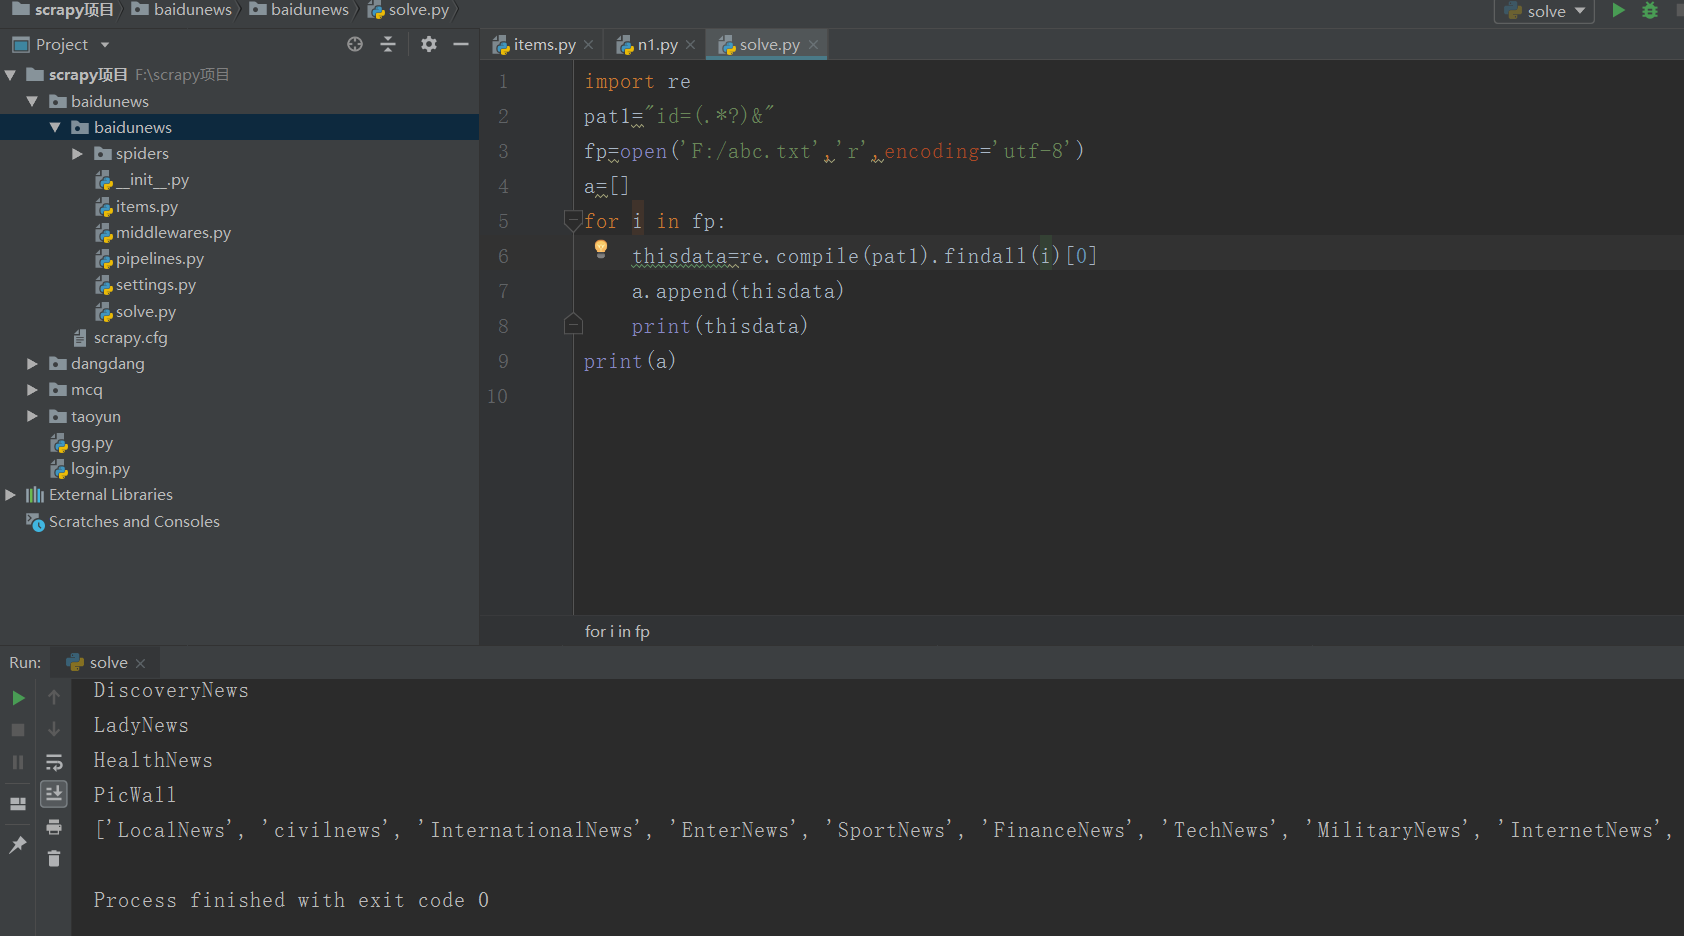
两种不同的链接的源代码的url也不同:


items.py:
# -*- coding: utf-8 -*-

# Define here the models for your scraped items

#

# See documentation in:

# https://docs.scrapy.org/en/latest/topics/items.html

import scrapy

class BaidunewsItem(scrapy.Item):

    # define the fields for your item here like:

    # name = scrapy.Field()

    title=scrapy.Field()

    link=scrapy.Field()

    content=scrapy.Field()
n1.py:
# -*- coding: utf-8 -*-

import scrapy

from baidunews.items import BaidunewsItem #从核心目录

from scrapy.http import Request

import re

import time

class N1Spider(scrapy.Spider):

    name = 'n1'

    allowed_domains = ['baidu.com']

    start_urls = ["http://news.baidu.com/widget?id=LocalNews&ajax=json"]

    allid=['LocalNews', 'civilnews', 'InternationalNews', 'EnterNews', 'SportNews', 'FinanceNews', 'TechNews', 'MilitaryNews', 'InternetNews', 'DiscoveryNews', 'LadyNews', 'HealthNews', 'PicWall']

    allurl=[]

    for k in range(len(allid)):

        thisurl="http://news.baidu.com/widget?id="+allid[k]+"&ajax=json"

        allurl.append(thisurl)

    def parse(self, response):

        while True: #每隔5分钟爬一次

            for m in range(len(self.allurl)):

                yield Request(self.allurl[m], callback=self.next)

                time.sleep(300) #单位为秒

    cnt=0

    def next(self,response):

        print("第" + str(self.cnt) + "个栏目")

        self.cnt+=1

        data=response.body.decode("utf-8","ignore")

        pat1='"m_url":"(.*?)"'

        pat2='"url":"(.*?)"'

        url1=re.compile(pat1,re.S).findall(data)

        url2=re.compile(pat2,re.S).findall(data)

        if(len(url1)!=0):

            url=url1

        else :

            url=url2

        for i in range(len(url)):

            thisurl=re.sub("\\\/","/",url[i])

            print(thisurl)

            yield Request(thisurl,callback=self.next2)

    def next2(self,response):

        item=BaidunewsItem()

        item["link"]=response.url

        item["title"]=response.xpath("/html/head/title/text()")

        item["content"]=response.body

        print(item)

        yield item
将settings的pipeline开启:
将robots改为False,scrapy crawl n1 --nolog即可运行
scrapy豆瓣网登录爬虫
要在settings里加上:
USER_AGENT = 'Mozilla/5.0 (Macintosh; Intel Mac OS X 10_8_3) AppleWebKit/536.5 (KHTML, like Gecko) Chrome/19.0.1084.54 Safari/536.5'
关于scrapy.http.FormRequest和scrapy.http.FormRequest.from_response的用法区别参考这篇博客:https://blog.csdn.net/qq_33472765/article/details/80958820
d1.py:
# -*- coding: utf-8 -*-

import scrapy

from scrapy.http import Request, FormRequest

class D1Spider(scrapy.Spider):

    name = 'd1'

    allowed_domains = ['douban.com']

    # start_urls = ['http://douban.com/']

    headers = {"User-Agent": "Mozilla/5.0 (Windows NT 10.0; Win64; x64; rv:68.0) Gecko/20100101 Firefox/68.0"}

    def start_requests(self):

        # 首先爬一次登录页,然后进入回调函数parse()

        print("开始:")

        return [Request("https://accounts.douban.com/passport/login",meta={"cookiejar":1},callback=self.login)]

    def login(self, response):

        #判断验证码

        captcha=response.xpath("//")

        data = {

            "ck": "",

            "name": "***",

            "password": "***",

            "remember": "false",

            "ticket": ""

        }

        print("登陆中……")

        return FormRequest(url="https://accounts.douban.com/j/mobile/login/basic",

                                         # 设置cookie信息

                                         meta={"cookiejar": response.meta["cookiejar"]},

                                         # 设置headers信息模拟成浏览器

                                         headers=self.headers,

                                         # 设置post表单中的数据

                                         formdata=data,

                                         # 设置回调函数

                                         callback=self.next,

                                         )

    def next(self,response):

        #跳转到个人中心

        yield Request("https://www.douban.com/people/202921494/",meta={"cookiejar":1},callback=self.next2)

    def next2(self, response):

        title = response.xpath("/html/head/title/text()").extract()

        print(title)
现在的豆瓣是滑块验证码,对于现在的我这个菜鸡还不会处理。
在urllib中使用XPath表达式
先安装lxml模块:pip install lxml,然后将网页数据通过lxml下的etree转化为treedata的形式。
import urllib.request

from lxml import etree

data=urllib.request.urlopen("http://www.baidu.com").read().decode("utf-8","ignore")

treedata=etree.HTML(data)

title=treedata.xpath("//title/text()")

print(title)
python爬虫(4)——scrapy框架的更多相关文章
- Python爬虫进阶(Scrapy框架爬虫)
准备工作: 配置环境问题什么的我昨天已经写了,那么今天直接安装三个库 首先第一步: ...
- python爬虫随笔-scrapy框架(1)——scrapy框架的安装和结构介绍
scrapy框架简介 Scrapy,Python开发的一个快速.高层次的屏幕抓取和web抓取框架,用于抓取web站点并从页面中提取结构化的数据.Scrapy用途广泛,可以用于数据挖掘.监测和自动化测试 ...
- python爬虫之scrapy框架介绍
一.什么是Scrapy? Scrapy是一个为了爬取网站数据,提取结构性数据而编写的应用框架,非常出名,非常强悍.所谓的框架就是一个已经被集成了各种功能(高性能异步下载,队列,分布式,解析,持久化等) ...
- python爬虫之scrapy框架
Scrapy是一个为了爬取网站数据,提取结构性数据而编写的应用框架. 其可以应用在数据挖掘,信息处理或存储历史数据等一系列的程序中.其最初是为了页面抓取 (更确切来说, 网络抓取 )所设计的, 也可以 ...
- python爬虫之Scrapy框架(CrawlSpider)
提问:如果想要通过爬虫程序去爬取”糗百“全站数据新闻数据的话,有几种实现方法? 方法一:基于Scrapy框架中的Spider的递归爬去进行实现的(Request模块回调) 方法二:基于CrawlSpi ...
- (转)python爬虫----(scrapy框架提高(1),自定义Request爬取)
摘要 之前一直使用默认的parse入口,以及SgmlLinkExtractor自动抓取url.但是一般使用的时候都是需要自己写具体的url抓取函数的. python 爬虫 scrapy scrapy提 ...
- python爬虫使用scrapy框架
scrapy框架提升篇 关注公众号"轻松学编程"了解更多 1.创建启动爬虫脚本 在项目目录下创建start.py文件: 添加代码: #以后只要运行start.py就可以启动爬虫 i ...
- Python 爬虫之Scrapy框架
Scrapy框架架构 Scrapy框架介绍: 写一个爬虫,需要做很多的事情.比如:发送网络请求.数据解析.数据存储.反反爬虫机制(更换ip代理.设置请求头等).异步请求等.这些工作如果每次都要自己从零 ...
- python爬虫中scrapy框架是否安装成功及简单创建
判断框架是否安装成功,在新建的爬虫文件夹下打开盘符中框输入cmd,在命令中输入scrapy,若显示如下图所示,则说明成功安装爬虫框架: 查看当前版本:在刚刚打开的命令框内输入scrapy versio ...
- Python网络爬虫之Scrapy框架(CrawlSpider)
目录 Python网络爬虫之Scrapy框架(CrawlSpider) CrawlSpider使用 爬取糗事百科糗图板块的所有页码数据 Python网络爬虫之Scrapy框架(CrawlSpider) ...
随机推荐
- mysql从命令行执行sql语句
mysql -u root -p -e "create database mydb;"
- 【poj3207】Ikki's Story IV - Panda's Trick(2-sat)
传送门 题意: 给出一个圆,圆上有\(n\)个点,依次为\(0,1,\cdots,n-1\). 现在要连接\(m\)对点,每次连接时可以直接从里面连,也可以从外面连. 最后问,连完这\(m\)对点后, ...
- CodeForces 984C Finite or not?
http://codeforces.com/problemset/problem/984/C Time limit 1000 msMemory limit 262144 kB 题目 You ...
- Conda和Python的国内安装源
Conda和Python的国内安装源 Windows系统: 更换python国内源的方法. 在"C:\Users[xxxx]\pip\pip.ini"文件中配置如下内容(没有则新建 ...
- -bash:vi:command not find 问题解决
Linux命令行输入命令执行后报“bash:vi:command not found”. 这是由于系统PATH设置问题,PATH没有设置对,系统就无法找到精确命令了. 1.在命令行中输入:export ...
- Windows Terminal (Preview)治好了cmd,powershell的癌症
前言 话说n年前,我想开发一款powershell麻将游戏,但是发现命令行下无法显示麻将牌这种特殊符号. 经过研究发现,这是4字节的utf16le字符串.而powershell依赖的渲染引擎,只能渲染 ...
- Oracle 查询(SELECT)语句(一)
Ø 简介 本文介绍 Oracle 中查询(SELECT)语句的使用,在 SQL 中 SELECT 语句是相对内容较多的,也是相对比较复杂一点的,所以这里拿出来单独学习. 首先,我们先来理一下思路,我 ...
- idea中的后缀补全
IDEA有个很牛逼的功能,那就是后缀补全(Postfix Completion),这个功能可以通过后缀来使用代码补全进行模板式地补全语句,如遍历循环语句(for.foreach).使用 String. ...
- cap理论与分布式事务的解决方案
现在很火的微服务架构所设计的系统是分布式系统.分布式系统有一个著名的CAP理论,即一个分布式系统要同时满足一致性(Consistency).可用性(Availablility)和分区容错(Partit ...
- lego loam 跑镭神32线激光雷达
师弟反应镭神32线激光雷达(32C)录制的数据包不能跑lego loam,这里就总结一下. 首先lego loam默认的接受的topic name是velodyne_points,点云的frame_i ...