沉淀再出发:关于netty的一些理解和使用
沉淀再出发:关于netty的一些理解和使用
一、前言
Netty是由JBOSS提供的一个java开源框架。Netty提供异步的、事件驱动的网络应用程序框架和工具,用以快速开发高性能、高可靠性的网络服务器和客户端程序。也就是说,Netty 是一个基于NIO的客户、服务器端编程框架,使用Netty 可以确保你快速和简单的开发出一个网络应用,例如实现了某种协议的客户、服务端应用。Netty相当于简化和流线化了网络应用的编程开发过程,例如:基于TCP和UDP的socket服务开发。“快速”和“简单”并不用产生维护性或性能上的问题。Netty 是一个吸收了多种协议(包括FTP、SMTP、HTTP等各种二进制文本协议)的实现经验,并经过相当精心设计的项目。最终,Netty 成功的找到了一种方式,在保证易于开发的同时还保证了其应用的性能,稳定性和伸缩性。netty在底层的数据通信和封装之中有着重要的作用,下面我们就来看看netty的简单使用过程,以及背后的原理。
二、netty的简单使用
2.1、netty的环境部署和使用
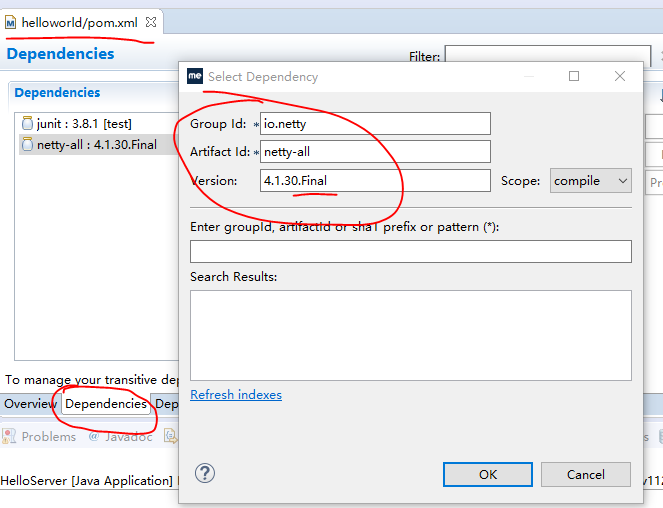
在这里我们使用myeclipse平台,maven管理工具进行开发,其实使用eclipse或者其他软件也可以。首先我们新建一个maven项目,项目名和包名自定:

之后我们修改pom.xml文件,增加netty依赖:
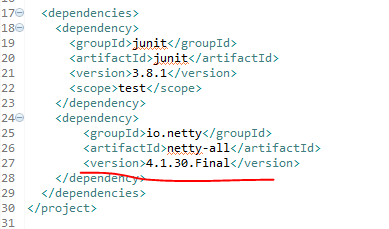
保存之后,系统就会自动为我们下载和安装了,非常的方便,这样,我们的环境就部署完毕了。
2.2、一个简单的案例
下面我们看一个简单地案例:
我们新建一个包,然后写入两个文件:
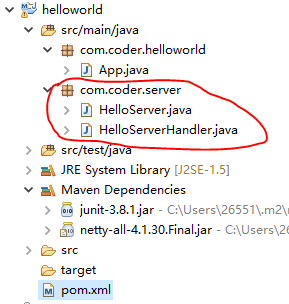
首先我们编写一个处理连接的类 HelloServerHandler :
 package com.coder.server;

 import io.netty.buffer.ByteBuf;

 import io.netty.channel.ChannelHandlerContext;

 import io.netty.channel.ChannelInboundHandlerAdapter;

 import io.netty.util.CharsetUtil;

 import io.netty.util.ReferenceCountUtil;

 public class HelloServerHandler extends ChannelInboundHandlerAdapter {

     /**

      * 收到数据时调用

      */

     @Override

     public void channelRead(ChannelHandlerContext ctx, Object msg) throws Exception {

         try {

             ByteBuf in = (ByteBuf)msg;

             System.out.print(in.toString(CharsetUtil.UTF_8));

         } finally {

             // 抛弃收到的数据

             ReferenceCountUtil.release(msg);

         }

     }

     /**

      * 当Netty由于IO错误或者处理器在处理事件时抛出异常时调用

      */

     @Override

     public void exceptionCaught(ChannelHandlerContext ctx, Throwable cause) throws Exception {

         // 当出现异常就关闭连接

         cause.printStackTrace();

         ctx.close();

     }

 }
其次,我们编写接收连接,并且派发和处理的类 HelloServer :
 package com.coder.server;

 import io.netty.bootstrap.ServerBootstrap;

 import io.netty.channel.ChannelFuture;

 import io.netty.channel.ChannelInitializer;

 import io.netty.channel.ChannelOption;

 import io.netty.channel.EventLoopGroup;

 import io.netty.channel.nio.NioEventLoopGroup;

 import io.netty.channel.socket.SocketChannel;

 import io.netty.channel.socket.nio.NioServerSocketChannel;

 public class HelloServer {

     private int port;

     public HelloServer(int port) {

         this.port = port;

     }

     public void run() throws Exception {

         EventLoopGroup bossGroup = new NioEventLoopGroup();        // 用来接收进来的连接

         EventLoopGroup workerGroup = new NioEventLoopGroup();    // 用来处理已经被接收的连接

         System.out.println("准备运行端口:" + port);

         try {

             ServerBootstrap b = new ServerBootstrap();

             b.group(bossGroup, workerGroup)

             .channel(NioServerSocketChannel.class)            // 这里告诉Channel如何接收新的连接

             .childHandler( new ChannelInitializer<SocketChannel>() {

                 @Override

                 protected void initChannel(SocketChannel ch) throws Exception {

                     // 自定义处理类

                     ch.pipeline().addLast(new HelloServerHandler());

                 }

             })

             .option(ChannelOption.SO_BACKLOG, 128)

             .childOption(ChannelOption.SO_KEEPALIVE, true);

             // 绑定端口,开始接收进来的连接

             ChannelFuture f = b.bind(port).sync();

             // 等待服务器socket关闭

             f.channel().closeFuture().sync();

         } catch (Exception e) {

             workerGroup.shutdownGracefully();

             bossGroup.shutdownGracefully();

         }

     }

     public static void main(String[] args) throws Exception {

         int port = 12345;

         new HelloServer(port).run();

     }

 }
然后运行,等待连接就好了,那么问题来了,使用什么进行连接呢?在windows中,我们可以使用Telnet,这个比较方便和简单,但是我们需要打开控制面板的程序和功能模块,并且启动服务,之后最好重启一下电脑:

下面我们运行程序,并使用Telnet客户端测试一下:

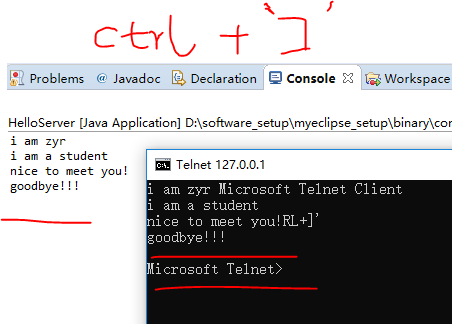
在telnet中‘ctrl+]’可以显示输入的文字,否则将看不到输入。
三、使用netty自定义时间服务器
本例中我们试图在服务器和客户端连接被创立时发送一个消息,然后在客户端解析收到的消息并输出。并且,在这个项目中使用 POJO 代替 ByteBuf 来作为传输对象。
3.1、pojo对象创建
Time 类:
 package com.coder.pojo;

 import java.util.Date;

 /**

  * 自定义时间数据类

  *

  */

 public class Time {

     private final long value;

     public Time() {

         // 除以1000是为了使时间精确到秒
           //注意这里的this,其实就是调用了 public Time(long value) ,并且更加的方便和快捷。

         this(System.currentTimeMillis() / 1000L);

     }

     public Time(long value) {

         this.value = value;

     }

     public long value() {

         return value;

     }

     @Override

     public String toString() {

         return new Date((value()) * 1000L).toString();

     }

 }
3.2、服务器程序
TimeEncoderPOJO类:
 package com.coder.server;

 import com.coder.pojo.Time;

 import io.netty.buffer.ByteBuf;

 import io.netty.channel.ChannelHandlerContext;

 import io.netty.handler.codec.MessageToByteEncoder;

 /**

  * 服务器数据编码类

  *

  */

 public class TimeEncoderPOJO extends MessageToByteEncoder<Time> {

     // 发送数据时调用

     @Override

     protected void encode(ChannelHandlerContext ctx, Time msg, ByteBuf out) throws Exception {

         // 只传输当前时间,精确到秒

         out.writeInt((int)msg.value());

     }

 }
TimeServerHandlerPOJO类:连接建立并且准备通信的时候进行处理,发送当前时间,并增加监听。
 package com.coder.server;

 import com.coder.pojo.Time;

 import io.netty.channel.ChannelFuture;

 import io.netty.channel.ChannelFutureListener;

 import io.netty.channel.ChannelHandlerContext;

 import io.netty.channel.ChannelInboundHandlerAdapter;

 /**

  * 服务器解码器

  * 连接建立时发送当前时间

  *

  */

 public class TimeServerHandlerPOJO extends ChannelInboundHandlerAdapter {

     /**

      * 连接建立的时候并且准备进行通信时被调用

      */

     @Override

     public void channelActive(final ChannelHandlerContext ctx) throws Exception {

         // 发送当前时间信息

         ChannelFuture f = ctx.writeAndFlush(new Time());

         // 发送完毕之后关闭 Channel

         f.addListener(ChannelFutureListener.CLOSE);

     }

     @Override

     public void exceptionCaught(ChannelHandlerContext ctx, Throwable cause) throws Exception {

         cause.printStackTrace();

         ctx.close();

     }

 }
TimeServerPOJO类:服务器的主程序
 package com.coder.server;

 import io.netty.bootstrap.ServerBootstrap;

 import io.netty.channel.ChannelFuture;

 import io.netty.channel.ChannelInitializer;

 import io.netty.channel.ChannelOption;

 import io.netty.channel.EventLoopGroup;

 import io.netty.channel.nio.NioEventLoopGroup;

 import io.netty.channel.socket.SocketChannel;

 import io.netty.channel.socket.nio.NioServerSocketChannel;

 public class TimeServerPOJO {

 private int port;

     public TimeServerPOJO(int port) {

         this.port = port;

     }

     public void run() throws Exception {

         EventLoopGroup bossGroup = new NioEventLoopGroup();        // 用来接收进来的连接

         EventLoopGroup workerGroup = new NioEventLoopGroup();    // 用来处理已经被接收的连接

         System.out.println("准备运行端口:" + port);

         try {

             ServerBootstrap b = new ServerBootstrap();        // 启动NIO服务的辅助启动类

             b.group(bossGroup, workerGroup)

             .channel(NioServerSocketChannel.class)            // 这里告诉Channel如何接收新的连接

             .childHandler( new ChannelInitializer<SocketChannel>() {

                 @Override

                 protected void initChannel(SocketChannel ch) throws Exception {

                     // 自定义处理类

                     // 注意添加顺序

                     ch.pipeline().addLast(new TimeEncoderPOJO(),new TimeServerHandlerPOJO());

                 }

             })

             .option(ChannelOption.SO_BACKLOG, 128)

             .childOption(ChannelOption.SO_KEEPALIVE, true);

             // 绑定端口,开始接收进来的连接

             ChannelFuture f = b.bind(port).sync();

             // 等待服务器socket关闭

             f.channel().closeFuture().sync();

         } catch (Exception e) {

             workerGroup.shutdownGracefully();

             bossGroup.shutdownGracefully();

         }

     }

     public static void main(String[] args) throws Exception {

         int port = 12345;

         new TimeServerPOJO(port).run();

     }

 }
其中ch.pipeline().addLast(new TimeEncoderPOJO(),new TimeServerHandlerPOJO());方法的含义为:Handles an I/O event or intercepts an I/O operation, and forwards it to its next handler in its ChannelPipeline.也就是说当我们添加一些处理的时候会按照管道的方式,一步步的处理,因此先后顺序非常重要。
3.3、客户端程序
先来看看解码器(服务器端发送了编码后的时间信息,因此,这里客户端收到之后需要解码):
TimeDecoderPOJO 类:
 package com.coder.client;

 import java.util.List;

 import com.coder.pojo.Time;

 import io.netty.buffer.ByteBuf;

 import io.netty.channel.ChannelHandlerContext;

 import io.netty.handler.codec.ByteToMessageDecoder;

 public class TimeDecoderPOJO extends ByteToMessageDecoder {

     /**

      * 有新数据接收时调用

      * 为防止分包现象,先将数据存入内部缓存,到达满足条件之后再进行解码

      */

     @Override

     protected void decode(ChannelHandlerContext ctx, ByteBuf in, List<Object> out) throws Exception {

         if(in.readableBytes() < 4) {

             return;

         }

         // out添加对象则表示解码成功

         out.add(new Time(in.readUnsignedInt()));

     }

 }
再看看客户端数据处理类:
TimeClientHandlerPOJO类:
 package com.coder.client;

 import com.coder.pojo.Time;

 import io.netty.channel.ChannelHandlerContext;

 import io.netty.channel.ChannelInboundHandlerAdapter;

 /**

  * 客户端数据处理类

  *

  */

 public class TimeClientHandlerPOJO extends ChannelInboundHandlerAdapter {

     @Override

     public void channelRead(ChannelHandlerContext ctx, Object msg) throws Exception {

         // 直接将信息转换成Time类型输出即可

         Time time = (Time)msg;

         System.out.println(time);

         ctx.close();

     }

     @Override

     public void exceptionCaught(ChannelHandlerContext ctx, Throwable cause) throws Exception {

         cause.printStackTrace();

         ctx.close();

     }

 }
最后是客户端的主程序:
TimeClientPOJO类:
 package com.coder.client;

 import io.netty.bootstrap.Bootstrap;

 import io.netty.channel.ChannelFuture;

 import io.netty.channel.ChannelInitializer;

 import io.netty.channel.ChannelOption;

 import io.netty.channel.EventLoopGroup;

 import io.netty.channel.nio.NioEventLoopGroup;

 import io.netty.channel.socket.SocketChannel;

 import io.netty.channel.socket.nio.NioSocketChannel;

 public class TimeClientPOJO {

     public static void main(String[] args) throws Exception{

         String host = "127.0.0.1";            // ip

         int port = 12345;                    // 端口

         EventLoopGroup workerGroup = new NioEventLoopGroup();

         try {

             Bootstrap b = new Bootstrap();            // 与ServerBootstrap类似

             b.group(workerGroup);                    // 客户端不需要boss worker

             b.channel(NioSocketChannel.class);

             b.option(ChannelOption.SO_KEEPALIVE, true);    // 客户端的socketChannel没有父亲

             b.handler(new ChannelInitializer<SocketChannel>() {

                 @Override

                 protected void initChannel(SocketChannel ch) throws Exception {

                     // POJO

                     ch.pipeline().addLast(new TimeDecoderPOJO() ,new TimeClientHandlerPOJO());

                 }

             });

             // 启动客户端,客户端用connect连接

             ChannelFuture f = b.connect(host, port).sync();

             // 等待连接关闭

             f.channel().closeFuture().sync();

         } finally {

             workerGroup.shutdownGracefully();

         }

     }

 }
至此程序编写完毕,先运行服务器,再运行客户端程序,然后测试即可,我们会发现服务器一直等待着请求,当客户端连接上之后,服务器就会发出带着格式的时间,客户端接收到之后进行解码,然后显示出来并且退出。在同一个myeclipse之中可以运行多个程序,使用下图中的按钮可以进行切换。


四、netty的基本组成部分
4.1、Channel
Channel 是 Java NIO 的一个基本构造。它代表一个到实体(如一个硬件设备、一个文件、一个网络套接字或者一个能够执行一个或者多个不同的I/O操作的程序组件)的开放连接,如读操作和写操作。目前,可以把 Channel 看作是传入(入站)或者传出(出站)数据的载体。因此,它可以被打开或者被关闭,连接或者断开连接。
4.2、Callback(回调)
Netty 在内部使用了回调来处理事件;当一个回调被触发时,相关的事件可以被一个 interfaceChannelHandler 的实现处理。
4.3、Future
Future 提供了另一种在操作完成时通知应用程序的方式。这个对象可以看作是一个异步操作的结果的占位符;它将在未来的某个时刻完成,并提供对其结果的访问。JDK 预置了 interface java.util.concurrent.Future,但是其所提供的实现,只允许手动检查对应的操作是否已经完成,或者一直阻塞直到它完成。这是非常繁琐的,所以 Netty 提供了它自己的实现ChannelFuture,用于在执行异步操作的时候使用。
4.4、Event 和 Handler
Netty 使用不同的事件来通知我们状态的改变或者是操作的状态。这使得我们能够基于已经发生的事件来触发适当的动作。这些动作可能是:记录日志、数据转换、流控制、应用程序逻辑。Netty 是一个网络编程框架,所以事件是按照它们与入站或出站数据流的相关性进行分类的。可能由入站数据或者相关的状态更改而触发的事件包括:连接已被激活或者连接失活、数据读取、用户事件、错误事件。出站事件是未来将会触发的某个动作的操作结果,这些动作包括:打开或者关闭到远程节点的连接、将数据写到或者冲刷到套接字。
Netty 的 ChannelHandler 为处理器提供了基本的抽象,目前可以认为每个 ChannelHandler 的实例都类似于一种为了响应特定事件而被执行的回调。Netty 提供了大量预定义的可以开箱即用的 ChannelHandler 实现,包括用于各种协议(如 HTTP 和 SSL/TLS)的 ChannelHandler。在内部 ChannelHandler 自己也使用了事件和 Future。
五、netty聊天程序
5.1、服务器端
SimpleChatServerInitializer类:
 package com.coder.server;

 import io.netty.channel.ChannelInitializer;

 import io.netty.channel.ChannelPipeline;

 import io.netty.channel.socket.SocketChannel;

 import io.netty.handler.codec.DelimiterBasedFrameDecoder;

 import io.netty.handler.codec.Delimiters;

 import io.netty.handler.codec.string.StringDecoder;

 import io.netty.handler.codec.string.StringEncoder;

 /**

  * 服务器配置初始化

  * 添加多个处理器

  */

 public class SimpleChatServerInitializer extends ChannelInitializer<SocketChannel> {

     @Override

     protected void initChannel(SocketChannel ch) throws Exception {

         ChannelPipeline pipeline = ch.pipeline();

         // 添加处理类

         // 使用'\r''\n'分割帧

         pipeline.addLast("framer",

                 new DelimiterBasedFrameDecoder(8192, Delimiters.lineDelimiter()));

         // 解码、编码器

         pipeline.addLast("decoder", new StringDecoder());

         pipeline.addLast("encoder", new StringEncoder());

         // 处理器

         pipeline.addLast("handler", new SimpleChatServerHandler());

         System.out.println("SimpleChatClient: " + ch.remoteAddress() + "连接上");

     }

 }
SimpleChatServerHandler类:
 package com.coder.server;

 import io.netty.channel.*;

 import io.netty.channel.group.ChannelGroup;

 import io.netty.channel.group.DefaultChannelGroup;

 import io.netty.util.concurrent.GlobalEventExecutor;

 /**

  * 服务端处理器

  */

 public class SimpleChatServerHandler extends SimpleChannelInboundHandler<String> {

     public static ChannelGroup channels = new DefaultChannelGroup(GlobalEventExecutor.INSTANCE);

     /**

      * 收到新的客户端连接时调用

      * 将客户端channel存入列表,并广播消息

      */

     @Override

     public void handlerAdded(ChannelHandlerContext ctx) throws Exception {

         Channel incoming = ctx.channel();

         // 广播加入消息

         channels.writeAndFlush("[SERVER] - " + incoming.remoteAddress() + " 加入\n");

         channels.add(incoming);        // 存入列表

     }

     /**

      * 客户端连接断开时调用

      * 广播消息

      */

     @Override

     public void handlerRemoved(ChannelHandlerContext ctx) throws Exception {

         Channel incoming = ctx.channel();

         // 广播离开消息

         channels.writeAndFlush("[SERVER] - " + incoming.remoteAddress() + " 离开\n");

         // channel会自动从ChannelGroup中删除

     }

     /**

      * 收到消息时调用

      * 将消息转发给其他客户端

      */

     @Override

     protected void channelRead0(ChannelHandlerContext ctx, String msg) throws Exception {

         Channel incoming = ctx.channel();

         for(Channel channel : channels) {        // 遍历所有连接的客户端

             if(channel != incoming) {            // 其他客户端

                 channel.writeAndFlush("[" + incoming.remoteAddress() + "] " + msg + "\n" );

             } else {                            // 自己

                 channel.writeAndFlush("[you] " + msg + "\n" );

             }

         }

     }

     /**

      * 监听到客户端活动时调用

      */

     @Override

     public void channelActive(ChannelHandlerContext ctx) throws Exception {

         Channel incoming = ctx.channel();

         System.out.println("SimpleChatClient: " + incoming.remoteAddress() + " 在线");

     }

     /**

      * 监听到客户端不活动时调用

      */

     @Override

     public void channelInactive(ChannelHandlerContext ctx) throws Exception {

         Channel incoming = ctx.channel();

         System.out.println("SimpleChatClient: " + incoming.remoteAddress() + " 掉线");

     }

     /**

      * 当Netty由于IO错误或者处理器在处理事件抛出异常时调用

      * 关闭连接

      */

     @Override

     public void exceptionCaught(ChannelHandlerContext ctx, Throwable cause) throws Exception {

         Channel incoming = ctx.channel();

         System.out.println("SimpleChatClient: " + incoming.remoteAddress() + " 异常");

     }

 }
SimpleChatServer类:
 package com.coder.server;

 import io.netty.bootstrap.ServerBootstrap;

 import io.netty.channel.ChannelFuture;

 import io.netty.channel.ChannelOption;

 import io.netty.channel.EventLoopGroup;

 import io.netty.channel.nio.NioEventLoopGroup;

 import io.netty.channel.socket.nio.NioServerSocketChannel;

 /**

  * 服务端 main 启动

  */

 public class SimpleChatServer {

     private int port;        // 端口

     public SimpleChatServer(int port) {

         this.port = port;

     }

     // 配置并开启服务器

     public void run() throws Exception {

         EventLoopGroup bossGroup = new NioEventLoopGroup();        // 用来接收进来的连接

         EventLoopGroup workerGroup = new NioEventLoopGroup();    // 用来处理已接收的连接

         try {

             ServerBootstrap sb = new ServerBootstrap();            // 启动NIO服务的辅助启动类

             sb.group(bossGroup, workerGroup)

                 .channel(NioServerSocketChannel.class)                // 设置如何接受连接

                 .childHandler(new SimpleChatServerInitializer())    // 配置Channel

                 .option(ChannelOption.SO_BACKLOG, 128)                // 设置缓冲区

                 .childOption(ChannelOption.SO_KEEPALIVE, true);    // 启用心跳机制

             System.out.println("SimpleChatServer 启动了");

             ChannelFuture future = sb.bind(port).sync();        // 绑定端口,开始接收连接

             future.channel().closeFuture().sync();                // 等待关闭服务器(不会发生)

         } finally {

             workerGroup.shutdownGracefully();

             bossGroup.shutdownGracefully();

             System.out.println("SimpleChatServer 关闭了");

         }

     }

     public static void main(String[] args) throws Exception {

         int port = 8080;

         new SimpleChatServer(port).run();     // 开启服务器

     }

 }
5.2、客户端程序
SimpleChatClientInitializer类:
 package com.coder.client;

 import io.netty.channel.ChannelInitializer;

 import io.netty.channel.ChannelPipeline;

 import io.netty.channel.socket.SocketChannel;

 import io.netty.handler.codec.DelimiterBasedFrameDecoder;

 import io.netty.handler.codec.Delimiters;

 import io.netty.handler.codec.string.StringDecoder;

 import io.netty.handler.codec.string.StringEncoder;

 /**

  * 客户端配置初始化

  * 与服务端类似

  */

 public class SimpleChatClientInitializer extends ChannelInitializer<SocketChannel> {

     @Override

     protected void initChannel(SocketChannel ch) throws Exception {

         ChannelPipeline pipeline = ch.pipeline();

         // 添加处理类

         // 使用'\r''\n'分割帧

         pipeline.addLast("framer",

                 new DelimiterBasedFrameDecoder(8192, Delimiters.lineDelimiter()));

         // 解码、编码器

         pipeline.addLast("decoder", new StringDecoder());

         pipeline.addLast("encoder", new StringEncoder());

         // 处理器

         pipeline.addLast("handler", new SimpleChatClientHandler());

     }

 }
SimpleChatClientHandler类:
 package com.coder.client;

 import io.netty.channel.ChannelHandlerContext;

 import io.netty.channel.SimpleChannelInboundHandler;

 /**

  * 客户端处理类

  * 直接输出收到的消息

  */

 public class SimpleChatClientHandler extends SimpleChannelInboundHandler<String> {

     @Override

     protected void channelRead0(ChannelHandlerContext ctx, String msg) throws Exception {

         System.out.println(msg);    // 直接输出消息

     }

 }
SimpleChatClient类:
 package com.coder.client;

 import java.io.BufferedReader;

 import java.io.InputStreamReader;

 import io.netty.bootstrap.Bootstrap;

 import io.netty.channel.Channel;

 import io.netty.channel.EventLoopGroup;

 import io.netty.channel.nio.NioEventLoopGroup;

 import io.netty.channel.socket.nio.NioSocketChannel;

 /**

  * 客户端

  * 开启客户端,接收控制台输入并发送给服务端

  */

 public class SimpleChatClient {

     private final String host;        // IP

     private final int port;        // 端口

     public SimpleChatClient(String host, int port) {

         this.host = host;

         this.port = port;

     }

     // 配置并运行客户端

     public void run() throws Exception {

         EventLoopGroup group = new NioEventLoopGroup();

         try {

             Bootstrap b = new Bootstrap();        // 客户端辅助启动类

             b.group(group)                                    // 客户端只需要一个用来接收并处理连接

                 .channel(NioSocketChannel.class)            // 设置如何接受连接

                 .handler(new SimpleChatClientInitializer());// 配置 channel

             // 连接服务器

             Channel channel = b.connect(host, port).sync().channel();

             // 读取控制台输入字符

             BufferedReader in = new BufferedReader(new InputStreamReader(System.in));

             while(true) {

                 // 每行成一帧输出,以"\r\n"结尾

                 channel.writeAndFlush(in.readLine() + "\r\n");

             }

         } catch (Exception e) {

             e.printStackTrace();        // 输出异常

         } finally {

             group.shutdownGracefully();    // 关闭

         }

     }

     public static void main(String[] args) throws Exception {

         new SimpleChatClient("localhost", 8080).run();        // 启动客户端

     }

 }
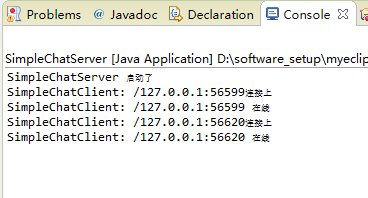
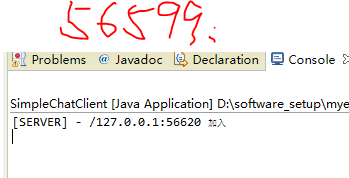
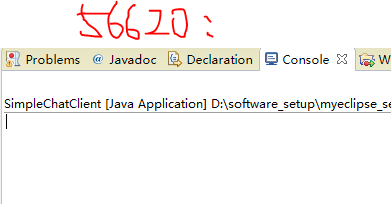
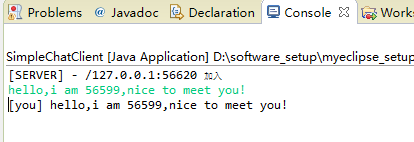
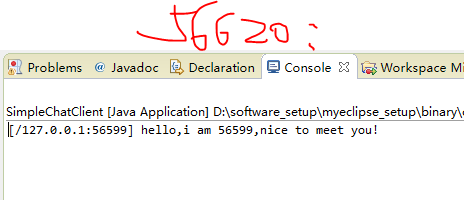
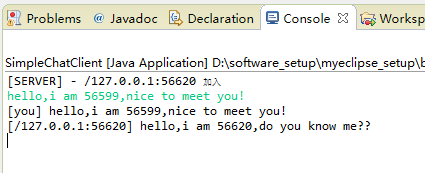
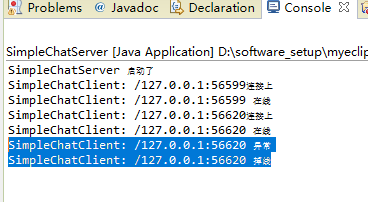
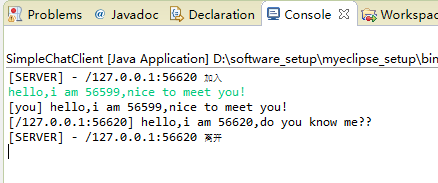
运行结果:

六、总结
通过代码的形式,我们对netty有了直观的了解和实际上的掌握。
参考文献:https://www.cnblogs.com/coderJiebao/tag/netty/
沉淀再出发:关于netty的一些理解和使用的更多相关文章
- 沉淀再出发:Spring的架构理解
沉淀再出发:Spring的架构理解 一.前言 在Spring之前使用的EJB框架太庞大和重量级了,开发成本很高,由此spring应运而生.关于Spring,学过java的人基本上都会慢慢接触到,并且在 ...
- 沉淀再出发:spring boot的理解
沉淀再出发:spring boot的理解 一.前言 关于spring boot,我们肯定听过了很多遍了,其实最本质的东西就是COC(convention over configuration),将各种 ...
- 沉淀再出发:关于java中的AQS理解
沉淀再出发:关于java中的AQS理解 一.前言 在java中有很多锁结构都继承自AQS(AbstractQueuedSynchronizer)这个抽象类如果我们仔细了解可以发现AQS的作用是非常大的 ...
- 沉淀,再出发:VUE的简单理解
沉淀,再出发:VUE的简单理解 一.前言 Vue.js(读音 /vjuː/, 类似于 view) 是一套构建用户界面的渐进式框架.Vue 只关注视图层,采用自底向上增量开发的设计.Vue 的目标是通过 ...
- 沉淀再出发:dubbo的基本原理和应用实例
沉淀再出发:dubbo的基本原理和应用实例 一.前言 阿里开发的dubbo作为服务治理的工具,在分布式开发中有着重要的意义,这里我们主要专注于dubbo的架构,基本原理以及在Windows下面开发出来 ...
- 沉淀再出发:在python3中导入自定义的包
沉淀再出发:在python3中导入自定义的包 一.前言 在python中如果要使用自己的定义的包,还是有一些需要注意的事项的,这里简单记录一下. 二.在python3中导入自定义的包 2.1.什么是模 ...
- 沉淀再出发:jetty的架构和本质
沉淀再出发:jetty的架构和本质 一.前言 我们在使用Tomcat的时候,总是会想到jetty,这两者的合理选用是和我们项目的类型和大小息息相关的,Tomcat属于比较重量级的容器,通过很多的容器层 ...
- 沉淀再出发:Bean,JavaBean,POJO,VO,PO,EJB等名词的异同
沉淀再出发:Bean,JavaBean,POJO,VO,PO,EJB等名词的异同 一.前言 想必大家都有这样的困惑,接触的东西越多却越来越混乱了,这个时候就要进行对比和深入的探讨了,抓住每一个概念背后 ...
- 沉淀再出发:java中注解的本质和使用
沉淀再出发:java中注解的本质和使用 一.前言 以前XML是各大框架的青睐者,它以松耦合的方式完成了框架中几乎所有的配置,但是随着项目越来越庞大,XML的内容也越来越复杂,维护成本变高.于是就有人提 ...
随机推荐
- Django获取Header中的信息
今天需要从header中获取一些信息,查了一些资料,需要注意一下几点: request.META.get("header key") 用于获取header的信息 注意的是heade ...
- 在超链接href中实现form的提交
<form name="form1" method="post" action=""> <div class=" ...
- 使用minikube在本机测试kubernetes
目录 简介 安装 Docker CE 安装 kubectl 安装 minikube 启动 minikube 启动 dashboard 启动一个服务 删除服务 参考 本文主要讲解 minikube(ku ...
- 通配符证书导致 Outlook Anywhere 的客户端连接问题
通配符证书导致 Outlook Anywhere 的客户端连接问题 本主题介绍当您使用 Outlook Anywhere 连接到 Microsoft Exchange 及在组织中跨 Exchange ...
- ACM,算法
ACM,算法 描述 最近Topcoder的XD遇到了一个难题,倘若一个数的三次方的后三位是111,他把这样的数称为小光棍数.他已经知道了第一个小光棍数是471,471的三次方是104487111,现在 ...
- amazeui笔记-web组件
Json.parse()
- angular1的 伪MVC
以下的代码是自己对angular1的一些理解.如果非要按照mvc的这种模式开发..可以用以下的这种方式理解. //userFactorys.js 这是服务方法 return 的方法取得json数据里的 ...
- Emacs快速入门
Emacs 快速入门 Emacs 启动: 直接打emacs, 如果有X-windows就会开视窗. 如果不想用X 的版本, 就用 emacs -nw (No windows)起动. 符号说明 C-X ...
- [C语言] 数据结构-预备知识指针
所有的伟大源于一个勇敢的开始 数据结构预备知识 指针 1.指针:是C语言的灵魂,指针=地址 地址:内存单元的编号 指针变量:存放内存单元地址的变量 int *p;//p是指针变量,int *表示该p变 ...
- ssm集成redis
身在一个传统的IT公司,接触的新技术比较少,打算年后跳槽,所以抽空学了一下redis. 简单的redis测试,咱们这边就不讲了,现在主要讲讲ssm集成redis的过程,因为现在项目用的就是ssm的框架 ...