python mysql模块
多次使用python操作mysql数据库,先与大家分享一下,关于如何使用python操作mysql数据库。mysql并不是python自带的模块,因此需要下载安装。(在windows平台下介绍该使用过程)
1、下载/安装python-mysql
下载地址:https://pypi.python.org/pypi/MySQL-python/1.2.5
双击下载的文件,一直选择next就可以安装好(前提是必须已经安装了python),注意python-mysql与python对应的版本,否则在使用过程中会出现意想不到的错误。
2、检查是否安装成功
打开python交互界面,输入import MySQLdb,没有报错表示成功安装。
如图:

3、使用方式
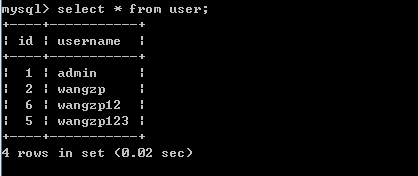
测试数据库为:

3.1 与数据库建立连接
|
1
2
3
4
5
6
7
8
9
|
# 使用MySQLdb.connect()方法connection = MySQLdb.connect(host="127.0.0.1", port=3306, user="root", passwd="root", db="test")# host : 主机名(IP)# port : 端口号,mysql默认为3306# user : 用户名# passwd : 密码# db : 数据库(默认连接的数据库)【可选】# charset : 编码方式【可选】# 如果未指定db属性,那么可以使用connection.select_db("数据库名称")选择指定数据库 |
3.2 获取游标对象
|
1
2
3
|
# 具体的sql执行,都是通过游标对象完成的;通过连接对象的cursor方法获取游标对象# 初始状态游标执行第一个元素cursor = connection.cursor() |
3.3 执行SQL语句
|
1
2
3
4
5
6
7
8
9
10
11
12
13
14
15
16
17
18
19
20
21
22
23
24
25
26
27
28
29
30
31
32
33
|
# 分为单个SQL执行和批量SQL执行,以及是否参数化(可以防止SQL注入)# query: sql字符串# args :如果sql字符串为%s占位符那么args是元组或者列表,如果sql字符串占位符是%(key)s形式## ,那么是字典类型。否则为None(默认)# 语法1:cursor.execute(query, args)# 语法2:cursor.executemany(query, args) # 范例1:使用语法1查询数据import MySQLdbif __name__ == "__main__": # create mysql connection connection = MySQLdb.connect(host="127.0.0.1", port=3306, user="root", passwd="root", db="test") # get cursor cursor = connection.cursor() # 返回执行结果数 # nums = cursor.execute("select * from user where id=%s", [1]) # 使用%s占位符 nums = cursor.execute("select * from user where id = %(id)s", {"id" : 1}) # 使用%(key)s占位符 print(nums) print(cursor.fetchone()) # 范例2:使用语法2查询一条数据import MySQLdbif __name__ == "__main__": # create mysql connection connection = MySQLdb.connect(host="127.0.0.1", port=3306, user="root", passwd="root", db="test") # get cursor cursor = connection.cursor() # 返回执行结果数; nums = cursor.executemany("select * from user where id=%s", [[1], [2]]) print(nums) print(cursor.fetchone()) print(cursor.fetchmany()) print(cursor.fetchall())# 结果是:nums = 2, 但是查询结果却是id=2的结果;那是因为nums表示执行了多少个execute方法,# 而执行查询结果,却是覆盖了上一个结果,因此当使用语法2查询时,执行返回最后一个条件的结果 |
对上述两种语法,这里做一些阐述:
1、execute:执行单条sql语句,并返回sql语句执行的结果数量
2、executemany:执行多条sql语句,内部实际是多次调用execute,但是比显示这样调用效率要高一些,返回execute执行成功的数量(实际就是sql语句的sql执行的结果数量。
当执行更新(插入、修改、删除)操作时,需要通过connection.commit()显示执行提交,才会将execute或者executemany执行的结果,映射到数据库中。
当执行查询操作时,需要使用cursor.fetchone()、cursor.fetchmany(size), cursor.fetchall(),获取一个、多个、全部sql执行查询的结果。如果使用cursor.frtchmany()默认会获取一个,如果想获取指定个数,那么可以使用cursor.fetchmany(size=2)方式。
3.4 查询时游标的理解
3.4.1 游标规则
如果使用同一个cursor.execute()执行查询结果,初始状态游标执行首个元素,当使用cursor.fetch*时,游标会向下移动;
cursor.fetchone : 向下移动一个位置
cursor.fetchmany(size=num) : 向下移动size指定数值位置
cursor.fetchall() :游标移动到末尾
例如:
|
1
2
3
4
5
6
7
8
9
10
11
12
|
import MySQLdbif __name__ == "__main__": # create mysql connection connection = MySQLdb.connect(host="127.0.0.1", port=3306, user="root", passwd="root", db="test") # get cursor cursor = connection.cursor() # 返回执行结果数 nums = cursor.execute("select * from user") print(cursor.fetchone()) print(cursor.fetchmany(size=1)) print(cursor.fetchall()) |
执行结果:
(1L, 'admin')
((2L, 'wangzp'),)
((6L, 'wangzp12'), (5L, 'wangzp123'))
根据结果可以发现,游标会移动,按照上述描述的规则。
3.4.2 设置游标位置
可以通过cursor.scroll(position, mode="relative | absolute")方法,来设置相对位置游标和绝对位置游标。
方法参数描述:
position : 游标位置
mode : 游标位置的模式,relative:默认模式,相对当前位置;absolute:绝对位置
例如:
mode=relative, position=1;表示的是设置游标为当前位置+1的位置,即向下移动一个位置
mode=absolute, position=2;将游标移动到索引为2的位置
代码示例:
|
1
2
3
4
5
6
7
8
9
10
11
12
13
14
|
import MySQLdbif __name__ == "__main__": # create mysql connection connection = MySQLdb.connect(host="127.0.0.1", port=3306, user="root", passwd="root", db="test") # get cursor cursor = connection.cursor() # 返回执行结果数 nums = cursor.execute("select * from user") print(cursor.fetchone()) # 执行后,游标移动到索引位置为1 cursor.scroll(1) # 相对游标移动模式,当前索引+1,即游标位置为2 print(cursor.fetchmany(size=1)) # 因此获取第3个元素 cursor.scroll(0, mode="absolute") # 绝对索引模式,将游标重置为0 print(cursor.fetchall()) # 因此获取所有数据 |
运行结果:
(1L, 'admin')
((6L, 'wangzp12'),)
((1L, 'admin'), (2L, 'wangzp'), (6L, 'wangzp12'), (5L, 'wangzp123'))
3.5 事务管理
使用connection.commit()提交,connection.rollback()回滚。
总结:
除了上述一些用法外,还有一些注入执行存储过程等方法,这里不做介绍,详情可以参考相关文档。其实用法相对还是比较简单的。一般开发可以分为如下步骤:
1、建立数据库连接
2、获取游标
3、执行SQL
4、如果sql是查询,那么使用fetch系列函数查询,但是需要注意的是游标的移动方式。
如下列一个简单的封装代码(部分):
|
1
2
3
4
5
6
7
8
9
10
11
12
13
14
15
16
17
18
19
20
21
22
23
24
25
26
27
28
29
30
31
32
33
34
35
36
37
38
39
40
41
42
43
44
45
46
47
48
49
50
|
import MySQLdbclass DBUtil(object): @staticmethod def getConnection(host, port, user, password, db): "get mysql connection" connection = None try: connection = MySQLdb.connect(host=host, port=port, user=user, passwd=password, db=db) except MySQLdb.Error, e: print(e) return connection @staticmethod def getCursor(connection): "get cursor" cursor = None try: cursor = connection.cursor() except MySQLdb.Error, e: print(e) return cursor @staticmethod def update(cursor, sql, args): return cursor.execute(sql, args) @staticmethod def updateAndCommit(connection, cursor, sql, args): nums = cursor.execute(sql, args) connection.commit() return nums @staticmethod def updateBatch(cursor, sql, args): return cursor.executemany(sql, args) @staticmethod def updateBatchAndCommit(connection, cursor, sql, args): nums = cursor.executemany(sql, args) connection.commit() return nums if __name__ == "__main__": connection = DBUtil.getConnection("127.0.0.1", 3306, "root", "root", "test") cursor = DBUtil.getCursor(connection) nums = cursor.execute("select * from user") print(cursor.fetchall())
|
python mysql模块的更多相关文章
- ubuntu 安装python mysql模块
Installation Starting with a vanilla Lucid install , install pip and upgrade to the latest version: ...
- Python Paramiko模块与MySQL数据库操作
Paramiko模块批量管理:通过调用ssh协议进行远程机器的批量命令执行. 要使用paramiko模块那就必须先安装这个第三方模块,仅需要在本地上安装相应的软件(python以及PyCrypto), ...
- yum安装memcache,mongo扩展以及python的mysql模块安装
//启动memcached/usr/local/memcached/bin/memcached -d -c 10240 -m 1024 -p 11211 -u root/usr/local/memca ...
- Python MySQLdb模块连接操作mysql数据库实例_python
mysql是一个优秀的开源数据库,它现在的应用非常的广泛,因此很有必要简单的介绍一下用python操作mysql数据库的方法.python操作数据库需要安装一个第三方的模块,在http://mysql ...
- Python 操作 Mysql 模块
一.Python 操作 Mysql 模块的安装 linux: yum install MySQL-python window: http://files.cnblogs.com/files/wupei ...
- python自动化--模块操作之re、MySQL、Excel
一.python自有模块正则 import re # re.match只匹配字符串的开始,如果字符串开始不符合正则表达式,则匹配失败,函数返回None print(re.match("www ...
- python mysql
mysql Linux 安装mysql: apt-get install mysql-server 安装python-mysql模块:apt-get install python-mysqldb Wi ...
- Python Mysql 篇
Python 操作 Mysql 模块的安装 linux: yum install MySQL-python window: http://files.cnblogs.com/files/wupeiqi ...
- python 常用模块(转载)
转载地址:http://codeweblog.com/python-%e5%b8%b8%e7%94%a8%e6%a8%a1%e5%9d%97/ adodb:我们领导推荐的数据库连接组件bsddb3:B ...
随机推荐
- JQuery中width和JS中JS中关于clientWidth offsetWidth scrollWidth 等的含义
JQuery中: width()方法用于获得元素宽度: innerWidth()方法用于获得包括内边界(padding)的元素宽度: outerWidth()方法用于获得包括内边界(padding)和 ...
- spring boot: 输出json
spring boot: 输出json 注意:关闭java的Terminate后,在重新启动,否则报错 app.java启动配置 package com.muyang.boot1; import o ...
- Rails 5 Test Prescriptions 第8章 Integration Testing with Capybara and Cucumber
Capybara: A complete reference is available atrubydoc.info. 集成测试就是把局部的程序组合起来测试. 端到端测试是一个特殊的集成测试,覆盖了 ...
- UVA-11761-马尔可夫/记忆化搜索
https://vjudge.net/problem/UVA-11762 给出一个整数n,每次随机挑选一个小于等于n的素数,如果是n的因子,n变为n/x ,否则不变,问n变为1的期望挑选次数. f[i ...
- 使用Spring Loader或者Jrebel实现java 热部署
.其实JRebel和Spring-Loaded就是一个开发环境下的利器,skip build and redeploy process,大大提升了工作效率!而非生产环境的利器...因为线上reload ...
- 微信小程序scroll-view横向滚动
官方文档给的代码复制下来发现无法滚动,没反应,使用css设置浮动属性也无效 官方没有给出css代码,横向需要设置两个css属性才行: white-space: nowrap; ----规定段落中的文本 ...
- lvs+keepalived+bind实现负载均衡高可用智能dns【转】
转:https://www.cnblogs.com/mikeluwen/p/7068356.html 整体架构: 1.IP地址规划: Dns1:172.28.0.54 Dns2:172.28.0.55 ...
- 前端 crypto-js aes 加解密
下载:npm install crypto-js --save 需要定义两个方法 ,分别是用于加密和解密,这里我将它放在了 utils 文件夹下,命名为 secret.js ,其具体代码如下: con ...
- ES6学习一 JS语言增强篇
一 背景 JavaScript经过二十来年年的发展,由最初简单的交互脚本语言,发展到今天的富客户端交互,后端服务器处理,跨平台(Native),以及小程序等等的应用.JS的角色越来越重要,处理场景越来 ...
- STL标准库-hash
技术在于交流.沟通,本文为博主原创文章转载请注明出处并保持作品的完整性 hash的结构图如下图 oject通过hashfunc转换成hashcode然后插入到相应篮子中 hash同rb_tree是一种 ...
