inotify+rsync架构实现实时同步
前序
使用inotify+rsync架构实现(文件夹/文件)实时同步, 双机之间需要ssh免密码配置(两步完成ssh免密码登录)
环境
客户端:192.168.137.176 (rsync + inotify-tools-3.14 + 实时shell脚本)
服务端:192.168.137.177 (rsync + xinetd)
操作
客户端
工具:rsync+ xinetd
tar -zxvf inotify-tools-3.14.tar.gz

cd inotify-tools-3.14

./configure && make && make install
实时shell(csync.sh)
#*************************************************************************

#         > File Name: /tmp/1.sh

#         > Author: chenglee

#         > Main : chengkenlee@sina.com

#         > Blog : http://www.cnblogs.com/chenglee/

#         > Created Time : 2019年02月19日 星期二 19时30分51秒

#*************************************************************************

#!/bin/bash

serverip="192.168.137.177"

serverdir="/home/test"

clientdir="/home/test"

module="test"

/usr/local/bin/inotifywait -mrq -e modify,create,move,delete,attrib ${clientdir} | while read events

    do

    rsync -a --delete ${serverdir} ${serverip}::${module}

    echo "`date +'%F %T'` 出现事件 $events" >>rsync.log 2>&1

    done
服务端
vim /etc/rsyncd.conf
# /etc/rsyncd: configuration file for rsync daemon mode

# See rsyncd.conf man page for more options.

# configuration example:

# uid = nobody

# gid = nobody

# use chroot = yes

# max connections = 4

# pid file = /var/run/rsyncd.pid

# exclude = lost+found/

# transfer logging = yes

# timeout = 900

# ignore nonreadable = yes

# dont compress   = *.gz *.tgz *.zip *.z *.Z *.rpm *.deb *.bz2

[test]

    path = /home/

    read only = false

    uid = root

    gid = root
启动xinetd(没有的安装一下)
systemctl restart xinetd
启动rsync
rsync --daemon
测试
1.新建资源文件夹(客户端个服务端都需要建立)
mkdir /home/test
2.启动实时shell
nohup ./csync.sh &
3.在客户端/home/test文件夹下建立资源
touch /home/test/file{1..10}

日志
2019-02-19 21:39:52 出现事件 /home/test/ CREATE file6

2019-02-19 21:39:52 出现事件 /home/test/ ATTRIB file6

2019-02-19 21:39:52 出现事件 /home/test/ CREATE file7

2019-02-19 21:39:52 出现事件 /home/test/ ATTRIB file7

2019-02-19 21:39:53 出现事件 /home/test/ CREATE file8

2019-02-19 21:39:53 出现事件 /home/test/ ATTRIB file8

2019-02-19 21:39:53 出现事件 /home/test/ CREATE file9

2019-02-19 21:39:53 出现事件 /home/test/ ATTRIB file9

2019-02-19 21:39:53 出现事件 /home/test/ CREATE file10

2019-02-19 21:39:53 出现事件 /home/test/ ATTRIB file10

服务端展示
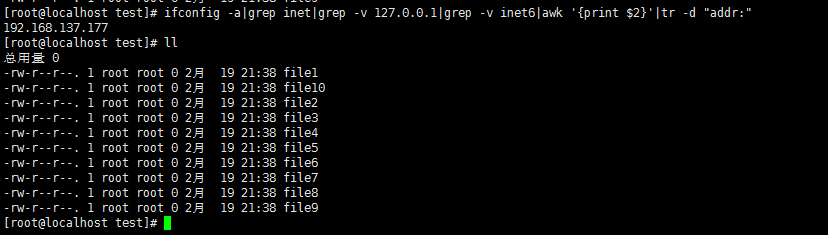
只要实时监控脚本启动, 无论你在客户端机器的/home/test下做任何操作都会自动同步到服务端的/home/test下面
inotify+rsync架构实现实时同步的更多相关文章
- inotify和rsync实现数据实时同步
数据的实时同步 实现实时同步 要利用监控服务(inotify),监控同步数据服务器目录中信息的变化 发现目录中数据产生变化,就利用rsync服务推送到备份服务器上 实现实时同步的方法 ino ...
- rsync 与 inotify 的使用 & 实现实时同步备份
今日内容 rsync 内容详细 上一篇内容问题 1.yum源问题 2.VPN链接正常,但是没办法通过172 3.VPN链接时,出现了DNS错误 4.掩码不对 5.openvpn开启错误 复制的命令 1 ...
- Rsync+Sersync数据实时同步(双向)
Rsync+Sersync数据实时同步(双向) 服务介绍 一.为什么要用rsync+sersync架构? 1.sersync是基于inotify开发的,类似于inotify-tools的工具 2.se ...
- centos6.6配置rsync+sersync实现实时同步分布式多客户端分发同步
1.sersync项目: sersync项目利用inotify与rsync技术实现对服务器数据实时同步到解决方案,其中inotify用于监控sersync所在服务器上文件系统的事件变化,rsync是目 ...
- inotify软件部署及实时同步
声明:博主使用的是CentOS6.9的系统 参考资料: https://github.com/rvoicilas/inotify-tools/wiki http://www.ibm.com/devel ...
- rsync+inotify-tools文件实时同步
rsync+inotify-tools文件实时同步案例 全量备份 Linux下Rsync+sersync实现数据实时同步完成. 增量备份 纯粹的使用rsync做单向同步时,rsync的守护进程是运行在 ...
- CentOS7之Rsync+Inotify架构实现实时同步文件和文件夹
简介:rsync是用来同步文件和文件夹的,inotify是用来实现监听变动而自动同步的 OS:Centos7.3 服务器端:172.16.13.157 客 户 端 :172.16.13.156 目 ...
- 烂泥:rsync与inotify集成实现数据实时同步更新
本文由秀依林枫提供友情赞助,首发于烂泥行天下. 上篇文章我们介绍了如何使用rsync同步文件,这篇文章我们再来介绍下,如何把rsync与inotify集成实现数据的实时同步. 要达到这个目的,我们需要 ...
- rsync+inotify百万级文件实时同步
实验环境:Centos7.4 目的:将源服务器的文件实时同步至目标服务器 源服务器:10.11.1.107 目标服务器:10.11.1.106 分别在两个节点安装rsync yum -y instal ...
随机推荐
- Ionic异常及解决
1. 编译时提示: ERROR: In <declare-styleable> FontFamilyFont, unable to find attribute android:fontV ...
- HttpSession的认识
package javax.servlet.http; import java.util.Enumeration; import javax.servlet.ServletContext; publi ...
- Solve Error: "errcode": 85005, "errmsg": "appid not bind weapp hint"
在使用微信官方给的添加自定义菜单的示例代码: { "button":[ { "type":"click", "name" ...
- mac homebrew
brew 全称Homebrew 是Mac OSX上的软件包管理工具 Homebrew 安装和卸载工具 只用一行命令就能完成 官方地址: http://brew.sh/index.html ...
- Coffee and Coursework (Hard Version)
Coffee and Coursework (Hard Version) time limit per test 2.5 seconds memory limit per test 256 megab ...
- bug制造者又上线了
上一家公司,领导经常这样表扬一位同事,“你写的bug远比你的功能值钱...” 今天特么的突然觉得我好像也有这样的功能,不知道是上次回家把脑子落家里了还是,前几天淋雨脑子进了水了. 呢么简单一个功能,愣 ...
- 关于IOC和DI
IoC (Inverse of Control)即控制反转.是指将原来程序中自己创建实现类对象的控制权反转到IOC容器中.只需要通过IOC获了对象的实例,将IOC当成一个黑盒子.工厂.容器. spri ...
- python全栈开发 * 09知识点汇总 * 1806011
09 函数初识一 函数的的定义# 函数: 对代码块和功能的封装和定义# 引入 回家过程 未用函数# print("步行")# print("坐地铁")# pri ...
- Docker入门3------手动编辑自定义镜像
手动编辑自定义镜像 查看本地现有镜像: 基于centos创建一个,会自动下载centos最新原始镜像 docker run -it --name=web centos /bin/bash 然后在容器内 ...
- 为虚拟机配置NAT网络
一.打开网络适配器 1.按图中所示进行配置 2.记得把网和VM8关联一下 3.点击网络设置 4.点击右下角小齿轮来配置ip 5.在IPv4下选择手动 6. 7. 这个就是Linux的NAT配置