从零开始实现ASP.NET Core MVC的插件式开发(五) - 插件的删除和升级
标题:从零开始实现ASP.NET Core MVC的插件式开发(五) - 使用AssemblyLoadContext实现插件的升级和删除
作者:Lamond Lu
地址:https://www.cnblogs.com/lwqlun/p/11395828.html
源代码:https://github.com/lamondlu/Mystique

前景回顾:
- 从零开始实现ASP.NET Core MVC的插件式开发(一) - 使用Application Part动态加载控制器和视图
- 从零开始实现ASP.NET Core MVC的插件式开发(二) - 如何创建项目模板
- 从零开始实现ASP.NET Core MVC的插件式开发(三) - 如何在运行时启用组件
- 从零开始实现ASP.NET Core MVC的插件式开发(四) - 插件安装
简介
在上一篇中,我为大家讲解了如何实现插件的安装,在文章的最后,留下了两个待解决的问题。
- .NET Core 2.2中不能实现运行时删除插件
- .NET Core 2.2中不能实现运行时升级插件
其实这2个问题归根结底其实都是一个问题,就是插件程序集被占用,不能在运行时更换程序集。在本篇中,我将分享一下我是如何一步一步解决这个问题的,其中也绕了不少弯路,查阅过资料,在.NET Core官方提过Bug,几次差点想放弃了,不过最终是找到一个可行的方案。
.NET Core 2.2的遗留问题
程序集被占用的原因
回顾一下,我们之前加载插件程序集时所有使用的代码。
	var provider = services.BuildServiceProvider();

    using (var scope = provider.CreateScope())

    {

    	var unitOfWork = scope.ServiceProvider.GetService<IUnitOfWork>();

        var allEnabledPlugins = unitOfWork.PluginRepository

        	.GetAllEnabledPlugins();

		foreach (var plugin in allEnabledPlugins)

        {

        	var moduleName = plugin.Name;

            var assembly = Assembly.LoadFile($"{AppDomain.CurrentDomain.BaseDirectory}Modules\\{moduleName}\\{moduleName}.dll");

			var controllerAssemblyPart = new AssemblyPart(assembly);

            mvcBuilders.PartManager

                    .ApplicationParts

                    .Add(controllerAssemblyPart);

        }

    }
这里我们使用了Assembly.LoadFile方法加载了插件程序集。 在.NET中使用Assembly.LoadFile方法加载的程序集会被自动锁定,不能执行任何转移,删除等造作,所以这就给我们删除和升级插件造成了很大困难。
PS: 升级插件需要覆盖已加载的插件程序集,由于程序集锁定,所以覆盖操作不能成功。
使用AssemblyLoadContext
在.NET Framework中,如果遇到这个问题,常用的解决方案是使用AppDomain类来实现插件热插拔,但是在.NET Core中没有AppDomain类。不过经过查阅,.NET Core 2.0之后引入了一个AssemblyLoadContext类来替代.NET Freamwork中的AppDomain。本以为使用它就能解决当前程序集占用的问题,结果没想到.NET Core 2.x版本提供的AssemblyLoadContext没有提供Unload方法来释放加载的程序集,只有在.NET Core 3.0版本中才为AssemblyLoadContext类添加了Unload方法。
相关链接:
升级.NET Core 3.0 Preview 8
因此,为了完成插件的删除和升级功能,我将整个项目升级到了最新的.NET Core 3.0 Preview 8版本。
这里.NET Core 2.2升级到.NET Core 3.0有一点需要注意的问题。
在.NET Core 2.2中默认启用了Razor视图的运行时编译,简单点说就是.NET Core 2.2中自动启用了读取原始的Razor视图文件,并编译视图的功能。这就是我们在第三章和第四章中的实现方法,每个插件文件最终都放置在了一个Modules目录中,每个插件既有包含Controller/Action的程序集,又有对应的原始Razor视图目录Views,在.NET Core 2.2中当我们在运行时启用一个组件之后,对应的Views可以自动加载。
The files tree is:

=================

  |__ DynamicPlugins.Core.dll

  |__ DynamicPlugins.Core.pdb

  |__ DynamicPluginsDemoSite.deps.json

  |__ DynamicPluginsDemoSite.dll

  |__ DynamicPluginsDemoSite.pdb

  |__ DynamicPluginsDemoSite.runtimeconfig.dev.json

  |__ DynamicPluginsDemoSite.runtimeconfig.json

  |__ DynamicPluginsDemoSite.Views.dll

  |__ DynamicPluginsDemoSite.Views.pdb

  |__ Modules

    |__ DemoPlugin1

      |__ DemoPlugin1.dll

      |__ Views

        |__ Plugin1

          |__ HelloWorld.cshtml

        |__ _ViewStart.cshtml
但是在.NET Core 3.0中,Razor视图的运行时编译需要引入程序集Microsoft.AspNetCore.Mvc.Razor.RuntimeCompilation。并且在程序启动时,需要启动运行时编译的功能。
public void ConfigureServices(IServiceCollection services)

{

    ...

	var mvcBuilders = services.AddMvc()

        .AddRazorRuntimeCompilation();

    ...

}
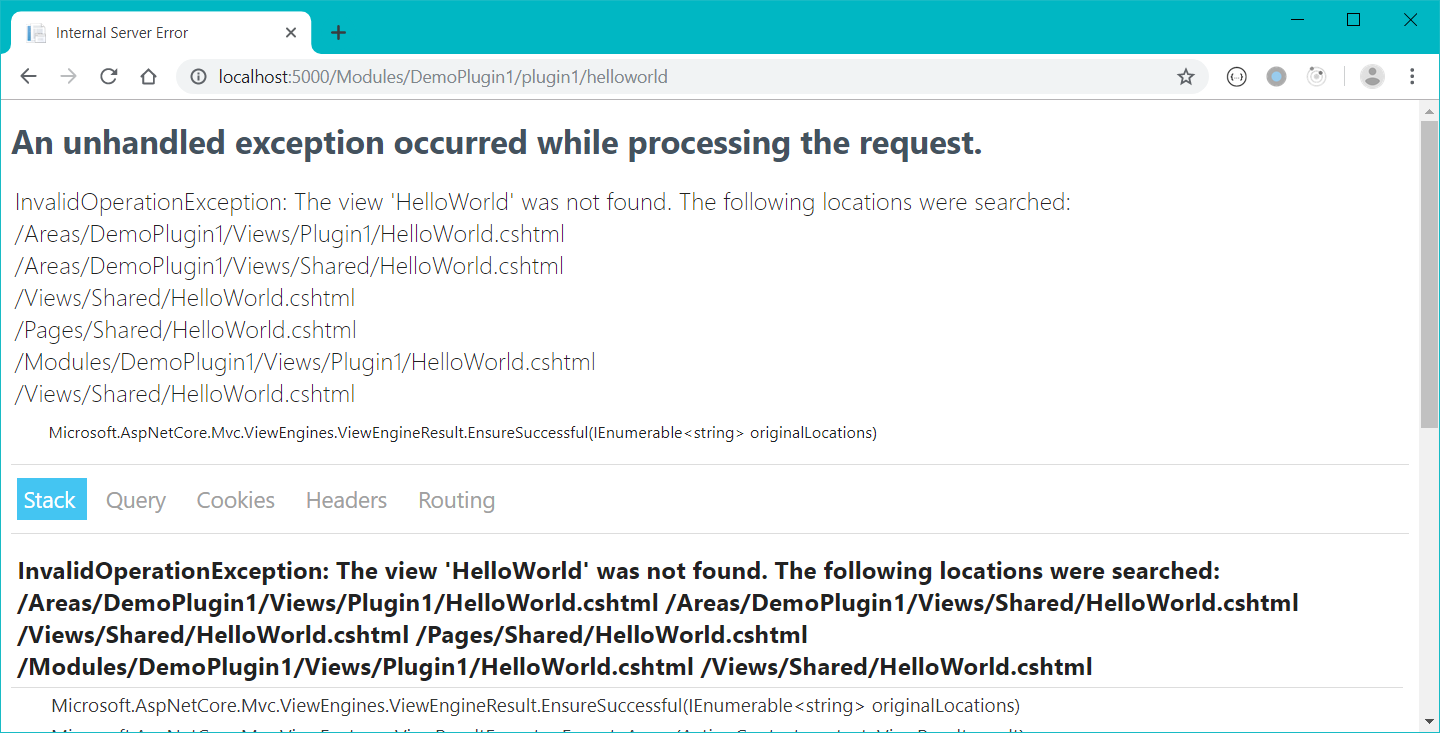
如果没有启用Razor视图的运行时编译,程序访问插件视图的时候,就会报错,提示视图找不到。

使用.NET Core 3.0的AssemblyLoadContext加载程序集
这里为了创建一个可回收的程序集加载上下文,我们首先基于AssemblyLoadcontext创建一个CollectibleAssemblyLoadContext类。其中我们将IsCollectible属性通过父类构造函数,将其设置为true。
	public class CollectibleAssemblyLoadContext

        : AssemblyLoadContext

    {

        public CollectibleAssemblyLoadContext()

        	: base(isCollectible: true)

        {

        }

        protected override Assembly Load(AssemblyName name)

        {

            return null;

        }

    }
在整个插件加载上下文的设计上,每个插件都使用一个单独的CollectibleAssemblyLoadContext来加载,所有插件的CollectibleAssemblyLoadContext都放在一个PluginsLoadContext对象中。
相关代码: PluginsLoadContexts.cs
	public static class PluginsLoadContexts

    {

        private static Dictionary<string, CollectibleAssemblyLoadContext>

            _pluginContexts = null;

        static PluginsLoadContexts()

        {

            _pluginContexts = new Dictionary<string, CollectibleAssemblyLoadContext>();

        }

        public static bool Any(string pluginName)

        {

            return _pluginContexts.ContainsKey(pluginName);

        }

        public static void RemovePluginContext(string pluginName)

        {

            if (_pluginContexts.ContainsKey(pluginName))

            {

                _pluginContexts[pluginName].Unload();

                _pluginContexts.Remove(pluginName);

            }

        }

        public static CollectibleAssemblyLoadContext GetContext(string pluginName)

        {

            return _pluginContexts[pluginName];

        }

        public static void AddPluginContext(string pluginName,

             CollectibleAssemblyLoadContext context)

        {

            _pluginContexts.Add(pluginName, context);

        }

    }
代码解释:
- 当加载插件的时候,我们需要将当前插件的程序集加载上下文放到
_pluginContexts字典中。字典的key是插件的名称,字典的value是插件的程序集加载上下文。 - 当移除一个插件的时候,我们需要使用
Unload方法,来释放当前的程序集加载上下文。
在完成以上代码之后,我们更改程序启动和启用组件的代码,因为这两部分都需要将插件程序集加载到CollectibleAssemblyLoadContext中。
Startup.cs
	var provider = services.BuildServiceProvider();

    using (var scope = provider.CreateScope())

    {

        var option = scope.ServiceProvider

        	.GetService<MvcRazorRuntimeCompilationOptions>();

        var unitOfWork = scope.ServiceProvider

        	.GetService<IUnitOfWork>();

        var allEnabledPlugins = unitOfWork.PluginRepository

        	.GetAllEnabledPlugins();

        foreach (var plugin in allEnabledPlugins)

        {

            var context = new CollectibleAssemblyLoadContext();

            var moduleName = plugin.Name;

            var filePath = $"{AppDomain.CurrentDomain.BaseDirectory}Modules\\{moduleName}\\{moduleName}.dll";

            var assembly = context.LoadFromAssemblyPath(filePath);

            var controllerAssemblyPart = new AssemblyPart(assembly);

            mvcBuilders.PartManager.ApplicationParts

                    .Add(controllerAssemblyPart);

            PluginsLoadContexts.AddPluginContext(plugin.Name, context);

        }

    }
PluginsController.cs
	public IActionResult Enable(Guid id)

    {

        var module = _pluginManager.GetPlugin(id);

        if (!PluginsLoadContexts.Any(module.Name))

        {

            var context = new CollectibleAssemblyLoadContext();

            _pluginManager.EnablePlugin(id);

            var moduleName = module.Name;

            var filePath = $"{AppDomain.CurrentDomain.BaseDirectory}Modules\\{moduleName}\\{moduleName}.dll";

            context.

            var assembly = context.LoadFromAssemblyPath(filePath);

            var controllerAssemblyPart = new AssemblyPart(assembly);

            _partManager.ApplicationParts.Add(controllerAssemblyPart);

            MyActionDescriptorChangeProvider.Instance.HasChanged = true;

            MyActionDescriptorChangeProvider.Instance.TokenSource.Cancel();

            PluginsLoadContexts.AddPluginContext(module.Name, context);

        }

        else

        {

            var context = PluginsLoadContexts.GetContext(module.Name);

            var controllerAssemblyPart = new AssemblyPart(context.Assemblies.First());

            _partManager.ApplicationParts.Add(controllerAssemblyPart);

            _pluginManager.EnablePlugin(id);

            MyActionDescriptorChangeProvider.Instance.HasChanged = true;

            MyActionDescriptorChangeProvider.Instance.TokenSource.Cancel();

        }

        return RedirectToAction("Index");

    }
意外结果
完成以上代码之后,我立刻尝试了删除程序集的操作,但是得到的结果却不是我想要的。
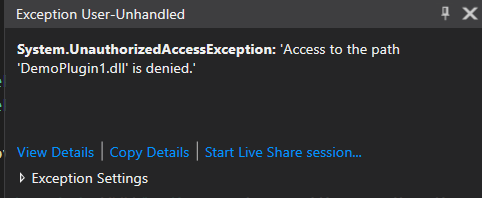
虽然.NET Core 3.0为AssemblyLoadContext提供了Unload方法,但是调用之后, 你依然会得到一个文件被占用的错误

暂时不知道这是不是.NET Core 3.0的bug, 还是功能就是这么设计的,反正感觉这条路是走不通了,折腾了一天,在网上找了好多方案,但是都不能解决这个问题。
就在快放弃的时候,突然发现AssemblyLoadContext类提供了另外一种加载程序集的方式LoadFromStream。
改用LoadFromStream加载程序集
看到LoadFromStream方法之后,我的第一思路就是可以使用FileStream加载插件程序集,然后将获得的文件流传给LoadFromStream方法,并在文件加载完毕之后,释放掉这个FileStream对象。
根据以上思路,我将加载程序集的方法修改如下
PS: Enable方法的修改方式类似,这里我就不重复写了。
	var provider = services.BuildServiceProvider();

    using (var scope = provider.CreateScope())

    {

        var option = scope.ServiceProvider

            .GetService<MvcRazorRuntimeCompilationOptions>();

        var unitOfWork = scope.ServiceProvider.GetService<IUnitOfWork>();

        var allEnabledPlugins = unitOfWork.PluginRepository.GetAllEnabledPlugins();

        foreach (var plugin in allEnabledPlugins)

        {

            var context = new CollectibleAssemblyLoadContext();

            var moduleName = plugin.Name;

            var filePath = $"{AppDomain.CurrentDomain.BaseDirectory}Modules\\{moduleName}\\{moduleName}.dll";

            _presetReferencePaths.Add(filePath);

            using (var fs = new FileStream(filePath, FileMode.Open))

            {

                var assembly = context.LoadFromStream(fs);

                var controllerAssemblyPart = new AssemblyPart(assembly);

                mvcBuilders.PartManager.ApplicationParts.Add(controllerAssemblyPart);

                PluginsLoadContexts.AddPluginContext(plugin.Name, context);

            }

        }

    }
修改之后,我又试了一下删除插件的代码,果然成功删除了。
"Empty path name is not legal. "问题
就在我认为功能已经全部完成之后,我又重新安装了删除的插件,尝试访问插件中的controller/action, 结果得到了意想不到的错误,插件的中包含的页面打不开了。
fail: Microsoft.AspNetCore.Diagnostics.ExceptionHandlerMiddleware[1]

      An unhandled exception has occurred while executing the request.

System.ArgumentException: Empty path name is not legal. (Parameter 'path')

   at System.IO.FileStream..ctor(String path, FileMode mode, FileAccess access, FileShare share, Int32 bufferSize, FileOptions options)

   at Microsoft.AspNetCore.Mvc.Razor.RuntimeCompilation.RazorReferenceManager.CreateMetadataReference(String path)

   at System.Linq.Enumerable.SelectListIterator`2.ToList()

   at System.Linq.Enumerable.ToList[TSource](IEnumerable`1 source)

   at Microsoft.AspNetCore.Mvc.Razor.RuntimeCompilation.RazorReferenceManager.GetCompilationReferences()

   at System.Threading.LazyInitializer.EnsureInitializedCore[T](T& target, Boolean& initialized, Object& syncLock, Func`1 valueFactory)

   at System.Threading.LazyInitializer.EnsureInitialized[T](T& target, Boolean& initialized, Object& syncLock, Func`1 valueFactory)

   at Microsoft.AspNetCore.Mvc.Razor.RuntimeCompilation.RazorReferenceManager.get_CompilationReferences()

   at Microsoft.AspNetCore.Mvc.Razor.RuntimeCompilation.LazyMetadataReferenceFeature.get_References()

   at Microsoft.CodeAnalysis.Razor.CompilationTagHelperFeature.GetDescriptors()

   at Microsoft.AspNetCore.Razor.Language.DefaultRazorTagHelperBinderPhase.ExecuteCore(RazorCodeDocument codeDocument)

   at Microsoft.AspNetCore.Razor.Language.RazorEnginePhaseBase.Execute(RazorCodeDocument codeDocument)

   at Microsoft.AspNetCore.Razor.Language.DefaultRazorEngine.Process(RazorCodeDocument document)

   at Microsoft.AspNetCore.Razor.Language.DefaultRazorProjectEngine.ProcessCore(RazorCodeDocument codeDocument)

   at Microsoft.AspNetCore.Razor.Language.RazorProjectEngine.Process(RazorProjectItem projectItem)

   at Microsoft.AspNetCore.Mvc.Razor.RuntimeCompilation.RuntimeViewCompiler.CompileAndEmit(String relativePath)

   at Microsoft.AspNetCore.Mvc.Razor.RuntimeCompilation.RuntimeViewCompiler.OnCacheMiss(String normalizedPath)

--- End of stack trace from previous location where exception was thrown ---

   at Microsoft.AspNetCore.Mvc.Razor.Compilation.DefaultRazorPageFactoryProvider.CreateFactory(String relativePath)

   at Microsoft.AspNetCore.Mvc.Razor.RazorViewEngine.CreateCacheResult(HashSet`1 expirationTokens, String relativePath, Boolean isMainPage)

   at Microsoft.AspNetCore.Mvc.Razor.RazorViewEngine.OnCacheMiss(ViewLocationExpanderContext expanderContext, ViewLocationCacheKey cacheKey)

   at Microsoft.AspNetCore.Mvc.Razor.RazorViewEngine.LocatePageFromViewLocations(ActionContext actionContext, String pageName, Boolean isMainPage)

   at Microsoft.AspNetCore.Mvc.Razor.RazorViewEngine.FindView(ActionContext context, String viewName, Boolean isMainPage)

   at Microsoft.AspNetCore.Mvc.ViewEngines.CompositeViewEngine.FindView(ActionContext context, String viewName, Boolean isMainPage)

   at Microsoft.AspNetCore.Mvc.ViewFeatures.ViewResultExecutor.FindView(ActionContext actionContext, ViewResult viewResult)

   at Microsoft.AspNetCore.Mvc.ViewFeatures.ViewResultExecutor.ExecuteAsync(ActionContext context, ViewResult result)

   at Microsoft.AspNetCore.Mvc.ViewResult.ExecuteResultAsync(ActionContext context)

   at Microsoft.AspNetCore.Mvc.Infrastructure.ResourceInvoker.<InvokeNextResultFilterAsync>g__Awaited|29_0[TFilter,TFilterAsync](ResourceInvoker invoker, Task lastTask, State next, Scope scope, Object state, Boolean isCompleted)

   at Microsoft.AspNetCore.Mvc.Infrastructure.ResourceInvoker.Rethrow(ResultExecutedContextSealed context)

   at Microsoft.AspNetCore.Mvc.Infrastructure.ResourceInvoker.ResultNext[TFilter,TFilterAsync](State& next, Scope& scope, Object& state, Boolean& isCompleted)

   at Microsoft.AspNetCore.Mvc.Infrastructure.ResourceInvoker.InvokeResultFilters()

--- End of stack trace from previous location where exception was thrown ---

   at Microsoft.AspNetCore.Mvc.Infrastructure.ResourceInvoker.<InvokeNextResourceFilter>g__Awaited|24_0(ResourceInvoker invoker, Task lastTask, State next, Scope scope, Object state, Boolean isCompleted)

   at Microsoft.AspNetCore.Mvc.Infrastructure.ResourceInvoker.Rethrow(ResourceExecutedContextSealed context)

   at Microsoft.AspNetCore.Mvc.Infrastructure.ResourceInvoker.Next(State& next, Scope& scope, Object& state, Boolean& isCompleted)

   at Microsoft.AspNetCore.Mvc.Infrastructure.ResourceInvoker.InvokeFilterPipelineAsync()

--- End of stack trace from previous location where exception was thrown ---

   at Microsoft.AspNetCore.Mvc.Infrastructure.ResourceInvoker.<InvokeAsync>g__Awaited|17_0(ResourceInvoker invoker, Task task, IDisposable scope)

   at Microsoft.AspNetCore.Routing.EndpointMiddleware.<Invoke>g__AwaitRequestTask|6_0(Endpoint endpoint, Task requestTask, ILogger logger)

   at Microsoft.AspNetCore.Routing.EndpointRoutingMiddleware.SetRoutingAndContinue(HttpContext httpContext)

   at Microsoft.AspNetCore.Diagnostics.ExceptionHandlerMiddleware.<Invoke>g__Awaited|6_0(ExceptionHandlerMiddleware middleware, HttpContext context, Task task)
这个文件路径非法的错误让我感觉很奇怪,为什么会有这种问题呢?与之前的代码的不同之处只有一个地方,就是从LoadFromAssemblyPath改为了LoadFromStream。
为了弄清这个问题,我clone了最新的.NET Core 3.0 Preview 8源代码,发现了在 .NET Core运行时编译视图的时候,会调用如下方法。
RazorReferenceManager.cs
    internal IEnumerable<string> GetReferencePaths()

    {

        var referencePaths = new List<string>();

        foreach (var part in _partManager.ApplicationParts)

        {

            if (part is ICompilationReferencesProvider compilationReferenceProvider)

            {

                referencePaths.AddRange(compilationReferenceProvider.GetReferencePaths());

            }

            else if (part is AssemblyPart assemblyPart)

            {

                referencePaths.AddRange(assemblyPart.GetReferencePaths());

            }

        }

        referencePaths.AddRange(_options.AdditionalReferencePaths);

        return referencePaths;

    }
这段代码意思是根据当前加载程序集的所在位置,来发现对应视图。
那么问题就显而易见了,我们之前用LoadFromAssemblyPath加载程序集,程序集的文件位置被自动记录下来,但是我们改用LoadFromStream之后,所需的文件位置信息丢失了,是一个空字符串,所以.NET Core在尝试加载视图的时候,遇到空字符串,抛出了一个非法路径的错误。
其实这里的方法很好改,只需要将空字符串的路径排除掉即可。
	internal IEnumerable<string> GetReferencePaths()

    {

        var referencePaths = new List<string>();

        foreach (var part in _partManager.ApplicationParts)

        {

            if (part is ICompilationReferencesProvider compilationReferenceProvider)

            {

                referencePaths.AddRange(compilationReferenceProvider.GetReferencePaths());

            }

            else if (part is AssemblyPart assemblyPart)

            {

                referencePaths.AddRange(assemblyPart.GetReferencePaths().Where(o => !string.IsNullOrEmpty(o));

            }

        }

        referencePaths.AddRange(_options.AdditionalReferencePaths);

        return referencePaths;

    }
但是由于不清楚会不会导致其他问题,所以我没有采取这种方法,我将这个问题作为一个Bug提交到了官方。
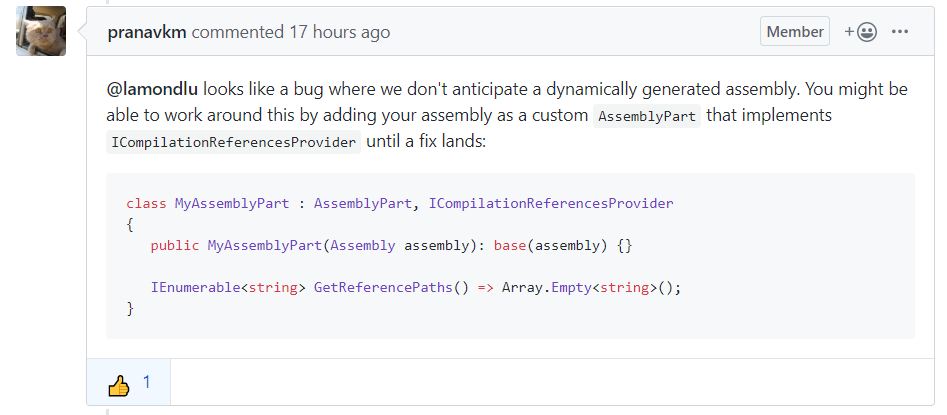
没想到仅仅8小时,就得到官方的解决方案。

这段意思是说ASP.NET Core暂时不支持动态加载程序集,如果要在当前版本实现功能,需要自己实现一个AssemblyPart类, 在获取程序集路径的时候,返回空集合而不是空字符串。
PS: 官方已经将这个问题放到了.NET 5 Preview 1中,相信.NET 5中会得到真正的解决。
根据官方的方案,Startup.cs文件的最终版本
	public class MyAssemblyPart : AssemblyPart, ICompilationReferencesProvider

    {

        public MyAssemblyPart(Assembly assembly) : base(assembly) { }

        public IEnumerable<string> GetReferencePaths() => Array.Empty<string>();

    }

    public static class AdditionalReferencePathHolder

    {

        public static IList<string> AdditionalReferencePaths = new List<string>();

    }

    public class Startup

    {

        public IList<string> _presets = new List<string>();

        public Startup(IConfiguration configuration)

        {

            Configuration = configuration;

        }

        public IConfiguration Configuration { get; }

        // This method gets called by the runtime. Use this method to add services to the container.

        public void ConfigureServices(IServiceCollection services)

        {

            services.AddOptions();

            services.Configure<ConnectionStringSetting>(Configuration.GetSection("ConnectionStringSetting"));

            services.AddScoped<IPluginManager, PluginManager>();

            services.AddScoped<IUnitOfWork, UnitOfWork>();

            var mvcBuilders = services.AddMvc()

                .AddRazorRuntimeCompilation(o =>

                {

                    foreach (var item in _presets)

                    {

                        o.AdditionalReferencePaths.Add(item);

                    }

                    AdditionalReferencePathHolder.AdditionalReferencePaths = o.AdditionalReferencePaths;

                });

            services.Configure<RazorViewEngineOptions>(o =>

            {

                o.AreaViewLocationFormats.Add("/Modules/{2}/Views/{1}/{0}" + RazorViewEngine.ViewExtension);

                o.AreaViewLocationFormats.Add("/Views/Shared/{0}.cshtml");

            });

            services.AddSingleton<IActionDescriptorChangeProvider>(MyActionDescriptorChangeProvider.Instance);

            services.AddSingleton(MyActionDescriptorChangeProvider.Instance);

            var provider = services.BuildServiceProvider();

            using (var scope = provider.CreateScope())

            {

                var option = scope.ServiceProvider.GetService<MvcRazorRuntimeCompilationOptions>();

                var unitOfWork = scope.ServiceProvider.GetService<IUnitOfWork>();

                var allEnabledPlugins = unitOfWork.PluginRepository.GetAllEnabledPlugins();

                foreach (var plugin in allEnabledPlugins)

                {

                    var context = new CollectibleAssemblyLoadContext();

                    var moduleName = plugin.Name;

                    var filePath = $"{AppDomain.CurrentDomain.BaseDirectory}Modules\\{moduleName}\\{moduleName}.dll";

                    _presets.Add(filePath);

                    using (var fs = new FileStream(filePath, FileMode.Open))

                    {

                        var assembly = context.LoadFromStream(fs);

                        var controllerAssemblyPart = new MyAssemblyPart(assembly);

                        mvcBuilders.PartManager.ApplicationParts.Add(controllerAssemblyPart);

                        PluginsLoadContexts.AddPluginContext(plugin.Name, context);

                    }

                }

            }

        }

        public void Configure(IApplicationBuilder app, IWebHostEnvironment env)

        {

            if (env.IsDevelopment())

            {

                app.UseDeveloperExceptionPage();

            }

            else

            {

                app.UseExceptionHandler("/Home/Error");

            }

            app.UseStaticFiles();

            app.UseRouting();

            app.UseEndpoints(routes =>

            {

                routes.MapControllerRoute(

                    name: "Customer",

                    pattern: "{controller=Home}/{action=Index}/{id?}");

                routes.MapControllerRoute(

                    name: "Customer",

                    pattern: "Modules/{area}/{controller=Home}/{action=Index}/{id?}");

            });

        }

    }
插件删除和升级的代码
解决了程序集占用问题之后,我们就可以开始编写删除/升级插件的代码了。
删除插件
如果要删除一个插件,我们需要完成以下几个步骤
- 删除组件记录
- 删除组件迁移的表结构
- 移除加载过的ApplicationPart
- 刷新Controller/Action
- 移除组件对应的程序集加载上下文
- 删除组件文件
根据这个步骤,我编写了一个Delete方法,代码如下:
	    public IActionResult Delete(Guid id)

        {

            var module = _pluginManager.GetPlugin(id);

            _pluginManager.DisablePlugin(id);

            _pluginManager.DeletePlugin(id);

            var moduleName = module.Name;

            var matchedItem = _partManager.ApplicationParts.FirstOrDefault(p =>

                                                   p.Name == moduleName);

            if (matchedItem != null)

            {

                _partManager.ApplicationParts.Remove(matchedItem);

                matchedItem = null;

            }

            MyActionDescriptorChangeProvider.Instance.HasChanged = true;

            MyActionDescriptorChangeProvider.Instance.TokenSource.Cancel();

            PluginsLoadContexts.RemovePluginContext(module.Name);

            var directory = new DirectoryInfo($"{AppDomain.CurrentDomain.BaseDirectory}Modules/{module.Name}");

            directory.Delete(true);

            return RedirectToAction("Index");

        }
升级插件
对于升级插件的代码,我将它和新增插件的代码放在了一起
	public void AddPlugins(PluginPackage pluginPackage)

    {

        var existedPlugin = _unitOfWork.PluginRepository.GetPlugin(pluginPackage.Configuration.Name);

        if (existedPlugin == null)

        {

            InitializePlugin(pluginPackage);

        }

        else if (new DomainModel.Version(pluginPackage.Configuration.Version) > new DomainModel.Version(existedPlugin.Version))

        {

            UpgradePlugin(pluginPackage, existedPlugin);

        }

        else

        {

            DegradePlugin(pluginPackage);

        }

    }

    private void InitializePlugin(PluginPackage pluginPackage)

    {

        var plugin = new DTOs.AddPluginDTO

        {

            Name = pluginPackage.Configuration.Name,

            DisplayName = pluginPackage.Configuration.DisplayName,

            PluginId = Guid.NewGuid(),

            UniqueKey = pluginPackage.Configuration.UniqueKey,

            Version = pluginPackage.Configuration.Version

        };

        _unitOfWork.PluginRepository.AddPlugin(plugin);

        _unitOfWork.Commit();

        var versions = pluginPackage.GetAllMigrations(_connectionString);

        foreach (var version in versions)

        {

            version.MigrationUp(plugin.PluginId);

        }

        pluginPackage.SetupFolder();

    }

    public void UpgradePlugin(PluginPackage pluginPackage, PluginViewModel oldPlugin)

    {

        _unitOfWork.PluginRepository.UpdatePluginVersion(oldPlugin.PluginId,

                    pluginPackage.Configuration.Version);

        _unitOfWork.Commit();

        var migrations = pluginPackage.GetAllMigrations(_connectionString);

        var pendingMigrations = migrations.Where(p => p.Version > oldPlugin.Version);

        foreach (var migration in pendingMigrations)

        {

            migration.MigrationUp(oldPlugin.PluginId);

        }

        pluginPackage.SetupFolder();

    }

    public void DegradePlugin(PluginPackage pluginPackage)

    {

        throw new NotImplementedException();

    }
代码解释:
这里我首先判断了当前插件包和已安装版本的版本差异
- 如果系统没有安装过当前插件,就安装插件
- 如果当前插件包的版本比已安装的版本高,就升级插件
- 如果当前插件包的版本比已安装的版本低,就降级插件(现实中这种情况不多)
InitializePlugin是用来加载新组件的,它的内容就是之前的新增插件方法UpgradePlugin是用来升级组件的,当我们升级一个组件的时候,我们需要做一下几个事情- 升级组件版本
- 做最新版本组件的脚本迁移
- 使用最新程序包覆盖老程序包
DegradePlugin是用来降级组件的,由于篇幅问题,我就不详细写了,大家可以自行填补。
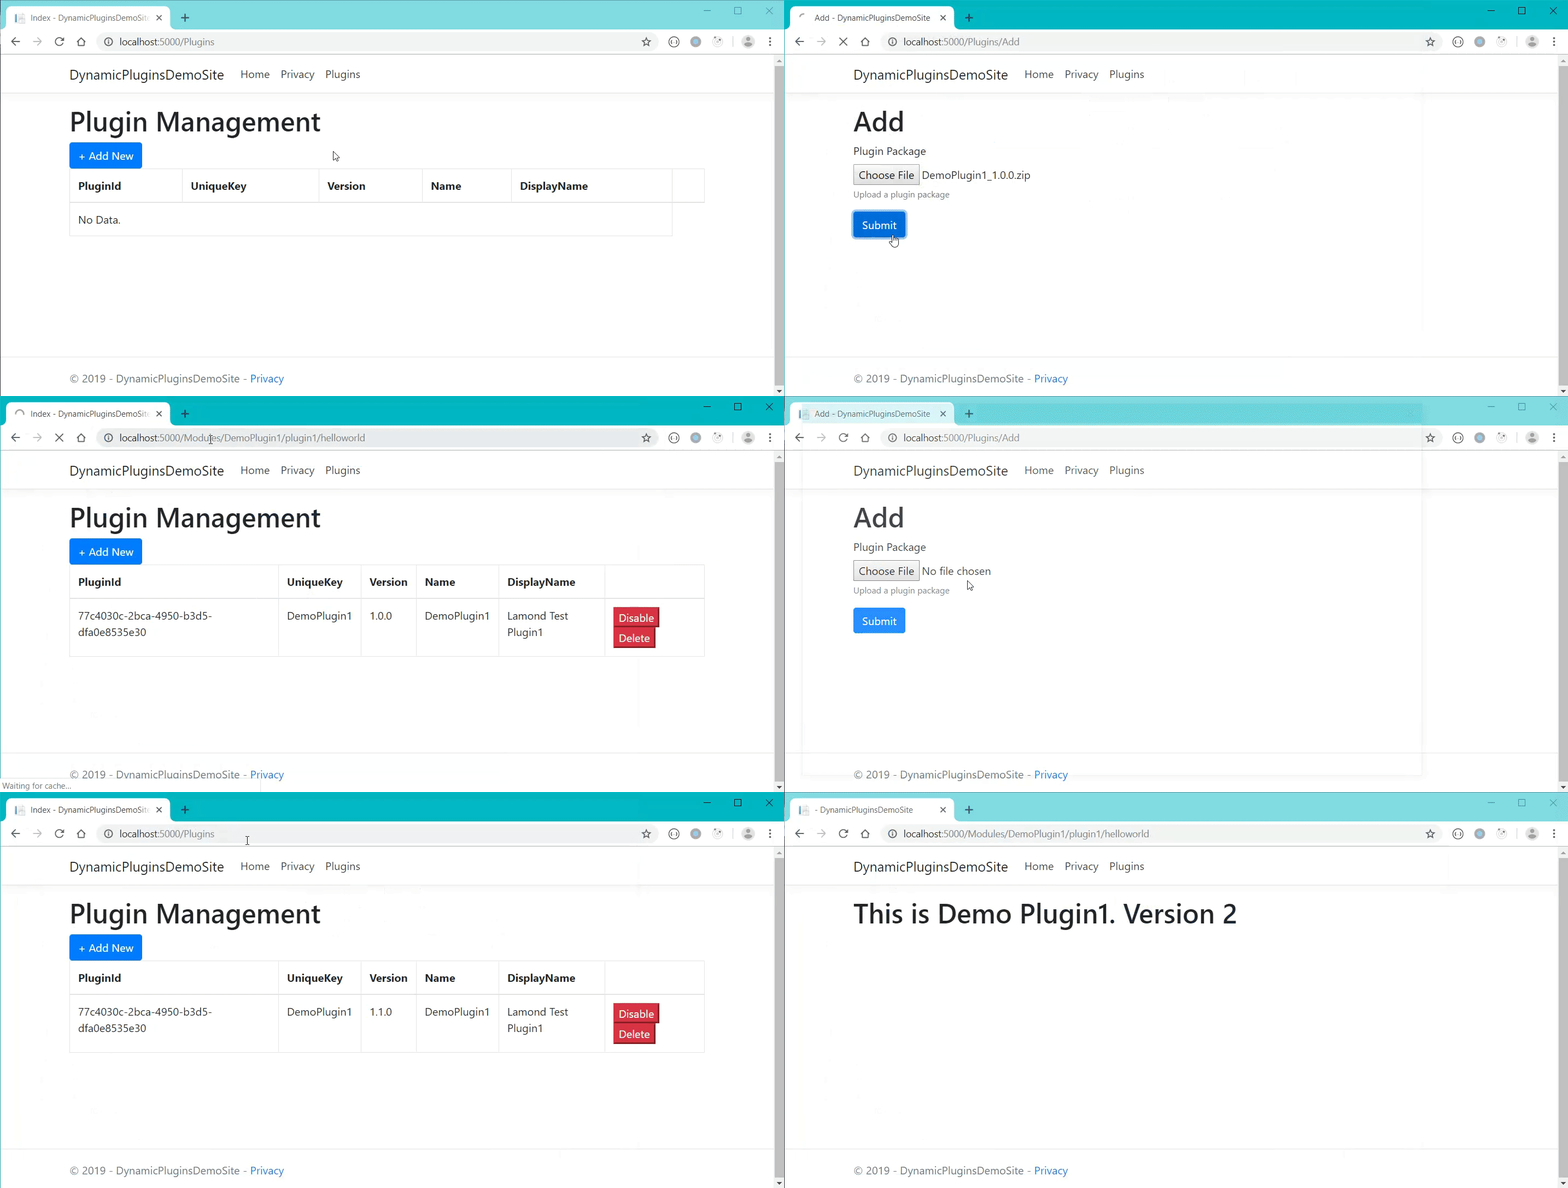
最终效果

总结
本篇中,我为大家演示如果使用.NET Core 3.0的AssemblyLoadContext来解决已加载程序集占用的问题,以此实现了插件的升级和降级。本篇的研究时间较长,因为中间出现的问题确实太多了,没有什么可以复用的方案,我也不知道是不是第一个在.NET Core中这么尝试的。不过结果还算好,想实现的功能最终还是做出来了。后续呢,这个项目会继续添加新的功能,希望大家多多支持。
从零开始实现ASP.NET Core MVC的插件式开发(五) - 插件的删除和升级的更多相关文章
- 从零开始实现ASP.NET Core MVC的插件式开发(一) - 使用ApplicationPart动态加载控制器和视图
标题:从零开始实现ASP.NET Core MVC的插件式开发(一) - 使用Application Part动态加载控制器和视图 作者:Lamond Lu 地址:http://www.cnblogs ...
- 从零开始实现ASP.NET Core MVC的插件式开发(二) - 如何创建项目模板
标题:从零开始实现ASP.NET Core MVC的插件式开发(二) - 如何创建项目模板 作者:Lamond Lu 地址:https://www.cnblogs.com/lwqlun/p/11155 ...
- 从零开始实现ASP.NET Core MVC的插件式开发(三) - 如何在运行时启用组件
标题:从零开始实现ASP.NET Core MVC的插件式开发(三) - 如何在运行时启用组件 作者:Lamond Lu 地址:https://www.cnblogs.com/lwqlun/p/112 ...
- 从零开始实现ASP.NET Core MVC的插件式开发(四) - 插件安装
标题:从零开始实现ASP.NET Core MVC的插件式开发(四) - 插件安装 作者:Lamond Lu 地址:https://www.cnblogs.com/lwqlun/p/11260750. ...
- 从零开始实现ASP.NET Core MVC的插件式开发(六) - 如何加载插件引用
标题:从零开始实现ASP.NET Core MVC的插件式开发(六) - 如何加载插件引用. 作者:Lamond Lu 地址:https://www.cnblogs.com/lwqlun/p/1171 ...
- 从零开始实现ASP.NET Core MVC的插件式开发(七) - 近期问题汇总及部分解决方案
标题:从零开始实现ASP.NET Core MVC的插件式开发(七) - 问题汇总及部分解决方案 作者:Lamond Lu 地址:https://www.cnblogs.com/lwqlun/p/12 ...
- 从零开始实现ASP.NET Core MVC的插件式开发(八) - Razor视图相关问题及解决方案
标题:从零开始实现ASP.NET Core MVC的插件式开发(八) - Razor视图相关问题及解决方案 作者:Lamond Lu 地址:https://www.cnblogs.com/lwqlun ...
- 从零开始实现ASP.NET Core MVC的插件式开发(九) - 升级.NET 5及启用预编译视图
标题:从零开始实现ASP.NET Core MVC的插件式开发(九) - 如何启用预编译视图 作者:Lamond Lu 地址:https://www.cnblogs.com/lwqlun/p/1399 ...
- 使用 ASP.NET Core MVC 创建 Web API(五)
使用 ASP.NET Core MVC 创建 Web API 使用 ASP.NET Core MVC 创建 Web API(一) 使用 ASP.NET Core MVC 创建 Web API(二) 使 ...
随机推荐
- mimalloc内存分配代码分析
这篇文章中我们会介绍一下mimalloc的实现,其中可能涉及上一篇文章提到的内容,如果不了解的可以先看下这篇mimalloc剖析.首先我们需要了解的是其整体结构,mimalloc的结构如下图所示 ...
- 万字长文:ELK(V7)部署与架构分析
ELK(7版本)部署与架构分析 1.ELK的背景介绍与应用场景 在项目应用运行的过程中,往往会产生大量的日志,我们往往需要根据日志来定位分析我们的服务器项目运行情况与BUG产生位置.一般情况下直接在日 ...
- Ambassador,云原生应用的“门神”
目前,行业内基于云原生思想的开源项目,重点在于管理.控制微服务以及微服务架构下服务之间的通信问题.它们有效的解决了“服务异构化”.“动态化”.“多协议”场景所带来的east/west流量的管控问题,而 ...
- spring applicationContext.xml文件移到resources目录下
SpringMVC的框架默认目录结构 修改后的目录结构及web.xml 同时在pom里的配置:将resources目录打包到web-inf/classes目录下<resources> ...
- Java IO 为什么我们需要缓冲区
在执行IO操作我们通常会设置一个字节数组作为缓冲区用来写/读数据,一般情况下一个合理大小的缓冲区是有利于提升性能的,但是有一个问题一直困扰着我,为什么缓冲区可以提升IO操作的性能? 经查阅资料之后,总 ...
- 剖析std::function接口与实现
目录 前言 一.std::function的原理与接口 1.1 std::function是函数包装器 1.2 C++注重运行时效率 1.3 用函数指针实现多态 1.4 std::function的接 ...
- IDEA 控制台输出日志无法grep
不知从何时开始,我的IDEA控制台无法直接使用Grep插件来过滤输出日志了,这个插件真的挺好用的,不知道是升级后造成的还是我自己设置错误,反正在控制台右键无法打开grep来过滤: 在我开发过程中需要这 ...
- 对Rust所有权、借用及生命周期的理解
Rust的内存管理中涉及所有权.借用与生命周期这三个概念,下面是个人的一点粗浅理解. 一.从内存安全的角度理解Rust中的所有权.借用.生命周期 要理解这三个概念,你首要想的是这么做的出发点是什么-- ...
- light oj 1159 - Batman LCS
学过简单动态规划的人应该对最长公共子序列的问题很熟悉了,这道题只不过多加了一条字符串变成三条了,还记得,只要把状态变成三维的即可. //http://lightoj.com/volume_showpr ...
- 消息中间件——RabbitMQ(一)Windows/Linux环境搭建(完整版)
前言 最近在学习消息中间件--RabbitMQ,打算把这个学习过程记录下来.此章主要介绍环境搭建.此次主要是单机搭建(条件有限),包括在Windows.Linux环境下的搭建,以及RabbitMQ的监 ...
