Neural Network模型复杂度之Weight Decay - Python实现
- 背景介绍
Neural Network之模型复杂度主要取决于优化参数个数与参数变化范围. 优化参数个数可手动调节, 参数变化范围可通过正则化技术加以限制. 正则化技术之含义是: 引入额外的条件, 对function space进行适当的约束. 本文借助pytorch前向计算与反向传播特性, 以正则化技术之weight decay($l^2$范数)为例, 简要演示正则化对Neural Network模型复杂度的影响. - 操作流程
①. 获取数据; ②. 封装数据; ③. 构建模型; ④. 构建损失函数; ⑤. 构建优化器; ⑥. 训练单元; ⑦. 测试单元; ⑧. 启动训练测试; ⑨. 保存模型 - 数据、模型与损失函数
数据生成策略如下,
\begin{equation*}
\left\{
\begin{aligned}
x &= r + 2g + 3b \\
y &= r^2 + 2g^2 + 3b^2 \\
lv &= -3r-4g-5b
\end{aligned}
\right.
\end{equation*}
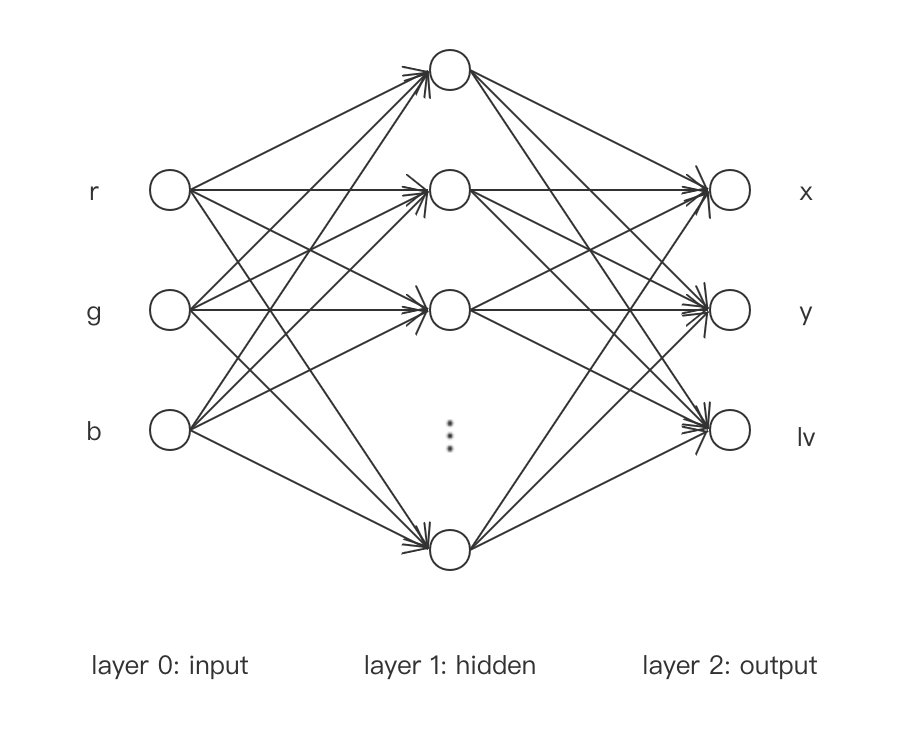
Neural Network网络模型如下,
其中, 输入层为$(r,g,b)$, 隐藏层取激活函数为双曲正切函数$\tanh$, 输出层为$(x,y,lv)$且不取激活函数.
损失函数如下,
\begin{gather*}
L = \sum_i\frac{1}{2}(\bar{x}^{(i)}-x^{(i)})^2+\frac{1}{2}(\bar{y}^{(i)}-y^{(i)})^2+\frac{1}{2}(\bar{lv}^{(i)}-lv^{(i)})^2 \\
J = L + \frac{\lambda}{2}\|W\|_2^2
\end{gather*}
其中, $i$为data序号, $(\bar{x}, \bar{y}, \bar{lv})$为相应观测值, $W$为隐藏层weight, $L$为原始损失函数, $J$为添加$W$之$l^2$正则项后的损失函数, $\lambda$为可调超参数控制正则项在损失函数$J$中的权重. - 代码实现
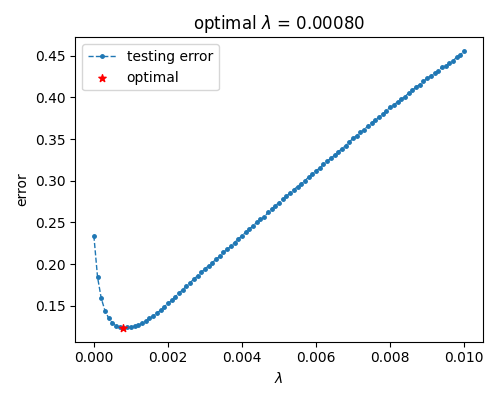
本文拟将中间隐藏层节点数设置为50, 使模型具备较高复杂度. 后逐渐提升权重参数$\lambda$, 使模型复杂度降低, 以此观察泛化误差的变化. 根据操作流程, 具体实现如下,


  1 # L2 normalization之实现:

  2 # 1. 获取数据

  3 # 2. 封装数据

  4 # 3. 构建模型

  5 # 4. 构建损失函数

  6 # 5. 构建优化器

  7 # 6. 训练单元

  8 # 7. 测试单元

  9 # 8. 启动训练与测试

 10 # 9. 保存模型

 11

 12 import numpy

 13 import torch

 14 from torch import optim

 15 from matplotlib import pyplot as plt

 16

 17

 18 numpy.random.seed(0)

 19 torch.random.manual_seed(0)

 20

 21 def xFunc(r, g, b):

 22     x = r + 2 * g + 3 * b

 23     return x

 24

 25 def yFunc(r, g, b):

 26     y = r ** 2 + 2 * g ** 2 + 3 * b ** 2

 27     return y

 28

 29 def lvFunc(r, g, b):

 30     lv = -3 * r - 4 * g - 5 * b

 31     return lv

 32

 33

 34 # 1. 获取数据

 35 class GeneData(object):

 36

 37     def __init__(self, rRange=[-1, 1], gRange=[-1, 1], bRange=[-1, 1]):

 38         self.__rRange = rRange

 39         self.__gRange = gRange

 40         self.__bRange = bRange

 41

 42     def getDataset(self, num):

 43         rArr, gArr, bArr = self.__generate_rgbArr(num)

 44         xArr, yArr, lvArr = self.__generate_xylvArr(rArr, gArr, bArr)

 45         rgb = numpy.hstack((rArr.reshape((-1, 1)), gArr.reshape((-1, 1)), bArr.reshape((-1, 1))))

 46         xylv = numpy.hstack((xArr.reshape((-1, 1)), yArr.reshape((-1, 1)), lvArr.reshape((-1, 1))))

 47         return torch.tensor(rgb, dtype=torch.float), torch.tensor(xylv, dtype=torch.float)

 48

 49     def __generate_xylvArr(self, rArr, gArr, bArr):

 50         xArr = xFunc(rArr, gArr, bArr)

 51         yArr = yFunc(rArr, gArr, bArr)

 52         lvArr = lvFunc(rArr, gArr, bArr)

 53         return xArr, yArr, lvArr

 54

 55     def __generate_rgbArr(self, num):

 56         rArr = numpy.random.uniform(*self.__rRange, num)

 57         gArr = numpy.random.uniform(*self.__gRange, num)

 58         bArr = numpy.random.uniform(*self.__bRange, num)

 59         return rArr, gArr, bArr

 60

 61

 62 # 2. 封装数据

 63 class PackData(object):

 64

 65     def __init__(self, features, labels, batch_size=None, random_shuffle=True):

 66         self.__features = features

 67         self.__labels = labels

 68         self.__batch_size = batch_size

 69         self.__random_shuffle = random_shuffle

 70

 71         self.num = self.__features.shape[0]

 72         if self.__batch_size is None:

 73             self.__batch_size = self.num

 74

 75         self.__indices = list(range(self.num))

 76         if self.__random_shuffle:

 77             numpy.random.shuffle(self.__indices)

 78

 79     def __call__(self):

 80         for i in range(0, self.num, self.__batch_size):

 81             batchIndices = self.__indices[i:min(i+self.__batch_size, self.num)]

 82             yield self.__features[batchIndices], self.__labels[batchIndices]

 83

 84

 85 # 3. 构建模型: multi-layer perceptron

 86 class MLP(object):

 87

 88     def __init__(self, hidden_dim=100):

 89         self.__hidden_dim = hidden_dim

 90

 91         self.l1_W = torch.normal(0, 0.01, (3, self.__hidden_dim), requires_grad=True)

 92         self.l1_b = torch.zeros((1, self.__hidden_dim), requires_grad=True)

 93         self.l1_f = torch.nn.Tanh()

 94

 95         self.l2_W = torch.normal(0, 0.01, (self.__hidden_dim, 3), requires_grad=True)

 96         self.l2_b = torch.zeros((1, 3), requires_grad=True)

 97

 98     def __call__(self, x):

 99         l1_1 = torch.matmul(x, self.l1_W) + self.l1_b

100         l1_2 = self.l1_f(l1_1)

101

102         l2_1 = torch.matmul(l1_2, self.l2_W) + self.l2_b

103         return l2_1

104

105

106 # 4. 构建损失函数

107 class MSE(object):

108

109     def __init__(self, lamda):

110         self.__lamda = lamda

111

112     def __call__(self, Y, Y_, mlpObj=None):

113         L = torch.sum((Y - Y_) ** 2) / 2

114         if mlpObj:

115             term1 = torch.sum(mlpObj.l1_W ** 2)

116             term2 = torch.sum(mlpObj.l2_W ** 2)

117             term3 = (term1 + term2) * self.__lamda / 2

118             L = L + term3

119         return L

120

121

122 # 6. 训练单元

123 def training_epoch(packObj, mlpObj, mseObj, optObj):

124     loss_total = 0

125     with torch.enable_grad():

126         for X, Y_ in packObj():

127             optObj.zero_grad()

128             Y = mlpObj(X)

129             loss = mseObj(Y, Y_, mlpObj)

130             loss.backward()

131             optObj.step()

132

133             loss_total += loss.item()

134     return loss_total

135

136

137 # 7. 测试单元

138 def testing_epoch(packObj, mlpObj, mseObj):

139     loss_total = 0

140     with torch.no_grad():

141         for X, Y_ in packObj():

142             Y = mlpObj(X)

143             loss = mseObj(Y, Y_)

144             loss_total += loss.item()

145     return loss_total

146

147

148 # 8. 启动训练与测试

149 def train(trainingData, testingData, model, loss, optimizer, maxEpoch=10000):

150     testingLossList = list()

151     for epoch in range(maxEpoch):

152         training_epoch(trainingData, model, loss, optimizer)

153         testingLoss = testing_epoch(testingData, model, loss) / testingData.num

154         testingLossList.append(testingLoss)

155         # if epoch % 100 == 0:

156         #     print("epoch {}: testing error = {:.5f}".format(epoch,

157         #         testingLoss))

158

159     minIdx = numpy.argmin(testingLossList)

160     testingLossBest = testingLossList[minIdx]

161     return testingLossBest

162

163

164 # 9. 模型保存

165 def save(model, filename=None):

166     l1_W = model.l1_W.detach().numpy()

167     l1_b = model.l1_b.detach().numpy()

168     l2_W = model.l2_W.detach().numpy()

169     l2_b = model.l2_b.detach().numpy()

170

171     if filename is None:

172         filename = "./mlp.dat"

173     with open(filename, "wt") as f:

174         f.write("l1_W = \n")

175         for row in l1_W:

176             for ele in row:

177                 f.write("{:.9f} ".format(ele))

178             f.write("\n")

179         f.write("\nl1_b = \n")

180         for ele in l1_b[0]:

181             f.write("{:.9f} ".format(ele))

182         f.write("\n")

183

184         f.write("\nl2_W = \n")

185         for row in l2_W:

186             for ele in row:

187                 f.write("{:.9f} ".format(ele))

188             f.write("\n")

189         f.write("\nl2_b = \n")

190         for ele in l2_b[0]:

191             f.write("{:.9f} ".format(ele))

192

193

194 # 搜索超参数lamda

195 def search_lamda():

196     rRange = [-10, 10]

197     gRange = [-10, 10]

198     bRange = [-10, 10]

199     trainingNum = 500

200     testingNum = 1000

201     batch_size = 250

202     hidden_dim = 50

203

204     geneObj = GeneData(rRange, gRange, bRange)

205     trainingData = geneObj.getDataset(trainingNum)

206     testingData = geneObj.getDataset(testingNum)

207     trainingPack = PackData(*trainingData, batch_size)

208     testingPack = PackData(*testingData, batch_size)

209

210     lamda = 0.001

211     lr = 0.003

212     mlpObj = MLP(hidden_dim)

213     mseObj = MSE(lamda)

214     params = [mlpObj.l1_W, mlpObj.l1_b, mlpObj.l2_W, mlpObj.l2_b]

215     optObj = optim.Adam(params, lr)

216     train(trainingPack, testingPack, mlpObj, mseObj, optObj, 100000)

217     l1_W, l1_b, l2_W, l2_b = mlpObj.l1_W, mlpObj.l1_b, mlpObj.l2_W, mlpObj.l2_b

218

219     lr = 0.003

220     lamdaList = numpy.linspace(0, 0.01, 101)

221     testList = list()

222     for idx, lamda in enumerate(lamdaList):

223         mlpObj = MLP(hidden_dim)

224         mlpObj.l1_W.requires_grad = False

225         mlpObj.l1_b.requires_grad = False

226         mlpObj.l2_W.requires_grad = False

227         mlpObj.l2_b.requires_grad = False

228         l1_W.requires_grad = False

229         l1_b.requires_grad = False

230         l2_W.requires_grad = False

231         l2_b.requires_grad = False

232         mlpObj.l1_W[:], mlpObj.l1_b[:], mlpObj.l2_W[:], mlpObj.l2_b[:] = l1_W, l1_b, l2_W, l2_b

233         mlpObj.l1_W.requires_grad = True

234         mlpObj.l1_b.requires_grad = True

235         mlpObj.l2_W.requires_grad = True

236         mlpObj.l2_b.requires_grad = True

237         mseObj = MSE(lamda)

238         params = [mlpObj.l1_W, mlpObj.l1_b, mlpObj.l2_W, mlpObj.l2_b]

239         optObj = optim.Adam(params, lr)

240         testingLoss = train(trainingPack, testingPack, mlpObj, mseObj, optObj, 100000)

241         print("lamda = {:5f}, testing error = {}".format(lamda, testingLoss))

242         testList.append(testingLoss)

243         l1_W, l1_b, l2_W, l2_b = mlpObj.l1_W, mlpObj.l1_b, mlpObj.l2_W, mlpObj.l2_b

244

245     minIdx = numpy.argmin(testList)

246     lamdaBest = lamdaList[minIdx]

247     testBest = testList[minIdx]

248

249     fig = plt.figure(figsize=(5, 4))

250     ax1 = fig.add_subplot(1, 1, 1)

251     ax1.plot(lamdaList, testList, ".--", lw=1, markersize=5, label="testing error", zorder=1)

252     ax1.scatter(lamdaBest, testBest, marker="*", s=30, c="red", label="optimal", zorder=2)

253     ax1.set(xlabel="$\\lambda$", ylabel="error", title="optimal $\\lambda$ = {:.5f}".format(lamdaBest))

254     ax1.legend()

255     fig.tight_layout()

256     fig.savefig("search_lamda.png", dpi=100)

257

258     ############

259     maxEpoch = 100000

260     mlpObj = MLP(hidden_dim)

261     mseObj = MSE(lamdaBest)

262     params = [mlpObj.l1_W, mlpObj.l1_b, mlpObj.l2_W, mlpObj.l2_b]

263     optObj = optim.Adam(params, lr)

264

265     testingLossBest = numpy.inf

266     for epoch in range(maxEpoch):

267         training_epoch(trainingPack, mlpObj, mseObj, optObj)

268         testingLoss = testing_epoch(testingPack, mlpObj, mseObj) / testingPack.num

269         print("epoch {}: testing error best = {}, testing error current = {}".format(epoch, testingLossBest, testingLoss))

270         if testingLoss < testingLossBest:

271             save(mlpObj)

272             testingLossBest = testingLoss

273

274

275

276 if __name__ == "__main__":

277 search_lamda() - 结果展示
 可以看到, 泛化误差在提升权重参数后先下降后上升, 大致对应降低模型复杂度使模型表现从过拟合至欠拟合.
 - 使用建议
①. bias代表函数偏置, 直观上对模型复杂度(函数平滑程度)影响微弱, 一般无需正则化;
②. 超参数连续调整时, 训练参数迭代初值可选用前一超参数下的收敛值;
③. weight decay适用于神经网络所有层. - 参考文档
①. 动手学深度学习 - 李牧
Neural Network模型复杂度之Weight Decay - Python实现的更多相关文章
- A Survey of Model Compression and Acceleration for Deep Neural Network时s
A Survey of Model Compression and Acceleration for Deep Neural Network时s 本文全面概述了深度神经网络的压缩方法,主要可分为参数修 ...
- 通过Visualizing Representations来理解Deep Learning、Neural network、以及输入样本自身的高维空间结构
catalogue . 引言 . Neural Networks Transform Space - 神经网络内部的空间结构 . Understand the data itself by visua ...
- 论文笔记:Person Re-identification with Deep Similarity-Guided Graph Neural Network
Person Re-identification with Deep Similarity-Guided Graph Neural Network 2018-07-27 17:41:45 Paper: ...
- [Scikit-learn] 1.1 Generalized Linear Models - Neural network models
本章涉及到的若干知识点(红字):本章节是作为通往Tensorflow的前奏! 链接:https://www.zhihu.com/question/27823925/answer/38460833 首先 ...
- 1 - ImageNet Classification with Deep Convolutional Neural Network (阅读翻译)
ImageNet Classification with Deep Convolutional Neural Network 利用深度卷积神经网络进行ImageNet分类 Abstract We tr ...
- How to implement a neural network
神经网络的实践笔记 link: http://peterroelants.github.io/posts/neural_network_implementation_part01/ 1. 生成训练数据 ...
- [CS231n-CNN] Training Neural Networks Part 1 : activation functions, weight initialization, gradient flow, batch normalization | babysitting the learning process, hyperparameter optimization
课程主页:http://cs231n.stanford.edu/ Introduction to neural networks -Training Neural Network ________ ...
- Recurrent Neural Network系列4--利用Python,Theano实现GRU或LSTM
yi作者:zhbzz2007 出处:http://www.cnblogs.com/zhbzz2007 欢迎转载,也请保留这段声明.谢谢! 本文翻译自 RECURRENT NEURAL NETWORK ...
- machine learning 之 Neural Network 3
整理自Andrew Ng的machine learning课程week6. 目录: Advice for applying machine learning (Decide what to do ne ...
- 计算机视觉学习记录 - Implementing a Neural Network from Scratch - An Introduction
0 - 学习目标 我们将实现一个简单的3层神经网络,我们不会仔细推到所需要的数学公式,但我们会给出我们这样做的直观解释.注意,此次代码并不能达到非常好的效果,可以自己进一步调整或者完成课后练习来进行改 ...
随机推荐
- python爬虫学习——列表
namelist = [] #定义一个空的列表 namelist1 = ["小张","小红","小李"] print(namelist1[0 ...
- C#中的Byte,String,Int,Hex之间的转换函数
/// <summary> Convert a string of hex digits (ex: E4 CA B2) to a byte array. </summary> ...
- 学习Java Day29
今天学习了类的设计技巧: 1.一定要保证数据私有 2.一定要对数据初始化 3.不要在类中使用过多的基本类型 4.不是所有的字段都需要单独的字段访问器和字段更改器 5.分解有过多职责的类 6.类名和方法 ...
- rt-thread模糊到清晰系列: ipc.c
#include <rtthread.h> #include <rthw.h> #ifdef RT_USING_HOOK extern void (*rt_object_try ...
- 真·生产力「GitHub 热点速览」
这些工具真的能极大提高生产力,节约你的时间来自(摸)我(鱼)增(划)值(水).先别提 style2paints,你给它随意画个草图,就能给你一个能交付给甲方爸爸的成品插画.如果提升 30%-40% 传 ...
- xmind使用分享
Xmind 介绍 1. 特点 是表达发散性思维的有效工具,图文并重,把各主题的隶属关系和相关的层级表现出来,把关键字与图像,文字,颜色建立起链接记忆. 2.安装,下载与破解 参考:https://bl ...
- aspnetcore 原生 DI 实现基于 key 的服务获取
你可能想通过一个字符串或者其他的类型来获取一个具体的服务实现,那么在 aspnetcore 原生的 MSDI 中,如何实现呢?本文将介绍如何通过自定义工厂来实现. 我们现在恰好有基于 Json 和 M ...
- 《HelloGitHub》第 83 期
兴趣是最好的老师,HelloGitHub 让你对编程感兴趣! 简介 HelloGitHub 分享 GitHub 上有趣.入门级的开源项目. https://github.com/521xueweiha ...
- left join(二)
left join 通俗的解释:以左表为主表,返回左表的所有行,如果右表中没有匹配,则依然会有左表的记录,右表字段用null填充.看起来非常好理解,但实际操作的过程中可能会有一些很容易被忽略的点. 一 ...
- umi学习记录
菜单路由: 方法1:在config中配置全部路由,由后台返的的菜单进行匹配 方法2:动态注册路由和添加菜单--目前仅尝试了umi@2 的版本 原理:使用umi的运行时配置patchRoutes和ren ...
