python黑帽子(第三章)
Windows/Linux下包的嗅探

根据os.name判断操作系统 下面是os的源码

posix是Linux nt是Windows
在windows中需要管理员权限、linux中需要root权限 因为是开启混杂模式(混杂模式允许我们嗅探网卡上流经的所有数据包,即使数据的目的地址不是本机)
import socket

import os

# 监听的网卡  0.0.0.0表示所有网卡

host = "192.168.1.102"

# Windows和Linux的区别是Windows允许我们嗅探所有协议的所有数据包,但Linux只能嗅探到ICMP数据。

if os.name == "nt":

    socket_protocol = socket.IPPROTO_IP   # 用于接收任何ip包

else:

    socket_protocol = socket.IPPROTO_ICMP # 只接受icmp

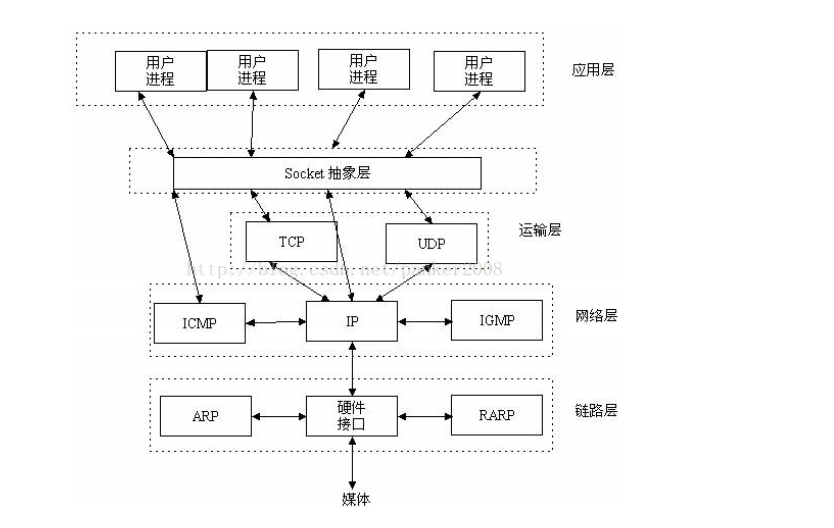
# SOCK_RAW是一种底层的SOCKET编程接口 可以处理ICMP、IGMP等网络报文、可以处理一些特殊协议报文以及操作IP层及其以上的数据

sniffer = socket.socket(socket.AF_INET, socket.SOCK_RAW, socket_protocol)

sniffer.bind((host, 21))    # 对网卡进行监听端口无所谓

# 设置在捕获的数据包中包含IP头

sniffer.setsockopt(socket.IPPROTO_IP, socket.IP_HDRINCL, 1)

# 在Windows平台上,需要设置IOCTL以启动混杂模式,以允许我们嗅探网卡上经过的所有数据包(即使数据的目的地址不是本机)

if os.name == "nt":

    sniffer.ioctl(socket.SIO_RCVALL, socket.RCVALL_ON)

# 读取单个数据包

print(sniffer.recvfrom(65535))

# 在Windows平台上关闭混杂模式

if os.name == "nt":

    sniffer.ioctl(socket.SIO_RCVALL, socket.RCVALL_OFF)
解码IP头
上面只是捕获了包含ip头的数据包,现在我们来解码关于ip头的信息
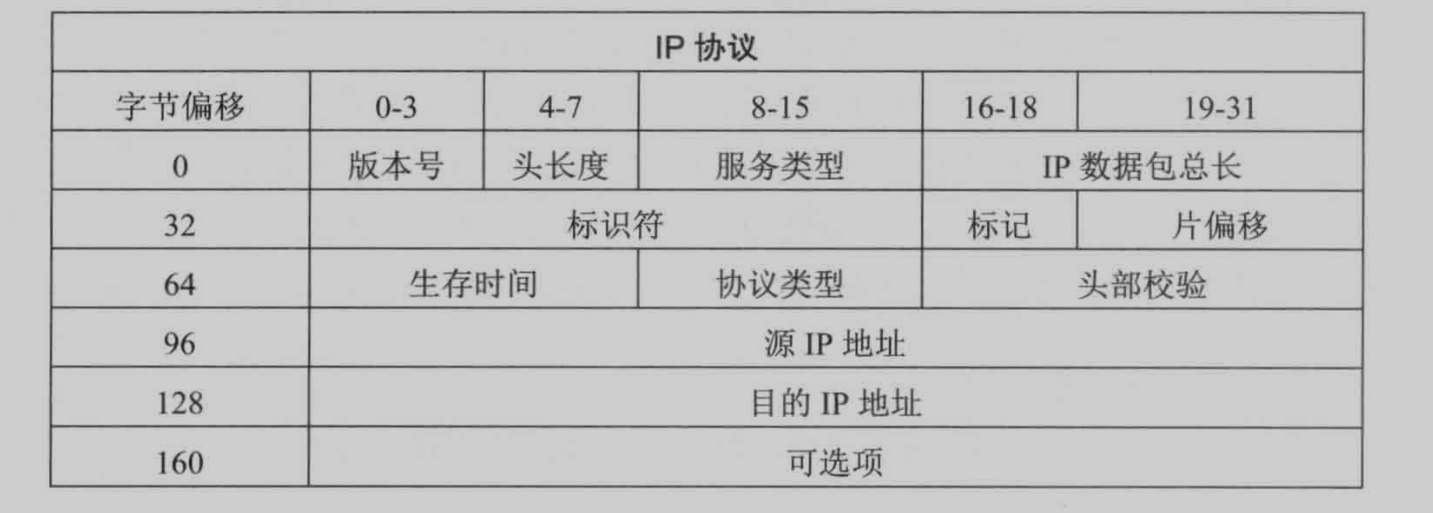
ipv4头结构 每行32位

import socket

import os

import struct

from ctypes import *

# 监听的主机IP

host = "192.168.1.102"

# IP头定义

class IP(Structure):

    _fields_ = [

        ('ihl', c_ubyte, 4),            # 头长度

        ('version', c_ubyte, 4),        # 版本号

        ('tos', c_ubyte),               # 服务类型

        ('len', c_ushort),              # ip数据包总长

        ('id', c_ushort),               # 标识符

        ('offset', c_ushort),           # 片偏移

        ('ttl', c_ubyte),               # 生存时间

        ('protocol_num', c_ubyte),      # 协议类型区分上层协议

        ('sum', c_ushort),              # 头部校验

        ('src', c_ulong),               # 源IP   linux需要将c_ulong改为c_uint32

        ('dst', c_ulong)                # 目的IP

    ]

    def __new__(cls, socket_buffer=None):           # new()方法是在类准备将自身实例化时调用,将原始缓冲区中的数据填充到结构中

        return cls.from_buffer_copy(socket_buffer)

    def __init__(self, socket_buffer=None):

        # 协议字段与协议名称对应

        self.protocol_map = {1: 'ICMP', 6: 'TCP', 17: 'UDP'}

        # 可读性更强的IP地址,struct.pack()将数据解码为"<"小端,"L"无符号长型

        # inet_ntoa() 将32bit数值转换为IP地址

        self.src_address = socket.inet_ntoa(struct.pack("<L", self.src))

        self.dst_address = socket.inet_ntoa(struct.pack("<L", self.dst))

        # 匹配协议类型

        try:

            self.protocol = self.protocol_map[self.protocol_num]

        except:

            self.protocol = str(self.protocol_num)

if os.name == 'nt':

    socket_protocol = 0

else:

    socket_protocol = 1

sniffer = socket.socket(socket.AF_INET, socket.SOCK_RAW, socket_protocol)

sniffer.bind((host, 0))

sniffer.setsockopt(socket.IPPROTO_IP, socket.IP_HDRINCL, 1)

if os.name == 'nt':

    sniffer.ioctl(socket.SIO_RCVALL, socket.RCVALL_ON)

try:

    while True:

        # 读取数据包

        raw_buffer = sniffer.recvfrom(65565)[0]

        # 前20个字节也就是前160位为ip头

        ip_header = IP(raw_buffer[0:20])

        # 输出协议和通信双方的IP地址

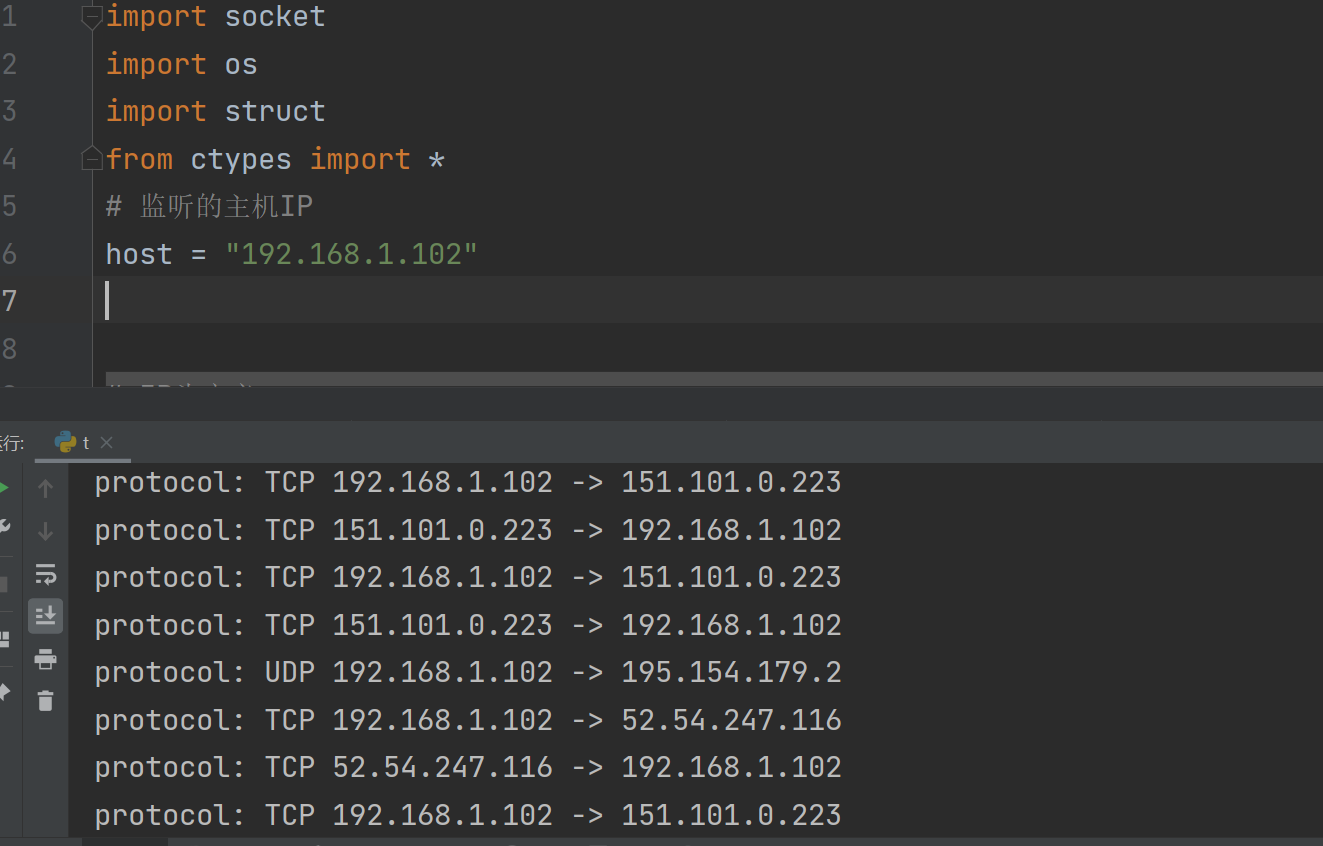
        print("protocol: %s %s -> %s" % (ip_header.protocol, ip_header.src_address, ip_header.dst_address))

# 处理ctrl+c

except KeyboardInterrupt:

    if os.name == 'nt':

        sniffer.ioctl(socket.SIO_RCVALL, socket.RCVALL_OFF)

解码icmp
当发送一个UDP数据包到主机的某个关闭的UDP端口上时,目标主机通常会返回一个ICMP包指示目标端口不可达。这样的ICMP信息意味着目标主机是存活的,因为我们可以假设如果没有接受到发送的UDP数据的任何响应,目标主机应该不存在。

import threading

import socket

import os

import struct

from ctypes import *

import time

from netaddr import IPNetwork, IPAddress

host = "192.168.1.102"

# 目标网段

subnet = "192.168.1.0/24"

# 自定义字段,用于辨别收到的包是否是响应我们的UDP请求

magic_message = b'PYTHONRULES!'

class IP(Structure):

    _fields_ = [

        ('ihl', c_ubyte, 4),

        ('version', c_ubyte, 4),

        ('tos', c_ubyte),

        ('len', c_ushort),

        ('id', c_ushort),

        ('offset', c_ushort),

        ('ttl', c_ubyte),

        ('protocol_num', c_ubyte),

        ('sum', c_ushort),

        ('src', c_ulong),

        ('dst', c_ulong)

    ]

    def __new__(cls, socket_buffer=None):

        return cls.from_buffer_copy(socket_buffer)

    def __init__(self, socket_buffer=None):

        self.protocol_map = {1: 'ICMP', 6: 'TCP', 17: 'UDP'}

        self.src_address = socket.inet_ntoa(struct.pack("<L", self.src))

        self.dst_address = socket.inet_ntoa(struct.pack("<L", self.dst))

        try:

            self.protocol = self.protocol_map[self.protocol_num]

        except:

            self.protocol = str(self.protocol_num)

# ICMP包头定义

class ICMP(Structure):

    _fields_ = [

        ("type", c_ubyte),          # 类型

        ("code", c_ubyte),          # 代码值

        ("checksum", c_ushort),     # 头部校验和

        ("unused", c_ushort),       # 未使用

        ("next_hop_mtu", c_ushort)  # 下一跳的MTU

    ]

    def __new__(cls, socket_buffer=None):

        return cls.from_buffer_copy(socket_buffer)

    def __init__(self, socket_buffer=None):

        pass

# 批量发送UDP请求包

def udp_sender(subnet, magic_message):

    time.sleep(2)

    sender = socket.socket(socket.AF_INET, socket.SOCK_DGRAM)

    for ip in IPNetwork(subnet):

        try:

            # 设置端口为大于1023的端口号,尽量使用不常用端口

            sender.sendto(magic_message, (str(ip), 65212))

        except:

            pass

if os.name == 'nt':

    socket_protocol = socket.IPPROTO_IP

else:

    socket_protocol = socket.IPPROTO_ICMP

sniffer = socket.socket(socket.AF_INET, socket.SOCK_RAW, socket_protocol)

sniffer.bind((host, 0))

sniffer.setsockopt(socket.IPPROTO_IP, socket.IP_HDRINCL, 1)

if os.name == 'nt':

    sniffer.ioctl(socket.SIO_RCVALL, socket.RCVALL_ON)

# 启用多线程发送UDP请求包

t = threading.Thread(target=udp_sender, args=(subnet, magic_message, ))

t.start()

try:

    while True:

        raw_buffer = sniffer.recvfrom(65535)[0]

        ip_header = IP(raw_buffer[0:20])

        # print("protocol: %s %s -> %s" % (ip_header.protocol, ip_header.src_address, ip_header.dst_address))

        # 如果协议为ICMP,则进行下一步处理 ip协议的

        if ip_header.protocol == 'ICMP':

            # 计算真实IP头长度 --> 计算公式:ihl(4位二进制换算十进制) * 4 = ip头长度(字节)

            offset = ip_header.ihl * 4

            buf = raw_buffer[offset:offset + sizeof(ICMP)]

            # 结构ICMP头数据

            icmp_header = ICMP(buf)

            # print("ICMP -> Type: %d Code: %d" % (icmp_header.type, icmp_header.code))

            # 收到检查类型为3,代码为3的ICMP包则说明目标主机存在

            if icmp_header.type == 3 and icmp_header.code == 3:

                # 确认响应的主机在我们的目标子网内

                if IPAddress(ip_header.src_address) in IPNetwork(subnet):

                    # 确认ICMP数据中包含我们发送的自定义字符串

                    if raw_buffer[len(raw_buffer)-len(magic_message):] == magic_message:

                        print("Host Up: %s" % ip_header.src_address)

except KeyboardInterrupt:

    if os.name == 'nt':

        sniffer.ioctl(socket.SIO_RCVALL, socket.RCVALL_OFF)
python黑帽子(第三章)的更多相关文章
- python黑帽子(第五章)
对开源CMS进行扫描 import os import queue import requests # 原书编写时间过于久远 现在有requests库对已经对原来的库进行封装 更容易调用 import ...
- python黑帽子(第四章)
Scapy窃取ftp登录账号密码 sniff函数的参数 filter 过滤规则,默认是嗅探所有数据包,具体过滤规则与wireshark相同. iface 参数设置嗅探器索要嗅探的网卡,默认对所有的网卡 ...
- 读书笔记 ~ Python黑帽子 黑客与渗透测试编程之道
Python黑帽子 黑客与渗透测试编程之道 <<< 持续更新中>>> 第一章: 设置python 环境 1.python软件包管理工具安装 root@star ...
- 2017-2018-2 20179204 PYTHON黑帽子 黑客与渗透测试编程之道
python代码见码云:20179204_gege 参考博客Python黑帽子--黑客与渗透测试编程之道.关于<Python黑帽子:黑客与渗透测试编程之道>的学习笔记 第2章 网络基础 t ...
- python学习心得第三章
python学习心得第三章 1.三元运算 变量=值1 if 条件 else 值2 由图如果条件成立则赋值1给变量,如果条件不成立则赋值2给变量. 2.数据类型 集合:set() class set(o ...
- python学习笔记——第三章 串
第三章 字符串学习 1.字符串不灵活, 它不能被分割符值 >>> format = "hello, %s. %s enough for ya?" >> ...
- 《零压力学Python》 之 第三章知识点归纳
第三章(第一个程序)知识点归纳 编程犹如写剧本.Python函数与剧本差别不大,你可以反复调用函数,而它每次都执行预定的“脚本”(脚本也可以指整个程序). 在Python IDLE中,真正的编程是从编 ...
- 跟着高淇学Python——第一到第三章总结
2019/10/26 第一章:Python介绍 Python是一种解释型,面向对象的语言.特点是: 可读性强 简洁,简洁 面向对象 免费开源 可移植性和跨平台性 丰富的库 可扩展性 应用范围:1.人工 ...
- 路飞学城-Python爬虫集训-第三章
这个爬虫集训课第三章的作业讲得是Scrapy 课程主要是使用Scrapy + Redis实现分布式爬虫 惯例贴一下作业: Python爬虫可以使用Requests库来进行简单爬虫的编写,但是Reque ...
随机推荐
- python 多ip端口扫描器
from socket import * import threading #导入线程相关模块 import re # qianxiao996精心制作 #博客地址:https://blog.csdn. ...
- 【Mybatis】SQL语句的解析执行过程原理
sqlSession简单介绍 拿到SqlSessionFactory对象后,会调用SqlSessionFactory的openSesison方法,这个方法会创建一个Sql执行器(Executor),这 ...
- 麒麟系统开发笔记(二):国产麒麟系统搭建Qt开发环境安装Qt5.12
前言 开发国产应用,使用到银河麒麟V4,V10,本篇以V10记录,参照上一篇可安装V4.V7.V10三个版本,麒麟V4系自带了Qt,麒麟V10没有自带Qt,需要自己编译搭建环境. 银河麒麟V1 ...
- Linux 性能调优都有哪几种方法?
1.Disabling daemons (关闭 daemons). 2.Shutting down the GUI (关闭 GUI). 3.Changing kernel paramete ...
- Spring Boot 需要独立的容器运行吗?
可以不需要,内置了 Tomcat/ Jetty 等容器.
- SpringBoot项目单元测试不经过过滤器问题
SpringBoot使用MockMvc:https://docs.spring.io/spring-boot/docs/current/reference/html/spring-boot-featu ...
- Spring Bean生命周期回调方法
参阅官方文档:https://docs.spring.io/spring/docs/current/spring-framework-reference/core.html#beans-factory ...
- gateway聚合swagger3统一管理api文档
springboot微服务整合swagger3方法很简单,下文会演示.但是在分布式项目中如果每个微服务都需要单独的分开访问获取接口文档就不方便了,本文将详细讲解springcloud gateway网 ...
- idea中web项目的创建
在idea中创建web项目 1)创建一个普通的Java项目 2)右键项目选择ADD Framework Support 3)勾选JavaEE 4)添加jar包 点击Project Structure ...
- matlab拟合函数的三种方法
方法一:多项式拟合polyfit 1 x=[1 2 3 4 5 6 7 8 9]; 2 3 y=[9 7 6 3 -1 2 5 7 20]; 4 P= polyfit(x, y, 3) %三阶多项式拟 ...
