android中获取 bitmap 像素的颜色 之吸管取色功能
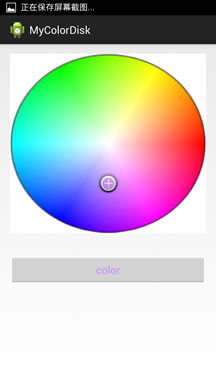
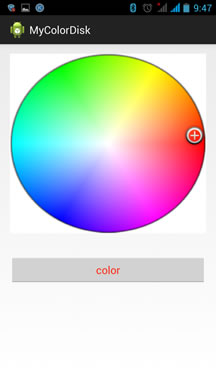
本功能是参考android API colorPickerView修改,实现类似与PS中吸管取色功能。也就是可以对图片的任意位置取该位置的RGB。本demo中,完成了色盘取色功能。当点击色盘的某个位置,松手时,显示当前的颜色。由于是demo,显示的颜色用button的文字颜色的相应改变达到效果。把色盘图片更换为其他资源,则对你换的资源取色。具体要按需求改动。色盘取色可以用于绘图时的颜色选择,不用弹出对话框选择有限的几种颜色。总得来说还是吸管功能。
主要代码如下:
<?xml version="1.0" encoding="utf-8"?>
<manifest xmlns:android="http://schemas.android.com/apk/res/android"
package="com.mrlin.mycolordisk"
android:versionCode="1"
android:versionName="1.0" >
<uses-sdk
android:minSdkVersion="8"
android:targetSdkVersion="17" />
<application
android:allowBackup="true"
android:icon="@drawable/ic_launcher"
android:label="@string/app_name"
android:theme="@style/AppTheme" >
<activity
android:name="com.mrlin.mycolordisk.MainActivity"
android:label="@string/app_name" >
<intent-filter>
<action android:name="android.intent.action.MAIN" />
<category android:name="android.intent.category.LAUNCHER" />
</intent-filter>
</activity>
</application>
</manifest>
来自CODE的代码片
AndroidManifest.xml
package com.mrlin.mycolordisk;
import android.content.Context;
import android.graphics.Bitmap;
import android.graphics.Bitmap.Config;
import android.graphics.BitmapFactory;
import android.graphics.Canvas;
import android.graphics.Color;
import android.graphics.Paint;
import android.graphics.PointF;
import android.graphics.Rect;
import android.util.AttributeSet;
import android.view.MotionEvent;
import android.view.View;
public class ColorPickerView extends View {
private Context mContext;
private Paint mRightPaint; //画笔
private int mHeight; //view高
private int mWidth; //view宽
private int[] mRightColors;
private int LEFT_WIDTH;
private Bitmap mLeftBitmap;
private Bitmap mLeftBitmap2;
private Paint mBitmapPaint;
private PointF mLeftSelectPoint;
private OnColorChangedListener mChangedListener;
private boolean mLeftMove = false;
private float mLeftBitmapRadius;
private Bitmap mGradualChangeBitmap;
private Bitmap bitmapTemp;
private int mCallBackColor = Integer.MAX_VALUE;
int newWidgth;
int newHeigh;
public static String hexColor="";
public static int ColorText=0;
public ColorPickerView(Context context) {
this(context, null);
}
public ColorPickerView(Context context, AttributeSet attrs) {
super(context, attrs);
mContext = context;
init();
}
public void setOnColorChangedListenner(OnColorChangedListener listener) {
mChangedListener = listener;
mChangedListener.onColorChanged(ColorText);
}
//初始化资源与画笔
private void init() {
bitmapTemp = BitmapFactory.decodeResource(getResources(), R.drawable.piccolor);
mRightPaint = new Paint();
mRightPaint.setStyle(Paint.Style.FILL);
mRightPaint.setStrokeWidth(1);
mRightColors = new int[3];
mRightColors[0] = Color.WHITE;
mRightColors[2] = Color.BLACK;
mBitmapPaint = new Paint();
mLeftBitmap = BitmapFactory.decodeResource(mContext.getResources(), R.drawable.reading__color_view__button);
mLeftBitmap2 = BitmapFactory.decodeResource(mContext.getResources(), R.drawable.reading__color_view__button_press);
mLeftBitmapRadius = mLeftBitmap.getWidth() / 2;
mLeftSelectPoint = new PointF(0, 0);
newWidgth=BitmapFactory.decodeResource(getResources(), R.drawable.piccolor).getWidth();
newHeigh=BitmapFactory.decodeResource(getResources(), R.drawable.piccolor).getHeight();
}
//important patient please!!!
@Override
protected void onDraw(Canvas canvas) {
canvas.drawBitmap(getGradual() , null , new
Rect(0, 0, LEFT_WIDTH , mHeight ), mBitmapPaint);
// 右边
// 两个图标
if (mLeftMove) {
canvas.drawBitmap(mLeftBitmap, mLeftSelectPoint.x - mLeftBitmapRadius,
mLeftSelectPoint.y - mLeftBitmapRadius, mBitmapPaint);
} else {
try {
canvas.drawBitmap(mLeftBitmap2, mLeftSelectPoint.x - mLeftBitmapRadius,
mLeftSelectPoint.y - mLeftBitmapRadius, mBitmapPaint);
} catch (Exception e) {
// TODO: handle exception
}
}
}
@Override
protected void onMeasure(int widthMeasureSpec, int heightMeasureSpec) {
int widthMode = MeasureSpec.getMode(widthMeasureSpec);
int heightMode = MeasureSpec.getMode(heightMeasureSpec);
int width = MeasureSpec.getSize(widthMeasureSpec);
int height = MeasureSpec.getSize(heightMeasureSpec);
if (widthMode == MeasureSpec.EXACTLY) {
mWidth = width;
} else {
mWidth = newHeigh;
}
if (heightMode == MeasureSpec.EXACTLY) {
mHeight = height;
} else {
mHeight = newHeigh;
}
LEFT_WIDTH = mWidth;
setMeasuredDimension(mWidth, mHeight);
}
@Override
public boolean onTouchEvent(MotionEvent event) {
float x = event.getX();
float y = event.getY();
switch (event.getAction()) {
case MotionEvent.ACTION_DOWN:
case MotionEvent.ACTION_MOVE:
mLeftMove = true;
proofLeft(x, y);
invalidate();
break;
case MotionEvent.ACTION_UP:
//取色
ColorText=getLeftColor(x, y);
mLeftMove = false;
invalidate();
//松手后,此变量置真,更新button字体颜色
MainActivity.flagOfColorChange=true;
}
return true;
}
@Override
protected void onDetachedFromWindow() {
if (mGradualChangeBitmap != null && mGradualChangeBitmap.isRecycled() == false) {
mGradualChangeBitmap.recycle();
}
if (mLeftBitmap != null && mLeftBitmap.isRecycled() == false) {
mLeftBitmap.recycle();
}
if (mLeftBitmap2 != null && mLeftBitmap2.isRecycled() == false) {
mLeftBitmap2.recycle();
}
super.onDetachedFromWindow();
}
private Bitmap getGradual() {
if (mGradualChangeBitmap == null) {
Paint leftPaint = new Paint();
leftPaint.setStrokeWidth(1);
mGradualChangeBitmap = Bitmap.createBitmap(LEFT_WIDTH, mHeight, Config.RGB_565);
mGradualChangeBitmap.eraseColor(Color.WHITE);
Canvas canvas = new Canvas(mGradualChangeBitmap);
canvas.drawBitmap( bitmapTemp, null , new Rect(0, 0, LEFT_WIDTH , mHeight ), mBitmapPaint);
}
return mGradualChangeBitmap;
}
// 校正xy
private void proofLeft(float x, float y) {
if (x < 0) {
mLeftSelectPoint.x = 0;
} else if (x > (LEFT_WIDTH)) {
mLeftSelectPoint.x = LEFT_WIDTH;
} else {
mLeftSelectPoint.x = x;
}
if (y < 0) {
mLeftSelectPoint.y = 0;
} else if (y > (mHeight - 0)) {
mLeftSelectPoint.y = mHeight - 0;
} else {
mLeftSelectPoint.y = y;
}
}
private int getLeftColor(float x, float y) {
Bitmap temp = getGradual();
// 为了防止越界
int intX = (int) x;
int intY = (int) y;
if(intX<0)intX=0;
if(intY<0)intY=0;
if (intX >= temp.getWidth()) {
intX = temp.getWidth() - 1;
}
if (intY >= temp.getHeight()) {
intY = temp.getHeight() - 1;
}
System.out.println("leftColor"+temp.getPixel(intX, intY));
return temp.getPixel(intX, intY);
}
// ### 内部类 ###
public interface OnColorChangedListener {
void onColorChanged(int color);
}
}
来自CODE的代码片
ColorPickerView.java
package com.mrlin.mycolordisk;
import android.app.Activity;
import android.os.Bundle;
import android.os.Handler;
import android.os.Message;
import android.view.Menu;
import android.widget.Button;
import com.mrlin.mycolordisk.ColorPickerView.OnColorChangedListener;
public class MainActivity extends Activity {
private ColorPickerView colorDisk=null;
private Button btnColor=null;
public static boolean flagOfColorChange=false;
private final static int COLOR_CHANGE=1;
Handler mColorhandler=new Handler()
{
public void handleMessage(Message msg)
{
switch(msg.what)
{
case COLOR_CHANGE:
btnColor.setTextColor(ColorPickerView.ColorText);
break;
default:
break;
}
};
};
@Override
protected void onCreate(Bundle savedInstanceState) {
super.onCreate(savedInstanceState);
setContentView(R.layout.activity_main);
btnColor=(Button)findViewById(R.id.btnColor);
//用线程监听 是否颜色已经改变
new Thread(new Runnable() {
@Override
public void run() {
// TODO Auto-generated method stub
while(true)
{
//当色盘颜色改变时,也就是松手时,把flagOfColorChange置为true
//然后handler 发送消息,button改变字体
//此变量为全局变量,破坏了封装性。但是实现了功能,有更好的方式可以留言
if(flagOfColorChange)
{
System.out.println("color change!!!");
flagOfColorChange=false;
mColorhandler.sendEmptyMessage(COLOR_CHANGE);
}
}
}
}).start();
}
@Override
public boolean onCreateOptionsMenu(Menu menu) {
// Inflate the menu; this adds items to the action bar if it is present.
getMenuInflater().inflate(R.menu.main, menu);
return true;
}
}
来自CODE的代码片
MainActivity.java
<RelativeLayout xmlns:android="http://schemas.android.com/apk/res/android"
xmlns:tools="http://schemas.android.com/tools"
android:layout_width="match_parent"
android:layout_height="match_parent"
android:paddingBottom="@dimen/activity_vertical_margin"
android:paddingLeft="@dimen/activity_horizontal_margin"
android:paddingRight="@dimen/activity_horizontal_margin"
android:paddingTop="@dimen/activity_vertical_margin"
tools:context=".MainActivity" >
<com.mrlin.mycolordisk.ColorPickerView
android:id="@+id/colorDisk"
android:layout_width="fill_parent"
android:layout_height="300dp"
android:layout_alignLeft="@+id/btnColor"
android:layout_alignRight="@+id/btnColor" />
<Button
android:id="@+id/btnColor"
android:layout_width="wrap_content"
android:layout_height="wrap_content"
android:layout_alignParentLeft="true"
android:layout_alignParentRight="true"
android:layout_below="@+id/colorDisk"
android:layout_marginTop="37dp"
android:text="color" />
</RelativeLayout>
来自CODE的代码片
activity_main.xml
运行效果如下:
android中获取 bitmap 像素的颜色 之吸管取色功能的更多相关文章
- android 中获取视频文件的缩略图(非原创)
在android中获取视频文件的缩略图有三种方法: 1.从媒体库中查询 2. android 2.2以后使用ThumbnailUtils类获取 3.调用jni文件,实现MediaMetadataRet ...
- android中获取时间
android中获取时间 1)通过calendar类获取 Calendar calendar = Calendar.getInstance();int moth = calendar.get(Cale ...
- URL转Drawable之 Android中获取网络图片的三种方法
转载自: http://doinone.iteye.com/blog/1074283 Android中获取网络图片是一件耗时的操作,如果直接获取有可能会出现应用程序无响应(ANR:Applicatio ...
- Android中获取应用程序(包)的大小-----PackageManager的使用(二)
通过第一部分<<Android中获取应用程序(包)的信息-----PackageManager的使用(一)>>的介绍,对PackageManager以及 AndroidMani ...
- Android中获取正在运行的应用程序-----ActivityManager.RunningAppProcessInfo类详解
今天继续讲解关于ActivityManager的使用,通过前面一节的学习,我们学会了如何利用ActivityManager获取系统里 正在运行的进程.本文要讲解的知识点是利用这些进程信息获取系统里正在 ...
- Android中获取网页表单中的数据实现思路及代码
在Android中获取网页里表单中的数据具体实现代码如下,感兴趣的各位可以参考过下哈,希望对大家有所帮助 MainActivity如下: 复制代码 代码如下: package cn.testjavas ...
- android中获取root权限的方法以及原理(转)
一. 概述 本文介绍了android中获取root权限的方法以及原理,让大家对android 玩家中常说的“越狱”有一个更深层次的认识. 二. Root 的介绍 1. Root 的目的 可以让我们拥有 ...
- Android中获取网页表单中的数据
MainActivity如下: package cn.testjavascript; import java.util.StringTokenizer; import android.os.Bundl ...
- 四十六、android中的Bitmap
四十六.android中的Bitmap: http://www.cnblogs.com/linjiqin/archive/2011/12/28/2304940.html 四十七.实现调用Android ...
随机推荐
- Java学习03
Java学习03 1.java面试一些问题 一.什么是变量 变量是指在程序执行期间可变的数据.类中的变量是用来表示累的属性的,在编程过程中,可以对变量的值进行修改.变量通常是可变的,即值是变化的 二. ...
- 【转】从底层了解ASP.NET体系结构
从底层了解ASP.NET体系结构 原文:http://blog.csdn.net/zhoufoxcn/article/details/1890158 Java体系架构的书多如牛毛,比如SSH架构什么的 ...
- 解决Sublime Text3莫名的中文乱码问题
有好几回用Sublime Text3写着中英混杂的文字的时候,会突然就弹出警告说什么编码不行,然后点击确定后,原来的中文全都乱码了: 然后即使按ctrl+z撤回也没用,重新打开也没用,用记事本的转换a ...
- python成长之路13
一:SqlAlchemy ORM ORM:Object Relational Mapping 对象关系映射是一种程序技术,用于实现面向对象编程语言里不同类型系统的数据之间的转换 SQLAlchemy是 ...
- Web APIs 基于令牌TOKEN验证的实现
Web APIs 基于令牌TOKEN验证的实现 概述: ASP.NET Web API 的好用使用过的都知道,没有复杂的配置文件,一个简单的ApiController加上需要的Action就能工作.但 ...
- An update on OS X Code Signing(OS X代码签名)
There has recently been updates to the OS X code signing process. These updates also affect Qt appli ...
- Qt学习 之 文件
文件操作是应用程序必不可少的部分.Qt 作为一个通用开发库,提供了跨平台的文件操作能力.从本章开始,我们来了解下 Qt 的文件以及输入输出的功能,也就是 I/O 系统. Qt 通过QIODevice提 ...
- 引用 IP电话的原理结构及其关键技术
引用 茫然 的 两种将字符串转换成浮点数的方法 方法一: char szString[] = "-2876.99812376443"; double db1; db1 = atof ...
- Linux编程---I/O部分
非常多函数都能够在网上找到,也比較基础,所以原型仅仅给出了函数名.详细用到再man吧. 输入输出是个非常重要的一块内容.差点儿网络相关的东西基本都是靠底层IO调用来实现的. 好吧.还是先踏踏实实的介绍 ...
- TTL电平与RS232电平的区别
TTL电平与RS232电平的区别 工作中遇到一个关于电平选择的问题,居然给忘记RS232电平的定义了,当时无法反应上来,回来之后查找资料才了解两者之间的区别,视乎两年多的时间,之前非常熟悉的一些常 ...