华为路由器配置OSPF
OSPF是什么
OSPF(Open Shortest Pass First,开放最短路径优先协议),是一个最常用的内部网管协议,是一个链路状态协议。
使用场景:适用于运营商、政府机构等大型网络中多节点要求互联互通
网络结构:支持两层结构 1骨干区域 2 子区域
OSPF基于IP
OSPF不属于网络层协议

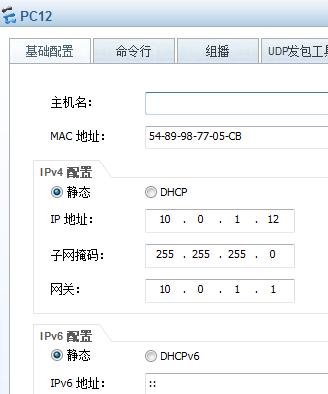
PC12 配置好IP信息后启动

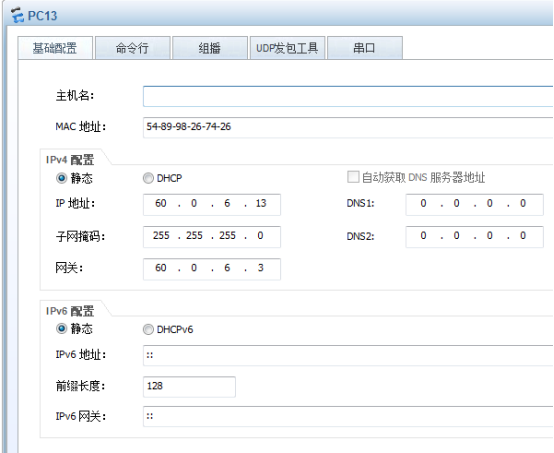
PC13 同样操作配置好IP信息后启动

路由设备配置部分

R6 基础环境配置
<Huawei>system-view #切换模式

[Huawei]sysname R6 #给设备起个名字 R6
[R6]display ip interface brief #查看设备接口信息

[R6]int GigabitEthernet 0/0/0 #进入 GE 0 接口
[R6]ip add 10.0.1.1 24 #配置IP
[R6]q #退出并返回上一级目录
[R6]int GigabitEthernet 0/0/1
[R6-GigabitEthernet0/0/1]ip add 20.0.2.1 24
[R6-GigabitEthernet0/0/1]
[R6-GigabitEthernet0/0/1]display ip interface brief

R8 基础环境配置
<Huawei>
<Huawei>system-view #切换模式
Enter system view, return user view with Ctrl+Z.
[Huawei]
[Huawei]sysname R8 #给设备起个名字 R8
[R8]
[R8]int GigabitEthernet 0/0/0 #进入 GE 0 接口
[R8-GigabitEthernet0/0/0]
[R8-GigabitEthernet0/0/0]ip add 20.0.2.2 24 #配置IP
[R8-GigabitEthernet0/0/0]
Mar 6 2019 11:07:24-08:00 R8 %%01IFNET/4/LINK_STATE(l)[0]:The line protocol IP
on the interface GigabitEthernet0/0/0 has entered the UP state.
[R8-GigabitEthernet0/0/0]
[R8-GigabitEthernet0/0/0]int GigabitEthernet 0/0/1 #进入 GE 1 接口
[R8-GigabitEthernet0/0/1]
[R8-GigabitEthernet0/0/1]ip add 30.0.3.2 24 #配置IP
Mar 6 2019 11:08:48-08:00 R8 %%01IFNET/4/LINK_STATE(l)[1]:The line protocol IP
on the interface GigabitEthernet0/0/1 has entered the UP state.
[R8-GigabitEthernet0/0/1]q #退出并返回上一级目录
[R8]
[R8]interface LoopBack0
[R8-LoopBack0]q #退出并返回上一级目录
[R8]
[R8]interface LoopBack0 #配置回环口 0
[R8-LoopBack0]ip add 6.6.6.6 24 #配置IP
[R8-LoopBack0]q #退出并返回上一级目录
[R8]
[R8]display ip interface brief #查看设备接口信息
*down: administratively down
^down: standby
(l): loopback
(s): spoofing
The number of interface that is UP in Physical is 4
The number of interface that is DOWN in Physical is 0
The number of interface that is UP in Protocol is 4
The number of interface that is DOWN in Protocol is 0
Interface IP Address/Mask Physical Protocol
GigabitEthernet0/0/0 20.0.2.2/24 up up
GigabitEthernet0/0/1 30.0.3.2/24 up up
LoopBack0 6.6.6.6/24 up up(s)
NULL0 unassigned up up(s)
R9 基础环境配置
<Huawei>SY
<Huawei>system-view
Enter system view, return user view with Ctrl+Z.
[Huawei]
[Huawei]SY
[Huawei]sysname R9
[R9]
[R9]int
[R9]interface gi
[R9]interface GigabitEthernet 0/0/0
[R9-GigabitEthernet0/0/0]ip add 30.0.3.3 24
[R9-GigabitEthernet0/0/0]
Mar 6 2019 11:20:22-08:00 R9 %%01IFNET/4/LINK_STATE(l)[0]:The line protocol IP
on the interface GigabitEthernet0/0/0 has entered the UP state.
[R9-GigabitEthernet0/0/0]interface GigabitEthernet 0/0/1
[R9-GigabitEthernet0/0/1]ip add 60.0.6.3 24
Mar 6 2019 11:20:55-08:00 R9 %%01IFNET/4/LINK_STATE(l)[1]:The line protocol IP
on the interface GigabitEthernet0/0/1 has entered the UP state.
[R9-GigabitEthernet0/0/1]q
[R9]
[R9]display ip interface brief
*down: administratively down
^down: standby
(l): loopback
(s): spoofing
The number of interface that is UP in Physical is 3
The number of interface that is DOWN in Physical is 0
The number of interface that is UP in Protocol is 3
The number of interface that is DOWN in Protocol is 0
Interface IP Address/Mask Physical Protocol
GigabitEthernet0/0/0 30.0.3.3/24 up up
GigabitEthernet0/0/1 60.0.6.3/24 up up
NULL0 unassigned up up(s)
[R9]
[R9]
OSPF配置部分
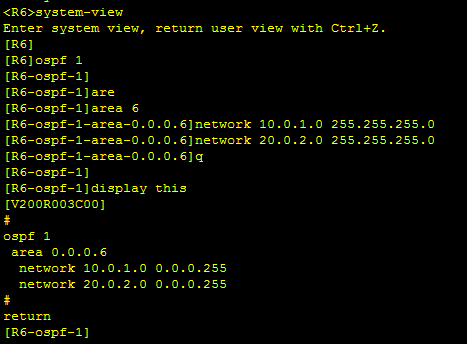
R6 配置OSPF

R8 配置OSPF
<R8>system-view #切换模式
Enter system view, return user view with Ctrl+Z.
[R8]
[R8]ospf 2 #创建OSPF线程2
[R8-ospf-2]area 6 #创建区域 6
[R8-ospf-2-area-0.0.0.6]network 20.0.2.0 255.255.255.0 #宣告网段
[R8-ospf-2-area-0.0.0.6]network 30.0.3.0 255.255.255.0 #宣告网段
[R8-ospf-2-area-0.0.0.6]network 6.6.6.6 255.255.255.0 #宣告网段
[R8-ospf-2-area-0.0.0.6]q #退出并返回上一级目录
[R8-ospf-2]
[R8-ospf-2]display this #查看设备接口信息
[V200R003C00]
#
ospf 2
area 0.0.0.6
network 6.6.6.0 0.0.0.255
network 20.0.2.0 0.0.0.255
network 30.0.3.0 0.0.0.255
#
return
[R8-ospf-2]
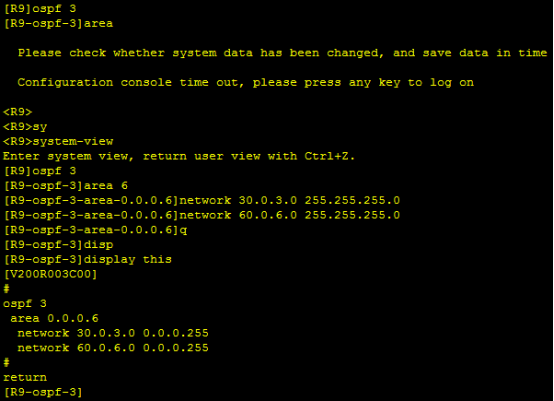
R9 配置OSPF

华为路由器配置OSPF的更多相关文章
- Zabbix监控华为路由器配置
zabbix监控华为路由器 一.配置路由器界面: 开启snmpv2c功能,同时勾选v2c版本(不要勾v1,不安全,其实v2也不安全,如果很注重安全的话,一定要只配置v3). 手里没有路由器登录账号,大 ...
- 路由器配置——OSPF协议(2)
一.实验目的:使用OSPF协议达到全网互通的效果 二.拓扑图 三.具体步骤配置 (1)R1路由器配置 Router>enableRouter#configure terminalEnter co ...
- 路由器配置——OSPF协议(1)
一.实验目的:用OSPF协议使全网互通 二.拓扑图 三.具体步骤配置 (1)R1路由器配置 Router>enableRouter#configure terminalEnter configu ...
- 华为路由器OSPF配置常用命令
OSPF单区域配置 ospf 1 进入ospf视图1代表进程号 area 0 创建区域并进入OSPF区域视图,输入要创建的区域ID,骨干区域即区域0 network +IP +匹配码 display ...
- 华为路由器AR1220F-S的端口映射NAT配置(拨号光纤上网)
telnet 登录 或者ssh登录路由器 //进入系统试图界面 sys-view //第一步. 添加acl规则, 允许内网本身访问对外的公网ip. 否则,只能外部人员访问你的公网ip [Huawei] ...
- 华为路由器GRE配置
1. 协议简介 gre(generic routing encapsulation,通用路由封装)协议是对某些网络层协议(如ip 和ipx)的数据报进行封装,使这些被封装的数据报能够在另一个网络层协议 ...
- 路由器配置——基于链路的OSPF简单口令认证
一.实验目的:掌握基于链路的OSPF简单口令认证 二.拓扑图: 三.具体步骤配置: (1)R1路由器配置 Router>enable Router#configure terminal Ente ...
- 路由器配置——基于区域的OSPF,MD5认证
一.实验目的:掌握OSPF基于区域的MD5认证 二.拓扑图: 三.具体步骤配置 (1)R1路由器配置 Router>enable Router#configure terminal Enter ...
- 路由器配置——基于区域的OSPF简单认证
一.实验目的:掌握区域的OSPF简单认证 二.拓扑图: 三.具体步骤配置: (1)R1路由器配置 Router>enable Router#configure terminal Enter co ...
随机推荐
- 数据库漏洞扫描工具scuba
1.先下载安装scuba 参考地址 https://www.52pojie.cn/thread-702605-1-1.html 百度网盘下载地址: 链接:https://pan.baidu.com/ ...
- sql注入--bool盲注,时间盲注
盲注定义: 有时目标存在注入,但在页面上没有任何回显,此时,我们需要利用一些方法进行判断或者尝试得到数据,这个过程称之为盲注. 布尔盲注: 布尔盲注只有true跟false,也就是说它根据你的注入信息 ...
- openstack核心组件——nova计算服务(7)
云计算openstack核心组件——nova计算服务(7) 一.nova介绍: Nova 是 OpenStack 最核心的服务,负责维护和管理云环境的计算资源.OpenStack 作为 ...
- 前端直传文件到aliyun OSS
<template> <div id="container"> <div class="img-item m-1 upload-file&q ...
- 使用Scrcpy实现电脑控制安卓手机
很多时候我们想要在电脑上使用一些手机软件,使用模拟器当然是一种选择,但是这些模拟器要不然不免费,要不然广告多不放心.Scrcpy是一个开源免费的软件,通过abd命令实现了安卓手机投屏和控制功能,并且支 ...
- Redis中的事务(多命令)操作
作为一个nosql数据库,事务是必要功能.但是redis我们是可以理解为它不支持事务操作的,因为它的特征完全不满足我们对事物的正常理解 ps:我不知道是谁一开始提出redis支持事务的,但是我更倾向于 ...
- MySQL手注之联合查询注入
了解联合查询注入之前,先要了解一下什么是union? union是用于合并两个sql查询结果的语句. 要使用union 必须有相同的列数 必须有两条以上的select语句组成 列的数据类型必须兼容 ...
- springmvc 源码分析(二)-- DiapartcherServlet核心调用流程分析
测试环境搭建: 本次搭建是基于springboot来实现的,代码在码云的链接:https://gitee.com/yangxioahui/thymeleaf.git 项目结构代码如下: 一: cont ...
- c#后台代码请求访问api接口
前言:最近公司项目与外部api接口对接较多 ,写下自己的代码总结.介绍两种访问方式(HttpClient.HttpWebRequest) 一.HttpWebRequest 访问Api private ...
- 08 . Jenkins之SpringCloud微服务+Vue+Docker持续集成
简介 大致流程 /* 1.开发人员每天把代码提交到Gitlab代码仓库 2.jenkins从gitlab中拉取项目源码,编译并打包成war包,然后构建Docker镜像,将镜像上传到Harbor私有仓库 ...
