简单的使用Nginx框架搭建Web服务器~
系统环境Debian 8,内核版本
一、首先来安装nginx服务程序:
1、安装nginx服务需要的相关程序(记得在root权限下操作下面的指令)
aptitude install libpcre3 libpcre3-dev libpcrecpp0 libssl-dev zlib1g-dev

2、接下就下载nginx的源码配置安装,如下所示
注:在运行.configure文件的时候出现下面的错误,./configure: error: SSL modules require the OpenSSL library. 解决办法如下:
Centos需要安装yum install openssl-devel
Ubuntu则需要安装:sudo apt-get install libssl-dev
cd  /home

wget http://nginx.org/download/nginx-1.17.10.tar.gz

tar -zxvf nginx-0.7..tar.gz

cd nginx-0.7.

./configure --sbin-path=/usr/local/sbin --with-http_ssl_module  --with-http_stub_status_module

make&&make install
注2020-04-27:这里再安装ngnix过程中,出现了配置的错误,信息如下所示:

根据上述错误的提示,可以选择直接安装PCRE Library,安装的指令如下所示:
sudo apt-get install libpcre3 libpcre3-dev # For Ubuntu

yum -y install pcre pcre-devel # For Centos
安装完成后继续配置编译即可!
3、完成上面的安装之后,接下来就是编写对应的nginx服务的配置文件,配置文件是供我们调用和启动,关闭nginx服务的:
vim /etc/init.d/nginx
插入的内容如下所示,亲测可用~
#! /bin/sh

### BEGIN INIT INFO

# Provides:          nginx

# Required-Start:    $all

# Required-Stop:     $all

# Default-Start:

# Default-Stop:

# Short-De.ion: starts the nginx web server

# De.ion:       starts nginx using start-stop-daemon

### END INIT INFO

PATH=/usr/local/sbin:/usr/local/bin:/sbin:/bin:/usr/sbin:/usr/bin

DAEMON=/usr/local/sbin/nginx

NAME=nginx

DESC=nginx

test -x $DAEMON || exit

# Include nginx defaults if available

if [ -f /etc/default/nginx ] ; then

        . /etc/default/nginx

fi

set -e

case "$1" in

  start)

        echo -n "Starting $DESC: "

        start-stop-daemon --start --quiet --pidfile /usr/local/nginx/logs/nginx.pid \

                --exec $DAEMON -- $DAEMON_OPTS

        echo "$NAME."

        ;;

  stop)

        echo -n "Stopping $DESC: "

        start-stop-daemon --stop --quiet --pidfile /usr/local/nginx/logs/nginx.pid \

                --exec $DAEMON

        echo "$NAME."

        ;;

  restart|force-reload)

        echo -n "Restarting $DESC: "

        start-stop-daemon --stop --quiet --pidfile \

                /usr/local/nginx/logs/nginx.pid --exec $DAEMON

        sleep

        start-stop-daemon --start --quiet --pidfile \

                /usr/local/nginx/logs/nginx.pid --exec $DAEMON -- $DAEMON_OPTS

        echo "$NAME."

        ;;

  reload)

      echo -n "Reloading $DESC configuration: "

      start-stop-daemon --stop --signal HUP --quiet --pidfile /usr/local/nginx/logs/nginx.pid \

          --exec $DAEMON

      echo "$NAME."

      ;;

  *)

        N=/etc/init.d/$NAME

        echo "Usage: $N {start|stop|restart|force-reload}" >&

        exit

        ;;

esac

exit
4、最后是使能对应的.sh脚本文件,相关的操作如下,直接执行就行了~(亲测可用)
/usr/sbin/update-rc.d -f nginx defaults #If Debian inform you that nginx script can't excutable,you need to use:chmod /etc/init.d/nginx #添加脚本到系统默认运行级别

ln -s /usr/local/nginx  /etc/nginx #由于nginx是安装在/usr/local/,可以链接到我们常用的/etc/下

/etc/init.d/nginx start #现在可以运行nginx了

lynx http://localhost #或者用局域网其它机器访问本机

# If it show the info:Welcome to nginx! that means you have install nginx cerrectly!
二、测试如下所示(这里我稍微的改动了一哈子网页....懒得改回来了):
 总之结果,大概就是这个样子的~
下面是index.html的相关内容:
 <!DOCTYPE html>

 <html>

 <head>

 <title>Welcome to nginx!</title>

 <style>

     body {

         width: 35em;

         margin: 0 auto;

         font-family: Tahoma, Verdana, Arial, sans-serif;

     }

 </style>

 </head>

 <body>

 <h1>Welcome to nginx!This is my first Web Project!Author MM1994UESTC</h1>

 <p>If you see this page, the nginx web server is successfully installed and

 working. Further configuration is required.</p>

 <p>For online documentation and support please refer to

 <a href="http://nginx.org/">nginx.org</a>.<br/>

 Commercial support is available at

 <a href="http://nginx.com/">nginx.com</a>.</p>

 <p><em>Thank you for using nginx.</em></p>

 </body>

 </html>
关于HTML的相关语法也是比较简单的,如果不涉及JS,CCS等动态的复杂的网页设计,基本的Web网页的搭建也是够用了~
三、修改nginx服务的相关架构,下面是nginx.conf的内容,通过修改nginx.conf的相关内容,从而实现nginx的相关功能:
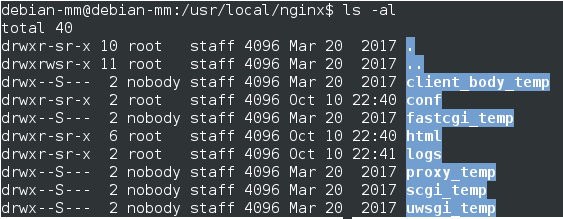
nginx service服务的文件结构如下所示:

这里最重要的,经常使用的文件夹是html文件夹和conf文件夹,分别包含了index.html文件和nginx.conf文件
nginx.conf文件内容:
 #user  nobody;

 worker_processes  ;

 #error_log  logs/error.log;

 #error_log  logs/error.log  notice;

 #error_log  logs/error.log  info;

 #pid        logs/nginx.pid;

 events {

     worker_connections  ;

 }

 http {

     include       mime.types;

     default_type  application/octet-stream;

     #log_format  main  '$remote_addr - $remote_user [$time_local] "$request" '

     #                  '$status $body_bytes_sent "$http_referer" '

     #                  '"$http_user_agent" "$http_x_forwarded_for"';

     #access_log  logs/access.log  main;

     sendfile        on;

     #tcp_nopush     on;

     #keepalive_timeout  ;

     keepalive_timeout  ;

     #gzip  on;

     server {

         listen       ;

         server_name  localhost;

         #charset koi8-r;

         #access_log  logs/host.access.log  main;

         location / {

             root   html;

             index  index.html;# index.html index.htm;

         }

         #error_page                /.html;

         # redirect server error pages to the static page /50x.html

         #

         error_page        /50x.html;

         location = /50x.html {

             root   html;

         }

         # proxy the PHP scripts to Apache listening on 127.0.0.1:

         #

         #location ~ \.php$ {

         #    proxy_pass   http://127.0.0.1;

         #}

         # pass the PHP scripts to FastCGI server listening on 127.0.0.1:

         #

         #location ~ \.php$ {

         #    root           html;

         #    fastcgi_pass   127.0.0.1:;

         #    fastcgi_index  index.php;

         #    fastcgi_param  SCRIPT_FILENAME  /scripts$fastcgi_script_name;

         #    include        fastcgi_params;

         #}

         # deny access to .htaccess files, if Apache's document root

         # concurs with nginx's one

         #

         #location ~ /\.ht {

         #    deny  all;

         #}

     }

     # another virtual host using mix of IP-, name-, and port-based configuration

     #

     #server {

     #    listen       ;

     #    listen       somename:;

     #    server_name  somename  alias  another.alias;

     #    location / {

     #        root   html;

     #        index  index.html index.htm;

     #    }

     #}

     # HTTPS server

     #

     #server {

     #    listen        ssl;

     #    server_name  localhost;

     #    ssl_certificate      cert.pem;

     #    ssl_certificate_key  cert.key;

     #    ssl_session_cache    shared:SSL:1m;

     #    ssl_session_timeout  5m;

     #    ssl_ciphers  HIGH:!aNULL:!MD5;

     #    ssl_prefer_server_ciphers  on;

     #    location / {

     #        root   html;

     #        index  index.html index.htm;

     #    }

     #}

 }
这里我们一般通过修改29行的HTML的文件名就可以让nginx服务显示输出不同的网页内容(修改之后记得重启nginx服务:sudo /etc/init.d/nginx restart),我们可以使用自己编写的html文件,例如下面我们编写的相关的html文件:
 这里html文件是保存在html文件夹当中的,Frame_0.html是我编写的脚本文件
Frame_0.html的具体内容如下:
<html>

<style>

#header{

    background-color:black;

    color:white;

    text-align:center;

    padding:5px;

}

#nav{

    line-height:30px;

    background-color:#eeeeee;

    height:360px;

    width:150px;

    float:left;

    padding:5px;

}

#Photos{

    background-color:#B0C4DE;

    width:200px;

    height:350;

    float:left;

    padding:10px;

}

#section_o{

    background-color:Gray;

    color:white;

    width:350px;

    height:350px;

    float:left;

    padding:10px;

}

#section_t{

    background-color:#FAEBD7;

    width:1000px;

    height:350px;

    float:left;

    padding:10px;

}

#footer_o{

    backgound-color:Gray;

    color:black;

    float:left;

    width:310;

    height:600;

    text-align:left

    padding:5px;

}

#footer{

    background-color:black;

    color:white;

    clear:both;

    text-align:center;

    padding:5px;

}

</style>

<body>

<div id="header">

<h2>Introductions</h2>

</div>

<div id="nav">

BasicInfo<br>

ProgrammingSkill<br>

Project<br>

Education<br>

<a href="https://github.com/mm1994uestc">GitHub</a><br>

<a href="http://www.cnblogs.com/uestc-mm/">CNBlogs</a>

<br>

<embed src="Sounds/Faded.mp3" height="30" width="150">

<br>

<address typle="font-size:18">

Writen by myself.<br>

Visit:<a href="http://gispalab.uestc.edu.cn/">GISPALAB</a><br>

Box 610054,UESTC.<br>

CN

</address>

</div>

<div id="Photos">

<img src="Picture/MyPic.jpg" width="210">

<p style="text-align:center;background-color:PowderBlue;font-size:14px;color:red">Personal Photo take in  Our University's Library which University i obtain my BS degree!</p>

</div>

<div id="section_o">

<p><span style='color:red;font-weight:bold;'>Undergraduate majors:</span> signal and system, circuit theory, analog circuit and pulse circuit, digital logic design and application, embedded system, comprehensive experiment, FPGA microcomputer and interface technology, high frequency and RF circuit, communication principle, optical fiber communication, electromagnetic field and wave, solid state physics and semiconductor physics.</p>

<p><span style='color:red;font-weight:bold;'>Master's courses:</span> pattern recognition, digital image processing, stochastic processes and applications, matrix theory, numerical analysis, Linux kernel analysis</p>

</div>

<div style="line-weight:13px" id="section_t">

<p style="color:red;font-size:20;font-weight:bold;">In this section,i will talk something about how to learn a new skill quikily and efficiently!</p>

<p >First of all, understand that this is a technology to solve the problem, according to the official documents and tutorials to do some testing, and then use the technology in the work. Recommend a learning technology website -51CTO college, a comprehensive IT technology learning platform.</p>

<p>If you want to learn C language in the short term, you really need a lot of intelligence and patience. It is not easy to learn computer science, it is because the way of thinking and the realization of the abstract thinking is very different, most people do not have the ability to process thinking, so it is necessary to develop. No matter whether C or other language, thinking or program must develop, but that is not enough, C is more biased in machine language, you need to understand the principle of the computer register, need to understand the data structure, which leads to write C language requires the use of memory is very accurate, with a little mistakes will overflow, seemingly no problem how the program is not the final result. So write more code to practice, the accuracy of the code is very helpful. I go to school in high school C, do not go to work, are holding a C language books have been watching, the initial time how to see also see, but insisted on watching a few times, you will slowly understand. After the understanding of the process of thinking, and then write the program is not difficult. But now than when I was learning programming easier, the previous tutorial is very poor quality, the amount is not much, now the electronic version and teaching video everywhere, and easy to understand, as long as you are willing to adhere to, or can learn quickly.</p>

</div>

<div style="line-height:13px;background-color:#FFFACD" id="footer_o">

<p style="color:Blue;font-size:20px">Intelligent dustbin:</p>

<img src="Picture/Garbage.jpg" height="153">

<img src="Picture/Infrared tube.jpg" height="153">

<p>The kernel code:<br>

<Code>

<pre>

<span style="color:red">Driver for Infrared tube:</span>

unsigned char sensor_inp()

<span style="color:red">Driver for 74HC595:</span>

void HC595datasend(unsigned char date2)

<span style="color:red">Driver for VIRVO:</span>

void virvo()

</pre>

</Code>

<embed src="Video/Garbage.mp4" height="240"/>

</p>

</div>

<div style="line-height:13px;background-color:#708090" id="footer_o">

<p style="color:Blue;font-size:20px">Blood glucose meter:</p>

<img src="Picture/glucose1.jpg" height="200">

<img src="Picture/glucose2.jpg" height="200">

<p>The kernel code:<br>

<Code>

<pre>

<span style="color:red">Driver for MU609:</span>

void MU609_GPIO_Init(void);

void MU609_Init(void);

void MU609_Reset(void);

void MU609_StateLED_ON(void);

void MU609_StateLED_OFF(void);

</pre>

</Code>

</p>

<img src="Picture/glucose.jpg" height="195">

</div>

<div style="line-height:13px;background-color:#FFDAB9" id="footer_o">

<p style="color:Blue;font-size:20px">Image segmentation:</p>

<img src="Picture/Test.png" height="100">

<img src="Picture/Binary.png" height="100">

<p style="font-size:8px">The kernel code:<br>

<Code>

<pre>

<span style="color:red">Driver for PixleFind:</span>

function [Pic_Process,C]=Pixel(Pic,Row,Clo,m,n)

    while (While_Flag==1)

        C=C+1;

        Pic_Process(Row,Clo)=1;

        Pic_Buffer(Row,Clo)=0;

        if Clo<=1 || Row>m || Clo>n || Row<=1

            break;

        end

        if Pic_Buffer(Row,Clo-1)==1

            Clo=Clo-1;

            While_Flag=1;

        else if Pic_Buffer(Row+1,Clo)==1

                Row=Row+1;

                While_Flag=1;

            else if Pic_Buffer(Row,Clo+1)==1

                    Clo=Clo+1;

                    While_Flag=1;

              else if Pic_Buffer(Row-1,Clo)==1

                        Row=Row-1;

                        While_Flag=1;

                    else

                        While_Flag=0;

</pre>

</Code>

</p>

<img src="Picture/Section1.png" height="80"/>

<img src="Picture/Section2.png" height="80"/>

<img src="Picture/Section3.png" height="80"/>

</div>

<div style="line-height:13px;background-color:#708090" id="footer_o">

<p style="color:Blue;font-size:20px">Vertical image rectification:</p>

<img src="Picture/Ori.png" height="90">

<img src="Picture/Res.png" height="90">

<p style="color:white">The kernel code:<br>

<Code style="color:white">

<pre>

Image = cv2.imread('D:\PythonDevelopment\Rec<br>tangleRot\Py_Sample\89683.jpg', cv2.<br>IMREAD_UNCHANGED)

Size_X = np.size(Image, 0)

Size_Y = np.size(Image, 1)

T_L = Size_X/3

T_H = Size_X*2/3

X0 = 0  # Row

Y0 = 0  # Clo

X1 = 0

Y1 = 0

while Image[X0, Y0, 1] == 0:

    if X0 == Size_X-1:

        X0 = 0

        Y0 += 1

    X0 += 1

if (T_L < X0)and(X0 < T_H):

    I_Res = Image

else:

    if X0 > (Size_X/2):

        X1 = X0 - 300

    else:

        X1 = X0 + 300

    Y1 = 0

    while Image[X1, Y1, 1] == 0:

        Y1 += 1

    K = float((Y0 - Y1))/float((X0 - X1))

    Theta = -1*math.atan(K)*180/math.pi

    I_Res=rotate_about_center(Image,Theta,0.88)

</pre>

</Code>

</p>

</div>

<div style="line-height:13px;background-color:#FFFACD" id="footer_o">

<p style="color:Blue;font-size:20px">Remote PTZ:</p>

<img src="Picture/PTZ.jpg" height="400">

<p>The kernel code:<br>

gizwits_product.c<br>

gizwits_product.h<br>

gizwits_protocol.c<br>

gizwits_protocol.h<br>

hal_uart.c<br>

hal_uart.h<br>

</p>

</div>

<div id="footer">

<p>Copyright MM1994UESTC</p>

</div>

<body>

</html>
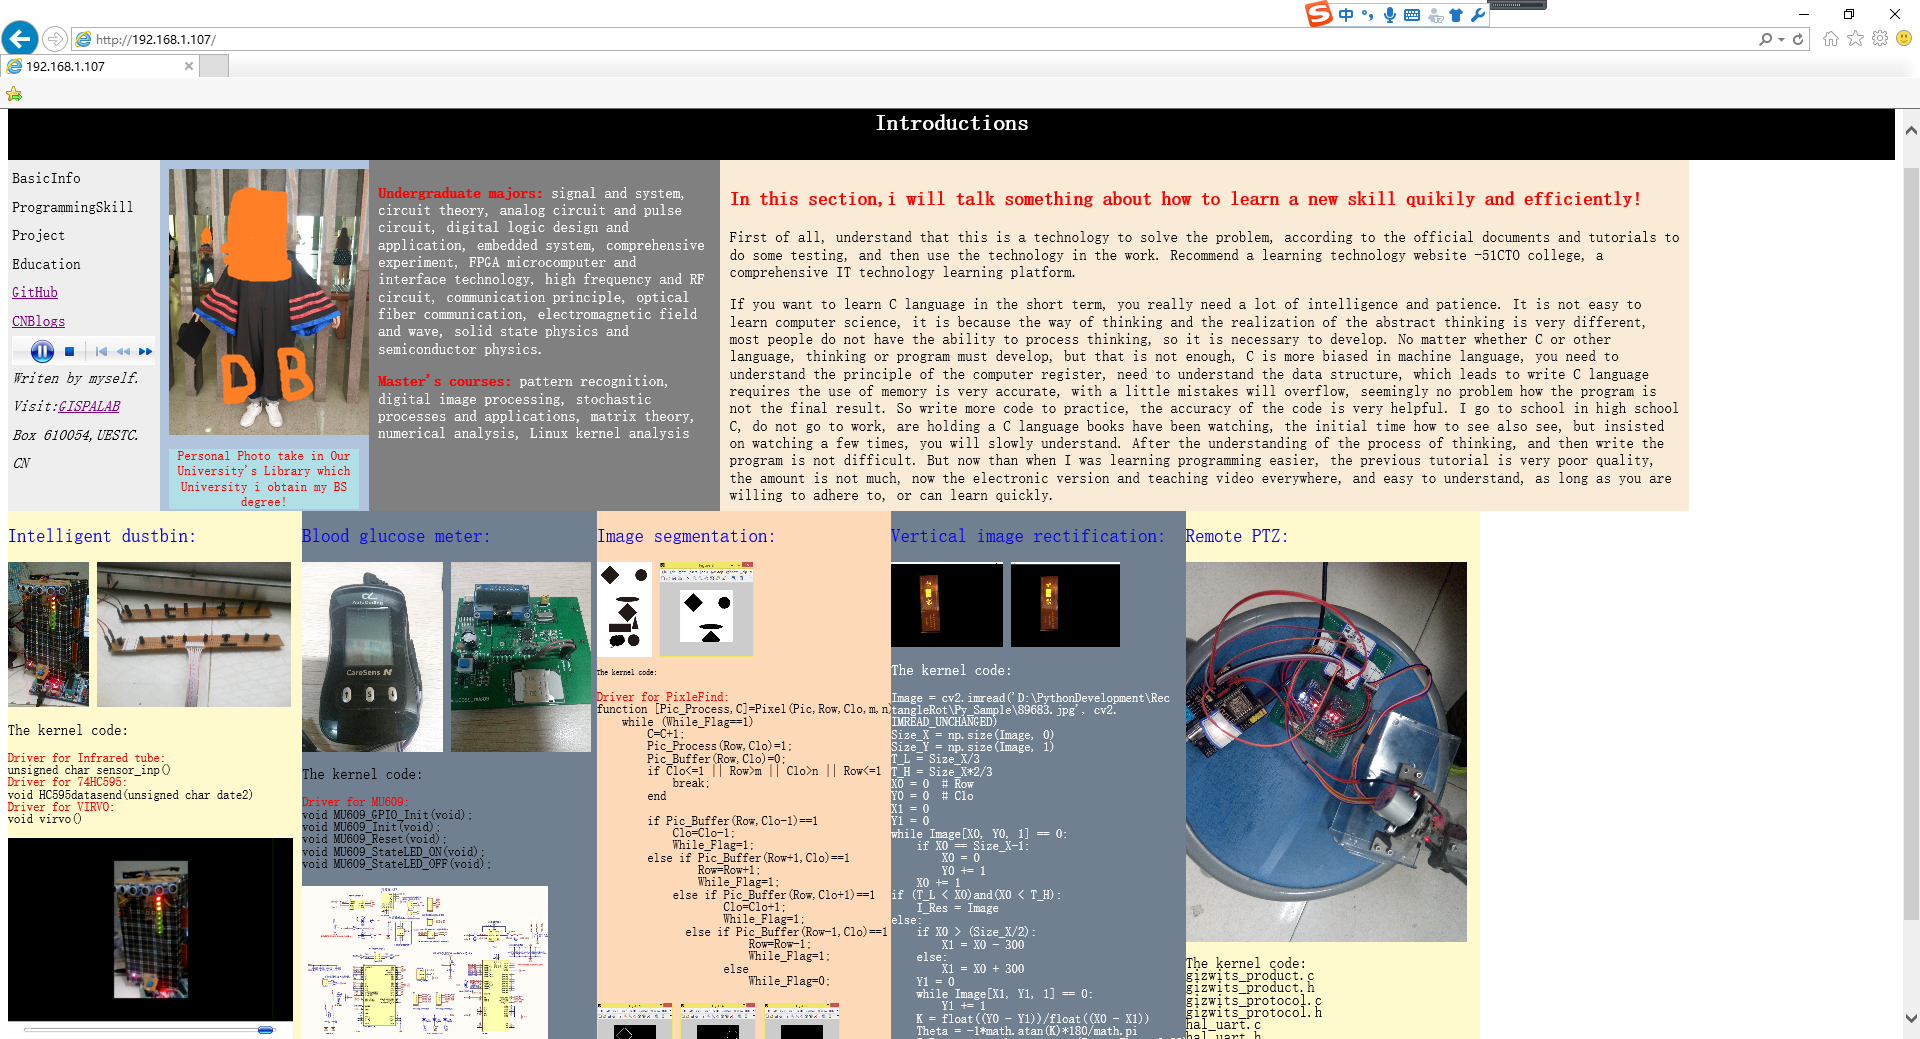
HTML文件中涉及到的相关的图片、音频、视频等内容都保存在Picture Sounds Video对应的文件夹当中,最终的实验结果如下图所示:

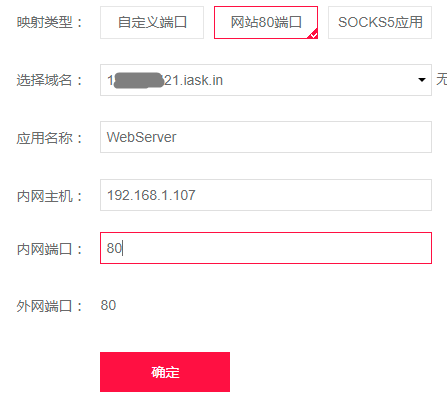
 在花生壳官网完成内网映射,选用80端口~
OK!基本的目标已经达成了,后面具体需要使用什么功能在添加吧~可以先感受一下,哈哈!!
若要使用外网访问,只需要按照之前在ESP8266文章中提到的路由器功能DMZ主机,或者使用花生壳的端口映射就可以实现了,如上图所示。
完~
简单的使用Nginx框架搭建Web服务器~的更多相关文章
- SSM框架搭建web服务器实现登录功能(Spring+SpringMVC+Mybatis)
初学java EE,虽然知道使用框架会使开发更加便捷高效,但是对于初学者来说,感到使用框架比较迷惑,尤其是各种jar包的引用.各种框架的配置.注解的使用等等. 最好的学习方法就是实践,于是下载了一个现 ...
- virtualbox搭建ubuntu server nginx+mysql+tomcat web服务器1 (未完待续)
virtualbox搭建ubuntu server nginx+mysql+tomcat web服务器1 (未完待续) 第一次接触到 linux,不知道linux的确很强大,然后用virtualbox ...
- 轻松使用Nginx搭建web服务器
如果读者以前做过web开发的话,就应该知道如何去搭建一个web服务器来跑你的web站点,在windows下你可能会选择去用IIS,十分的快捷,在linux下,你可能首先会想到apache,“一哥”( ...
- Python搭建Web服务器,与Ajax交互,接收处理Get和Post请求的简易结构
用python搭建web服务器,与ajax交互,接收处理Get和Post请求:简单实用,没有用框架,适用于简单需求,更多功能可进行扩展. python有自带模块BaseHTTPServer.CGIHT ...
- Ubuntu 搭建Web服务器(MySQL+PHP+Apache)详细教程
Ubuntu 搭建Web服务器(MySQL+PHP+Apache)详细教程 看了好多人的博客,有的不全 or 有问题,整理了一下,适合小白 新手先整理几个小问题 1.为啥使用 Linux 搭建服务器? ...
- 一文读懂Python web框架和web服务器之间的关系
我们都知道 Python 作为一门强大的语言,能够适应快速原型和较大项目的制作,因此被广泛用于 web 应用程序的开发中. 在面试的过程中,大家或多或少都被问到过这样一个问题:一个请求从浏览器发出到数 ...
- 你真的了解如何将 Nginx 配置为Web服务器吗
阅读之前,建议先阅读初识 Nginx. 之后,我们来了解一下 Nginx 配置. 抽象来说,将 Nginx 配置为 Web 服务器就是定义处理哪些 URLS 和如何处理这些URLS 对应的请求.具体来 ...
- NodeMCU入门(4):搭建Web服务器,配置网络连接
准备工作 1.NodeMCU模块 2.ESPlorer v0.2.0-rc6 3.NodeMCU-HTTP-Server 搭建web服务器 下载https://github.com/wangzexi/ ...
- CentOS 6.2下搭建Web服务器
1Centos 6.2下搭建web服务器 如今,Linux在Web应用越来越广,许多企业都采用Linux来搭建Web服务器,这样即节省了购买正版软件的费用,而且还能够提高服务器的安全性. 之前我们介绍 ...
随机推荐
- tomcat占用cpu比较多
在Linux中当Tomcat启动后,我们只是去查看应用是否能够正常访问来判断Tomcat启动是否正常.一般情况下这样看是没有问题的,但是有时候我们会发现当Tomcat使用了一段时间后,开始出现CPU或 ...
- windows+mysql集群搭建-三分钟搞定集群
注:本文来源: 陈晓婵 < windows+mysql集群搭建-三分钟搞定集群 > 一:mysql集群搭建教程-基础篇 计算机一级考试系统要用集群,目标是把集群搭建起来,保证一 ...
- 十大web安全扫描工具
本文来源:绿盟整理 <十大web安全扫描工具> 十大web安全扫描工具 扫描程序可以在帮助造我们造就安全的Web 站点上助一臂之力,也就是说在黑客"黑"你之前, 先测 ...
- rbac(基于角色权限控制)-------权限管理
权限管理 创建一个rbac和app的应用,这个rbac主要是用来存放权限的,全称叫做基于角色权限控制 一.先看配置文件合适不,给创建的rbac在配置文件里面设置一下 找到INSTALLED_APPS= ...
- 【kafka】设置指定topic和group_id消耗的offset
该博文方法有问题,正确方案在http://www.cnblogs.com/dplearning/p/7992994.html 背景: 搭建了一个kafka集群,建立了topic test,用group ...
- JSP 指令 脚本元素 表达式 声明
一.page指令 1. 可以使用page指令来控制JSP转换器转换当前JSP页 面的某些方面.例如,可以告诉JSP用于转换隐式对象 out的缓冲器的大小.内容类型,以及需要导入的Java 类型,等等. ...
- Deal with Warning: mysqli::__construct(): (HY000/2002)
1.安装XAMPP之后,如果之前安装过MySQL或者 apache,启动XAMPP中的响应的服务的时候回出现报错, 出错的原因,具体看报错的原因,如果是端口占用,在配置中修改端口号,如果是提示 “Fo ...
- base64解密
问题 : base64解密 时间限制: 1 Sec 内存限制: 128 MB 题目描述 Base64编码要求把3个8位字节(3*8=24)转化为4个6位的字节(4*6=24),之后在6位的前面补两个 ...
- shell脚本批量创建用户
#!/bin/bash DATE=$(date +%F_%T) USER_FILE=user.txt echo_color() { == "green" ];then echo - ...
- Vue自定义class覆盖第三方组件原有样式
一个vue文件可以写多个<style></style>, 如果在style加上socped代表本组件的样式,不污染全局. 如果需要覆盖第三方组件样式,则不能加scoped,因此 ...
