Ajax技术使用之ajax与模态框结合的妙用
Ajax技术使用之ajax与模态框结合的妙用
要求:
使用ajax的方式提交数据:https://www.cnblogs.com/-wenli/p/10470063.html
使用模态框完成增加数据,能完成增加,删除与修改也就很简单了。
HTML代码
关于在django中引用静态文件:https://www.cnblogs.com/-wenli/p/10470063.html
关于使用的css样式:https://v3.bootcss.com/css/
<!DOCTYPE html>
<html lang="en">
<head>
<meta charset="UTF-8">
{%load staticfiles%}
<link rel="stylesheet" href="{% static '/plugins/bootstrap-3.3.7-dist/css/bootstrap.css' %}">
<link rel="stylesheet" href="{% static '/plugins/font-awesome-4.7.0/font-awesome-4.7.0/css/font-awesome.css' %}">
<script src="{% static '/js/jquery/jquery-3.3.1.js' %}"></script>
<title>Title</title>
</head>
<body> <div class="container">
<div>
<a type="button" class="btn btn-primary" id="addBtn">添加</a>
</div>
<div>
<table border="1" class="table table-bordered">
<thead>
<tr>
<th>ID</th>
<th>姓名</th>
<th>年龄</th>
<th>性别</th>
<th>班级</th>
<th>住址</th>
<th>行为</th>
</tr>
</thead>
<tbody>
{% for row in stu_list %}
<tr>
<td>
{{ row.id }}
</td>
<td>
{{ row.username }}
</td>
<td>
{{ row.age }}
</td>
<td>
{{ row.gender }}
</td>
<td>
{{ row.cs.title }}
</td>
<td>
{{ row.address }}
</td>
<td>
<a type="button" class="btn btn-primary" href="/delstudent.html?nid={{ row.id }}">删除</a>
<span class="glyphicon glyphicon-remove" aria-hidden="true"></span>
<a type="button" class="btn btn-primary" href="/altstudent.html?nid={{ row.id }}">编辑</a>
<span class="fa fa-edit" aria-hidden="true"></span> </td>
</tr>
{% endfor %}
</tbody>
</table>
</div>
</div> <!--<!– Button trigger modal –>-->
<!--<button type="button" class="btn btn-primary btn-lg" data-toggle="modal" data-target="#myModal">-->
<!--Launch demo modal-->
<!--</button>-->
<!--默认通过id相同来关联使用-->
<!-- Modal -->
<div class="modal fade" id="addModal" tabindex="-1" role="dialog" aria-labelledby="myModalLabel">
<div class="modal-dialog" role="document">
<div class="modal-content">
<div class="modal-header">
<button type="button" class="close" data-dismiss="modal" aria-label="Close"><span aria-hidden="true">×</span>
</button>
<h4 class="modal-title" id="myModalLabel">创建学生</h4>
</div> <div class="modal-body"> <div class="form-group">
<label for="exampleInputEmail1">姓名:</label>
<input type="text" class="form-control" id="exampleInputEmail1" name="username" placeholder="name">
</div> <div class="form-group">
<label for="exampleInput">年龄:</label>
<input type="text" class="form-control" id="exampleInput" name="age" placeholder="age">
</div> <div class="form-group">
<label for="exampleInputEmail1">性别:</label>
<label class="checkbox-inline">
<input type="radio" name="gender" value="1"> 男
</label>
<label class="checkbox-inline">
<input type="radio" name="gender" value="0"> 女
</label>
<div> <div class="form-group">
<select class="form-control" name="class">
{% for row in obj %}
<option value="{{ row.id }}">{{ row.title }}</option>
{% endfor %}
</select>
<div> <div class="form-group">
<label for="exampleInputEmail1">住址:</label>
<input type="text" class="form-control" id="exampleInputaddress" placeholder="address" name="address">
</div> </div>
<div class="modal-footer">
<span id="errMsg" style="color:red;"></span>
<button type="button" class="btn btn-default" data-dismiss="modal">Close</button>
<button type="button" class="btn btn-primary" id="btnSave">确定</button>
</div> </div>
</div>
</div> <script src="{% static '/plugins/bootstrap-3.3.7-dist/js/bootstrap.js' %}"></script>
<script>
<!--#调用函数-->
<!--页面加载完后执行的函数 -->
$(function(){
bindEvent();
bindSave();
});
<!--#绑定函数-->
function bindEvent(){
$('#addBtn').click(function(){
$('#addModal').modal('show');
<!--#通过js的方法调用模态对话框-->
})
}
function bindSave(){ $('#btnSave').click(function(){
var postData={};
<!--#在id为addModal的标签下找input与select标签-->
$('#addModal').find('input,select').each(function(){
console.log(this);
var v =$(this).val();
var n=$(this).attr('name');
if(n=='gender'){
if($(this).prop('checked')){
postData[n]=v;
}
}
else{
postData[n]=v;
}
});
console.log(postData) $.ajax({
url:"/addstudent.html/",
type:'POST',
data:postData,
success:function(arg){
console.log(arg);
<!--JSON.parse()将字符串转换为字典-->
var dict=JSON.parse(arg);
if(dict.status){
window.location.reload();
}
else{
$('#errMsg').text(dict.message);
} }
}) }) } </script>
</body>
</html>
视图函数
 from django.shortcuts import render,HttpResponse,redirect

 from app01 import models

 def get_student(request):

     stu_list = models.Student.objects.all()

     obj = models.Classes.objects.all()

     print(stu_list)

     print(obj)

     # return HttpResponse('ok')

     return render(request, "get_student.html", {'stu_list': stu_list,'obj':obj})

 def add_student(request):

     response={'status':True,'message':None}

     try:

         name = request.POST.get('username')

         age = request.POST.get('age')

         gender = request.POST.get('gender')

         cs_id = request.POST.get('class')

         address = request.POST.get('address')

         print(name, age, gender, cs_id, address)

         models.Student.objects.create(username=name, age=age, gender=gender, cs_id=cs_id, address=address)

     except Exception as e:

         response['status']=False

         response['message']='用户输入错误'

     import json

     result=json.dumps(response,ensure_ascii=False)

     return HttpResponse(result)

         # ret=models.Classes.objects.all().values('title')

         # for Title in ret:

         #     if Title['title']==title:

         #         print(Title)

         # 注意这里是url路径

 def del_student(request):

     nid = request.GET.get('nid')

     print(nid)

     ret = models.Student.objects.filter(id=nid).delete()

     print(ret)

     return redirect('/student.html/')

 def alt_student(request):

     if request.method=="GET":

         nid = request.GET.get('nid')

         obj=models.Student.objects.filter(id=nid)[0]

         cs_list = models.Classes.objects.all()

         return render(request,'alt_student.html',locals())

     elif request.method=="POST":

         nid=request.GET.get("nid")

         name = request.POST.get('name')

         age = request.POST.get('age')

         gender = request.POST.get('gender')

         cs_id = request.POST.get('class')

         address = request.POST.get('address')

         print(name, age, gender, cs_id, address)

         # models.Student.objects.filter(id=nid).update(username=name,age=age,gender=gender,cs_id=cs_id,address=address)

         return redirect("/student.html/")
路由
 from django.contrib import admin

 from django.urls import path

 from app01.views import *

 urlpatterns = [

 path('altclasses.html/',alt_classes),

 path('student.html/', get_student),

 path('addstudent.html/',add_student),

 path('delstudent.html/',del_student),

 ]
具体实现测试

代码分析:
使用ajax提交数据

url:提交地址
type:数据传输的方式,支持所有http方法
data:传输的数据为键值对格式
succes:function(arg){
//执行代码
}
这个函数只有服务端返回的信息到达客户端才会执行,这个很重要,比如添加完数据,在函数里自动刷新页面,如果数据格式错误,将服务端返回的信息,在这里就行处理,显示到页面上。
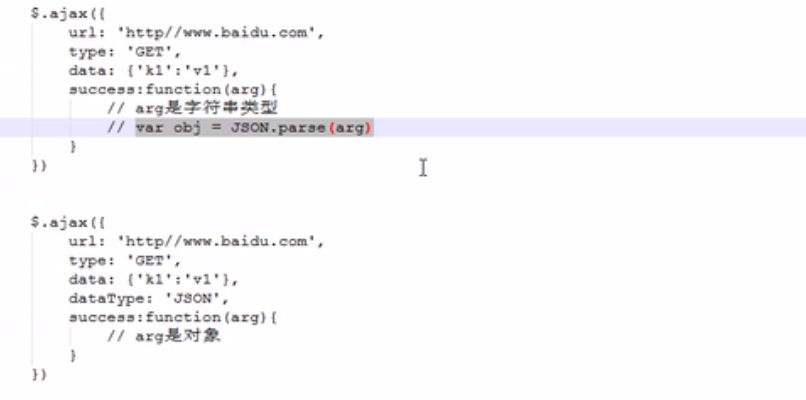
而arg为服务端返回的数据,为字符串
这里就要补充一下在python下,以及javascript下的序列化。

如果我们使用下面第一种方法,需要自行进行反序列化,JSON.parse()。
如果使用第二种方法:只需要加上dataType:'JSON',ajax自动帮我们完成反序列化。

绑定模态框
找到

id="addModal"的div:为模态框

id="addBtn"的a标签:为添加按钮

我们需要为按钮绑定事件,点击按钮就会出现模态框
  function bindEvent(){

        $('#addBtn').click(function(){

            $('#addModal').modal('show');

            <!--#通过js的方法调用模态对话框-->

        })

     }
注意 :

$('#addModal').modal('show');

为js的方式打开模态框。
获取模态框里的数据,并发送

我们的思路是获取标签的name属性与标签里的值,构成字典发送过去,注意这里面会获取两次radio,去掉我们没有选择的radio,我们点击选择的radio会有属性。
1.绑定事件,确定的时候提交数据,触发事件
找到模态框与确定按钮的id
$('#btnSave').click(function(
2.创建空字典
var postData={}
3.
首先所有获取所有的input与select标签
$('#addModal').find('input,select').each(function(
4.
打印获取到的标签
将所有标签的值赋给v
将所有标签的name属性的值赋给n
 console.log(this);

 var v =$(this).val();

 var n=$(this).attr('name');
5.
如果n的属性里有gender则进行剔除,最后赋值,打印一遍符合要求的标签
  if(n=='gender'){

                if($(this).prop('checked')){

                    postData[n]=v;

                }

            }

            else{

            postData[n]=v;

            }

            });

            console.log(postData)
6.最后发送数据。
补充知识点:
$('#fm').serialize()
Ajax技术使用之ajax与模态框结合的妙用的更多相关文章
- 《所用到的AJAX技术基础》
来自百度网页,w3cshool网页:AJAX = Asychronous JavaScript and XML,翻译成中文为:异步的JavaScript XML. 异步的意思就是不重新加载整个页面,后 ...
- Ajax 技术一
一.Ajax概述 1.历史起源 1998年,微软公司Outlook Web Access研发小组在当时的IE浏览器中集成了一种技术,可以在客户端无刷新的前提下向服务器端发送Http请求,这门技术称之为 ...
- Ajax技术使用(一)
Ajax技术使用 目录 AJAX介绍 XMLHttpRequest 请求和响应 onreadystatechange 事件 AJAX介绍 什么是 AJAX AJAX = 异步 JavaScript 和 ...
- day64—ajax技术学习笔记
转行学开发,代码100天——2018-05-19 Ajax技术学习笔记 AJAX = Asynchronous JavaScript and XML(异步的 JavaScript 和 XML).AJA ...
- 从头开始一步一步实现EF6+Autofac+MVC5+Bootstarp极简前后台ajax表格展示及分页(二)前端修改、添加表格行点击弹出模态框
在前一篇中,由于不懂jquery,前端做的太差了,今天做稍做修改,增加一个跳转到指定页面功能,表格行点击样式变化.并且在表格中加入bootstarp的按钮组,按钮点击后弹出模态框,须修改common, ...
- 使用ajax请求,模态框调用并更改密码
前端页面 <a href="javascript:void(0);" onclick="changPassword()"> <i class= ...
- Asp.net MVC利用Ajax.BeginForm实现bootstrap模态框弹出,并进行前段验证
1.新建Controller public ActionResult Index() { return View(); } public ActionResult Person(int? id) { ...
- Ajax发送请求等待时弹出模态框等待提示
主要的代码分为两块,一个是CSS定义模态框,另一个是在Ajax中弹出模态框. 查看菜鸟教程中的模态框教程demo,http://www.runoob.com/try/try.php?filename= ...
- bootstrap模态框动态赋值, ajax异步请求数据后给id为queryInfo的模态框赋值并弹出模态框(JS)
/查询单个 function query(id) { $.ajax({ url : "/small/productServlet", async : true, type : &q ...
随机推荐
- js new一个函数和直接调用函数的区别
用new和调用一个函数的区别:如果函数返回值是一个值类型(Number.String.Boolen)时,new函数将会返回这个函数的实例对象,而如果这个函数的返回值是一个引用类型(Object.Arr ...
- webpack2配置备份
package.json: { "name": "leyi", "version": "1.0.0", "ma ...
- 网络编程—tcp
一.TCP简介 TCP介绍 TCP协议,传输控制协议(英语:Transmission Control Protocol,缩写为 TCP)是一种面向连接的.可靠的.基于字节流的传输层通信协议,由IETF ...
- Nginx详解二十五:Nginx架构篇之Nginx常见的问题
Nginx常见的问题 1.相同server_name多个虚拟主机优先级访问,是按读取文件的优先级来排序 在/opt/app/下准备3个code文件夹,下面放入3个html文件,里面的内容分别是code ...
- 启动tomcat出现内存溢出错误 java.lang.OutOfMemoryError: PermGen space
三种因素引起: 1.jvm(jdk)的内存引起. 2. eclipse的内存引起. 3.tomcat的内存引起. 1.解决方法: 2.解决方法: 解决问题的方式就是:修改了安装目录eclipse.in ...
- 关于Mybaits10种通用的写法
用来循环容器的标签forEach,查看例子 foreach元素的属性主要有item,index,collection,open,separator,close. item:集合中元素迭代时的别名, i ...
- 彻头彻尾理解 LinkedHashMap
HashMap和双向链表合二为一即是LinkedHashMap.所谓LinkedHashMap,其落脚点在HashMap,因此更准确地说,它是一个将所有Entry节点链入一个双向链表的HashMap. ...
- 步步为营103-ZTree 二级联动
1:添加引用 <%--流程类别多选--引用js和css文件--开始--%> <link rel="stylesheet" href="../css/zT ...
- 常见的爬虫分析库(2)-xpath语法
xpath简介 1.xpath使用路径表达式在xml和html中进行导航 2.xpath包含标准函数库 3.xpath是一个w3c的标准 xpath节点关系 1.父节点 2.子节点 3.同胞节点 4. ...
- Django的Session存储Redis环境配置
第一步:在项目目录下的settings.py中MIDDLEWARE中加上中间件: # session中间件Django项目默认启用Session 'django.contrib.sessions.mi ...
