张高兴的 Windows 10 IoT 开发笔记:BH1750FVI 光照度传感器
BH1750FVI 是一款 IIC 接口的数字型光强度传感器集成电路。下面介绍一下其在 Windows 10 IoT Core 环境下的用法。
项目运行在 Raspberry Pi 2/3 上,使用 C# 进行编码。
1. 准备
包含 BH1750FVI 的传感器,这里选择的是淘宝上最多的 GY-30;Raspberry Pi 2/3 一块,环境为 Windows 10 IoT Core;公母头杜邦线 4-5 根
2. 连线
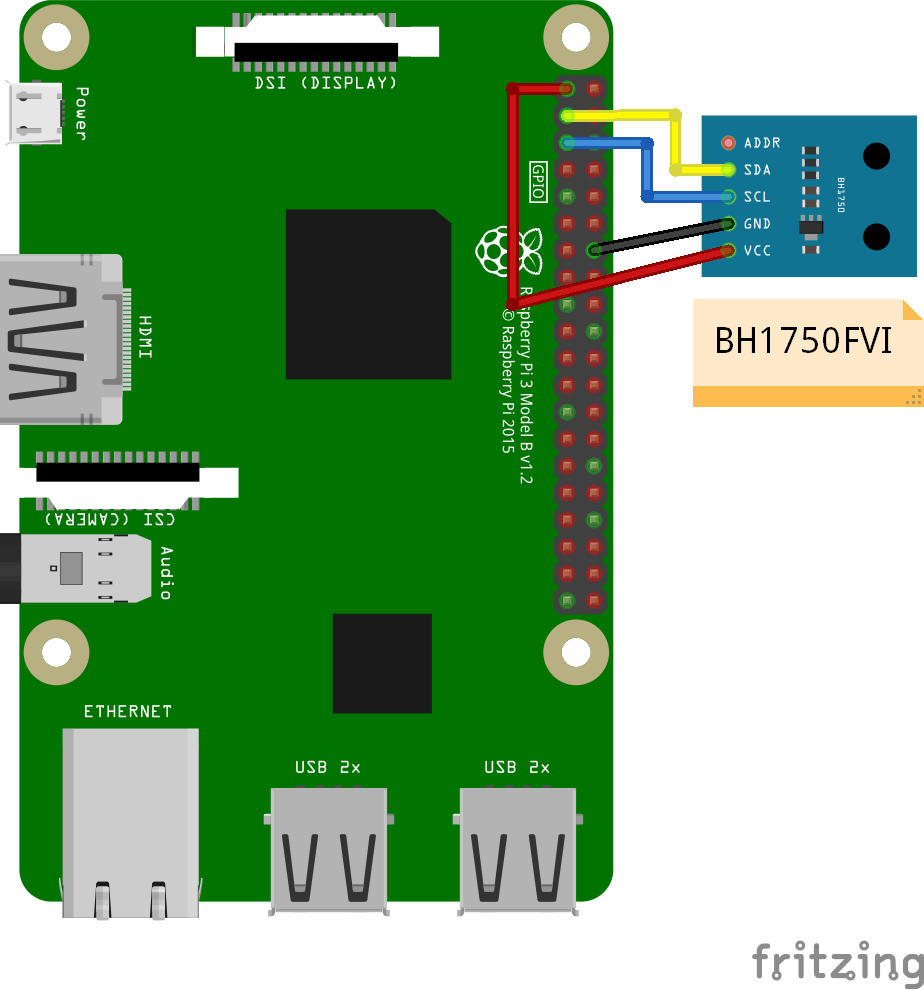
Raspberry Pi 2/3 的引脚如图

由于采用的是 IIC 通信方式,因此我们需要把 GY-30 上的 SDA 与 Pin3 相连,SCL 与 Pin5 相连。VCC 接 3.3V,GND 接地。ADD 决定了传感器的地址,将其连接至 VCC ≥ 0.7 V 的时候,地址为 0x5C,接地时为 0x23。可以不连接。
SDA - Pin3
SCL - Pin5
VCC - 3.3V
GND - GND
3. 代码
GitHub : https://github.com/ZhangGaoxing/windows-iot-demo/tree/master/BH1750FVIDemo
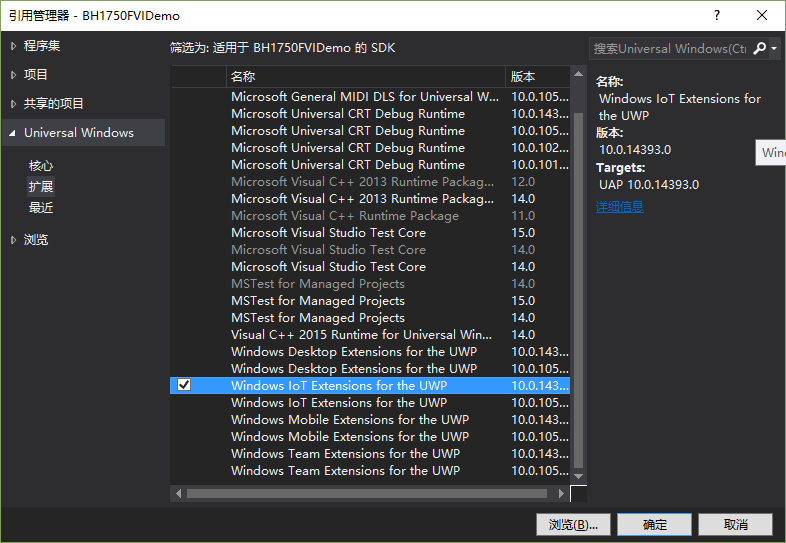
需要新建一个 Windows 通用 项目 ,并且添加引用 Windows IoT Extensions for the UWP
在项目中添加一个 C# 代码文件 BH1750FVI.cs,代码如下
using System;

using System.Threading.Tasks;

using Windows.Devices.I2c;

namespace BH1750FVIDemo

{

    /// <summary>

    /// I2C Address Setting

    /// </summary>

    enum AddressSetting

    {

        /// <summary>

        /// ADD Pin connect to high power level

        /// </summary>

        AddPinHigh = 0x5C,

        /// <summary>

        /// ADD Pin connect to low power level

        /// </summary>

        AddPinLow = 0x23

    };

    /// <summary>

    /// The mode of measuring

    /// </summary>

    enum MeasurementMode

    {

        /// <summary>

        /// Start measurement at 1 lx resolution

        /// </summary>

        ContinuouslyHighResolutionMode = 0x10,

        /// <summary>

        /// Start measurement at 0.5 lx resolution

        /// </summary>

        ContinuouslyHighResolutionMode2 = 0x11,

        /// <summary>

        /// Start measurement at 4 lx resolution

        /// </summary>

        ContinuouslyLowResolutionMode = 0x13,

        /// <summary>

        /// Start measurement at 1 lx resolution once

        /// </summary>

        OneTimeHighResolutionMode = 0x20,

        /// <summary>

        /// Start measurement at 0.5 lx resolution once

        /// </summary>

        OneTimeHighResolutionMode2 = 0x21,

        /// <summary>

        /// Start measurement at 4 lx resolution once

        /// </summary>

        OneTimeLowResolutionMode = 0x23

    }

    /// <summary>

    /// Setting light transmittance

    /// </summary>

    enum LightTransmittance

    {

        Fifty,

        Eighty,

        Hundred,

        Hundred_Twenty,

        Hundred_Fifty,

        Two_Hundred

    }

    class BH1750FVI

    {

        I2cDevice sensor;

        private byte sensorAddress;

        private byte sensorMode;

        private byte sensorResolution = ;

        private double sensorTransmittance = ;

        private byte registerHighVal = 0x42;

        private byte registerLowVal = 0x65;

        /// <summary>

        /// Constructor

        /// </summary>

        /// <param name="address">Enumeration type of AddressSetting</param>

        /// <param name="mode">Enumeration type of MeasurementMode</param>

        public BH1750FVI(AddressSetting address, MeasurementMode mode)

        {

            sensorAddress = (byte)address;

            sensorMode = (byte)mode;

            if (mode == MeasurementMode.ContinuouslyHighResolutionMode2 || mode == MeasurementMode.OneTimeHighResolutionMode2)

            {

                sensorResolution = ;

            }

        }

        /// <summary>

        /// Constructor

        /// </summary>

        /// <param name="address">Enumeration type of AddressSetting</param>

        /// <param name="mode">Enumeration type of MeasurementMode</param>

        /// <param name="transmittance">Enumeration type of LightTransmittance</param>

        public BH1750FVI(AddressSetting address, MeasurementMode mode, LightTransmittance transmittance)

        {

            sensorAddress = (byte)address;

            sensorMode = (byte)mode;

            if (mode == MeasurementMode.ContinuouslyHighResolutionMode2 || mode == MeasurementMode.OneTimeHighResolutionMode2)

            {

                sensorResolution = ;

            }

            switch (transmittance)

            {

                case LightTransmittance.Fifty:

                    {

                        registerHighVal = 0x44;

                        registerLowVal = 0x6A;

                        sensorTransmittance = 0.5;

                    }

                    break;

                case LightTransmittance.Eighty:

                    {

                        registerHighVal = 0x42;

                        registerLowVal = 0x76;

                        sensorTransmittance = 0.8;

                    }

                    break;

                case LightTransmittance.Hundred:

                    {

                        registerHighVal = 0x42;

                        registerLowVal = 0x65;

                    }

                    break;

                case LightTransmittance.Hundred_Twenty:

                    {

                        registerHighVal = 0x41;

                        registerLowVal = 0x7A;

                        sensorTransmittance = 1.2;

                    }

                    break;

                case LightTransmittance.Hundred_Fifty:

                    {

                        registerHighVal = 0x41;

                        registerLowVal = 0x7E;

                        sensorTransmittance = 1.5;

                    }

                    break;

                case LightTransmittance.Two_Hundred:

                    {

                        registerHighVal = 0x41;

                        registerLowVal = 0x73;

                        sensorTransmittance = ;

                    }

                    break;

            }

        }

        /// <summary>

        /// Initialize BH1750FVI

        /// </summary>

        public async Task InitializeAsync()

        {

            var settings = new I2cConnectionSettings(sensorAddress);

            settings.BusSpeed = I2cBusSpeed.FastMode;

            var controller = await I2cController.GetDefaultAsync();

            sensor = controller.GetDevice(settings);

            sensor.Write(new byte[] { 0x01 });

            sensor.Write(new byte[] { registerHighVal });

            sensor.Write(new byte[] { registerLowVal });

        }

        /// <summary>

        /// Read data from BH1750FVI

        /// </summary>

        /// <returns>A double type contains data</returns>

        public double Read()

        {

            byte[] readBuf = new byte[];

            sensor.WriteRead(new byte[] { sensorMode }, readBuf);

            byte temp = readBuf[];

            readBuf[] = readBuf[];

            readBuf[] = temp;

            double result = BitConverter.ToUInt16(readBuf, ) / (1.2 * sensorResolution * sensorTransmittance);

            return result;

        }

        /// <summary>

        /// Cleanup

        /// </summary>

        public void Dispose()

        {

            sensor.Dispose();

        }

    }

}
下面解释如何使用
代码包含三个枚举类型,两个构造函数,三个方法。
第一步调用构造函数将 BH1750FVI 实例化。
第二步调用 InitializeAsync() 初始化 I2C 设备
第三步调用 Read() 读取数据,返回的是一个 double 类型的值
当需要关闭设备时,调用 Dispose()
张高兴的 Windows 10 IoT 开发笔记:BH1750FVI 光照度传感器的更多相关文章
- 张高兴的 Windows 10 IoT 开发笔记:使用 ADS1115 读取模拟信号
考虑到 Raspberry Pi 读取模拟信号是很烦人的事情,更何况是在没人玩的 Windows 10 IoT 下,所以准备正儿八经的写点东西. 需求:使用 Raspberry Pi 读取输出模拟信号 ...
- 张高兴的 Windows 10 IoT 开发笔记:使用 Lightning 中的软件 PWM 驱动 RGB LED
感觉又帮 Windows 10 IoT 开荒了,所以呢,正儿八经的写篇博客吧.其实大概半年前就想写的,那时候想做个基于 Windows 10 IoT 的小车,但树莓派原生不支持 PWM 啊.百度也搜不 ...
- 张高兴的 Windows 10 IoT 开发笔记:HC-SR04 超声波测距模块
HC-SR04 采用 IO 触发测距.下面介绍一下其在 Windows 10 IoT Core 环境下的用法. 项目运行在 Raspberry Pi 2/3 上,使用 C# 进行编码. 1. 准备 H ...
- 张高兴的 Windows 10 IoT 开发笔记:部署 ASP.NET Core 2 应用
今天是大年初二,都去走亲戚了吧,享受一下这难得的能和亲友相聚的时光.而我就不一样了,今天一回到家就又开始瞎折腾了,哈哈哈. 问题背景 最近花了点时间用 ASP.NET Core 2 写了个个人博客,中 ...
- 张高兴的 Windows 10 IoT 开发笔记:串口红外编解码模块 YS-IRTM
This is a Windows 10 IoT Core project on the Raspberry Pi 2/3, coded by C#. GitHub: https://github.c ...
- 张高兴的 Windows 10 IoT 开发笔记:无线收发芯片 nRF24L01
This is a Windows 10 IoT Core project on the Raspberry Pi 2/3, coded by C#. GitHub:https://github.co ...
- 张高兴的 Windows 10 IoT 开发笔记:FM 电台模块 KT0803L
This is a Windows 10 IoT Core project on the Raspberry Pi 2/3, coded by C#. GitHub:https://github.co ...
- 张高兴的 Windows 10 IoT 开发笔记:0.96 寸 I2C OLED
This is a Windows 10 IoT Core project on the Raspberry Pi 2/3, coded by C#. GitHub:https://github.co ...
- 张高兴的 Windows 10 IoT 开发笔记:使用 MAX7219 驱动数码管
This is a Windows 10 IoT Core project on the Raspberry Pi 2/3, coded by C#. GitHub:https://github.co ...
随机推荐
- Swing-JFileChooser的使用
JFileChooser文件选择器是Swing中经常用到的一个控件.它的使用主要包含以下几个参数: 1.当前路径.也就是它第一次打开时所在的路径,许多软件喜欢设置为桌面. 2.文件过滤器.通过设置文件 ...
- JFrame常用属性设置模板
最近在学习Swing,在各种demo中都需要构建JFrame,于是我决定把构建JFrame的代码贴上来,以后就直接复制粘贴了. public static void main(String[] arg ...
- 纳税服务系统【抽取BaseService、条件查询】
抽取BaseService 到目前为止,我们已经写了三个模块的开发了.我们已经抽取过了BaseAction.BaseDao,我们这次来看看我们的Service接口. UserService /** * ...
- Spring - bean的依赖关系(depends-on属性)
depends-on是bean标签的属性之一,表示一个bean对其他bean的依赖关系.乍一想,不是有ref吗?其实还是有区别的,<ref/>标签是一个bean对其他bean的引用,而de ...
- 7z命令行 极限压缩指令
摘抄自http://www.cnblogs.com/qanholas/archive/2011/10/03/2198487.html 7za a -t7z bag.7z "/home/fil ...
- Django实现内容缓存
1.缓存的简介 在动态网站中,用户所有的请求,服务器都会去数据库中进行相应的增,删,查,改,渲染模板,执行业务逻辑,最后生成用户看到的页面. 当一个网站的用户访问量很大的时候,每一次的的后台操作,都会 ...
- SIT 和 UAT
在企业级软件的测试过程中,经常会划分为三个阶段--单元测试,SIT和UAT,如果开发人员足够,通常还会在SIT之前引入代码审查机制(Code Review)来保证软件符合客户需求且流程正确.下面简单介 ...
- 一篇搞定Python正则表达式
1. 正则表达式语法 1.1 字符与字符类 1 特殊字符:\.^$?+*{}[]()| 以上特殊字符要想使用字面值,必须使用\进行转义 2 字符类 1. 包含在[]中的一个或者多个字符被称为字符 ...
- [js高手之路] 设计模式系列课程 - 迭代器(1)
迭代器是指通过一种形式依次遍历数组,对象,或者类数组结构中的每个元素. 常见的有jquery中的each方法, ES5自带的forEach方法. 下面我们就来自定义一个类似jquery或者ES5的迭代 ...
- 翻译连载 |《你不知道的JS》姊妹篇 |《JavaScript 轻量级函数式编程》- 引言&前言
原文地址:Functional-Light-JS 原文作者:Kyle Simpson-<You-Dont-Know-JS>作者 译者团队(排名不分先后):阿希.blueken.brucec ...