SpringSecurity 默认表单登录页展示流程源码
SpringSecurity 默认表单登录页展示流程源码
本篇主要讲解 SpringSecurity提供的默认表单登录页 它是如何展示的的流程,
涉及
1.FilterSecurityInterceptor,
2.ExceptionTranslationFilter ,
3.DefaultLoginPageGeneratingFilter 过滤器,
并且简单介绍了 AccessDecisionManager 投票机制
1.准备工作(体验SpringSecurity默认表单认证)
1.1 创建SpringSecurity项目
先通过IDEA 创建一个SpringBoot项目 并且依赖SpringSecurity,Web依赖

此时pom.xml会自动添加
<dependency>

        <groupId>org.springframework.boot</groupId>

        <artifactId>spring-boot-starter-security</artifactId>

</dependency>
1.2 提供一个接口
@RestController

public class HelloController {

@RequestMapping("/hello")

public String hello() {

    return "Hello SpringSecurity";

  }

}
1.3 启动项目
直接访问 提供的接口
http://localhost:8080/hello
会发现浏览器被直接重定向到了 /login 并且显示如下默认的表单登录页
http://localhost:8080/login

1.4 登录
在启动项目的时候 控制台会打印一个 seuciryt password : xxx
Using generated security password: f520875f-ea2b-4b5d-9b0c-f30c0c17b90b
直接登录
用户名:user 密码 :f520875f-ea2b-4b5d-9b0c-f30c0c17b90b
登录成功并且 浏览器又会重定向到 刚刚访问的接口

2.springSecurityFilterchain 过滤器链
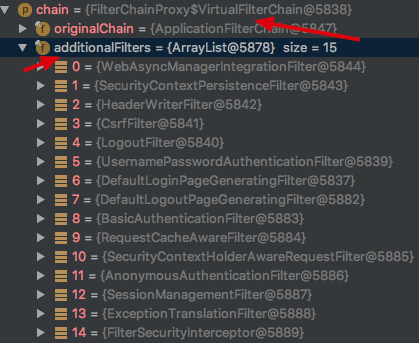
如果你看过我另一篇关于SpringSecurity初始化源码的博客,那么你一定知道当SpringSecurity项目启动完成后会初始化一个 springSecurityFilterchain 它内部 additionalFilters属性初始化了很多Filter 如下
所有的请求都会经过这一系列的过滤器 Spring Security就是通过这些过滤器 来进行认证授权等

3.FilterSecurityInterceptor (它会判断这次请求能否通过)
FilterSecurityInterceptor是过滤器链中最后一个过滤器,主要用于判断请求能否通过,内部通过AccessDecisionManager 进行投票判断
当我们未登录访问
http://localhost:8080/hello
请求会被 FilterSecurityInterceptor 拦截
public void doFilter(ServletRequest request, ServletResponse response,

		FilterChain chain) throws IOException, ServletException {

	FilterInvocation fi = new FilterInvocation(request, response, chain);

	invoke(fi);

}
重点看invoke方法
public void invoke(FilterInvocation fi) throws IOException, ServletException {

	if ((fi.getRequest() != null)

			&& (fi.getRequest().getAttribute(FILTER_APPLIED) != null)

			&& observeOncePerRequest) {

		// filter already applied to this request and user wants us to observe

		// once-per-request handling, so don't re-do security checking

		fi.getChain().doFilter(fi.getRequest(), fi.getResponse());

	}

	else {

		// first time this request being called, so perform security checking

		if (fi.getRequest() != null && observeOncePerRequest) {

			fi.getRequest().setAttribute(FILTER_APPLIED, Boolean.TRUE);

		}

		InterceptorStatusToken token = super.beforeInvocation(fi);

		try {

			fi.getChain().doFilter(fi.getRequest(), fi.getResponse());

		}

		finally {

			super.finallyInvocation(token);

		}

		super.afterInvocation(token, null);

	}

}
源码中有这样一句,其实就是判断当前用户是否能够访问指定的接口,可以则执行 fi.getChain().doFilter 调用访问的接口
否则 内部会抛出异常
InterceptorStatusToken token = super.beforeInvocation(fi);
beforeInvocation 方法内部是通过 accessDecisionManager 去做决定的
Spring Security已经内置了几个基于投票的AccessDecisionManager包括(AffirmativeBased ,ConsensusBased ,UnanimousBased)当然如果需要你也可以实现自己的AccessDecisionManager
使用这种方式,一系列的AccessDecisionVoter将会被AccessDecisionManager用来对Authentication是否有权访问受保护对象进行投票,然后再根据投票结果来决定是否要抛出AccessDeniedException
this.accessDecisionManager.decide(authenticated, object, attributes);
AffirmativeBased的 decide的实现如下
public void decide(Authentication authentication, Object object, Collection<ConfigAttribute> configAttributes) throws AccessDeniedException {

    int deny = 0;

    Iterator var5 = this.getDecisionVoters().iterator();

    while(var5.hasNext()) {

        AccessDecisionVoter voter = (AccessDecisionVoter)var5.next();

        int result = voter.vote(authentication, object, configAttributes);

        if (this.logger.isDebugEnabled()) {

            this.logger.debug("Voter: " + voter + ", returned: " + result);

        }

        switch(result) {

        case -1:

            ++deny;

            break;

        case 1:

            return;

        }

    }

    if (deny > 0) {

        throw new AccessDeniedException(this.messages.getMessage("AbstractAccessDecisionManager.accessDenied", "Access is denied"));

    } else {

        this.checkAllowIfAllAbstainDecisions();

    }

}
AffirmativeBased的逻辑是这样的:
   (1)只要有AccessDecisionVoter的投票为ACCESS_GRANTED则同意用户进行访问;

   (2)如果全部弃权也表示通过;

   (3)如果没有一个人投赞成票,但是有人投反对票,则将抛出AccessDeniedException。
当我们第一次访问的时候
http://localhost:8080/hello的时候
返回 result = -1 会抛出 AccessDeniedException 拒绝访问异常
4.ExceptionTranslationFilter (捕获AccessDeniedException异常)
该过滤器它会接收到FilterSecurityInterceptor抛出的 AccessDeniedException异常)并且进行捕获,然后发送重定向到/login请求
源码如下:
public void doFilter(ServletRequest req, ServletResponse res, FilterChain chain)

		throws IOException, ServletException {

	HttpServletRequest request = (HttpServletRequest) req;

	HttpServletResponse response = (HttpServletResponse) res;

	try {

		chain.doFilter(request, response);

		logger.debug("Chain processed normally");

	}

	catch (IOException ex) {

		throw ex;

	}

	catch (Exception ex) {

		// Try to extract a SpringSecurityException from the stacktrace

		Throwable[] causeChain = throwableAnalyzer.determineCauseChain(ex);

		RuntimeException ase = (AuthenticationException) throwableAnalyzer

				.getFirstThrowableOfType(AuthenticationException.class, causeChain);

		if (ase == null) {

			ase = (AccessDeniedException) throwableAnalyzer.getFirstThrowableOfType(

					AccessDeniedException.class, causeChain);

		}

		if (ase != null) {

			if (response.isCommitted()) {

				throw new ServletException("Unable to handle the Spring Security Exception because the response is already committed.", ex);

			}

			handleSpringSecurityException(request, response, chain, ase);

		}

		else {

			// Rethrow ServletExceptions and RuntimeExceptions as-is

			if (ex instanceof ServletException) {

				throw (ServletException) ex;

			}

			else if (ex instanceof RuntimeException) {

				throw (RuntimeException) ex;

			}

			// Wrap other Exceptions. This shouldn't actually happen

			// as we've already covered all the possibilities for doFilter

			throw new RuntimeException(ex);

		}

	}

}
当获取异常后 调用
handleSpringSecurityException(request, response, chain, ase);
handleSpringSecurityException 源码如下:
private void handleSpringSecurityException(HttpServletRequest request,

		HttpServletResponse response, FilterChain chain, RuntimeException exception)

		throws IOException, ServletException {

	if (exception instanceof AuthenticationException) {

		logger.debug(

				"Authentication exception occurred; redirecting to authentication entry point",

				exception);

		sendStartAuthentication(request, response, chain,

				(AuthenticationException) exception);

	}

	else if (exception instanceof AccessDeniedException) {

		Authentication authentication = SecurityContextHolder.getContext().getAuthentication();

		if (authenticationTrustResolver.isAnonymous(authentication) || authenticationTrustResolver.isRememberMe(authentication)) {

			logger.debug(

					"Access is denied (user is " + (authenticationTrustResolver.isAnonymous(authentication) ? "anonymous" : "not fully authenticated") + "); redirecting to authentication entry point",

					exception);

			sendStartAuthentication(

					request,

					response,

					chain,

					new InsufficientAuthenticationException(

						messages.getMessage(

							"ExceptionTranslationFilter.insufficientAuthentication",

							"Full authentication is required to access this resource")));

		}

		else {

			logger.debug(

					"Access is denied (user is not anonymous); delegating to AccessDeniedHandler",

					exception);

			accessDeniedHandler.handle(request, response,

					(AccessDeniedException) exception);

		}

	}

}
先判断获取的异常是否是AccessDeniedException 再判断是否是匿名用户,如果是则调用 sendStartAuthentication 重定向到登录页面
重定向登录页面之前会保存当前访问的路径,这就是为什么我们访问 /hello接口后 再登录成功后又会跳转到 /hello接口,因为在重定向到/login接口前 这里进行了保存 requestCache.saveRequest(request, response);
protected void sendStartAuthentication(HttpServletRequest request,

		HttpServletResponse response, FilterChain chain,

		AuthenticationException reason) throws ServletException, IOException {

	// SEC-112: Clear the SecurityContextHolder's Authentication, as the

	// existing Authentication is no longer considered valid

	SecurityContextHolder.getContext().setAuthentication(null);

	requestCache.saveRequest(request, response);

	logger.debug("Calling Authentication entry point.");

	authenticationEntryPoint.commence(request, response, reason);

}
authenticationEntryPoint.commence(request, response, reason);方法内部
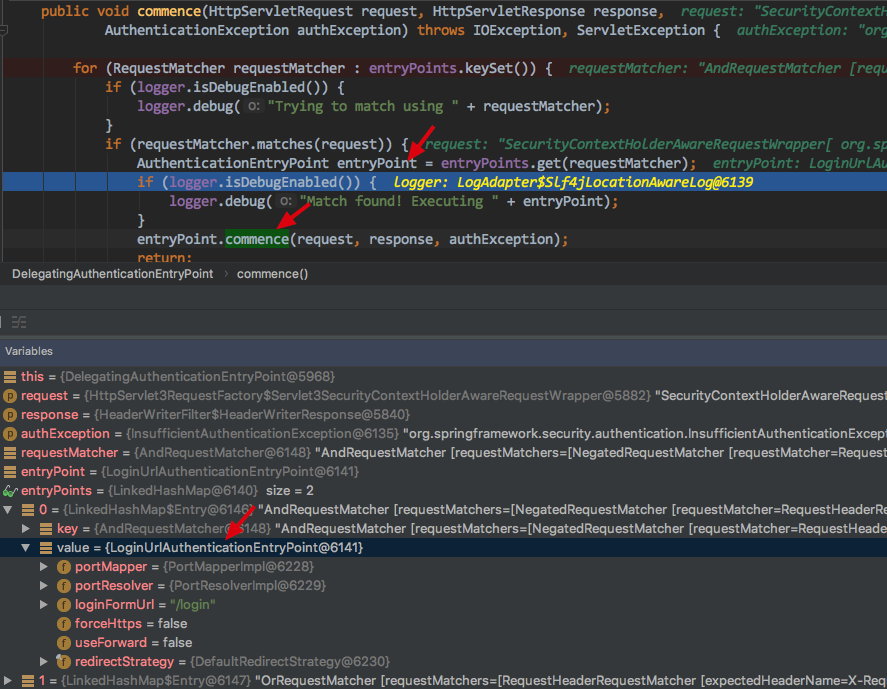
调用LoginUrlAuthenticationEntryPoint 的 commence方法

LoginUrlAuthenticationEntryPoint 的commence方法内部有 构造重定向URL的方法
redirectUrl = buildRedirectUrlToLoginPage(request, response, authException);

protected String buildRedirectUrlToLoginPage(HttpServletRequest request,

		HttpServletResponse response, AuthenticationException authException) {

	String loginForm = determineUrlToUseForThisRequest(request, response,

			authException);

protected String determineUrlToUseForThisRequest(HttpServletRequest request,

		HttpServletResponse response, AuthenticationException exception) {

	return getLoginFormUrl();

}
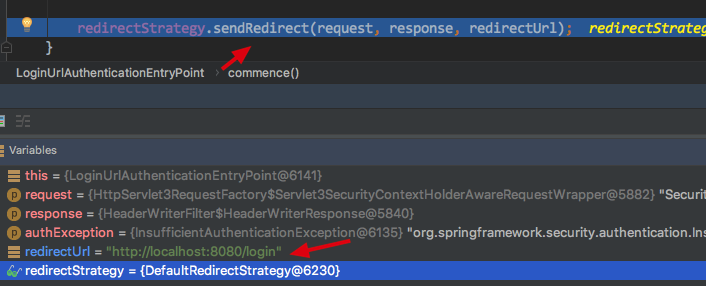
最终会获取到需要重定向的URL /login

然后sendRedirect 既会重定向到 /login 请求

5.DefaultLoginPageGeneratingFilter (会捕获重定向的/login 请求)
DefaultLoginPageGeneratingFilter是过滤器链中的一个用于捕获/login请求,并且渲染出一个默认表单页面
public void doFilter(ServletRequest req, ServletResponse res, FilterChain chain)

		throws IOException, ServletException {

	HttpServletRequest request = (HttpServletRequest) req;

	HttpServletResponse response = (HttpServletResponse) res;

	boolean loginError = isErrorPage(request);

	boolean logoutSuccess = isLogoutSuccess(request);

	if (isLoginUrlRequest(request) || loginError || logoutSuccess) {

		String loginPageHtml = generateLoginPageHtml(request, loginError,

				logoutSuccess);

		response.setContentType("text/html;charset=UTF-8");

		response.setContentLength(loginPageHtml.getBytes(StandardCharsets.UTF_8).length);

		response.getWriter().write(loginPageHtml);

		return;

	}

	chain.doFilter(request, response);

}
isLoginUrlRequest 判断请求是否是 loginPageUrl
private boolean isLoginUrlRequest(HttpServletRequest request) {

	return matches(request, loginPageUrl);

}
因为我们没有配置所以 默认的 loginPageUrl = /login

验证通过请求路径 能匹配 loginPageUrl
String loginPageHtml = generateLoginPageHtml(request, loginError,

				logoutSuccess);
generateLoginPageHtml 绘制默认的HTML 页面,到此我们默认的登录页面怎么来的就解释清楚了
private String generateLoginPageHtml(HttpServletRequest request, boolean loginError,

		boolean logoutSuccess) {

	String errorMsg = "Invalid credentials";

	if (loginError) {

		HttpSession session = request.getSession(false);

		if (session != null) {

			AuthenticationException ex = (AuthenticationException) session

					.getAttribute(WebAttributes.AUTHENTICATION_EXCEPTION);

			errorMsg = ex != null ? ex.getMessage() : "Invalid credentials";

		}

	}

	StringBuilder sb = new StringBuilder();

	sb.append("<!DOCTYPE html>\n"

			+ "<html lang=\"en\">\n"

			+ "  <head>\n"

			+ "    <meta charset=\"utf-8\">\n"

			+ "    <meta name=\"viewport\" content=\"width=device-width, initial-scale=1, shrink-to-fit=no\">\n"

			+ "    <meta name=\"description\" content=\"\">\n"

			+ "    <meta name=\"author\" content=\"\">\n"

			+ "    <title>Please sign in</title>\n"

			+ "    <link href=\"https://maxcdn.bootstrapcdn.com/bootstrap/4.0.0-beta/css/bootstrap.min.css\" rel=\"stylesheet\" integrity=\"sha384-/Y6pD6FV/Vv2HJnA6t+vslU6fwYXjCFtcEpHbNJ0lyAFsXTsjBbfaDjzALeQsN6M\" crossorigin=\"anonymous\">\n"

			+ "    <link href=\"https://getbootstrap.com/docs/4.0/examples/signin/signin.css\" rel=\"stylesheet\" crossorigin=\"anonymous\"/>\n"

			+ "  </head>\n"

			+ "  <body>\n"

			+ "     <div class=\"container\">\n");

	String contextPath = request.getContextPath();

	if (this.formLoginEnabled) {

		sb.append("      <form class=\"form-signin\" method=\"post\" action=\"" + contextPath + this.authenticationUrl + "\">\n"

				+ "        <h2 class=\"form-signin-heading\">Please sign in</h2>\n"

				+ createError(loginError, errorMsg)

				+ createLogoutSuccess(logoutSuccess)

				+ "        <p>\n"

				+ "          <label for=\"username\" class=\"sr-only\">Username</label>\n"

				+ "          <input type=\"text\" id=\"username\" name=\"" + this.usernameParameter + "\" class=\"form-control\" placeholder=\"Username\" required autofocus>\n"

				+ "        </p>\n"

				+ "        <p>\n"

				+ "          <label for=\"password\" class=\"sr-only\">Password</label>\n"

				+ "          <input type=\"password\" id=\"password\" name=\"" + this.passwordParameter + "\" class=\"form-control\" placeholder=\"Password\" required>\n"

				+ "        </p>\n"

				+ createRememberMe(this.rememberMeParameter)

				+ renderHiddenInputs(request)

				+ "        <button class=\"btn btn-lg btn-primary btn-block\" type=\"submit\">Sign in</button>\n"

				+ "      </form>\n");

	}

	if (openIdEnabled) {

		sb.append("      <form name=\"oidf\" class=\"form-signin\" method=\"post\" action=\"" + contextPath + this.openIDauthenticationUrl + "\">\n"

				+ "        <h2 class=\"form-signin-heading\">Login with OpenID Identity</h2>\n"

				+ createError(loginError, errorMsg)

				+ createLogoutSuccess(logoutSuccess)

				+ "        <p>\n"

				+ "          <label for=\"username\" class=\"sr-only\">Identity</label>\n"

				+ "          <input type=\"text\" id=\"username\" name=\"" + this.openIDusernameParameter + "\" class=\"form-control\" placeholder=\"Username\" required autofocus>\n"

				+ "        </p>\n"

				+ createRememberMe(this.openIDrememberMeParameter)

				+ renderHiddenInputs(request)

				+ "        <button class=\"btn btn-lg btn-primary btn-block\" type=\"submit\">Sign in</button>\n"

				+ "      </form>\n");

	}

	if (oauth2LoginEnabled) {

		sb.append("<h2 class=\"form-signin-heading\">Login with OAuth 2.0</h2>");

		sb.append(createError(loginError, errorMsg));

		sb.append(createLogoutSuccess(logoutSuccess));

		sb.append("<table class=\"table table-striped\">\n");

		for (Map.Entry<String, String> clientAuthenticationUrlToClientName : oauth2AuthenticationUrlToClientName.entrySet()) {

			sb.append(" <tr><td>");

			String url = clientAuthenticationUrlToClientName.getKey();

			sb.append("<a href=\"").append(contextPath).append(url).append("\">");

			String clientName = HtmlUtils.htmlEscape(clientAuthenticationUrlToClientName.getValue());

			sb.append(clientName);

			sb.append("</a>");

			sb.append("</td></tr>\n");

		}

		sb.append("</table>\n");

	}

	if (this.saml2LoginEnabled) {

		sb.append("<h2 class=\"form-signin-heading\">Login with SAML 2.0</h2>");

		sb.append(createError(loginError, errorMsg));

		sb.append(createLogoutSuccess(logoutSuccess));

		sb.append("<table class=\"table table-striped\">\n");

		for (Map.Entry<String, String> relyingPartyUrlToName : saml2AuthenticationUrlToProviderName.entrySet()) {

			sb.append(" <tr><td>");

			String url = relyingPartyUrlToName.getKey();

			sb.append("<a href=\"").append(contextPath).append(url).append("\">");

			String partyName = HtmlUtils.htmlEscape(relyingPartyUrlToName.getValue());

			sb.append(partyName);

			sb.append("</a>");

			sb.append("</td></tr>\n");

		}

		sb.append("</table>\n");

	}

	sb.append("</div>\n");

	sb.append("</body></html>");

	return sb.toString();

}
至此 SpringSecurity 默认表单登录页展示流程源码部分已经全部讲解完毕,会渲染出下面的页面,但是一定要有网的情况,否则样式可能会变化

6.总结
本篇主要讲解 SpringSecurity提供的默认表单登录页 它是如何展示的的流程,包括涉及这一流程中相关的 3个过滤器
1.FilterSecurityInterceptor,
2.ExceptionTranslationFilter ,
3.DefaultLoginPageGeneratingFilter 过滤器,
并且简单介绍了一下 AccessDecisionManager 它主要进行投票来判断该用户是否能够访问相应的 资源
AccessDecisionManager 投票机制我也没有深究 后续我会详细深入一下再展开
个人博客地址: https://www.askajohnny.com 欢迎访问!
本文由博客一文多发平台 OpenWrite 发布!
SpringSecurity 默认表单登录页展示流程源码的更多相关文章
- SpringSecurity 自定义表单登录
SpringSecurity 自定义表单登录 本篇主要讲解 在SpringSecurity中 如何 自定义表单登录 , SpringSecurity默认提供了一个表单登录,但是实际项目里肯定无法使用的 ...
- spring security 之自定义表单登录源码跟踪
上一节我们跟踪了security的默认登录页的源码,可以参考这里:https://www.cnblogs.com/process-h/p/15522267.html 这节我们来看看如何自定义单表认 ...
- SpringSecurity实战记录(一)开胃菜:基于内存的表单登录小Demo搭建
Ps:本次搭建基于Maven管理工具的版本,Gradle版本可以通过gradle init --type pom命令在pom.xml路径下转化为Gradle版本(如下图) (1)构建工具IDEA In ...
- SpringBoot集成Spring Security(4)——自定义表单登录
通过前面三篇文章,你应该大致了解了 Spring Security 的流程.你应该发现了,真正的 login 请求是由 Spring Security 帮我们处理的,那么我们如何实现自定义表单登录呢, ...
- Spring Security 表单登录
1. 简介 本文将重点介绍使用Spring Security登录. 本文将构建在之前简单的Spring MVC示例之上,因为这是设置Web应用程序和登录机制的必不可少的. 2. Maven 依赖 要将 ...
- 10款精美的HTML5表单登录联系和搜索表单
1.HTML5/CSS3仿Facebook登录表单 这款纯CSS3发光登录表单更是绚丽多彩.今天我们要分享一款仿Facebook的登录表单,无论从外观还是功能上说,这款登录表单还是挺接近Faceboo ...
- 【从零开始学BPM,Day2】默认表单开发
[课程主题]主题:5天,一起从零开始学习BPM[课程形式]1.为期5天的短任务学习2.每天观看一个视频,视频学习时间自由安排. [第二天课程] Step 1 软件下载:H3 BPM10.0全开放免费下 ...
- VC POST表单——登录验证新浪邮箱
1.本机环境: Windows XP SP3.ADSL 2.开发工具: WildPackets OmniPeek V5.1.4 Visual C++ 6.0 IE6.0 FlexEdit V2.3.1 ...
- Android逆向破解表单登录程序
Android逆向破解表单登录程序 Android开发 ADT: android studio(as) 程序界面如下,登录成功时弹出通知登录成功,登录失败时弹出通知登录失败. 布局代码 <?xm ...
随机推荐
- H3C 域名
- H3C 根据主机地址数划分子网
- git 安装及基本配置
git 基本上来说是开发者必备工具了,在服务器里没有 git 实在不太能说得过去.何况,没有 git 的话,面向github编程 从何说起,如同一个程序员断了左膀右臂. 你对流程熟悉后,只需要一分钟便 ...
- 一次接口压力测试qps极低原因分析及解决过程
一次接口压力测试qps极低原因分析及解决过程 9-2日在做内部的性能测试相关培训时,发现注册接口压力测试qps极低(20左右),这个性能指标远不能达到上线标准 ,经过一系列调试,最后定位 98%的时间 ...
- linux 自动检测 IRQ 号
驱动在初始化时最有挑战性的问题中的一个是如何决定设备要使用哪个 IRQ 线. 驱动需 要信息来正确安装处理. 尽管程序员可用请求用户在加载时指定中断号, 这是个坏做法, 因为大部分时间用户不知道这个号 ...
- 修改github上的项目语言类型
当在github上上传一个项目时,可能会出现一个问题就是项目代码类型是自动生成的,可能与我们实际项目代码种类不匹配,此时就需要修改项目语言类型了. 由于无法直接更改,所以用到此方法: 在你的项目根目录 ...
- Spring Boot 2.x使用Mockito进行测试
在上一篇,项目基本实现了Spring Boot对Mybatis的整合.这篇文章使用Mockito对项目进行测试. 1.使用postmat测试: 2.编写单元测试类,使用mockito进行测试: 3.使 ...
- 在小程序内点击按钮分享H5网页给好友或者朋友圈
在小程序内点击按钮分享H5网页给好友或者朋友圈 首先需要建立h5容器文件夹 页面.wxml <navigator url="/pages/report-await/fouryearh5 ...
- Linux 内核 NuBus 总线
另一个有趣的, 但是几乎被忘记的, 接口总线是 NuBus. 它被发现于老的 Mac 计算机(那 些有 M68K CPU 家族的). 所有的这个总线是内存映射的(象 M68K 的所有东西), 并且设备 ...
- Wanafly 挑战赛 14 E 无效位置 (线性基+并查集)
Wanafly 挑战赛 14 E 无效位置 (线性基+并查集) 传送门:https://ac.nowcoder.com/acm/contest/81/#question 题意: n个数,m次操作 一个 ...
