第六模块:WEB框架开发 第1章·Django框架开发88~128
- 88-Ajax简介
- 89-Ajax的简单实现
- 90-基于Ajax的传递数据
- 91-基于Ajax的登录验证
- 92-基于Form表单的文件上传
- 93-请求头之contentType
- 94-Ajax传递json数据
- 95-基于Ajax的文件上传
- 96-分页器1
- 97-分页器2
- 98-分页器3
- 99-分页器4
- 100-form组件的校验功能
- 101-form组件的渲染标签功能1
- 102-form组件的渲染标签功能2
- 103-form组件的渲染错误信息
- 104-form组件的参数配置
- 105-form组件检验的局部钩子
- 106-组件之全局钩子校验
- 107-HTTP协议的无状态保存
- 108-Cookie简介
- 109-Cookie的设置与读取
- 110-设置Cookie的超时参数
- 111-设置Cookie的有效路径
- 112-Cookie应用之保存上次访问时间
- 113-session的流程简介
- 114-session之保存登录状态
- 115-session应用之保存上次登录时间
- 116-session的更新操作
- 117-基于session的注销功能
- 118-session的总结
- 119-用户认证组件简介
- 120-基于用户认证组件的登录验证信息存储
- 121-基于用户认证组件的注销功能
- 122-基于用户认证组件的注册用户功能
- 123-基于用户认证组件的认证装饰器
- 124-中间件的实现流程
- 125-中间件的process_request和process_response方法
- 126-中间件之process_view方法
- 127-中间件之process_exception
- 128-中间之应用
88-Ajax简介
1、什么是Ajax?
AJAX(Asynchronous Javascript And XML)翻译成中文就是“异步Javascript和XML”。即使用Javascript语言与服务器进行异步交互,传输的数据为XML(当然,传输的数据不只是XML,现在更多使用json数据);
同步交互:客户端发出一个请求后,需要等待服务器响应结束后,才能发出第二个请求;
异步交互:客户端发出一个请求后,无需等待服务器响应结束,就可以发出第二个请求;
AJAX除了异步的特点外,还有一个就是:浏览器页面局部刷新;(这一特点给用户的感受是在不知不觉中完成请求和响应过程);
2、Ajax的使用场景;
3、Ajax的优点;
AJAX使用Javascript技术向服务器发送异步请求;
Ajax无须刷新整个页面;
89-Ajax的简单实现
1、创建Django项目-AjaxDemo;
2、配置urls.py;
"""AjaxDemo URL Configuration

The `urlpatterns` list routes URLs to views. For more information please see:

    https://docs.djangoproject.com/en/2.1/topics/http/urls/

Examples:

Function views

    1. Add an import:  from my_app import views

    2. Add a URL to urlpatterns:  path('', views.home, name='home')

Class-based views

    1. Add an import:  from other_app.views import Home

    2. Add a URL to urlpatterns:  path('', Home.as_view(), name='home')

Including another URLconf

    1. Import the include() function: from django.urls import include, path

    2. Add a URL to urlpatterns:  path('blog/', include('blog.urls'))

"""

from django.contrib import admin

from django.urls import path

from app01 import views

urlpatterns = [

    path('admin/', admin.site.urls),

    path('index/', views.index),

    path('test_ajax/', views.test_ajax),

]
3、编写视图函数views.py;
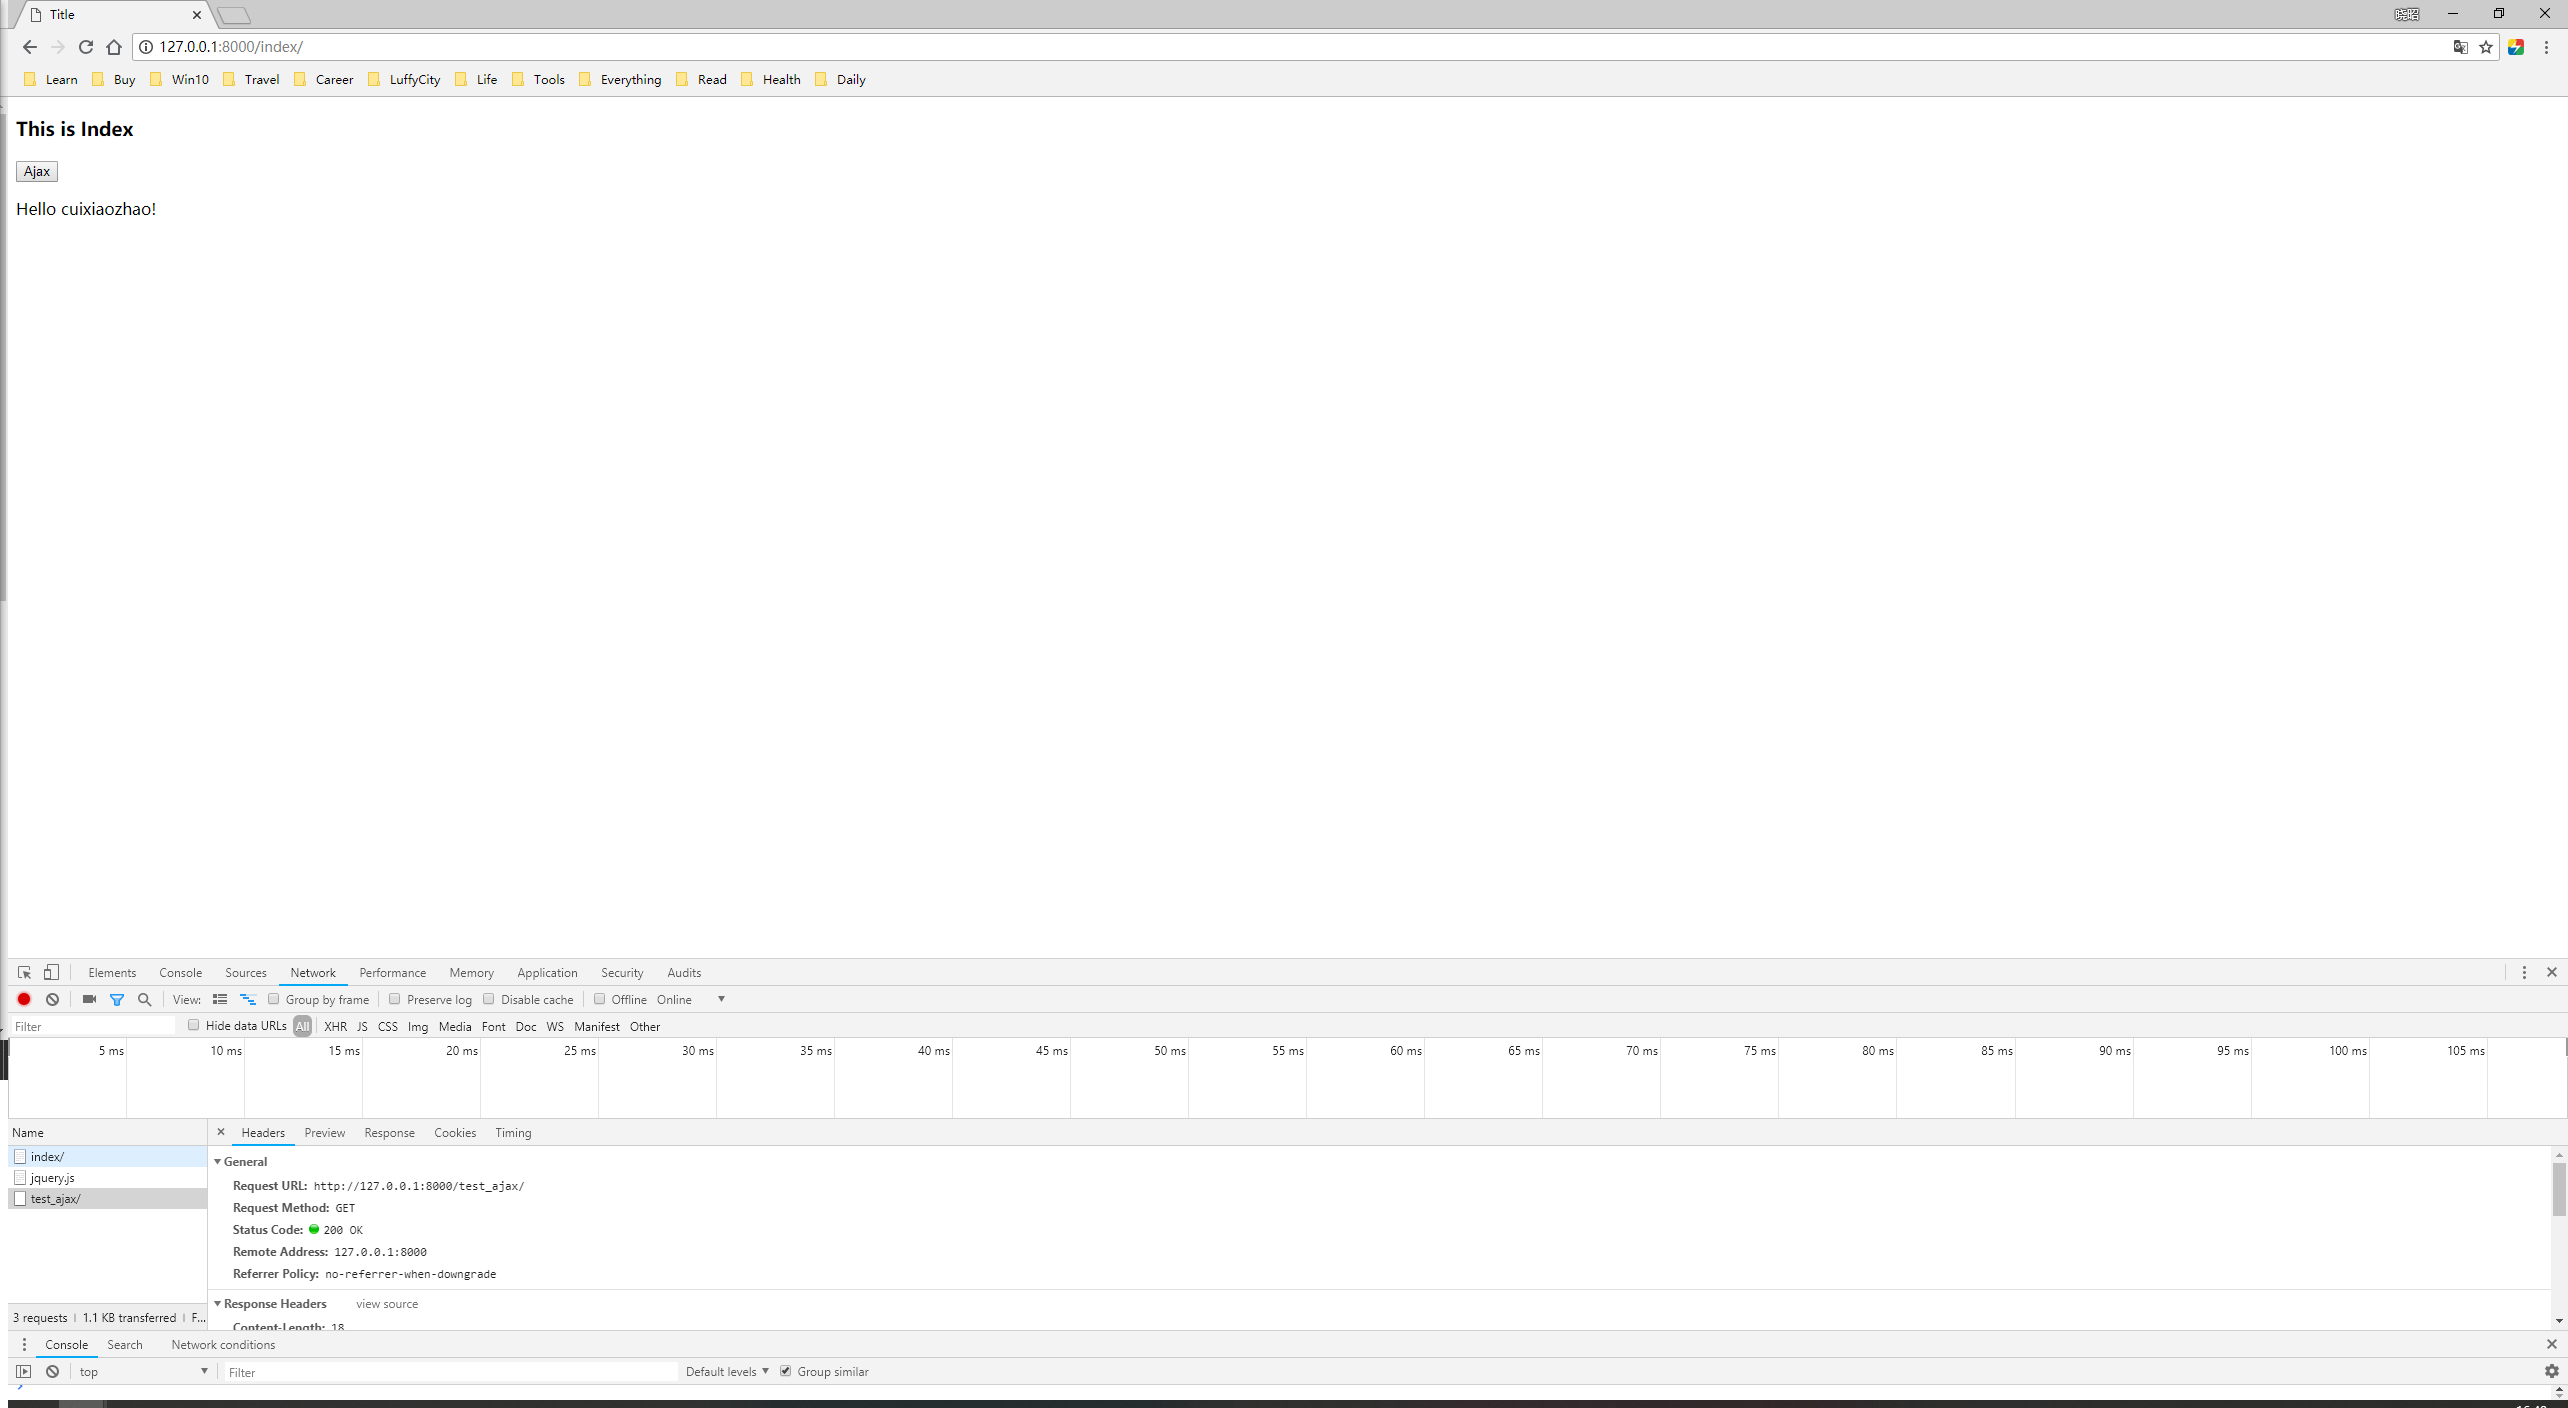
from django.shortcuts import render,HttpResponse

# Create your views here.

def index(request):

    return render(request,"index.html")

def test_ajax(request):

    return HttpResponse("Hello cuixiaozhao!")
4、编写templates下的index.html文件;
<!DOCTYPE html>
<html lang="en">
<head>
<meta charset="UTF-8">
<title>Title</title>
<script src="https://cdn.bootcss.com/jquery/3.3.1/jquery.js"></script>
<style type="text/css"> </style>
</head>
<body>
<h3>This is Index</h3>
<button class="Ajax">Ajax</button>
<p class="content"></p>
</body>
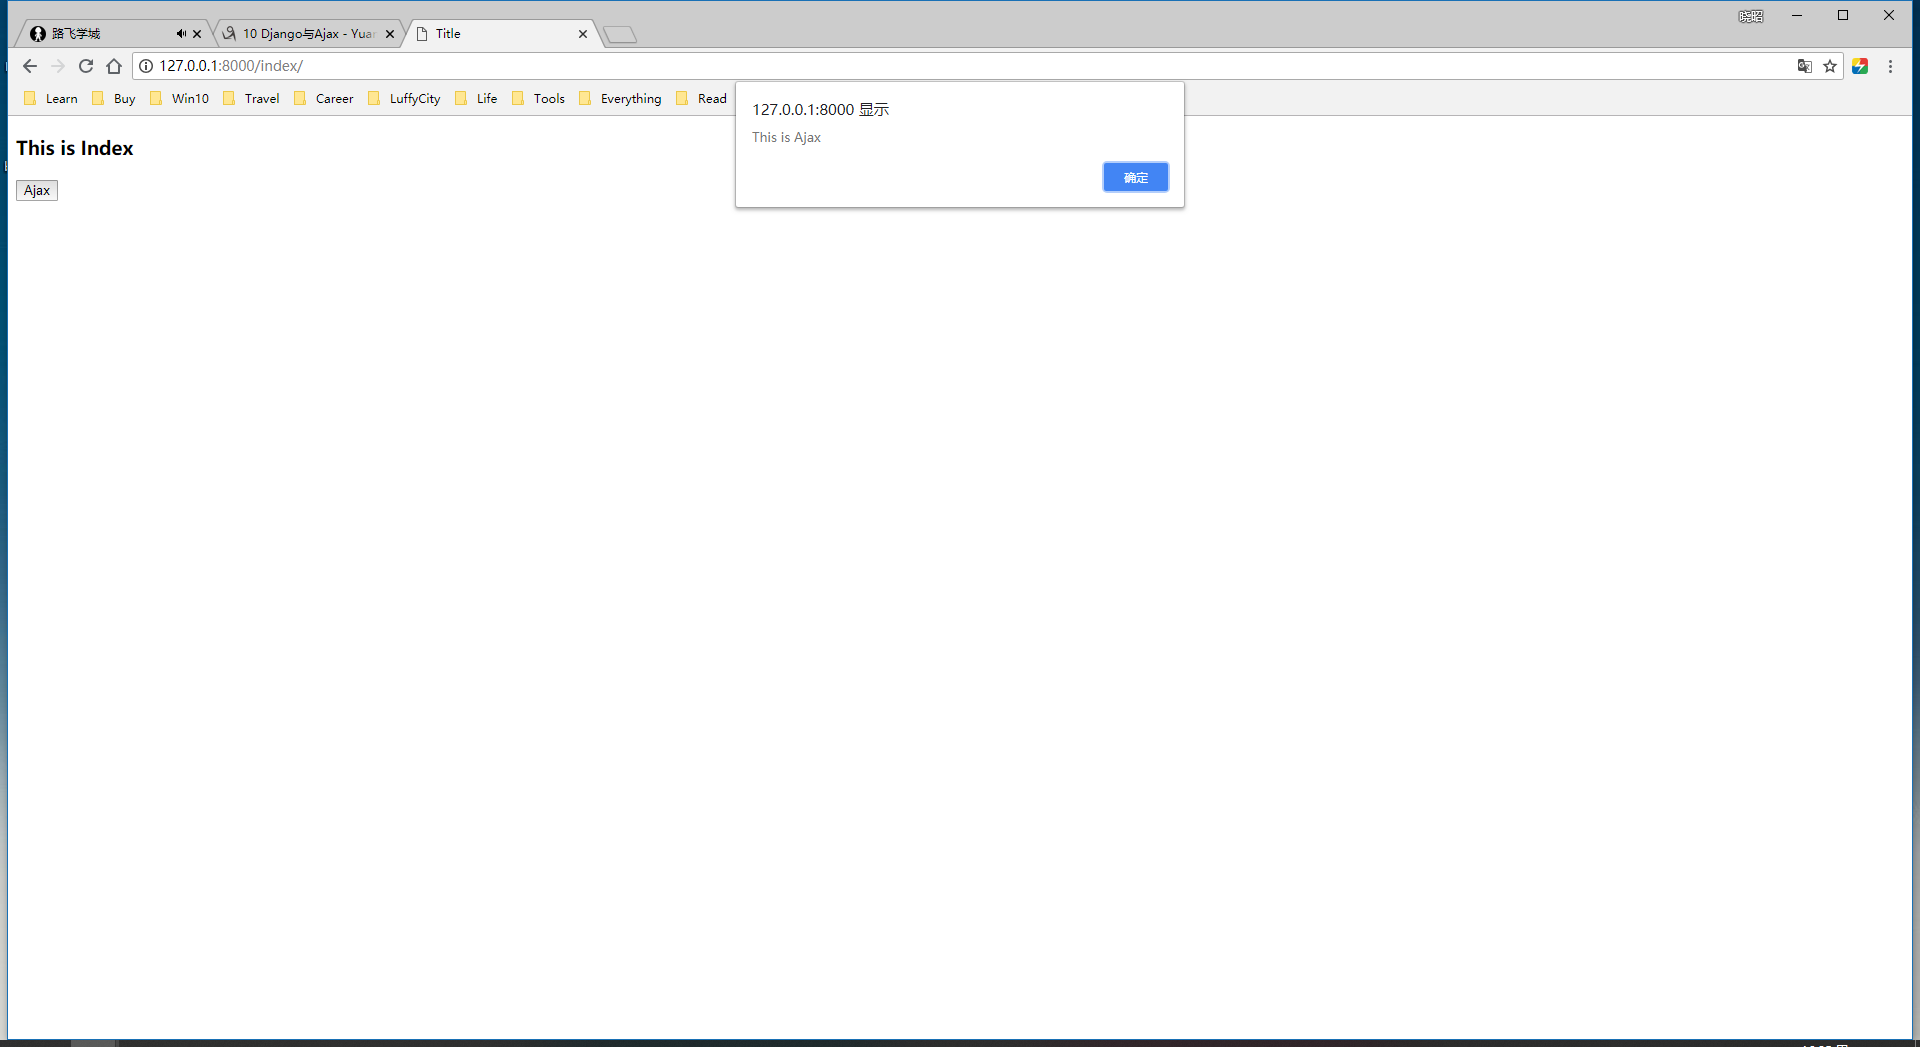
<script>
$(".Ajax").click(function () {
//alert("This is Ajax") //发送Ajax请求;
$.ajax({
url:"/test_ajax/",//请求的URL;
type:"get",//请求方式post;
success:function (data) {//回调函数,某个事件执行完之后,再去执行的函数;
console.log(data);
$(".content").html(data)
}
})
})
</script>
</html>
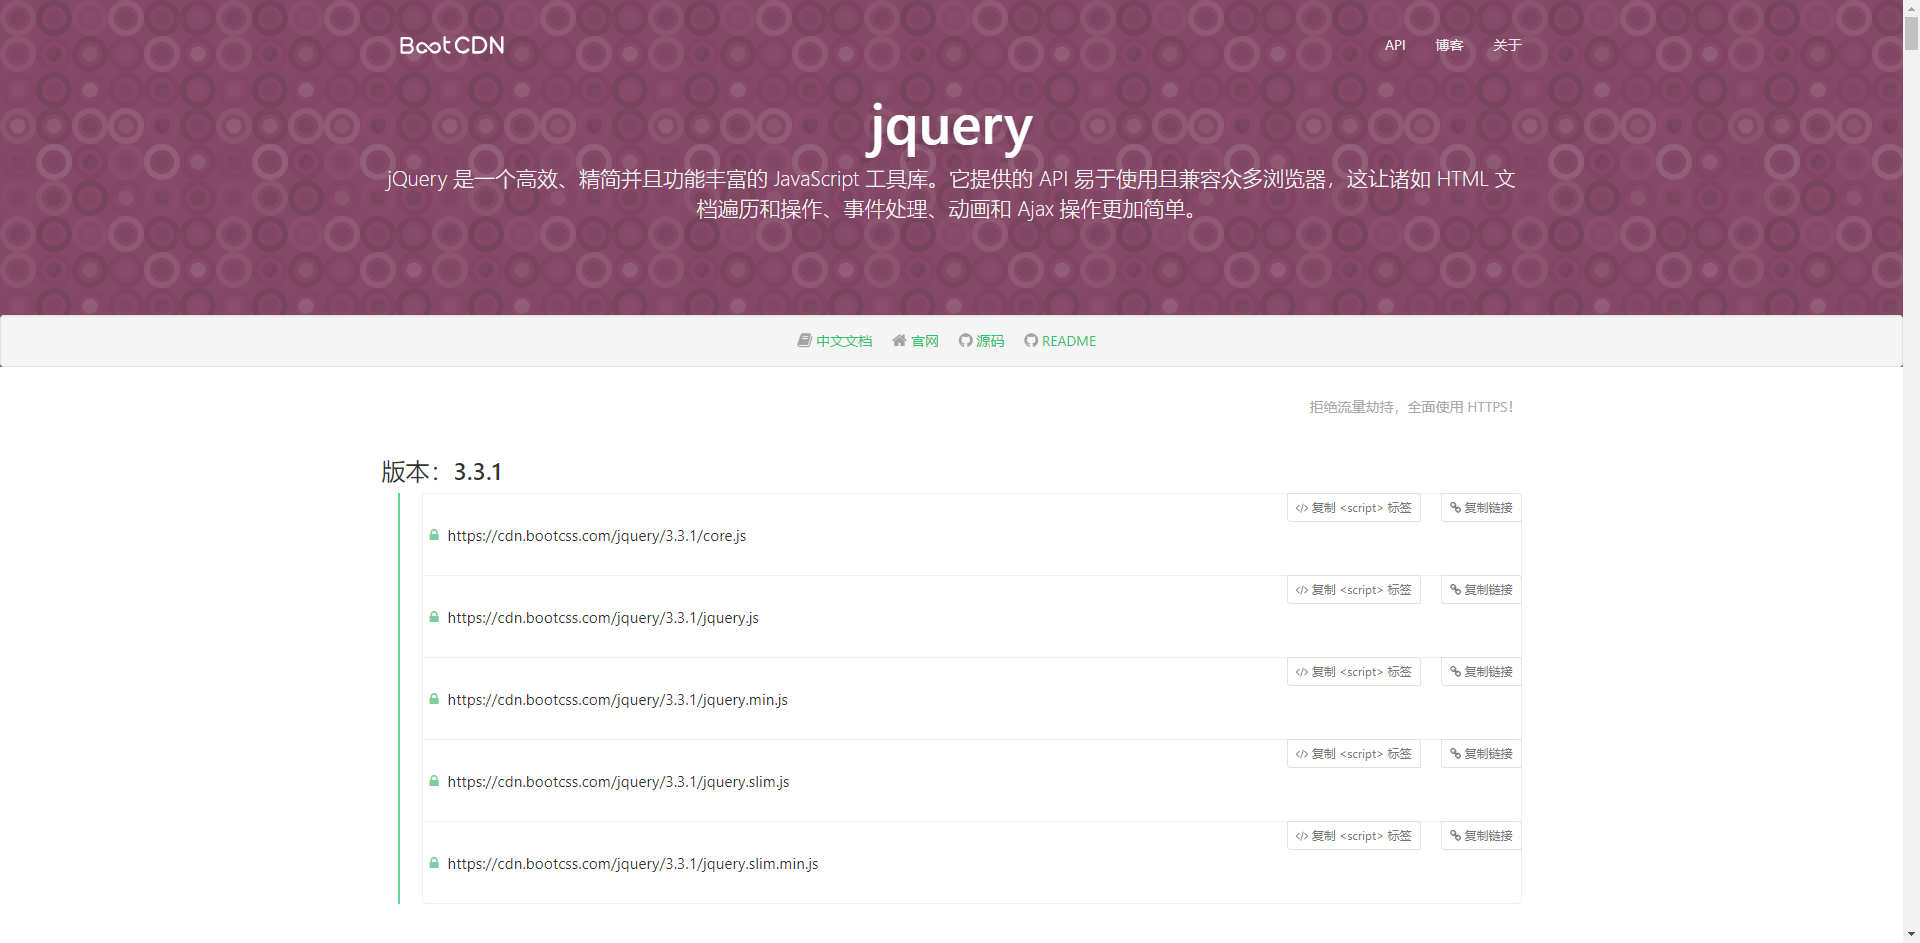
5、引入CDN类型的jQuery文件;
<script src="https://cdn.bootcss.com/jquery/3.3.1/jquery.js"></script>
各版本的jQuery的CDN地址;https://www.bootcdn.cn/jquery/
6、编写Ajax请求的js;
<script>

    $(".Ajax").click(function () {

        //alert("This is Ajax")

        //发送Ajax请求;

        $.ajax({

            url:"/test_ajax/",//请求的URL;

            type:"get",//请求方式post;

            success:function (data) {//回调函数,某个事件执行完之后,再去执行的函数;

                console.log(data);

                $(".content").html(data)

            }

        })

    })

</script>
7、进行验证;
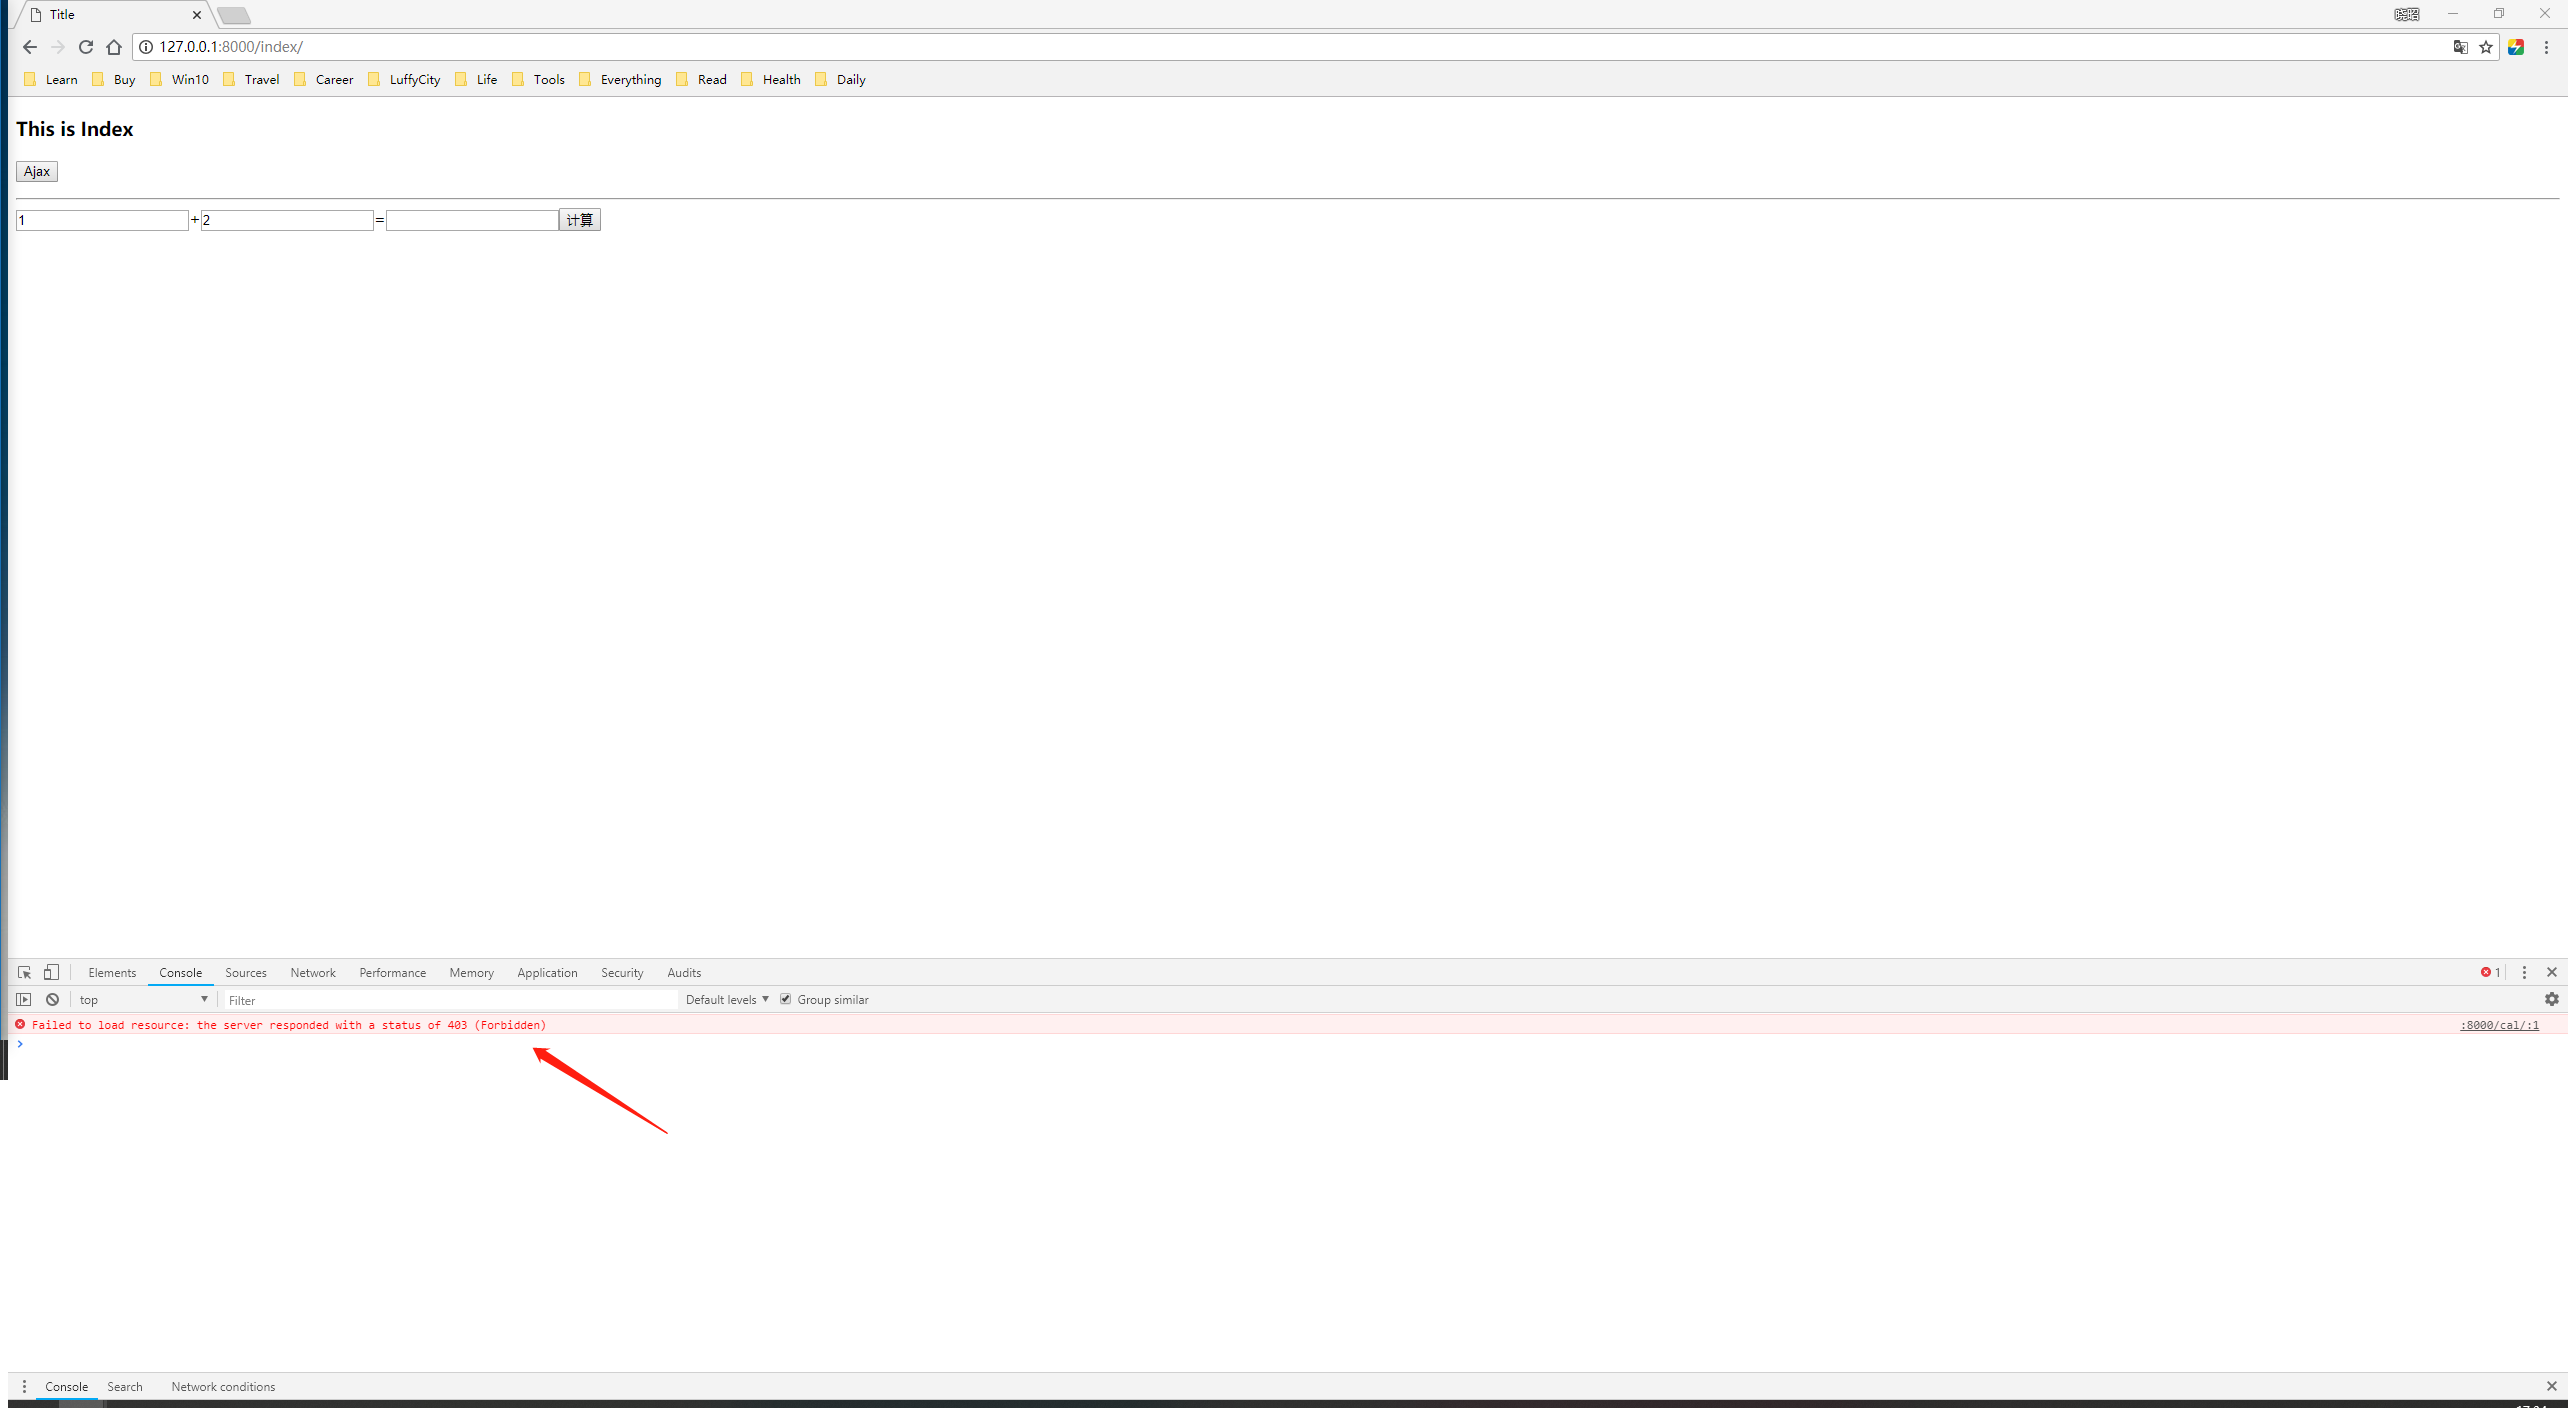
90-基于Ajax的传递数据
1、基于Ajax的传递数据;
2、将settings.py中的 'django.middleware.csrf.CsrfViewMiddleware',先注释掉;
urls.py;
"""AjaxDemo URL Configuration

The `urlpatterns` list routes URLs to views. For more information please see:

    https://docs.djangoproject.com/en/2.1/topics/http/urls/

Examples:

Function views

    1. Add an import:  from my_app import views

    2. Add a URL to urlpatterns:  path('', views.home, name='home')

Class-based views

    1. Add an import:  from other_app.views import Home

    2. Add a URL to urlpatterns:  path('', Home.as_view(), name='home')

Including another URLconf

    1. Import the include() function: from django.urls import include, path

    2. Add a URL to urlpatterns:  path('blog/', include('blog.urls'))

"""

from django.contrib import admin

from django.urls import path

from app01 import views

urlpatterns = [

    path('admin/', admin.site.urls),

    path('index/', views.index),

    path('test_ajax/', views.test_ajax),

    path('cal/', views.cal),

]
views.py;
from django.shortcuts import render,HttpResponse

# Create your views here.

def index(request):

    print(request.GET)

    return render(request,"index.html")

def test_ajax(request):

    return HttpResponse("Hello cuixiaozhao!")

def cal(request):

    print(request.POST)

    n1 = int(request.POST.get("n1"))

    n2 = int(request.POST.get("n2"))

    ret = n1 + n2

    return HttpResponse(ret)
index.html;
<!DOCTYPE html>
<html lang="en">
<head>
<meta charset="UTF-8">
<title>Title</title>
<script src="https://cdn.bootcss.com/jquery/3.3.1/jquery.js"></script>
<style type="text/css"> </style>
</head>
<body>
<h3>This is Index</h3>
<button class="Ajax">Ajax</button>
<p class="content"></p>
<hr> <input type="text" id="num1">+<input type="text" id="num2">=<input id="ret" type="text" ><button class="cal">计算</button>
</body>
<script>
$(".Ajax").click(function () {
//alert("This is Ajax") //发送Ajax请求;
$.ajax({
url:"/test_ajax/",//请求的URL;
type:"get",//请求方式post;
data:{age:26,sex:2},
success:function (data) {//回调函数,某个事件执行完之后,再去执行的函数;
console.log(data);
$(".content").html(data)
}
})
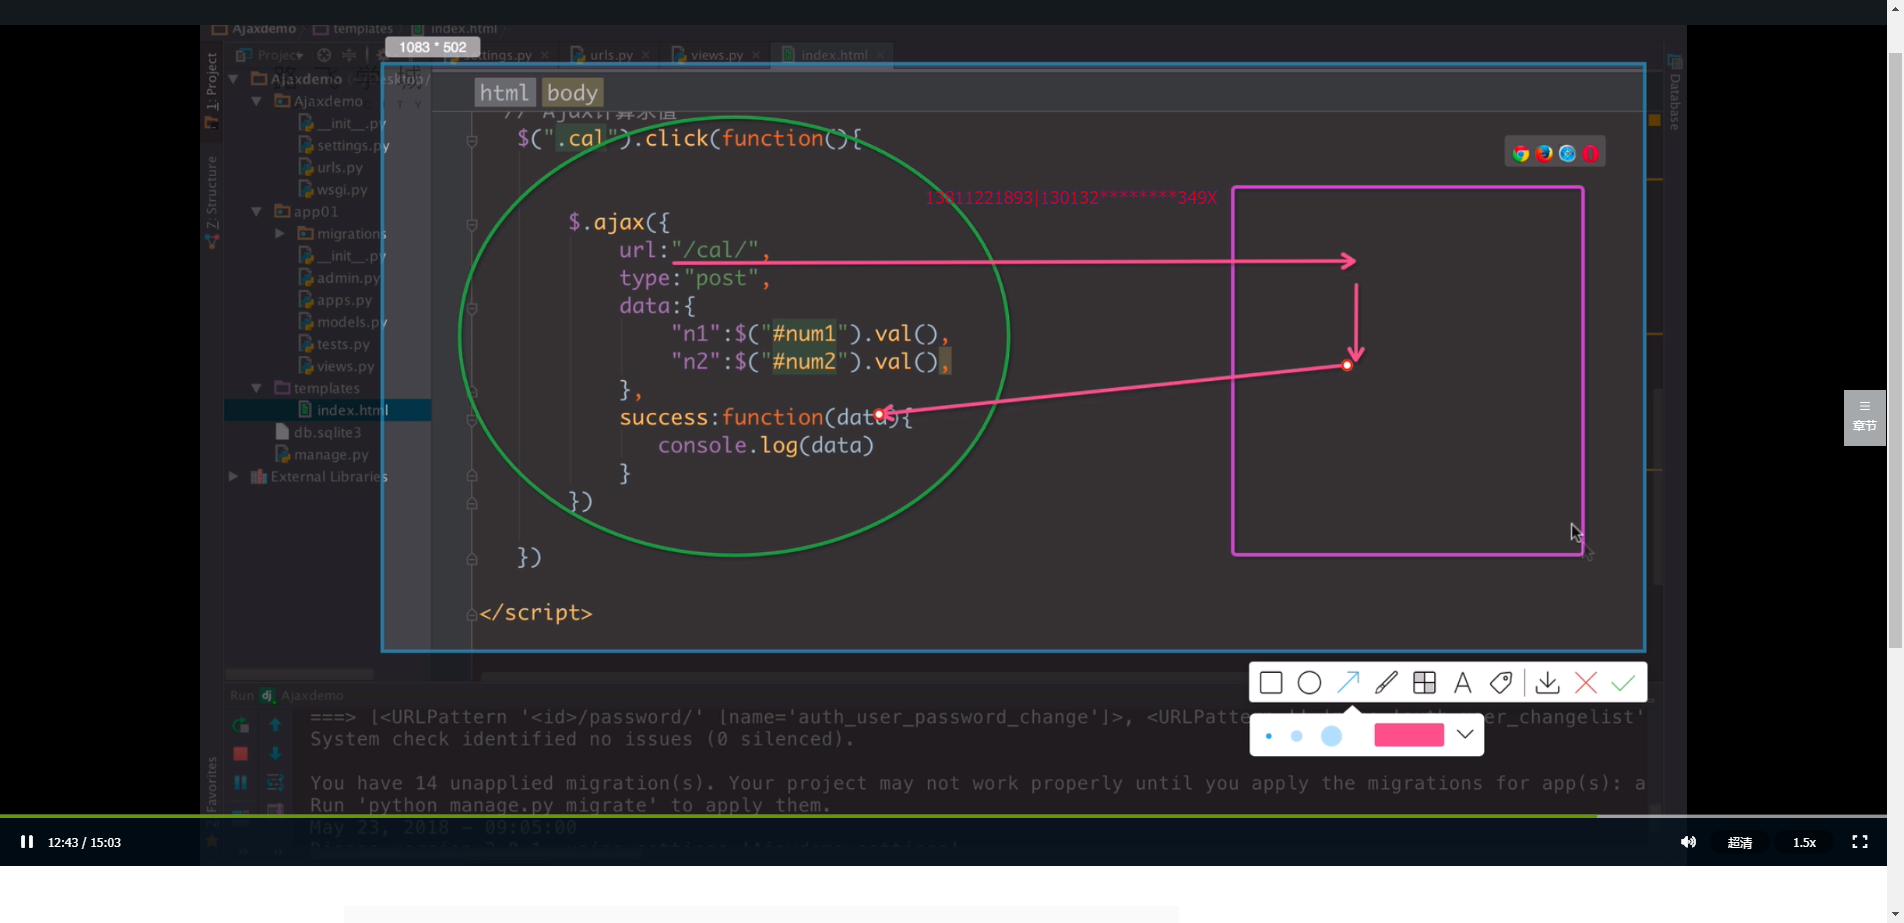
}) //Ajax计算求值;
$(".cal").click(function () {
$.ajax({
url:"/cal/",
type:"post",
data:{
"n1":$("#num1").val(),
"n2":$("#num2").val(),
},
success:function (data) {
console.log(data);
$("#ret").val(data);
}
})
})
</script>
</html>

操作日志:
Performing system checks...

System check identified no issues (0 silenced).

You have 15 unapplied migration(s). Your project may not work properly until you apply the migrations for app(s): admin, auth, contenttypes, sessions.

Run 'python manage.py migrate' to apply them.

August 20, 2018 - 16:51:22

Django version 2.1, using settings 'AjaxDemo.settings'

Starting development server at http://127.0.0.1:8000/

Quit the server with CTRL-BREAK.

<QueryDict: {}>

[20/Aug/2018 16:51:45] "GET /index/ HTTP/1.1" 200 798

[20/Aug/2018 16:51:46] "GET /test_ajax/?age=26&sex=2 HTTP/1.1" 200 18
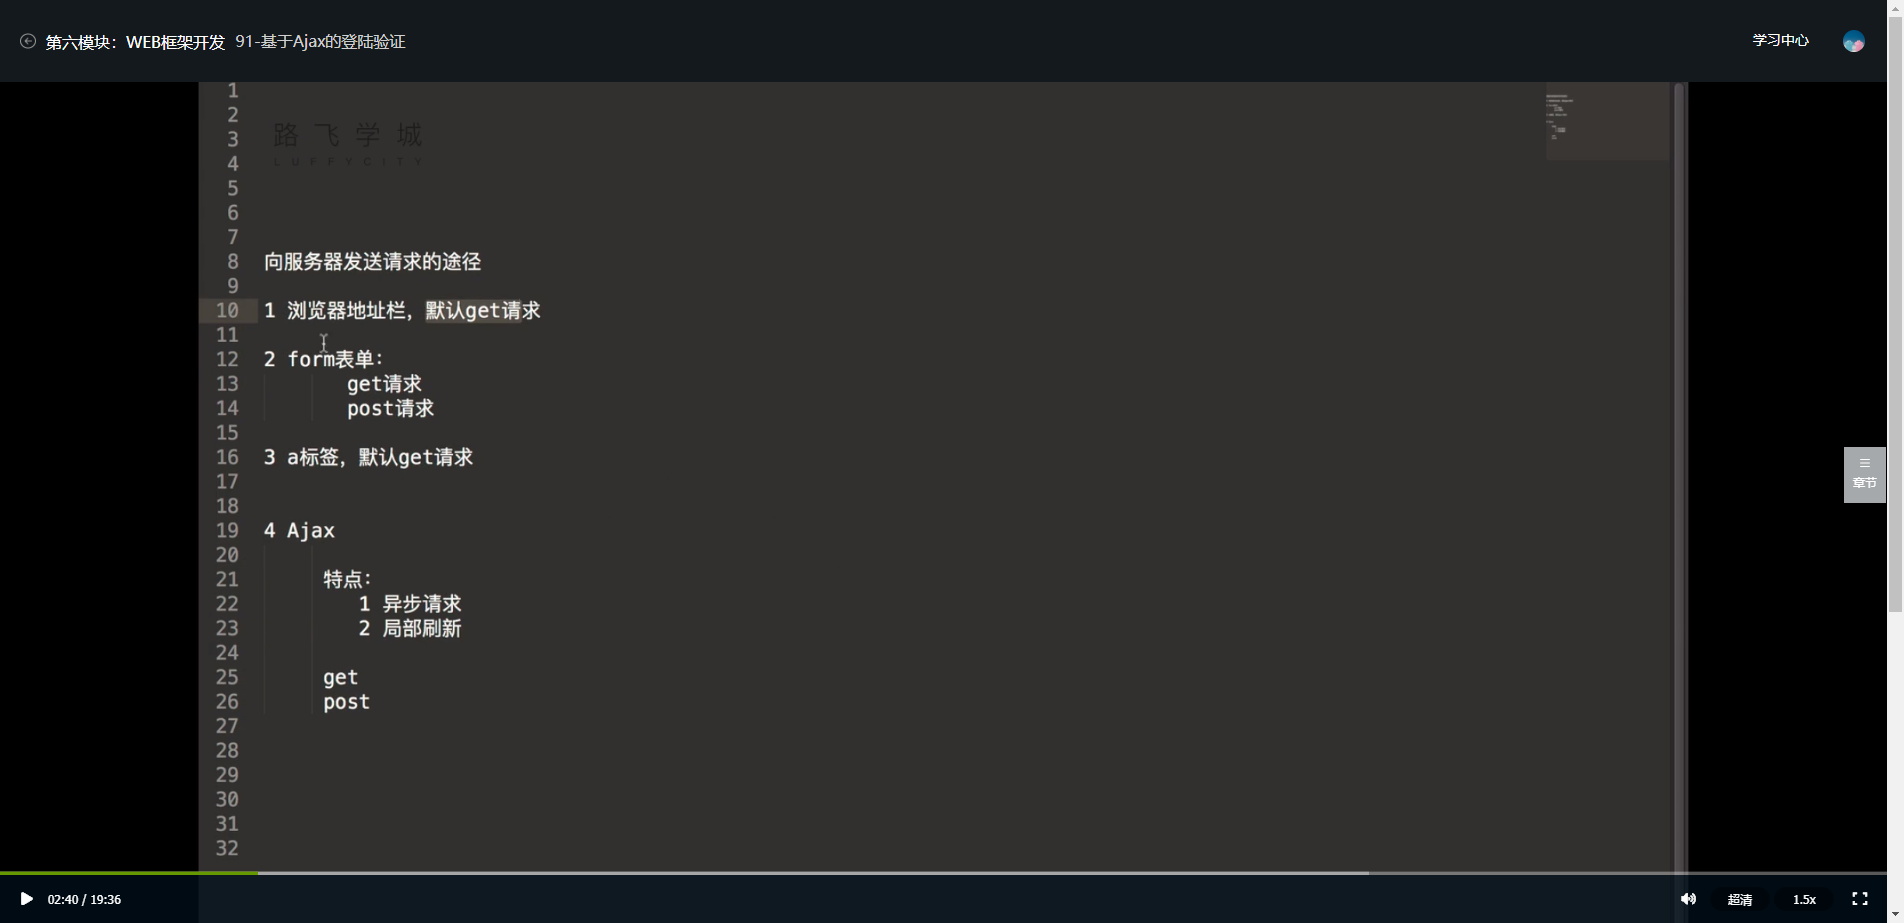
91-基于Ajax的登录验证
1、基于Ajax的登录验证;
2、views.py;
from django.shortcuts import render,HttpResponse

# Create your views here.

from app01.models import User

def index(request):

    print(request.GET)

    return render(request,"index.html")

def test_ajax(request):

    return HttpResponse("Hello cuixiaozhao!")

def cal(request):

    print(request.POST)

    n1 = int(request.POST.get("n1"))

    n2 = int(request.POST.get("n2"))

    ret = n1 + n2

    return HttpResponse(ret)

def login(request):

    # print(request.POST)

    user = request.POST.get("user")

    pwd = request.POST.get("pwd")

    user = User.objects.filter(name=user,pwd=pwd).first()

    res = {"User":None,"msg":None}

    if user:

        res["user"] = user.name

    else:

        res["msg"] = "Username or Password is Wrong!"

    import json

    #引入json的目的,是因为http协议传输过程中,必须使用字符串;如此引入了"序列化"以及"反序列化"的概念;

    return HttpResponse(json.dumps(res))
3、urls.py;
"""AjaxDemo URL Configuration

The `urlpatterns` list routes URLs to views. For more information please see:

    https://docs.djangoproject.com/en/2.1/topics/http/urls/

Examples:

Function views

    1. Add an import:  from my_app import views

    2. Add a URL to urlpatterns:  path('', views.home, name='home')

Class-based views

    1. Add an import:  from other_app.views import Home

    2. Add a URL to urlpatterns:  path('', Home.as_view(), name='home')

Including another URLconf

    1. Import the include() function: from django.urls import include, path

    2. Add a URL to urlpatterns:  path('blog/', include('blog.urls'))

"""

from django.contrib import admin

from django.urls import path

from app01 import views

urlpatterns = [

    path('admin/', admin.site.urls),

    path('index/', views.index),

    path('test_ajax/', views.test_ajax),

    path('cal/', views.cal),

    path('login/', views.login),

]
4、index.html;
<!DOCTYPE html>

<html lang="en">

<head>

    <meta charset="UTF-8">

    <title>Title</title>

    <script src="https://cdn.bootcss.com/jquery/3.3.1/jquery.js"></script>

    <style type="text/css">

    </style>

</head>

<body>

<h3>This is Index</h3>

<button class="Ajax">Ajax</button>

<p class="content"></p>

<hr>

<br>

<br>

<br>

<br>

<br>

<input type="text" id="num1">+<input type="text" id="num2">=<input id="ret" type="text" ><button class="cal">计算</button>

<hr>

<br>

<br>

<br>

<br>

<br>

<from action="">

    用户名:<input type="text" id="user">

    密码:<input type="password" id="pwd">

    <input type="button" value="submit" class="login_btn"><span class="error"></span>

</from>

<script>

    $(".Ajax").click(function () {

        //alert("This is Ajax")

        //发送Ajax请求;

        $.ajax({

            url:"/test_ajax/",//请求的URL;

            type:"get",//请求方式post;

            data:{age:26,sex:2},

            success:function (data) {//回调函数,某个事件执行完之后,再去执行的函数;

                console.log(data);

                $(".content").html(data)

            }

        })

    })

    //Ajax计算求值;

    $(".cal").click(function () {

        $.ajax({

            url:"/cal/",

            type:"post",

            data:{

                "n1":$("#num1").val(),

                "n2":$("#num2").val(),

            },

            success:function (data) {

                console.log(data);

                $("#ret").val(data);

            }

        })

    })

    //Ajax的登录验证;

    $(".login_btn").click(function () {

        $.ajax({

            url:"/login/",

            type:"post",

            data:{

                "user":$("#user").val(),

                "pwd":$("#pwd").val(),

            },

            success:function (data) {

                console.log(data);//json字符串;

                console.log(typeof data);

                var data = JSON.parse(data)//反序列化,object{}

                console.log(data);//json字符串;

                console.log(typeof data);

                if (data.user){

                    location.href = "http://www.cnblogs.com/tqtl991/"

                }else {

                    $(".error").html(data.msg).css({"color":"red","margin-left":"10px"})

                }

            }

        })

    })

</script>

</body>

</html>
92-基于Form表单的文件上传
1、urls.py;
"""AjaxDemo URL Configuration

The `urlpatterns` list routes URLs to views. For more information please see:

    https://docs.djangoproject.com/en/2.1/topics/http/urls/

Examples:

Function views

    1. Add an import:  from my_app import views

    2. Add a URL to urlpatterns:  path('', views.home, name='home')

Class-based views

    1. Add an import:  from other_app.views import Home

    2. Add a URL to urlpatterns:  path('', Home.as_view(), name='home')

Including another URLconf

    1. Import the include() function: from django.urls import include, path

    2. Add a URL to urlpatterns:  path('blog/', include('blog.urls'))

"""

from django.contrib import admin

from django.urls import path

from app01 import views

urlpatterns = [

    path('admin/', admin.site.urls),

    path('index/', views.index),

    path('test_ajax/', views.test_ajax),

    path('cal/', views.cal),

    path('login/', views.login),

    path('file_put/', views.file_put),

]
2、views.py;
from django.shortcuts import render,HttpResponse

# Create your views here.

from app01.models import User

def index(request):

    print(request.GET)

    return render(request,"index.html")

def test_ajax(request):

    return HttpResponse("Hello cuixiaozhao!")

def cal(request):

    print(request.POST)

    n1 = int(request.POST.get("n1"))

    n2 = int(request.POST.get("n2"))

    ret = n1 + n2

    return HttpResponse(ret)

def login(request):

    # print(request.POST)

    user = request.POST.get("user")

    pwd = request.POST.get("pwd")

    user = User.objects.filter(name=user,pwd=pwd).first()

    res = {"User":None,"msg":None}

    if user:

        res["user"] = user.name

    else:

        res["msg"] = "Username or Password is Wrong!"

    import json

    #引入json的目的,是因为http协议传输过程中,必须使用字符串;如此引入了"序列化"以及"反序列化"的概念;

    return HttpResponse(json.dumps(res))

def file_put(request):

    if request.method == "POST":

        print(request.POST)

        print(request.FILES)

        file_obj = request.FILES.get("avatar")

        with open(file_obj.name,"wb") as f:

            for line in file_obj:

                f.write(line)

        return HttpResponse("OK")

    return render(request,"file_put.html")
3、file_put.html;
<!DOCTYPE html>

<html lang="en">

<head>

    <meta charset="UTF-8">

    <title>Title</title>

    <style type="text/css">

    </style>

</head>

<body>

    <h3>基于Form表单的文件上传</h3>

    <form action="" method="post" enctype="multipart/form-data">

        用户名:<input type="text" name="user">

        头像:<input type="file" name="avatar">

        <input type="submit">

    </form>

</body>

</html>
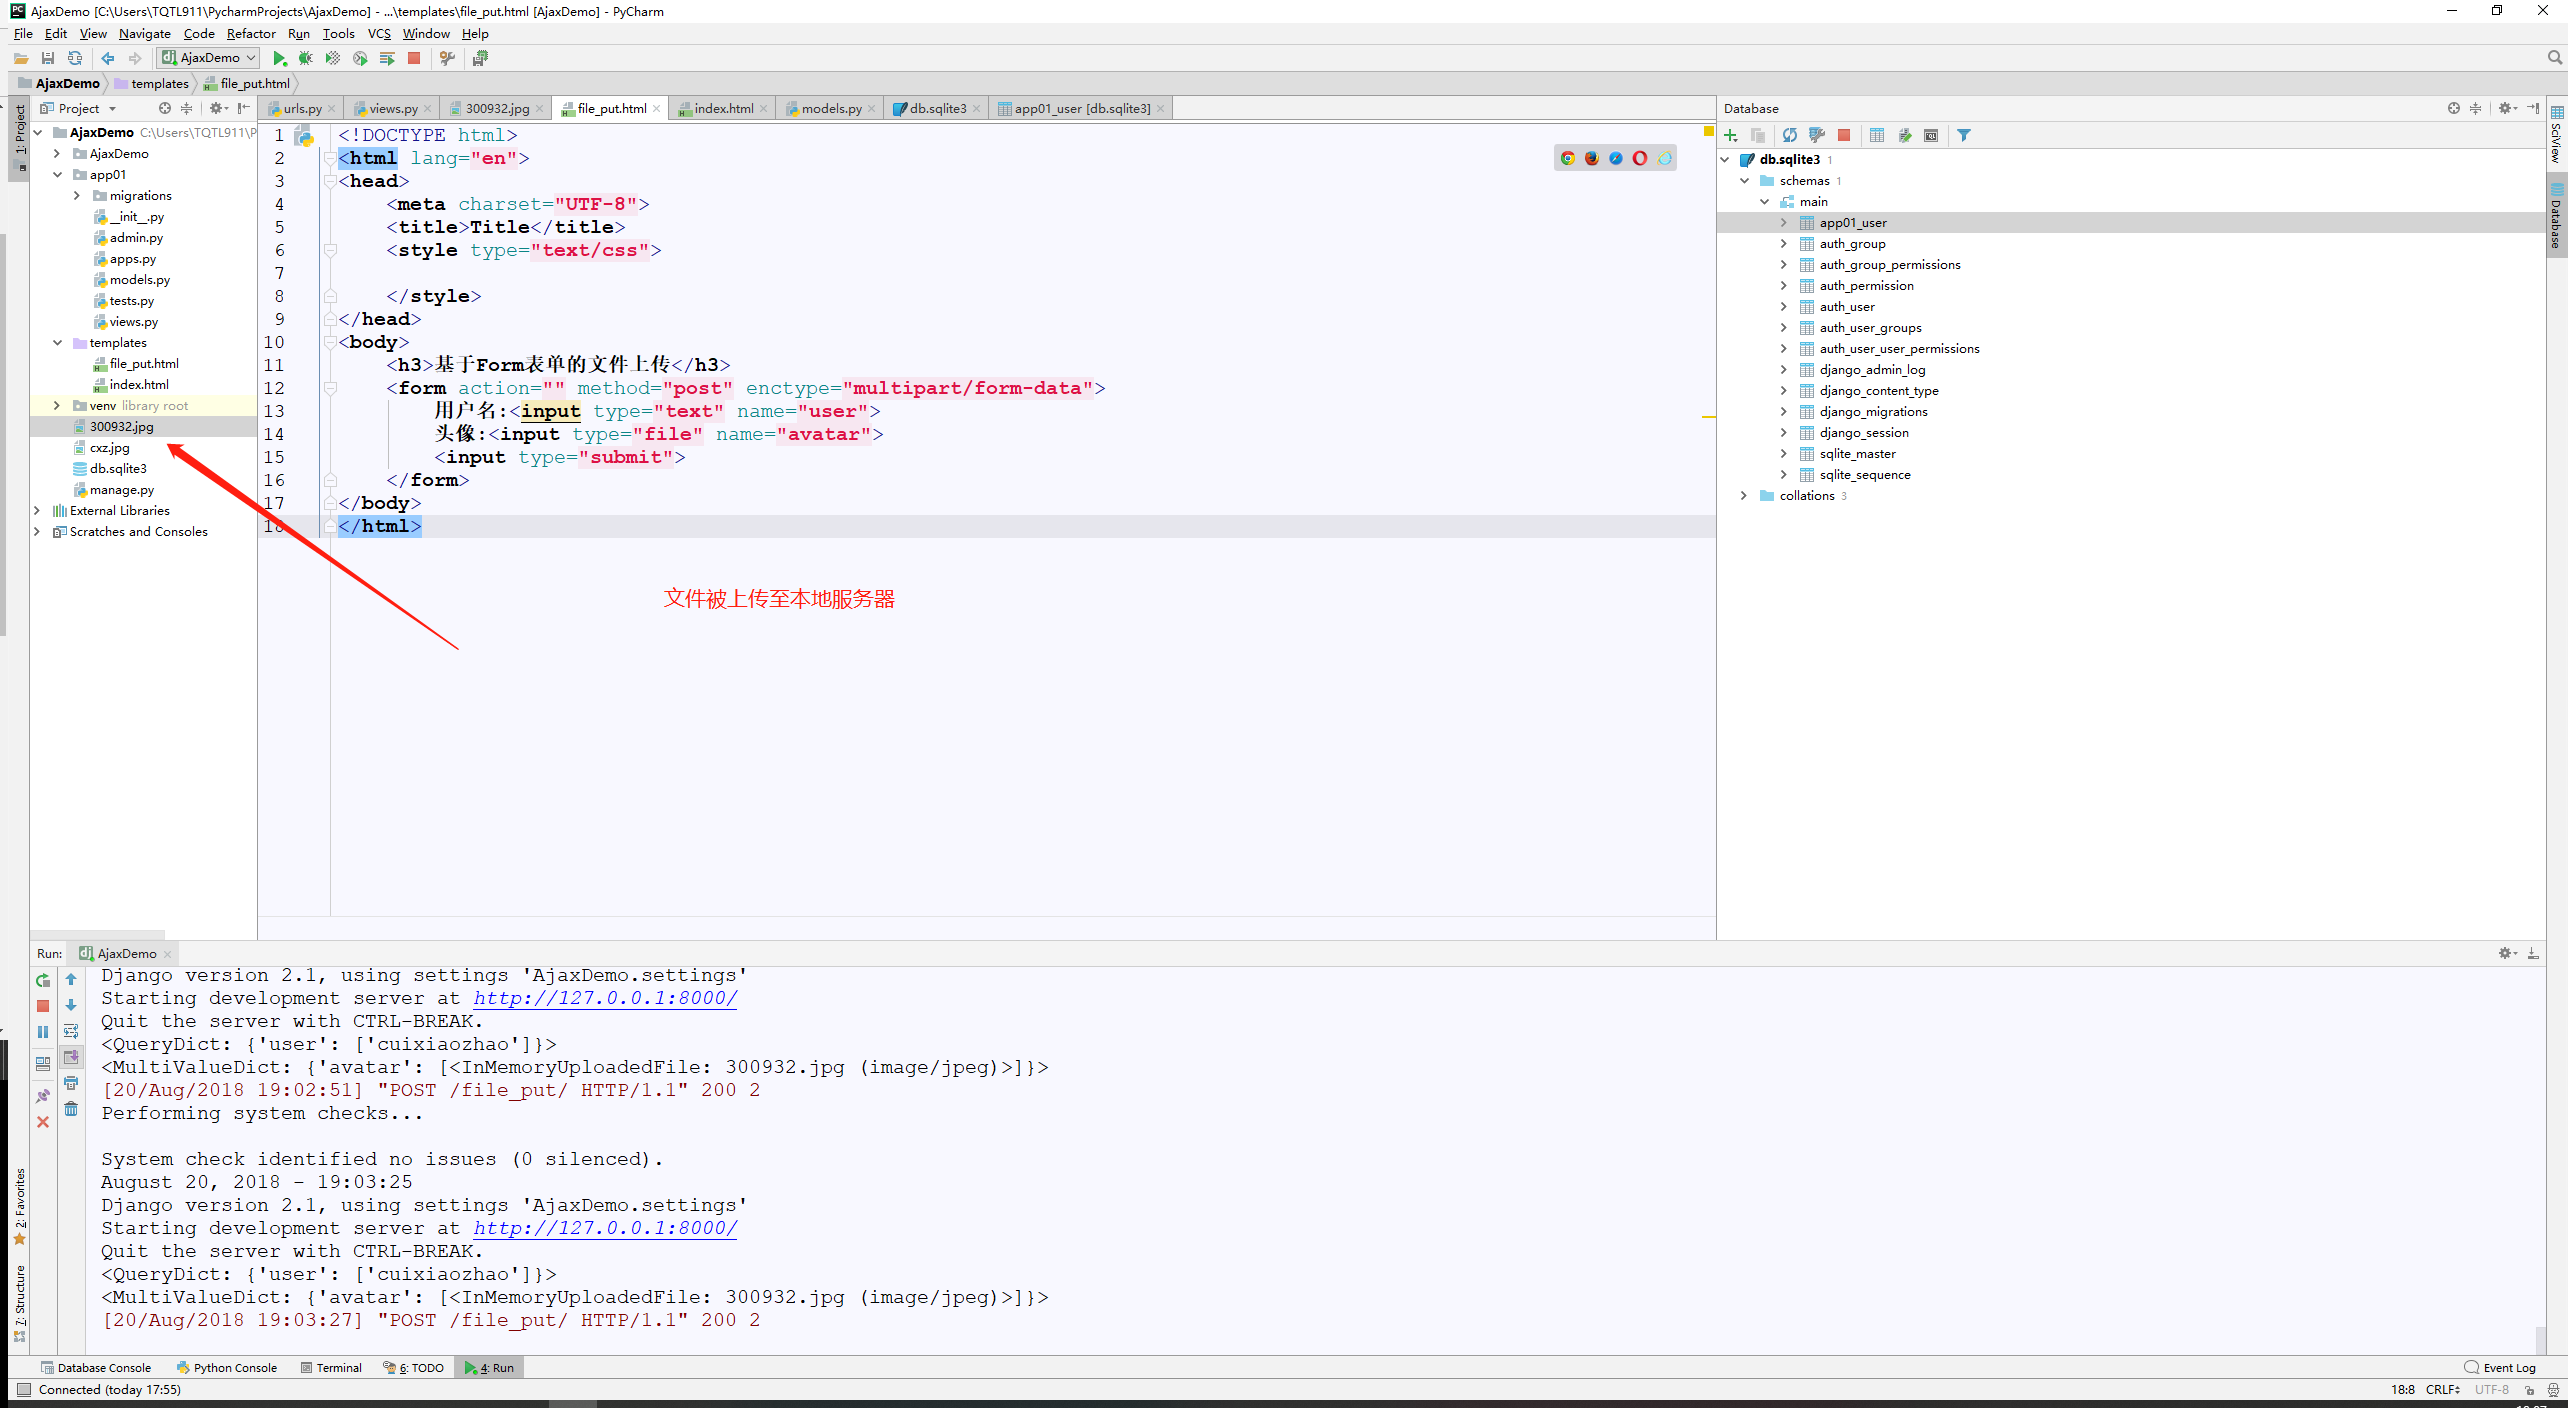
4、注意打开文件的方式;
def file_put(request):

    if request.method == "POST":

        print(request.POST)

        print(request.FILES)#先获取了文件这个对象;

        file_obj = request.FILES.get("avatar")

        with open(file_obj.name,"wb") as f:#通过file_obj.name拿到原有本文的文件名,而不是自己指定。记得以“wb”的模式打开;

            for line in file_obj:

                f.write(line)

        return HttpResponse("OK")

    return render(request,"file_put.html")
93-请求头之contentType
1、请求头之ContentType;
2、file_put.html;
<!DOCTYPE html>
<html lang="en">
<head>
<meta charset="UTF-8">
<title>Title</title>
<script src="https://cdn.bootcss.com/jquery/3.3.1/jquery.js"></script>
<style type="text/css"> </style>
</head>
<body>
<h3>简单的form</h3>
<form action="" method="post" enctype="application/x-www-form-urlencoded">
用户名:<input type="text" name="user">
密码:<input type="password" name="pwd">
<input type="submit">
</form> <hr>
<h3>基于Form表单的文件上传</h3>
<form action="" method="post" enctype="multipart/form-data">
用户名:<input type="text" name="user">
头像:<input type="file" name="avatar">
<input type="submit">
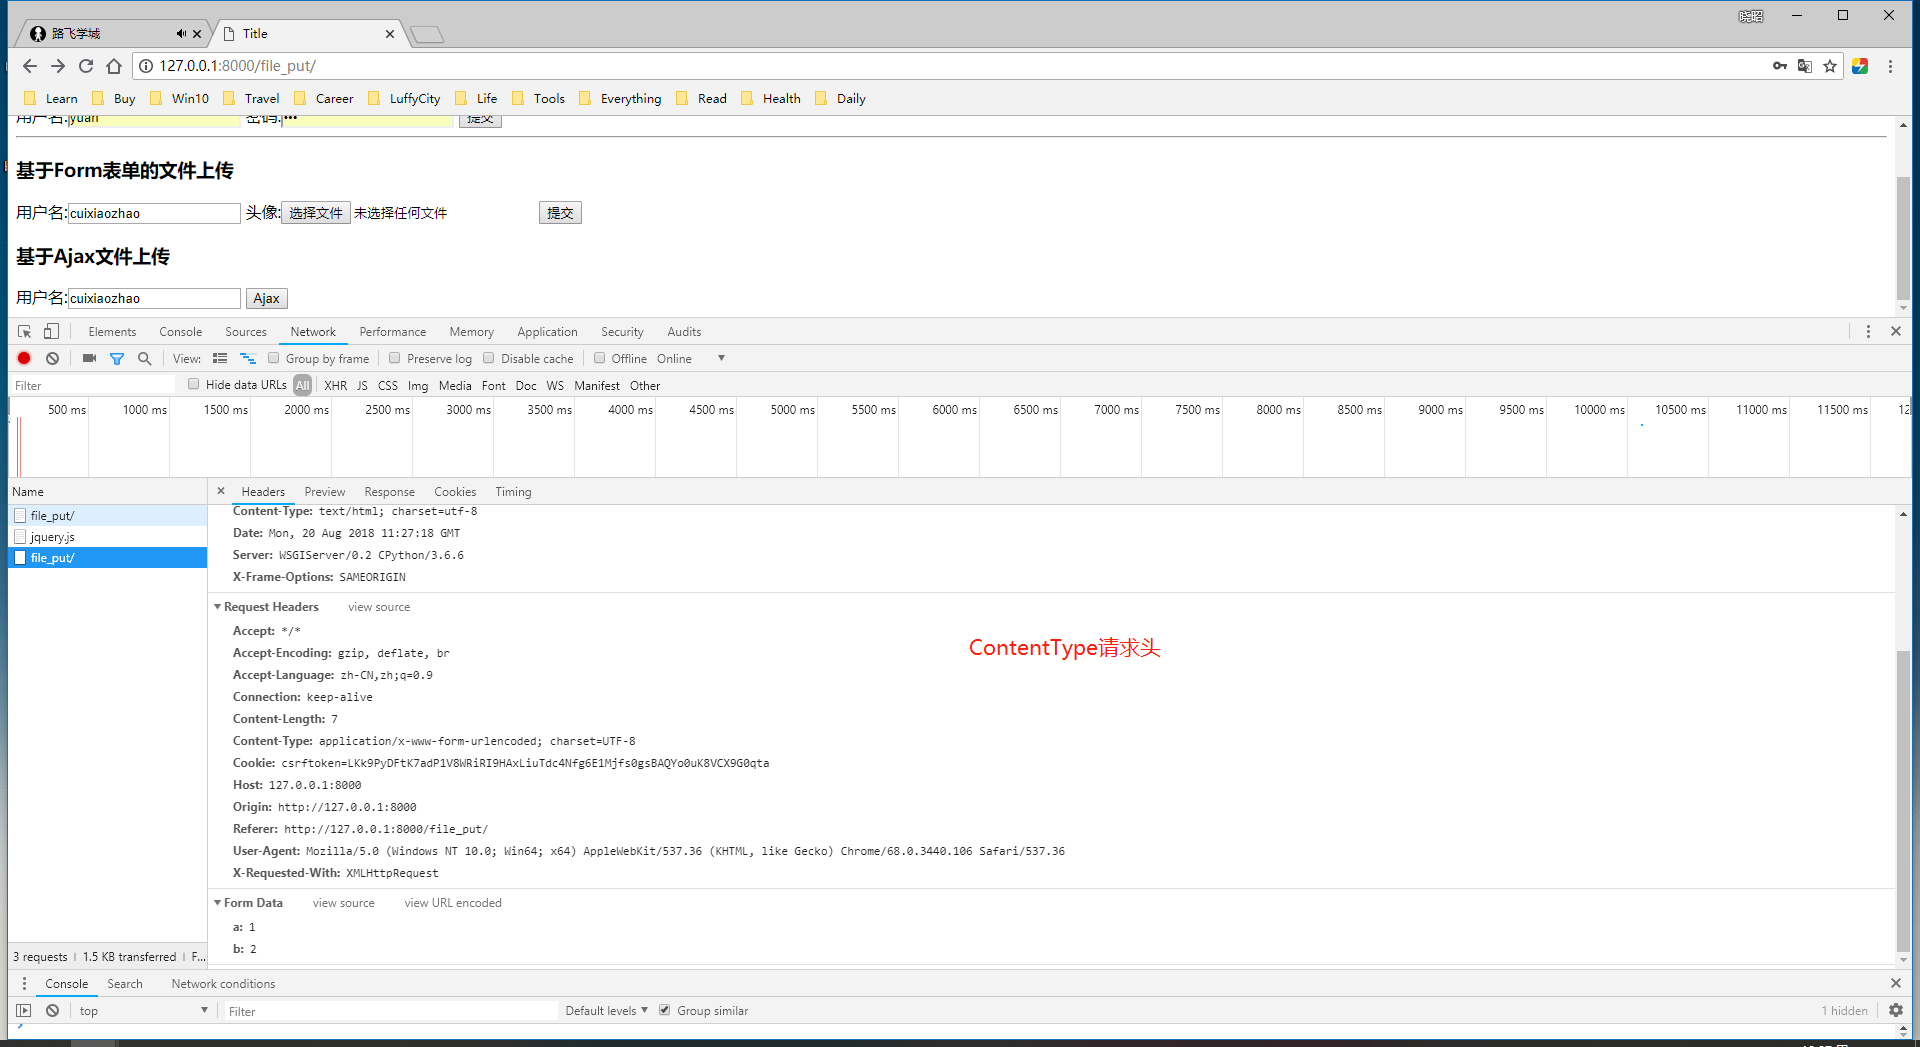
</form> <h3>基于Ajax文件上传</h3>
<form action="" method="post">
用户名:<input type="text" name="user">
<input type="button" class="btn" value="Ajax">
</form>
<script>
$(".btn").click(function () {
$.ajax({
url:"",
type:"post",
data:{
a:1,
b:2, },
success:function (data) {
console.log(data) }
})
})
</script>
</body>
</html>
views.py;
from django.shortcuts import render,HttpResponse

# Create your views here.

from app01.models import User

def index(request):

    print(request.GET)

    return render(request,"index.html")

def test_ajax(request):

    return HttpResponse("Hello cuixiaozhao!")

def cal(request):

    print(request.POST)

    n1 = int(request.POST.get("n1"))

    n2 = int(request.POST.get("n2"))

    ret = n1 + n2

    return HttpResponse(ret)

def login(request):

    # print(request.POST)

    user = request.POST.get("user")

    pwd = request.POST.get("pwd")

    user = User.objects.filter(name=user,pwd=pwd).first()

    res = {"User":None,"msg":None}

    if user:

        res["user"] = user.name

    else:

        res["msg"] = "Username or Password is Wrong!"

    import json

    #引入json的目的,是因为http协议传输过程中,必须使用字符串;如此引入了"序列化"以及"反序列化"的概念;

    return HttpResponse(json.dumps(res))

def file_put(request):

    if request.method == "POST":

        print(request.POST)

        print(request.FILES)

        # file_obj = request.FILES.get("avatar")

        # with open(file_obj.name,"wb") as f:

        #     for line in file_obj:

        #         f.write(line)

        return HttpResponse("OK")

    return render(request,"file_put.html")

"""

请求首行:

请求头:

请求头:

请求头:

........

请求头:ContentType:urlencode

请求体(a=1&b=2&c=3):

"""
94-Ajax传递json数据
1、Ajax传递json数据;
views.py;
from django.shortcuts import render,HttpResponse

# Create your views here.

from app01.models import User

def index(request):

    print(request.GET)

    return render(request,"index.html")

def test_ajax(request):

    return HttpResponse("Hello cuixiaozhao!")

def cal(request):

    print(request.POST)

    n1 = int(request.POST.get("n1"))

    n2 = int(request.POST.get("n2"))

    ret = n1 + n2

    return HttpResponse(ret)

def login(request):

    # print(request.POST)

    user = request.POST.get("user")

    pwd = request.POST.get("pwd")

    user = User.objects.filter(name=user,pwd=pwd).first()

    res = {"User":None,"msg":None}

    if user:

        res["user"] = user.name

    else:

        res["msg"] = "Username or Password is Wrong!"

    import json

    #引入json的目的,是因为http协议传输过程中,必须使用字符串;如此引入了"序列化"以及"反序列化"的概念;

    return HttpResponse(json.dumps(res))

def file_put(request):

    if request.method == "POST":

        print("body",request.body)#请求报文中的请求体!

        print("POST",request.POST)

        print(request.FILES)

        # file_obj = request.FILES.get("avatar")

        # with open(file_obj.name,"wb") as f:

        #     for line in file_obj:

        #         f.write(line)

        return HttpResponse("OK")

    return render(request,"file_put.html")

"""

请求首行:

请求头:

请求头:

请求头:

........

请求头:ContentType:json#urlencode

请求体{"a":1,"b":2}:#a=1&b=2&c=3

"""
file_put.html;
<!DOCTYPE html>

<html lang="en">

<head>

    <meta charset="UTF-8">

    <title>Title</title>

    <script src="https://cdn.bootcss.com/jquery/3.3.1/jquery.js"></script>

    <style type="text/css">

    </style>

</head>

<body>

<h3>简单的form</h3>

<form action="" method="post" enctype="application/x-www-form-urlencoded">

    用户名:<input type="text" name="user">

    密码:<input type="password" name="pwd">

    <input type="submit">

</form>

<hr>

<h3>基于Form表单的文件上传</h3>

<form action="" method="post" enctype="multipart/form-data">

    用户名:<input type="text" name="user">

    头像:<input type="file" name="avatar">

    <input type="submit">

</form>

<h3>基于Ajax文件上传</h3>

<form action="" method="post">

    用户名:<input type="text" name="user">

    <input type="button" class="btn" value="Ajax">

</form>

<script>

    $(".btn").click(function () {

        $.ajax({

            url:"",

            type:"post",

            contentType:"application/json",

            data:JSON.stringify({

                a:1,

                b:2,

            }),

            success:function (data) {

                console.log(data)

            }

        })

    })

</script>

</body>

</html>
操作日志:
"D:\Program\PyCharm 2018.1.4\bin\runnerw.exe" C:\Users\TQTL911\PycharmProjects\AjaxDemo\venv\Scripts\python.exe C:/Users/TQTL911/PycharmProjects/AjaxDemo/manage.py runserver 8000

Performing system checks...

System check identified no issues (0 silenced).

August 21, 2018 - 09:37:03

Django version 2.1, using settings 'AjaxDemo.settings'

Starting development server at http://127.0.0.1:8000/

Quit the server with CTRL-BREAK.

<QueryDict: {}>

[21/Aug/2018 09:37:05] "GET /index/ HTTP/1.1" 200 2383

Not Found: /favicon.ico

[21/Aug/2018 09:37:05] "GET /favicon.ico HTTP/1.1" 404 2509

[21/Aug/2018 09:37:07] "POST /login/ HTTP/1.1" 200 55

[21/Aug/2018 09:37:26] "GET /file_put/ HTTP/1.1" 200 1227

[21/Aug/2018 09:37:30] "POST /file_put/ HTTP/1.1" 200 2

b'{"a":1,"b":2}'

<QueryDict: {}>

<MultiValueDict: {}>

[21/Aug/2018 09:37:56] "GET /file_put/ HTTP/1.1" 200 1227

b'{"a":1,"b":2}'

[21/Aug/2018 09:38:28] "POST /file_put/ HTTP/1.1" 200 2

<QueryDict: {}>

<MultiValueDict: {}>

Performing system checks...

System check identified no issues (0 silenced).

August 21, 2018 - 09:40:11

Django version 2.1, using settings 'AjaxDemo.settings'

Starting development server at http://127.0.0.1:8000/

Quit the server with CTRL-BREAK.
95-基于Ajax的文件上传
1、基于Ajax的文件上传;
views.py;
from django.shortcuts import render,HttpResponse

# Create your views here.

from app01.models import User

def index(request):

    print(request.GET)

    return render(request,"index.html")

def test_ajax(request):

    return HttpResponse("Hello cuixiaozhao!")

def cal(request):

    print(request.POST)

    n1 = int(request.POST.get("n1"))

    n2 = int(request.POST.get("n2"))

    ret = n1 + n2

    return HttpResponse(ret)

def login(request):

    # print(request.POST)

    user = request.POST.get("user")

    pwd = request.POST.get("pwd")

    user = User.objects.filter(name=user,pwd=pwd).first()

    res = {"User":None,"msg":None}

    if user:

        res["user"] = user.name

    else:

        res["msg"] = "Username or Password is Wrong!"

    import json

    #引入json的目的,是因为http协议传输过程中,必须使用字符串;如此引入了"序列化"以及"反序列化"的概念;

    return HttpResponse(json.dumps(res))

def file_put(request):

    if request.method == "POST":

        print("body",request.body)#请求报文中的请求体!

        print("POST",request.POST)

        print(request.FILES)

        # file_obj = request.FILES.get("avatar")

        # with open(file_obj.name,"wb") as f:

        #     for line in file_obj:

        #         f.write(line)

        return HttpResponse("OK")

    return render(request,"file_put.html")

"""

请求首行:

请求头:

请求头:

请求头:

........

请求头:ContentType:json#urlencode

请求体{"a":1,"b":2}:#a=1&b=2&c=3

"""
file_put.py;
<!DOCTYPE html>

<html lang="en">

<head>

    <meta charset="UTF-8">

    <title>Title</title>

    <script src="https://cdn.bootcss.com/jquery/3.3.1/jquery.js"></script>

    <style type="text/css">

    </style>

</head>

<body>

<h3>简单的form</h3>

<form action="" method="post" enctype="application/x-www-form-urlencoded">

    用户名:<input type="text" name="user">

    密码:<input type="password" name="pwd">

    <input type="submit">

</form>

<hr>

<h3>基于Form表单的文件上传</h3>

<form action="" method="post" enctype="multipart/form-data">

    用户名:<input type="text" name="user">

    头像:<input type="file" name="avatar">

    <input type="submit">

</form>

<hr>

<br>

<br>

<br>

<!--

<h3>Ajax传递json数据</h3>

<form action="" method="post">

    用户名:<input type="text" name="user">

    <input type="button" class="btn" value="Ajax">

</form>

-->

<hr>

<br>

<br>

<br>

<h2>基于Ajax的文件上传</h2>

<form action="" method="post">

    用户名:<input type="text" id="user">

    头像:<input type="text" id="avatar">

    <input type="file" class="btn" value="Ajax">

    <input type="button" class="btn" value="Ajax">

</form>

<script>

    //Ajax传递json数据;

    /*  $(".btn").click(function () {

          $.ajax({

              url:"",

              type:"post",

              contentType:"application/json",

              data:JSON.stringify({

                  a:1,

                  b:2,

              }),

              success:function (data) {

                  console.log(data)

              }

          })

      })

      */

    //基于Ajax上传文件;

    $(".btn").click(function () {

        var formdata = new FormData();

        formdata.append("user",$("#user").val());

        formdata.append("avatar",$("#avatar")[0].files[0]);

        $.ajax({

            url:"",

            type:"post",

            ContentType:false,

            processData:false,

            data:formdata,

            success:function (data) {

                console.log(data)

            }

        })

    })

</script>

</body>

</html>
96-分页器1
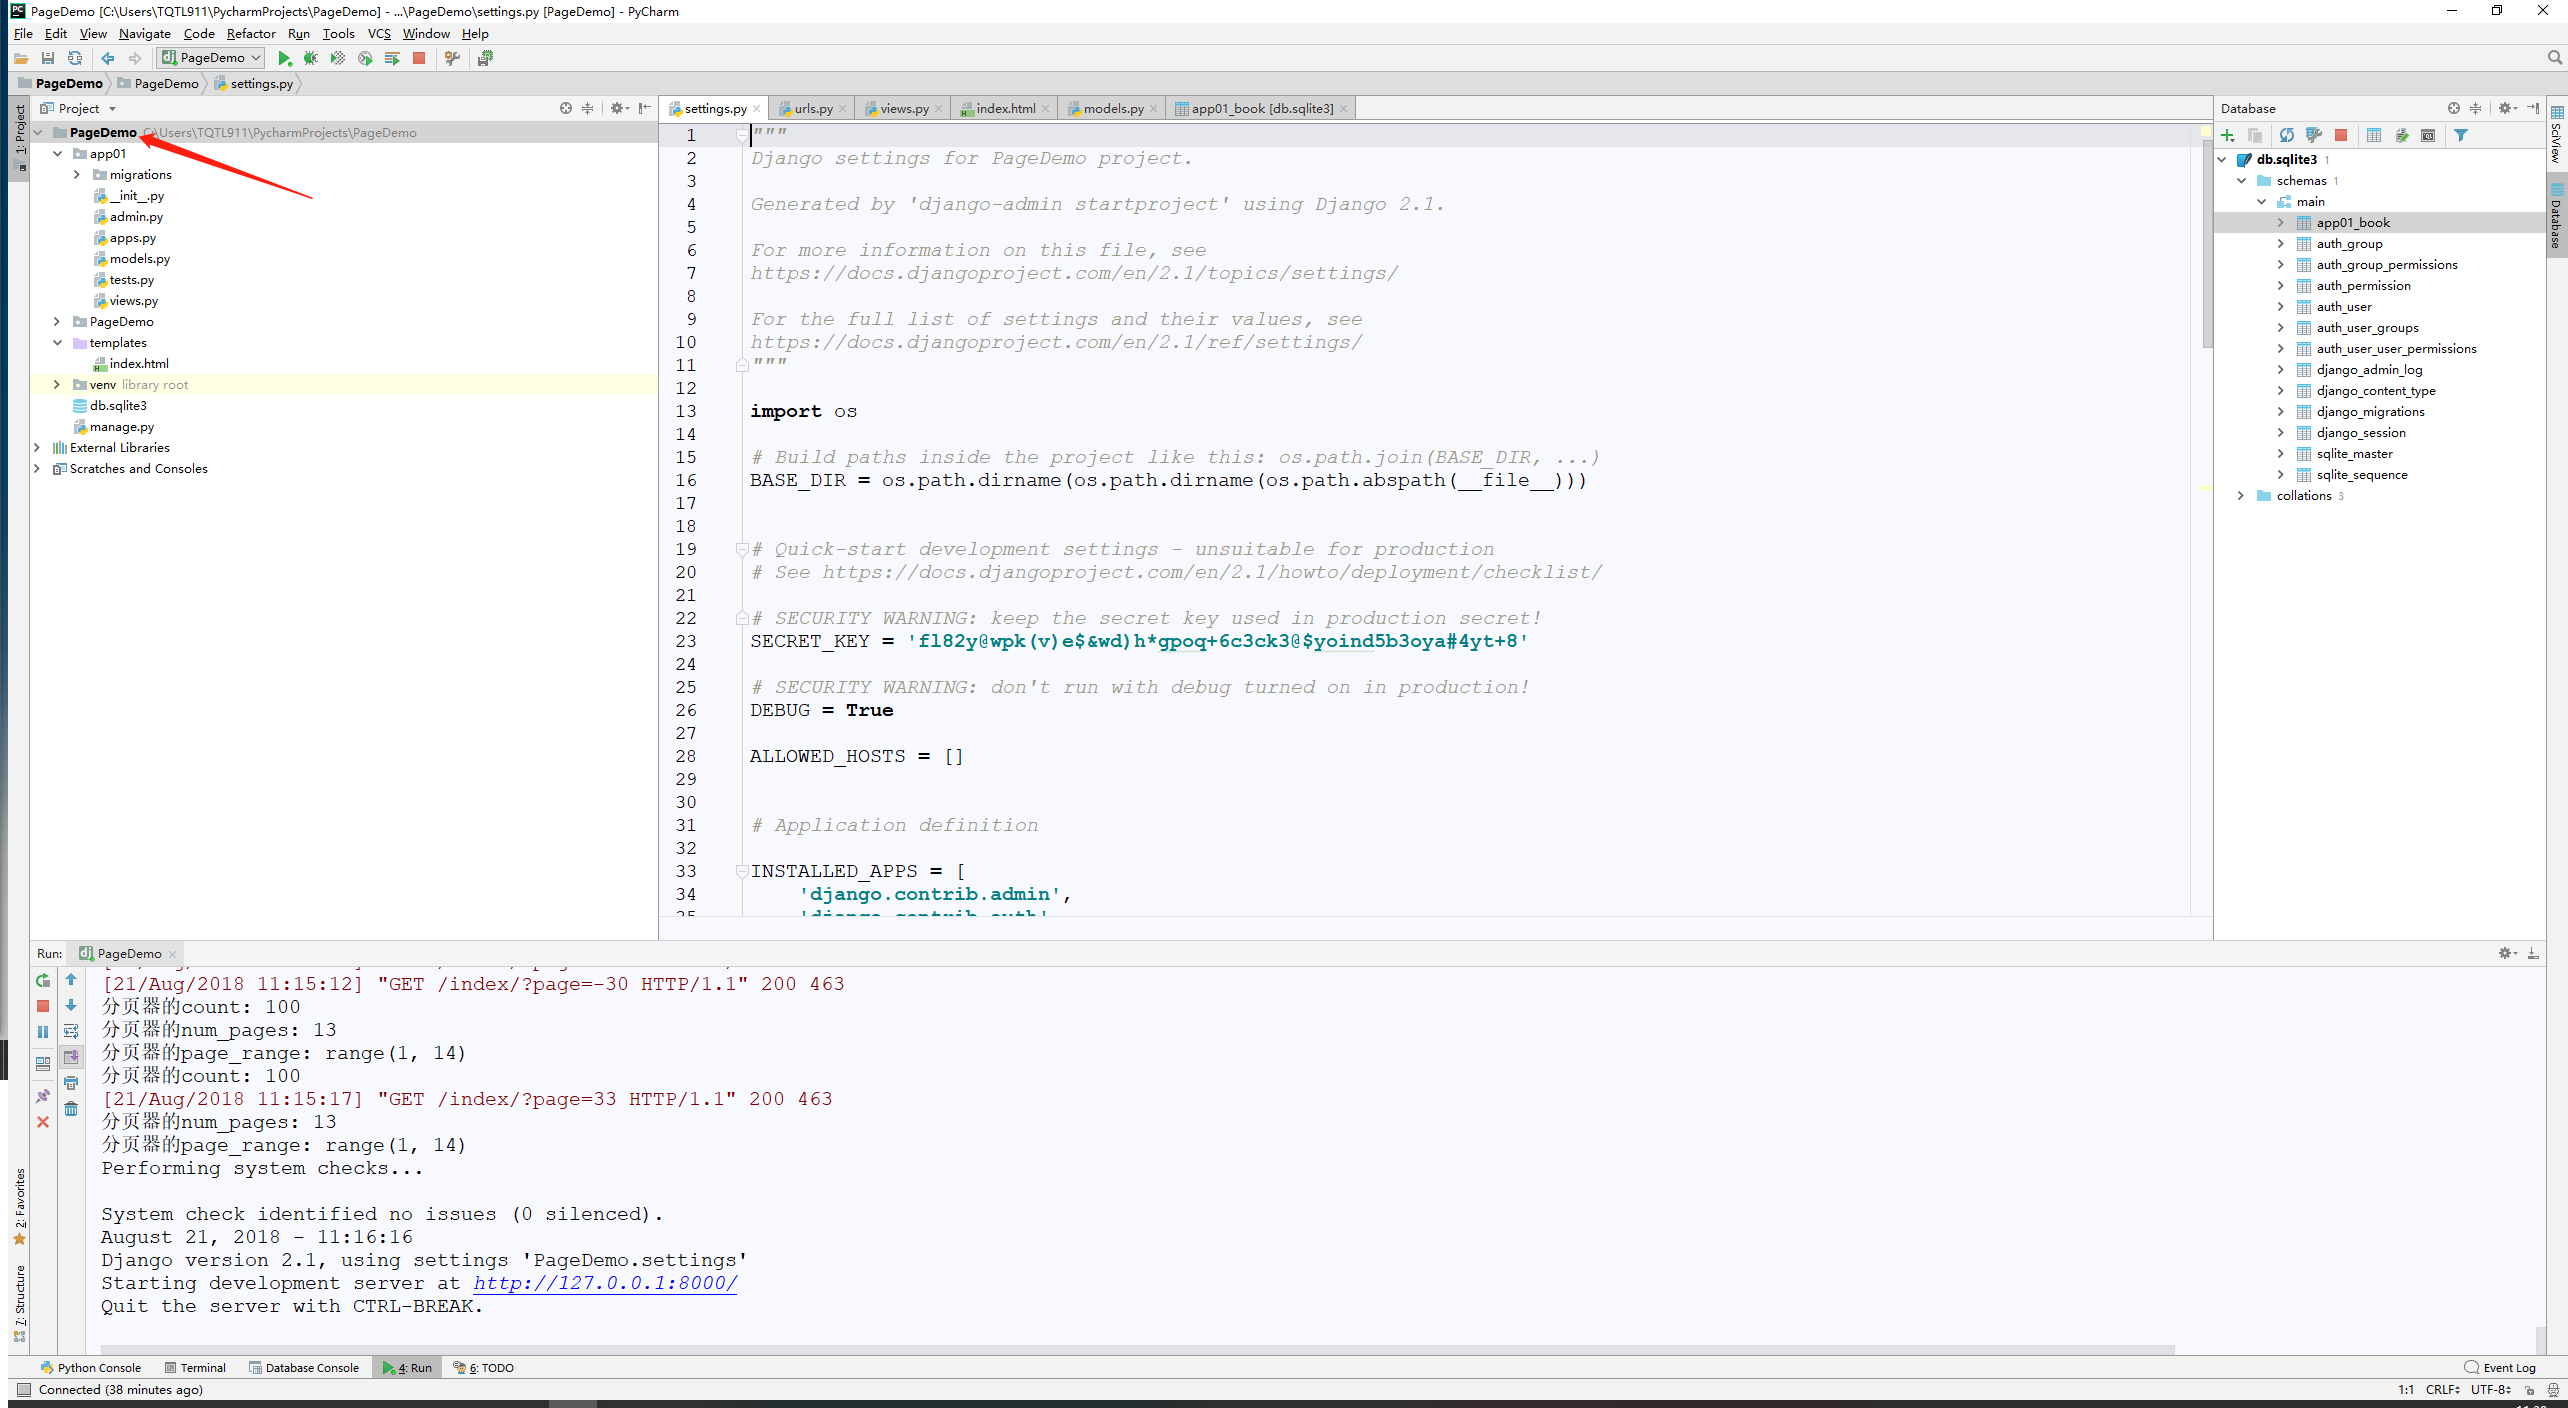
1、Django中的分页器初识;
Django 提供了几个类, 可以帮助我们管理分页数据 - 也就是说,通过 "上一个 / 下一个" 链接分割多个页面的数据, 这些类放在 `django/core/ paginator.py`中。
2、创建PageDemo的Django项目并配置应用app01;
3、配置urls.py;
"""PageDemo URL Configuration

The `urlpatterns` list routes URLs to views. For more information please see:

    https://docs.djangoproject.com/en/2.1/topics/http/urls/

Examples:

Function views

    1. Add an import:  from my_app import views

    2. Add a URL to urlpatterns:  path('', views.home, name='home')

Class-based views

    1. Add an import:  from other_app.views import Home

    2. Add a URL to urlpatterns:  path('', Home.as_view(), name='home')

Including another URLconf

    1. Import the include() function: from django.urls import include, path

    2. Add a URL to urlpatterns:  path('blog/', include('blog.urls'))

"""

from django.contrib import admin

from django.urls import path

from app01 import views

urlpatterns = [

    path('admin/', admin.site.urls),

    path('index/', views.index),

]
4、编写视图函数views.py;
- for循环导入数据(不建议);
- 通过bulk_create()方法一次性批量插入数据;
- 通过django.core.paginator导入Paginator,EmptyPage模块;
- Paginator下的count()方法;
- Paginator下的num_pages()方法;
- Paginator下的page_range()方法;
- try except 异常捕获的引入;
5、templates下新增index.html文件;
<!DOCTYPE html>
<html lang="en">
<head>
<meta charset="UTF-8">
<title>Title</title>
<style type="text/css"> </style>
</head>
<body>
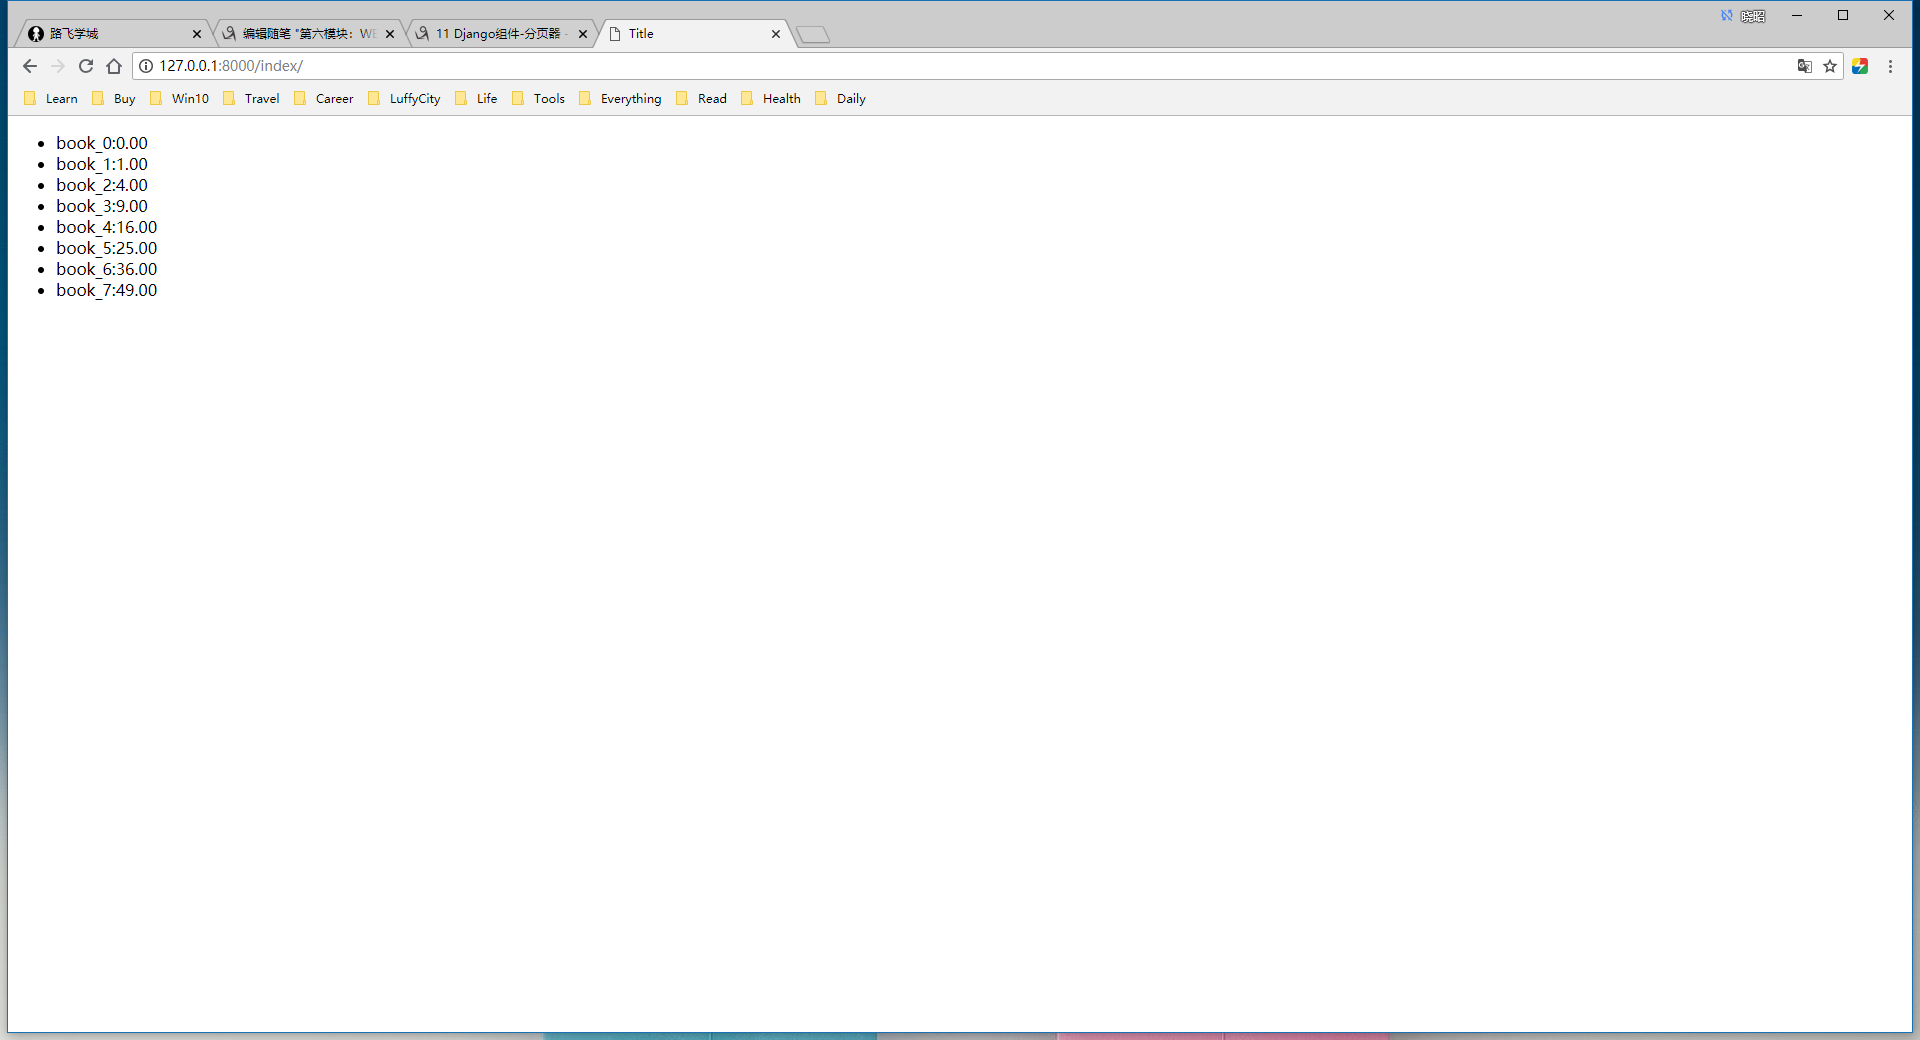
<ul>
{% for book in current_page %}
<li>{{ book.title }}:{{ book.price }}</li>
{% endfor %} </ul>
</body>
</html>
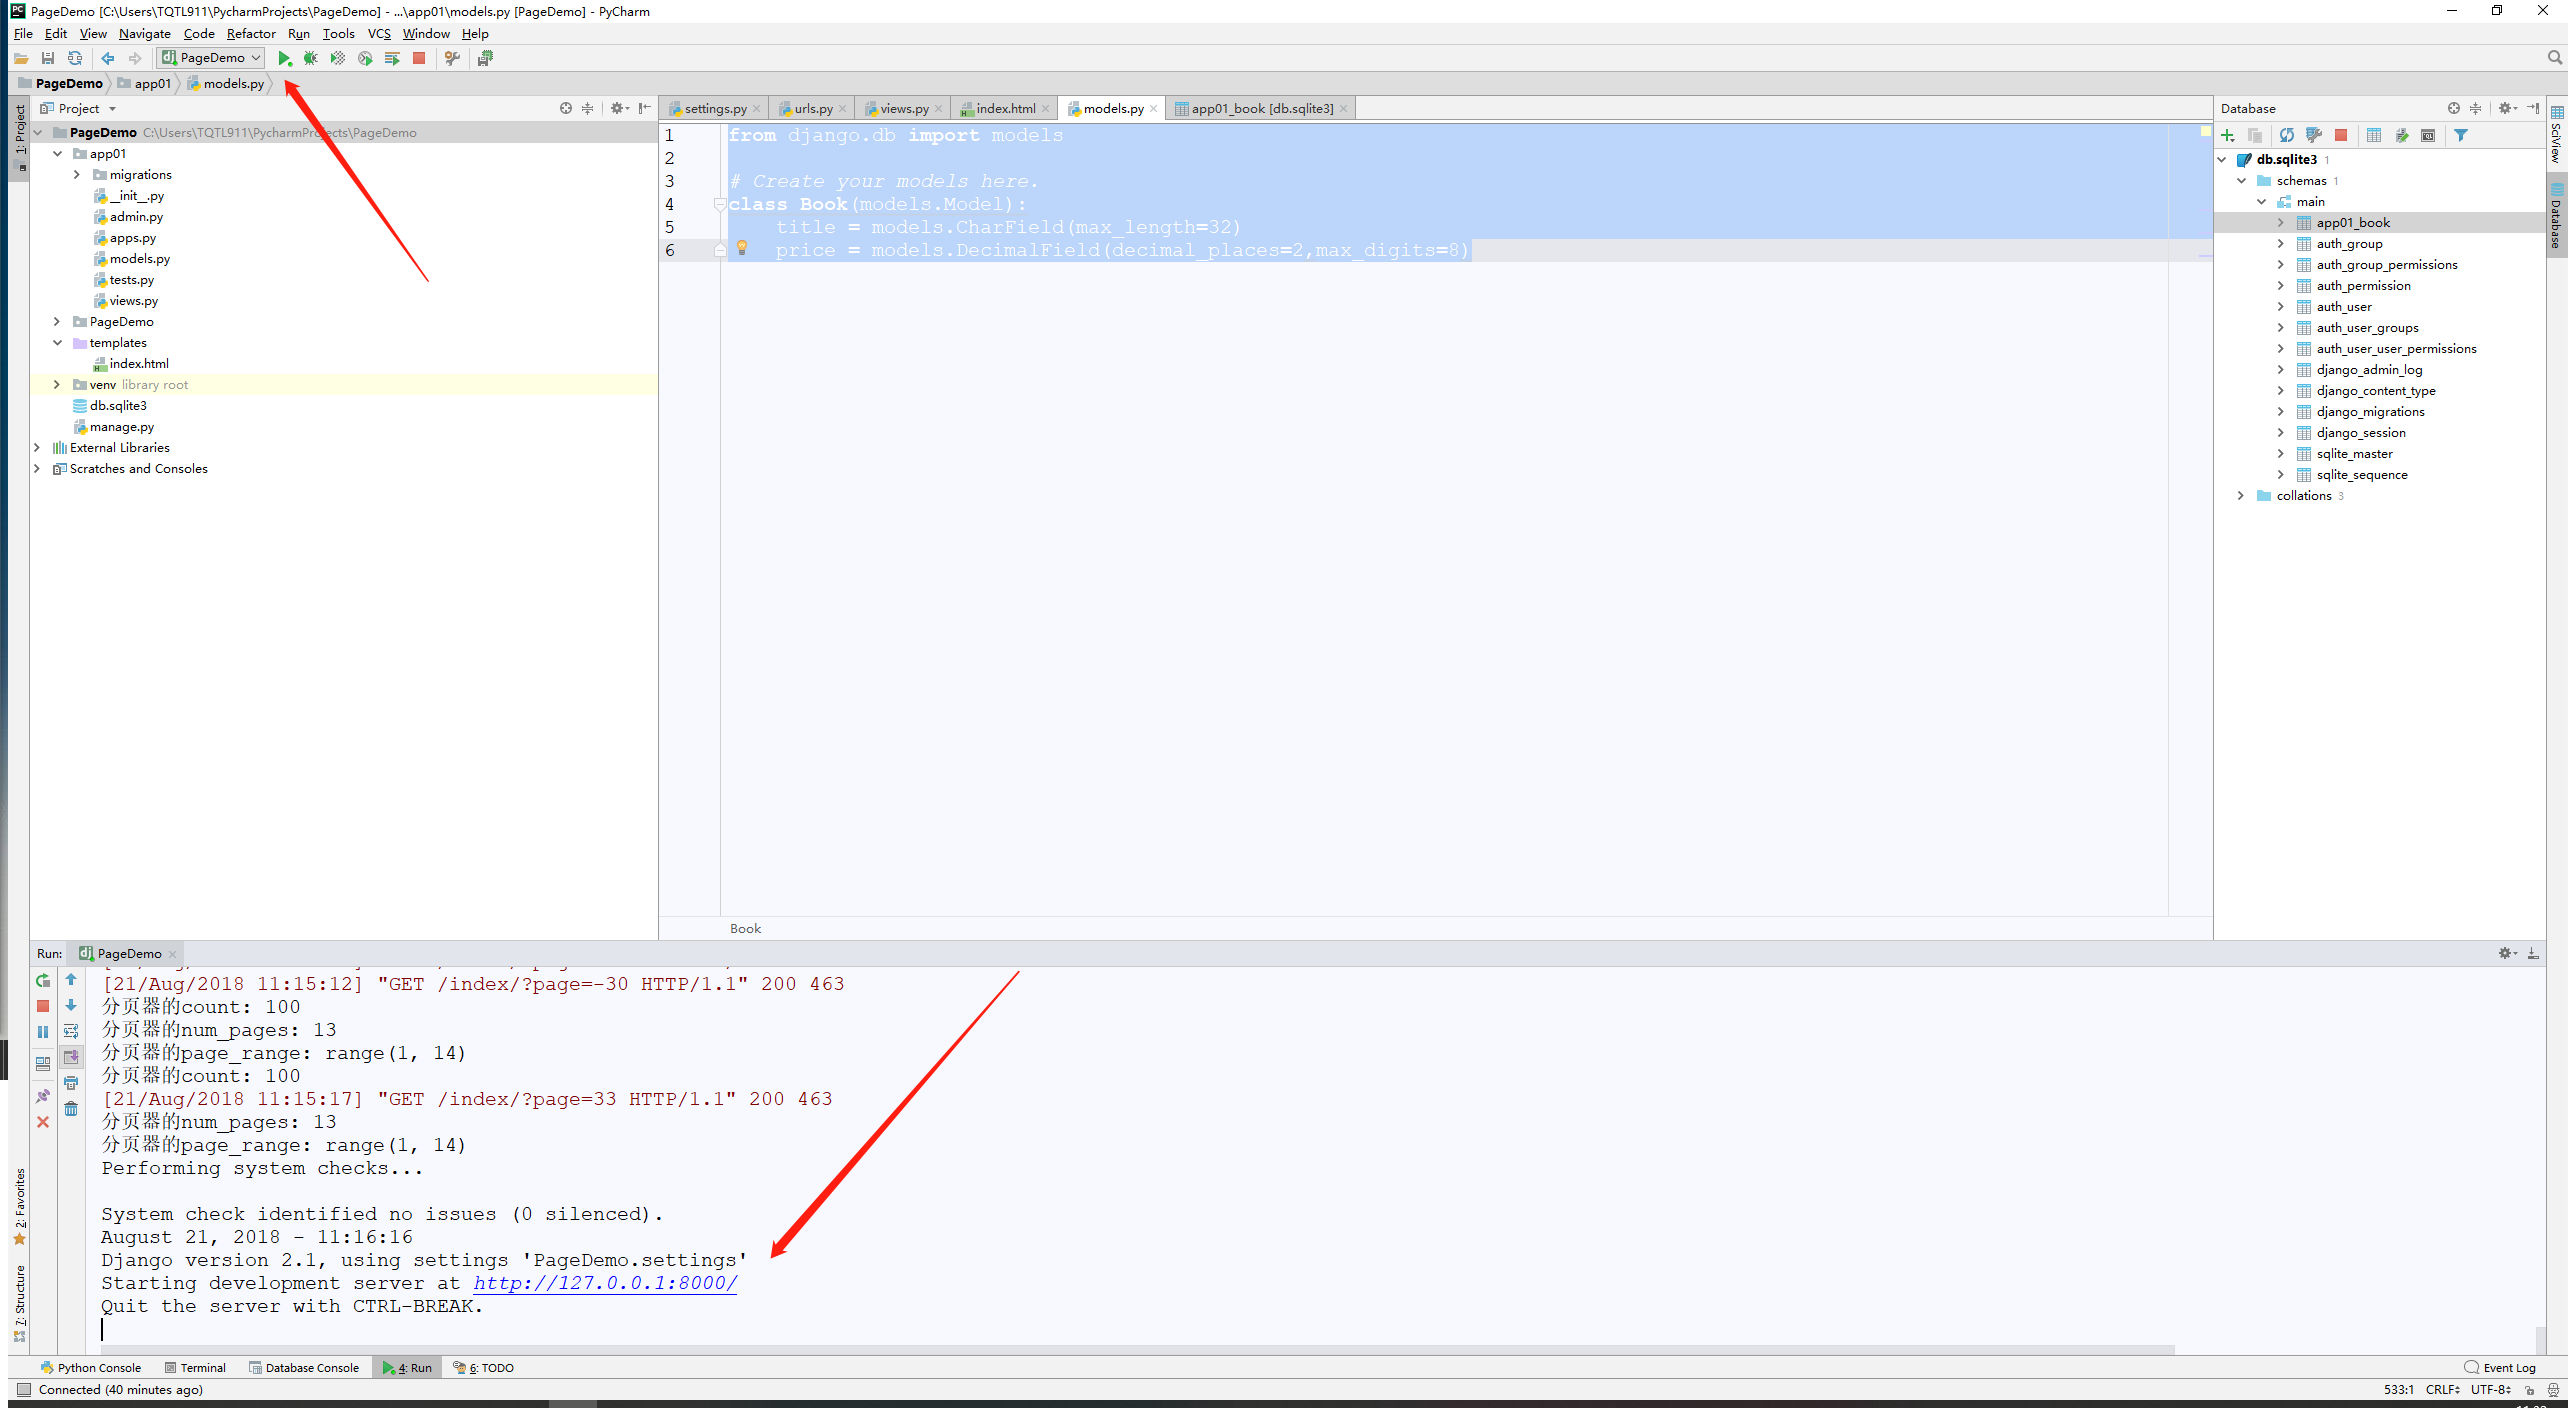
6、创建models.py文件;
from django.db import models

# Create your models here.

class Book(models.Model):

    title = models.CharField(max_length=32)

    price = models.DecimalField(decimal_places=2,max_digits=8)
7、执行数据库迁移操作;
python manage.py makemigrations

python manage.py migrate
Microsoft Windows [版本 10.0.17134.1]

(c) 2018 Microsoft Corporation。保留所有权利。

(venv) C:\Users\TQTL911\PycharmProjects\PageDemo>python manage.py makemigrations

Migrations for 'app01':

  app01\migrations\0001_initial.py

    - Create model Book

(venv) C:\Users\TQTL911\PycharmProjects\PageDemo>python manage.py migrate

Operations to perform:

  Apply all migrations: admin, app01, auth, contenttypes, sessions

Running migrations:

  Applying contenttypes.0001_initial... OK

  Applying auth.0001_initial... OK

  Applying admin.0001_initial... OK

  Applying admin.0002_logentry_remove_auto_add... OK

  Applying admin.0003_logentry_add_action_flag_choices... OK

  Applying app01.0001_initial... OK

  Applying contenttypes.0002_remove_content_type_name... OK

  Applying auth.0002_alter_permission_name_max_length... OK

  Applying auth.0003_alter_user_email_max_length... OK

  Applying auth.0004_alter_user_username_opts... OK

  Applying auth.0005_alter_user_last_login_null... OK

  Applying auth.0006_require_contenttypes_0002... OK

  Applying auth.0007_alter_validators_add_error_messages... OK

  Applying auth.0008_alter_user_username_max_length... OK

  Applying auth.0009_alter_user_last_name_max_length... OK

  Applying sessions.0001_initial... OK

(venv) C:\Users\TQTL911\PycharmProjects\PageDemo>^A
8、进行项目启动;
9、访问index.html页面;
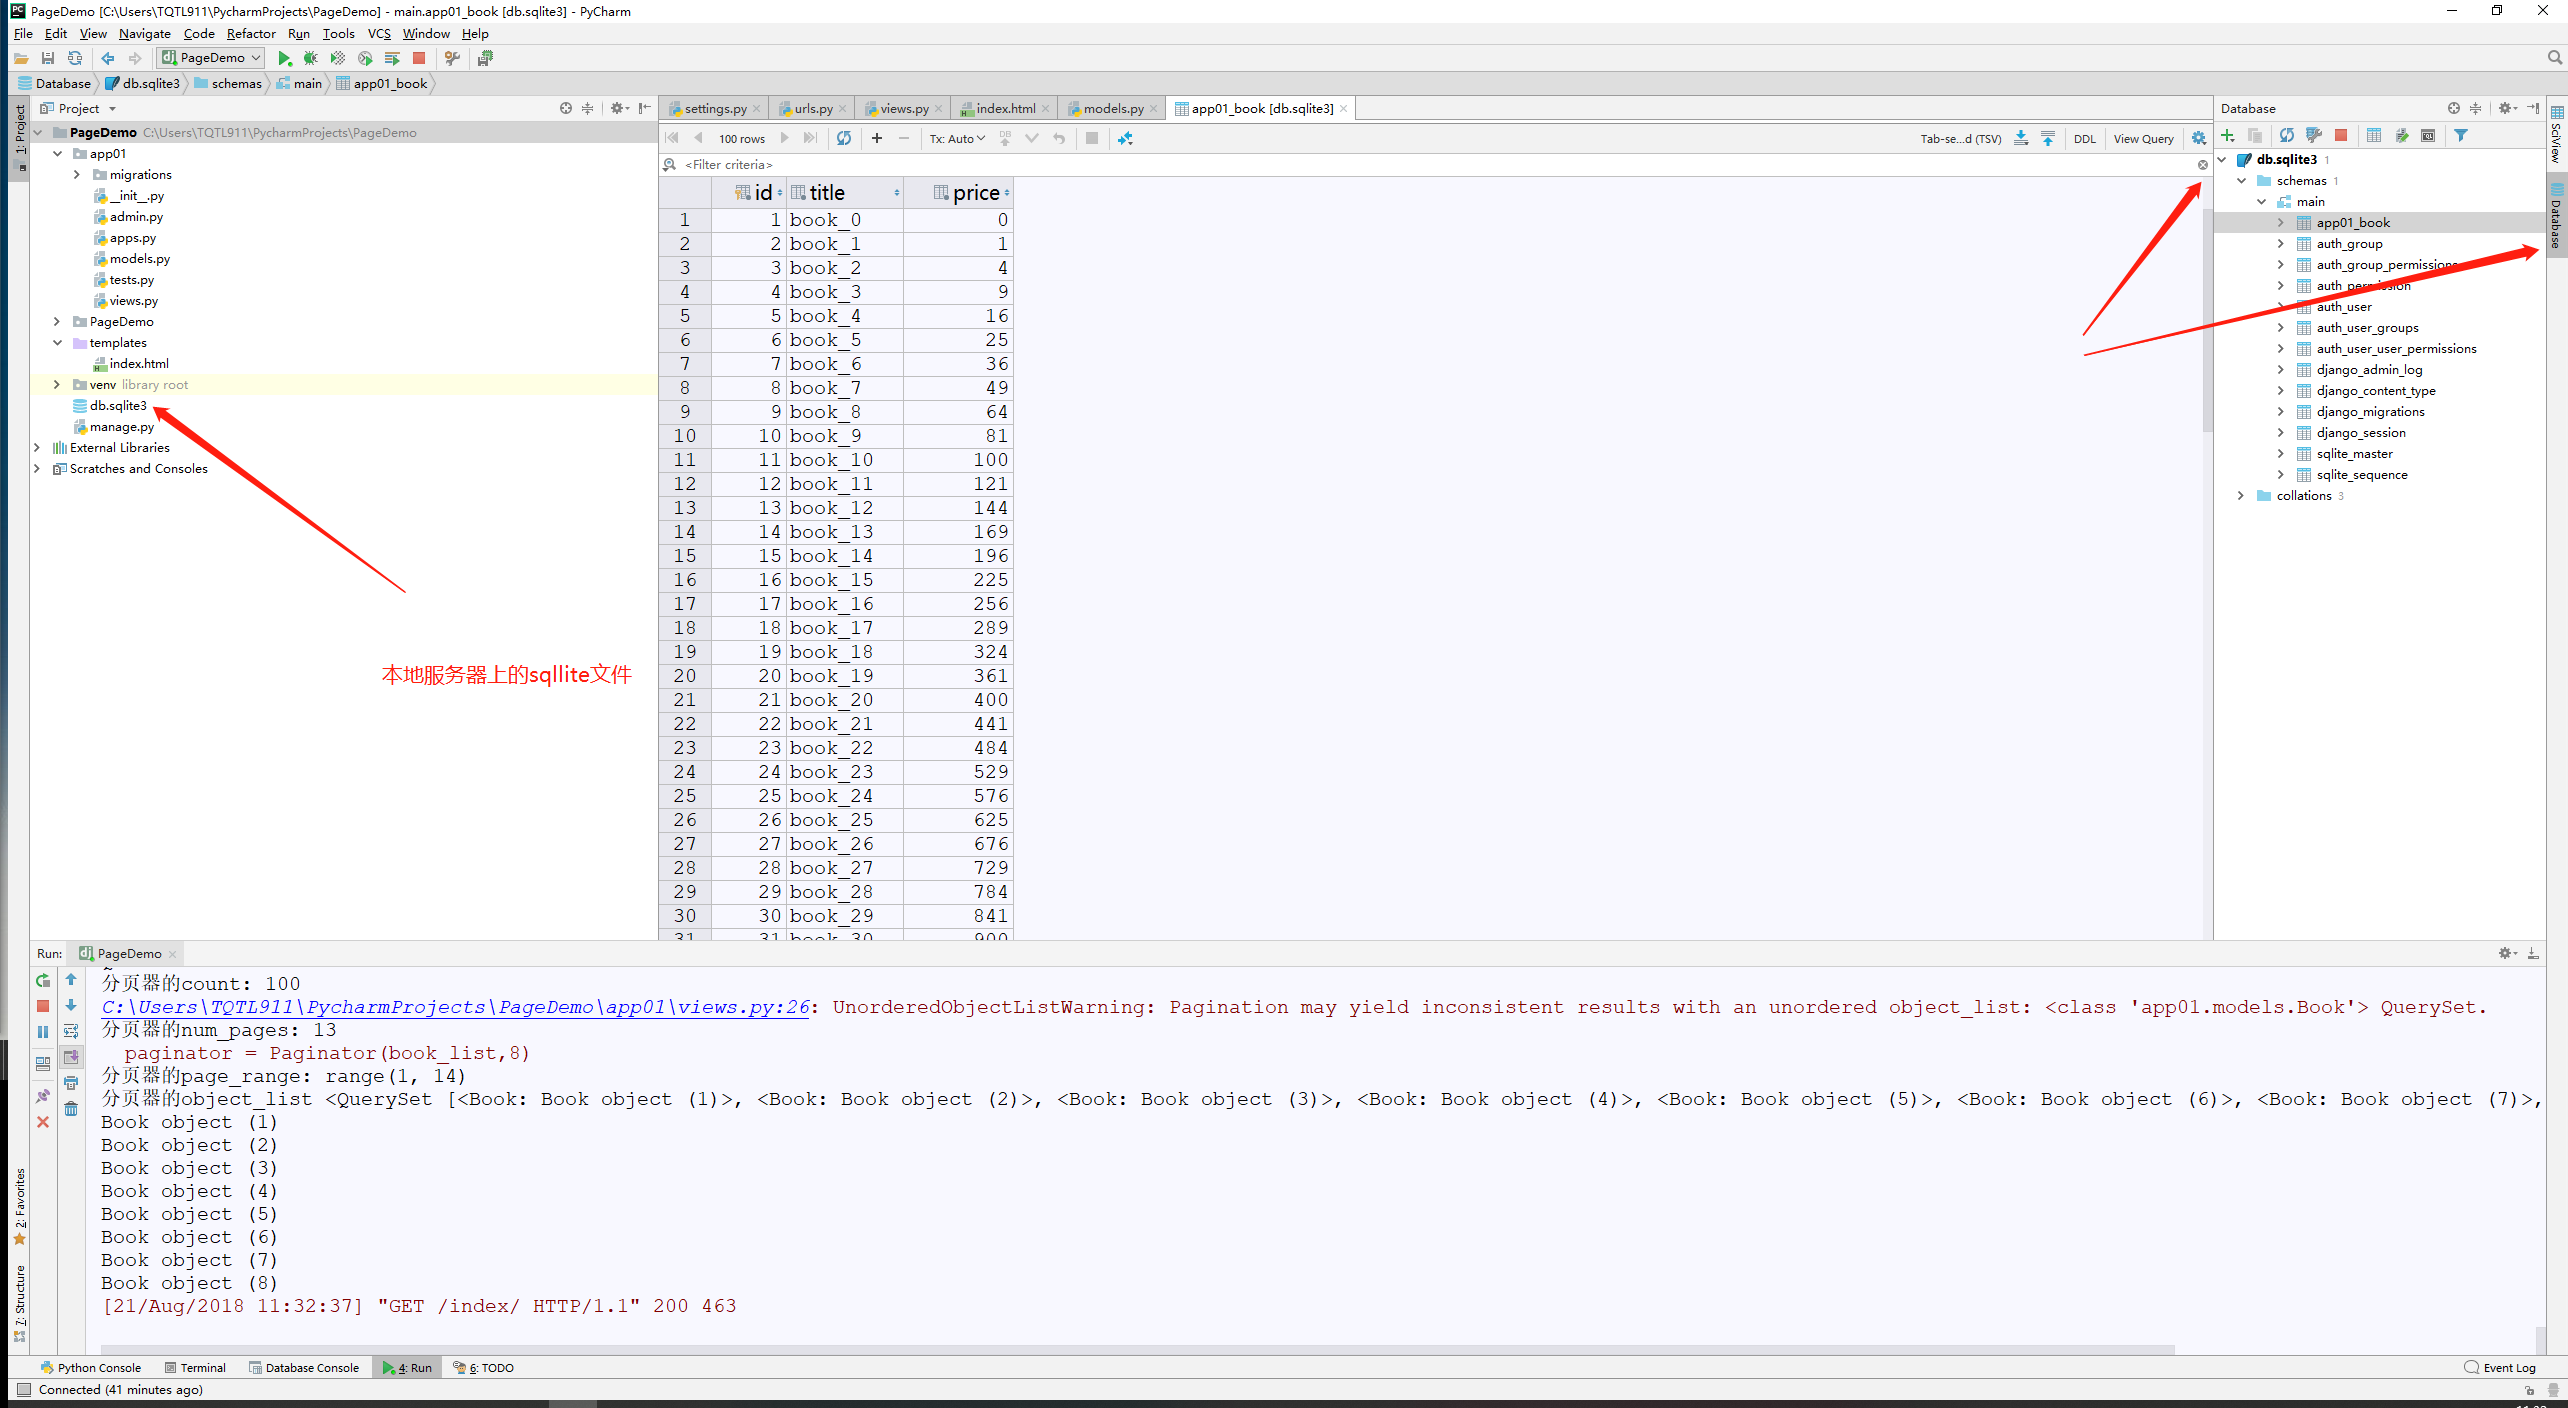
10、链接sqllite数据库并查看数据;
操作日志;
System check identified no issues (0 silenced).

August 21, 2018 - 11:16:16

Django version 2.1, using settings 'PageDemo.settings'

Starting development server at http://127.0.0.1:8000/

Quit the server with CTRL-BREAK.

分页器的count: 100

C:\Users\TQTL911\PycharmProjects\PageDemo\app01\views.py:26: UnorderedObjectListWarning: Pagination may yield inconsistent results with an unordered object_list: <class 'app01.models.Book'> QuerySet.

分页器的num_pages: 13

  paginator = Paginator(book_list,8)

分页器的page_range: range(1, 14)

分页器的object_list <QuerySet [<Book: Book object (1)>, <Book: Book object (2)>, <Book: Book object (3)>, <Book: Book object (4)>, <Book: Book object (5)>, <Book: Book object (6)>, <Book: Book object (7)>, <Book: Book object (8)>]>

Book object (1)

Book object (2)

Book object (3)

Book object (4)

Book object (5)

Book object (6)

Book object (7)

Book object (8)

[21/Aug/2018 11:32:37] "GET /index/ HTTP/1.1" 200 463
97-分页器2
1、分页器实现显示页码;
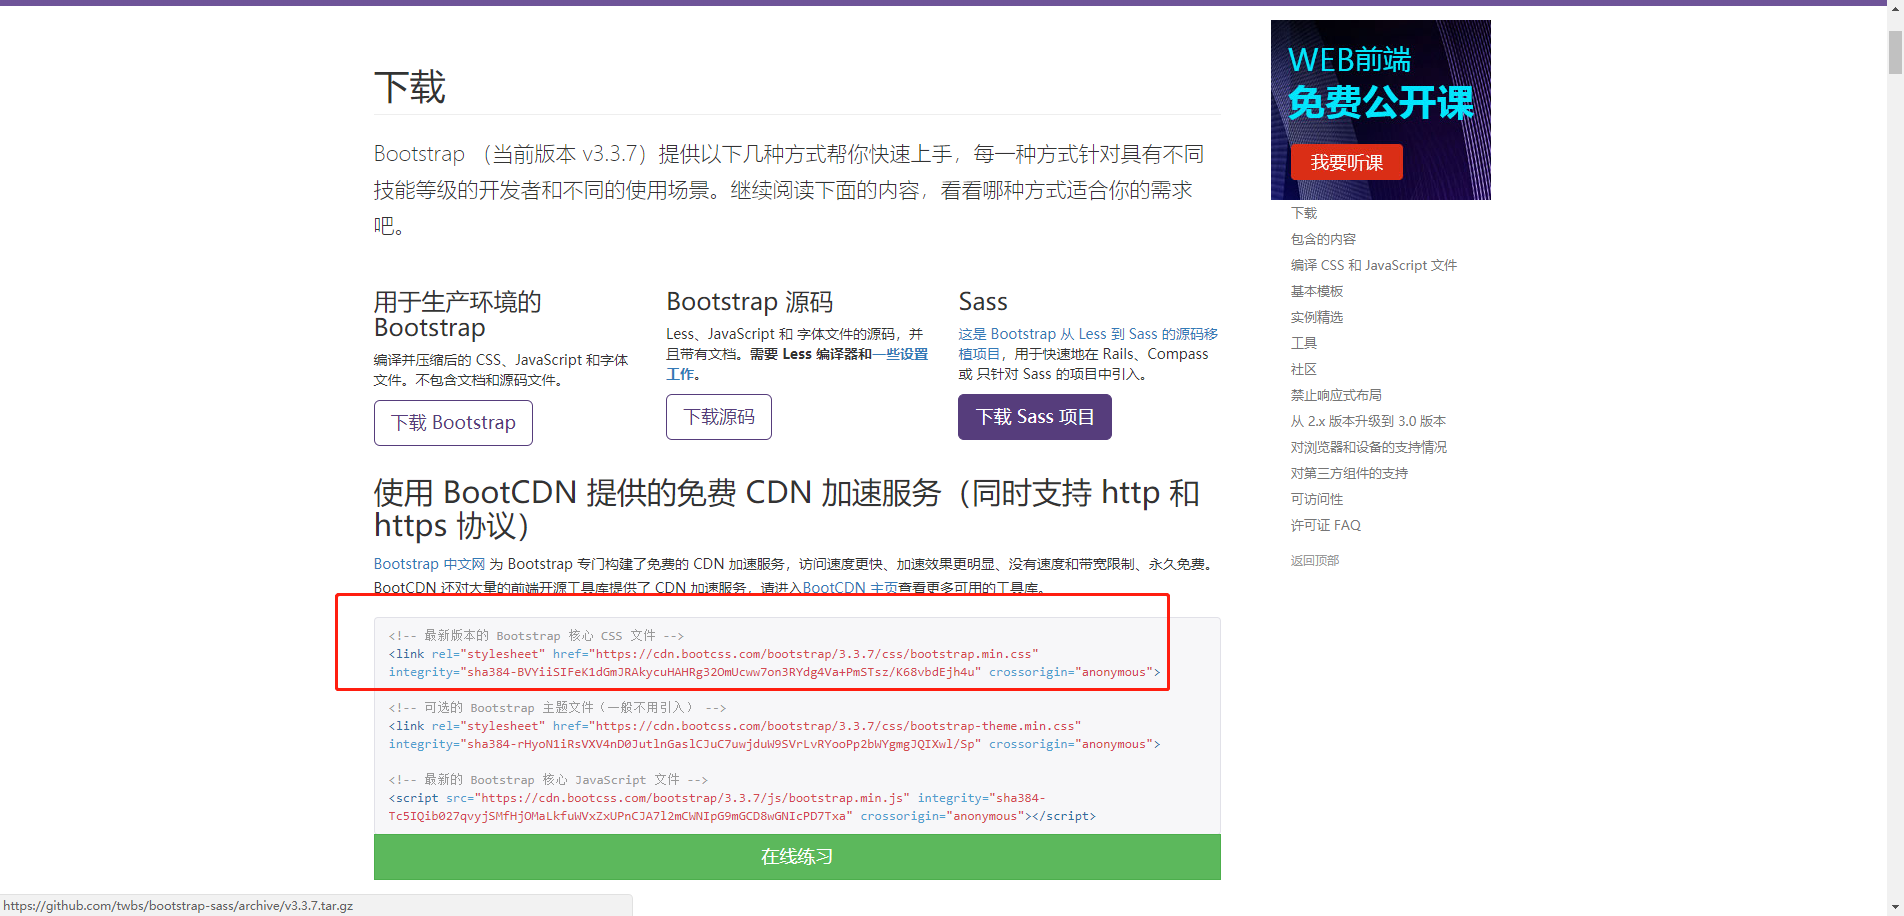
2、引入CDN类型的Bootstrap;
使用 BootCDN 提供的免费 CDN 加速服务(同时支持 http 和 https 协议)
Bootstrap 中文网 为 Bootstrap 专门构建了免费的 CDN 加速服务,访问速度更快、加速效果更明显、没有速度和带宽限制、永久免费。BootCDN 还对大量的前端开源工具库提供了 CDN 加速服务,请进入BootCDN 主页查看更多可用的工具库。
<!-- 最新版本的 Bootstrap 核心 CSS 文件 -->

<link rel="stylesheet" href="https://cdn.bootcss.com/bootstrap/3.3.7/css/bootstrap.min.css" integrity="sha384-BVYiiSIFeK1dGmJRAkycuHAHRg32OmUcww7on3RYdg4Va+PmSTsz/K68vbdEjh4u" crossorigin="anonymous">

<!-- 可选的 Bootstrap 主题文件(一般不用引入) -->

<link rel="stylesheet" href="https://cdn.bootcss.com/bootstrap/3.3.7/css/bootstrap-theme.min.css" integrity="sha384-rHyoN1iRsVXV4nD0JutlnGaslCJuC7uwjduW9SVrLvRYooPp2bWYgmgJQIXwl/Sp" crossorigin="anonymous">

<!-- 最新的 Bootstrap 核心 JavaScript 文件 -->

<script src="https://cdn.bootcss.com/bootstrap/3.3.7/js/bootstrap.min.js" integrity="sha384-Tc5IQib027qvyjSMfHjOMaLkfuWVxZxUPnCJA7l2mCWNIpG9mGCD8wGNIcPD7Txa" crossorigin="anonymous"></script>
3、添加Bootstrap下的分页组件;
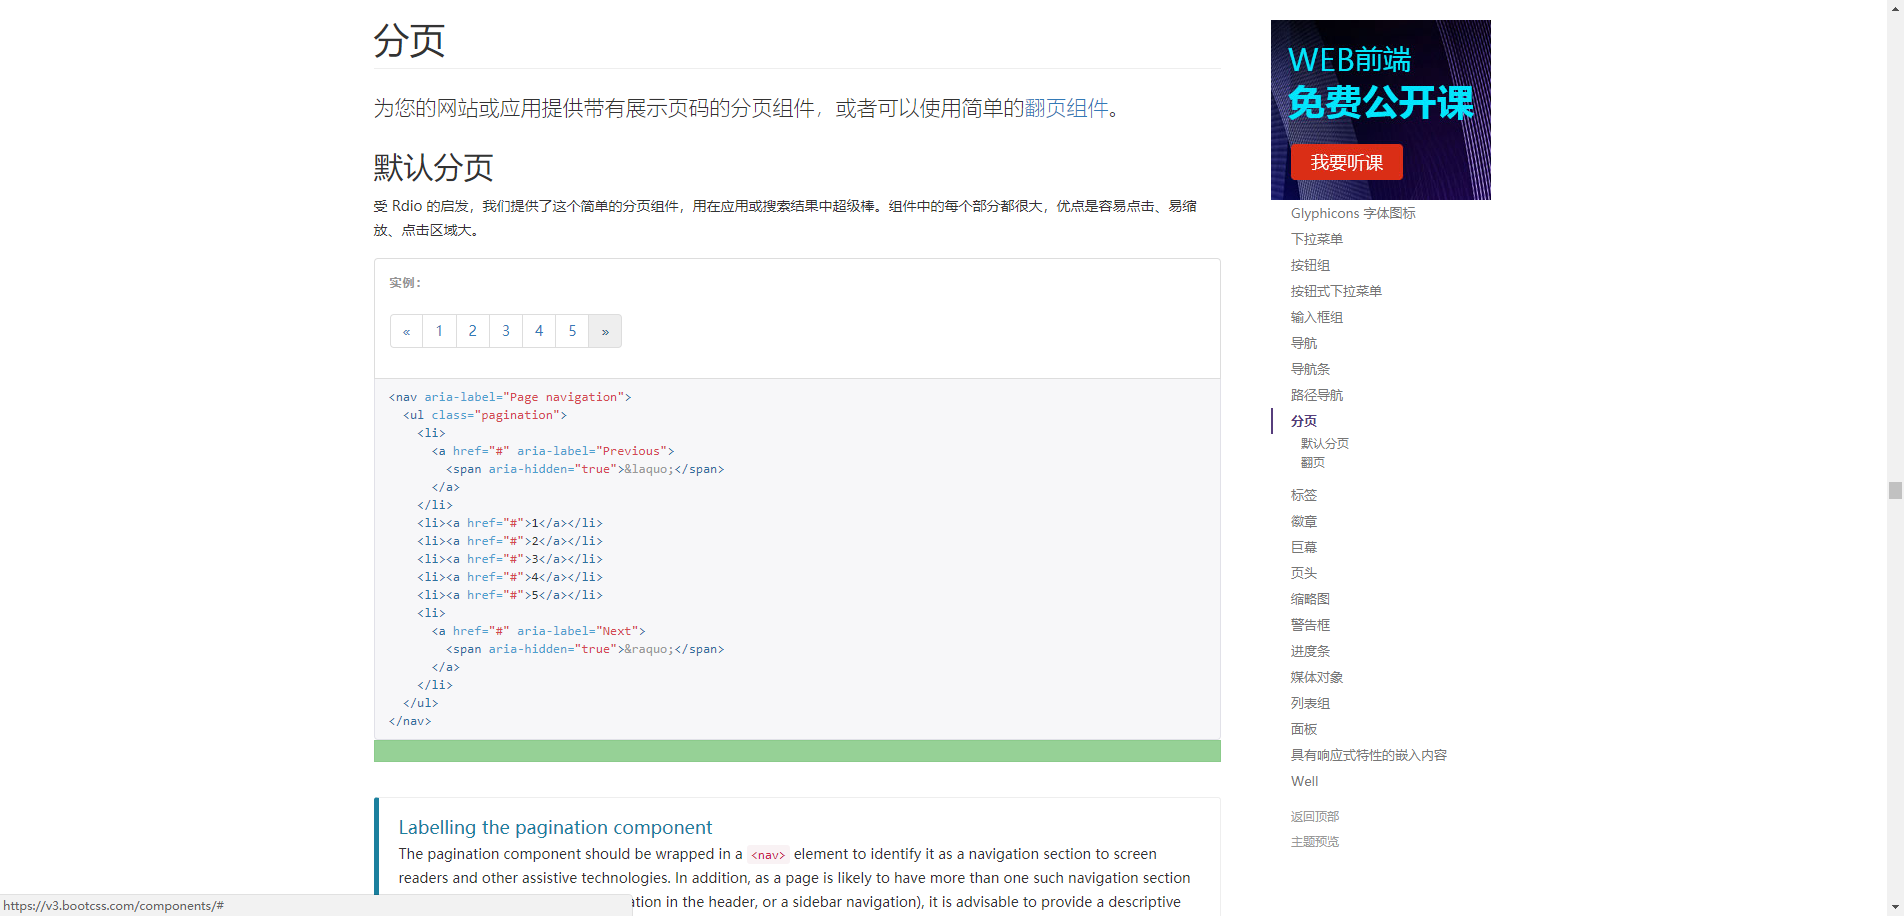
<nav aria-label="Page navigation">
<ul class="pagination">
<li>
<a href="#" aria-label="Previous">
<span aria-hidden="true">«</span>
</a>
</li>
<li><a href="#">1</a></li>
<li><a href="#">2</a></li>
<li><a href="#">3</a></li>
<li><a href="#">4</a></li>
<li><a href="#">5</a></li>
<li>
<a href="#" aria-label="Next">
<span aria-hidden="true">»</span>
</a>
</li>
</ul>
</nav>
4、针对分页的内容进行循环遍历;
index.html;
<!DOCTYPE html>

<html lang="en">

<head>

    <meta charset="UTF-8">

    <title>Django中的分页器</title>

    <!-- 最新版本的 Bootstrap 核心 CSS 文件 -->

    <link rel="stylesheet" href="https://cdn.bootcss.com/bootstrap/3.3.7/css/bootstrap.min.css" integrity="sha384-BVYiiSIFeK1dGmJRAkycuHAHRg32OmUcww7on3RYdg4Va+PmSTsz/K68vbdEjh4u" crossorigin="anonymous">

</head>

<body>

<ul>

    {% for book in current_page %}

        <li>{{ book.title }}:{{ book.price }}</li>

    {% endfor %}

</ul>

<nav aria-label="Page navigation">

    <ul class="pagination">

        <li>

            <a href="#" aria-label="Previous"><span aria-hidden="true">上一页</span></a>

        </li>

        {% for item in paginator.page_range %}

            {% if current_page_num == item %}

                <li class="active"><a href="?page={{ item }}">{{ item }}</a></li>

            {%   else %}

                <li ><a href="?page={{ item }}">{{ item }}</a></li>

            {% endif %}

        {% endfor %}

        <li>

            <a href="#" aria-label="Next"><span aria-hidden="true">下一页</span></a>

        </li>

    </ul>

</nav>

</body>

</html>
views.py;
from django.shortcuts import render

# Create your views here.

from app01.models import *

#引入Django中的分页器;

from django.core.paginator import Paginator,EmptyPage

def index(request):

    ""

    '''

    # #循环插入,不可取,效率低下,数据库压力过大!;

    # for i in range(10):

    #     Book.objects.create(title="Book_%s"%i,price=i*i)

    #批量插入;

    book_list = []

    for i in range(100):

        book = Book(title="book_%s"%i,price=i*i)

        book_list.append(book)

    #一次性批量插入;

    Book.objects.bulk_create(book_list)

    :param request:

    :return:

    '''

    book_list = Book.objects.all()

    #分页器;

    paginator = Paginator(book_list,8)

    print("分页器的count:",paginator.count)#数据总数;

    print("分页器的num_pages:",paginator.num_pages)#总页数;

    print("分页器的page_range:",paginator.page_range)#页码的列表;

    #加入异常捕获;

    try:

        current_page_num = int(request.GET.get("page",1))

        current_page = paginator.page(current_page_num)

        #page1 = paginator.page(2)

        #page1 = paginator.page(3)

        #显示某一页具体数据的两种方式;

        print("分页器的object_list",current_page.object_list)

        #进入循环打印;

        for i in current_page:

            print(i)

    except EmptyPage as e:

        #捕获到异常后,定位至第一页面,但是要提起导入EmptyPage模块;

        current_page = paginator.page(1)

    return render(request,"index.html",locals())
5、已选中的页签,进行加深显示;
98-分页器3
1、Django分页器3;
2、添加分页器的如下属性:
- ?page = {{ current_page_num|add:-1 }}
- ?page={{ current_page.previous_page_number}}
3、index.html:
<!DOCTYPE html>

<html lang="en">

<head>

    <meta charset="UTF-8">

    <title>Django中的分页器</title>

    <!-- 最新版本的 Bootstrap 核心 CSS 文件 -->

    <link rel="stylesheet" href="https://cdn.bootcss.com/bootstrap/3.3.7/css/bootstrap.min.css" integrity="sha384-BVYiiSIFeK1dGmJRAkycuHAHRg32OmUcww7on3RYdg4Va+PmSTsz/K68vbdEjh4u" crossorigin="anonymous">

</head>

<body>

<ul>

    {% for book in current_page %}

        <li>{{ book.title }}:{{ book.price }}</li>

    {% endfor %}

</ul>

<nav aria-label="Page navigation">

    <ul class="pagination">

        {% if current_page.has_previous %}

            <li>

                <!--<a href="?page={{ current_page_num|add:-1 }}" aria-label="Previous"><span aria-hidden="true">上一页</span></a>-->

                <a href="?page={{ current_page.previous_page_number}}" aria-label="Previous"><span aria-hidden="true">上一页</span></a>

            </li>

        {% else %}

            <li class="disabled">

                <a href="" aria-label="Previous"><span aria-hidden="true">上一页</span></a>

            </li>

        {% endif %}

        {% for item in paginator.page_range %}

            {% if current_page_num == item %}

                <li class="active"><a href="?page={{ item }}">{{ item }}</a></li>

            {%   else %}

                <li ><a href="?page={{ item }}">{{ item }}</a></li>

            {% endif %}

        {% endfor %}

        {% if current_page.has_next %}

            <li >

                <a href="?page={{ current_page.next_page_number}}" aria-label="Next"><span aria-hidden="true">下一页</span></a>

            </li>

        {% else %}

            <li class="disabled">

                <a href="" aria-label="Next"><span aria-hidden="true">下一页</span></a>

            </li>

        {% endif %}

    </ul>

</nav>

</body>

</html>
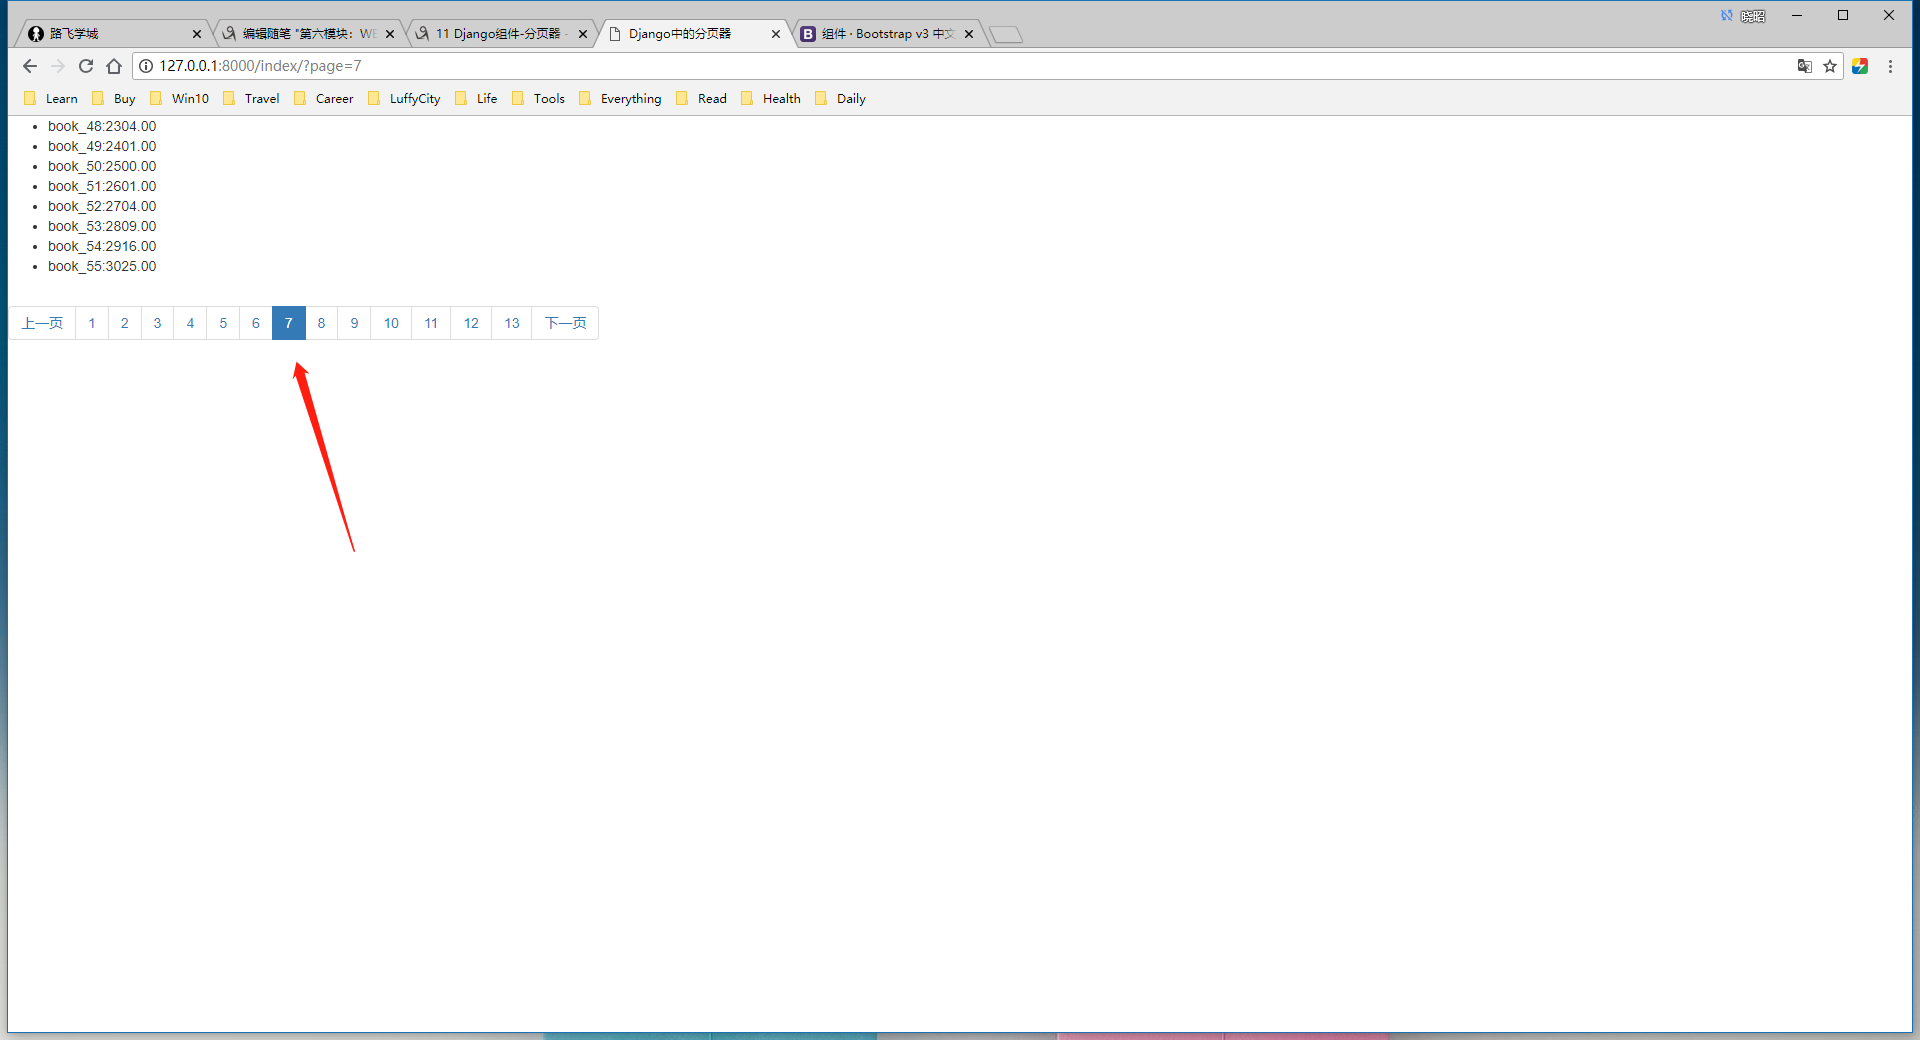
99-分页器4
1、Django下的分页器4;
2、index.html;
<!DOCTYPE html>

<html lang="en">

<head>

    <meta charset="UTF-8">

    <title>Django中的分页器</title>

    <!-- 最新版本的 Bootstrap 核心 CSS 文件 -->

    <link rel="stylesheet" href="https://cdn.bootcss.com/bootstrap/3.3.7/css/bootstrap.min.css" integrity="sha384-BVYiiSIFeK1dGmJRAkycuHAHRg32OmUcww7on3RYdg4Va+PmSTsz/K68vbdEjh4u" crossorigin="anonymous">

</head>

<body>

<ul>

    {% for book in current_page %}

        <li>{{ book.title }}:{{ book.price }}</li>

    {% endfor %}

</ul>

<nav aria-label="Page navigation">

    <ul class="pagination">

        {% if current_page.has_previous %}

            <li>

                <!--<a href="?page={{ current_page_num|add:-1 }}" aria-label="Previous"><span aria-hidden="true">上一页</span></a>-->

                <a href="?page={{ current_page.previous_page_number}}" aria-label="Previous"><span aria-hidden="true">上一页</span></a>

            </li>

        {% else %}

            <li class="disabled">

                <a href="" aria-label="Previous"><span aria-hidden="true">上一页</span></a>

            </li>

        {% endif %}

        {% for item in page_range %}

            {% if current_page_num == item %}

                <li class="active"><a href="?page={{ item }}">{{ item }}</a></li>

            {%   else %}

                <li ><a href="?page={{ item }}">{{ item }}</a></li>

            {% endif %}

        {% endfor %}

        {% if current_page.has_next %}

            <li >

                <a href="?page={{ current_page.next_page_number}}" aria-label="Next"><span aria-hidden="true">下一页</span></a>

            </li>

        {% else %}

            <li class="disabled">

                <a href="" aria-label="Next"><span aria-hidden="true">下一页</span></a>

            </li>

        {% endif %}

    </ul>

</nav>

</body>

</html>
3、views.py;
from django.shortcuts import render

# Create your views here.

from app01.models import *

#引入Django中的分页器;

from django.core.paginator import Paginator,EmptyPage

def index(request):

    ""

    '''

    # #循环插入,不可取,效率低下,数据库压力过大!;

    # for i in range(10):

    #     Book.objects.create(title="Book_%s"%i,price=i*i)

    #批量插入;

    book_list = []

    for i in range(100):

        book = Book(title="book_%s"%i,price=i*i)

        book_list.append(book)

    #一次性批量插入;

    Book.objects.bulk_create(book_list)

    :param request:

    :return:

    '''

    book_list = Book.objects.all()

    #分页器;

    paginator = Paginator(book_list,3)

    print("分页器的count:",paginator.count)#数据总数;

    print("分页器的num_pages:",paginator.num_pages)#总页数;

    print("分页器的page_range:",paginator.page_range)#页码的列表;

    #加入异常捕获;

    #进行页码的判断;

    current_page_num = int(request.GET.get("page", 1))

    if paginator.num_pages >11:

        if current_page_num-5 <1:

            page_range = range(1,12)

        elif current_page_num +5 >paginator.num_pages:

            page_range = range(paginator.num_pages-10,paginator.num_pages +1)

        else:

            page_range = range(current_page_num-5,current_page_num+6)

    else:

        page_range = paginator.page_range

    try:

        current_page = paginator.page(current_page_num)

        #page1 = paginator.page(2)

        #page1 = paginator.page(3)

        #显示某一页具体数据的两种方式;

        print("分页器的object_list",current_page.object_list)

        #进入循环打印;

        for i in current_page:

            print(i)

    except EmptyPage as e:

        #捕获到异常后,定位至第一页面,但是要提起导入EmptyPage模块;

        current_page = paginator.page(1)

    return render(request,"index.html",locals())
100-form组件的校验功能
1、form组件初识;
服务端假设所有用户提交的数据都是不可信任的,所以Django框架内置了form组件来验证用户提交的信息;
form组件的2大功能:
1、验证(显示错误信息);
2、保留用户上次输入的信息;
3、可以生成html标签;
2、创建Django项目-FormDemo并添加应用app01;
3、配合路由urls.py;
"""FormsDemo URL Configuration

The `urlpatterns` list routes URLs to views. For more information please see:

    https://docs.djangoproject.com/en/2.1/topics/http/urls/

Examples:

Function views

    1. Add an import:  from my_app import views

    2. Add a URL to urlpatterns:  path('', views.home, name='home')

Class-based views

    1. Add an import:  from other_app.views import Home

    2. Add a URL to urlpatterns:  path('', Home.as_view(), name='home')

Including another URLconf

    1. Import the include() function: from django.urls import include, path

    2. Add a URL to urlpatterns:  path('blog/', include('blog.urls'))

"""

from django.contrib import admin

from django.urls import path

from app01 import views

urlpatterns = [

    path('admin/', admin.site.urls),

    path('reg/', views.reg),

]
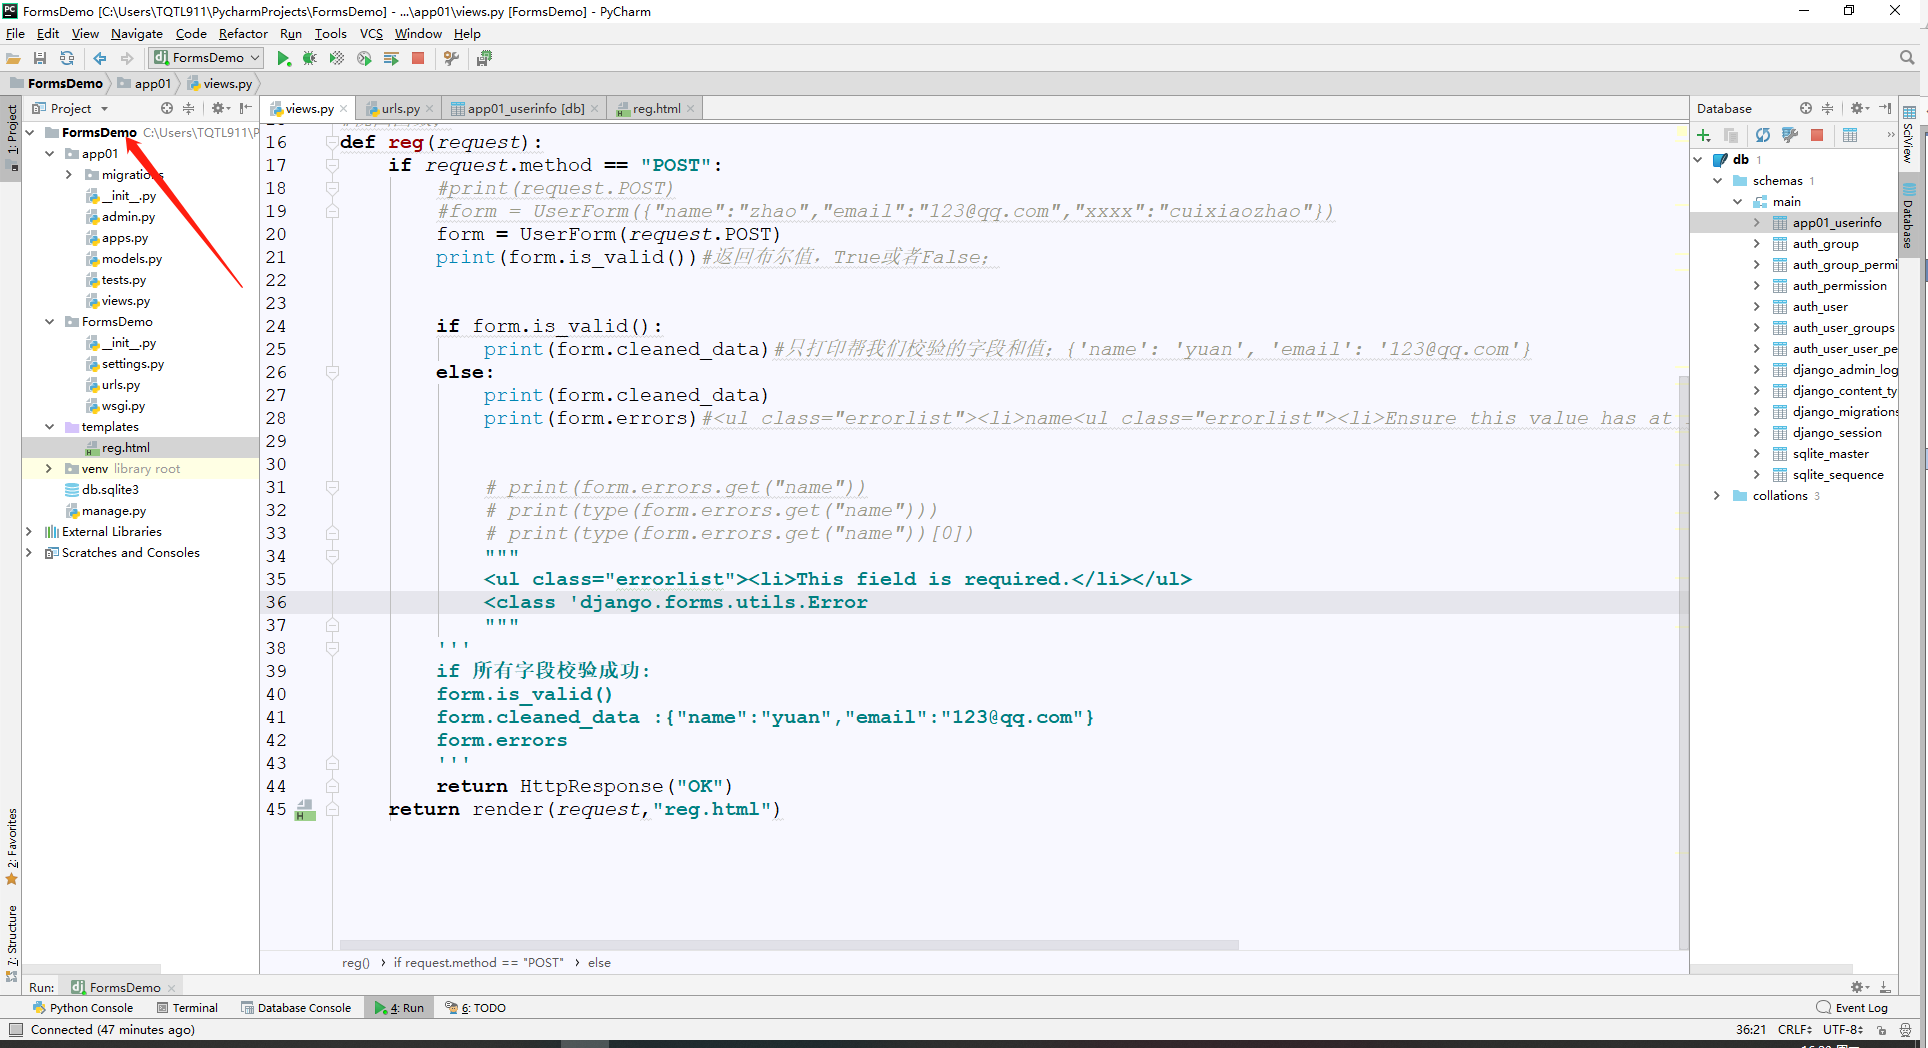
4、views.py添加视图函数;
from django.shortcuts import render,HttpResponse

# Create your views here.

#创建form组件;

from django import forms

class UserForm(forms.Form):

    name =     forms.CharField(min_length=4)

    pwd = forms.CharField(min_length=4)

    r_pwd = forms.CharField(min_length=4)

    email = forms.EmailField()

    tel = forms.CharField()

#视图函数;

def reg(request):

    if request.method == "POST":

        #print(request.POST)

        #form = UserForm({"name":"zhao","email":"123@qq.com","xxxx":"cuixiaozhao"})

        form = UserForm(request.POST)

        print(form.is_valid())#返回布尔值,True或者False;

        if form.is_valid():

            print(form.cleaned_data)#只打印帮我们校验的字段和值;{'name': 'yuan', 'email': '123@qq.com'}

        else:

            print(form.cleaned_data)

            print(form.errors)#<ul class="errorlist"><li>name<ul class="errorlist"><li>Ensure this value has at least 4 characters (it has 3).</li></ul></li></ul>

            # print(form.errors.get("name"))

            # print(type(form.errors.get("name")))

            # print(type(form.errors.get("name"))[0])

            """

            <ul class="errorlist"><li>This field is required.</li></ul>

            <class 'django.forms.utils.Error

            """

        '''

        if 所有字段校验成功:

        form.is_valid()

        form.cleaned_data :{"name":"yuan","email":"123@qq.com"}

        form.errors

        '''

        return HttpResponse("OK")

    return render(request,"reg.html")
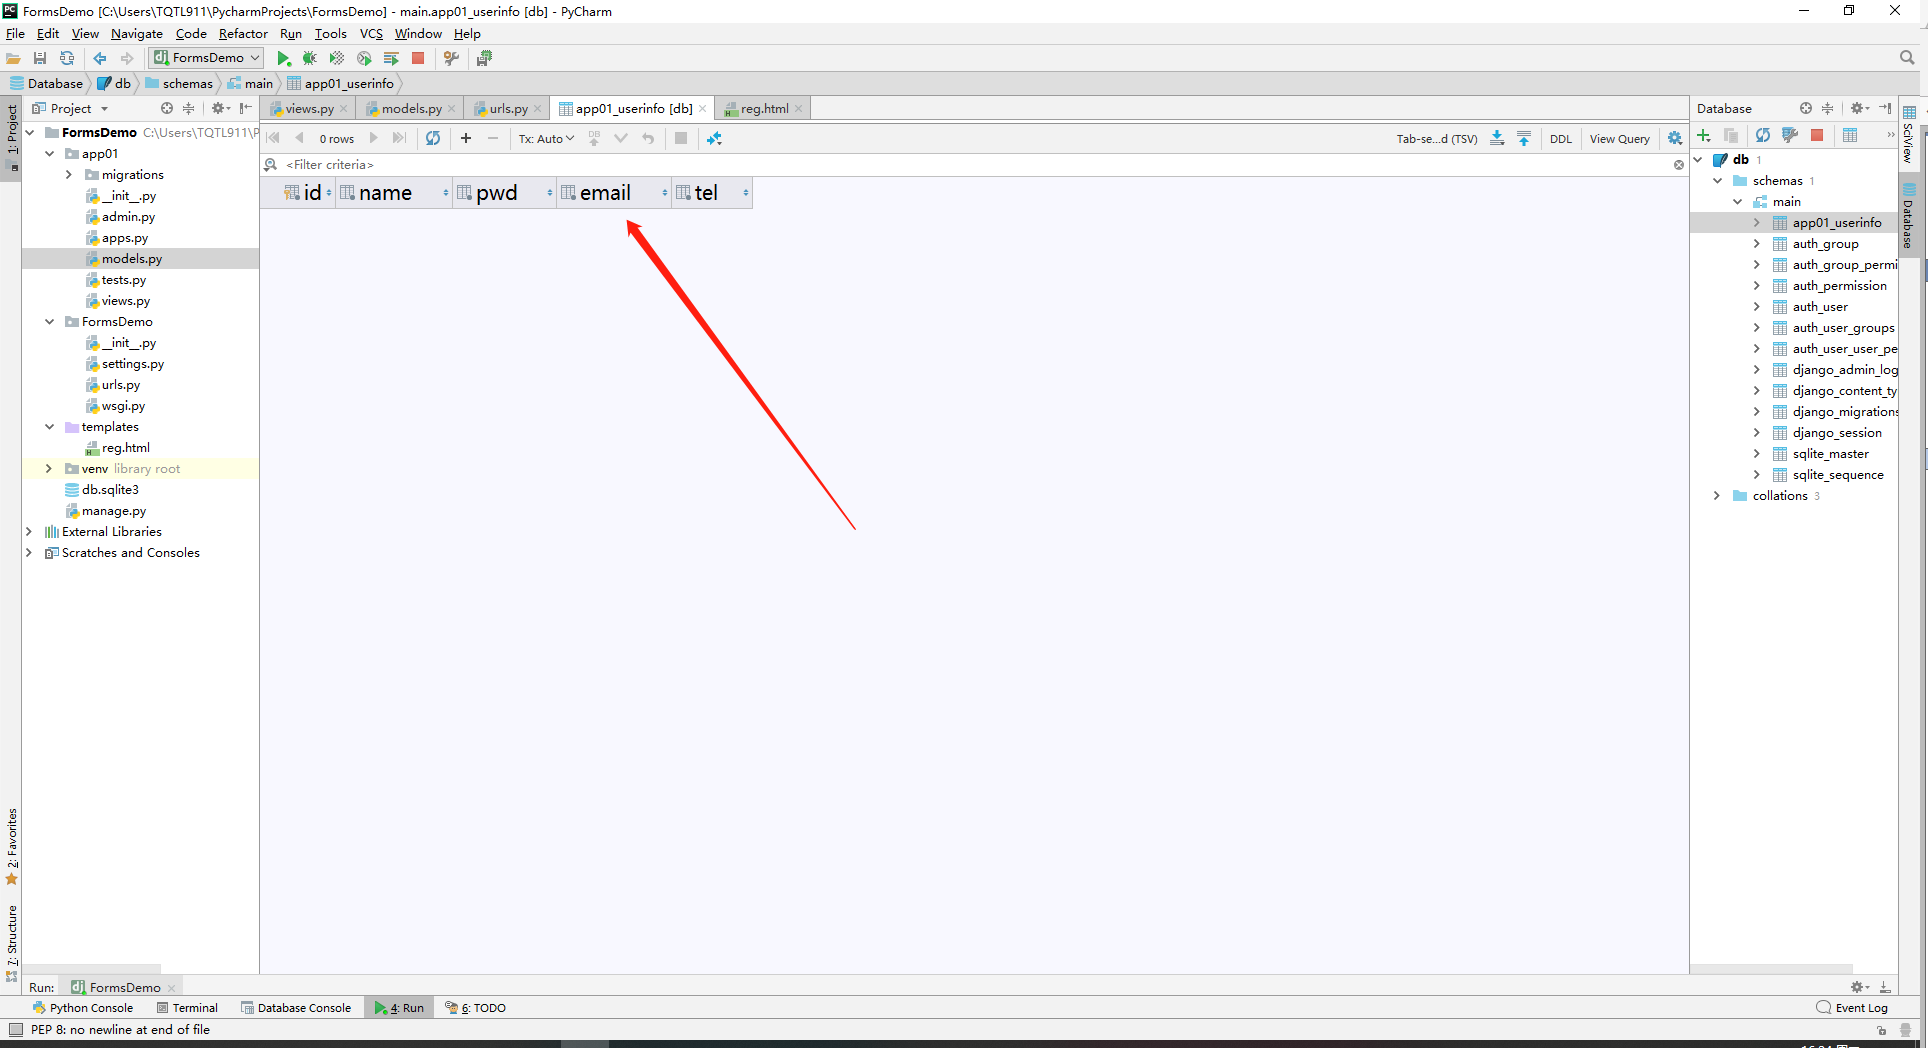
5、models.py添加表结构;
from django.db import models

# Create your models here.

class UserInfo(models.Model):

    name = models.CharField(max_length=32)

    pwd = models.CharField(max_length=32)

    email = models.EmailField()

    tel = models.CharField(max_length=32)
6、执行迁移数据库命令操作;
Microsoft Windows [版本 10.0.17134.1]

(c) 2018 Microsoft Corporation。保留所有权利。

(venv) C:\Users\TQTL911\PycharmProjects\FormsDemo>python manage.py makemigrations

Migrations for 'app01':

  app01\migrations\0001_initial.py

    - Create model UserInfo

(venv) C:\Users\TQTL911\PycharmProjects\FormsDemo>python manage.py migrate

Operations to perform:

  Apply all migrations: admin, app01, auth, contenttypes, sessions

Running migrations:

  Applying contenttypes.0001_initial... OK

  Applying auth.0001_initial... OK

  Applying admin.0001_initial... OK

  Applying admin.0002_logentry_remove_auto_add... OK

  Applying admin.0003_logentry_add_action_flag_choices... OK

  Applying app01.0001_initial... OK

  Applying contenttypes.0002_remove_content_type_name... OK

  Applying auth.0002_alter_permission_name_max_length... OK

  Applying auth.0003_alter_user_email_max_length... OK

  Applying auth.0004_alter_user_username_opts... OK

  Applying auth.0005_alter_user_last_login_null... OK

  Applying auth.0006_require_contenttypes_0002... OK

  Applying auth.0007_alter_validators_add_error_messages... OK

  Applying auth.0008_alter_user_username_max_length... OK

  Applying auth.0009_alter_user_last_name_max_length... OK

  Applying sessions.0001_initial... OK

(venv) C:\Users\TQTL911\PycharmProjects\FormsDemo>'
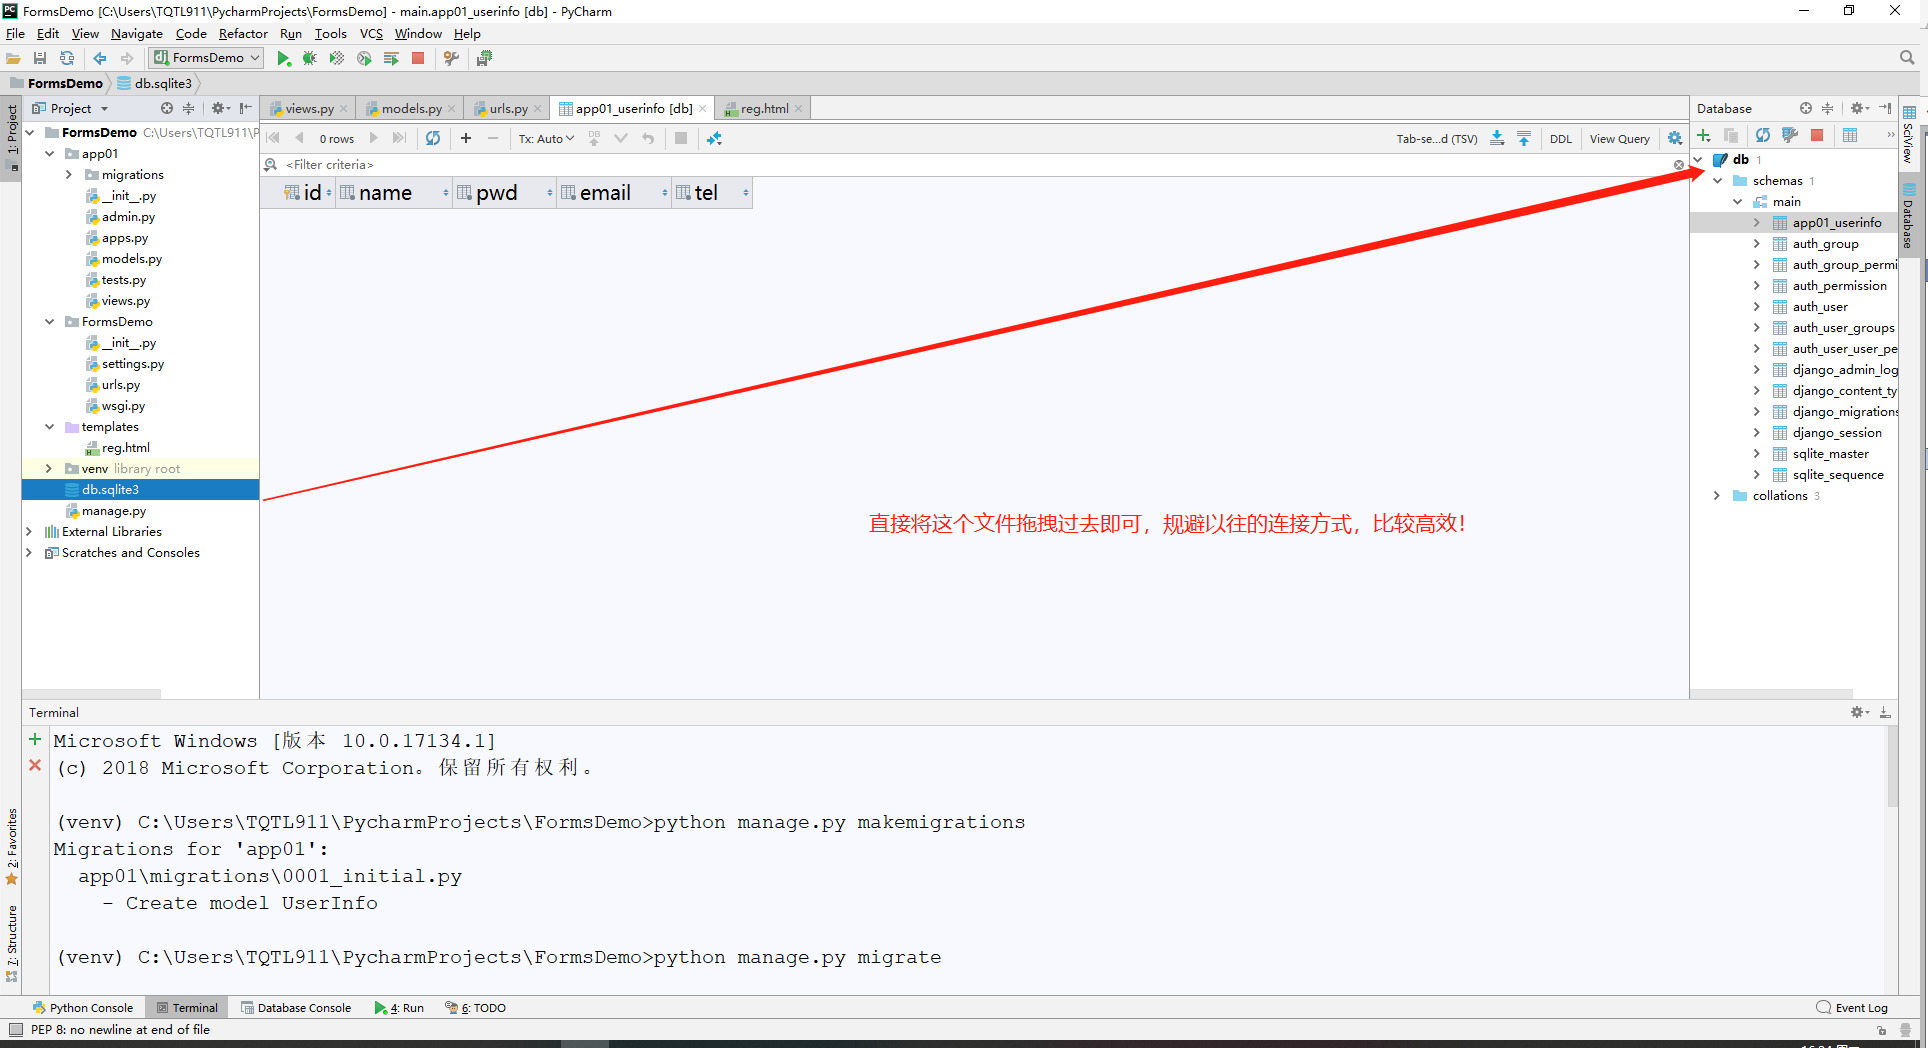
7、使用Pycharm自带Database客户端工具链接sqllite数据库;
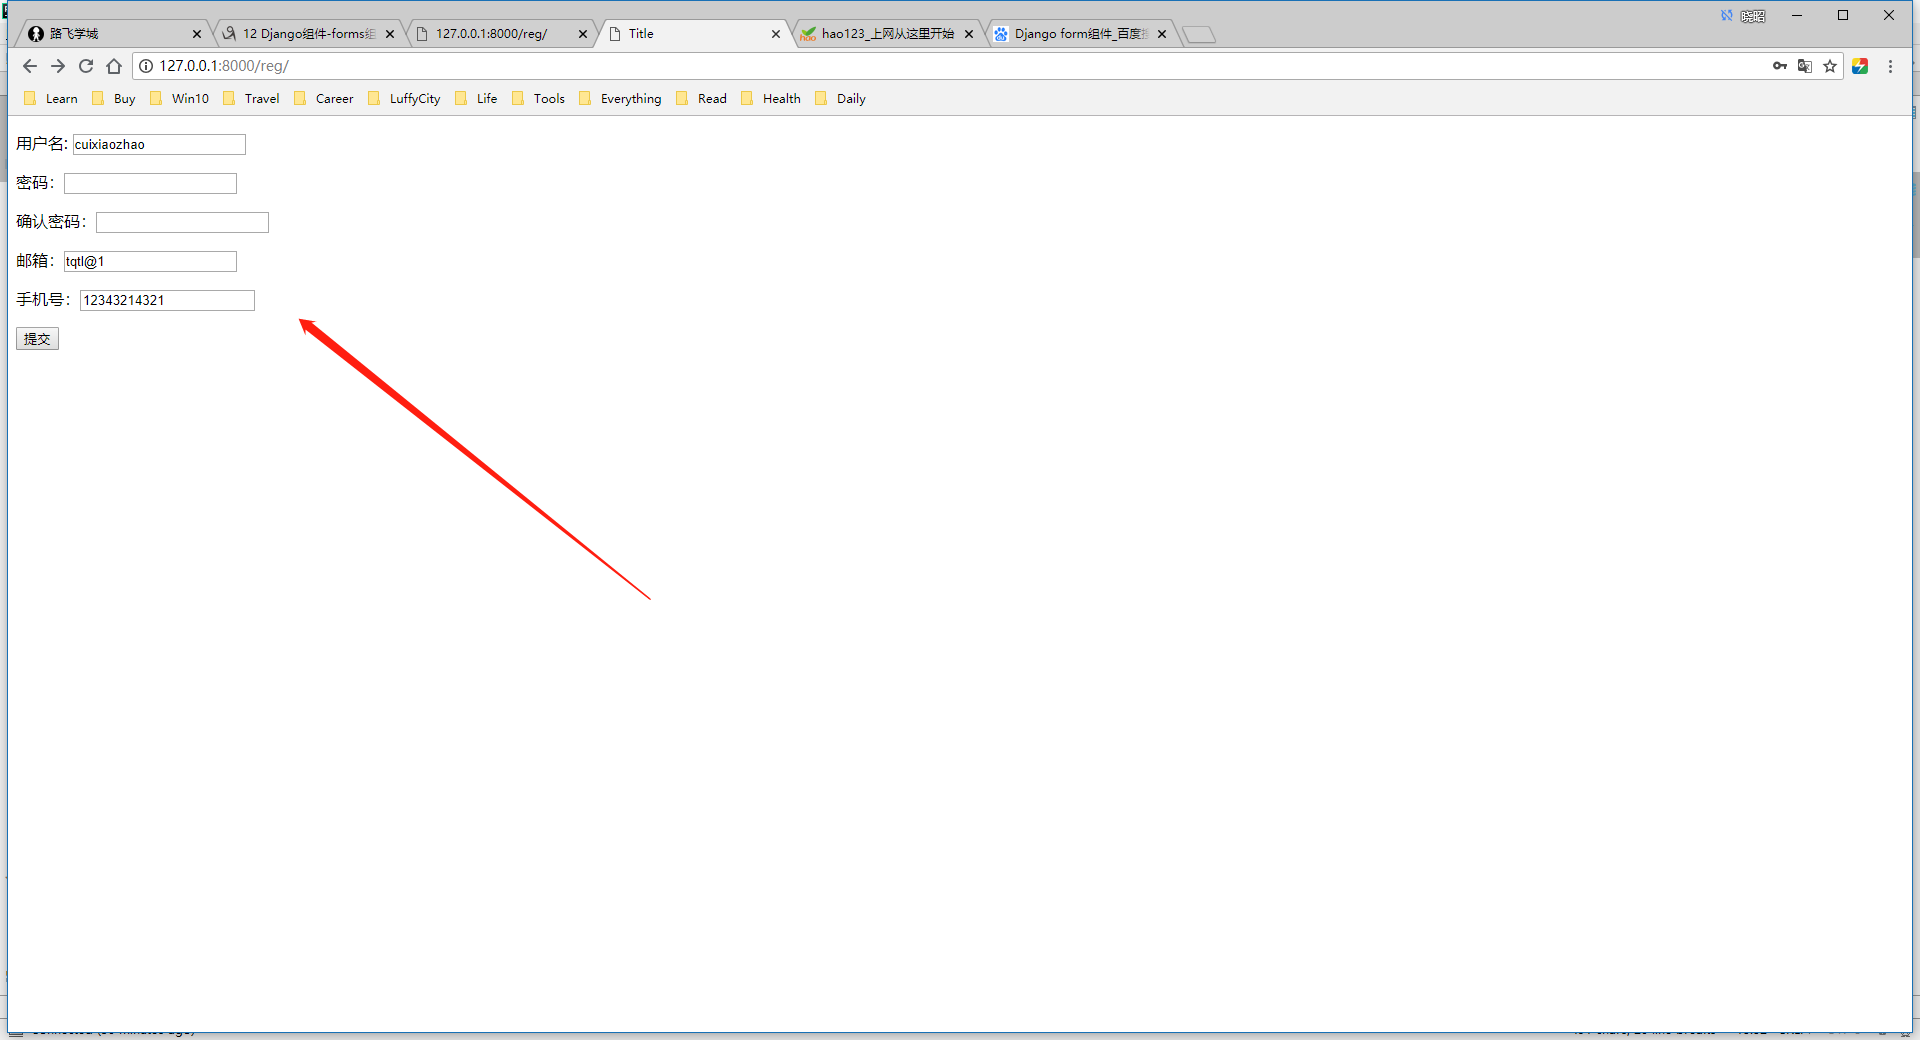
8、在模板路径templates下添加reg.html;
<!DOCTYPE html>

<html lang="en">

<head>

    <meta charset="UTF-8">

    <title>Title</title>

    <style type="text/css">

    </style>

</head>

<body>

<form action="" method="post">

    {% csrf_token %}

    <p>用户名: <input type="text" name="name"></p>

    <p>密码:<input type="password" name="pwd"></p>

    <p>确认密码:<input type="password" name="r_pwd"></p>

    <p>邮箱:<input type="email" name="email"></p>

    <p>手机号:<input type="e" name="tel"></p>

    <input type="submit">

</form>

</body>

</html>
9、进行form组件的提交验证;
10、form组件的注意点;
- 导入forms模块;
- 创建自定义form类,比如UserInfo;
- is_valid()方法初识;
- form.cleaned_data初识;
- form.errors初识;
101-form组件的渲染标签功能1
1、form组件之渲染标签功能1;
2、views.py;
from django.shortcuts import render,HttpResponse

# Create your views here.

#创建form组件;

from django import forms

class UserForm(forms.Form):

    name =     forms.CharField(min_length=4)

    pwd = forms.CharField(min_length=4)

    r_pwd = forms.CharField(min_length=4)

    email = forms.EmailField()

    tel = forms.CharField()

#视图函数;

def reg(request):

    if request.method == "POST":

        #print(request.POST)

        #form = UserForm({"name":"zhao","email":"123@qq.com","xxxx":"cuixiaozhao"})

        form = UserForm(request.POST)

        print(form.is_valid())#返回布尔值,True或者False;

        if form.is_valid():

            print(form.cleaned_data)#只打印帮我们校验的字段和值;{'name': 'yuan', 'email': '123@qq.com'}

        else:

            print(form.cleaned_data)

            print(form.errors)#<ul class="errorlist"><li>name<ul class="errorlist"><li>Ensure this value has at least 4 characters (it has 3).</li></ul></li></ul>

            # print(form.errors.get("name"))

            # print(type(form.errors.get("name")))

            # print(type(form.errors.get("name"))[0])

            """

            <ul class="errorlist"><li>This field is required.</li></ul>

            <class 'django.forms.utils.Error

            """

        '''

        if 所有字段校验成功:

        form.is_valid()

        form.cleaned_data :{"name":"yuan","email":"123@qq.com"}

        form.errors

        '''

        return HttpResponse("OK")

    #实例化form对象;

    form = UserForm()

    return render(request,"reg.html",locals())
3、reg.html;
<!DOCTYPE html>

<html lang="en">

<head>

    <meta charset="UTF-8">

    <title>Title</title>

    <style type="text/css">

    </style>

</head>

<body>

<form action="" method="post">

    {% csrf_token %}

    <p>用户名: <input type="text" name="name"></p>

    <p>密码:<input type="password" name="pwd"></p>

    <p>确认密码:<input type="password" name="r_pwd"></p>

    <p>邮箱:<input type="email" name="email"></p>

    <p>手机号:<input type="e" name="tel"></p>

    <input type="submit">

</form>

<br>

<hr>

<h3>form组件的渲染方式1</h3>

<form action="" method="post">

    {% csrf_token %}

    <p>用户名:

        {{ form.name }}

    </p>

    <p>密码:

        {{ form.pwd }}

    </p>

    <p>确认密码:

        {{ form.r_pwd }}

    </p>

    <p>邮箱:

        {{ form.email }}

    </p>

    <p>手机号:

        {{ form.tel }}

    </p>

    <input type="submit">

</form>

</body>

</html>
102-form组件的渲染标签功能2
1、form组件之渲染标签功能2;
2、reg.html;
- for循环之field.label
- form.as_p或者form.as_ul等方法介绍(不推荐使用哈,在测试环节可以用,应为它缺乏灵活性);
<!DOCTYPE html>

<html lang="en">

<head>

    <meta charset="UTF-8">

    <title>Title</title>

    <style type="text/css">

    </style>

</head>

<body>

<form action="" method="post">

    {% csrf_token %}

    <p>用户名: <input type="text" name="name"></p>

    <p>密码:<input type="password" name="pwd"></p>

    <p>确认密码:<input type="password" name="r_pwd"></p>

    <p>邮箱:<input type="email" name="email"></p>

    <p>手机号:<input type="e" name="tel"></p>

    <input type="submit">

</form>

<br>

<hr>

<h3>form组件的渲染方式1</h3>

<form action="" method="post">

    {% csrf_token %}

    <p>用户名:

        {{ form.name }}

    </p>

    <p>密码:

        {{ form.pwd }}

    </p>

    <p>确认密码:

        {{ form.r_pwd }}

    </p>

    <p>邮箱:

        {{ form.email }}

    </p>

    <p>手机号:

        {{ form.tel }}

    </p>

    <input type="submit">

</form>

<br>

<hr>

<h2>form组件的渲染方式2</h2>

<form action="" method="post">

    {% csrf_token %}

    {% for field in form %}

        <div>

            <lable for="">{{ field.label }}</lable>

            {{ field }}

        </div>

    {% endfor %}

    <input type="submit">

</form>

<br>

<hr>

<h1>form组件的渲染方式3-不推荐使用的哦!</h1>

<form action="" method="post">

    {% csrf_token %}

    <!--缺乏灵活性!-->

    {{ form.as_p }}

    <input type="submit">

</form>

</body>

</html>
103-form组件的渲染错误信息
1、form组件的渲染错误信息提示;
2、reg.html;
<span>{{ form.name.errors.0 }}</span>
<h3>form组件的渲染方式1</h3>

<form action="" method="post">

    {% csrf_token %}

    <p>用户名:

        {{ form.name }} <span>{{ form.name.errors.0 }}</span>

    </p>

    <p>密码:

        {{ form.pwd }} <span>{{ form.pwd.errors.0 }}</span>

    </p>

    <p>确认密码:

        {{ form.r_pwd }} <span>{{ form.r_pwd.errors.0 }}</span>

    </p>

    <p>邮箱:

        {{ form.email }} <span>{{ form.email.errors.0 }}</span>

    </p>

    <p>手机号:

        {{ form.tel }} <span>{{ form.tel.errors.0 }}</span>

    </p>

    <input type="submit">

</form>
104-form组件的参数配置
1、form组件的参数配置;
2、views.py;
from django.shortcuts import render,HttpResponse

# Create your views here.

#创建form组件;

from django import forms

#

from django.forms import widgets

class UserForm(forms.Form):

    name =     forms.CharField(min_length=4,label="用户名",error_messages={"required":"该字段不能为空"},widget=widgets.TextInput(attrs={"class":"form-control"}))

    pwd = forms.CharField(min_length=4,label="密码",widget=widgets.PasswordInput(attrs={"class":"form-control"}),error_messages={"required":"该字段不能为空"})

    r_pwd = forms.CharField(min_length=4,label="确认密码",widget=widgets.PasswordInput(attrs={"class":"form-control"}),error_messages={"required":"该字段不能为空","invalid":"格式错误!"})

    email = forms.EmailField(label="邮箱",error_messages={"required":"该字段不能为空"},widget=widgets.TextInput(attrs={"class":"form-control"}))

    tel = forms.CharField(label="手机号",error_messages={"required":"该字段不能为空"},widget=widgets.TextInput(attrs={"class":"form-control"}))

#视图函数;

def reg(request):

    if request.method == "POST":

        #print(request.POST)

        #form = UserForm({"name":"zhao","email":"123@qq.com","xxxx":"cuixiaozhao"})

        form = UserForm(request.POST)

        print(form.is_valid())#返回布尔值,True或者False;

        if form.is_valid():

            print(form.cleaned_data)#只打印帮我们校验的字段和值;{'name': 'yuan', 'email': '123@qq.com'}

        else:

            print(form.cleaned_data)

            print(form.errors)#<ul class="errorlist"><li>name<ul class="errorlist"><li>Ensure this value has at least 4 characters (it has 3).</li></ul></li></ul>

            # print(form.errors.get("name"))

            # print(type(form.errors.get("name")))

            # print(type(form.errors.get("name"))[0])

            """

            <ul class="errorlist"><li>This field is required.</li></ul>

            <class 'django.forms.utils.Error

            """

        '''

        if 所有字段校验成功:

        form.is_valid()

        form.cleaned_data :{"name":"yuan","email":"123@qq.com"}

        form.errors

        '''

        return HttpResponse("OK")

    #实例化form对象;

    form = UserForm()

    return render(request,"reg.html",locals())
3、reg.html;
<!DOCTYPE html>

<html lang="en">

<head>

    <meta charset="UTF-8">

    <title>Title</title>

    <!-- 最新版本的 Bootstrap 核心 CSS 文件 -->

    <link rel="stylesheet" href="https://cdn.bootcss.com/bootstrap/3.3.7/css/bootstrap.min.css" integrity="sha384-BVYiiSIFeK1dGmJRAkycuHAHRg32OmUcww7on3RYdg4Va+PmSTsz/K68vbdEjh4u" crossorigin="anonymous">

</head>

<body>

<div class="container">

    <div class="row">

        <div class="col-md-6 col-lg-offset-3">

            <form action="" method="post">

                {% csrf_token %}

                <p>用户名: <input type="text" name="name"></p>

                <p>密码:<input type="password" name="pwd"></p>

                <p>确认密码:<input type="password" name="r_pwd"></p>

                <p>邮箱:<input type="email" name="email"></p>

                <p>手机号:<input type="e" name="tel"></p>

                <input type="submit">

            </form>

            <br>

            <hr>

            <h3>form组件的渲染方式1</h3>

            <form action="" method="post">

                {% csrf_token %}

                <p>用户名:

                    {{ form.name }} <span>{{ form.name.errors.0 }}</span>

                </p>

                <p>密码:

                    {{ form.pwd }} <span>{{ form.pwd.errors.0 }}</span>

                </p>

                <p>确认密码:

                    {{ form.r_pwd }} <span>{{ form.r_pwd.errors.0 }}</span>

                </p>

                <p>邮箱:

                    {{ form.email }} <span>{{ form.email.errors.0 }}</span>

                </p>

                <p>手机号:

                    {{ form.tel }} <span>{{ form.tel.errors.0 }}</span>

                </p>

                <input type="submit">

            </form>

            <br>

            <hr>

            <h2>form组件的渲染方式2</h2>

            <form action="" method="post">

                {% csrf_token %}

                {% for field in form %}

                    <div>

                        <lable for="">{{ field.label }}</lable>

                        {{ field }}

                    </div>

                {% endfor %}

                <input type="submit">

            </form>

            <br>

            <hr>

            <h1>form组件的渲染方式3-不推荐使用的哦!</h1>

            <form action="" method="post">

                {% csrf_token %}

                <!--缺乏灵活性!-->

                {{ form.as_p }}

                <input type="submit">

            </form>

        </div>

    </div>

</div>

</body>

</html>
error_messages={"required":"该字段不能为空"}添加错误提示消息;widget=widgets.TextInput(attrs={"class":"form-control"})添加Bootstrap下的form-control属性;widget=widgets.PasswordInput(attrs={"class":"form-control"})添加Bootstrap下的form-control属性;
105-form组件检验的局部钩子
1、form组件之局部钩子;
106-组件之全局钩子校验
1、钩子校验;
2、myforms.py;
#!/usr/bin/env python3

# -*- coding:utf-8 -*-

# __Author__:TQTL911

# Version:python3.6.6

# Time:2018/8/21 20:05

from django import forms

from django.forms import widgets

from app01.models import UserInfo

from django.core.exceptions import NON_FIELD_ERRORS,ValidationError

class UserForm(forms.Form):

    name =     forms.CharField(min_length=4,label="用户名",error_messages={"required":"该字段不能为空"},widget=widgets.TextInput(attrs={"class":"form-control"}))

    pwd = forms.CharField(min_length=4,label="密码",widget=widgets.PasswordInput(attrs={"class":"form-control"}),error_messages={"required":"该字段不能为空"})

    r_pwd = forms.CharField(min_length=4,label="确认密码",widget=widgets.PasswordInput(attrs={"class":"form-control"}),error_messages={"required":"该字段不能为空","invalid":"格式错误!"})

    email = forms.EmailField(label="邮箱",error_messages={"required":"该字段不能为空"},widget=widgets.TextInput(attrs={"class":"form-control"}))

    tel = forms.CharField(label="手机号",error_messages={"required":"该字段不能为空"},widget=widgets.TextInput(attrs={"class":"form-control"}))

    #钩子

    def clean_name(self):

        val = self.cleaned_data.get("name")

        ret = UserInfo.objects.filter(name=val)

        if not ret:

            return val

        else:

            raise ValidationError("该用户已经注册")

    def clean_tel(self):

        val = self.cleaned_data.get("tel")

        if len(val) ==11:

            return val

        else:

            raise ValidationError("手机号不能小于11位")

    def clean(self):

        pwd = self.cleaned_data.get("pwd")

        r_pwd = self.cleaned_data.get("r_pwd")

        if pwd and r_pwd:

            if pwd == r_pwd:

                return self.cleaned_data

            else:

                raise ValidationError("两次密码不一致!")

        else:

            return self.cleaned_data
3、views.py;
from django.shortcuts import render,HttpResponse

# Create your views here.

#创建form组件;

from app01.myforms import *

#视图函数;

def reg(request):

    if request.method == "POST":

        print(request.POST)

        #form = UserForm({"name":"zhao","email":"123@qq.com","xxxx":"cuixiaozhao"})

        form = UserForm(request.POST)#form表单的name属性值应该与forms组件字段名称一致

        print(form.is_valid())#返回布尔值,True或者False;

        if form.is_valid():

            print(form.cleaned_data)#只打印帮我们校验的字段和值;{'name': 'yuan', 'email': '123@qq.com'}

        else:

            print(form.cleaned_data)

            #print(form.errors)#<ul class="errorlist"><li>name<ul class="errorlist"><li>Ensure this value has at least 4 characters (it has 3).</li></ul></li></ul>

            # print(form.errors.get("name"))

            # print(type(form.errors.get("name")))

            # print(type(form.errors.get("name"))[0])

            """

            <ul class="errorlist"><li>This field is required.</li></ul>

            <class 'django.forms.utils.Error

            """

        errors = form.errors.get("__all__")

        return render(request,"reg.html",locals())

        '''

        if 所有字段校验成功:

        form.is_valid()

        form.cleaned_data :{"name":"yuan","email":"123@qq.com"}

        form.errors

        '''

    #实例化form对象;

    form = UserForm()

    return render(request,"reg.html",locals())
4、reg.html;
<!DOCTYPE html>

<html lang="en">

<head>

    <meta charset="UTF-8">

    <title>Title</title>

    <!-- 最新版本的 Bootstrap 核心 CSS 文件 -->

    <link rel="stylesheet" href="https://cdn.bootcss.com/bootstrap/3.3.7/css/bootstrap.min.css" integrity="sha384-BVYiiSIFeK1dGmJRAkycuHAHRg32OmUcww7on3RYdg4Va+PmSTsz/K68vbdEjh4u" crossorigin="anonymous">

</head>

<body>

<div class="container">

    <div class="row">

        <div class="col-md-6 col-lg-offset-3">

{#            <h3>form组件的渲染方式1</h3>#}

{#            <form action="" method="post">#}

{#                {% csrf_token %}#}

{#                <p>用户名:#}

{#                    {{ form.name.label }} <span>{{ form.name.errors.0 }}</span>#}

{#                </p>#}

{#                <p>密码:#}

{#                    {{ form.pwd.label }} <span>{{ form.pwd.errors.0 }}</span>#}

{#                </p>#}

{#                <p>确认密码:#}

{#                    {{ form.r_pwd }} <span>{{ form.r_pwd.errors.0 }}</span>#}

{#                </p>#}

{#                <p>邮箱:#}

{#                    {{ form.email }} <span>{{ form.email.errors.0 }}</span>#}

{#                </p>#}

{#                <p>手机号:#}

{#                    {{ form.tel }} <span>{{ form.tel.errors.0 }}</span>#}

{#                </p>#}

{#                <input type="submit">#}

{#            </form>#}

            <h3>forms组件渲染方式1</h3>

            <form action="" method="post" novalidate>

                {% csrf_token %}

                <p>{{ form.name.label }}

                    {{ form.name }} <span class="pull-right error">{{ form.name.errors.0 }}</span>

                </p>

                <p>{{ form.pwd.label }}

                    {{ form.pwd }} <span class="pull-right error">{{ form.pwd.errors.0 }}</span>

                </p>

                <p>确认密码

                    {{ form.r_pwd }} <span class="pull-right error">{{ form.r_pwd.errors.0 }}</span><span class="pull-right error">{{ errors.0 }}</span>

                </p>

                <p>邮箱 {{ form.email }} <span class="pull-right error">{{ form.email.errors.0 }}</span></p>

                <p>手机号 {{ form.tel }} <span class="pull-right error">{{ form.tel.errors.0 }}</span></p>

                <input type="submit">

            </form>

        </div>

    </div>

</div>

</body>

</html>
107-HTTP协议的无状态保存
1、什么是HTTP协议的无状态保存?
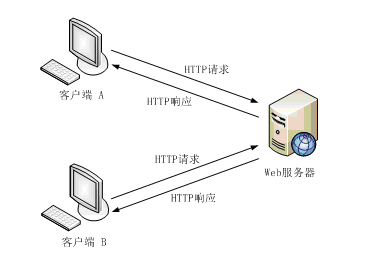
无状态是指协议对于事务处理没有记忆功能。缺少状态意味着,假如后面的处理需要前面的信息,则前面的信息必须重传,这样可能导致每次连接传送的数据量增大。另一方面,在服务器不需要前面信息时,应答就较快。直观地说,就是每个请求都是独立的,与前面的请求和后面的请求都是没有直接联系的。
还是看百度百科的详细解释吧!https://baike.baidu.com/item/HTTP%E6%97%A0%E7%8A%B6%E6%80%81%E5%8D%8F%E8%AE%AE/5808645
108-Cookie简介
1、什么是会话呢?
1)什么是会话跟踪技术?
我们需要先了解一下什么是会话!可以把会话理解为客户端与服务器之间的一次会晤,在一次会晤中可能会包含多次请求和响应。例如你给10086打个电话,你就是客户端,而10086服务人员就是服务器了。从双方接通电话那一刻起,会话就开始了,到某一方挂断电话表示会话结束。在通话过程中,你会向10086发出多个请求,那么这多个请求都在一个会话中。
在JavaWeb中,客户向某一服务器发出第一个请求开始,会话就开始了,直到客户关闭了浏览器会话结束。 在一个会话的多个请求中共享数据,这就是会话跟踪技术。例如在一个会话中的请求如下: 请求银行主页;
- 请求登录(请求参数是用户名和密码);
- 请求转账(请求参数是与转账相关的数据);
- 请求信用卡还款(请求参数与还款相关的数据);
在这上会话中当前用户信息必须在这个会话中共享的,因为登录的是张三,那么在转账和还款时一定是相对张三的转账和还款!
小结:这就说明我们必须在一个会话过程中有共享数据的能力。
2)会话路径技术使用Cookie或者session完成
我们知道HTTP协议是无状态协议,也就是说每个请求都是独立的!无法记录前一次请求的状态。但HTTP协议中可以使用Cookie来完成会话跟踪!在Web开发中,使用session来完成会话跟踪,session底层依赖Cookie技术。
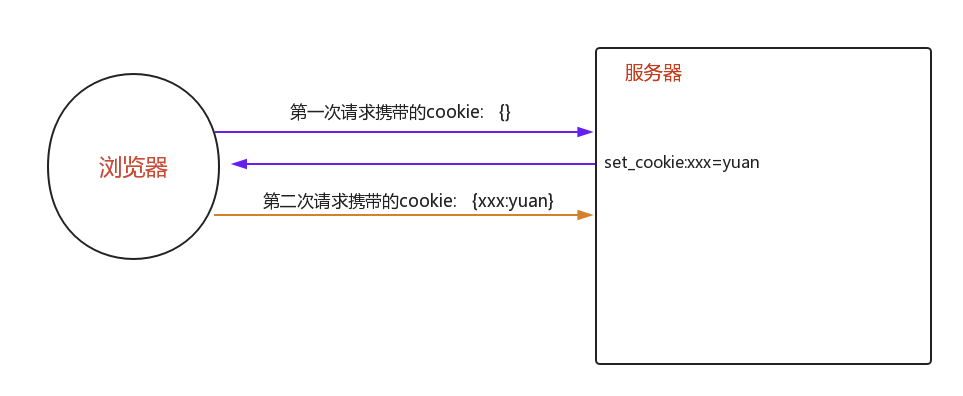
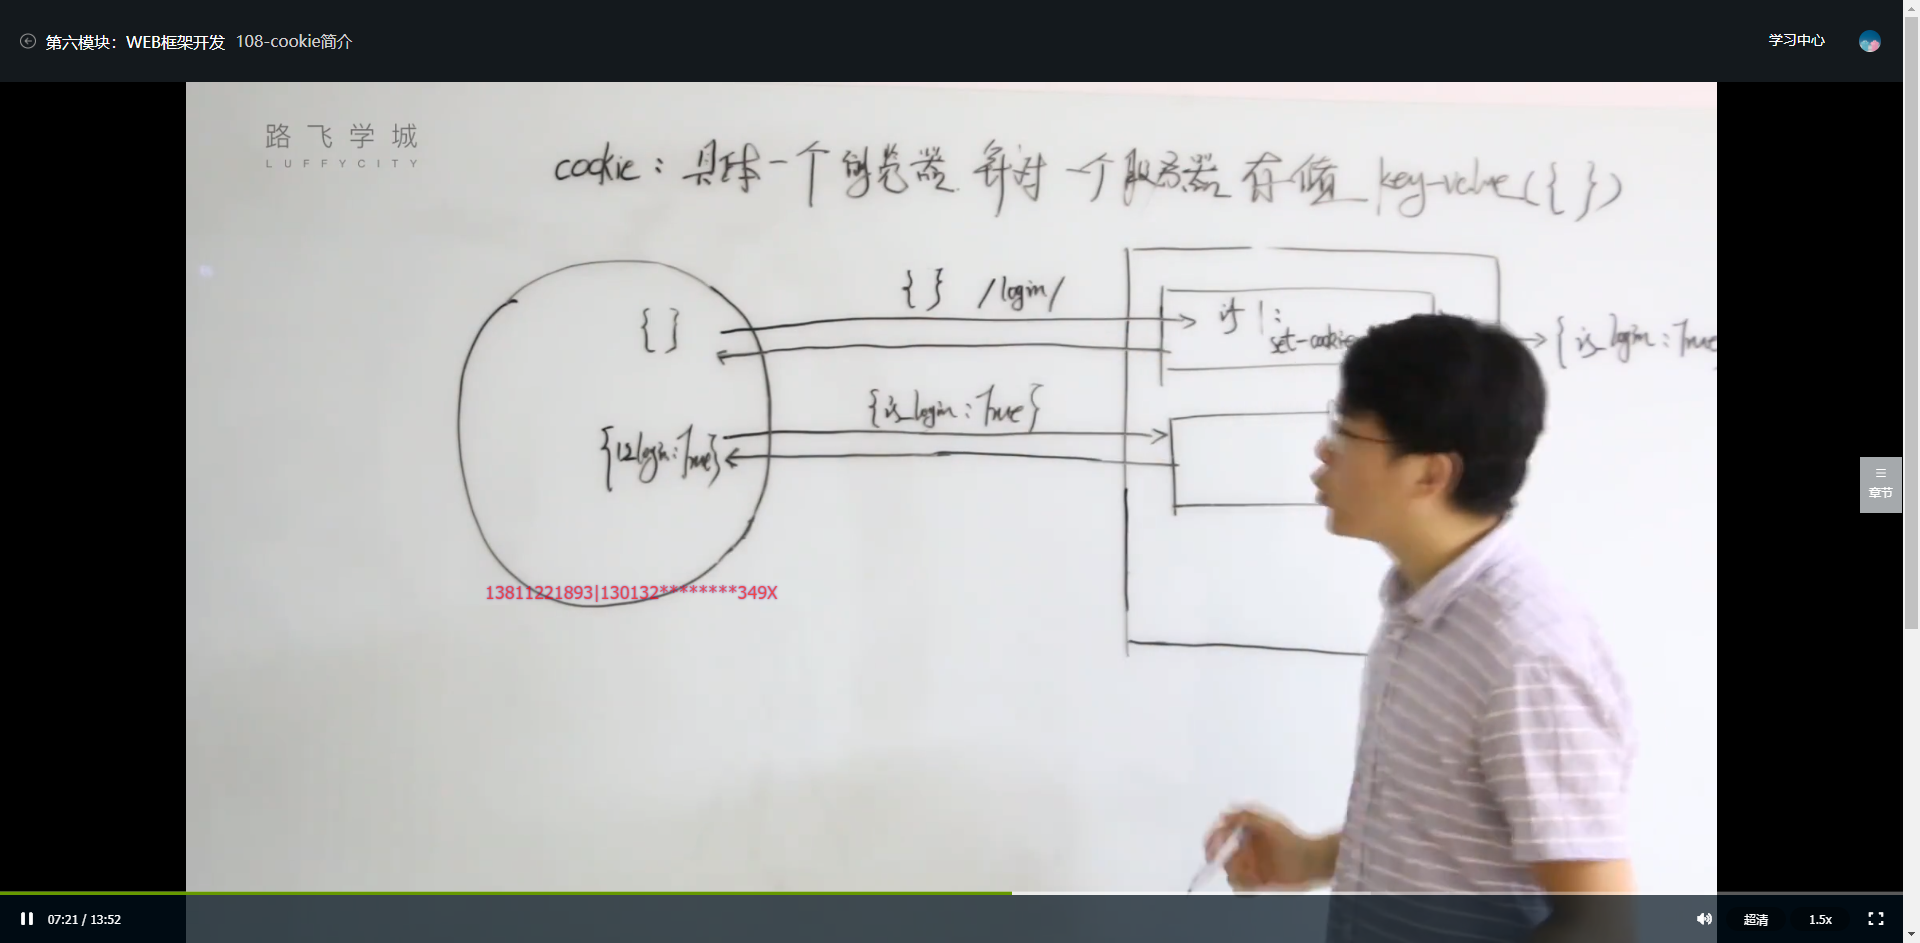
2、cookie是什么?
cookie即具体一个浏览器针对一个服务器存储的key-value{key:value};
Cookie翻译成中文是小甜点,小饼干的意思。在HTTP中它表示服务器送给客户端浏览器的小甜点。其实Cookie是key-value结构,类似于一个python中的字典。随着服务器端的响应发送给客户端浏览器。然后客户端浏览器会把Cookie保存起来,当下一次再访问服务器时把Cookie再发送给服务器。 Cookie是由服务器创建,然后通过响应发送给客户端的一个键值对。客户端会保存Cookie,并会标注出Cookie的来源(哪个服务器的Cookie)。当客户端向服务器发出请求时会把所有这个服务器Cookie包含在请求中发送给服务器,这样服务器就可以识别客户端了!
109-Cookie的设置与读取
1、新建CookieSession的Django项目;
2、设置urls.py下的path访问路径;
"""CookieSession URL Configuration

The `urlpatterns` list routes URLs to views. For more information please see:

    https://docs.djangoproject.com/en/2.1/topics/http/urls/

Examples:

Function views

    1. Add an import:  from my_app import views

    2. Add a URL to urlpatterns:  path('', views.home, name='home')

Class-based views

    1. Add an import:  from other_app.views import Home

    2. Add a URL to urlpatterns:  path('', Home.as_view(), name='home')

Including another URLconf

    1. Import the include() function: from django.urls import include, path

    2. Add a URL to urlpatterns:  path('blog/', include('blog.urls'))

"""

from django.contrib import admin

from django.urls import path

from app01 import views

urlpatterns = [

    path('admin/', admin.site.urls),

    path('login/', views.login),

    path('index/', views.index),

]
3、编写views.py视图函数;
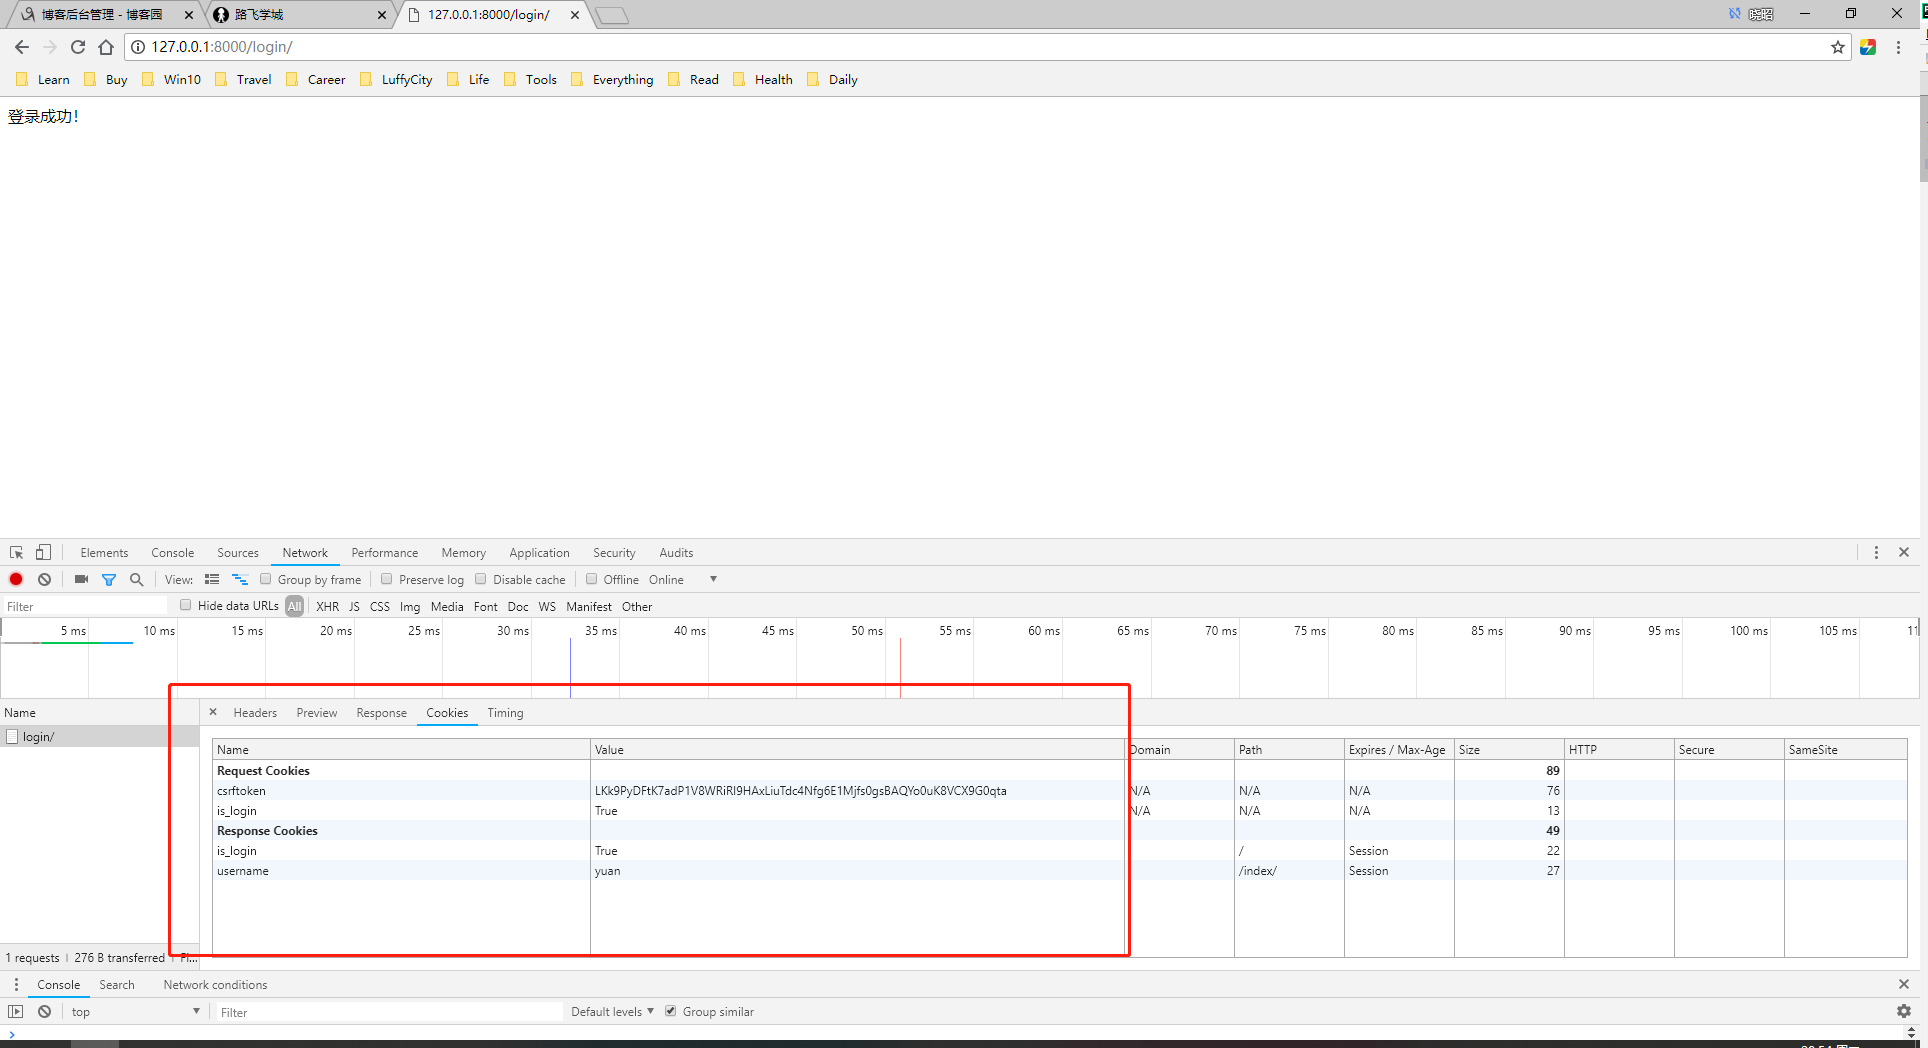
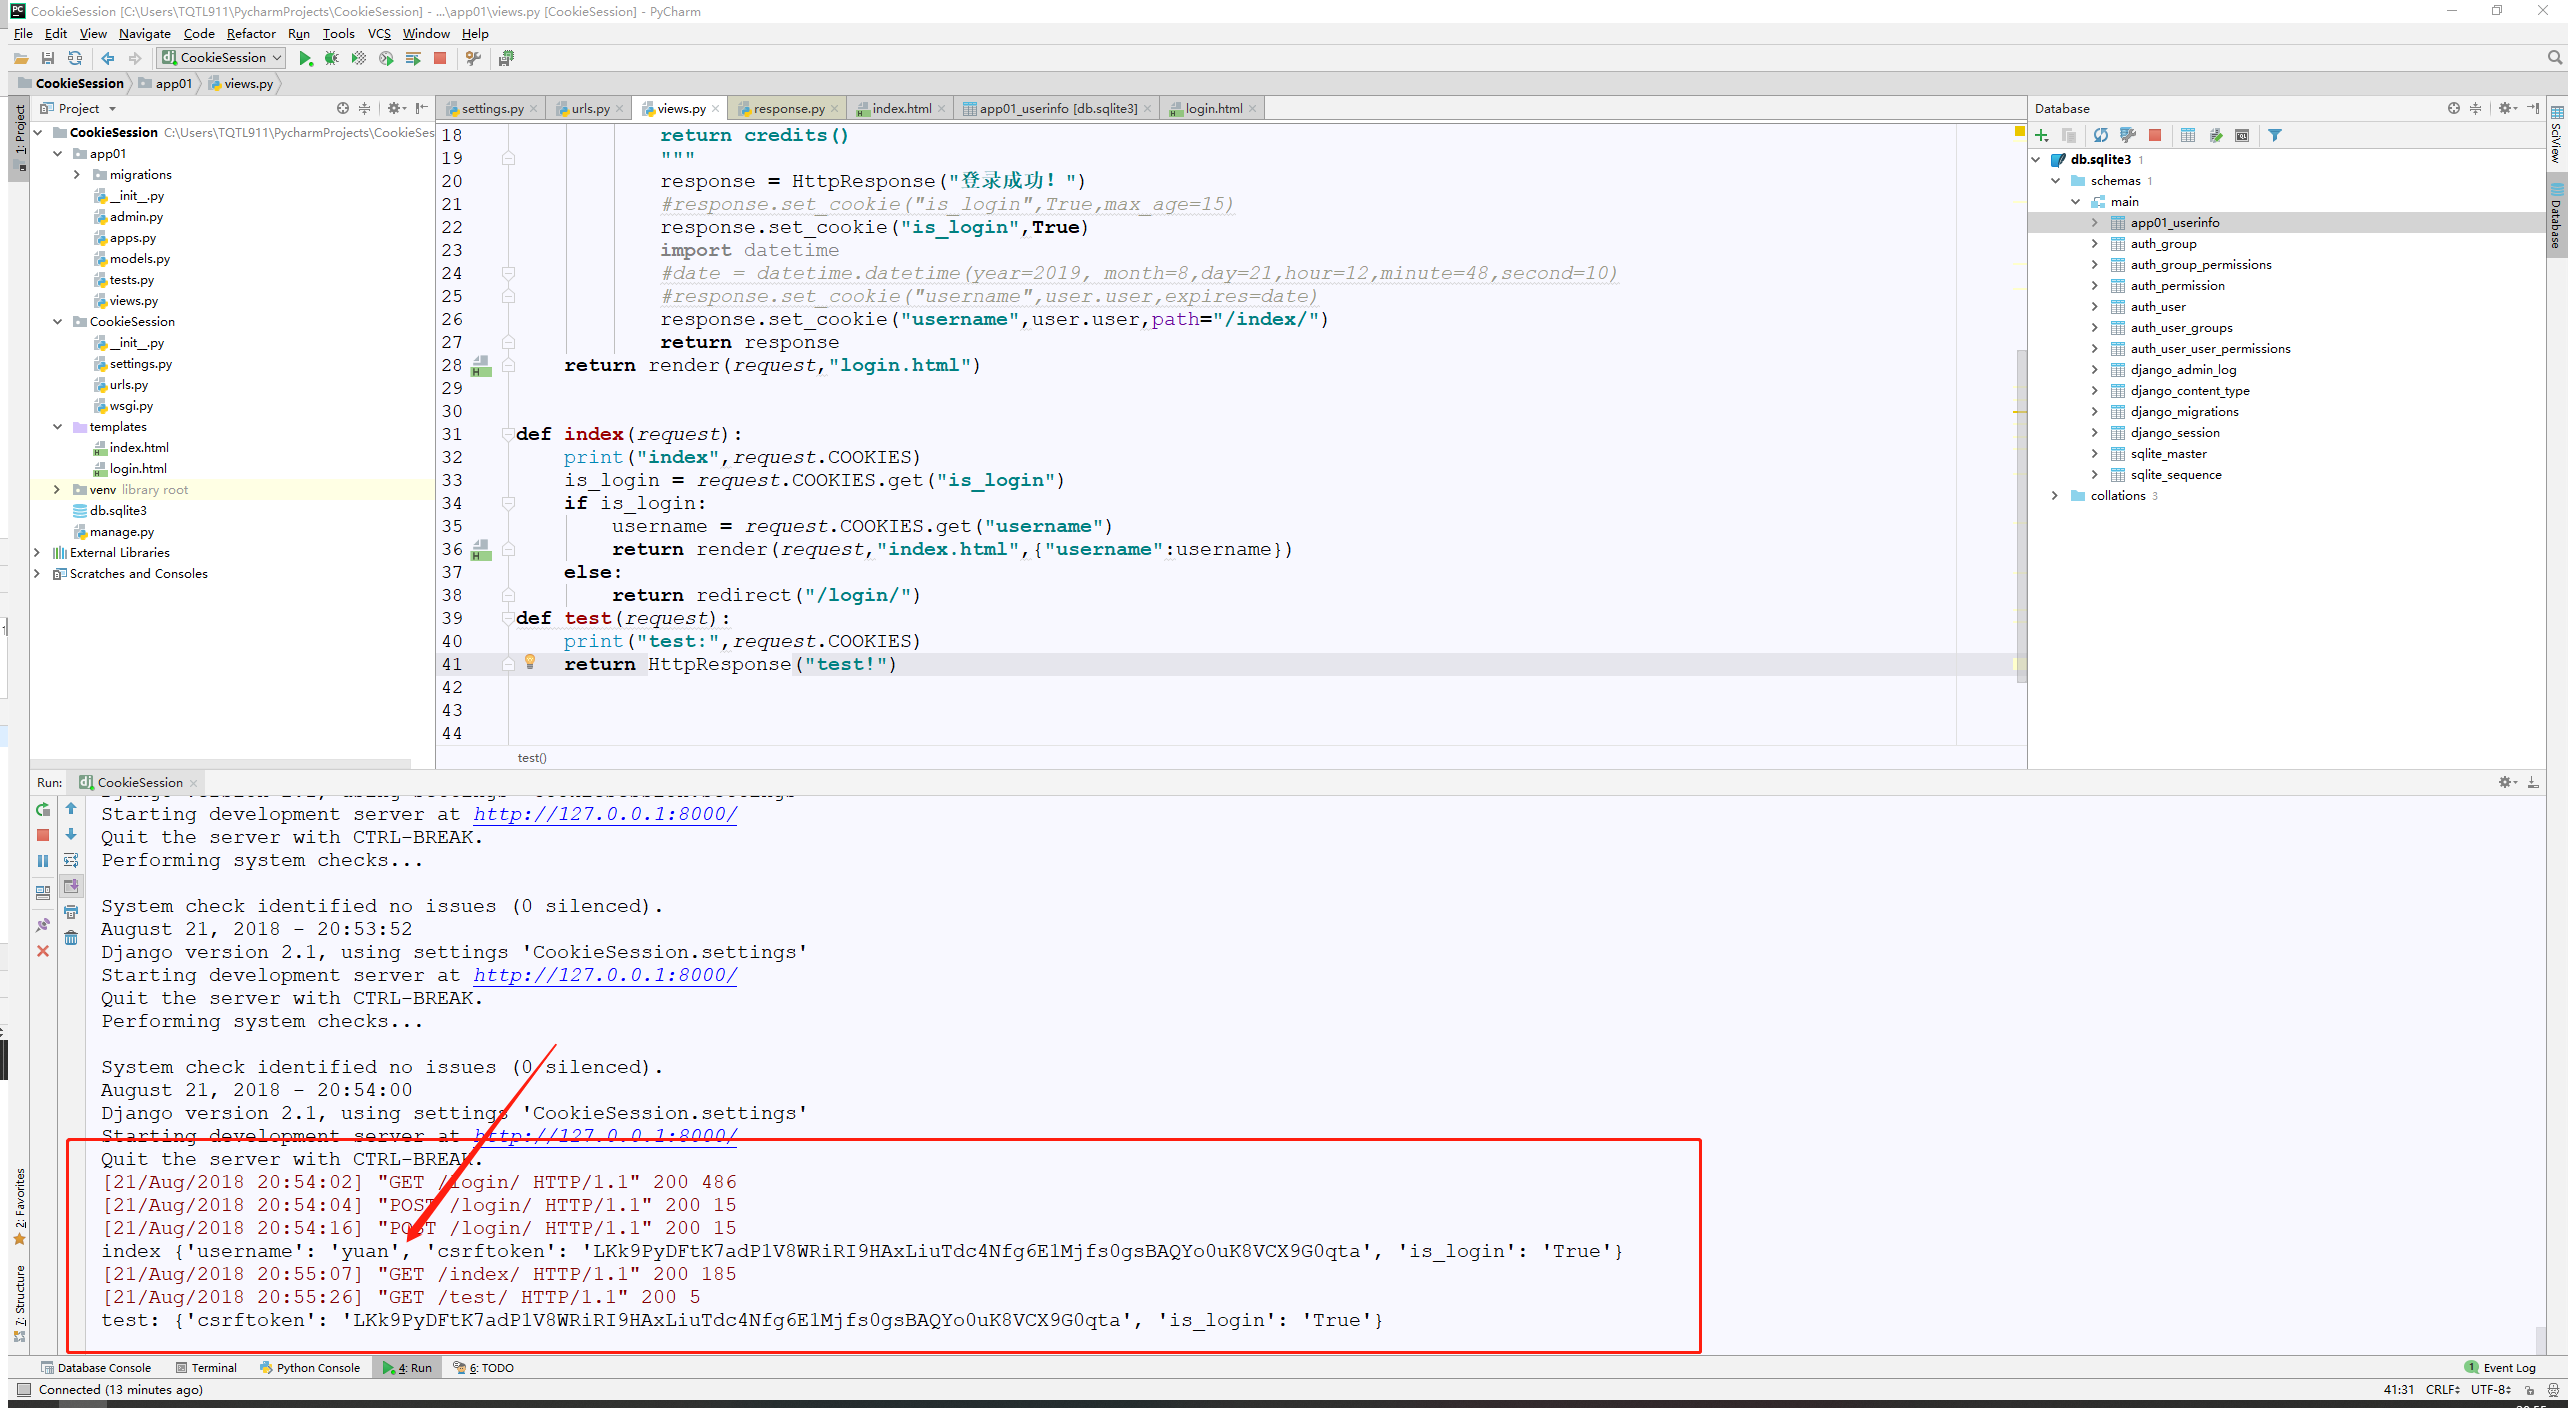
from django.shortcuts import render,HttpResponse,redirect # Create your views here.
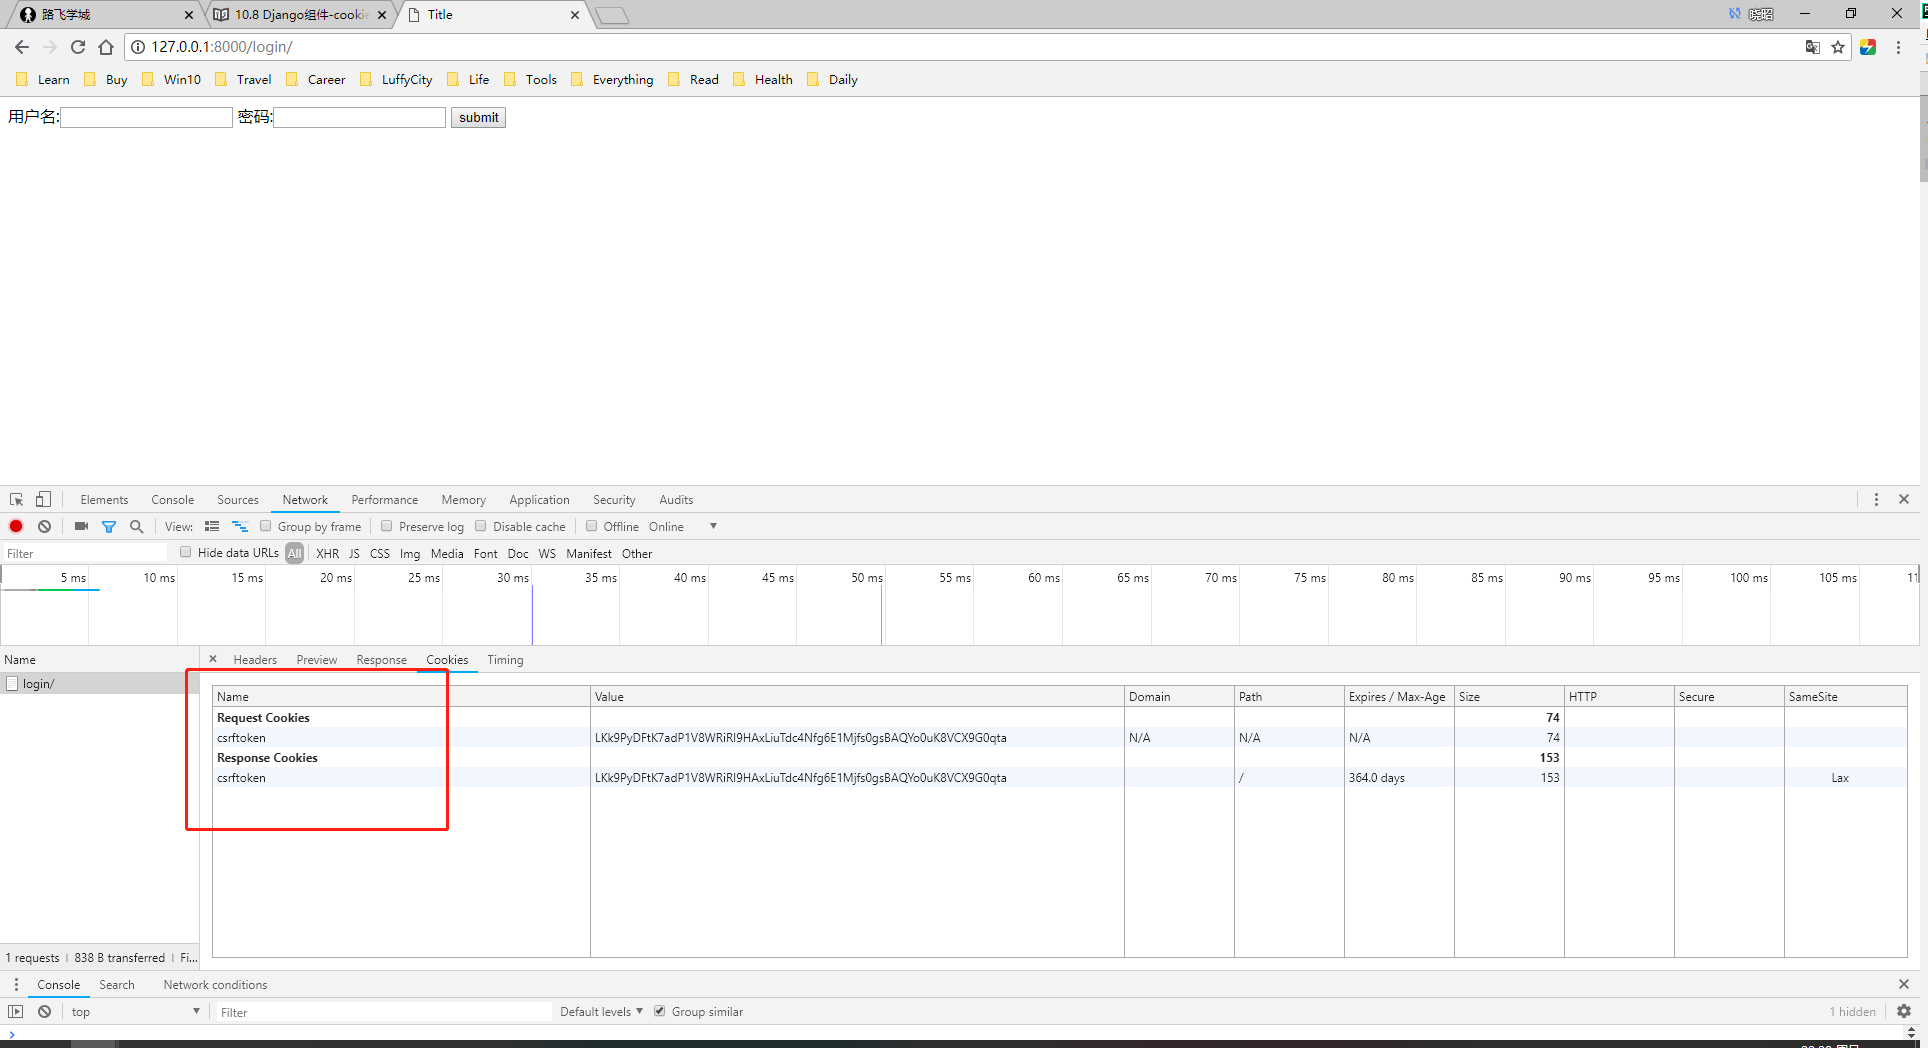
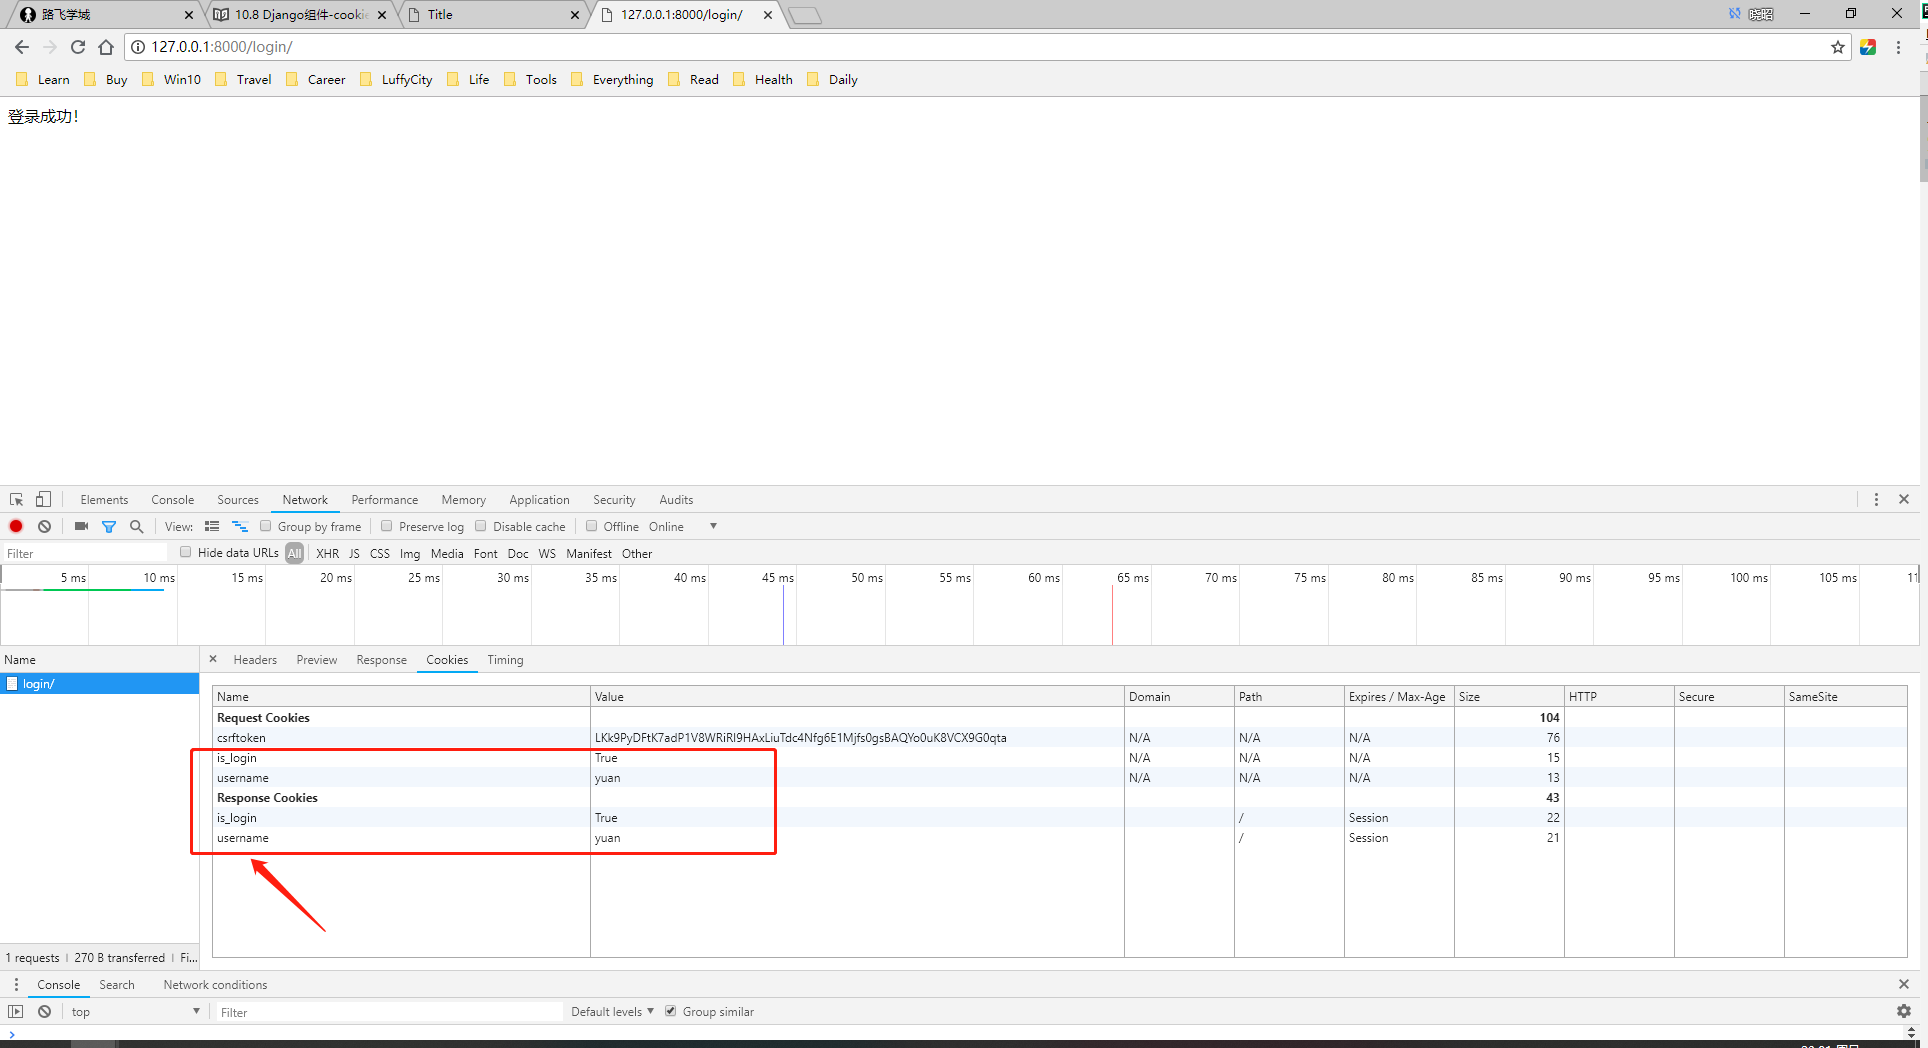
from app01.models import UserInfo def login(request):
if request.method == "POST":
user = request.POST.get("user")
pwd = request.POST.get("pwd") user = UserInfo.objects.filter(user=user,pwd=pwd).first()
if user:
#登录成功
"""
响应体:
return HttpResponse
return render()
return credits()
"""
response = HttpResponse("登录成功!")
response.set_cookie("is_login",True)
response.set_cookie("username",user.user)
return response
return render(request,"login.html") def index(request):
is_login = request.COOKIES.get("is_login")
if is_login:
username = request.COOKIES.get("username")
return render(request,"index.html",{"username":username})
else:
return redirect("/login/")
return render(request,"index.html")
4、配置templates下的login、index等html文件;
login.html;
<!DOCTYPE html>

<html lang="en">

<head>

    <meta charset="UTF-8">

    <title>Title</title>

    <style type="text/css">

    </style>

</head>

<body>

    <form action="" method="post">

        {% csrf_token %}

        用户名:<input type="text" name="user">

        密码:<input type="password" name="pwd">

        <input type="submit" value="submit">

    </form>

</body>

</html>
index.html;
<!DOCTYPE html>

<html lang="en">

<head>

    <meta charset="UTF-8">

    <title>Title</title>

    <style type="text/css">

    </style>

</head>

<body>

    <h3>Hi,{{ username }}</h3>

</body>

</html>
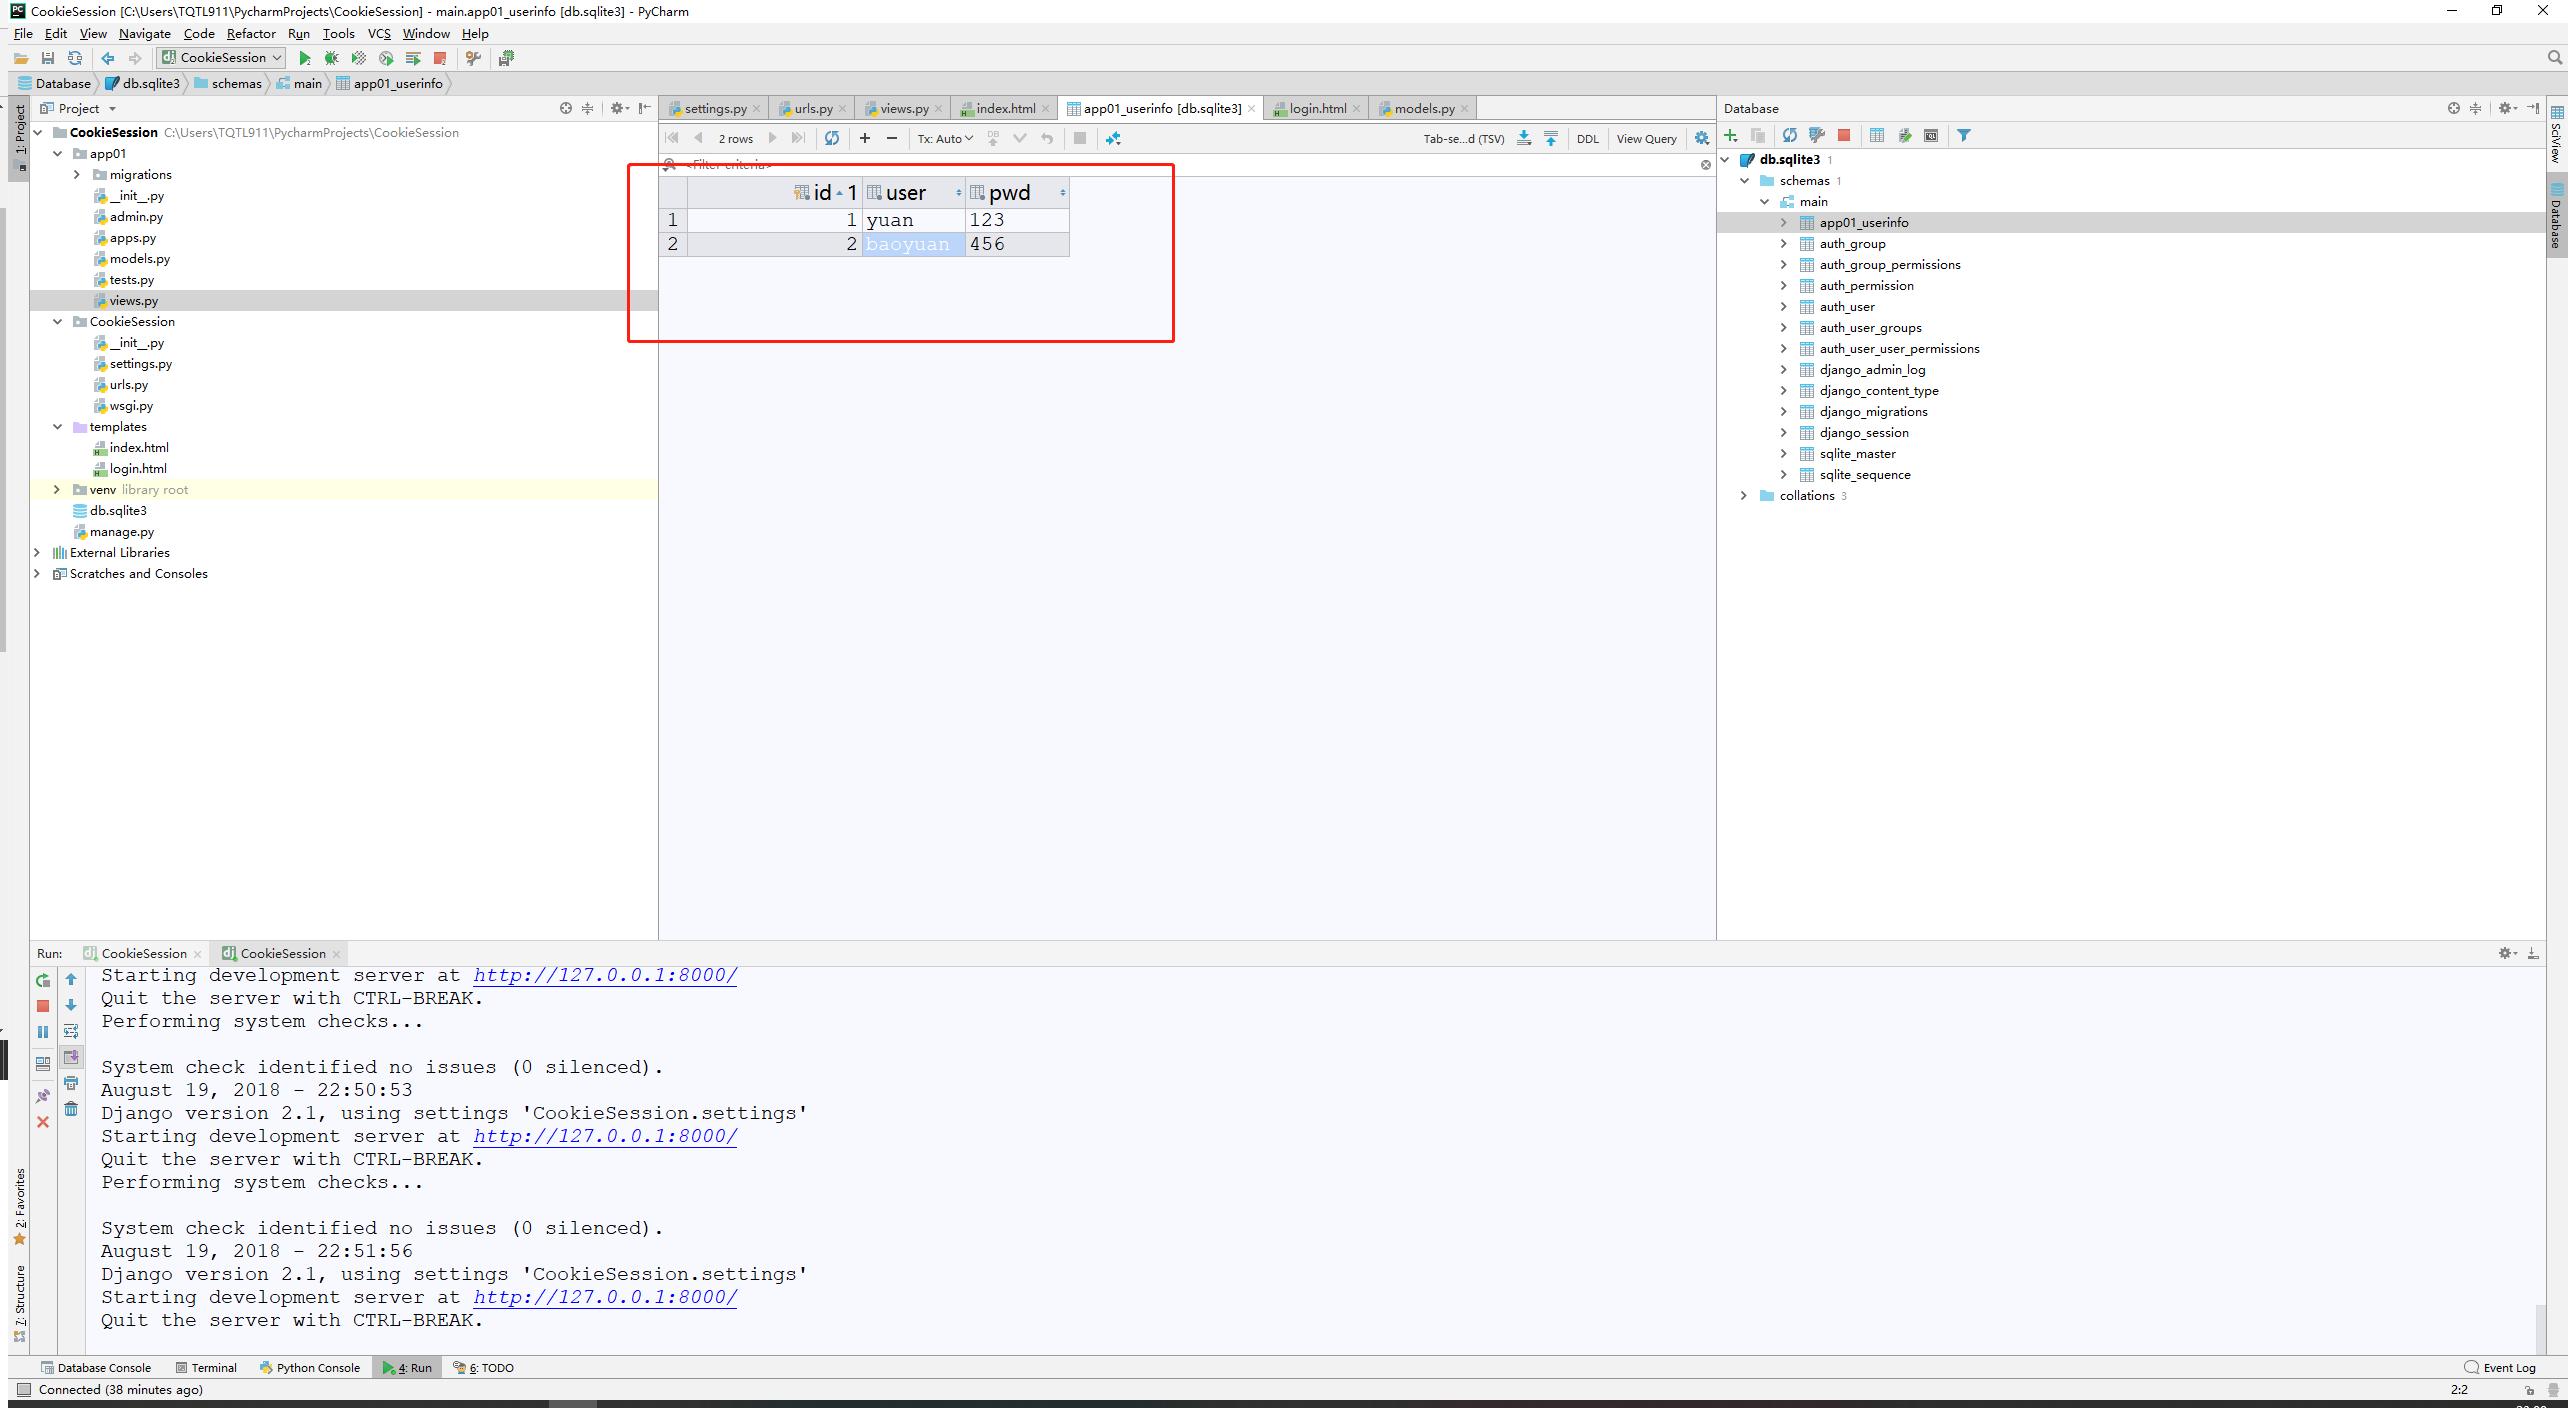
5、创建models.py下的表UserInfo并新增两条数据;
6、进行cookie的设置;
from django.shortcuts import render,HttpResponse,redirect

# Create your views here.

from app01.models import UserInfo

def login(request):

    if request.method == "POST":

        user = request.POST.get("user")

        pwd = request.POST.get("pwd")

        user = UserInfo.objects.filter(user=user,pwd=pwd).first()

        if user:

            #登录成功

            """

            响应体:

            return HttpResponse

            return render()

            return credits()

            """

            response = HttpResponse("登录成功!")

            response.set_cookie("is_login",True)

            response.set_cookie("username",user.user)

            return response

    return render(request,"login.html")

def index(request):

    is_login = request.COOKIES.get("is_login")

    if is_login:

        username = request.COOKIES.get("username")

        return render(request,"index.html",{"username":username})

    else:

        return redirect("/login/")

    return render(request,"index.html")
110-设置Cookie的超时参数
1、max_age = None,(单位15秒);
2、expires = None;
views.py;
from django.shortcuts import render,HttpResponse,redirect

# Create your views here.

from app01.models import UserInfo

def login(request):

    if request.method == "POST":

        user = request.POST.get("user")

        pwd = request.POST.get("pwd")

        user = UserInfo.objects.filter(user=user,pwd=pwd).first()

        if user:

            #登录成功

            """

            响应体:

            return HttpResponse

            return render()

            return credits()

            """

            response = HttpResponse("登录成功!")

            #response.set_cookie("is_login",True,max_age=15)

            response.set_cookie("is_login",True)

            import datetime

            date = datetime.datetime(year=2018, month=8,day=21,hour=12,minute=48,second=10)

            response.set_cookie("username",user.user,expires=date)

            return response

    return render(request,"login.html")

def index(request):

    print("index",request.COOKIES)

    is_login = request.COOKIES.get("is_login")

    if is_login:

        username = request.COOKIES.get("username")

        return render(request,"index.html",{"username":username})

    else:

        return redirect("/login/")

    return render(request,"index.html")
111-设置Cookie的有效路径
1、对视图函数设置有效路径path;
views.py;
from django.shortcuts import render,HttpResponse,redirect

# Create your views here.

from app01.models import UserInfo

def login(request):

    if request.method == "POST":

        user = request.POST.get("user")

        pwd = request.POST.get("pwd")

        user = UserInfo.objects.filter(user=user,pwd=pwd).first()

        if user:

            #登录成功

            """

            响应体:

            return HttpResponse

            return render()

            return credits()

            """

            response = HttpResponse("登录成功!")

            #response.set_cookie("is_login",True,max_age=15)

            response.set_cookie("is_login",True)

            import datetime

            #date = datetime.datetime(year=2019, month=8,day=21,hour=12,minute=48,second=10)

            #response.set_cookie("username",user.user,expires=date)

            #设置COOKIE的有效路径!

            response.set_cookie("username",user.user,path="/index/")

            return response

    return render(request,"login.html")

def index(request):

    print("index",request.COOKIES)

    is_login = request.COOKIES.get("is_login")

    if is_login:

        username = request.COOKIES.get("username")

        return render(request,"index.html",{"username":username})

    else:

        return redirect("/login/")

def test(request):

    print("test:",request.COOKIES)

    return HttpResponse("test!")
112-Cookie应用之保存上次访问时间
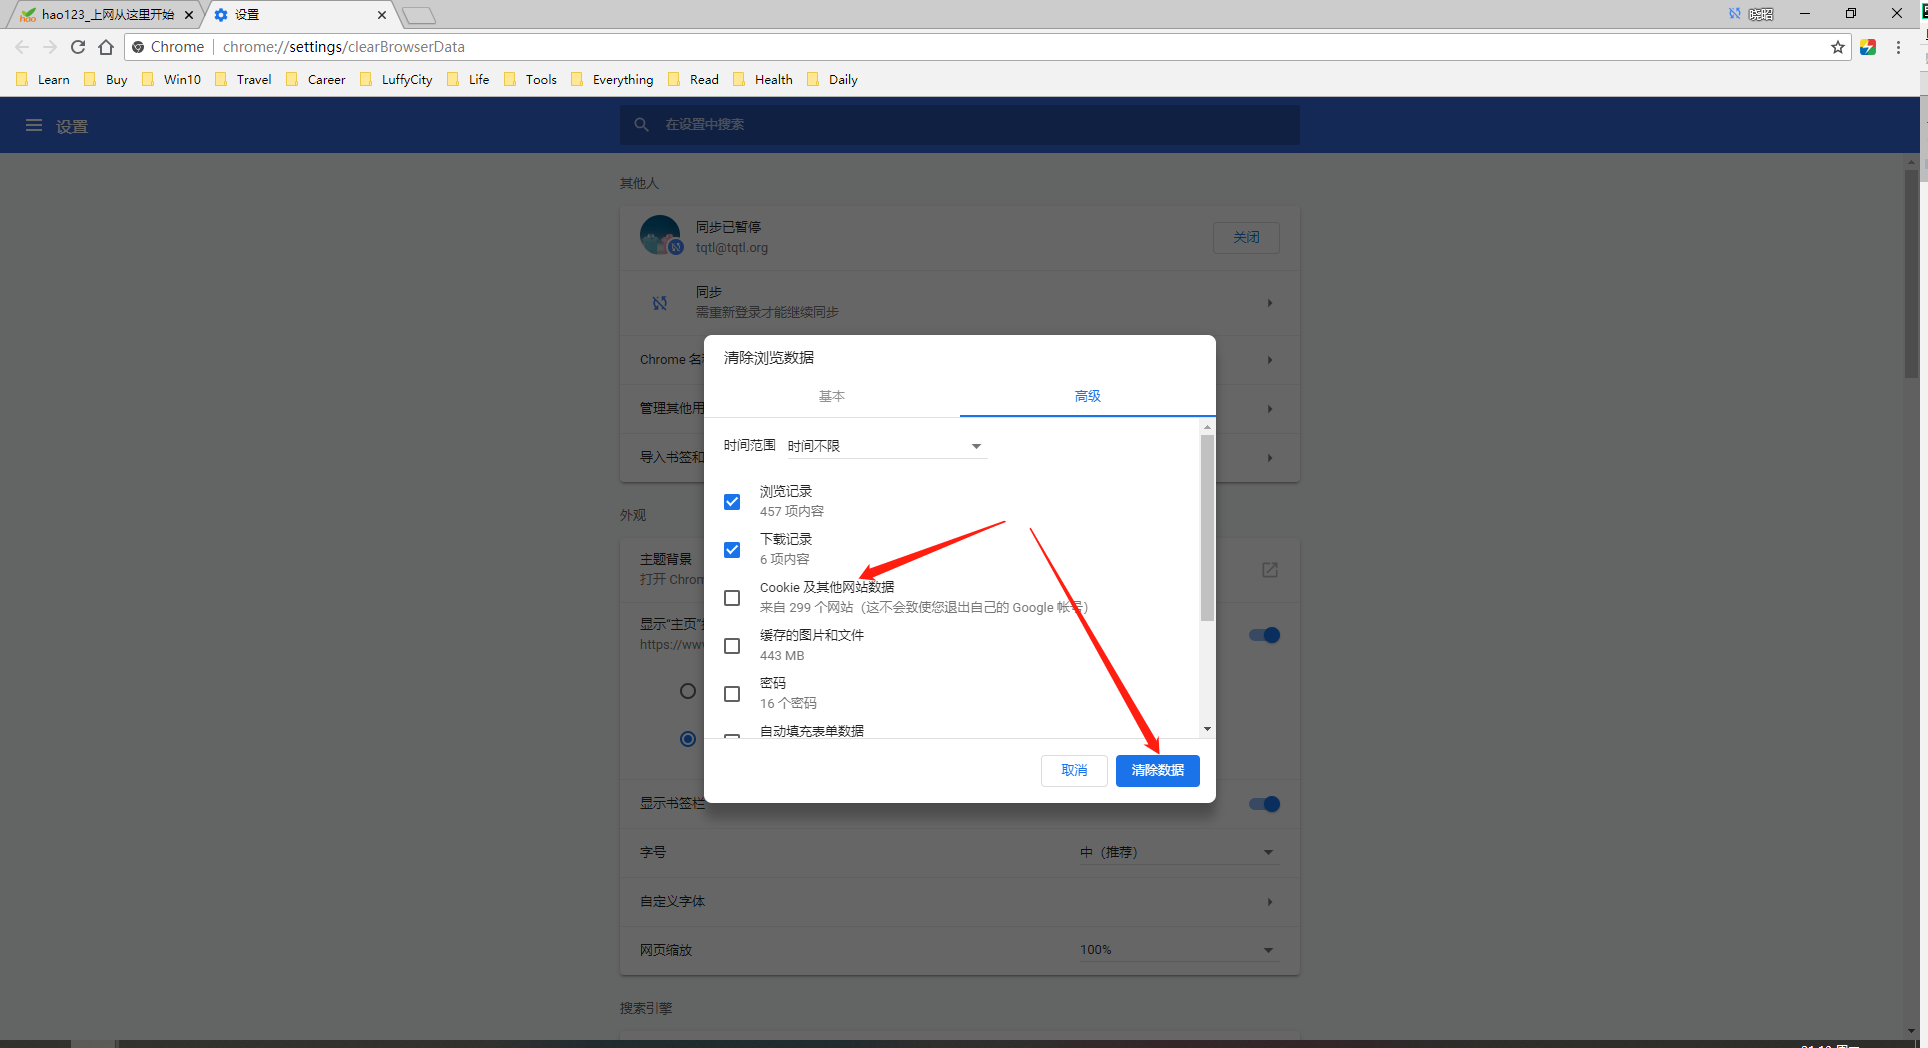
1、通过浏览器清除Cookies;Ctrl+Shift+Delete组合键;
2、显示上次访问网站的时间;
views.py;
from django.shortcuts import render,HttpResponse,redirect

# Create your views here.

from app01.models import UserInfo

def login(request):

    if request.method == "POST":

        user = request.POST.get("user")

        pwd = request.POST.get("pwd")

        user = UserInfo.objects.filter(user=user,pwd=pwd).first()

        if user:

            #登录成功

            """

            响应体:

            return HttpResponse

            return render()

            return credits()

            """

            response = HttpResponse("登录成功!")

            #response.set_cookie("is_login",True,max_age=15)

            response.set_cookie("is_login",True)

            import datetime

            #date = datetime.datetime(year=2019, month=8,day=21,hour=12,minute=48,second=10)

            #response.set_cookie("username",user.user,expires=date)

            #设置COOKIE的有效路径!

            response.set_cookie("username",user.user,path="/index/")

            return response

    return render(request,"login.html")

def index(request):

    print("index",request.COOKIES)

    is_login = request.COOKIES.get("is_login")

    if is_login:

        username = request.COOKIES.get("username")

        #在Username之后设置cookies存储上次登录的时间;

        import datetime

        #将时间格式化转换为自定义格式;

        now = datetime.datetime.now().strftime("%Y-%m-%d %H:%M:%S")

        last_time = request.COOKIES.get("last_visit_time","")

        response = render(request,"index.html",{"username":username,"last_time":last_time})

        response.set_cookie("last_visit_time",now)

        return response

    else:

        return redirect("/login/")

def test(request):

    print("test:",request.COOKIES)

    return HttpResponse("test!")
index.htmll;
<!DOCTYPE html>

<html lang="en">

<head>

    <meta charset="UTF-8">

    <title>Title</title>

    <style type="text/css">

    </style>

</head>

<body>

    <p>上次登录时间:{{ now }}</p>

    <h3>Hi,{{ last_time }}</h3>

</body>

</html>
3、显示上次浏览的商品的消息;
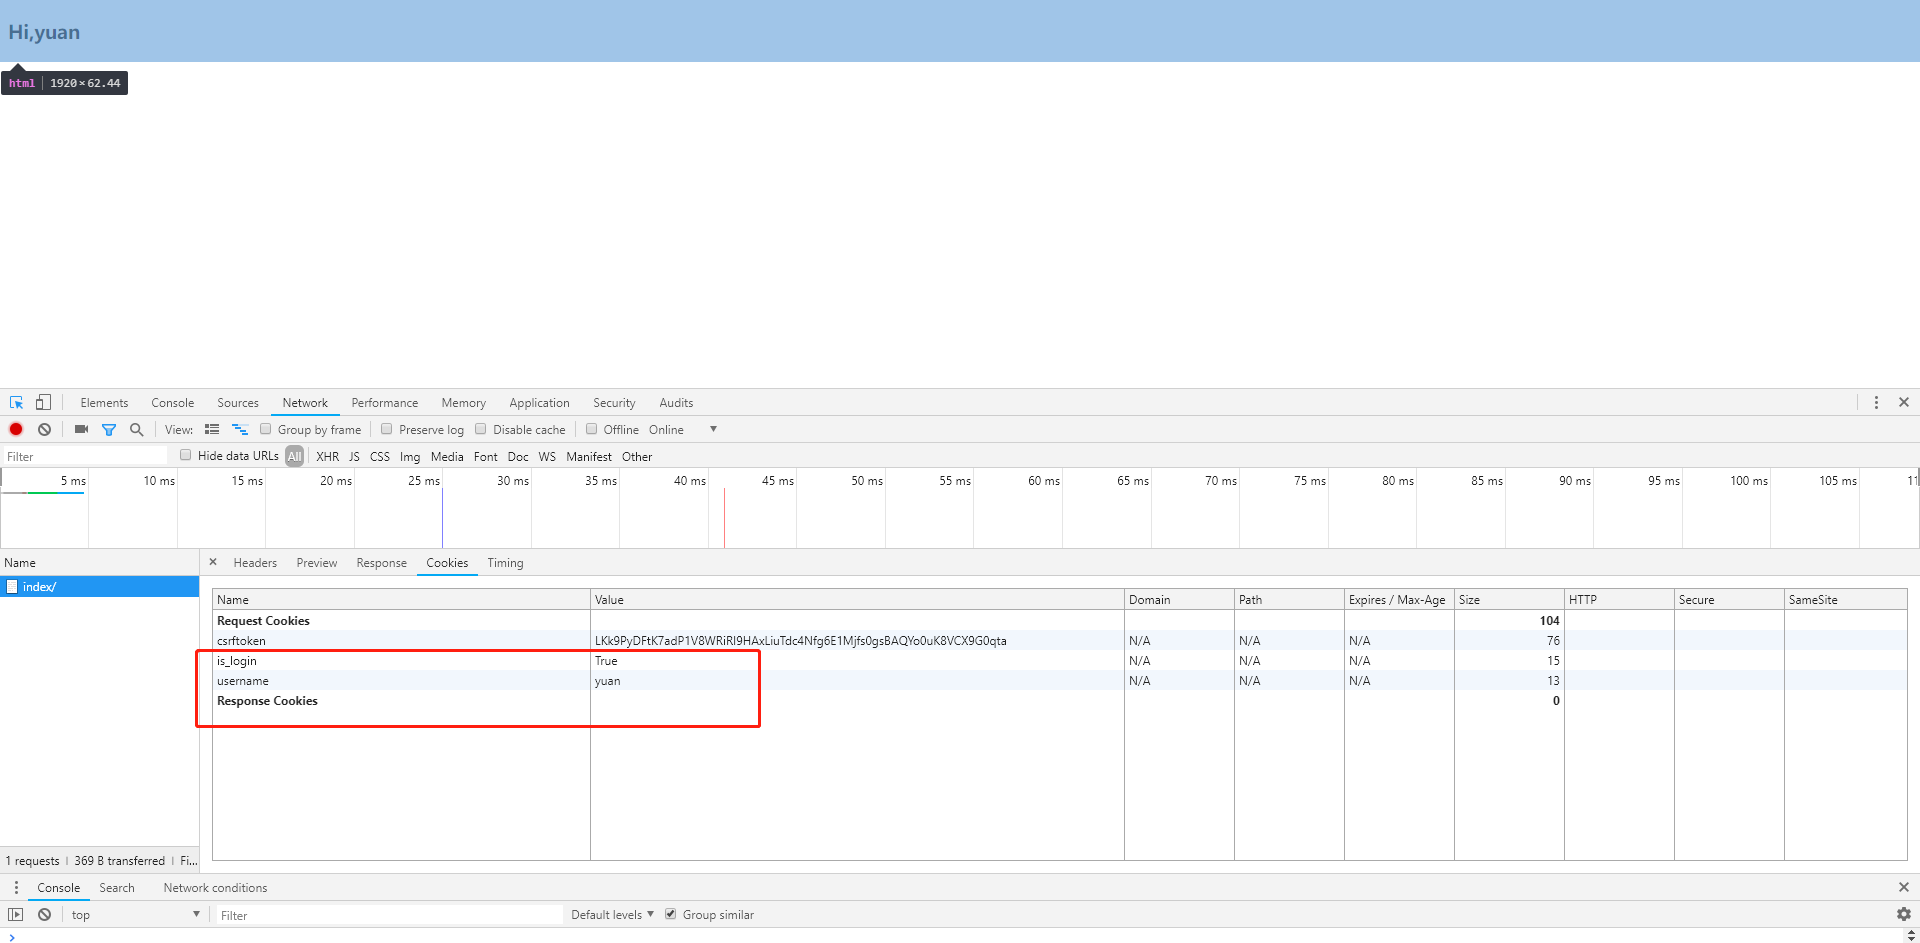
113-session的流程简介
1、session简介;
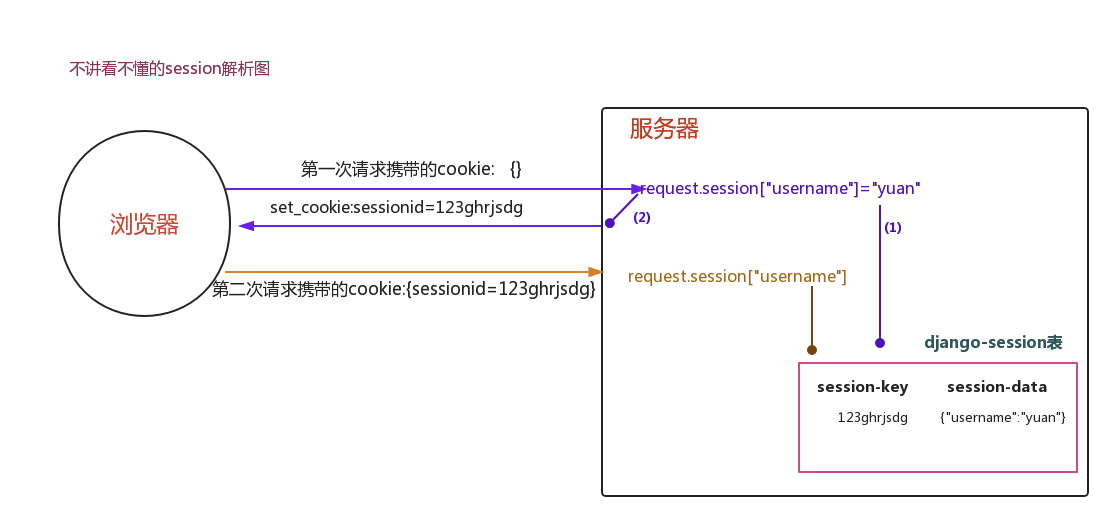
Session是服务器端技术,利用这个技术,服务器在运行时可以为每一个用户的浏览器创建一个其独享的session对象,由于 session为用户浏览器独享,所以用户在访问服务器的web资源时 ,可以把各自的数据放在各自的session中,当用户再去访问该服务器中的其它web资源时,其它web资源再从用户各自的session中 取出数据为用户服务。
2、session解析流程图;
114-session之保存登录状态
1、session之保存登录状态;
三大步:
- 1、成随机字符串;43djklf342dfjklsjkfa
- 2、response.set_cookie("sessionid",d4tqdx057mtw7izkf1l2wb4cnizt7qqy)
- 3、在Django-session表中创建一条记录;
session-key                          session-data
d4tqdx057mtw7izkf1l2wb4cnizt7qqy         {"is_login":True,"username":"yuan"}
2、views.py;
from django.shortcuts import render,HttpResponse,redirect

# Create your views here.

from app01.models import UserInfo

def login(request):

    if request.method == "POST":

        user = request.POST.get("user")

        pwd = request.POST.get("pwd")

        user = UserInfo.objects.filter(user=user,pwd=pwd).first()

        if user:

            #登录成功

            """

            响应体:

            return HttpResponse

            return render()

            return credits()

            """

            response = HttpResponse("登录成功!")

            #response.set_cookie("is_login",True,max_age=15)

            response.set_cookie("is_login",True)

            import datetime

            #date = datetime.datetime(year=2019, month=8,day=21,hour=12,minute=48,second=10)

            #response.set_cookie("username",user.user,expires=date)

            #设置COOKIE的有效路径!

            response.set_cookie("username",user.user,path="/index/")

            return response

    return render(request,"login.html")

def index(request):

    print("index",request.COOKIES)

    is_login = request.COOKIES.get("is_login")

    if is_login:

        username = request.COOKIES.get("username")

        #在Username之后设置cookies存储上次登录的时间;

        import datetime

        #将时间格式化转换为自定义格式;

        now = datetime.datetime.now().strftime("%Y-%m-%d %H:%M:%S")

        last_time = request.COOKIES.get("last_visit_time","")

        response = render(request,"index.html",{"username":username,"last_time":last_time})

        response.set_cookie("last_visit_time",now)

        return response

    else:

        return redirect("/login/")

def test(request):

    print("test:",request.COOKIES)

    return HttpResponse("test!")

def login_session(request):

    if request.method == "POST":

        user = request.POST.get("user")

        pwd = request.POST.get("pwd")

        user = UserInfo.objects.filter(user=user,pwd=pwd).first()

        if user:

            request.session["is_login"] = True

            request.session["username"] = user.user

            '''

            1、成随机字符串;43djklf342dfjklsjkfa

            2、response.set_cookie("sessionid",d4tqdx057mtw7izkf1l2wb4cnizt7qqy)

            3、在Django-session表中创建一条记录;

            session-key                                 session-data

            d4tqdx057mtw7izkf1l2wb4cnizt7qqy            {"is_login":True,"username":"yuan"}

            '''

            return HttpResponse("登录成功!")

    return render(request,"login.html")

def index_session(request):

    print("is_login:",request.session.get("is_login"))

    '''

    1、request.COOKIE.get("session")#d4tqdx057mtw7izkf1l2wb4cnizt7qqy

    2、django-session表中过滤记录;

    在django-session表中创建一条记录;

    session-key                              session-data

    d4tqdx057mtw7izkf1l2wb4cnizt7qqy        {"is_login":True,"username":"yuan"}

        obj-django-session.objects.fileter(session-key=d4tqdx057mtw7izkf1l2wb4cnizt7qqy).first()

    3、obj.session-data.get("is_login")

    '''

    is_login = request.session.get("is_login")

    if not is_login:

        return redirect("/login_session/")

    username = request.session.get("username")

    return render(request,"index.html",{"username":username})
3、index.html;
<!DOCTYPE html>

<html lang="en">

<head>

    <meta charset="UTF-8">

    <title>Title</title>

    <style type="text/css">

    </style>

</head>

<body>

    <p>上次登录时间:{{ now }}</p>

    <h3>Hi,{{ username }}</h3>

</body>

</html>
115-session应用之保存上次登录时间
1、基于session实现保存上次登录的时间;
2、views.py;
from django.shortcuts import render,HttpResponse,redirect

# Create your views here.

from app01.models import UserInfo

def login(request):

    if request.method == "POST":

        user = request.POST.get("user")

        pwd = request.POST.get("pwd")

        user = UserInfo.objects.filter(user=user,pwd=pwd).first()

        if user:

            #登录成功

            """

            响应体:

            return HttpResponse

            return render()

            return credits()

            """

            response = HttpResponse("登录成功!")

            #response.set_cookie("is_login",True,max_age=15)

            response.set_cookie("is_login",True)

            import datetime

            #date = datetime.datetime(year=2019, month=8,day=21,hour=12,minute=48,second=10)

            #response.set_cookie("username",user.user,expires=date)

            #设置COOKIE的有效路径!

            response.set_cookie("username",user.user,path="/index/")

            return response

    return render(request,"login.html")

def index(request):

    print("index",request.COOKIES)

    is_login = request.COOKIES.get("is_login")

    if is_login:

        username = request.COOKIES.get("username")

        #在Username之后设置cookies存储上次登录的时间;

        import datetime

        #将时间格式化转换为自定义格式;

        now = datetime.datetime.now().strftime("%Y-%m-%d %H:%M:%S")

        last_time = request.COOKIES.get("last_visit_time","")

        response = render(request,"index.html",{"username":username,"last_time":last_time})

        response.set_cookie("last_visit_time",now)

        return response

    else:

        return redirect("/login/")

def test(request):

    print("test:",request.COOKIES)

    return HttpResponse("test!")

def login_session(request):

    if request.method == "POST":

        user = request.POST.get("user")

        pwd = request.POST.get("pwd")

        user = UserInfo.objects.filter(user=user,pwd=pwd).first()

        if user:

            import datetime

            # 将时间格式化转换为自定义格式;

            now = datetime.datetime.now().strftime("%Y-%m-%d %H:%M:%S")

            request.session["is_login"] = True

            request.session["username"] = user.user

            #通过session设置上次登录时间;

            request.session["last_visit_time"] = now

            '''

            1、成随机字符串;43djklf342dfjklsjkfa

            2、response.set_cookie("sessionid",d4tqdx057mtw7izkf1l2wb4cnizt7qqy)

            3、在Django-session表中创建一条记录;

            session-key                                 session-data

            d4tqdx057mtw7izkf1l2wb4cnizt7qqy            {"is_login":True,"username":"yuan"}

            '''

            return HttpResponse("登录成功!")

    return render(request,"login.html")

def index_session(request):

    print("is_login:",request.session.get("is_login"))

    '''

    1、request.COOKIE.get("session")#d4tqdx057mtw7izkf1l2wb4cnizt7qqy

    2、django-session表中过滤记录;

    在django-session表中创建一条记录;

    session-key                              session-data

    d4tqdx057mtw7izkf1l2wb4cnizt7qqy        {"is_login":True,"username":"yuan"}

        obj-django-session.objects.fileter(session-key=d4tqdx057mtw7izkf1l2wb4cnizt7qqy).first()

    3、obj.session-data.get("is_login")

    '''

    is_login = request.session.get("is_login")

    if not is_login:

        return redirect("/login_session/")

    username = request.session.get("username")

    last_visit_time = request.session.get("last_visit_time")

    return render(request,"index.html",{"username":username,"last_visit_time":last_visit_time})
3、index.html;
<!DOCTYPE html>

<html lang="en">

<head>

    <meta charset="UTF-8">

    <title>Title</title>

    <style type="text/css">

    </style>

</head>

<body>

    <p>上次登录时间:{{ now }}</p>

    <h3>Hi,{{ username }}</h3>

    <h3>Hi,上次访问时间:{{ last_visit_time }}</h3>

</body>

</html>
116-session的更新操作
1、session的更新操作;
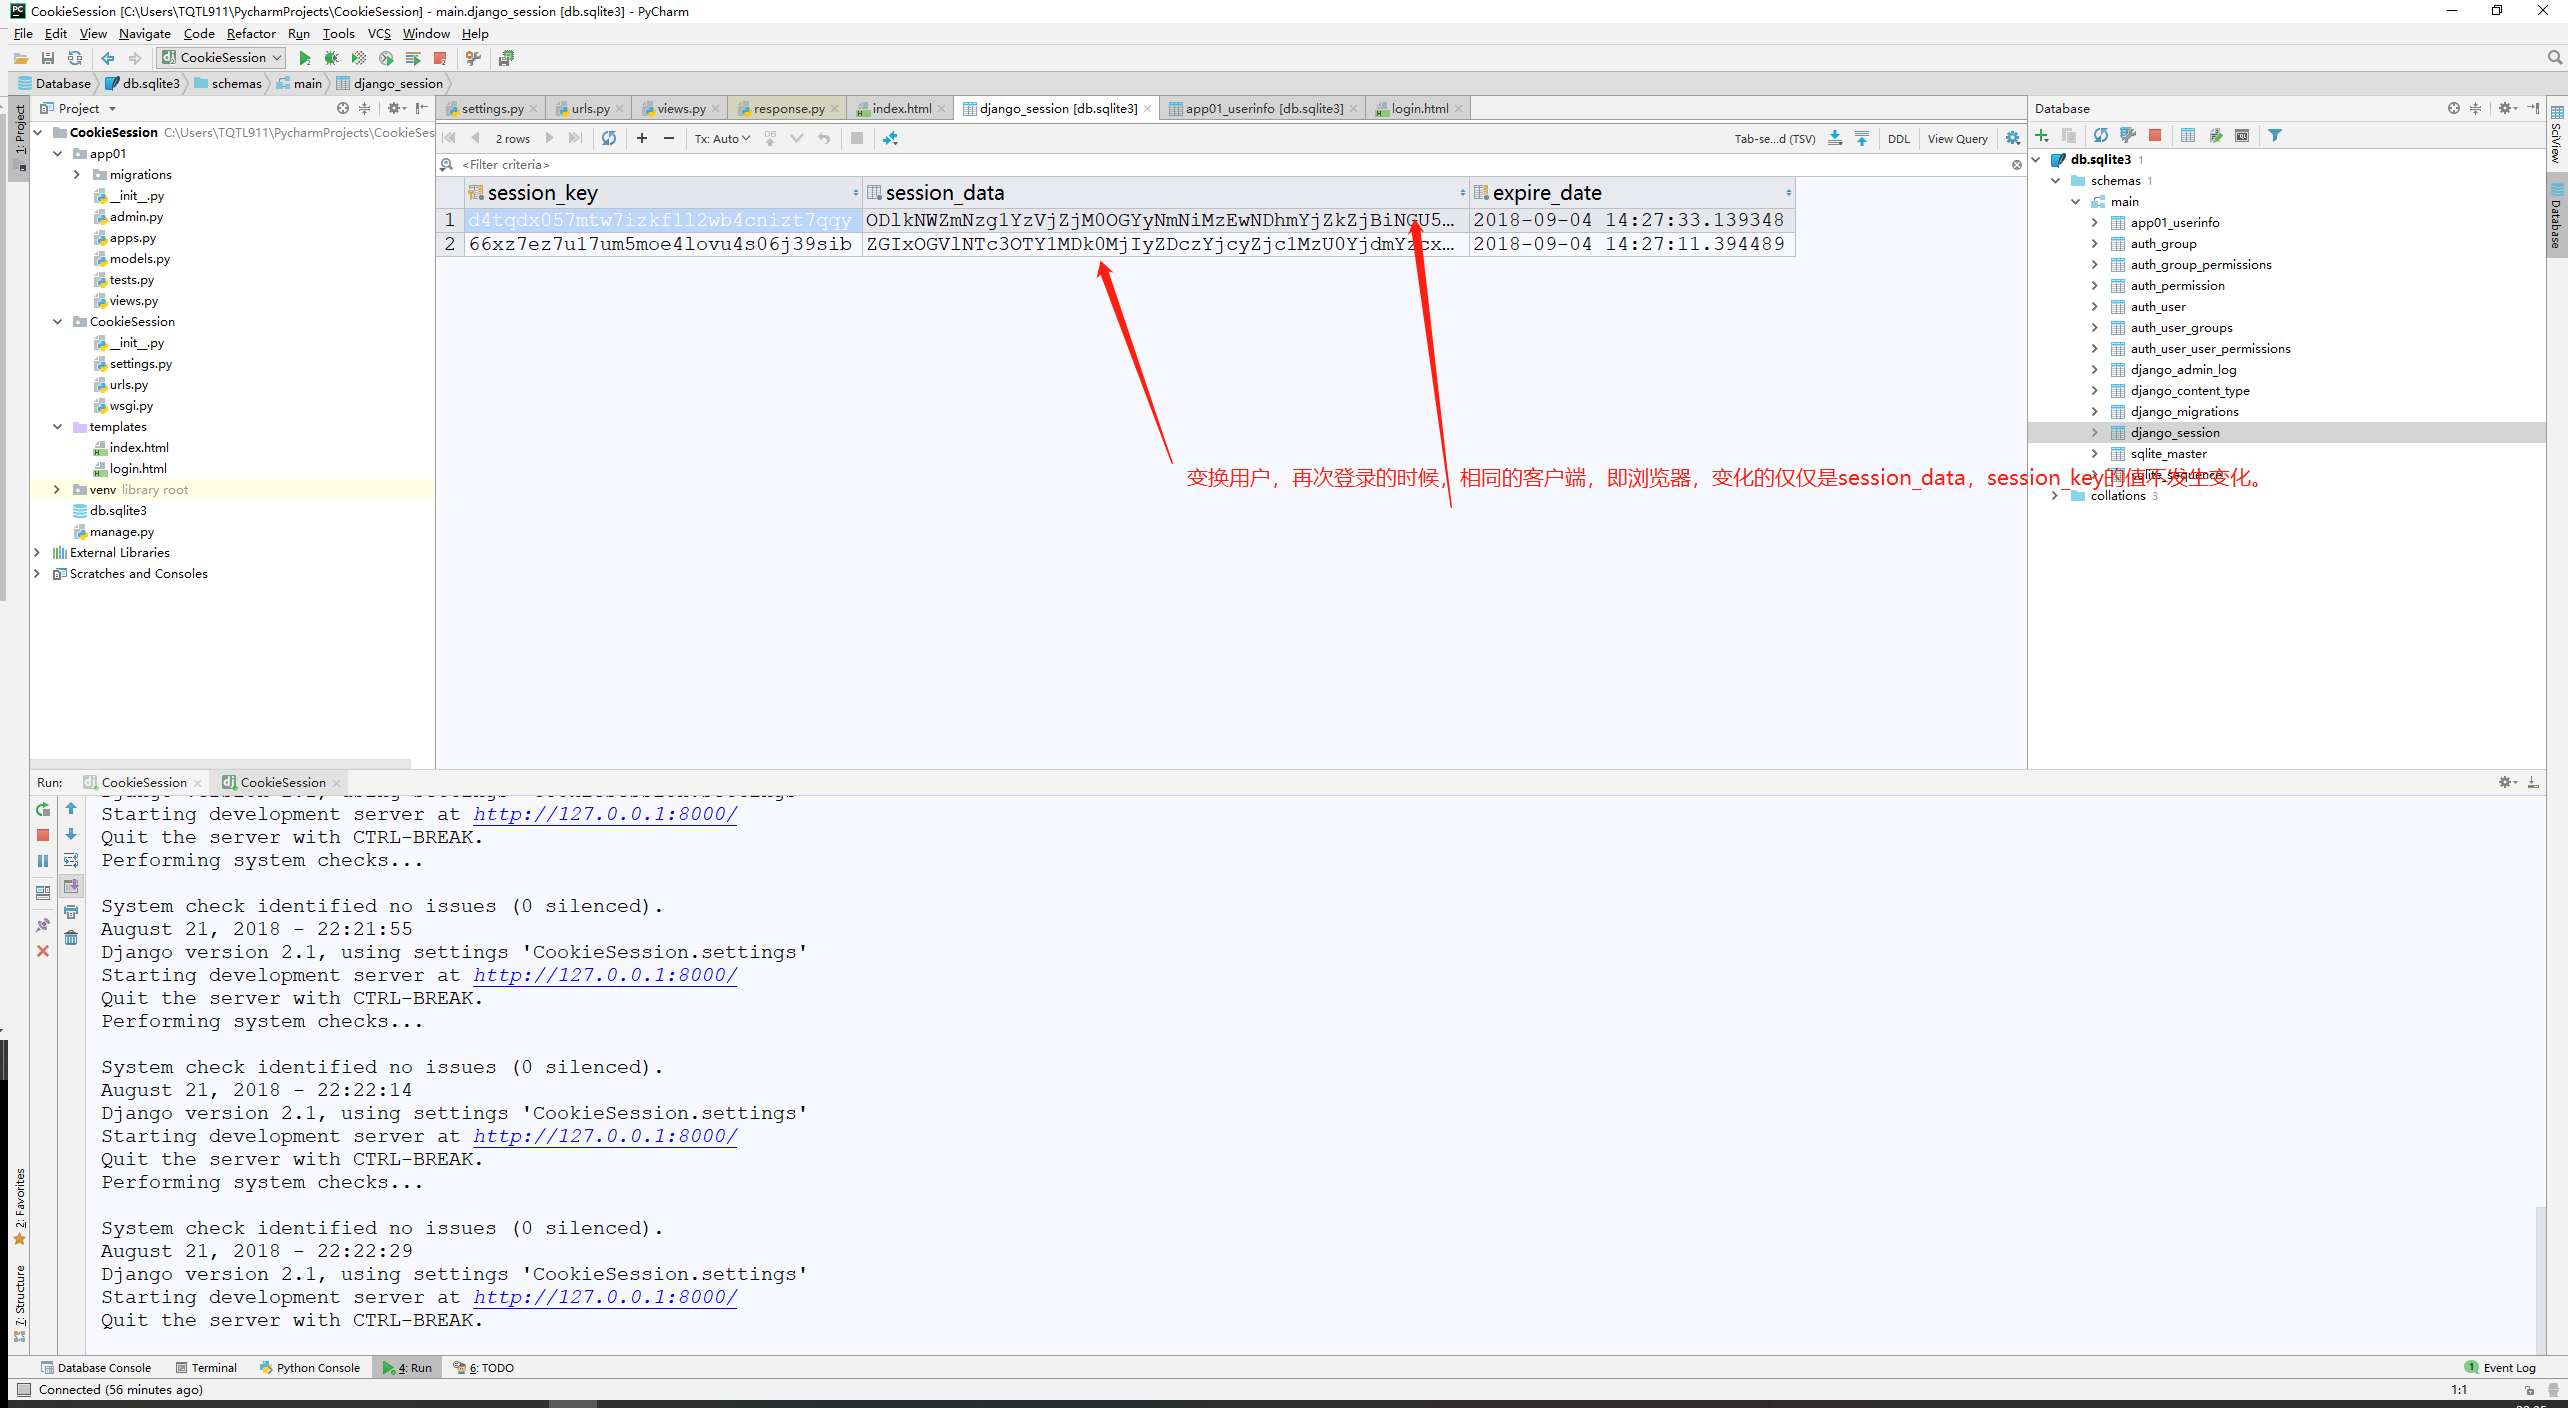
2、分为如下几种情况:
- 初次登录,比如Chrome;
- 相同用户再次登录,Chrome;
- 不同用户,再次登录,Chrome;
117-基于session的注销功能
- 通过del request.session["is_login"]方法删除session信息,但是不推荐;
- request.session.flush()方式进行清除session记录,Django-session表中的记录也删除;
1、views.py;
from django.shortcuts import render,HttpResponse,redirect

# Create your views here.

from app01.models import UserInfo

def login(request):

    if request.method == "POST":

        user = request.POST.get("user")

        pwd = request.POST.get("pwd")

        user = UserInfo.objects.filter(user=user,pwd=pwd).first()

        if user:

            #登录成功

            """

            响应体:

            return HttpResponse

            return render()

            return credits()

            """

            response = HttpResponse("登录成功!")

            #response.set_cookie("is_login",True,max_age=15)

            response.set_cookie("is_login",True)

            import datetime

            #date = datetime.datetime(year=2019, month=8,day=21,hour=12,minute=48,second=10)

            #response.set_cookie("username",user.user,expires=date)

            #设置COOKIE的有效路径!

            response.set_cookie("username",user.user,path="/index/")

            return response

    return render(request,"login.html")

def index(request):

    print("index",request.COOKIES)

    is_login = request.COOKIES.get("is_login")

    if is_login:

        username = request.COOKIES.get("username")

        #在Username之后设置cookies存储上次登录的时间;

        import datetime

        #将时间格式化转换为自定义格式;

        now = datetime.datetime.now().strftime("%Y-%m-%d %H:%M:%S")

        last_time = request.COOKIES.get("last_visit_time","")

        response = render(request,"index.html",{"username":username,"last_time":last_time})

        response.set_cookie("last_visit_time",now)

        return response

    else:

        return redirect("/login/")

def test(request):

    print("test:",request.COOKIES)

    return HttpResponse("test!")

def login_session(request):

    if request.method == "POST":

        user = request.POST.get("user")

        pwd = request.POST.get("pwd")

        user = UserInfo.objects.filter(user=user,pwd=pwd).first()

        if user:

            import datetime

            # 将时间格式化转换为自定义格式;

            now = datetime.datetime.now().strftime("%Y-%m-%d %H:%M:%S")

            request.session["is_login"] = True

            request.session["username"] = user.user

            #通过session设置上次登录时间;

            request.session["last_visit_time"] = now

            '''

            1、成随机字符串;43djklf342dfjklsjkfa

            2、response.set_cookie("sessionid",d4tqdx057mtw7izkf1l2wb4cnizt7qqy)

            3、在Django-session表中创建一条记录;

            session-key                                 session-data

            d4tqdx057mtw7izkf1l2wb4cnizt7qqy            {"is_login":True,"username":"yuan"}

            '''

            return HttpResponse("登录成功!")

    return render(request,"login.html")

def index_session(request):

    print("is_login:",request.session.get("is_login"))

    '''

    1、request.COOKIE.get("session")#d4tqdx057mtw7izkf1l2wb4cnizt7qqy

    2、django-session表中过滤记录;

    在django-session表中创建一条记录;

    session-key                              session-data

    d4tqdx057mtw7izkf1l2wb4cnizt7qqy        {"is_login":True,"username":"yuan"}

        obj-django-session.objects.fileter(session-key=d4tqdx057mtw7izkf1l2wb4cnizt7qqy).first()

    3、obj.session-data.get("is_login")

    '''

    is_login = request.session.get("is_login")

    if not is_login:

        return redirect("/login_session/")

    username = request.session.get("username")

    last_visit_time = request.session.get("last_visit_time")

    return render(request,"index.html",{"username":username,"last_visit_time":last_visit_time})

def logout(request):

    #del request.session["is_login"]

    #推荐使用如下方法;

    request.session.flush()

    return redirect("/login/")

'''

1、request.COOKIE.get("sessionid")

2、django-session.objects.filter(session-key=randon_str).delete()

3、response.delete_cookie("sessionid)

'''
2、index.html;
<!DOCTYPE html>

<html lang="en">

<head>

    <meta charset="UTF-8">

    <title>Title</title>

    <style type="text/css">

    </style>

</head>

<body>

    <p>上次登录时间:{{ now }}</p>

    <h3>Hi,{{ username }}</h3>

    <h3>Hi,上次访问时间:{{ last_visit_time }}</h3>

    <a href="/logout/">注销</a>

</body>

</html>
3、session基于settings.py中的配置;
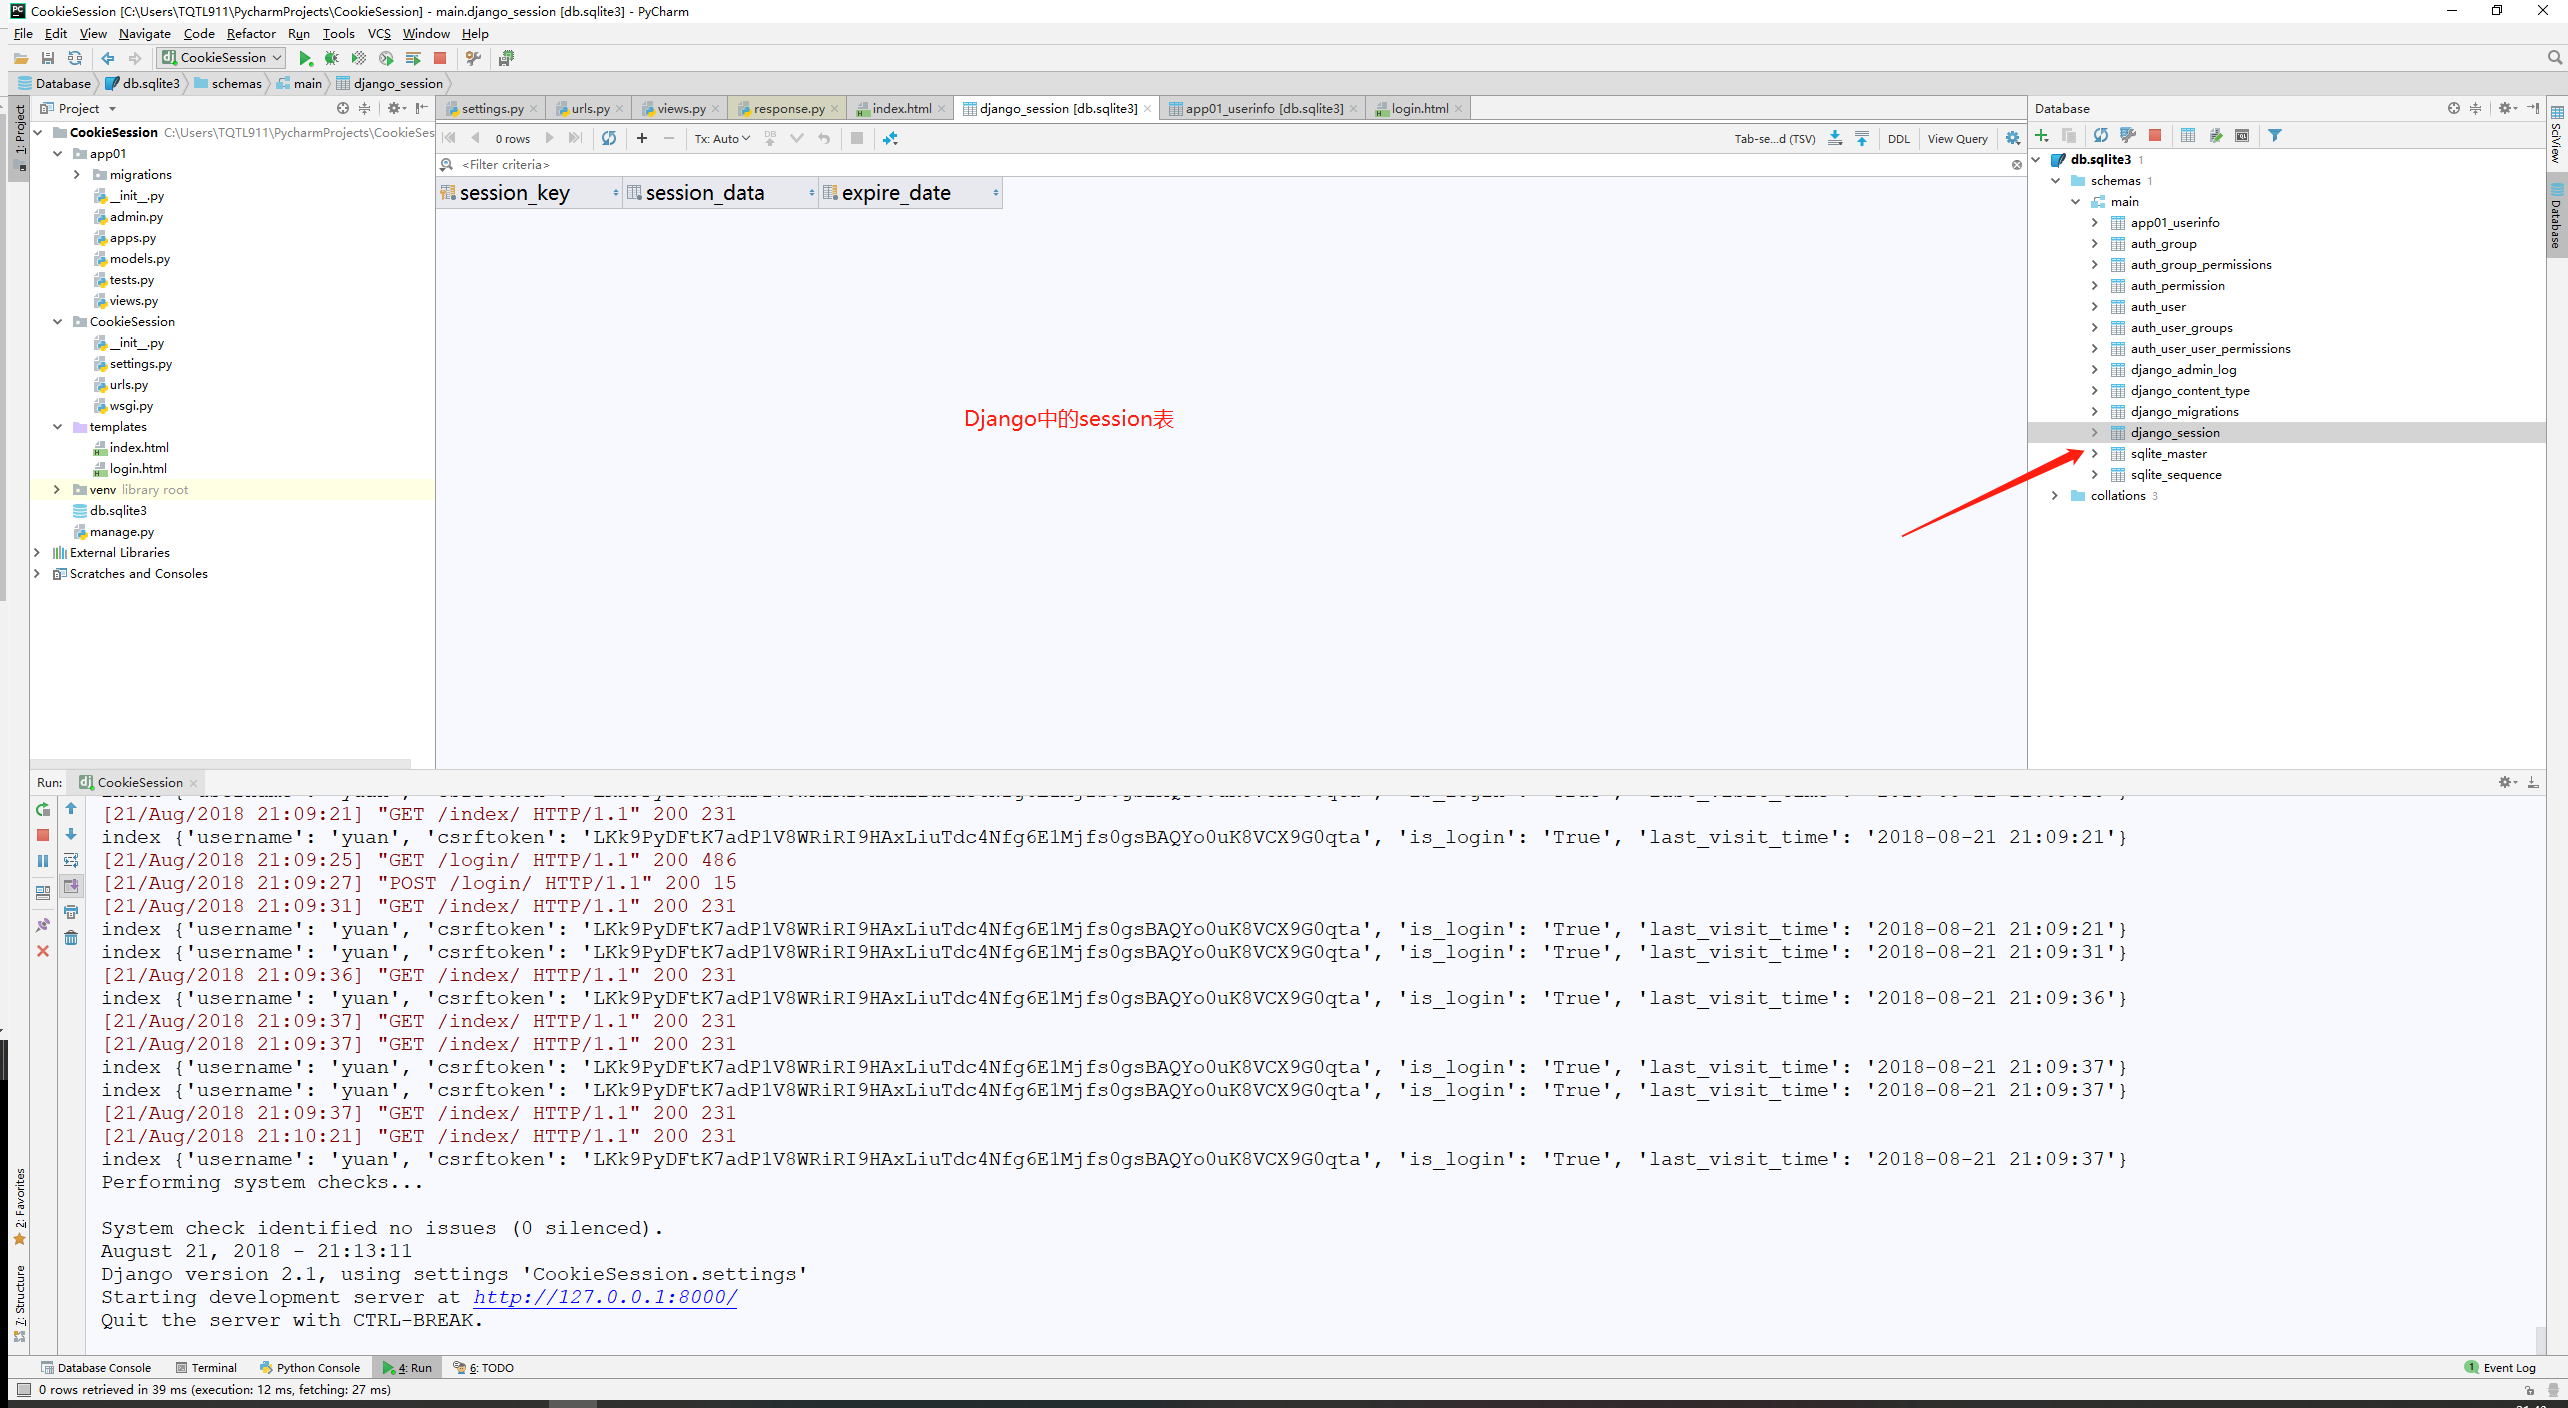
Django默认支持Session,并且默认是将Session数据存储在数据库中,即:django_session 表中。
常见的参数说明:
SESSION_ENGINE='django.contrib.sessions.backends.db'# 引擎(默认);SESSION_COOKIE_NAME ="sessionid"# Session的cookie保存在浏览器上时的key,即:sessionid=随机字符串(默认);SESSION_COOKIE_PATH ="/"# Session的cookie保存的路径(默认);SESSION_COOKIE_DOMAIN=None# Session的cookie保存的域名(默认);SESSION_COOKIE_SECURE=False# 是否Https传输cookie(默认);SESSION_COOKIE_HTTPONLY=True# 是否Session的cookie只支持http传输(默认);SESSION_COOKIE_AGE=1209600# Session的cookie失效日期(2周)(默认);SESSION_EXPIRE_AT_BROWSER_CLOSE=False# 是否关闭浏览器使得Session过期(默认);SESSION_SAVE_EVERY_REQUEST=False# 是否每次请求都保存Session,默认修改之后才保存(默认);
4、Django中session的语法;
1、设置Sessions值

          request.session['session_name'] ="admin"

2、获取Sessions值

          session_name = request.session["session_name"]

3、删除Sessions值

          del request.session["session_name"]

4、flush()

     删除当前的会话数据并删除会话的Cookie。

     这用于确保前面的会话数据不可以再次被用户的浏览器访问

5、get(key, default=None)

fav_color = request.session.get('fav_color', 'red')

6、pop(key)

fav_color = request.session.pop('fav_color')

7、keys()

8、items()

9、setdefault()

10 用户session的随机字符串

        request.session.session_key

        # 将所有Session失效日期小于当前日期的数据删除

        request.session.clear_expired()

        # 检查 用户session的随机字符串 在数据库中是否

        request.session.exists("session_key")

        # 删除当前用户的所有Session数据

        request.session.delete("session_key")

        request.session.set_expiry(value)

            * 如果value是个整数,session会在些秒数后失效。

            * 如果value是个datatime或timedelta,session就会在这个时间后失效。

            * 如果value是0,用户关闭浏览器session就会失效。

            * 如果value是None,session会依赖全局session失效策略。
118-session的总结
1、session的总结;
1 response.set_cookie(key,value)

2 request.COOKIE.get(key)

3 request.session[key]=value

          '''

            if request.COOKIE.get("sessionid"):

                更新

                 在django—session表中创建一条记录:

                   session-key                                     session-data

                   ltv8zy1kh5lxj1if1fcs2pqwodumr45t                  更新数据

            else:

                1 生成随机字符串   ltv8zy1kh5lxj1if1fcs2pqwodumr45t

                2 response.set_cookie("sessionid",ltv8zy1kh5lxj1if1fcs2pqwodumr45t)

                3 在django—session表中创建一条记录:

                   session-key                                     session-data

                   ltv8zy1kh5lxj1if1fcs2pqwodumr45t       {"is_login":True,"username":"yuan"}

            '''

4 reqeust.session[key]

   '''

    1  request.COOKIE.get("session")  #  ltv8zy1kh5lxj1if1fcs2pqwodumr45t

    2  django-session表中过滤纪录:

       在django—session表中创建一条记录:

               session-key                                   session-data

               ltv8zy1kh5lxj1if1fcs2pqwodumr45t       {"is_login":True,"username":"yuan"}

       obj=django—session.objects .filter(session-key=ltv8zy1kh5lxj1if1fcs2pqwodumr45t).first()

    3 obj.session-data.get("is_login")

    '''

5 request.session.flush()

    '''

    1 randon_str=request.COOKIE.get("sessionid")

    2 django-session.objects.filter(session-key=randon_str).delete()

    3 response.delete_cookie("sessionid",randon_str)

    '''
119-用户认证组件简介
1、用户认证组件介绍;
在进行用户登陆验证的时候,如果是自己写代码,就必须要先查询数据库,看用户输入的用户名是否存在于数据库中;如果用户存在于数据库中,然后再验证用户输入的密码,这样一来就要自己编写大量的代码。事实上,Django已经提供了内置的用户认证功能。
在使用"python manage.py makemigrationss"和"python manage.py migrate"迁移完成数据库之后,根据配置文件settings.py中的数据库段生成的数据表中已经包含了6张进行认证的数据表,分别是:
- auth_user;
- auth_group;
- auth_group_permissions;
- auth_permission;
- auth_user_groups;
- auth_user_user_permissions;
进行用户认证的数据表为auth_user;
要使用Django自带的认证功能,首先要导入auth模块;
2、用户认证组件相关;
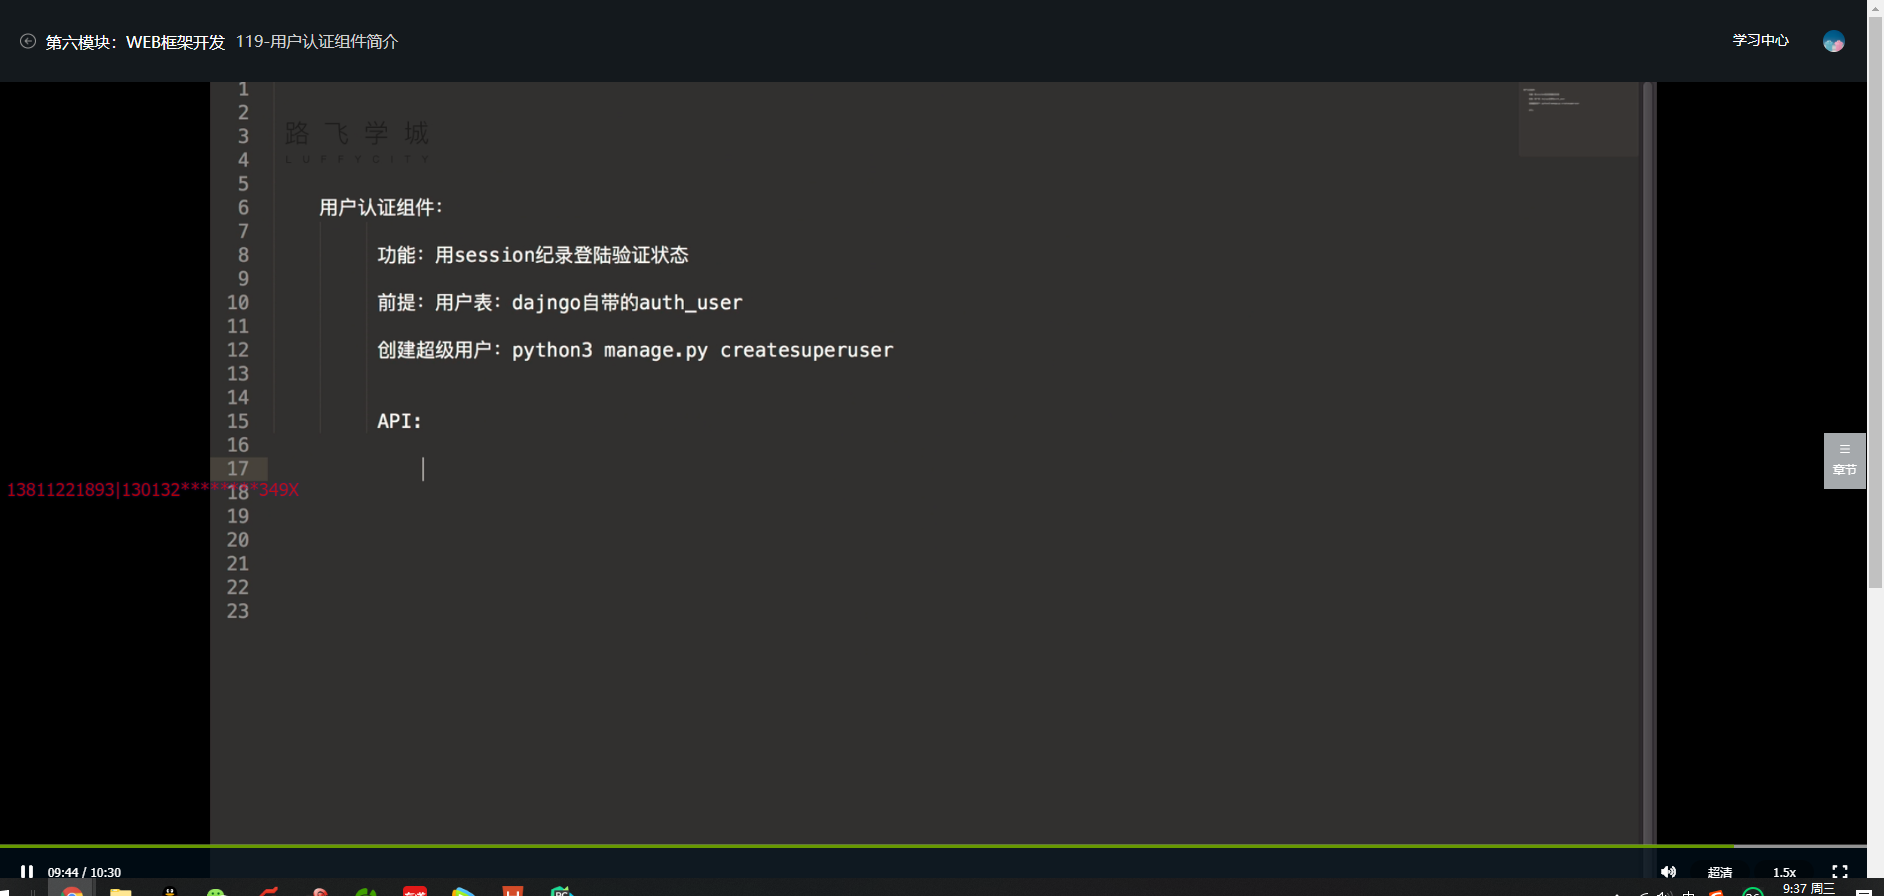
3、创建超级用户;
Python manage.py createsuperuser
Microsoft Windows [版本 10.0.17134.1]

(c) 2018 Microsoft Corporation。保留所有权利。

(venv) C:\Users\TQTL911\PycharmProjects\AuthDemo>python manage.py makemigrations

No changes detected

(venv) C:\Users\TQTL911\PycharmProjects\AuthDemo>python manage.py migrate

Operations to perform:

  Apply all migrations: admin, auth, contenttypes, sessions

Running migrations:

  Applying contenttypes.0001_initial... OK

  Applying auth.0001_initial... OK

  Applying admin.0001_initial... OK

  Applying admin.0002_logentry_remove_auto_add... OK

  Applying admin.0003_logentry_add_action_flag_choices... OK

  Applying contenttypes.0002_remove_content_type_name... OK

  Applying auth.0002_alter_permission_name_max_length... OK

  Applying auth.0003_alter_user_email_max_length... OK

  Applying auth.0004_alter_user_username_opts... OK

  Applying auth.0005_alter_user_last_login_null... OK

  Applying auth.0006_require_contenttypes_0002... OK

  Applying auth.0007_alter_validators_add_error_messages... OK

  Applying auth.0008_alter_user_username_max_length... OK

  Applying auth.0009_alter_user_last_name_max_length... OK

  Applying sessions.0001_initial... OK

(venv) C:\Users\TQTL911\PycharmProjects\AuthDemo>python manage.py createsuperuser

Username (leave blank to use 'tqtl911'): cuixiaozhao

Email address:

Password:

Password (again):

This password is too short. It must contain at least 8 characters.

This password is too common.

This password is entirely numeric.

Bypass password validation and create user anyway? [y/N]: n

Password:

Operation cancelled.

(venv) C:\Users\TQTL911\PycharmProjects\AuthDemo>python manage.py createsuperuser

Username (leave blank to use 'tqtl911'): cxz

Email address: tqtl@tqtl.org

Password:

Password (again):

This password is too common.

Bypass password validation and create user anyway? [y/N]: y

Superuser created successfully.

(venv) C:\Users\TQTL911\PycharmProjects\AuthDemo>^A
120-基于用户认证组件的登录验证信息存储
1、创建Django项目-AuthDemo并添加应用app01;
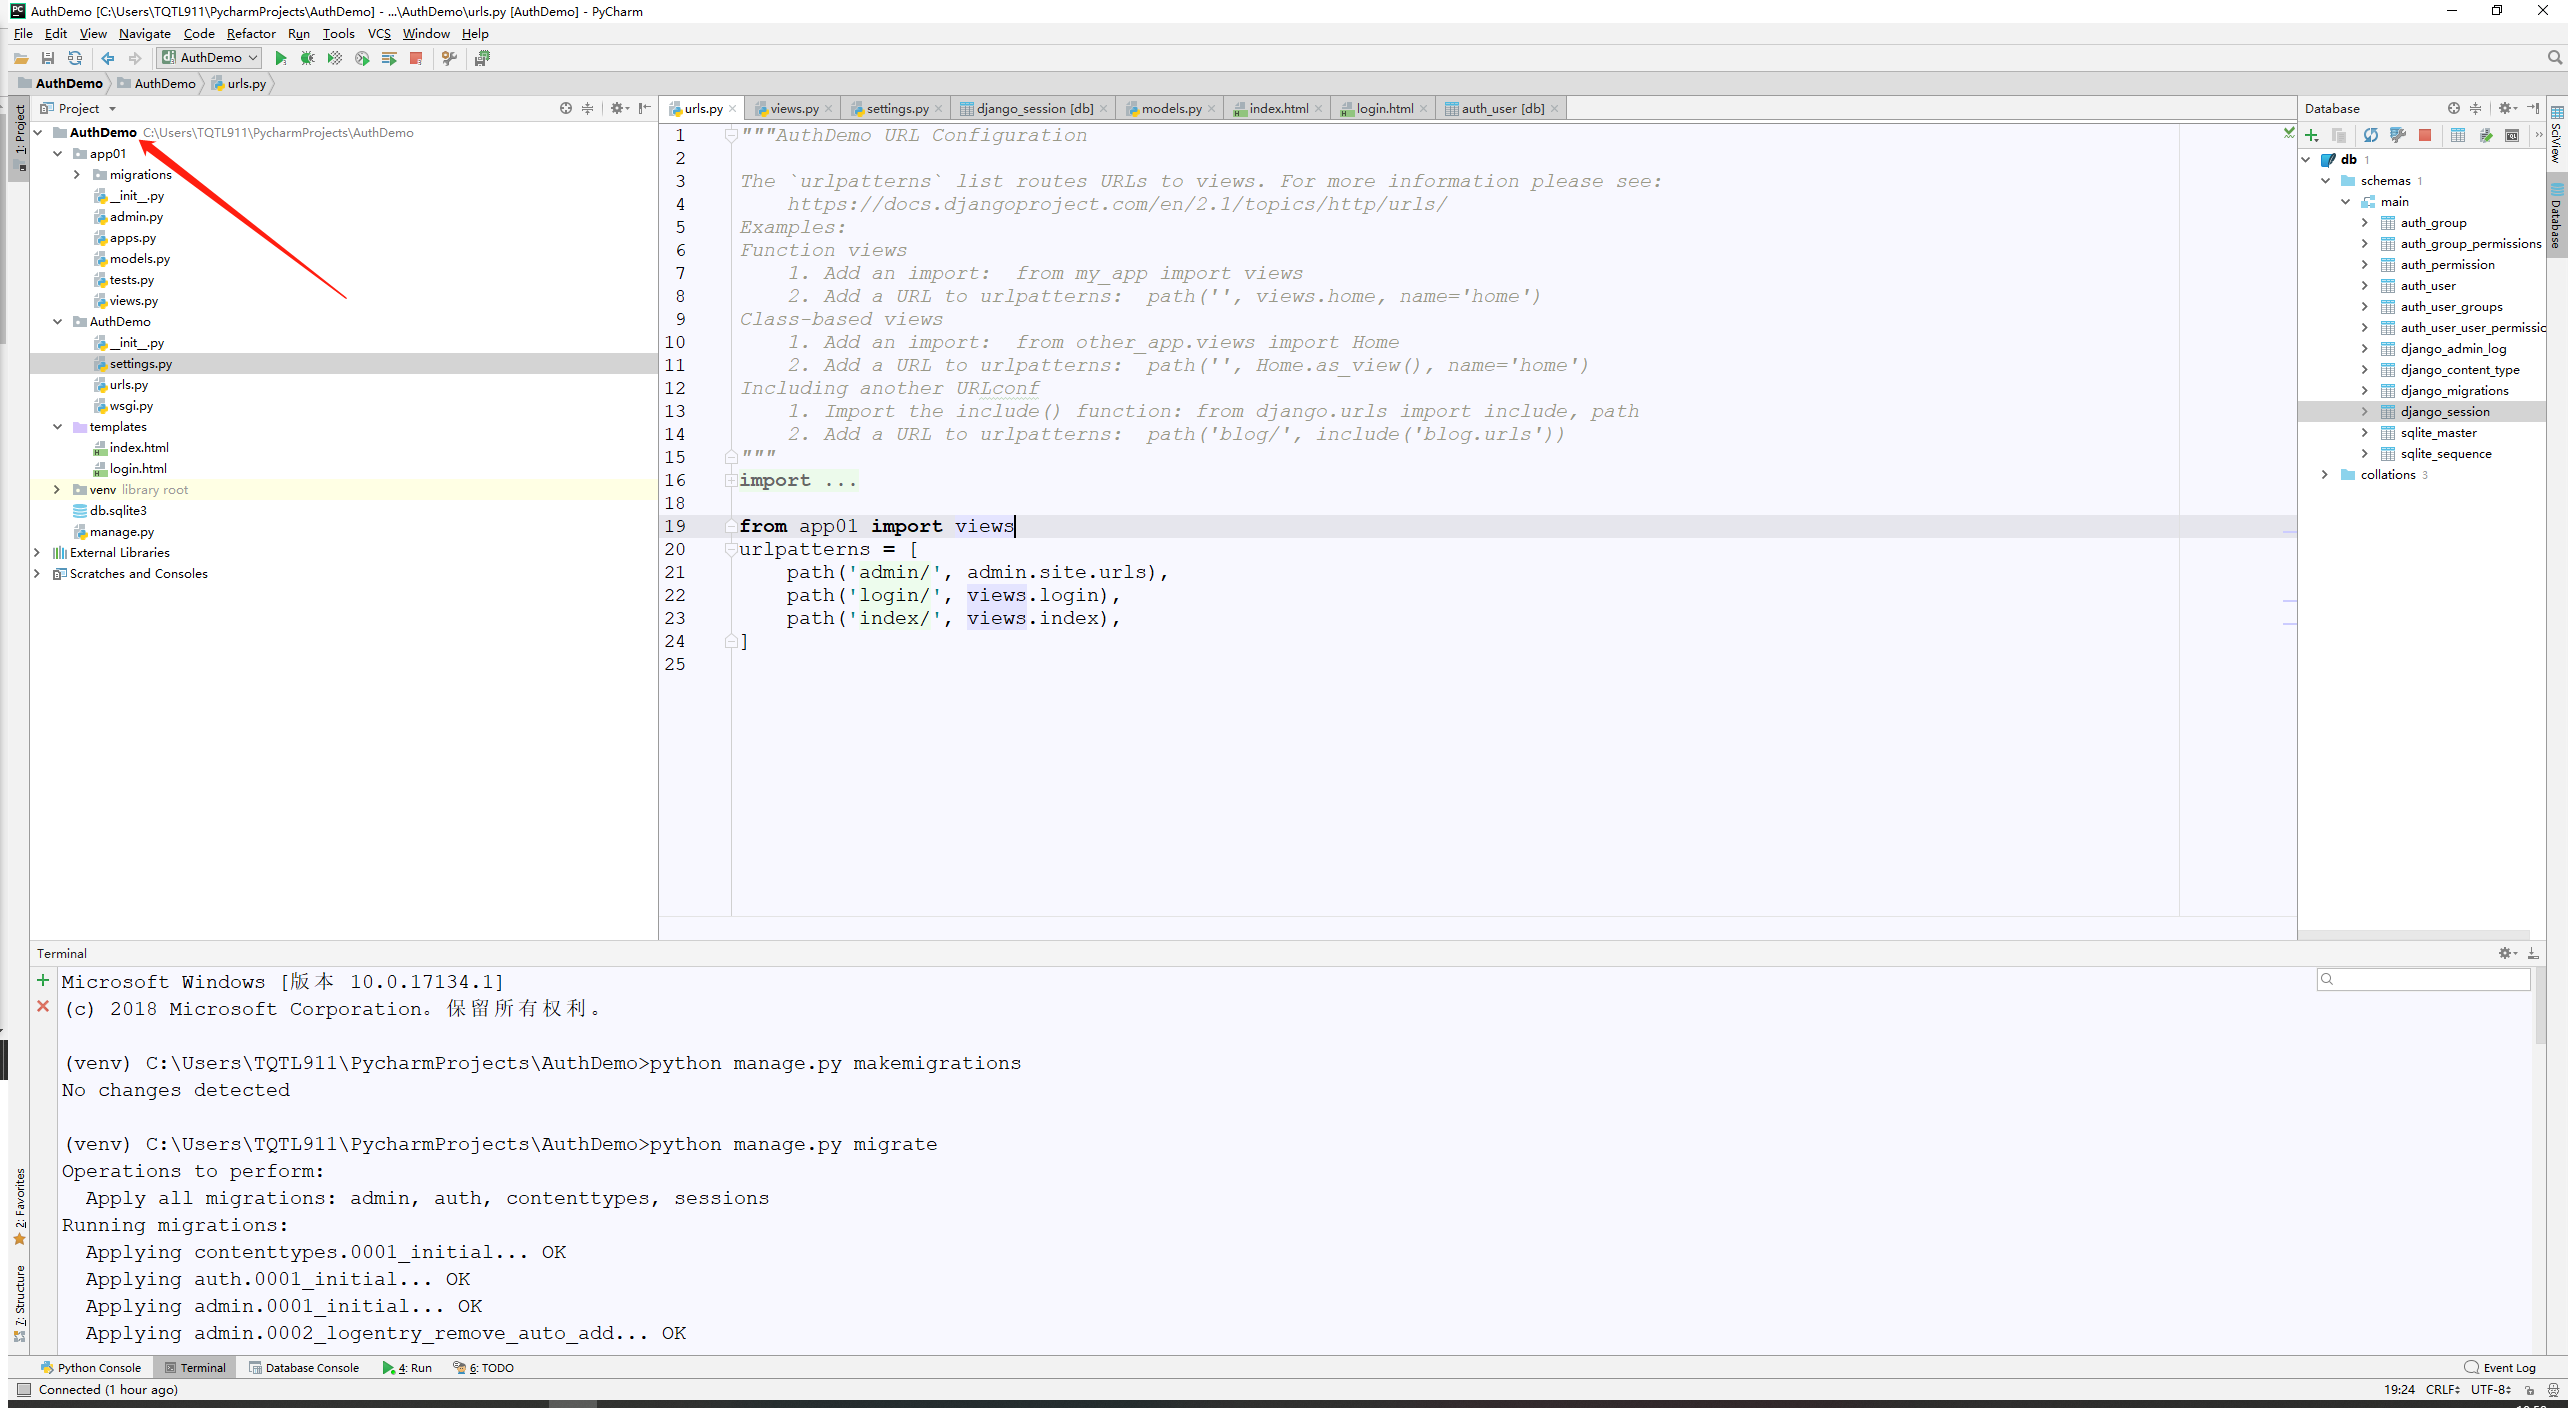
2、配置urls.py;
"""AuthDemo URL Configuration

The `urlpatterns` list routes URLs to views. For more information please see:

    https://docs.djangoproject.com/en/2.1/topics/http/urls/

Examples:

Function views

    1. Add an import:  from my_app import views

    2. Add a URL to urlpatterns:  path('', views.home, name='home')

Class-based views

    1. Add an import:  from other_app.views import Home

    2. Add a URL to urlpatterns:  path('', Home.as_view(), name='home')

Including another URLconf

    1. Import the include() function: from django.urls import include, path

    2. Add a URL to urlpatterns:  path('blog/', include('blog.urls'))

"""

from django.contrib import admin

from django.urls import path

from app01 import views

urlpatterns = [

    path('admin/', admin.site.urls),

    path('login/', views.login),

    path('index/', views.index),

]
3、编写视图函数login、index等;
from django.shortcuts import render,redirect,HttpResponse

# Create your views here.

#导入用户认证模块

from django.contrib import auth

from django.contrib.auth.models import User#User指代的就是django下的auth_user表;

def login(request):

    if request.method == "POST":

        user = request.POST.get("user")

        pwd = request.POST.get("pwd")

        #如果验证成功,就返回User对象,否则返回None;

        user = auth.authenticate(username = user, password = pwd)

        if user:

            auth.login(request,user)#request.user:当前登录对象;

            return redirect("/index/")

    return render(request,"login.html",)

def index(request):

    print("request.user:",request.user.username)

    print("request.user:",request.user.id)

    print("request.user:",request.user.is_anonymous)

    '''

    request.user:

    request.user: None

    request.user: True

    '''

    #判断是否登录;

    if request.user.is_anonymous:

        return redirect("/login/")

    return render(request,"index.html")

    #username = request.user.username

    #return render(request,"index.html",{"username":username})
4、创建超级用户;
python manage.py createsuperuser cxz
rosoft Windows [版本 10.0.17134.1]

(c) 2018 Microsoft Corporation。保留所有权利。

(venv) C:\Users\TQTL911\PycharmProjects\AuthDemo>python manage.py makemigrations

No changes detected

(venv) C:\Users\TQTL911\PycharmProjects\AuthDemo>python manage.py migrate

Operations to perform:

  Apply all migrations: admin, auth, contenttypes, sessions

Running migrations:

  Applying contenttypes.0001_initial... OK

  Applying auth.0001_initial... OK

  Applying admin.0001_initial... OK

  Applying admin.0002_logentry_remove_auto_add... OK

  Applying admin.0003_logentry_add_action_flag_choices... OK

  Applying contenttypes.0002_remove_content_type_name... OK

  Applying auth.0002_alter_permission_name_max_length... OK

  Applying auth.0003_alter_user_email_max_length... OK

  Applying auth.0004_alter_user_username_opts... OK

  Applying auth.0005_alter_user_last_login_null... OK

  Applying auth.0006_require_contenttypes_0002... OK

  Applying auth.0007_alter_validators_add_error_messages... OK

  Applying auth.0008_alter_user_username_max_length... OK

  Applying auth.0009_alter_user_last_name_max_length... OK

  Applying sessions.0001_initial... OK

(venv) C:\Users\TQTL911\PycharmProjects\AuthDemo>python manage.py createsuperuser

Username (leave blank to use 'tqtl911'): cuixiaozhao

Email address:

Password:

Password (again):

This password is too short. It must contain at least 8 characters.

This password is too common.

This password is entirely numeric.

Bypass password validation and create user anyway? [y/N]: n

Password:

Operation cancelled.

(venv) C:\Users\TQTL911\PycharmProjects\AuthDemo>python manage.py createsuperuser

Username (leave blank to use 'tqtl911'): cxz

Email address: tqtl@tqtl.org

Password:

Password (again):

This password is too common.

Bypass password validation and create user anyway? [y/N]: y

Superuser created successfully.

(venv) C:\Users\TQTL911\PycharmProjects\AuthDemo>python manage.py createsuperuser

Username (leave blank to use 'tqtl911'): ljp

Email address: ljp@tqtl.org

Password:

Password (again):

This password is too common.

Bypass password validation and create user anyway? [y/N]: y

Superuser created successfully.

(venv) C:\Users\TQTL911\PycharmProjects\AuthDemo>python manage.py createsuperuser

Username (leave blank to use 'tqtl911'): cxs

Email address: cxs@tqtl.org

Password:

Password (again):

This password is too common.

Bypass password validation and create user anyway? [y/N]: n

Password:

Password (again):

Error: Your passwords didn't match.

Password:

Password (again):

Superuser created successfully.

(venv) C:\Users\TQTL911\PycharmProjects\AuthDemo>
5、编写templates模本html文件;
index.html;
<!DOCTYPE html>

<html lang="en">

<head>

    <meta charset="UTF-8">

    <title>120-基于用户认证组件的登陆验证信息存储</title>

    <style type="text/css">

    </style>

</head>

<body>

<h1>Hi,{{ request.user.username }},Welcome to visit our website.</h1>

</body>

</html>
login.html;
<!DOCTYPE html>

<html lang="en">

<head>

    <meta charset="UTF-8">

    <title>120-基于用户认证组件的登陆验证信息存储</title>

    <style type="text/css">

    </style>

</head>

<body>

<form action="" method="post">

    {% csrf_token %}

   用户名: <input type="text" name="user">

    密码:<input type="password" name="pwd">

    <input type="submit" value="submit" >

</form>

</body>

</html>
6、启动Django项目并登陆验证;
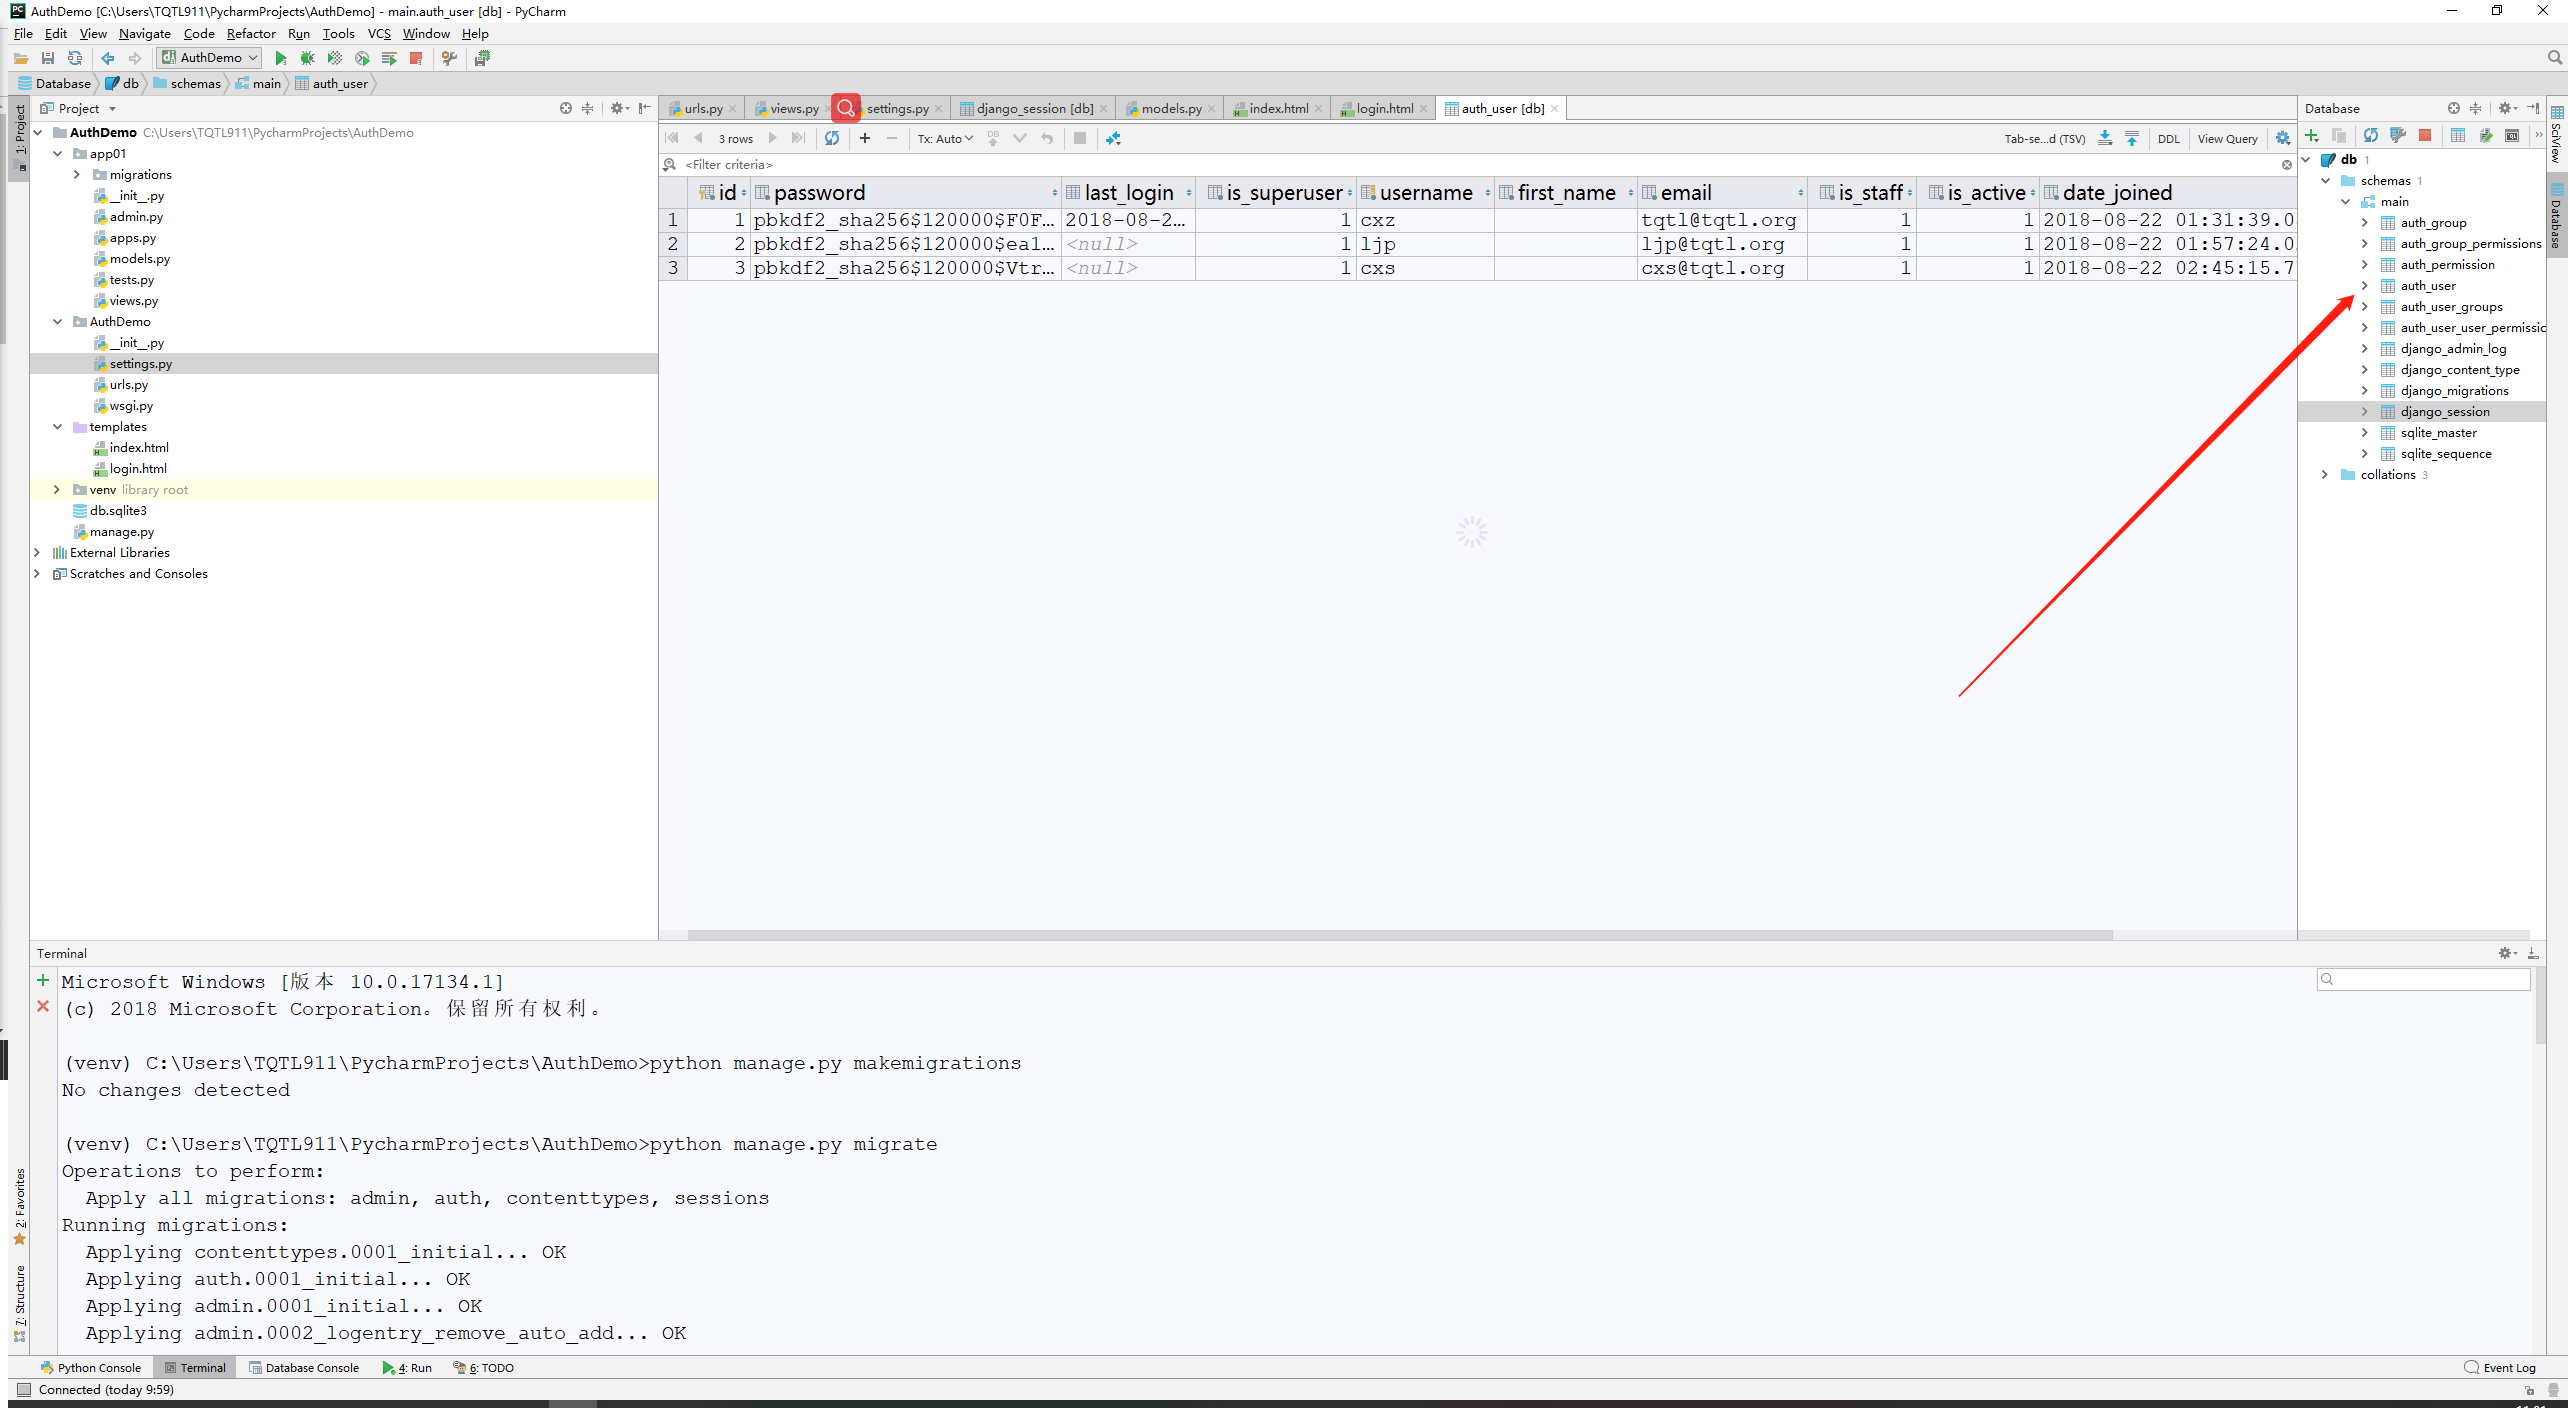
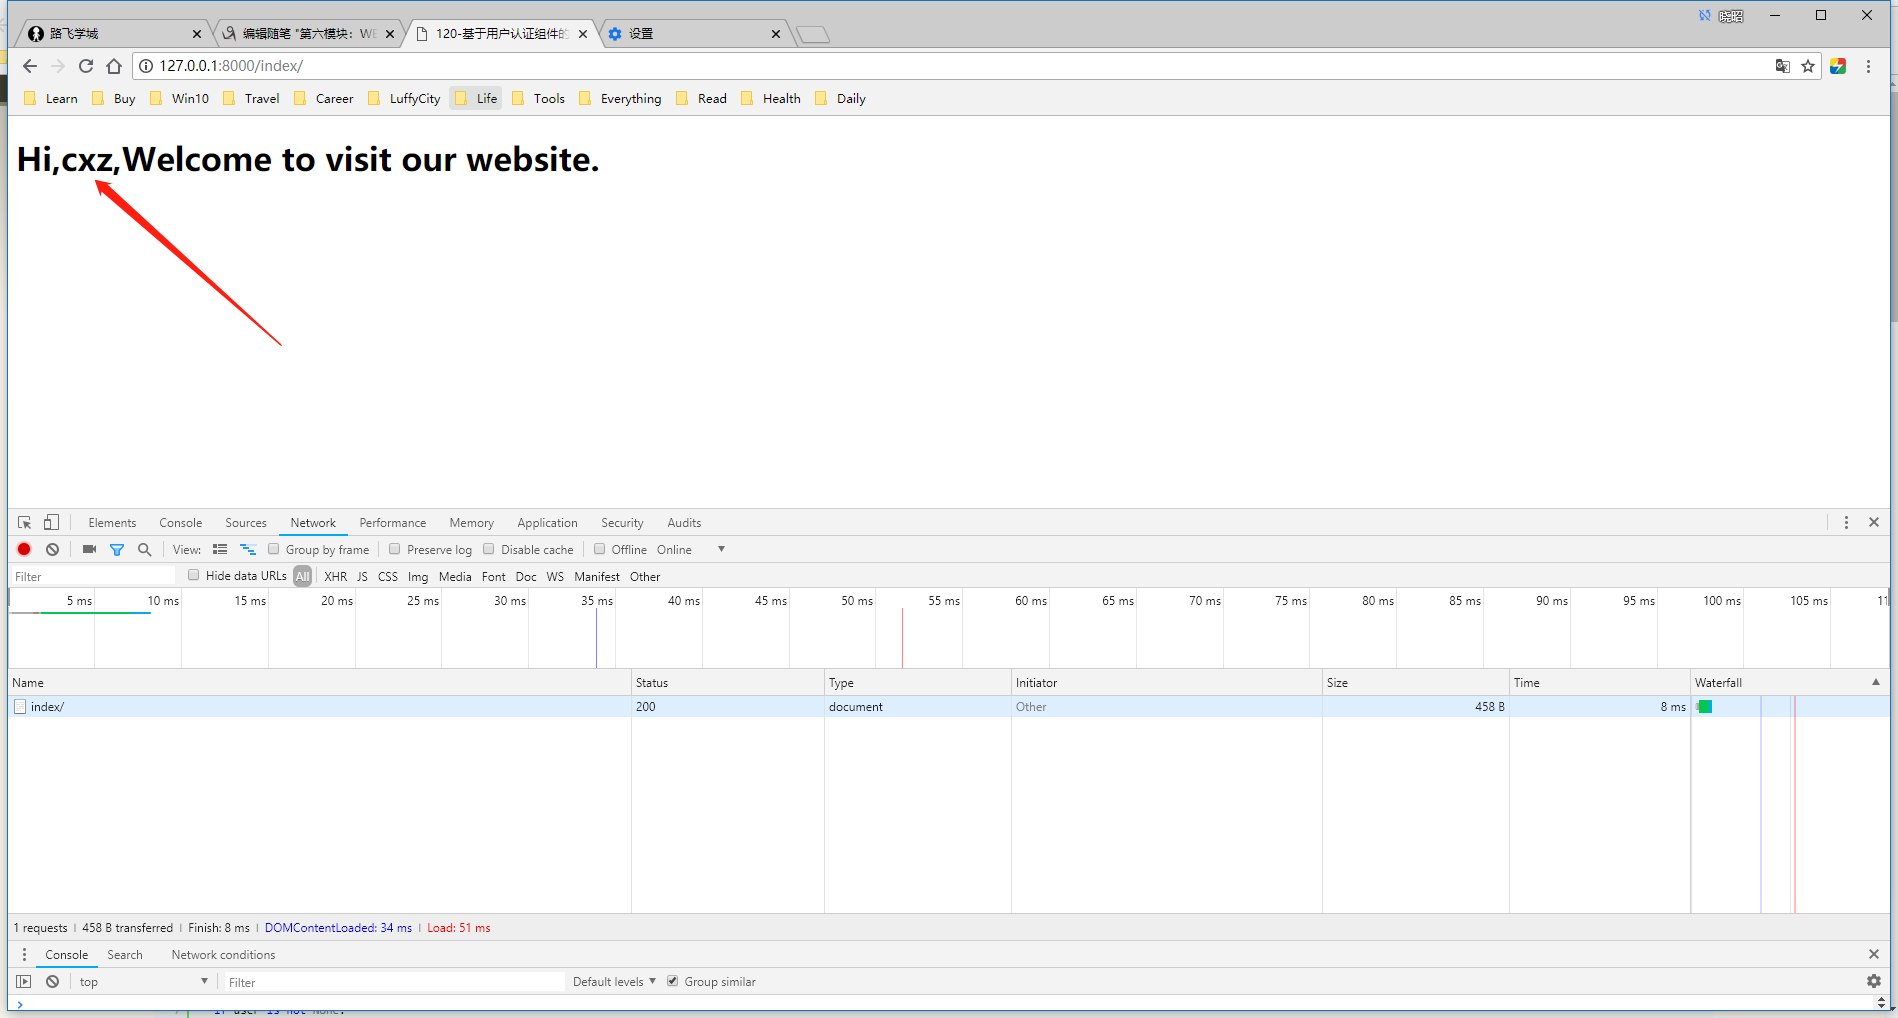
121-基于用户认证组件的注销功能
1、logout功能实现;
def logout(request):

    auth.logout(request)

    return redirect("/login/")
2、index.html;
<!DOCTYPE html>

<html lang="en">

<head>

    <meta charset="UTF-8">

    <title>120-基于用户认证组件的登陆验证信息存储</title>

    <style type="text/css">

    </style>

</head>

<body>

<h1>Hi,{{ request.user.username }},Welcome to visit our website.</h1>

<a href="/logout/">注销</a>

</body>

</html>
122-基于用户认证组件的注册用户功能
1、基于用户认证组件的注册用户功能;
2、views.py;
from django.shortcuts import render,redirect,HttpResponse

# Create your views here.

#导入用户认证模块

from django.contrib import auth

from django.contrib.auth.models import User#User指代的就是django下的auth_user表;

def login(request):

    if request.method == "POST":

        user = request.POST.get("user")

        pwd = request.POST.get("pwd")

        #如果验证成功,就返回User对象,否则返回None;

        user = auth.authenticate(username = user, password = pwd)

        if user:

            auth.login(request,user)#request.user:当前登录对象;

            return redirect("/index/")

    return render(request,"login.html",)

def index(request):

    print("request.user:",request.user.username)

    print("request.user:",request.user.id)

    print("request.user:",request.user.is_anonymous)

    '''

    request.user:

    request.user: None

    request.user: True

    '''

    #判断是否登录;

    #if request.user.is_anonymous:

    if not request.user.is_authenticated:

        return redirect("/login/")

    return render(request,"index.html")

    #username = request.user.username

    #return render(request,"index.html",{"username":username})

def logout(request):

    auth.logout(request)

    return redirect("/login/")

def reg(request):

    if request.method == "POST":

        user = request.POST.get("user")

        pwd = request.POST.get("pwd")

    #User.objects.create(username= user,password=pwd)#不能使用该方式插入数据,因为此方法密码是明文传输的;

        User.objects.create_user(username = user,password=pwd)

        return redirect("/login/")

    return render(request,"reg.html")
3、urls.py;
"""AuthDemo URL Configuration

The `urlpatterns` list routes URLs to views. For more information please see:

    https://docs.djangoproject.com/en/2.1/topics/http/urls/

Examples:

Function views

    1. Add an import:  from my_app import views

    2. Add a URL to urlpatterns:  path('', views.home, name='home')

Class-based views

    1. Add an import:  from other_app.views import Home

    2. Add a URL to urlpatterns:  path('', Home.as_view(), name='home')

Including another URLconf

    1. Import the include() function: from django.urls import include, path

    2. Add a URL to urlpatterns:  path('blog/', include('blog.urls'))

"""

from django.contrib import admin

from django.urls import path

from app01 import views

urlpatterns = [

    path('admin/', admin.site.urls),

    path('login/', views.login),

    path('index/', views.index),

    path('logout/', views.logout),

    path('reg/', views.reg),

]
4、reg.html;
<!DOCTYPE html>

<html lang="en">

<head>

    <meta charset="UTF-8">

    <title>122-基于用户认证组件的注册用户功能</title>

    <style type="text/css">

    </style>

</head>

<body>

<h3>注册</h3>

<form action="" method="post">

    {% csrf_token %}

   用户名: <input type="text" name="user">

    密码:<input type="password" name="pwd">

    <input type="submit" value="submit" >

</form>

</body>

</html>
5、小结;
用户认证组件:
- 功能:使用session记录登陆验证状态;
- 前提:用户表,使用Django自带的auth_user;
- 创建超级用户:Python manage.py createsuperuser;
- API:
- from django.contrib import auth
- 如果验证成功则返回user对象,否则返回None;user = auth.authenticate(username =user,password = pwd)
- auth.login(request,user)#request.user 当前登陆对象
- auth.logout(request)
- from django.contrib,auth.models import User#User = auth_user表;
- request.user.is_authenticated()
- user = User.objects.create_user(Username = ' ',password = ' ',email = ' ' )
- 补充
- 匿名用户对象
- class models.AnonymousUser
- django.contrib.auth.models.AnonymousUser 类实现了django.contrib.auth.models.User接口,但是有如下几个不同点:
- id 永远为None;
- username永远为空字符串;
- get_username()永远返回空字符串;
- is_staff和is_superuser 永远为False;
- is_active 永远为False;
- groups和user_permissions永远为空;
- is_anonymous()返回True而不是False;
- is_authenticated()、check_password()、save()和delete()引发NotImplementedError
- 在Django1.8中,新增AnonymousUser.get_username()以更好地模拟django.contrib.auth.models.User
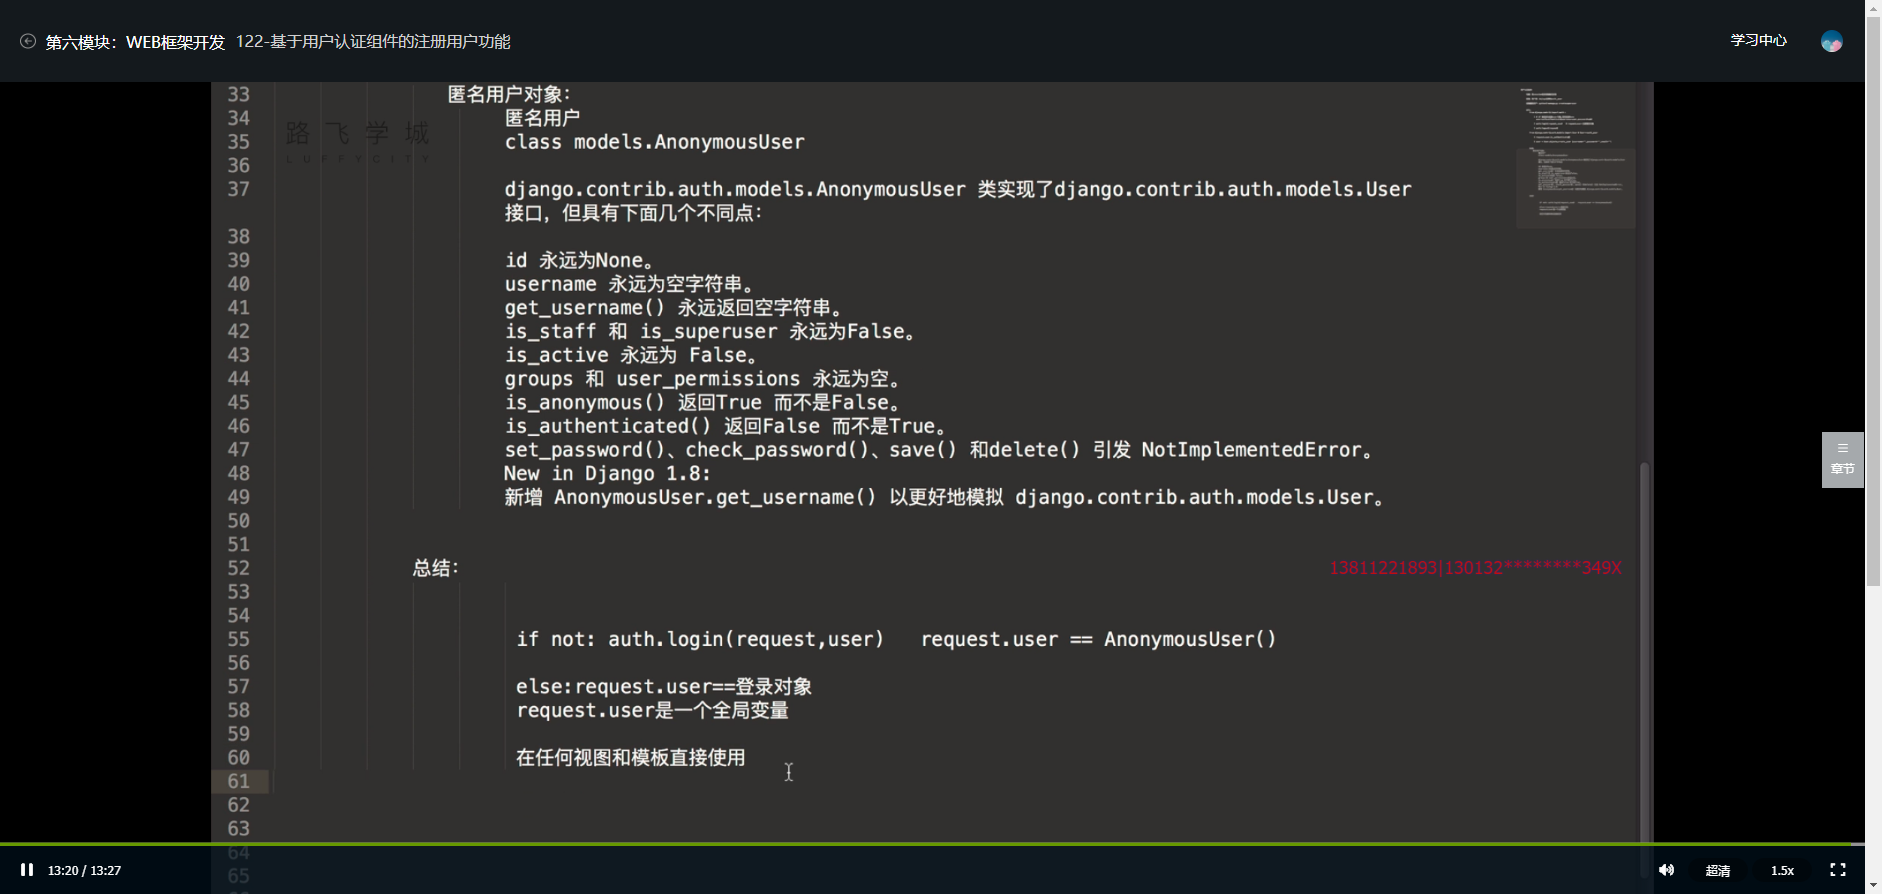
123-基于用户认证组件的认证装饰器
1、用户认证组件装饰器初识;
用户无序再在函数中写代码逻辑,通过顶部引入装饰器,来添加功能;
from django.contrib.auth.decorators import login_required
2、settings.py;
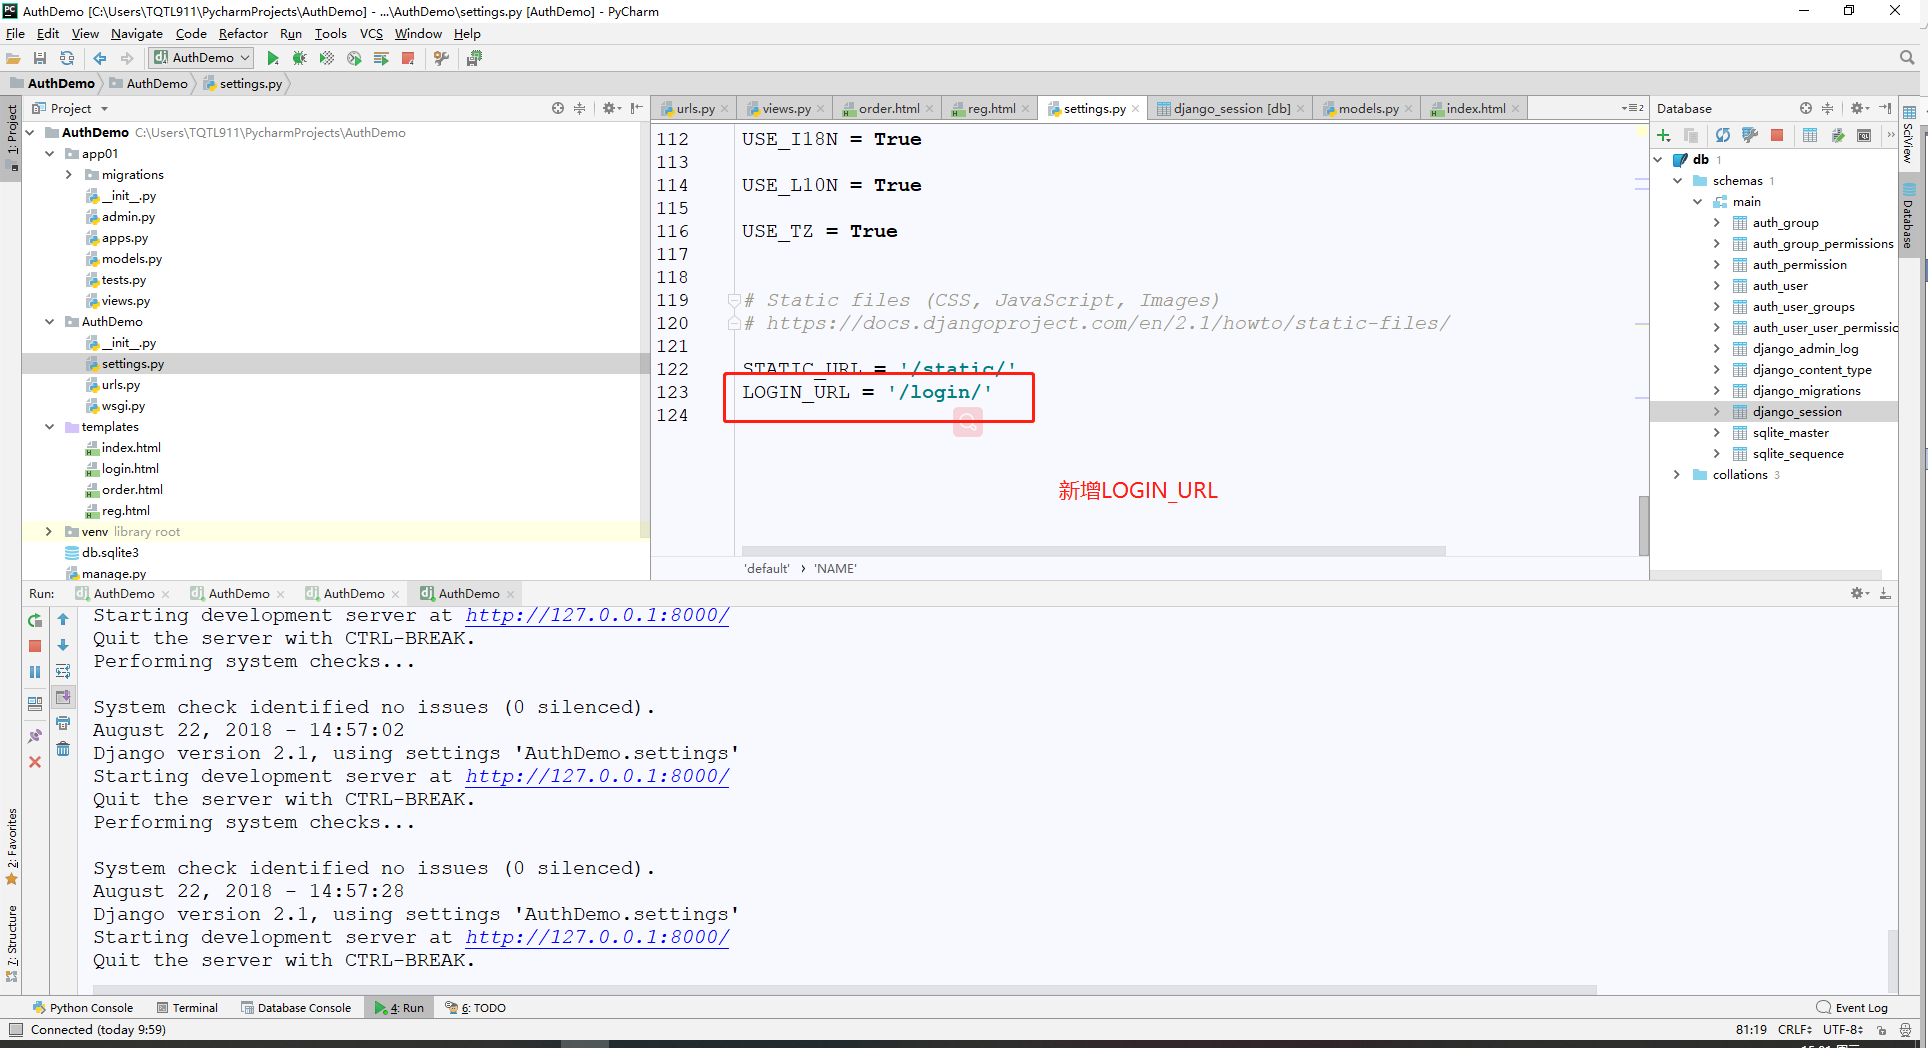
3、views.py;
from django.shortcuts import render,redirect,HttpResponse

# Create your views here.

#导入用户认证模块

from django.contrib import auth

from django.contrib.auth.models import User#User指代的就是django下的auth_user表;

#导入django的装饰器;

from django.contrib.auth.decorators import login_required

def login(request):

    if request.method == "POST":

        user = request.POST.get("user")

        pwd = request.POST.get("pwd")

        #如果验证成功,就返回User对象,否则返回None;

        user = auth.authenticate(username = user, password = pwd)

        if user:

            auth.login(request,user)#request.user:当前登录对象;

            next_url = request.GET.get("next","/index/")

            return redirect(next_url)

    return render(request,"login.html",)

@login_required

def index(request):

    print("request.user:",request.user.username)

    print("request.user:",request.user.id)

    print("request.user:",request.user.is_anonymous)

    '''

    request.user:

    request.user: None

    request.user: True

    '''

    #判断是否登录;

    #if request.user.is_anonymous:

    # if not request.user.is_authenticated:

    #     return redirect("/login/")

    return render(request,"index.html")

    # username = request.user.username

    # return render(request,"index.html",{"username":username})

def logout(request):

    auth.logout(request)

    return redirect("/login/")

def reg(request):

    # if request.method == "POST":

    #     user = request.POST.get("user")

    #     pwd = request.POST.get("pwd")

    #

    # #User.objects.create(username= user,password=pwd)#不能使用该方式插入数据,因为此方法密码是明文传输的;

    #     User.objects.create_user(username = user,password=pwd)

    #     return redirect("/login/")

    return render(request,"reg.html")

@login_required

def order(request):

    # if not request.user.is_authenticated:

    #     return redirect("/login/")

    return render(request,"order.html")
4、urls.py;
"""AuthDemo URL Configuration

The `urlpatterns` list routes URLs to views. For more information please see:

    https://docs.djangoproject.com/en/2.1/topics/http/urls/

Examples:

Function views

    1. Add an import:  from my_app import views

    2. Add a URL to urlpatterns:  path('', views.home, name='home')

Class-based views

    1. Add an import:  from other_app.views import Home

    2. Add a URL to urlpatterns:  path('', Home.as_view(), name='home')

Including another URLconf

    1. Import the include() function: from django.urls import include, path

    2. Add a URL to urlpatterns:  path('blog/', include('blog.urls'))

"""

from django.contrib import admin

from django.urls import path

from app01 import views

urlpatterns = [

    path('admin/', admin.site.urls),

    path('login/', views.login),

    path('index/', views.index),

    path('order/', views.order),

    path('logout/', views.logout),

    path('reg/', views.reg),

]
5、order.html;
<!DOCTYPE html>

<html lang="en">

<head>

    <meta charset="UTF-8">

    <title>order</title>

    <style type="text/css">

    </style>

</head>

<body>

<h3>order</h3>

</body>

</html>
6、跳转的URL详情;
http://127.0.0.1:8000/login/?next=/order/

http://127.0.0.1:8000/login/?next=/index/
124-中间件的实现流程
1、Django中中间件的概念;
中间件顾名思义,是介于request与response处理之间的一道处理过程,相对比较轻量级,并且在全局上改变django的输入与输出。因为改变的是全局,所以需要谨慎实用,用不好会影响到性能。
Django的中间件的定义:
Middleware is a framework of hooks into Django’s request/response processing. <br>It’s a light, low-level “plugin” system for globally altering Django’s input or output.
2、Django中默认的Middleware;
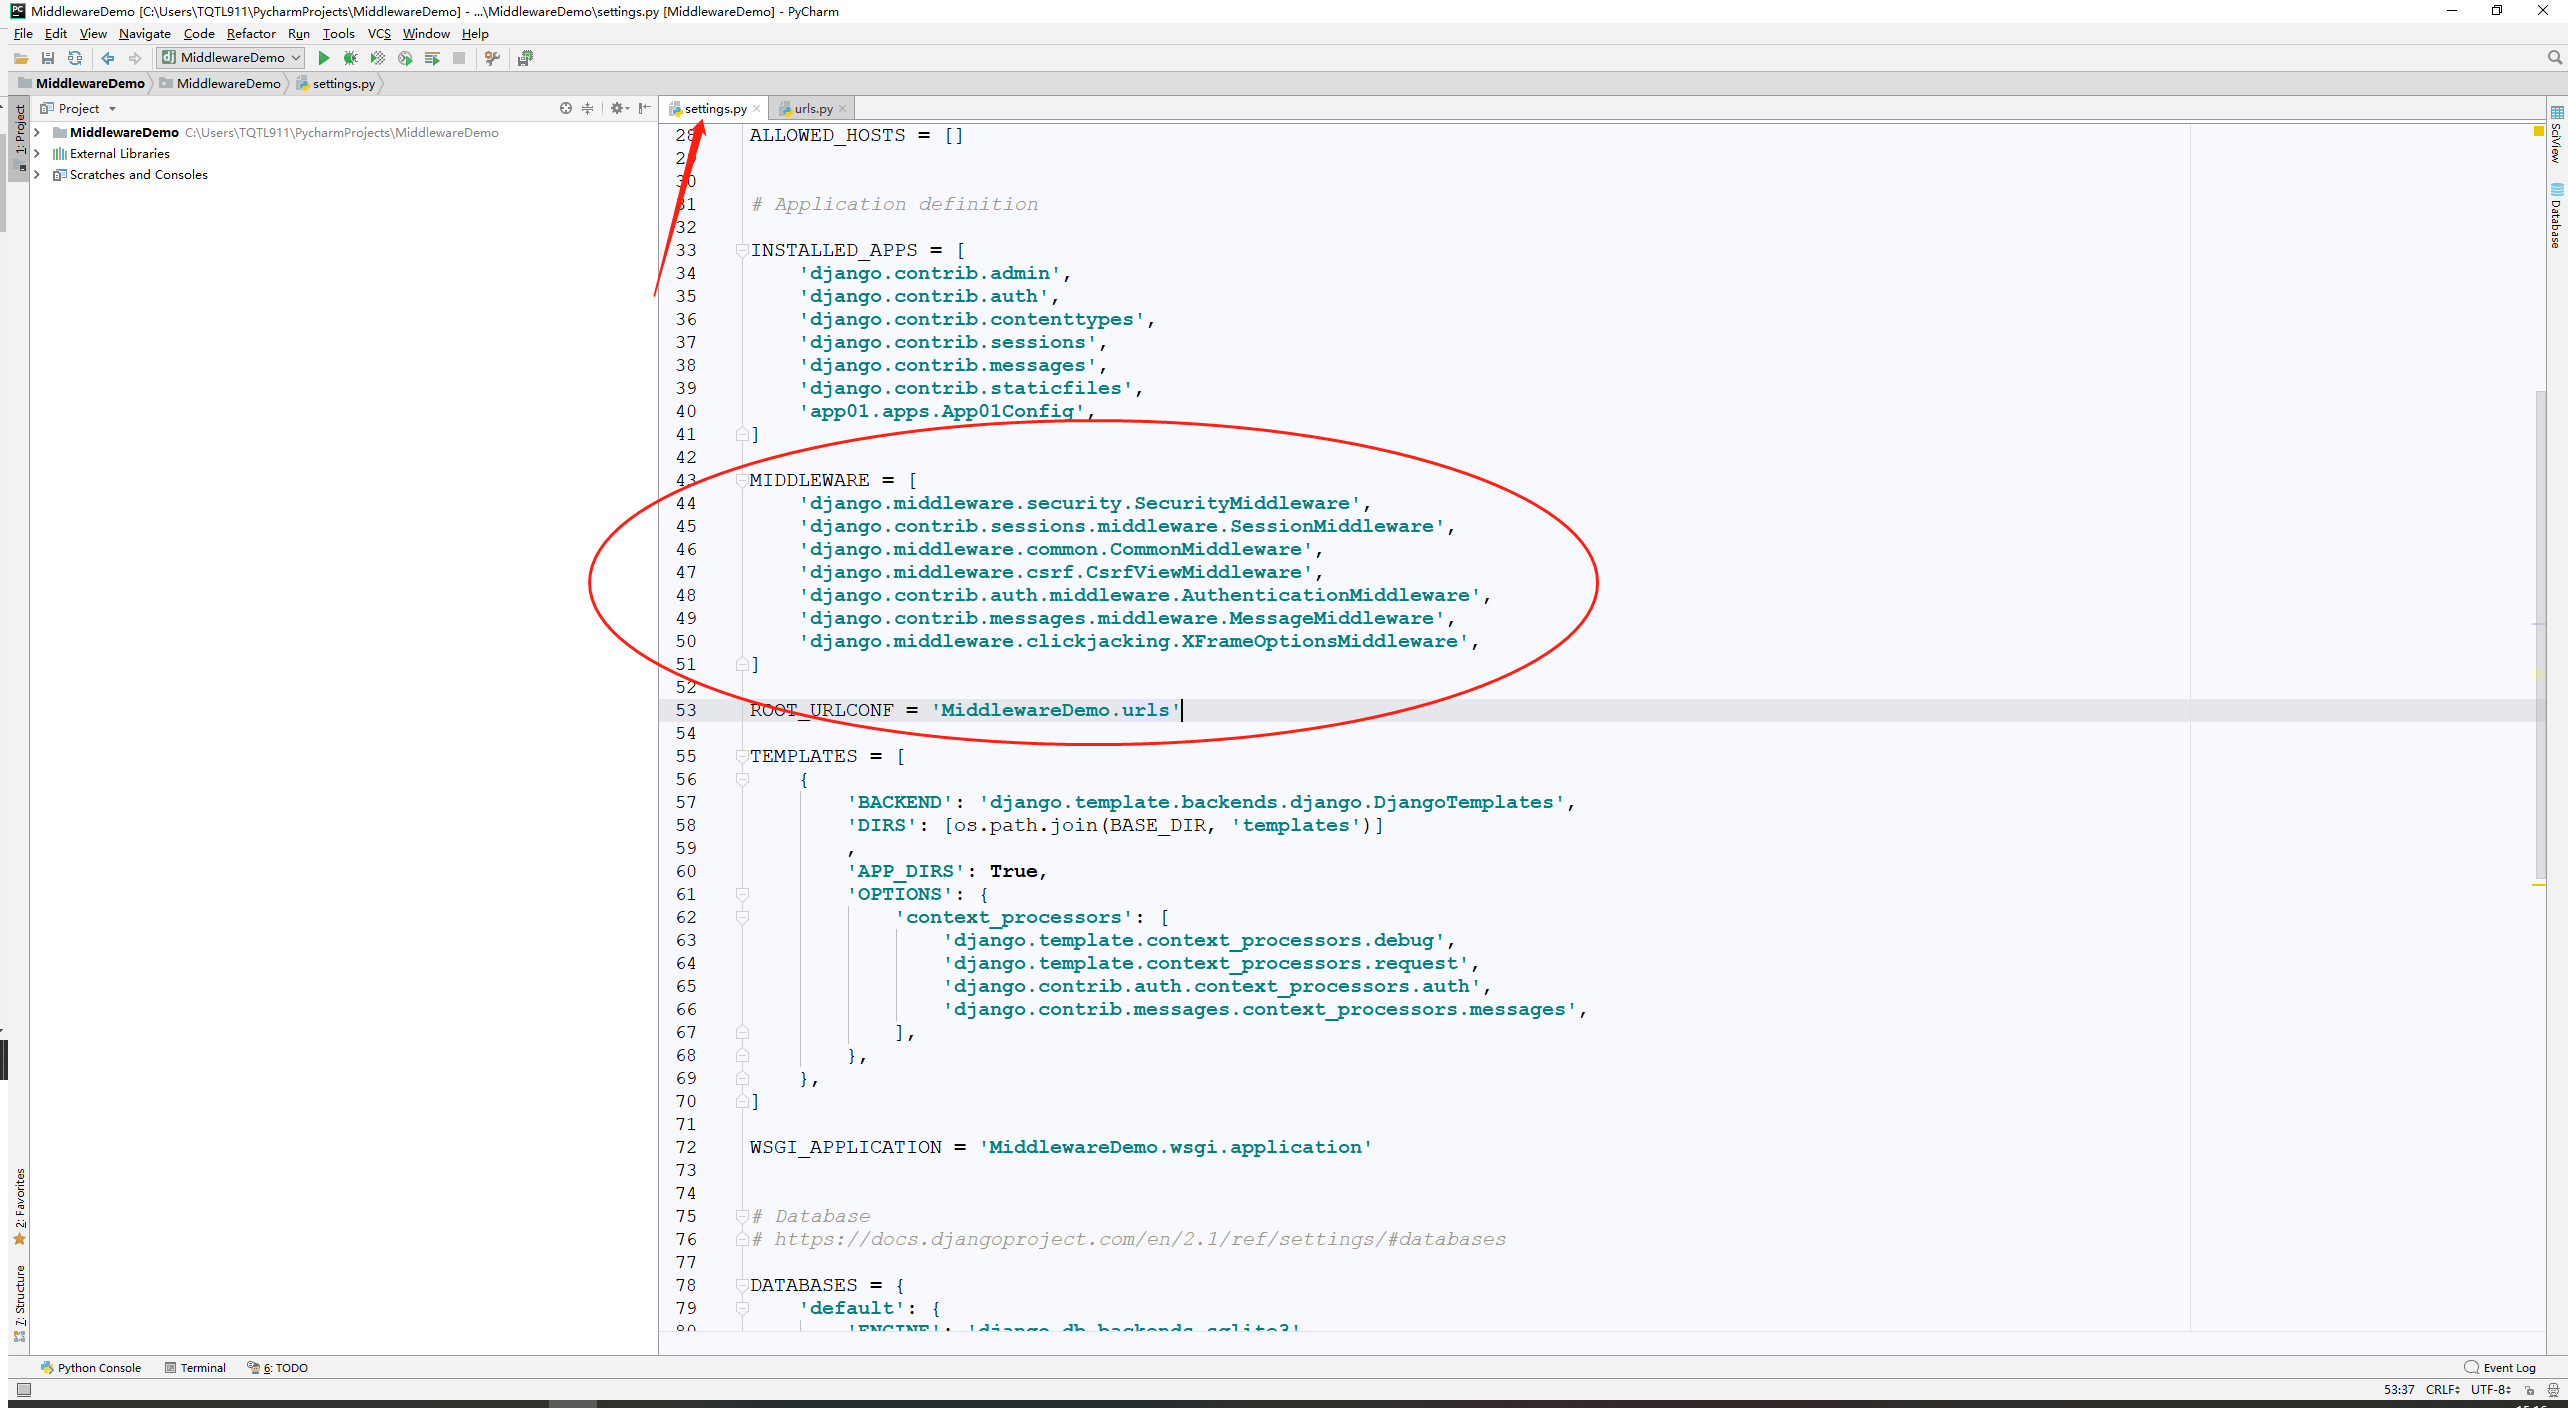
3、请求流程图,如下:
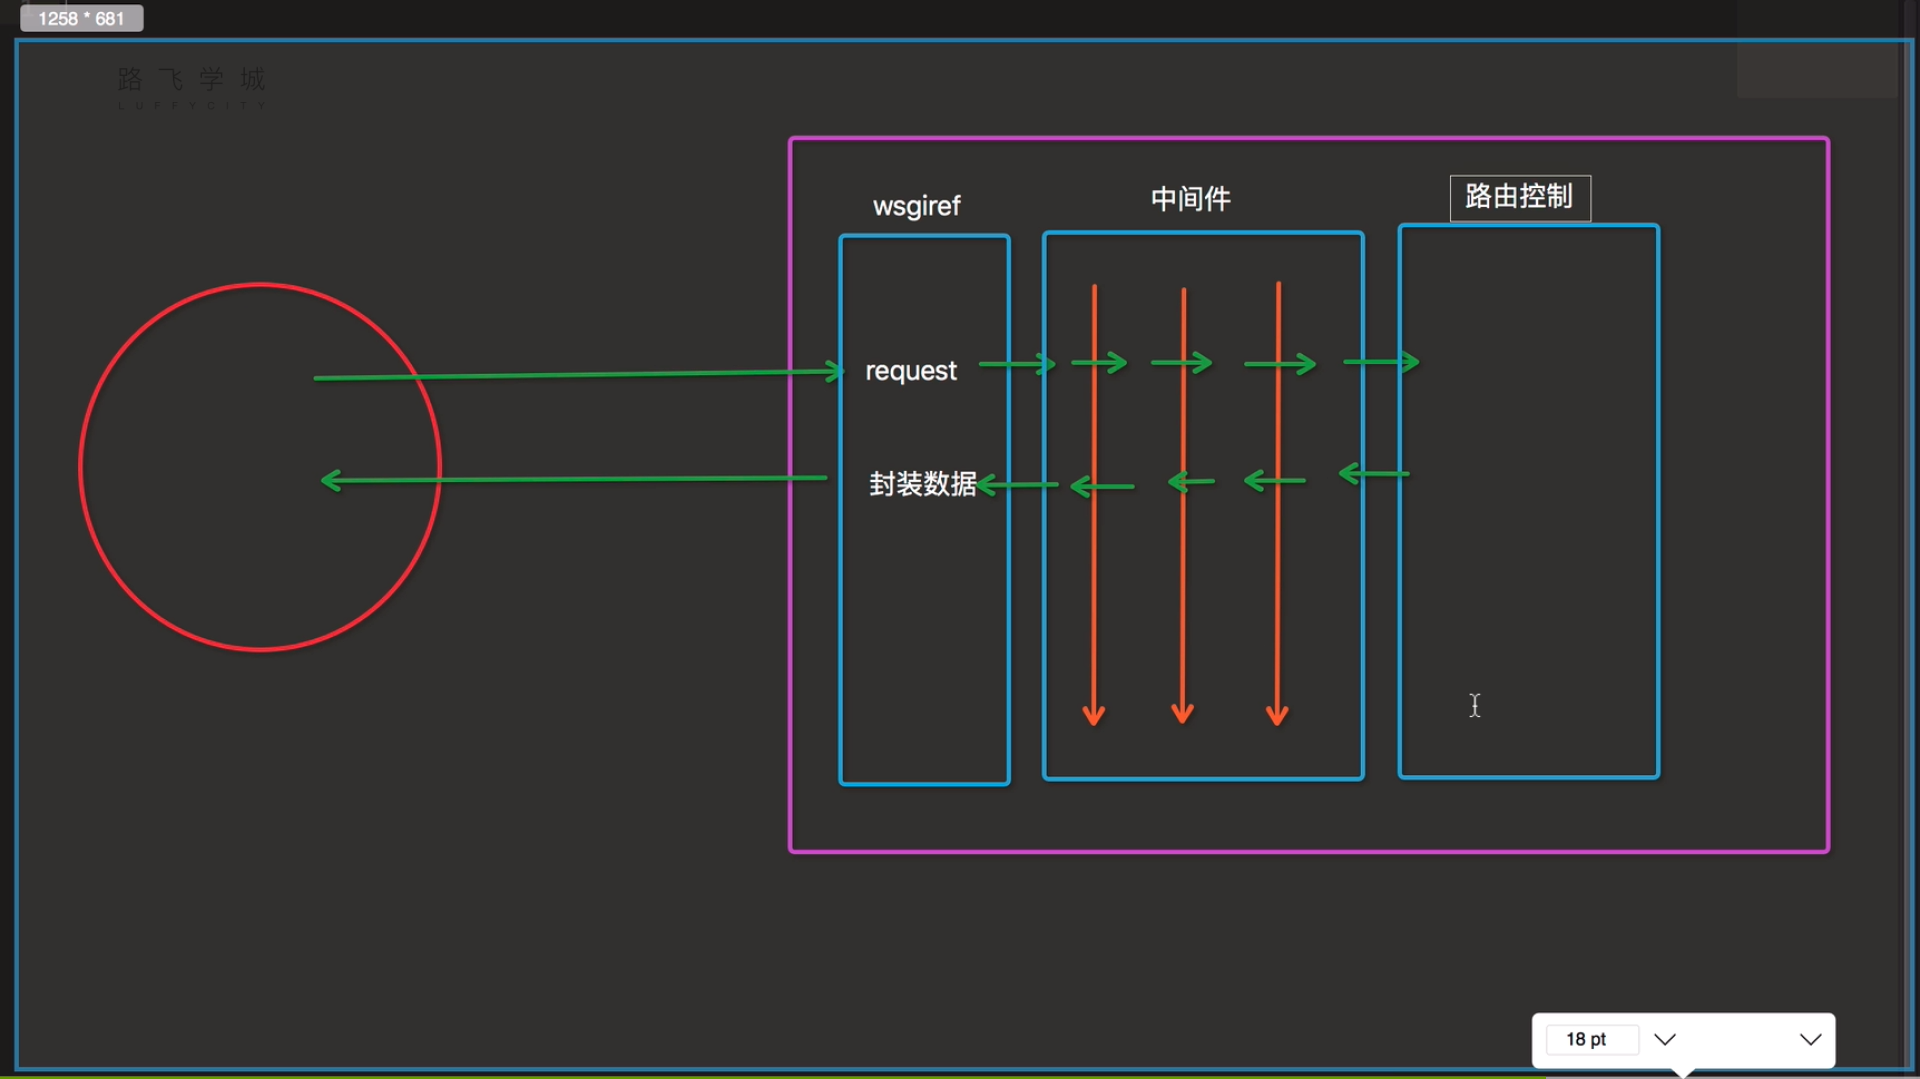

125-中间件的process_request和process_response方法
1、应用app01下新增my_middleware.py文件;

#!/usr/bin/env python3

# -*- coding:utf-8 -*-

# __Author__:TQTL911

# Version:python3.6.6

# Time:2018/8/22 15:20

#导入MiddlewareMixin中间件;

from django.utils.deprecation import MiddlewareMixin

class CustomerMiddleware(MiddlewareMixin):

    def process_request(self,request):

        print("CustomMiddleWare process_request......")

    def process_response(self,request,response):

        print("CustomMiddleWare process_response......")

        return response

class CustomerMiddleware2(MiddlewareMixin):

    def process_request(self,request):

        print("CustomMiddleWare process_request222......")

    def process_response(self,request,response):

        print("CustomMiddleWare process_response222......")

        return response

class CustomerMiddleware3(MiddlewareMixin):

    def process_request(self,request):

        print("CustomMiddleWare process_request3333......")
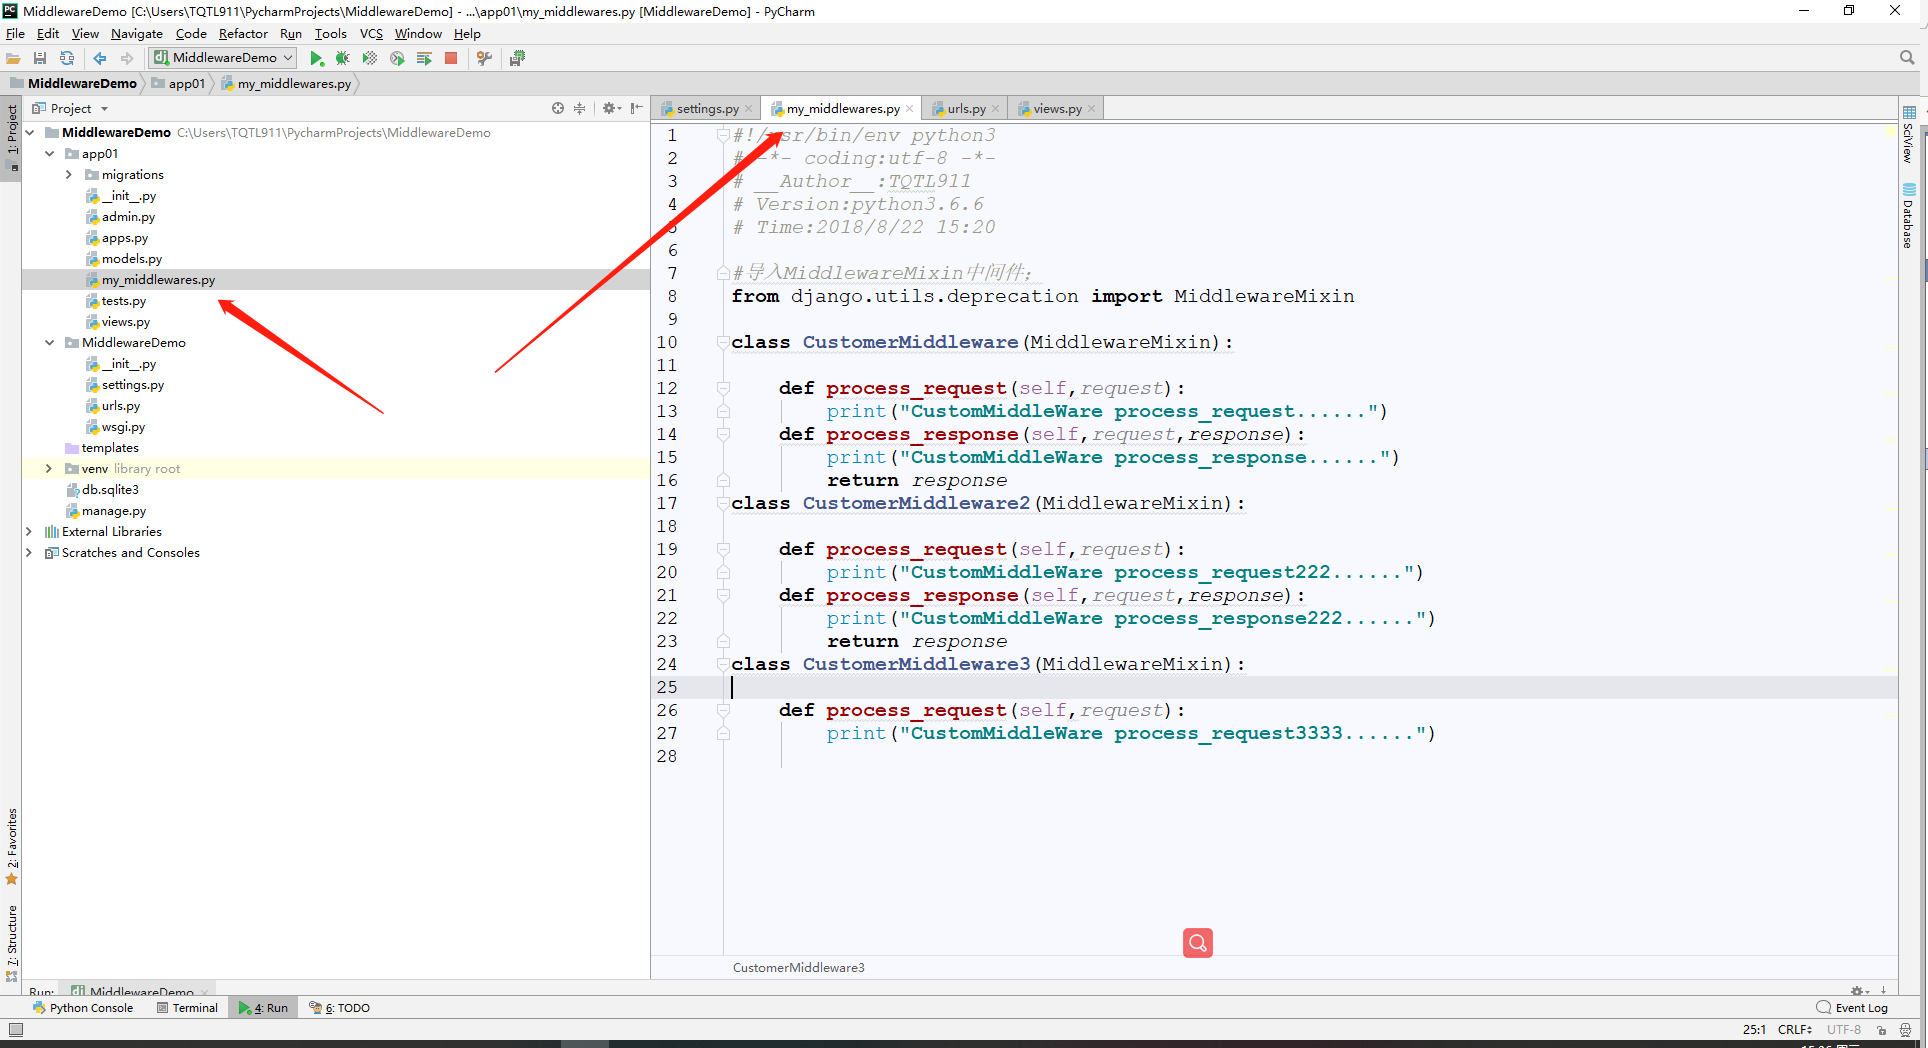
2、settings.py中配置引入自定义“中间件”;
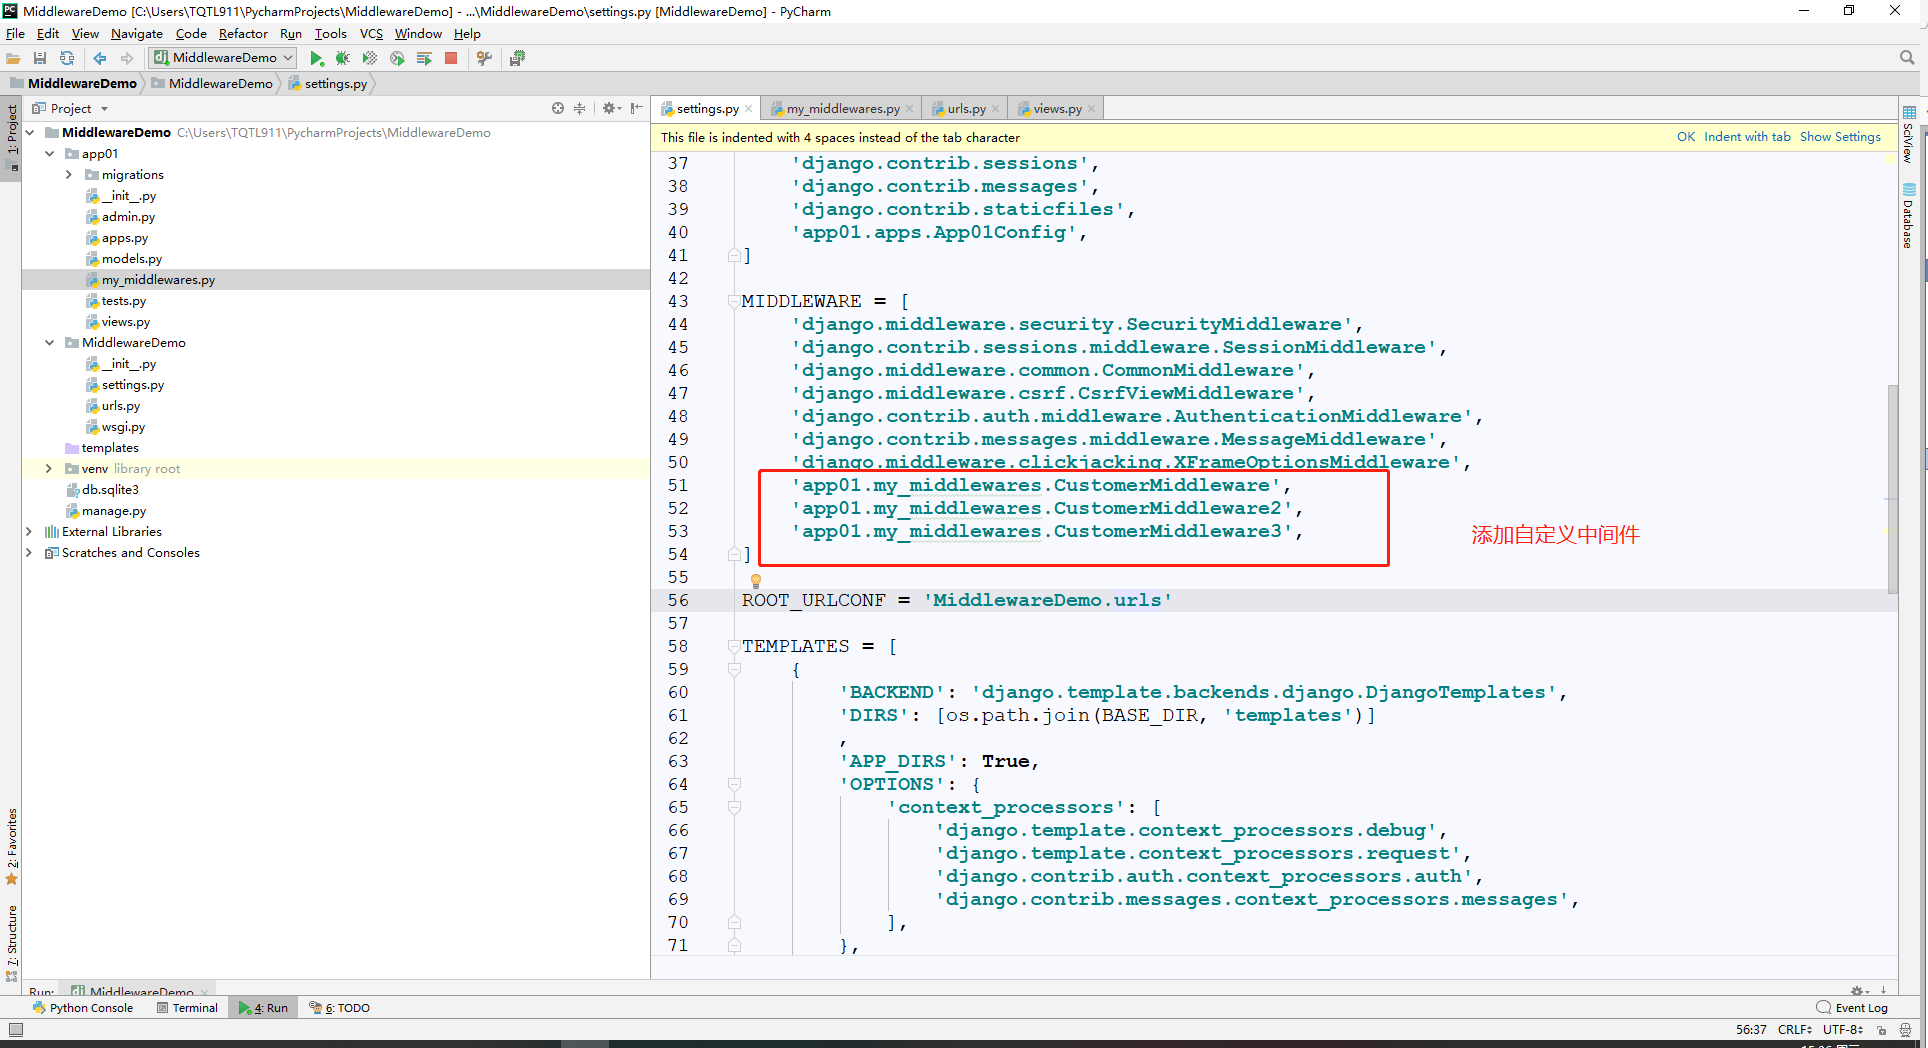
3、urls.py配置路径;
"""MiddlewareDemo URL Configuration

The `urlpatterns` list routes URLs to views. For more information please see:

    https://docs.djangoproject.com/en/2.1/topics/http/urls/

Examples:

Function views

    1. Add an import:  from my_app import views

    2. Add a URL to urlpatterns:  path('', views.home, name='home')

Class-based views

    1. Add an import:  from other_app.views import Home

    2. Add a URL to urlpatterns:  path('', Home.as_view(), name='home')

Including another URLconf

    1. Import the include() function: from django.urls import include, path

    2. Add a URL to urlpatterns:  path('blog/', include('blog.urls'))

"""

from django.contrib import admin

from django.urls import path

from app01 import views

urlpatterns = [

    path('admin/', admin.site.urls),

    path('index/', views.index),

    path('index_new/', views.index_new),

]
4、编写视图函数views.py;
from django.shortcuts import render,redirect,HttpResponse

# Create your views here.

def index(request):

    return HttpResponse("Index")

def index_new(request):

    return HttpResponse("Index_new")
5、进行验证;
You have 15 unapplied migration(s). Your project may not work properly until you apply the migrations for app(s): admin, auth, contenttypes, sessions.

Run 'python manage.py migrate' to apply them.

August 22, 2018 - 15:33:20

Django version 2.1, using settings 'MiddlewareDemo.settings'

Starting development server at http://127.0.0.1:8000/

Quit the server with CTRL-BREAK.

CustomMiddleWare process_request......

[22/Aug/2018 15:33:22] "GET /index_new/ HTTP/1.1" 200 9

CustomMiddleWare process_request222......

CustomMiddleWare process_request3333......

CustomMiddleWare process_response222......

CustomMiddleWare process_response......

Performing system checks...

System check identified no issues (0 silenced).

You have 15 unapplied migration(s). Your project may not work properly until you apply the migrations for app(s): admin, auth, contenttypes, sessions.

Run 'python manage.py migrate' to apply them.

August 22, 2018 - 15:39:35

Django version 2.1, using settings 'MiddlewareDemo.settings'

Starting development server at http://127.0.0.1:8000/

Quit the server with CTRL-BREAK.
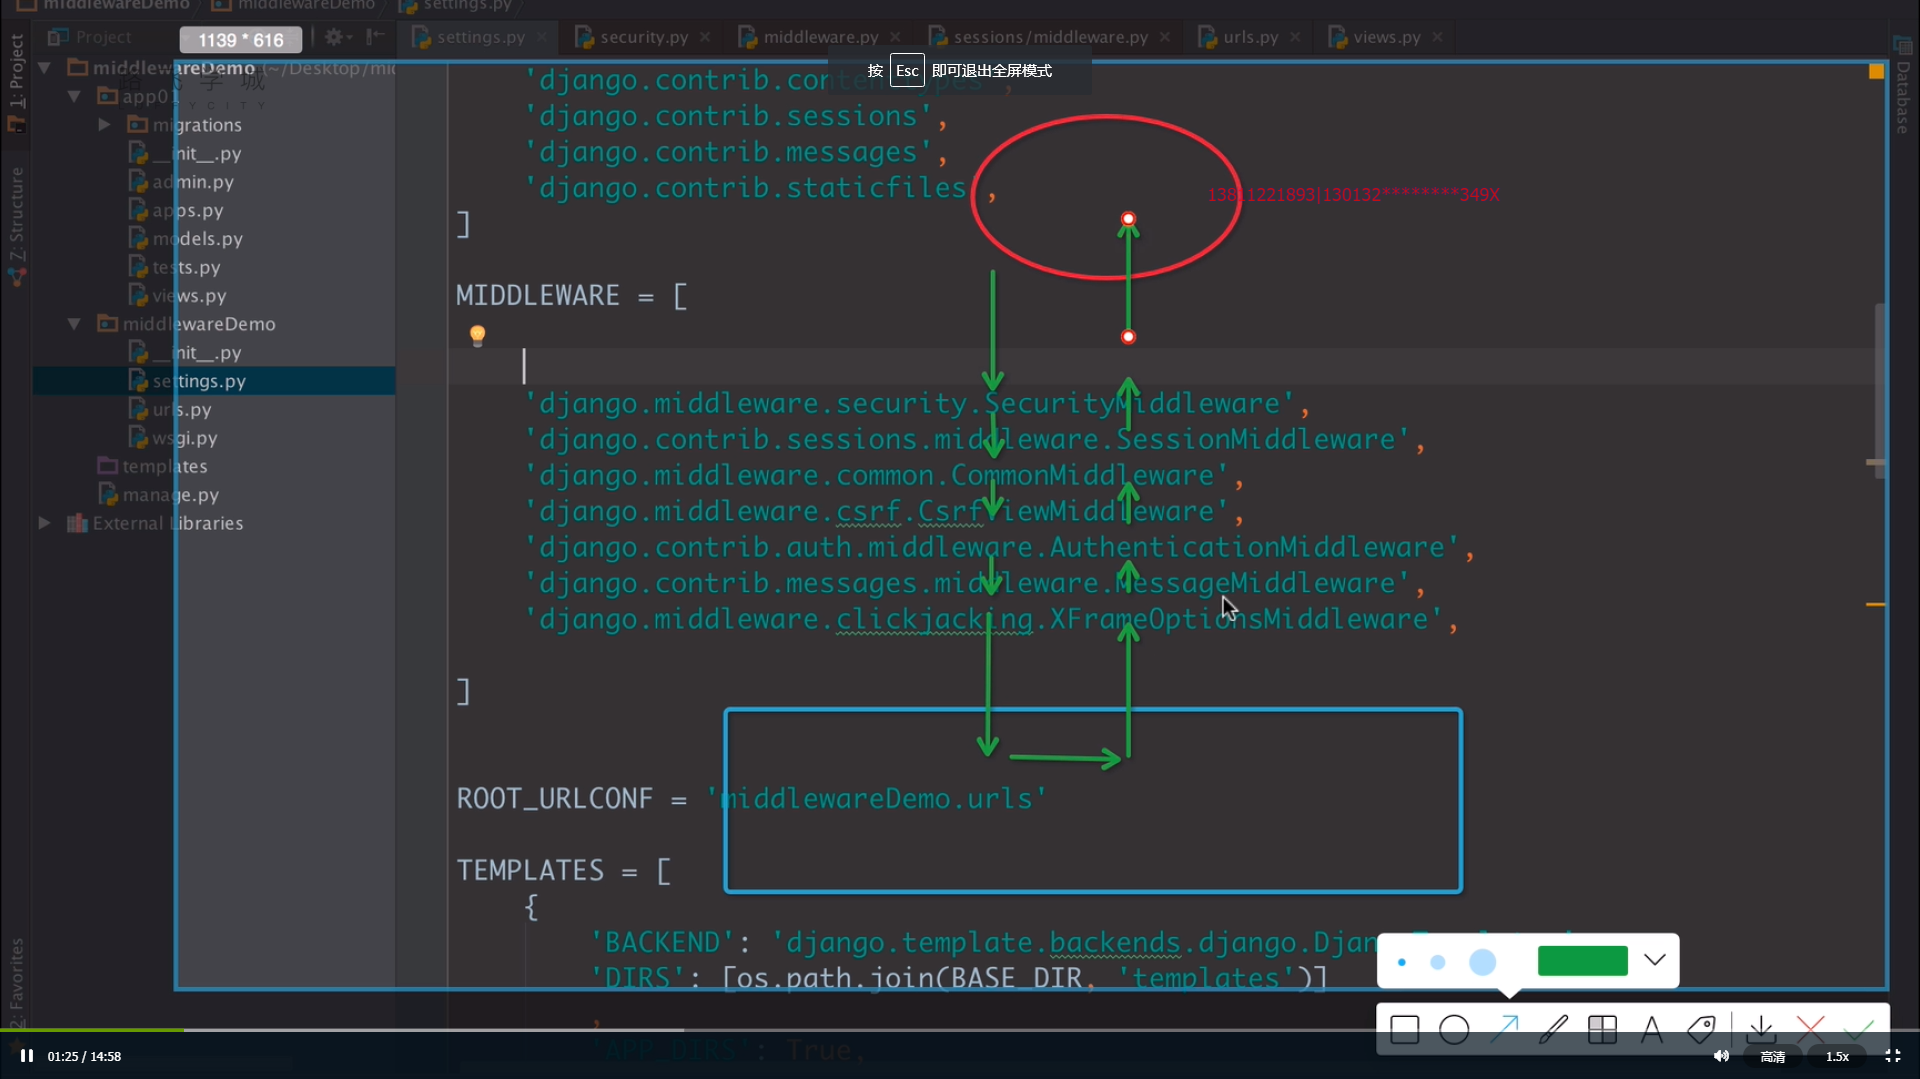
126-中间件之process_view方法
1、process-view的执行顺序;
#!/usr/bin/env python3

# -*- coding:utf-8 -*-

# __Author__:TQTL911

# Version:python3.6.6

# Time:2018/8/22 15:20

#导入MiddlewareMixin中间件;

from django.utils.deprecation import MiddlewareMixin

from django.shortcuts import HttpResponse

class CustomerMiddleware(MiddlewareMixin):

    def process_request(self,request):

        print("CustomMiddleWare process_request......")

        #return HttpResponse("forbidden")

    def process_response(self,request,response):

        print("CustomMiddleWare process_response......")

        return response

    def process_view(self,request, callback, callback_args, callback_kwargs):

        #print("=====>",callback(callback_args))

        print("process_view")

class CustomerMiddleware2(MiddlewareMixin):

    def process_request(self,request):

        print("CustomMiddleWare process_request222......")

    def process_response(self,request,response):

        print("CustomMiddleWare process_response222......")

        return response

    def process_view(self,request, callback, callback_args, callback_kwargs):

        print("22222process_view")

class CustomerMiddleware3(MiddlewareMixin):

    def process_request(self,request):

        print("CustomMiddleWare process_request3333......")
操作日志:
System check identified no issues (0 silenced).

You have 15 unapplied migration(s). Your project may not work properly until you apply the migrations for app(s): admin, auth, contenttypes, sessions.

Run 'python manage.py migrate' to apply them.

August 22, 2018 - 15:49:19

Django version 2.1, using settings 'MiddlewareDemo.settings'

Starting development server at http://127.0.0.1:8000/

Quit the server with CTRL-BREAK.

CustomMiddleWare process_request......

[22/Aug/2018 15:50:51] "GET /index_new/ HTTP/1.1" 200 9

CustomMiddleWare process_request222......

CustomMiddleWare process_request3333......

process_view

22222process_view

CustomMiddleWare process_response222......

CustomMiddleWare process_response......
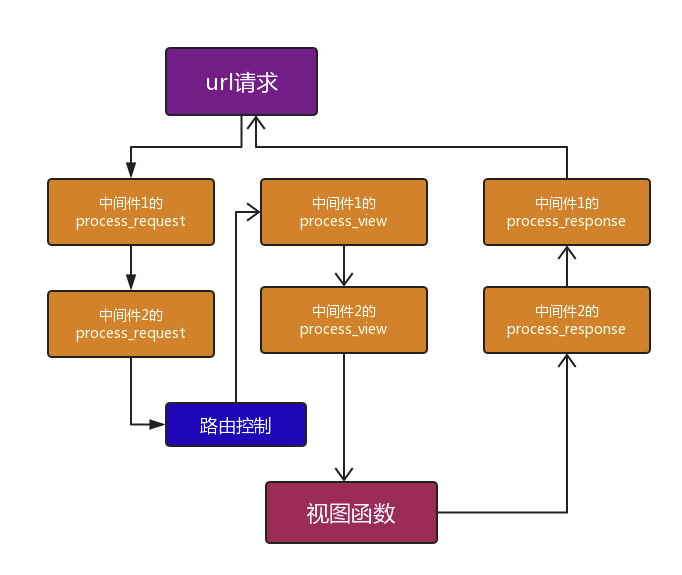
127-中间件之process_exception
1、Django中间件之process_exception;
#!/usr/bin/env python3

# -*- coding:utf-8 -*-

# __Author__:TQTL911

# Version:python3.6.6

# Time:2018/8/22 15:20

#导入MiddlewareMixin中间件;

from django.utils.deprecation import MiddlewareMixin

from django.shortcuts import HttpResponse

class CustomerMiddleware(MiddlewareMixin):

    def process_request(self,request):

        print("CustomMiddleWare process_request......")

        #return HttpResponse("forbidden")

    def process_response(self,request,response):

        print("CustomMiddleWare process_response......")

        return response

    def process_view(self,request, callback, callback_args, callback_kwargs):

        #print("=====>",callback(callback_args))

        print("process_view")

    def process_exception(self,request, exception):

        print("CustomMiddleware exception11111")

class CustomerMiddleware2(MiddlewareMixin):

    def process_request(self,request):

        print("CustomMiddleWare process_request222......")

    def process_response(self,request,response):

        print("CustomMiddleWare process_response222......")

        return response

    def process_view(self,request, callback, callback_args, callback_kwargs):

        print("22222process_view")

    def process_exception(self,request, exception):

        print("CustomMiddleware exception22222")

class CustomerMiddleware3(MiddlewareMixin):

    def process_request(self,request):

        print("CustomMiddleWare process_request3333......")
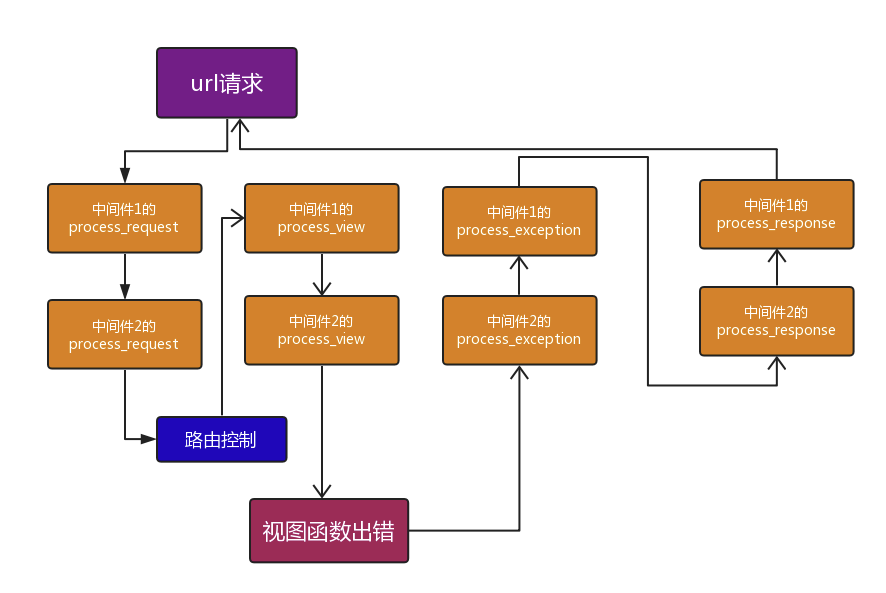
128-中间之应用
1、做IP访问频率的限制(比如防爬虫);
2、URL访问过滤;
3、middleware是一把双刃剑,具体使用装饰器还是middleware要结合具体业务场景;
mymiddleware.py;
from django.utils.deprecation import MiddlewareMixin

from django.shortcuts import HttpResponse,redirect

from AuthDemo import settings

class AuthMiddleware(MiddlewareMixin):

    def process_request(self,request):

        white_list = settings.WHITE_LIST

        if request.path in white_list:

            return None

        if not request.user.is_authenticated:

            return redirect("/login/")
settings.py中引入白名单;
WHITE_LIST = ['/login/','/reg/','logout']
第六模块:WEB框架开发 第1章·Django框架开发88~128的更多相关文章
- 第六模块:WEB框架开发 第1章·Django框架开发1~50
01-Django基础介绍 02-Web应用程序1 03-Web应用程序2 04-http请求协议1 05-http请求协议2 06-http协议之响应协议 07-wsgire模块1 08-wsgir ...
- 第六模块:WEB框架开发 第1章·Django框架开发50~87
51-表关系之一对多 52-表关系之多对多 53-表关系之一对一 54-数据库表关系之关联字段与外键约束 55-数据库表关系之sql创建关联表 56-ORM生成关联表模型 57-多表操作之一对多添加记 ...
- 第四模块:网络编程进阶&数据库开发 第2章·MySQL数据库开发
01-MySQL开篇 02-MySQL简单介绍 03-不同平台下安装MySQL 04-Windows平台MySQL密码设置与破解 05-Linux平台MySQL密码设置与破解 06-Mac平台MySQ ...
- Python学习笔记_04:Django框架简介
目录 1 什么是Django? 2 Django框架的开发环境搭建 3 Django操作MySql数据库简介 4 功能强大的Django管理工具应用 1 什么是Django? Django是应用于We ...
- python 之 Django框架(服务器程序和应用程序、基础必备三件套及相关配置)
第十二章 Django框架 12.1 服务器程序和应用程序 服务器程序负责对socket服务器进行封装,并在请求到来时,对请求的各种数据进行整理.应用程序则负责具体的逻辑处理.为了方便应用程序的开发, ...
- python主流框架简介和Django框架的使用
目录 一.手撸简易web框架 二.动静态网页 1. 静态网页 2. 动态网页 三.jinja2模板语法 1. jinja2的作用 四.python主流web框架 1. django 3. tornad ...
- 分布式队列celery 异步----Django框架中的使用
仅仅是个人学习的过程,发现有问题欢迎留言 一.celery 介绍 celery是一种功能完备的即插即用的任务对列 celery适用异步处理问题,比如上传邮件.上传文件.图像处理等比较耗时的事情 异步执 ...
- MySQL在Django框架下的基本操作(MySQL在Linux下配置)
[原]本文根据实际操作主要介绍了Django框架下MySQL的一些常用操作,核心内容如下: ------------------------------------------------------ ...
- Django框架数据库模型
博主最近开始优化之前的API接口自动化框架,这次打算使用django框架来完成 # -*- coding: utf-8 -*- from __future__ import unicode_liter ...
随机推荐
- HDU 2717 Catch That Cow(常规bfs)
传送门:http://acm.hdu.edu.cn/showproblem.php?pid=2717 Catch That Cow Time Limit: 5000/2000 MS (Java/Oth ...
- woff字体找不到导致的404错误
在iis中添加mime类型: .woff application/x-font-woff .woff2 application/x-font-woff
- List<子类>转List<父类>过程中犯的一些错误
新人犯的错误,记录一下供以后参考. 有两个类 public class A { public string Name{get;set;} } public class B:A { public int ...
- Visual Studio 中常用的快捷键
项目相关的快捷键 Ctrl + Shift + B = 生成项目 Ctrl + Alt + L = 显示 Solution Explorer(解决方案资源管理器) Shift + Alt+ C = 添 ...
- JavaScript面向对象(封装)
阮一峰的网络日志 1.生成实例对象的原始模式 var People = { name : '', age : '' } 根据这个原型对象生成两个实例对象 var people1 = {}; peopl ...
- JavaScript基础部分经典案例
再复杂的程序都是由一个个简单的部分组成. 001案例 - 交换两个变量的值 方法01 - 使用临时变量 var n1 = 5; var n2 = 6; // 创建一个临时中介变量 tmp var tm ...
- JS-类型相关
typeof检测类型typeof 返回的数据类型种类:number(js不分整形,浮点等等 所有的数字都是number类型).string.boolean.undefined.object.funct ...
- chromium之compiler_specific
直接上代码,将一些编译警告定义成宏 #if defined(COMPILER_MSVC) // Macros for suppressing and disabling warnings on MSV ...
- GitHub Desktop 拉取 GitHub上 Tag 版本代码
一直在使用 GitHub Desktop 图形化 git 管理工具,统一项目框架版本时需要切换到ThinkPHP Tag 分支版本,步骤如下, 1,先在 GitHub 中找到需要的版本,点进去 2,点 ...
- MyEclipse中好用的快捷键汇总整理
MyEclipse中常用的快捷键有很多,合理的使用其中一些快捷键组合,可以有效提高开发的效率和质量. 1.Ctrl + Shift + R:打开资源.可以查找并打开工作区中任何一个文件,且支持使用通配 ...