How to Install Eclipse C/C++ Development Tool--转
http://www3.ntu.edu.sg/home/ehchua/programming/howto/EclipseCpp_HowTo.html
Eclipse 4.3 (Kepler) for C/C++ Programming
How To Install Eclipse CDT 8.2 and Get Started
Eclipse is an open-source Integrated Development Environment (IDE) supported by IBM. The mother site is @ www.eclipse.org. Eclipse is popular for Java project development. It also supports C/C++, PHP, Python, Perl, and other web project developments via extensible plug-ins. Eclipse is cross-platform and runs under Windows, Linux and Mac OS.
1. How to Install Eclipse C/C++ Development Tool (CDT) 8.1.2 for Eclipse 4.2.2 (Juno)
Step 0: Install MinGW GCC or Cygwin GCC
To use Eclipse for C/C++ programming, you need a C/C++ compiler. On Windows, you could install either MinGW GCC or Cygwin GCC. Choose MinGW if you are not sure, because MinGW is lighter and easier to install, but having less features.
- MinGW GCC: Read "How to Install MinGW".
- Cygwin GCC: Read "How to Install Cygwin". Make sure that you select "
gcc", "g++", "gdb", and "make" packages under the "Devel" (Development) category - these packages are not part of the default installation.
Step 1: Install Eclipse C/C++ Development Tool (CDT)
Two ways to install CDT, depending on whether you have previously installed an Eclipse:
- If you have already installed "Eclipse for Java Developers" or other Eclipse packages, you could install the CDT plug-in as follows:
Launch Eclipse ⇒ Help ⇒ Install New Software ⇒ In "Work with" field,
pull down the drop-down menu and select "Kepler -
http://download.eclipse.org/releases/kepler" (or juno for Eclipse 4.2;
or helios for Eclipse 3.7).
In "Name" box, expand "Programming Language" node ⇒ Check "C/C++ Development Tools" ⇒ "Next" ⇒ ... ⇒ "Finish". - If you have not install any Eclipse package, you could download "Eclipse IDE for C/C++ Developers" from http://www.eclipse.org/downloads, and unzip the downloaded file into a directory of your choice.
Step 2: Configuration
You do NOT need to do any configuration, as long as the Cygwin or MinGW binaries are included in the PATH environment variable. CDT searches the PATH to discover the C/C++ compilers.
2. Writing your First C/C++ Program in Eclipse
2.1 C++ Program
Step 0: Launch Eclipse
- Start Eclipse by running "
eclipse.exe" in the Eclipse installed directory. - Choose an appropriate directory for your workspace (i.e., where you would like to save your works).
- If the "welcome" screen shows up, close it by clicking the "close" button.
Step 1: Create a new C++ Project
For each C++ application, you need to create a project to keep all the source codes, object files, executable files, and relevant resources.
To create a new C++ project:
- Choose "File" menu ⇒ "New" ⇒ Project... ⇒ C/C++ ⇒ C++ project.
- The "C++ Project" dialog pops up.
- In "Project name" field, enter "
FirstProject". - In "Project Types" box, select "Executable" ⇒ "Empty Project".
- In "Toolchains" box, choose your compiler, e.g., "Cygwin GCC" or "MinGW GCC" ⇒ Next.
- In "Project name" field, enter "
- The "Select Configurations" dialog appears. Select both "Debug" and "Release" ⇒ Finish.
Step 2: Write a Hello-world C++ Program
- In the "Project Explorer" (leftmost panel) ⇒ Right-click on "
FirstProject" (or use the "File" menu) ⇒ New ⇒ Source File. - The "New Source File" dialog pops up.
- In "Source file" field, enter "
Hello.cpp". - Click "Finish".
- In "Source file" field, enter "
- The source file "
Hello.cpp" opens on the editor panel (double-click on "test.cpp" to open if necessary). Enter the following codes:#include <iostream>
using namespace std; int main() {
cout << "Hello, world!" << endl;
return 0;
}
If "Unresolved Inclusion Error"
If error "unresolved inclusion" appears next to #include statement, the "include paths for headers" are not set properly. Select "Project" menu ⇒ Properties ⇒ C/C++ General ⇒ Paths and Symbols ⇒ In "Includes" tab:
For Cygwin GCC:
- "Add" the following directories to "GNU C", where
$CYGWIN_HOMEis your Cygwin installed directory:$CYGWIN_HOME\lib\gcc\i686-pc-cygwin\4.5.x\include$CYGWIN_HOME\lib\gcc\i686-pc-cygwin\4.5.x\include-fixed$CYGWIN_HOME\usr\include$CYGWIN_HOME\usr\include\w32api
- "Add" the following directories to "GNU C++", where
$CYGWIN_HOMEis your Cygwin installed directory:$CYGWIN_HOME\lib\gcc\i686-pc-cygwin\4.5.x\include\c++$CYGWIN_HOME\lib\gcc\i686-pc-cygwin\4.5.x\include\c++\i686-pc-cygwin$CYGWIN_HOME\lib\gcc\i686-pc-cygwin\4.5.x\include\c++\backward$CYGWIN_HOME\lib\gcc\i686-pc-cygwin\4.5.x\include$CYGWIN_HOME\lib\gcc\i686-pc-cygwin\4.5.x\include-fixed$CYGWIN_HOME\usr\include$CYGWIN_HOME\usr\include\w32api
For MinGW GCC:
- "Add" the following directories to "GNU C", where
$MINGW_HOMEis your MinGW installed directory:$MINGW_HOME\lib\gcc\mingw32\4.6.x\include$MINGW_HOME\include$MINGW_HOME\lib\gcc\mingw32\4.6.x\include-fixed
- "Add" the following directories to "GNU C++", where
$MINGW_HOMEis your Cygwin installed directory:$MINGW_HOME\lib\gcc\mingw32\4.6.x\include\c++$MINGW_HOME\lib\gcc\mingw32\4.6.x\include\c++\mingw32$MINGW_HOME\lib\gcc\mingw32\4.6.x\include\c++\backward$MINGW_HOME\lib\gcc\mingw32\4.6.x\include$MINGW_HOME\include$MINGW_HOME\lib\gcc\mingw32\4.6.x\include-fixed
NOTE: To find the header paths, you can do a search on headers such as "stdio.h" (for C) and "iostream" (for C++) under the Cygwin or MinGW installed directory.
libmpfr4" in cygwin.Step 3: Compile/Build
Right-click on the "FirstProject" (or use the "Project" menu) ⇒ choose "Build Project" to compile and link the program.
Step 4: Run
To run the program, right-click on the "FirstProject" (or anywhere on the source "test.cpp", or select the "Run" menu) ⇒ Run As ⇒ Local C/C++ Application ⇒ (If ask, choose Cygwin's gdb debugger) ⇒ The output "Hello, world!" appears on the "Console" panel.
NOTE: You need to create a new C++ project for EACH of your programming problems. This is messy for writing toy programs!
2.2 C Program
Follow the same steps as above. Create a "C Project" (instead of "C++ Project"). Try the following Hello-world program (called "Hello.c").
#include <stdio.h>
int main() {
printf("Hello, world!\n");
return 0;
}
2.3 C++ Program with Makefile
In the previous examples, we use so-called managed-make where Eclipse automatically generated a makefile to build the program. We can also choose to write our own makefile for complete control of the building process.
Step 1: Create a C++ Makefile Project
From "File" menu ⇒ New ⇒ Project... ⇒ C/C++ ⇒ C++ project ⇒ In "Project name", enter "HelloCppMakefile" ⇒ In "Project type", choose "Makefile Project ", "Empty Project" ⇒ In "Toolchains", choose "Cygwin GCC" or "MinGW GCC". Ignore the warning message.
Step 2: Write a C++ Program
Right-click on the project ⇒ New ⇒ Source File ⇒ In "Source file", enter "Hello.cpp" ⇒ Enter the following source codes:
#include <iostream>

using namespace std;

int main() {

   cout << "Hello, world!" << endl;

   return 0;

}
Step 3: Write a Makefile
Right-click on the project ⇒ New ⇒ File ⇒ In "File name", enter "makefile" ⇒ Enter the following codes. Take note that you need to use a Tab (NOT Spaces) for the indent.
all: Hello.exe

clean:

	rm Hello.o Hello.exe

Hello.exe: Hello.o

	g++ -g -o Hello.exe Hello.o

Hello.o: Hello.cpp

	g++ -c -g Hello.cpp
Step 4: Build the Project
Right-click on the project ⇒ Build Project.
Step 5: Run the Program
Right-click on the project ⇒ Run As ⇒ Local C/C++ Application.
[TODO] Write a makefile to compile toy-programs under one project.
3. Read the Documentation
At a minimum, you SHOULD browse through Eclipse's "Workbench User Guide" and "C/C++ Development User Guide"
- accessible via the Eclipse's "Welcome" page or "Help" menu. This will
save you many agonizing hours trying to figure out how to do some
things later.
4. Debugging C/C++ Programs in Eclipse CDT
Able to use a graphics debugger to debug program is crucial in
programming. It could save you countless of hours guessing on what went
wrong.
Step 0: Write a C++ Program -
The following program computes and prints the factorial of n (=1*2*3*...*n). The program, however, has a logical error and produce a wrong answer for n=20 ("The Factorial of 20 is -2102132736" - a negative number?!).
1 |
#include <iostream> |
The Factorial of 20 is -2102132736
Let us use the graphic debugger to debug the program.

Step 1: Set an Initial Breakpoint - A breakpoint suspends program execution for you to examine the internal states (e.g., value of variables) of the program. Before starting the debugger, you need to set at least one breakpoint to suspend the execution inside the program. Set a breakpoint at main() function by double-clicking on the left-margin of the line containing main(). A blue circle appears in the left-margin indicating a breakpoint is set at that line.

Step 2: Start Debugger - Right click on the project (or use the "Run" menu) ⇒ "Debug As" ⇒ "Local C/C++ Application" ⇒ choose "Yes" to switch into "Debug" perspective (A perspective is a particular arrangement of panels to suits a certain development task such as editing or debugging). The program begins execution but suspends its operation at the breakpoint, i.e., the main() function.
As illustrated in the following diagram, the highlighted line (also pointed to by a blue arrow) indicates the statement to be executed in the next step.
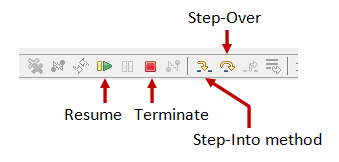

Step 3: Step-Over and Watch the Variables and Outputs - Click the "Step Over" button (or select "Step Over" from "Run" menu) to single-step thru your program. At each of the step, examine the value of the variables (in the "Variable" panel) and the outputs produced by your program (in the "Console" Panel), if any. You can also place your cursor at any variable to inspect the content of the variable.
Single-stepping thru the program and watching the values of internal variables and the outputs produced is the ultimate mean in debugging programs - because it is exactly how the computer runs your program!
Step 4: Breakpoint, Run-To-Line, Resume and Terminate - As mentioned, a breakpoint suspends program execution and let you examine the internal states of the program. To set a breakpoint on a particular statement, double-click the left-margin of that line (or select "Toggle Breakpoint" from "Run" menu).
"Resume" continues the program execution, up to the next breakpoint, or till the end of the program.
"Single-step" thru a loop with a large count is time-consuming. You could set a breakpoint at the statement immediately outside the loop (e.g., Line 12 of the above program), and issue "Resume" to complete the loop.
Alternatively, you can place the cursor on a particular statement, and issue "Run-To-Line" from the "Run" menu to continue execution up to the line.
"Terminate" ends the debugging session. Always terminate your current debugging session using "Terminate" or "Resume" till the end of the program.
Step 5: Switching Back to C/C++ perspective - Click the "C/C++" perspective icon on the upper-right corner to switch back to the "C/C++" perspective for further programming (or "Window" menu ⇒ Open Perspective ⇒ C/C++).
I can's stress more that mastering the use of debugger is crucial in programming. Explore the features provided by the debuggers.
Other Debugger's Features
Modify the Value of a Variable: You can modify the value of a variable by entering a new value in the "Variable" panel. This is handy for temporarily modifying the behavior of a program, without changing the source code.
Step-Into and Step-Return: To debug a function, you need to use "Step-Into" to step into the first statement of the method. You could use "Step-Return" to return back to the caller, anywhere within the method. Alternatively, you could set a breakpoint inside a method.
NOTE: If you receive error message "Can't find a source file at /cygdrive/c..." during debugging, you need to configure a mapping between "/cygdrive/c" and "c:/" (assuming that your program in kept in drive c. From "Window" ⇒ "Preferences" ⇒ "C/C++" ⇒ "Debug" ⇒ "Common Source Lookup Path", select "Add" ⇒ "Path Mapping".
5. Tips & Tricks
Read Eclipse for Java's Tips & Tricks for general tips in using Eclipse.
5.1 C/C++ Software Development Using GCC
- You can find the commands used in Eclipse CDT for build the project at "
<workspace>\.metadata\.plugins\org.eclipse.cdt.ui\global-build.log". - Setting include-paths, library-paths, and libraries: When building the program, the compiler needs the header files to compile the source codes; the linker needs the libraries to resolve external references. The compiler searches the "include-paths" for the headers specified in
#includedirectives. The linker searches the "library-paths" for "libraries" needed to link the program. In GCC, include-path is specified via-Idiroption or environment variableCPATH. The library-path is specified via-Ldiroption, or environment variableLIBRARY_PATH. The librarylibxxx.ais specified via-lxxxoption (lowercase letter'l', without the prefixliband.aextension).
In Eclipse CDT, you can set the include paths, library paths and
libraries by right-click on the project ⇒ Properties ⇒ C/C++ General ⇒
Paths and Symbols ⇒ Under tabs "Includes", "Library Paths" and
"Libraries". The settings are applicable to the selected project only.
To set the include paths and library paths for all the projects, set the environment variablesCPATHandLIBRARY_PATH. In Eclipse, choose "Window" ⇒ Preferences ⇒ C/C++ ⇒ Build ⇒ Environment.
Alternatively, copy the headers and libraries into system directories, and you can omit the include-paths and library-paths. - OpenGL with GLUT: For Cygwin, you
need to install gcc, g++, gdb, make (under Devel category) and opengl,
freeglut (under graphics category). The headersgl.h,glu.h,glut.hare kept in$cygwin\usr\include\w32api\GL. Use#include <GL/gl__.h>to include the headers. The librarieslibopengl32.alibglu32.aandlibglut32.aare kept in$cygwin\lib\w32api. To specify these libraries in linking, use-lopengl32-lglu32-lglut32options (without thelibprefix and.aextension). - OpenGL with SDL: Download SDL from http://www.libsdl.org. Choose Development Libraries ⇒ win32 ⇒ mingw32 ⇒ Unzip. Copy the headers directory
SDL(underinclude) to$cygwin\usr\include\w32api; copy all the library files inlibinto$cygwin\lib\w32api; copy the run-time librarySDL.dll(underbin) intoWindows/System32. In your program, include these two headers:#include <SDL/sdl.h>and#include <SDL/sdl_opengl.h>. For linking, add these libraries:-lSDL-lSDLmain. - #Pragram Comment Directive: pragma comment directive, e.g.,
#pragma comment(lib, "opengl32.lib"), is often used to include a particular library (same as-loption). This system-dependent directive works on Windows's compiler, but NOT in GCC. - Error "multiple target patterns": There is a problem with GNU make (at
$Cygwin\bin\make.exe). Replaced by this copy @ http://www.cmake.org/files/cygwin/make.exe. - fflush(stdout):
The gcc library uses buffered I/O (in accordance with the C
Specification). Output is only written out to the output stream after a
newline character. You can flush the output with afflush(). - Project name shall not include the word "setup": If you name your C/C++ project with a name including the word "
setup", then the resultant "*setup*.exe"
will trigger UAC (User Authorization Control) and require administrator
right to run. (This took me a few hours to figure out! Try renaming a "hello.exe" to "mysetup.exe".)
6. File I/O in Eclipse
Refer to Eclipse for Java's File IO.
REFERENCES & RESOURCES
- Eclipse's "C/C++ Development Tool User Guide", accessible via Eclipse's Help menu.
- GCC (GNU compilers) mother site @ http://gcc.gnu.org; GCC manual @ http://gcc.gnu.org/onlinedocs.
- An Introduction to GCC @ http://www.network-theory.co.uk/docs/gccintro/index.html.
How to Install Eclipse C/C++ Development Tool--转的更多相关文章
- How to install Eclipse?
http://askubuntu.com/questions/26632/how-to-install-eclipse How to install Eclipse? up vote113down v ...
- 使用 Eclipse C/C++ Development Toolkit 开发应用程序
使用 Eclipse C/C++ Development Toolkit 开发应用程序 (转) 来自http://blog.csdn.net/favory/article/details/189080 ...
- (转) How to install eclipse in ubuntu 12.04
源地址:http://www.krizna.com/ubuntu/install-eclipse-in-ubuntu-12-04/ Eclipse installation in ubuntu 12. ...
- 在Eclipse上安装Spring Tool Suite
. 不装IDE会没有Spring bean configure file Spring Tool Suite是一个基于Eclipse IDE开发环境中的用于开发Spring应用程序的工具,提供了开箱即 ...
- eclipse在线安装JBoss Tool过程
eclipse在线安装JBoss Tool过程 1.打开eclipse,依次点击"help--->Install New Software..." 2.再单击"Ad ...
- how to use Eclipse for kernel development
http://wiki.eclipse.org/HowTo_use_the_CDT_to_navigate_Linux_kernel_source Here are some steps that I ...
- 如何在Chrome development tool里查看C4C前台发送的请求细节
我们可以在Chrome development tool的network tab里观察到从前台UI发送到后台的HTTP请求: 更多Chrome Development Tool的使用工具请查看我的博客 ...
- Chrome Development Tool: [VM] file from javascript
Chrome Development Tool: [VM] file from javascript [VM] (scriptId) has no special meaning. It's a du ...
- Install eclipse ns3 in ubuntu 14.04
1. NS3 install 参考NS3 tutorial即可. 2.eclipse 2.1下载 下载地址:http://www.eclipse.org/downloads/ ...
随机推荐
- linux下PHP5.5的安装【oci8,pdo-oci,memcache,Zend OPCache扩展】
最近一段时间学习了一下PHP,用CI做了一个小项目,为了开发方便,本地windows下使用了集成环境XAMPP,不过当把项目部署到linux上时,确实遇到了很多问题,下面把我在linux上安装php的 ...
- js ~或者~~
问题:~是什么意思? 答:js中是对数字取反 var a = null; var b = '23' console.log(~~null) console.log(~~b)
- C# 设置textedit只能输入英文数字下划线,并且只能以英文开头(正则表达式)
this.textEdit1.Properties.Mask.EditMask = @"[a-zA-z][a-zA-Z0-9_]*";
- c# 委托与事件的区别
委托与事件的区别 委托和事件没有可比性,因为委托是数据类型,事件是对象(可以理解为对委托变量的封装.),下面说的是委托的对象(用委托方式实现的事件)和(标准的event方式实现)事件的区别.事件的内部 ...
- [转载] C++异常处理机制
原地址:http://blog.csdn.net/daheiantian/article/details/6530318 一.什么是异常处理 一句话:异常处理就是处理程序中的错误. 二.为什么需要异常 ...
- RDLC报表的相关技巧四(报表内依照分组重置页码)
报表中不同的组重置页数,如采购订单每一个PO显示的页数都是针对这个PO的,而不是总的页数. 步骤: 1.在各组实例中启用分页符2.用高级模式将组的属性中的ResetPageNumber设置为True3 ...
- C语言小总结
1.函数 有时程序中要多次实现某一功能,就需要多次重复编写实现此功能的代码,这使程序不精练.因此需要模块化程序设计的思想. 函数的返回值要匹配,若函数有返回值可以不接受,但是函数没有返回值不能接受. ...
- uC/OS-II 函数之信号量相关函数
上文主要介绍了时间相关的函数,本文介绍信号量相关的函数:OSSemCreate()建立信号量函数,OSSemPend()取得使用权函数,OSSemPost()使用权递加函数 信号量介绍 如果我们想对一 ...
- python2-url编解码
#coding:utf-8import urllibs={"username":"hhh","password":"XXXX&qu ...
- redis中存储小数
在做一个活动的需求时,需要往redis中有序的集合中存储一个小数,结果发现取出数据和存储时的数据不一致 zadd test_2017 1.1 tom (integer) zrevrange test_ ...