个人笔记-----Vue中多个router-view应用
单个 <router-view/> 和多个 <router-view/> 的区别,
单个 <router-view/> 只是一个区域的变化,不需要设置name属性,在设置路由的时候单个<router-view/>使用的是component,
多个<router-view/>里面需要设置一个name属性,设置路由的时候单个<router-view/>使用的是components,
————————————————
<div>
<router-view/>
<router-view class="left" name="nav" />
<router-view class="right" name="con" />
</div>
然后在router.js中进行配置,注意:component改成要components,components是一个对象了,nav:AboutNav,左侧的nav就是<router-view name="nav" /> 标签里的 name属性值,nav:AboutNav,右侧的AboutNav就是引用组件时候import AboutNav from './views/AboutNav.vue'中的AboutNav。
import AboutCon from './views/AboutCon.vue'
import AboutNav from './views/AboutNav.vue'
{
path: '/about',
name: 'about',
components:
{
nav:AboutNav,
con:AboutCon
}
}
--------------------
other
vue同一个页面可以有多个router-view
参考:https://blog.csdn.net/u011615787/article/details/80075240
分别给router-view定义一个name,默认显示的可以不用定义
自己先在components文件夹内写4个组件,准备放入4个router-viewer标签,我的分别是
app.vue
|
1
2
3
4
5
6
7
8
9
10
11
12
13
14
15
16
17
18
19
20
21
22
23
24
25
26
27
28
29
30
31
32
33
34
35
36
37
38
39
40
41
42
43
44
45
46
47
48
49
50
51
52
53
54
|
<template> <div id="app"> <!-- <img src="./assets/logo.png"> --> <!-- <container-Left/> --> <router-link to="/HelloWorld" > 222 </router-link> <router-view/> <router-view name="left" class="area left"/> <router-view name="right" class="area right"/> <router-view name="logo" class="area "/> <router-view name="bottom" class="area bottom"/> </div></template><script>import containerLeft from './components/containerLeft.vue'export default { name: 'App', components:{ containerLeft, }}</script><style>#app { font-family: 'Avenir', Helvetica, Arial, sans-serif; -webkit-font-smoothing: antialiased; -moz-osx-font-smoothing: grayscale; text-align: center; color: #2c3e50; /* margin-top: 60px; */}.area{ width: 400px; height:400px; border:1px red soild; position: absolute; top:20px; z-index: 1002;}.left{ left:0px; top:100px;}.right{ right: 0px;}.bottom{ top: 90%; width: 100%; height: 30px;}</style> |
路由文件router/index.js
核心:
|
1
2
3
4
5
6
7
8
9
10
11
12
13
14
15
16
17
18
19
20
21
22
23
24
25
26
27
28
29
30
31
32
33
34
35
36
37
38
39
40
41
42
43
44
45
46
47
48
49
50
51
52
53
54
55
56
57
58
|
import Vue from 'vue'import Router from 'vue-router'import HelloWorld from '@/components/HelloWorld'import Veaflet from '@/components/Veaflet'import containerLeft from '@/components/containerLeft'import containerRight from '@/components/containerRight'import containerTop from '@/components/containerTop'import containerBottom from '@/components/containerBottom'import lefttree from '@/components/lefttree'Vue.use(Router)// 创建一个路由器实例// 并且配置路由规则const router = new Router({ routes: [ { path: '/', name: 'Veaflet', meta:{title:'Veaflet'}, components:{ default: Veaflet, left:containerLeft, right:containerRight, logo:containerTop, bottom:containerBottom } }, { path: '/HelloWorld', name: 'HelloWorld', meta:{title:'HelloWorld'}, component: HelloWorld }, { path: '/containerLeft', name: 'containerLeft', meta:{title:'containerLeft'}, component: containerLeft }, { path: '/lefttree', name: 'lefttree', meta:{title:'lefttree'}, component: lefttree } ]}) //修改动态网页标题 beforeEach 导航钩子,路由改变前触发 router.beforeEach((to,from,next) =>{ //window.document.title = to.meta.title; window.document.title = to.name; next(); }) router.afterEach((to,from,next) =>{ window.scrollTo(0,0); }) export default router; |
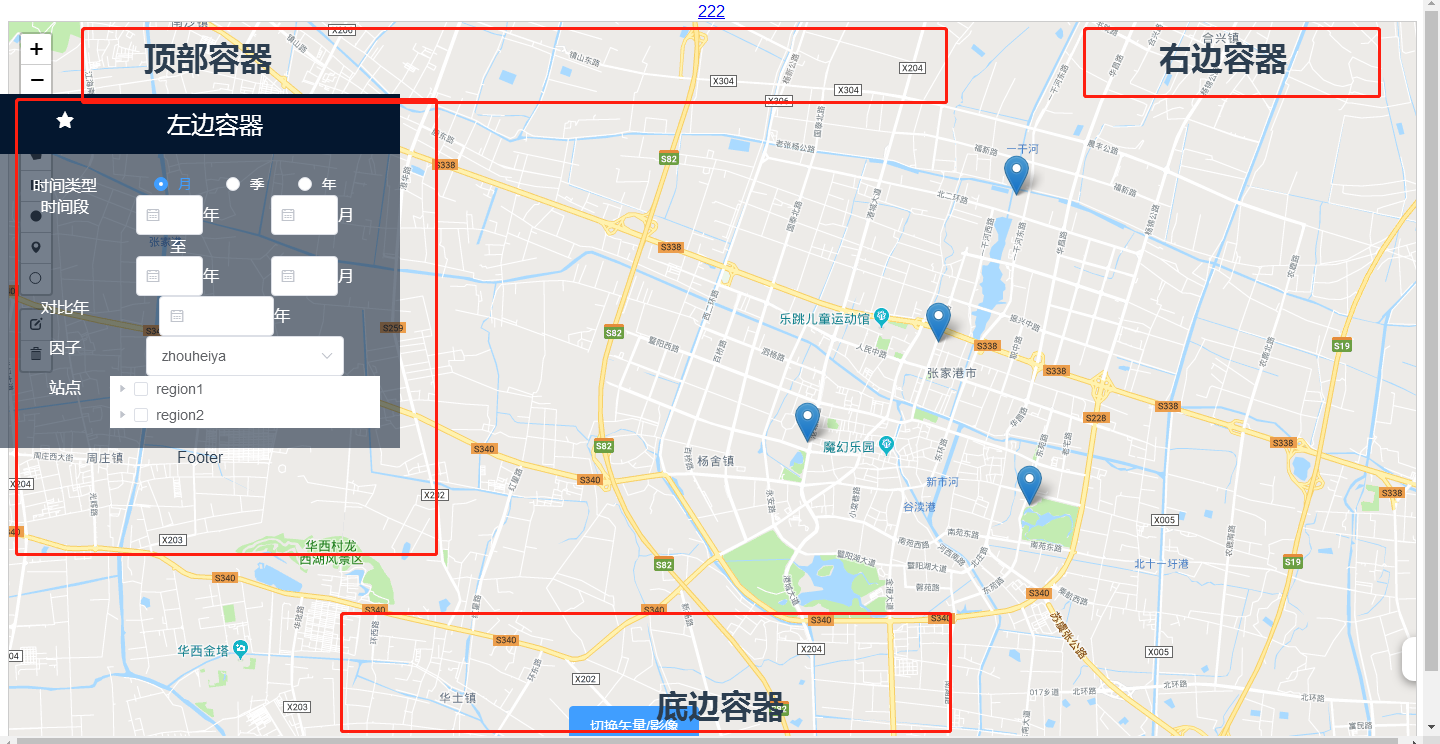
运行效果如图:
个人笔记-----Vue中多个router-view应用的更多相关文章
- vue中$route 和$router的区别
在vue中会出现一种情况 const url=this.$route.query.returnURL; this.$router.push(url); $router和$route的区别傻傻的分 ...
- 关于Vue中,$this.router.push到当前页面,只是传入参数不同,页面不刷新的问题解决
在页面的watch中,监听$router的变化 watch: { $route (to, from) { this.$router.go(0) } } 其中this.$router.go(0)为刷新页 ...
- vue中$router.push打开新窗口
在vue中使用 this.$router.push({ path: '/home' }) 默认是替代本窗口 如果想新开一个窗口,可以使用下面的方式: let routeData = this.$ro ...
- Vue学习笔记七:Vue中的样式
目录 两种样式 class样式 内联样式 两种样式 Vue中使用样式方式有两种,一种是class样式,一种是内联样式也就是style class样式 class样式使用的方式有5种,HTML如下 &l ...
- Vue中router两种传参方式
Vue中router两种传参方式 1.Vue中router使用query传参 相关Html: <!DOCTYPE html> <html lang="en"> ...
- vue中$watch源码阅读笔记
项目中使用了vue,一直在比较computed和$watch的使用场景,今天周末抽时间看了下vue中$watch的源码部分,也查阅了一些别人的文章,暂时把自己的笔记记录于此,供以后查阅: 实现一个简单 ...
- [Vue 牛刀小试]:第十二章 - 使用 Vue Router 实现 Vue 中的前端路由控制
一.前言 前端路由是什么?如果你之前从事的是后端的工作,或者虽然有接触前端,但是并没有使用到单页面应用的话,这个概念对你来说还是会很陌生的.那么,为什么会在单页面应用中存在这么一个概念,以及,前端路由 ...
- vue中$router以及$route的使用
路由基本概念 route,它是一条路由. { path: '/home', component: Home } routes,是一组路由. const routes = [ { path: '/hom ...
- Vue 中的Vue Router一级路由,二级路由,三级路由以及跳转
今天编写了一下Vue中的路由 先用命令行新建一个空的项目,并且我知道要用路由,就下载了路由的相关依赖 vue init webpack demo5 完毕之后进入所在的项目 cd demo5 之后用vs ...
随机推荐
- 前端-js基础
HTML三把利剑之一,浏览器具有解析js的能力 一.js基础 在HTML中可以将JavaScript/JS的代码写在head中,被script标签所包裹,当浏览器解释HTML时,遇到style标签时, ...
- navicate for mysql命令中输入中文报错
insert into xsxx(name,xb) values('李四','男') 错误提示: [SQL]insert into xsxx3(name,xb) values('李四','男') [E ...
- Emoji.voto,Linkerd 服务网格(service mesh)的示例应用程序
一个微服务应用程序,允许用户为他们最喜欢的表情符号(emoji)投票,并跟踪排行榜上收到的投票.愿最好的 emoji 获胜. 该应用程序由以下 3 个服务组成: emojivoto-web:Web 前 ...
- canvas实现任意正多边形的移动(点、线、面)
前言 我在上一篇文章简单实现了在canvas中移动矩形(点线面),不清楚的小伙伴请看我这篇文章:用canvas 实现矩形的移动(点.线.面)(1). ok,废话不多说,直接进入文章主题, 上一篇文章我 ...
- python基础之函数的应用
#函数应用# 1.语法"""def 函数名(参数): 函数体"""# 2. 没有参数的函数# def readbook():# print( ...
- PAT乙级:1053 住房空置率 (20分)
PAT乙级:1053 住房空置率 (20分) 题干 在不打扰居民的前提下,统计住房空置率的一种方法是根据每户用电量的连续变化规律进行判断.判断方法如下: 在观察期内,若存在超过一半的日子用电量低于某给 ...
- 前端基础EL表达式(八)
一.什么是EL表达式? 1.什么是EL表达式? EL(Expression Language) 是为了使JSP写起来更加简单.表达式语言的灵感来自于 ECMAScript 和 XPath 表达式语言, ...
- Java字节码增强技术
简单介绍下几种java字节码增强技术. ASM ASM是一个Java字节码操控框架,它能被用来动态生成类或者增强既有类的功能.ASM可以直接产生class文件,也可以在类被加载入Java虚拟机之前动态 ...
- Skywalking-02:如何写一个Skywalking trace插件
如何写一个Skywalking trace插件 javaagent 原理 美团技术团队-Java 动态调试技术原理及实践 类图 实现 ConsumeMessageConcurrentlyInstrum ...
- js 时间戳转为日期
1 function time(){ //页面时间戳转换成时间 2 $(".time").each(function(){ 3 var time = $(this).text(); ...