SpringSecurity:简单入门
SpringSecurity能做什么
SpringSecurity是一个安全框架,使用它可以让我们的系统变得安全一点,它可以对登陆系统的用户进行验证和授权
一个安全的系统需要做的事情很多,比如:防SQL注入、XSS攻击、CSRF等等,
还需要对每一个登陆系统的用户进行权限认证,即决定了每个用户能做什么、不能做什么
在权限管理之前,还得对用户进行授权,授权后根据权限区分用户
授予和权限认证就是SpringSecurity主要做的事情
很重要的一点是,在SpringBoot中使用,可以让原本对开发者来说复杂的SpringSecurity变得简单易用
当然SpringSecurity也有很明显的缺点,就是导入依赖之后,就默认实现了很多奇奇怪怪的东西,让人感觉莫名其妙
SpringSecurity怎么使用
1、首先使用maven导入依赖包
这里是直接在SpringBoot中集成的
     <dependency>

            <groupId>org.springframework.boot</groupId>

            <artifactId>spring-boot-starter-security</artifactId>

        </dependency>

        <dependency>

            <groupId>org.springframework.security</groupId>

            <artifactId>spring-security-test</artifactId>

            <scope>test</scope>

        </dependency>
2、创建一个Controller类测试一下,所以还要导入web依赖包
SecretController.java
 1 import org.springframework.web.bind.annotation.GetMapping;

 2 import org.springframework.web.bind.annotation.RestController;

 3

 4 @RestController

 5 public class SecretController {

 6     @GetMapping("/secret")

 7     public String getSecret(){

 8         return "this is secret";

 9     }

10 }
然后运行项目我们直接访问 http://localhost:8080/secret ,会发现页面重定向了,跳转到了一个登陆页面
我们甚至没有设置登陆用户名和密码
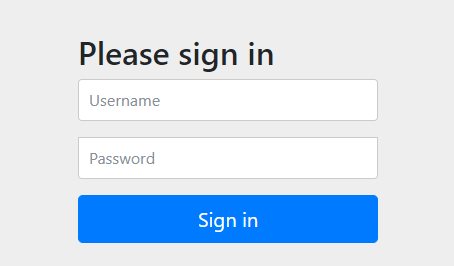
这个地方SpringSecurity默认的用户名是user,密码是动态生成的,在日志中会显示
这就是SpringSecurity强大的地方,仅仅是导入了依赖包,就默认进行了登陆验证,当然这也是弊端,因为我们根本不知道它是怎么配置的。
上面是SpringSecurity为我们默认配置的一个登陆页面,下面我们自己进行配置
2、使用SpringSecurity的配置(简单的例子)
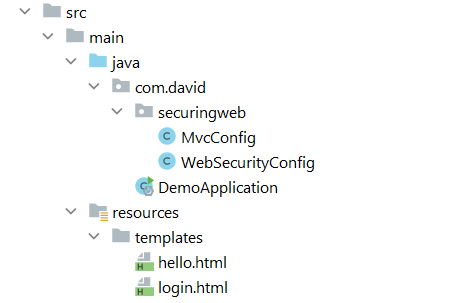
这里是整个例子的文件结构还有pom.xml,以及使用了thymeleaf,所以要导入依赖
文件结构
pom.xml
 1 <?xml version="1.0" encoding="UTF-8"?>

 2 <project xmlns="http://maven.apache.org/POM/4.0.0"

 3          xmlns:xsi="http://www.w3.org/2001/XMLSchema-instance"

 4          xsi:schemaLocation="http://maven.apache.org/POM/4.0.0 http://maven.apache.org/xsd/maven-4.0.0.xsd">

 5     <modelVersion>4.0.0</modelVersion>

 6

 7     <groupId>org.example</groupId>

 8     <artifactId>SecurityTest</artifactId>

 9     <version>1.0-SNAPSHOT</version>

10

11     <parent>

12         <groupId>org.springframework.boot</groupId>

13         <artifactId>spring-boot-starter-parent</artifactId>

14         <version>2.5.2</version>

15     </parent>

16

17     <dependencies>

18         <dependency>

19             <groupId>org.springframework.boot</groupId>

20             <artifactId>spring-boot-starter-web</artifactId>

21         </dependency>

22

23         <dependency>

24             <groupId>org.springframework.boot</groupId>

25             <artifactId>spring-boot-starter-thymeleaf</artifactId>

26         </dependency>

27

28         <dependency>

29             <groupId>org.springframework.boot</groupId>

30             <artifactId>spring-boot-starter-security</artifactId>

31         </dependency>

32     </dependencies>

33

34     <properties>

35         <maven.compiler.source>8</maven.compiler.source>

36         <maven.compiler.target>8</maven.compiler.target>

37     </properties>

38

39 </project>
首先我们要自己创建一个login页面,以及登录以后访问的页面
login.html
 1 <!DOCTYPE html>

 2 <html xmlns="http://www.w3.org/1999/xhtml" xmlns:th="https://www.thymeleaf.org"

 3       xmlns:sec="https://www.thymeleaf.org/thymeleaf-extras-springsecurity3">

 4 <head>

 5     <title>Spring Security Example </title>

 6 </head>

 7 <body>

 8 <div th:if="${param.error}">

 9     Invalid username and password.

10 </div>

11 <div th:if="${param.logout}">

12     You have been logged out.

13 </div>

14 <form th:action="@{/login}" method="post">

15     <div><label> User Name : <input type="text" name="username"/> </label></div>

16     <div><label> Password: <input type="password" name="password"/> </label></div>

17     <div><input type="submit" value="Sign In"/></div>

18 </form>

19 </body>

20 </html>
hello.html
 1 <!DOCTYPE html>

 2 <html xmlns="http://www.w3.org/1999/xhtml" xmlns:th="https://www.thymeleaf.org"

 3       xmlns:sec="https://www.thymeleaf.org/thymeleaf-extras-springsecurity3">

 4 <head>

 5     <title>Hello World!</title>

 6 </head>

 7 <body>

 8 <h1 th:inline="text">Hello [[${#httpServletRequest.remoteUser}]]!</h1>

 9

10 </body>

11 </html>
然后再MVC里面配置一下这两个页面,才可以通过url进行访问,MVC的配置需要实现WebMvcConfigurer接口
MvcConfig.java
 1 import org.springframework.context.annotation.Configuration;

 2 import org.springframework.web.servlet.config.annotation.ViewControllerRegistry;

 3 import org.springframework.web.servlet.config.annotation.WebMvcConfigurer;

 4

 5 @Configuration

 6 public class MvcConfig implements WebMvcConfigurer {

 7

 8     @Override

 9     public void addViewControllers(ViewControllerRegistry registry) {

10

11         registry.addViewController("/").setViewName("login");

12         registry.addViewController("/hello").setViewName("hello");

13         registry.addViewController("/login").setViewName("login");

14     }

15 }
然后我们需要进行SpringSecurity的配置,定义页面访问请求时,用户需要哪些权限,需要继承WebSecurityConfigurerAdapter类进行配置
现在配置中自己定义了一个用户(在实际项目中从数据库获取),而不再是由SpringSecurity默认定义
WebSecurityConfig.java
 1 import org.springframework.context.annotation.Bean;

 2 import org.springframework.context.annotation.Configuration;

 3 import org.springframework.security.config.annotation.web.builders.HttpSecurity;

 4 import org.springframework.security.config.annotation.web.configuration.EnableWebSecurity;

 5 import org.springframework.security.config.annotation.web.configuration.WebSecurityConfigurerAdapter;

 6 import org.springframework.security.core.userdetails.User;

 7 import org.springframework.security.core.userdetails.UserDetails;

 8 import org.springframework.security.core.userdetails.UserDetailsService;

 9 import org.springframework.security.crypto.bcrypt.BCryptPasswordEncoder;

10 import org.springframework.security.crypto.password.PasswordEncoder;

11 import org.springframework.security.provisioning.InMemoryUserDetailsManager;

12

13 @Configuration

14 @EnableWebSecurity

15 public class WebSecurityConfig extends WebSecurityConfigurerAdapter {

16 /*

17 @EnableWebSecurity注解让springsecurity集成springmvc

18  */

19     @Override

20     protected void configure(HttpSecurity http) throws Exception {

21 /*

22 定义了哪些路径访问是需要权限的,哪些不用

23 /和/login两个url是不需要权限就可以访问的

24 /hello需要有“USER”权限才能够访问

25  */

26         http.authorizeRequests()

27                 .antMatchers("/hello")

28                 .hasRole("USER")

29                 .and()

30                 .formLogin()

31                 .loginPage("/login")

32                 .permitAll();

33     }

34

35

36     @Bean

37     public PasswordEncoder passwordEncoder(){

38         /*

39         声明一个加密工具的Bean,供用户进行加密时调用

40          */

41         return new BCryptPasswordEncoder();

42     }

43

44     @Bean

45     @Override

46     protected UserDetailsService userDetailsService() {

47         /*

48         设置了一个预先存储在系统中的用户

49         赋予用户“USER”权限,才能够访问hello页面

50          */

51         String username = "user";

52         String password = "password";

53         UserDetails user = User.withUsername(username).password(new BCryptPasswordEncoder().encode(password)).roles("my").build();

54         return new InMemoryUserDetailsManager(user);

55     }

56 }
现在运行项目,在没有登录之前,访问/hello会被重定向到login页面,登录之后就能访问hello页面了
如果把上面代码里,用户的角色权限“USER”改成其他的,登录之后访问\hello则会抛出403错误,因为权限不够
SpringSecurity:简单入门的更多相关文章
- SpringSecurity简单入门
1.简介 Spring Security是一个能够为基于Spring的企业应用系统提供声明式的安全访问控制解决方案的安全框架.它提供了一组可以在Spring应用上下文中配置的Bean,充分利用了Spr ...
- spring security 简单入门
spring security 简单入门示例 一.概述 Spring Security是一个能够为基于Spring的企业应用系统提供声明式的安全访问控制解决方案的安全框架 . 其中最主要的安全操作有两 ...
- 用IntelliJ IDEA创建Gradle项目简单入门
Gradle和Maven一样,是Java用得最多的构建工具之一,在Maven之前,解决jar包引用的问题真是令人抓狂,有了Maven后日子就好过起来了,而现在又有了Gradle,Maven有的功能它都 ...
- [原创]MYSQL的简单入门
MYSQL简单入门: 查询库名称:show databases; information_schema mysql test 2:创建库 create database 库名 DEFAULT CHAR ...
- Okio 1.9简单入门
Okio 1.9简单入门 Okio库是由square公司开发的,补充了java.io和java.nio的不足,更加方便,快速的访问.存储和处理你的数据.而OkHttp的底层也使用该库作为支持. 该库极 ...
- emacs最简单入门,只要10分钟
macs最简单入门,只要10分钟 windwiny @2013 无聊的时候又看到鼓吹emacs的文章,以前也有几次想尝试,结果都是玩不到10分钟就退出删除了. 这次硬着头皮,打开几篇文章都看完 ...
- 【java开发系列】—— spring简单入门示例
1 JDK安装 2 Struts2简单入门示例 前言 作为入门级的记录帖,没有过多的技术含量,简单的搭建配置框架而已.这次讲到spring,这个应该是SSH中的重量级框架,它主要包含两个内容:控制反转 ...
- Docker 简单入门
Docker 简单入门 http://blog.csdn.net/samxx8/article/details/38946737
- Springmvc整合tiles框架简单入门示例(maven)
Springmvc整合tiles框架简单入门示例(maven) 本教程基于Springmvc,spring mvc和maven怎么弄就不具体说了,这边就只简单说tiles框架的整合. 先贴上源码(免积 ...
- git简单入门
git简单入门 标签(空格分隔): git git是作为程序员必备的技能.在这里就不去介绍版本控制和git产生的历史了. 首先看看常用的git命令: git init git add git comm ...
随机推荐
- 14.4、web排错三部曲
1.在客户端上ping服务器端ip : ping 服务器ip地址 :#排除线路问题: 2.在客户端上telnet服务器端Ip 端口号: telnet 服务器ip地址 端口号:#排除防火墙的影响: 3. ...
- 题解 P5327 [ZJOI2019]语言
P5327 [ZJOI2019]语言 解题思路 暴力 首先讲一下我垃圾的 40pts 的暴力(其他 dalao 都是 60pts 起步): 当然评测机快的话(比如 LOJ 的),可以卡过 3,4 个点 ...
- 在windows的情况下面右键添加vim
1, 首先打开注册表,然后打开下面路径: HKEY_CLASSES_ROOT\*\Shell 2, 右键新建项(也就是右键的文字): 用vim编辑 3, 在"用vim编辑"下面再 ...
- 记一次ios下h5页面图片显示问题
刚入职公司时做了一个移动端图片预览的组件,之前也有业务组用过,没发现什么问题,但是这次有两个很诡异的问题. 一个是老数据的图不显示,另一个是图片点击预览只显示一部分加载不全.之所以诡异是所有设备都没问 ...
- ansible 任务执行
ansible 任务执行模式 Ansible 系统由控制主机对被管节点的操作方式可分为两类,即adhoc和playbook: ad-hoc模式(点对点模式)• ad-hoc模式(点对点模式) 使用单个 ...
- MySQL 那些常见的错误设计规范
依托于互联网的发达,我们可以随时随地利用一些等车或坐地铁的碎片时间学习以及了解资讯.同时发达的互联网也方便人们能够快速分享自己的知识,与相同爱好和需求的朋友们一起共同讨论. 但是过于方便的分享也让知识 ...
- Maven | 把jar包安装到本地仓库
使用的场景 自己写的工具类想安装到本地 从Maven仓库中下载不下来的jar 使用的步骤 首先要保证自己的Maven配置全局环境变量,如果没有配置过maven全局变量,可以按照下面的步骤配置一下: 先 ...
- python 图像读取与显示
import aircv as ac import matplotlib.pyplot as plt '''imshow()函数格式为: matplotlib.pyplot.imshow(X, cma ...
- ZooKeeper 分布式锁 Curator 源码 02:可重入锁重复加锁和锁释放
ZooKeeper 分布式锁 Curator 源码 02:可重入锁重复加锁和锁释放 前言 加锁逻辑已经介绍完毕,那当一个线程重复加锁是如何处理的呢? 锁重入 在上一小节中,可以看到加锁的过程,再回头看 ...
- SLAM的数学基础(2):协方差和协方差矩阵
之前我们知道,方差是一组数据的离散程度,它的公式为: 那么如果我们有几组数据,需要知道这几组数据的协同性呢? 举个例子,还是在小红,几次考试成绩如下: 入学考试:数学:80,语文:80 期中考试:数学 ...