pyinstaller打包pyqt文件(转)
pyinstaller打包pyqt文件
打包pyqt文件
如何将pyqt生成exe的二进制文件呢,pyinstaller就是这样的工具
可以将脚本文件.py 文件转换为编辑后的二进制文件,在进行发布
下面说下,如果打包
一. 安装:
下载地址:https://github.com/pyinstaller/pyinstaller
最新版本pyinstaller2.1.1 (2015-01)
|
1
|
python setup.py install |
pyinstaller 是有依赖包的,安装之前必须要安装pywin32, 在网上找到对应版本的pywin32.msi
二. 写一个要打包的py文件

# -*- coding: utf-8 -*-
import sys
from PyQt4 import QtGui, QtCore class buttonRedrect(QtGui.QWidget): def __init__(self):
super(buttonRedrect, self).__init__()
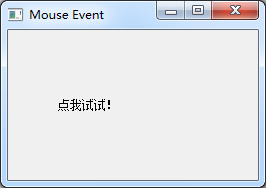
self.setWindowTitle('Mouse Event')
self.setWindowIcon(QtGui.QIcon('QQ.png')) self.labels = QtGui.QLabel(u'点我试试!', self)
self.labels.setGeometry(50, 50, 150, 50)
self.labels.mouseReleaseEvent = self.events def events(self, event):
ev=event.button()
if ev== QtCore.Qt.LeftButton:
OK = QtGui.QMessageBox.information(self, (u'提示'),(u'左键'),QtGui.QMessageBox.Yes , QtGui.QMessageBox.No)
if OK==QtGui.QMessageBox.Yes:
QtGui.QMessageBox.information(self, (u'提示'),(u'YES'),QtGui.QMessageBox.Yes)
else:
QtGui.QMessageBox.information(self, (u'提示'),(u'NO'),QtGui.QMessageBox.Yes)
elif ev == QtCore.Qt.RightButton:
OK = QtGui.QMessageBox.warning(self, (u'提示'),(u'右键'),QtGui.QMessageBox.Yes , QtGui.QMessageBox.No)
elif ev == QtCore.Qt.MiddleButton:
OK = QtGui.QMessageBox.question(self, (u'提示'),(u'滚动轴'),QtGui.QMessageBox.Yes , QtGui.QMessageBox.No) app=QtGui.QApplication(sys.argv)
buttonr=buttonRedrect()
buttonr.show()
sys.exit(app.exec_())
三. 文件打包
在要打包的同级目录下,新建一个pyinstaller.py, 内容如下
#! /usr/bin/env python

#-----------------------------------------------------------------------------

# Copyright (c) 2013, PyInstaller Development Team.

#

# Distributed under the terms of the GNU General Public License with exception

# for distributing bootloader.

#

# The full license is in the file COPYING.txt, distributed with this software.

#-----------------------------------------------------------------------------

"""

Main command-line interface to PyInstaller.

"""

# from  PyInstaller import  *

import  os

if __name__ == '__main__':

    from PyInstaller.main import run

    opts=['abc.py','-F','-w','--icon=favicon.ico']

    run(opts)
其中opts是参数,将参数修改成你要的需求
-- 参数说明:
-F, --onefile Py代码只有一个文件
-D, --onedir Py代码放在一个目录中(默认是这个)
-K, --tk 包含TCL/TK
-d, --debug 生成debug模式的exe文件
-w, --windowed, --noconsole 窗体exe文件(Windows Only)
-c, --nowindowed, --console 控制台exe文件(Windows Only)
-o DIR, --out=DIR 设置spec文件输出的目录,默认在PyInstaller同目录
--icon=<FILE.ICO> 加入图标(Windows Only)
-v FILE, --version=FILE 加入版本信息文件
--upx-dir, 压缩可执行程序
将命令行CMD切换切换到当前要打包的目录
F:\project\pyqt\TEST>
输入命令:
python pyinstaller.py
等5,6秒pyinstaller的INFO编译完成之后,目录里面就多出两个文件夹 build 和 dist, 其中 dist 里面就是二进制的打包文件
--遇到的问题:
在给打包文件添加icon的时候,报错
  File "C:\Python27\lib\site-packages\pyinstaller-2.1.1dev_-py2.7.egg\PyInstaller\build.py", line 320, in __postinit__

    self.assemble()

  File "C:\Python27\lib\site-packages\pyinstaller-2.1.1dev_-py2.7.egg\PyInstaller\build.py", line 1245, in assemble

    icon.CopyIcons(tmpnm, self.icon)

  File "C:\Python27\lib\site-packages\pyinstaller-2.1.1dev_-py2.7.egg\PyInstaller\utils\icon.py", line 170, in CopyIcons

    hsrc = win32api.LoadLibraryEx(srcpath, 0, LOAD_LIBRARY_AS_DATAFILE)

pywintypes.error: (193, 'LoadLibraryEx', '%1 \xb2\xbb\xca\xc7\xd3\xd0\xd0\xa7\xb5\xc4 Win32 \xd3\xa6\xd3\xc3\xb3\xcc\xd0\xf2\xa1\xa3')
当时我选择的icon参数是: --icon=favicon.png
后来把icon格式改为favicon.ico,才可以, 且 icon的参数不能带 " ' " or ' " '
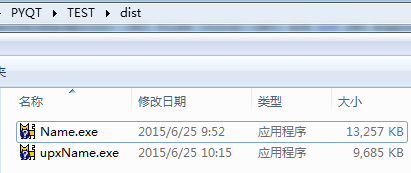
pyinstaller Using UPX
UPX的作用是给生成的exe加壳,减小体积, 我测试打包一个pyqt14Mb文件UPX压缩后只有9Mb
下载upx
地址:http://upx.sourceforge.net/ (最新upx391w.zip,2013-05月)
官网说明
http://pythonhosted.org/PyInstaller/#using-upx
Using UPXUPX is a free utility available for most operating systems. UPX compresses executable files and libraries, making them smaller, sometimes much smaller. UPX is available for most operating systems and can compress a large number of executable file formats. See the UPX home page for downloads, and for the list of supported executable formats. As of May 2013, the only major absence is 64-bit binaries for Windows and Mac OS X. UPX has no effect on these. A compressed executable program is wrapped in UPX startup code that dynamically decompresses the program when the program is launched. After it has been decompressed, the program runs normally. In the case of a PyInstaller one-file executable that has been UPX-compressed, the full execution sequence is:
PyInstaller looks for UPX on the execution path or the path specified with the --upx-dir option. If UPX exists, PyInstaller applies it to the final executable, unless the --noupx option was given. UPX has been used with PyInstaller output often, usually with no problems. |
使用
将下载的UPX包解压,将upx.exe 复制到pyinstaller的根目录 或项目目录,在pyinstaller参数中添加--upx-dir=FILE
注意:
- 网上教程常见的-X选项启用upx已经失效
- 如果upx.exe已经复制到PyInstaller文件夹下,会默认使用upx,如果不在文件夹下,可以使用--upx-dir选项,如--upx-dir=upx_dir,如--upx-dir=/usr/local/share/ or --upx-dir=./
- 如果upx.exe复制到了PyInstaller文件夹下,如果不想使用upx,需要添加参数 --noupx
upx打包报错:
upx: C:\Users\Administrator\AppData\Roaming\pyinstaller\bincache01_py27\mfcm90u.dll: CantPackException: .NET files (win32/.net) are not yet supported

34447 INFO: Executing - ./upx --lzma -q C:\Users\Administrator\AppData\Roaming\pyinstaller\bincache01_py27\qtgui4.dll

39400 INFO: Executing - ./upx --lzma -q C:\Users\Administrator\AppData\Roaming\pyinstaller\bincache01_py27\qtsvg4.dll

39618 INFO: Executing - ./upx --lzma -q C:\Users\Administrator\AppData\Roaming\pyinstaller\bincache01_py27\qtxml4.dll

39877 INFO: Executing - ./upx --lzma -q C:\Users\Administrator\AppData\Roaming\pyinstaller\bincache01_py27\qtopengl4.dll

upx: C:\Users\Administrator\AppData\Roaming\pyinstaller\bincache01_py27\qtopengl4.dll: IOException: rename error: File exists

Cannot find ('qtopengl4.dll', 'C:\Users\Administrator\AppData\Roaming\pyinstaller\bincache01_py27\qtopengl4.dll', 1, 'b')

Traceback (most recent call last):
意思就是没有找到qtopeng14.dll,
解决办法: 复制Python安装目录C:\Python27\Lib\site-packages\PyQt4 下的QtOpenGL4.dll到C:\Users\Administrator\AppData\Roaming\pyinstaller\bincache01_py27
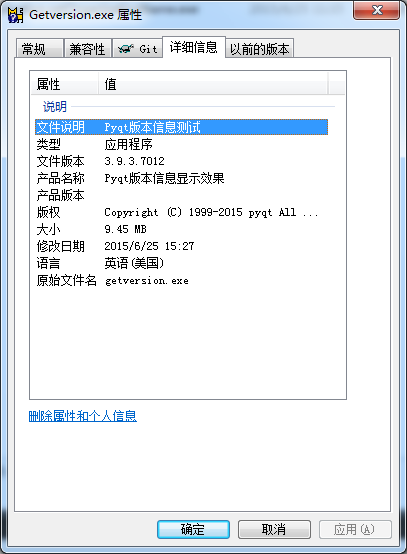
--version添加版权信息
我们发现一般打包的二进制exe文件都有版权信息,如QQ
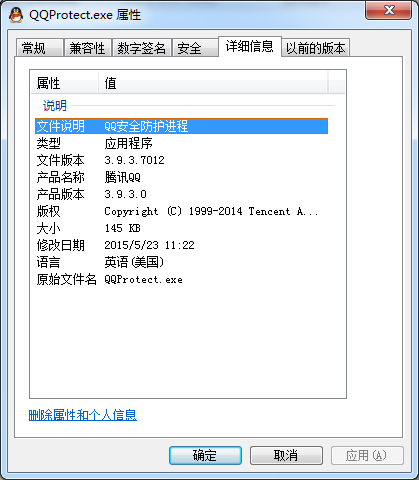
那pyinstaller如何添加版权信息呢?
添加版权信息很简单,添加参数:
-v FILE, --version=FILE 加入版本信息文件
官网说明:
地址: http://pythonhosted.org/PyInstaller/#capturing-version-data
Capturing Version Data
The pyi-grab_version command is invoked with the full path name of a Windows executable that has a Version resource. (A Version resource contains a group of data structures, some containing binary integers and some containing strings, that describe the properties of the executable. For details see the Version Information Structures page.) The command writes text that represents a Version resource in readable form. The version text is written to standard output. You can copy it from the console window or redirect it to a file. Then you can edit the version information to adapt it to your program. This approach is used because version resources are complex. Some elements are optional, others required. When you view the version tab of a Properties dialog, there's no simple relationship between the data displayed and the structure of the resource. Using pyi-grab_version you can find an executable that displays the kind of information you want, copy its resource data, and modify it to suit your package. The version text file is encoded UTF-8 and may contain non-ASCII characters. (Unicode characters are allowed in Version resource string fields.) Be sure to edit and save the text file in UTF-8 unless you are certain it contains only ASCII string values. The edited version text file can be given with a --version-file= option to pyinstaller or pyi-makespec. The text data is converted to a Version resource and installed in the executable output. In a Version resource there are two 64-bit binary values, FileVersion and ProductVersion. In the version text file these are given as four-element tuples, for example: filevers=(2, 0, 4, 0), The elements of each tuple represent 16-bit values from most-significant to least-significant. For example the FileVersion value given resolves to 0002000000040000 in hex.
The set_version utility reads a version text file as written by pyi-grab_version, converts it to a Version resource, and installs that resource in the executable_file specified. For advanced uses, examine a version text file. You find it is Python code that creates a VSVersionInfo object. The class definition for VSVersionInfo is found in utils/versioninfo.py in the PyInstallerdistribution folder. You can write a program that imports that module. In that program you can eval the contents of a version info text file to produce a VSVersionInfo object. You can use the .toRaw()method of that object to produce a Version resource in binary form. Or you can apply the unicode() function to the object to reproduce the version text file. |
使用pyinstaller内置的grab_version.py工具获得其他.exe程序的版本信息文件,版本信息文件里面包括公司名、程序名称版本号、文件说明、语言等
然后再把这个信息里面的相关信息更改成你想要的信息,再使用上面的--version-file=version_text_file
使用
grab_version.py的位置: Python安装目录\Lib\site-packages\PyInstaller-2.1.1dev_-py2.7.egg\PyInstaller\cliutils\grab_version.py
同时你也可以在Python安装目录找到C:\Python27\Scripts\pyi-grab_version.exe (前提已经安装pyinstaller) 直接使用pyi-grab_version.exe
python grab_version.py C:\QQProtect.exe
或
pyi-grab_version.exe C:\QQProtect.exe
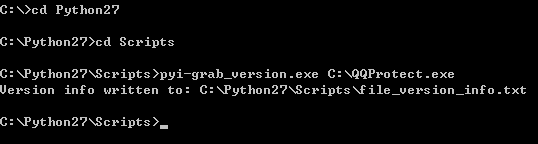
产生的file_version_info.txt内容如下:
# UTF-8

#

# For more details about fixed file info 'ffi' see:

# http://msdn.microsoft.com/en-us/library/ms646997.aspx

VSVersionInfo(

  ffi=FixedFileInfo(

    # filevers and prodvers should be always a tuple with four items: (1, 2, 3, 4)

    # Set not needed items to zero 0.

    filevers=(3, 9, 3, 7012),

    prodvers=(3, 9, 3, 0),

    # Contains a bitmask that specifies the valid bits 'flags'r

    mask=0x3f,

    # Contains a bitmask that specifies the Boolean attributes of the file.

    flags=0x0,

    # The operating system for which this file was designed.

    # 0x4 - NT and there is no need to change it.

    OS=0x4,

    # The general type of file.

    # 0x1 - the file is an application.

    fileType=0x1,

    # The function of the file.

    # 0x0 - the function is not defined for this fileType

    subtype=0x0,

    # Creation date and time stamp.

    date=(0, 0)

    ),

  kids=[

    StringFileInfo(

      [

      StringTable(

        u'040904e4',

        [StringStruct(u'CompanyName', u'Tencent'),

        StringStruct(u'FileDescription', u'QQ安全防护进程'),

        StringStruct(u'FileVersion', u'3.9.3.7012'),

        StringStruct(u'InternalName', u'QQProtect '),

        StringStruct(u'LegalCopyright', u'Copyright (C) 1999-2014 Tencent All Rights Reserved'),

        StringStruct(u'OriginalFilename', u'QQProtect.exe'),

        StringStruct(u'ProductName', u'腾讯QQ'),

        StringStruct(u'ProductVersion', u'3.9.3.0')])

      ]),

    VarFileInfo([VarStruct(u'Translation', [1033, 1252])])

  ]

)
我们修改上面txt文件内容信息保存到项目中的根目录
修改后:
# UTF-8

#

# For more details about fixed file info 'ffi' see:

# http://msdn.microsoft.com/en-us/library/ms646997.aspx

VSVersionInfo(

  ffi=FixedFileInfo(

    # filevers and prodvers should be always a tuple with four items: (1, 2, 3, 4)

    # Set not needed items to zero 0.

    filevers=(3, 9, 3, 7012),

    prodvers=(3, 9, 3, 0),

    # Contains a bitmask that specifies the valid bits 'flags'r

    mask=0x3f,

    # Contains a bitmask that specifies the Boolean attributes of the file.

    flags=0x0,

    # The operating system for which this file was designed.

    # 0x4 - NT and there is no need to change it.

    OS=0x4,

    # The general type of file.

    # 0x1 - the file is an application.

    fileType=0x1,

    # The function of the file.

    # 0x0 - the function is not defined for this fileType

    subtype=0x0,

    # Creation date and time stamp.

    date=(0, 0)

    ),

  kids=[

    StringFileInfo(

      [

      StringTable(

        u'040904e4',

        [StringStruct(u'CompanyName', u'Pyqt公司'),

        StringStruct(u'FileDescription', u'Pyqt版本信息测试'),

        StringStruct(u'FileVersion', u'1.0.0.12'),

        StringStruct(u'InternalName', u'www.pyqt.com '),

        StringStruct(u'LegalCopyright', u'Copyright (C) 1999-2015 pyqt All Rights Reserved'),

        StringStruct(u'OriginalFilename', u'getversion.exe'),

        StringStruct(u'ProductName', u'Pyqt版本信息显示效果'),

        StringStruct(u'ProductVersion', u'1.9.3.0')])

      ]),

    VarFileInfo([VarStruct(u'Translation', [1033, 1252])])

  ]

)
pyinstaller命令:
if __name__ == '__main__':

    from PyInstaller.main import run

    params=['Getversion.py', '-F', '-w', '--icon=favicon.ico', '--version-file=file_version_info.txt']

    run(params)
效果:

pyinstaller打包pyqt文件(转)的更多相关文章
- pyinstaller打包pyqt文件
打包pyqt文件 如何将pyqt生成exe的二进制文件呢,pyinstaller就是这样的工具 可以将脚本文件.py 文件转换为编辑后的二进制文件,在进行发布 下面说下,如果打包 一. 安装: 下载地 ...
- pyinstaller打包exe文件,运行时一闪而过
pyinstaller打包exe文件出现命令窗口一闪而过 原因:exe运行过程中出错了,解决这些错误就可以了 解决方法: 通过 cd path >> xxx.exe 在命令行中运行exe文 ...
- pyinstaller 打包.exe文件记录遇到的问题
用pyinstaller打包py2.7的程序有时会出现不匹配的错误,在python的idle下运行没有问题,打包之后却会报一些错误,所以打包的话还是尽量用py3.5版本,而且用 -F 将程序打包成一个 ...
- pyinstaller打包python文件成exe(原理.安装.问题)
py文件打包成exe文件的方式一共有三种:py2exe.PyInstaller和cx_Freeze 本文分四个步骤来详讲如何用PyInstaller将py文件打包成exe文件 1. PyInstall ...
- 利用PyInstaller打包exe文件
前言 平常我们通过Python写完一些小脚本之后,如果使用不频繁的话,一般会选择在DOS界面直接跑脚本,或者在IDE中运行.但当我们需要频繁使用某些脚本,或者在没有Python环境的机器上也能顺利运行 ...
- pyinstaller打包exe文件闪退的解决办法
pyinstaller是python下目前能打包py文件为windows下的exe文件的一个非常友好易用的库!但是,小爬每次用pyinstaller打包时也总是遇到一些难题,有时网上搜了一圈,也没看到 ...
- PyQt(Python+Qt)学习随笔:windows下使用pyinstaller将PyQt文件打包成exe可执行文件
专栏:Python基础教程目录 专栏:使用PyQt开发图形界面Python应用 专栏:PyQt入门学习 老猿Python博文目录 在<windows下使用pyinstaller将多个目录的Pyt ...
- pyinstaller打包py文件成exe文件时,出现ImportError: No module named 'pefile'错误解决办法!
首先pyinstaller的安装与使用详见如下链接: 安装完成之后,命令行中输入pyinstaller之后,结果如下: ImportError: No module named 'pefile' 缺少 ...
- 利用pyinstaller 打包Python文件
1.下载安装pyinstaller模块 cmd 命令: pip install pyinstaller cmd命令: pip list 查看自己安装的模块 2.建议把要大包的Python文件单独放到新 ...
随机推荐
- 2017-2018-2 20155303『网络对抗技术』Exp7:网络欺诈防范
2017-2018-2 『网络对抗技术』Exp7:网络欺诈防范 --------CONTENTS-------- 一.原理与实践说明 1.实践目标 2.实践内容概述 3.基础问题回答 二.实践过程记录 ...
- Freemarker取list集合中数据(将模板填充数据后写到客户端HTML)
1.模板写法: <html> <head> <title>freemarker测试</title> </head> <body> ...
- fnmatch模块的使用
fnmatch模块的使用 此模块的主要作用是文件名称的匹配,并且匹配的模式使用的unix shell风格.fnmatch比较简单就4个方法分别是:fnmatch,fnmatchcase,filter, ...
- Git相关二三事(git reflog 和彩色branch)【转】
转自:https://www.jianshu.com/p/3622ed542c3b 背景 git太常用了,虽然,用起来不难,但也有很多小技巧的东西... 1. 后悔药 哪天不小心,写完代码,没comm ...
- (并发编程)全局解释器锁(GIL)-----有了GIL不用给线程加锁了?
一.全局解释器锁 (GIL)运行test.py的流程:a.将python解释器的代码从硬盘读入内存b.将test.py的代码从硬盘读入内存 (一个进程内装有两份代码---一份cpython解释器代码 ...
- Java基础99 待续
1.待续 原创作者:DSHORE 作者主页:http://www.cnblogs.com/dshore123/ 原文出自:https://www.cnblogs.com/dshore123/p/107 ...
- Java编码与乱码问题
一.为什么要编码? 由于人类的语言太多,因而表示这些语言的符号太多,无法用计算机的一个基本的存储单元----byte来表示,因而必须要经过拆分或一些翻译工作,才能让计算机能理解. byte一个字节即8 ...
- 性能测试二十八:环境部署之Dubbo部署
Zookeeper部署 ZooKeeper是一个分布式的,开放源码的分布式应用程序协调服务,是Google的Chubby一个开源的实现,是Hadoop和Hbase的重要组件.它是一个为分布式应用提供一 ...
- python 全栈开发,Day104(DRF用户认证,结算中心,django-redis)
考试第二部分:MySQL数据库 6. MySQL中char和varchar的区别(1分) char是定长,varchar是变长. char的查询速度比varchar要快. 7. MySQL中va ...
- java 知识体系
java分成J2ME(移动应用开发),J2SE(桌面应用开发),J2EE(Web企业级应用),所以java并不是单机版的,只是面向对象语言.建议如果学习java体系的话可以这样去学习: *第一阶段:J ...