rest framework 认证
一、简单认证示例
需求:
- 用户名密码正确:没有 token 则产生一个 token,有 token 则更新,返回登录成功;
- 若用户名或密码错误,返回错误信息。
1、models.py
from django.db import models

class UserInfo(models.Model):

    USER_TYPE = (

        (1, '普通用户'),

        (2, 'VIP'),

        (3, 'SVIP')

    )

    user_type = models.IntegerField(choices=USER_TYPE)

    username = models.CharField(max_length=32)

    password = models.CharField(max_length=64)

class UserToken(models.Model):

    user = models.OneToOneField(UserInfo, on_delete=models.CASCADE)

    token = models.CharField(max_length=64)
2、urls.py
from django.contrib import admin

from django.urls import path

from app.views import IndexView

urlpatterns = [

    path('admin/', admin.site.urls),

    path('index/', IndexView.as_view()),

]
3、views.py
from django.shortcuts import render, HttpResponse

from django.views import View

import json

import hashlib

import time

from app import models

def md5(user):

    """加密"""

    ctime = str(time.time())

    m = hashlib.md5(bytes(user, encoding='utf-8'))

    m.update(bytes(ctime, encoding='utf-8'))

    return m.hexdigest()

class IndexView(View):

    def post(self, request, *args, **kwargs):

        ret = {'code': 1000, 'msg': None}

        try:

            user = request.POST.get('username')

            password = request.POST.get('password')

            obj = models.UserInfo.objects.filter(username=user, password=password).first()

            if not obj:

                ret['code'] = 10001

                ret['msg'] = '用户名或密码错误'

             # 为用户创建token

            token = md5(user)

            # 存在就更新,不存在就创建

            o = models.UserToken.objects.update_or_create(user=obj, defaults={'token': token})

        except Exception as e:

            ret['code'] = 1002

            ret['msg'] = '请求异常'

        return HttpResponse(json.dumps(ret))
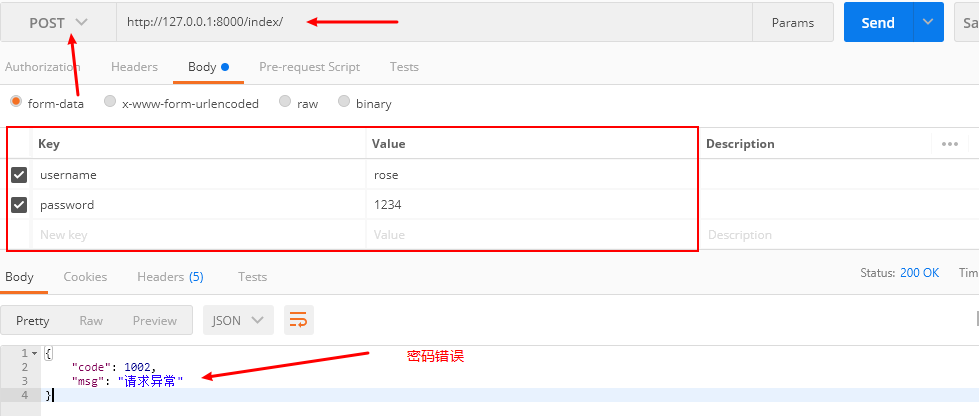
利用 postman 工具模拟发送 post 请求:

二、rest framework 认证
基于上面的例子,我们用 rest framework 给每个类都实现认证功能。
1、新建一个 auth.py 脚本文件,app/utils/auth.py:
from rest_framework import exceptions

from app import models

class MyAuthentication(object):

    """认证类"""

    def authenticate(self, request):

        token = request._request.GET.get('token')		# 获取 token

        token_obj = models.UserToken.objects.filter(token=token).first()

        if not token_obj:

            raise exceptions.AuthenticationFailed('用户认证失败')

        return (token_obj.user, token_obj)	# 返回一个元组

    def authenticate_header(self, val):

        pass
2、project/urls.py:
from django.contrib import admin

from django.urls import path

from app.views import IndexView, OrderView

urlpatterns = [

    path('admin/', admin.site.urls),

    path('index/', IndexView.as_view()),

    path('order/', OrderView.as_view()),

]
3、app/views.py:
from django.shortcuts import render, HttpResponse

from rest_framework.views import APIView

import hashlib

import time

from app import models

from django.http import JsonResponse

from .utils.auth import MyAuthentication		# 导入认证的类

def md5(user):

    """加密"""

    ctime = str(time.time())

    m = hashlib.md5(bytes(user, encoding='utf-8'))

    m.update(bytes(ctime, encoding='utf-8'))

    return m.hexdigest()

# 订单信息

ORDER_DICT = {

    1: {

        'name': 'rose',

        'age': 18,

        'gender': 'female'

    },

    2: {

        'name': 'tom',

        'age': 19,

        'gender': 'male'

    },

}

class OrderView(APIView):

    """订单管理"""

    authentication_classes = [MyAuthentication, ]  # 添加认证

    ret = {'code': 1000, 'msg': None, 'data': None, }

    def get(self, request, *args, **kwargs):

        self.ret['data'] = ORDER_DICT

        return JsonResponse(self.ret)

    def post(self, request, *args, **kwargs):

        try:

            user = request._request.POST.get('username')

            pwd = request._request.POST.get('password')

            obj = models.UserInfo.objects.filter(username=user, password=pwd).first()

            if not obj:

                self.ret['code'] = 1001

                self.ret['msg'] = '用户名或密码错误'

            token = md5(user)

            models.UserToken.objects.update_or_create(user=obj, defaults={'token': token})

            self.ret['token'] = token

        except Exception as e:

            self.ret['code'] = 1002

            self.ret['msg'] = '请求异常'

        return JsonResponse(self.ret)
在视图中我们新添加了一个订单类 OrderView,现在我们用 postman 发送 get 请求:

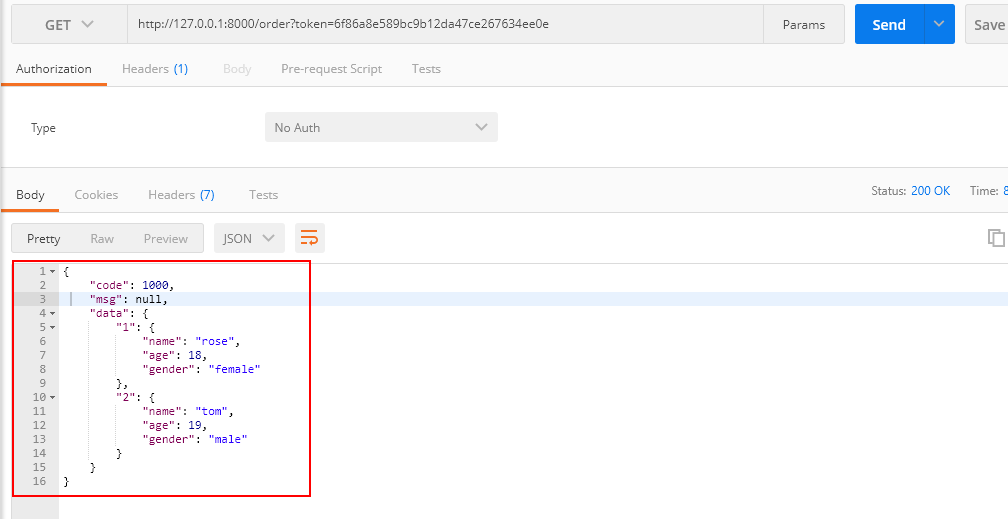
发现认证失败,这是因为我们在认证时候获取 URL 中的 token,若过来的请求没有携带 token 就会认证失败。下面再来看看携带 token 的样子:

三、分析 DRF 源码实现认证
在这里我们将通过分析 drf 的源码来分析它是怎么实现认证的,又是怎么来编辑认证类的,下面是源码大致流程:
封装原生request 对象
1、drf 使用的 CBV 模式,所有请求过来,首先执行 dispatch() 方法,restframe work 对 dispatch() 方法增加了一些其他功能 restframework/views.py:
def dispatch(self, request, *args, **kwargs):

    """

        `.dispatch()` is pretty much the same as Django's regular dispatch,

        but with extra hooks for startup, finalize, and exception handling.

        """

    self.args = args

    self.kwargs = kwargs

    # 对原生的 request 对象进行加工,丰富了

    # request= Request(request,parsers=self.get_parsers(),authenticators=self.get_authenticators(),negotiator=self.get_content_negotiator(),parser_context=parser_context)

    # 第一个参数为原生的 request 对象,

    request = self.initialize_request(request, *args, **kwargs)

    self.request = request

    self.headers = self.default_response_headers  # deprecate?

    try:

        # 认证

        self.initial(request, *args, **kwargs)

        # Get the appropriate handler method

        if request.method.lower() in self.http_method_names:

            handler = getattr(self, request.method.lower(),

                              self.http_method_not_allowed)

            else:

                handler = self.http_method_not_allowed

                response = handler(request, *args, **kwargs)

                except Exception as exc:

                    response = self.handle_exception(exc)

                    self.response = self.finalize_response(request, response, *args, **kwargs)

                    return self.response
从上面源码可以看到,在 dispatch() 方法中,主要做了两件事:
- self.initialize_request(request, *args, **kwargs):对原生 request 对象进行了封装,增加了一些其他功能
- self.initial(request, *args, **kwargs):执行认证功能
2、initialize_request()
下面我们来看看 initialize_request() 方法怎么封装原生 request 对象的:
def initialize_request(self, request, *args, **kwargs):

    """

    Returns the initial request object.

    """

    parser_context = self.get_parser_context(request)

    return Request(

        request,

        parsers=self.get_parsers(),

        authenticators=self.get_authenticators(),	# 这个函数将返回一个对象列表

        negotiator=self.get_content_negotiator(),

        parser_context=parser_context

    )
3、get_authenticators()
使用列表生成式循环 self.authentication_classes 中的对象,并执行,返回一个对象列表:
def get_authenticators(self):

    """

    Instantiates and returns the list of authenticators that this view can use.

    """

    return [auth() for auth in self.authentication_classes]
4、authentication_classes
api_settings 会从 settings 中匹配 DEFAULT_AUTHENTICATION_CLASSES 字段,所有可用通过在 settings 中设置 DEFAULT_AUTHENTICATION_CLASSES,可用实现全局认证:
class APIView(View):

    # The following policies may be set at either globally, or per-view.

    renderer_classes = api_settings.DEFAULT_RENDERER_CLASSES

    parser_classes = api_settings.DEFAULT_PARSER_CLASSES

    # 这句,从 setting 中找 DEFAULT_AUTHENTICATION_CLASSES 字段

    authentication_classes = api_settings.DEFAULT_AUTHENTICATION_CLASSES

	...
认证
下面我们来分析 dispatch() 中的另一个方法:initial(request, *args, **kwargs)(认证)
1、initial()
def initial(self, request, *args, **kwargs):

    """

    Runs anything that needs to occur prior to calling the method handler.

    """

    self.format_kwarg = self.get_format_suffix(**kwargs)

    # Perform content negotiation and store the accepted info on the request

    neg = self.perform_content_negotiation(request)

    request.accepted_renderer, request.accepted_media_type = neg

    # Determine the API version, if versioning is in use.

    version, scheme = self.determine_version(request, *args, **kwargs)

    request.version, request.versioning_scheme = version, scheme

    # Ensure that the incoming request is permitted

    # 实现认证

    self.perform_authentication(request)

    self.check_permissions(request)

    self.check_throttles(request)
2、perform_authentication():
这里面就调用了 user:
def perform_authentication(self, request):

    """

    Perform authentication on the incoming request.

    Note that if you override this and simply 'pass', then authentication

    will instead be performed lazily, the first time either

    `request.user` or `request.auth` is accessed.

    """

    request.user		# 这个 request 是原生 request 对象
3、user()
user() 是一个静态方法,因此调用它是不用加括号:
@property

def user(self):

    """

    Returns the user associated with the current request, as authenticated

    by the authentication classes provided to the request.

    """

    if not hasattr(self, '_user'):

        with wrap_attributeerrors():

            # 获取认证对象,进行一步步的认证

            self._authenticate()

    return self._user
4、_authenticate()
循环所有 authenticator 对象:
def _authenticate(self):

    """

    Attempt to authenticate the request using each authentication instance

    in turn.

    循环认证类的所有对象

    这里分三种情况

    1.如果authenticate方法抛出异常,self._not_authenticated()执行

    2.有返回值,必须是元组:(request.user,request.auth)

    3.返回None,表示当前认证不处理,等下一个认证来处理

    """

    for authenticator in self.authenticators:

        try:

            # 执行认证类的authenticate方法

            user_auth_tuple = authenticator.authenticate(self)

        except exceptions.APIException:

            self._not_authenticated()

            raise

        if user_auth_tuple is not None:

            self._authenticator = authenticator

            # 返回一个元组

            self.user, self.auth = user_auth_tuple

            return

    self._not_authenticated()
若 authenticate() 返回的是一个元组:
user_auth_tuple = return (token_obj.user, token_obj)

self.user, self.auth = (token_obj.user, token_obj)

# 那么相当于,即将用户对象封装到 request 对象中,可以通过 request 访问用户相关信息:

request.user = token_obj.user

request.auth = token_obj
若没有返回值则执行 _not_authenticated() 方法,将返回一个匿名用户,认证失败:
def _not_authenticated(self):

    """

    Set authenticator, user & authtoken representing an unauthenticated request.

    Defaults are None, AnonymousUser(匿名) & None.

    """

    self._authenticator = None

    if api_settings.UNAUTHENTICATED_USER:

        self.user = api_settings.UNAUTHENTICATED_USER()

    else:

        self.user = None

    if api_settings.UNAUTHENTICATED_TOKEN:

        self.auth = api_settings.UNAUTHENTICATED_TOKEN()

    else:

        self.auth = None
总结
通过一系列的认证,发现 rest framework 最终执行的是 authenticate() 方法来认证,如果在我们自定义认证类时,重写 authenticate() 方法,那么就默认会执行我们自己定义的 authenticate() 方法。
自定义认证类
app/utils/auth.py:
通过获取 URL 中 token 来认证:
from rest_framework import exceptions

from app import models

class MyAuthentication(object):

    def authenticate(self, request):

        token = request._request.GET.get('token')

        token_obj = models.UserToken.objects.filter(token=token).first()

        if not token_obj:

            raise exceptions.AuthenticationFailed('用户认证失败')

        return (token_obj.user, token_obj)

    def authenticate_header(self, val):

        pass
四、配置文件
1、在封装原生 request 对象的时候,我们发现 api_settings 是从 settings 中读取的配置文件:
class APIView(View):

    # The following policies may be set at either globally, or per-view.

    renderer_classes = api_settings.DEFAULT_RENDERER_CLASSES

    parser_classes = api_settings.DEFAULT_PARSER_CLASSES

    authentication_classes = api_settings.DEFAULT_AUTHENTICATION_CLASSES
2、api_settings
从 settings 中加载 REST_FRAMEWORK,从而找到 DEFAULT_AUTHENTICATION_CLASSES
api_settings = APISettings(None, DEFAULTS, IMPORT_STRINGS)

def reload_api_settings(*args, **kwargs):

    setting = kwargs['setting']

    # 从 settings 中加载 REST_FRAMEWORK

    if setting == 'REST_FRAMEWORK':

        api_settings.reload()
3、基于此我们在 settings 中配置认证类,从而使得每个视图类都有认证功能,而不需要单独添加 authentication_classes = [MyAuthentication, ]
# 设置全局认证

REST_FRAMEWORK = {

    "DEFAULT_AUTHENTICATION_CLASSES": ['app.utils.auth.MyAuthentication', ]     # 认证类的路径

}
**如果某个视图类不需要认证,可以单独设置 authentication_classes = []**
五、其它内置认证类
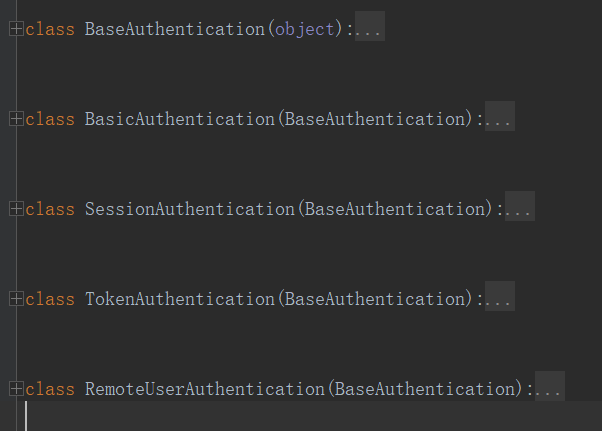
rest framework 还提供了一些其他的内置认证类 rest_framework/authentication.py:

类 BaseAuthentication:
类 BaseAuthentication 就实现了两个方法,因此我们自定义认证类时继承 BaseAuthentication 可以不写 authenticate_header() 方法,但是一定要重写 authenticate() 方法,否则会报错。
class BaseAuthentication(object):

    """

    All authentication classes should extend BaseAuthentication.(所有的认证类都应该继承 BaseAuthentication)

    """

    def authenticate(self, request):

        """

        Authenticate the request and return a two-tuple of (user, token).

        """

        # 不重写会报错

        raise NotImplementedError(".authenticate() must be overridden.")

    def authenticate_header(self, request):

        """

        Return a string to be used as the value of the `WWW-Authenticate`

        header in a `401 Unauthenticated` response, or `None` if the

        authentication scheme should return `403 Permission Denied` responses.

        """

        pass
匿名用户
如果允许匿名用户(即没有登录的用户)访问,可以修改自定义认证类为 app/utils/auth.py:
from rest_framework import exceptions

from app import models

from rest_framework.authentication import BaseAuthentication

class FirstAuthentication(BaseAuthentication):

    """不返回值,则会执行 _not_authenticated() 方法,返回一个匿名用户"""

    def authenticate(self, request):

        pass

    def authenticate_header(self, request):

        pass

class MyAuthentication(BaseAuthentication):

    def authenticate(self, request):

        token = request._request.GET.get('token')

        token_obj = models.UserToken.objects.filter(token=token).first()

        if not token_obj:

            raise exceptions.AuthenticationFailed('用户认证失败')

        return (token_obj.user, token_obj)

    def authenticate_header(self, val):

        pass
2、settings.py
# 设置全局认证

REST_FRAMEWORK = {

    "DEFAULT_AUTHENTICATION_CLASSES": ['app.utils.auth.FirstAuthentication', 'app.utils.auth.MyAuthentication', ],

}
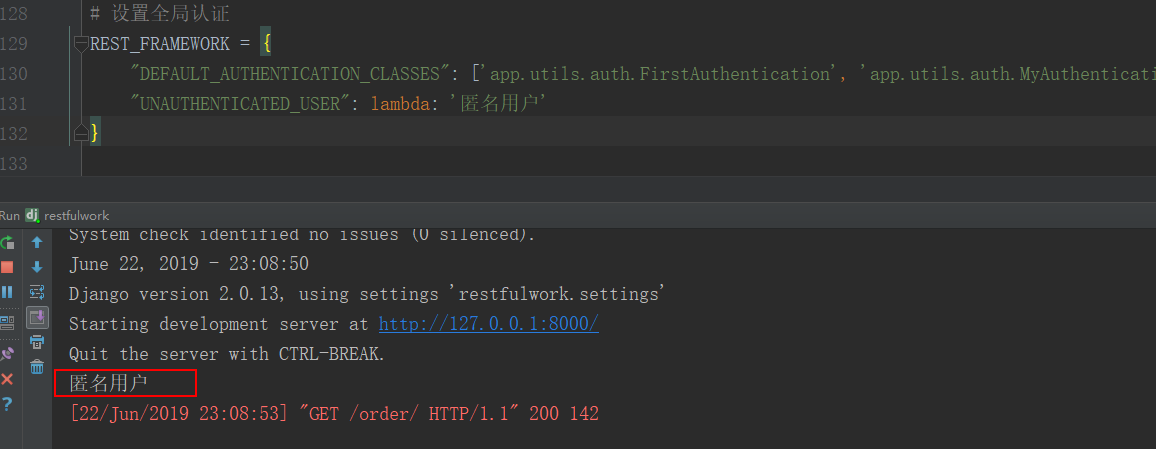
访问:http 时首先会以 `` 认证,将返回一个匿名用户 AnonymousUser,当然你也可以设置为中文:
# 设置全局认证

REST_FRAMEWORK = {

    "DEFAULT_AUTHENTICATION_CLASSES": ['app.utils.auth.FirstAuthentication', 'app.utils.auth.MyAuthentication', ],

    "UNAUTHENTICATED_USER": lambda: '匿名用户'

}
你也可设置为 None,Token 也可以设置:
"UNAUTHENTICATED_TOKEN": None

总结
自定义认证类需要实现以下几步:
- 自定义一个类,继承
BaseAuthentication,类中必须实现authenticate()方法 - 若全局需要认证,配置
settings即可 - 若局部某个类视图不需要认证,可以在其中添加
authentication_classes = [] - 若匿名用户也允许访问,可以定义一个类,不返回值
rest framework 认证的更多相关文章
- Django Rest Framework(认证、权限、限制访问频率)
阅读原文Django Rest Framework(认证.权限.限制访问频率) django_rest_framework doc django_redis cache doc
- 04 Django REST Framework 认证、权限和限制
目前,我们的API对谁可以编辑或删除代码段没有任何限制.我们希望有更高级的行为,以确保: 代码片段始终与创建者相关联. 只有通过身份验证的用户可以创建片段. 只有代码片段的创建者可以更新或删除它. 未 ...
- rest framework 认证 权限 频率
认证组件 发生位置 APIview 类种的 dispatch 方法执行到 initial 方法 进行 认证组件认证 源码位置 rest_framework.authentication 源码内部需要 ...
- rest framework认证组件和django自带csrf组件区别详解
使用 Django 中的 csrf 处理 Django中有一个django.middleware.csrf.CsrfViewMiddleware中间件提供了全局的csrf检查.它的原理是在<fo ...
- Django REST Framework 认证 - 权限 - 限制
一. 认证 (你是谁?) REST framework 提供了一些开箱即用的身份验证方案,并且还允许你实现自定义方案. 自定义Token认证 第一步 : 建表>>>> 定义一个 ...
- Django REST framework认证权限和限制和频率
认证.权限和限制 身份验证是将传入请求与一组标识凭据(例如请求来自的用户或其签名的令牌)相关联的机制.然后 权限 和 限制 组件决定是否拒绝这个请求. 简单来说就是: 认证确定了你是谁 权限确定你能不 ...
- restful framework 认证源码流程
一.请求到来之后,都要先执行dispatch方法,dispatch方法方法根据请求方式的不同触发get/post/put/delete等方法 注意,APIView中的dispatch方法有很多的功能 ...
- Django后端项目----restful framework 认证源码流程
一.请求到来之后,都要先执行dispatch方法,dispatch方法方法根据请求方式的不同触发get/post/put/delete等方法 注意,APIView中的dispatch方法有很多的功能 ...
- Rest Framework 认证源码流程
一.请求到来之后,都要先执行dispatch方法,dispatch方法方法根据请求方式的不同触发get/post/put/delete等方法 注意,APIView中的dispatch方法有很多的功能 ...
随机推荐
- Notepad工具使用小技巧
工欲善其事必先利其器 Notepad++是个很不错的文本编辑工具,掌握它的使用技巧可以提高我们工作的效率.见如下: 比较常用的罗列如下:(如果有更好的建议可以留言哈) 1: 添加书签 CTRL+F2 ...
- 我的Java开发学习之旅------>解惑Java进行三目运算时的自动类型转换
今天看到两个面试题,居然都做错了.通过这两个面试题,也加深对三目运算是的自动类型转换的理解. 题目1.以下代码输出结果是(). public class Test { public static vo ...
- Java AQS详解(转)
原文地址 一.概述 谈到并发,不得不谈ReentrantLock:而谈到ReentrantLock,不得不谈AbstractQueuedSynchronizer(AQS)! 类如其名,抽象的队列式的同 ...
- Java for LeetCode 086
Given a linked list and a value x, partition it such that all nodes less than x come before nodes gr ...
- Java for LeetCode 091 Decode Ways
A message containing letters from A-Z is being encoded to numbers using the following mapping: 'A' - ...
- C ~ 指针零散记录
2016.10.11 一个记录 void MB_float_u16(float f,uint16_t *a,uint16_t *b) { uint8_t *fp; ① uint8_t *ap; ② a ...
- ubuntu 14.04 用 shell 方便安装nginx
nginx.sh apt-get install -y build-essential gcc g++ make m4 libpcre3 libpcre3-dev libcurl4-gnutls-de ...
- 提高iOS开发效率的第三方框架等--不断更新中。。。
1. Mantle Mantle 让我们能简化 Cocoa 和 Cocoa Touch 应用的 model 层.简单点说,程序中经常要进行网络请求,请求到得一般是 json 字符串,我们一般会建一个 ...
- Spring Boot2.0之热部署原理
所谓的热部署:比如项目的热部署,就是在应用程序在不停止的情况下,实现新的部署 原理: 实用类加载器(classloader重新读取字节码文件到jvm内存) 如何纯手写一个热部署功能: 1.监听 cla ...
- JavaScript--Object类
Object类是所有JavaScript类的基类,提供了一种创建自定义对象的简单方式,不需要程序员再定义构造函数. 主要属性: constructor-对象的构造函数 prototype-获得类的pr ...
